
|
 December 8th, 2012, 10:16 PM
|
#1 |
|
ninjette.org guru
Name: Laurence
Location: Bangbuathong Thailand
Join Date: Jan 2012 Motorcycle(s): Green 2012 Ninja 250SE and a Yamaha fino scooter (my wife's really) Posts: 355
|
Bikers Rear sets DIY
I finally got around to buying a set of bikers rear sets for my bike.
I chose the bikers brand as I know the quality is very good and they are cheap. I eventually decided on the Gray. What do you get for your money ? When you open the box you find your left and right rear sets loosely assembled well wrapped in bubble wrap. Lift those out and the card divider and you will find tapped to the bottom of the box in bubble wrapped bags your foot pegs , racing steps ,Long shift rod and a bag containing six alan head bolts along with a parts diagram...no fitting instructions. 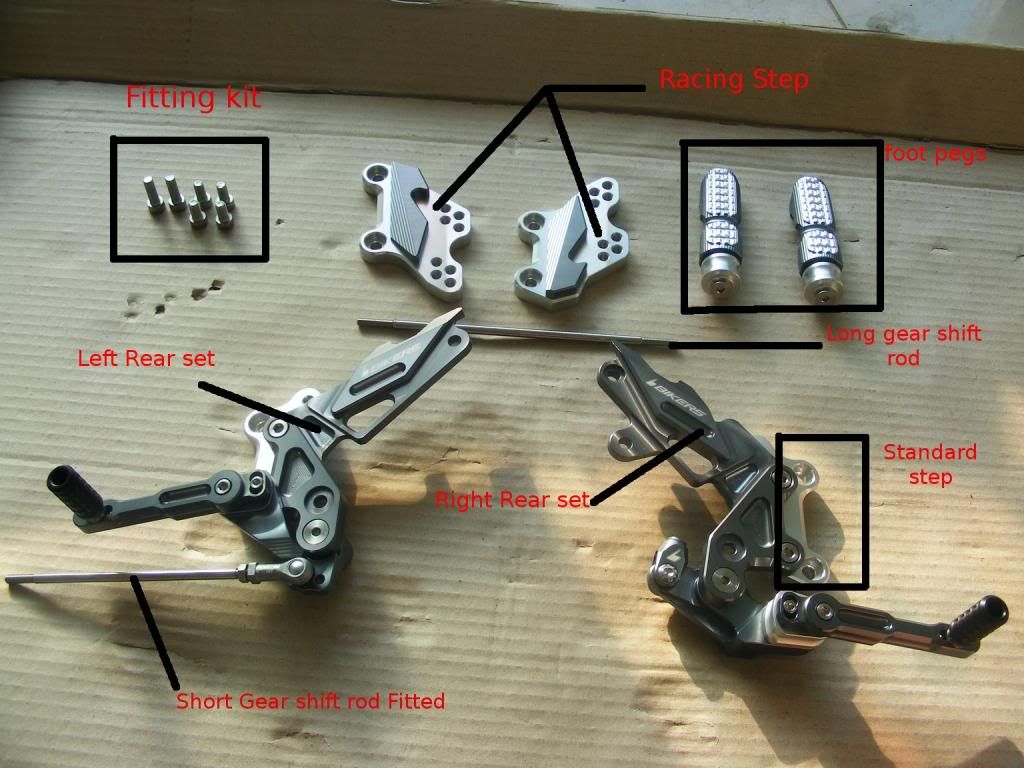 Tools need 2 x 10 mm spanners 1 x 13 mm spanner 1 x 6mm hex key 1 x 4 mm hex key pliers flat screwdriver blue lock-tight Lets get started your first job is to decide what position you want with the 2 steps supplied you have 8 different positions from stock to aggressive racing style. My aim was to lower my knee from the tank to allow a better grip on the bike and less painful on long rides,I tried the first 4 positions using the standard step but my legs are so long  . So I ended up using the racing step on the first position. . So I ended up using the racing step on the first position.Once you have a rough Idea what you want you can now start. I chose to do the left side first but it is up to you. Step one loosen the lock nuts on the shift linkage with a 10 mm spanner  Note the front is left hand thread Step two remove the 2 Hex bolts holding on the stock rear set. They have red lock tight on so they are tight. 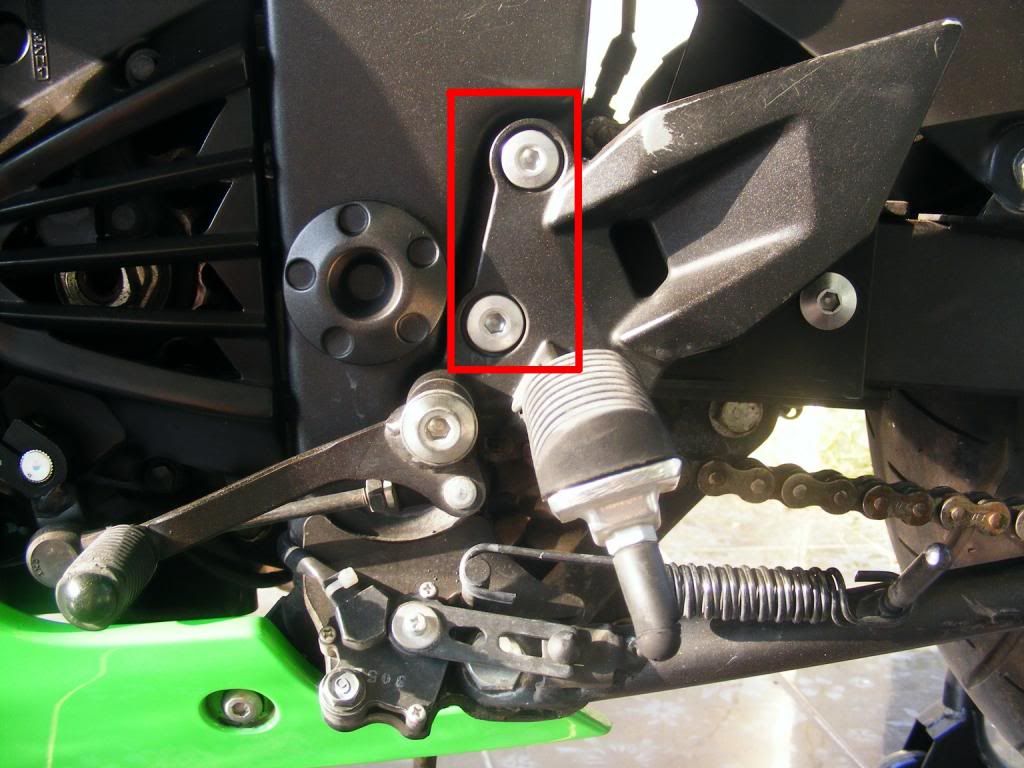 Step three I recommend you bolt your chosen step onto to the frame with 2 of the M8x15 hex bolts. (I found it was easier to bolt the step on first then add the rear set ) sorry no pic . Step four Bolt the foot peg on to the rear set in the position indicated with M8x35 countersunk hex bolt but leave a little loose 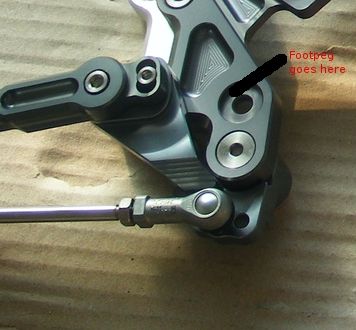 Step fiveChose the correct length shift rod and screw on the lock nuts. I used the shorter of the two ,Screw into the gear linkage and the rear set. Bolt on the rear set to the required position with 2 M8 x 25 hex bolts but do nut add the nyloc nuts and washers at this stage. Step six Now adjust the shifter hight and peg angle screw the shifter rod in or out to give the correct shifter hight be careful to leave enough thread in the fittings. 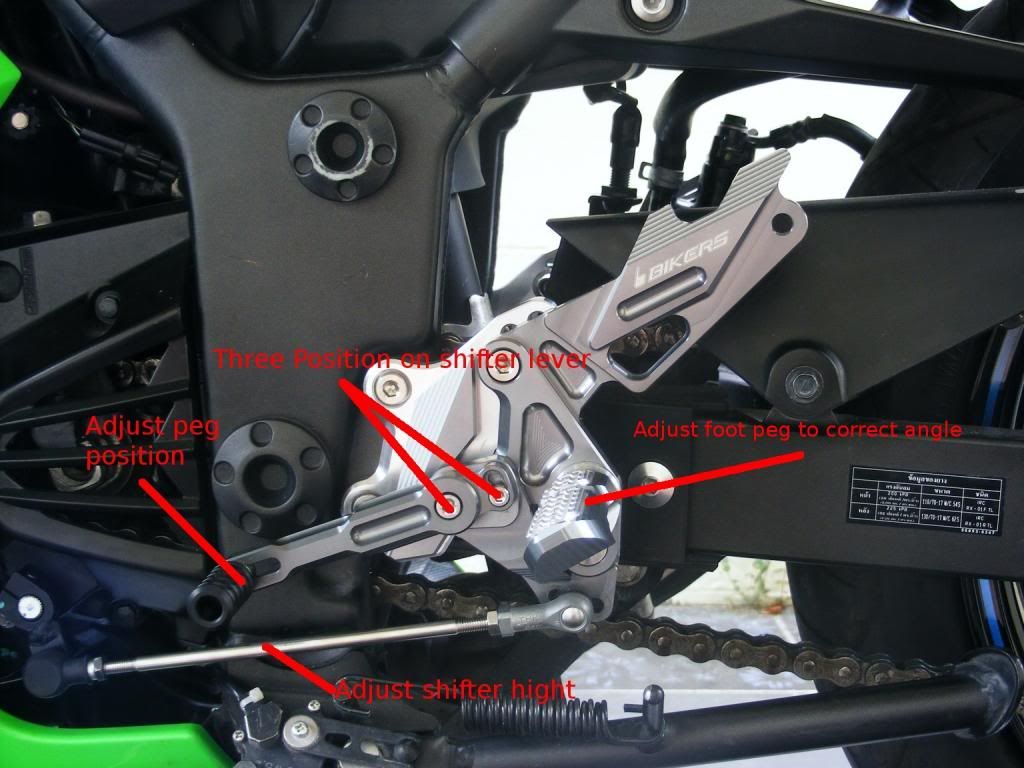 If needed you can remove the linkage ball on the shifter to a different position use 2 10 mm spanners and remove the lock nut then relocate to one of the other 2 positions. 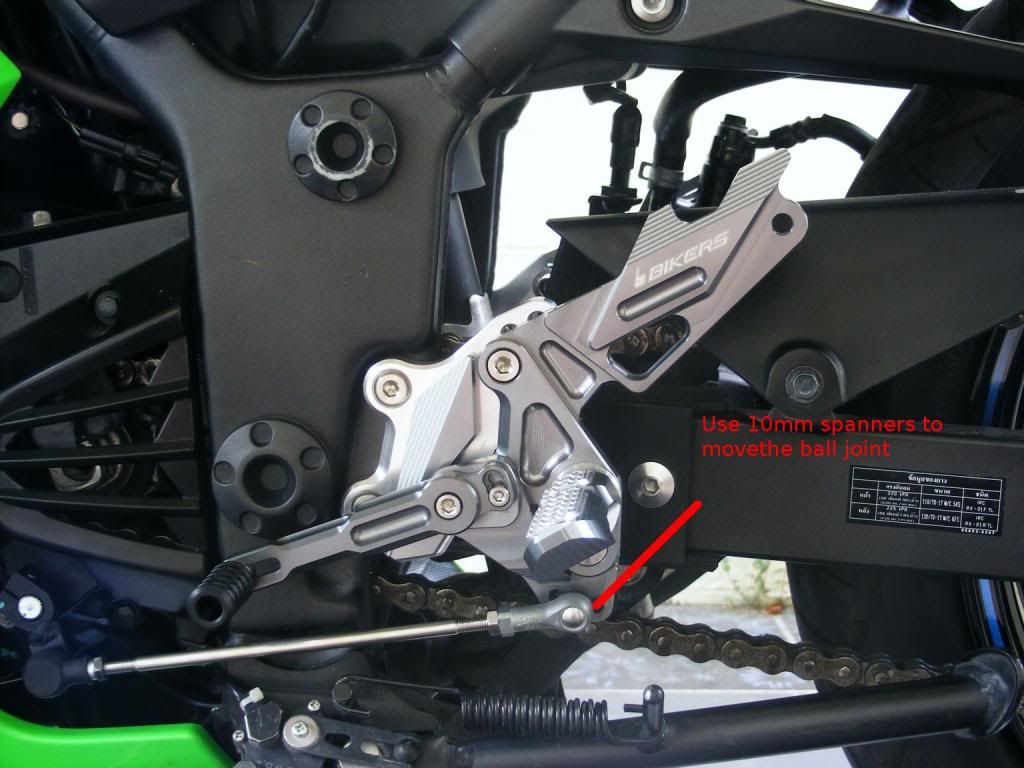 Its a good idea to wear your normal riding boots when adjusting the shifter and footpeg positions as riding boots tend to be thicker than reg shoes. take your time it is fiddly. lock the lock nuts on the shifter rod 10mm spanner . Now for the Right side Although this looks more complicated it was much easier than the left side. Step one Slacken the bolts to the master cylinder . Step two Undo the lock bolts for the brake linkage. Step threeRemove the rear set with 6 mm hex key Step four remove the master cylinder and unwind the linkage, unhook the brake light return spring and pull the switch free. 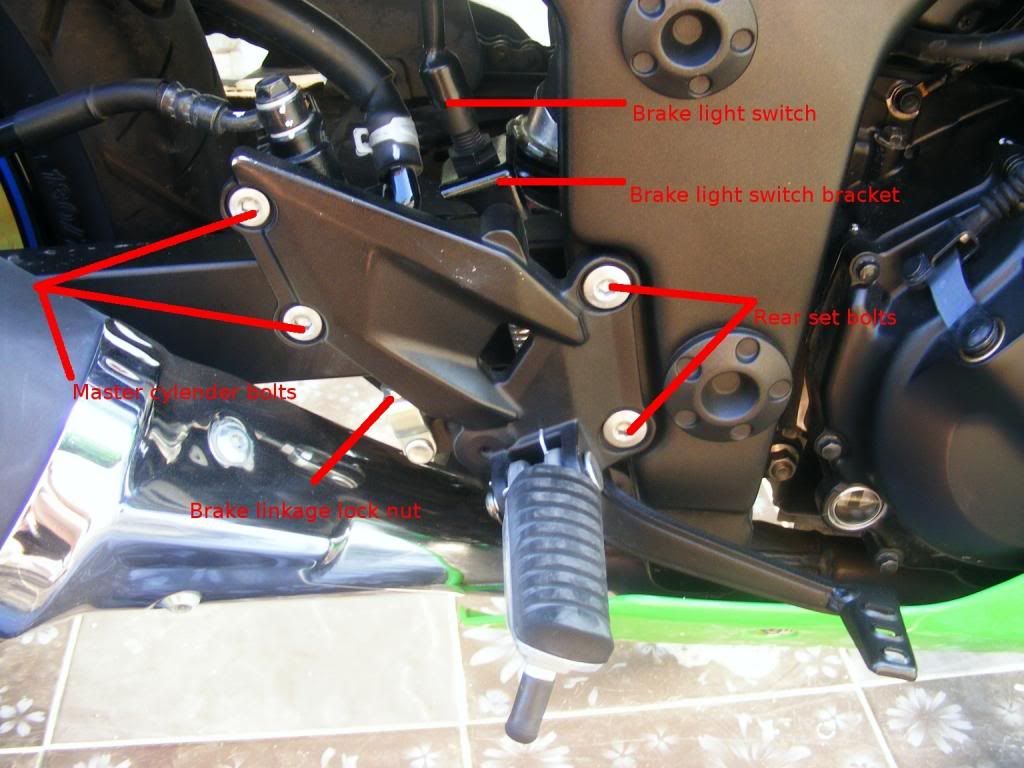 Step fiveRemove the brake light switch bracket from the oem rear set 10mm spanner and refit to the bikers rear set by removing the hex bolt located above the spring retaining peg. remove the brake return spring and fit it to the new rear set use a flat blade screw driver to pull it over the retaining peg. Step six Bolt your chosen step onto to the frame with 2 of the M8x15 hex bolts. step seven Bolt on the rear set to the required position with 2 M8 x 25 hex bolts but do nut add the nyloc nuts and washers at this stage. Step eightBolt on the master cylinder and connect to the brake linkage.I found that removing the E clip on the supplied clevis and screwing it on to the master cylinder the best way.then replace the pin and e clip. 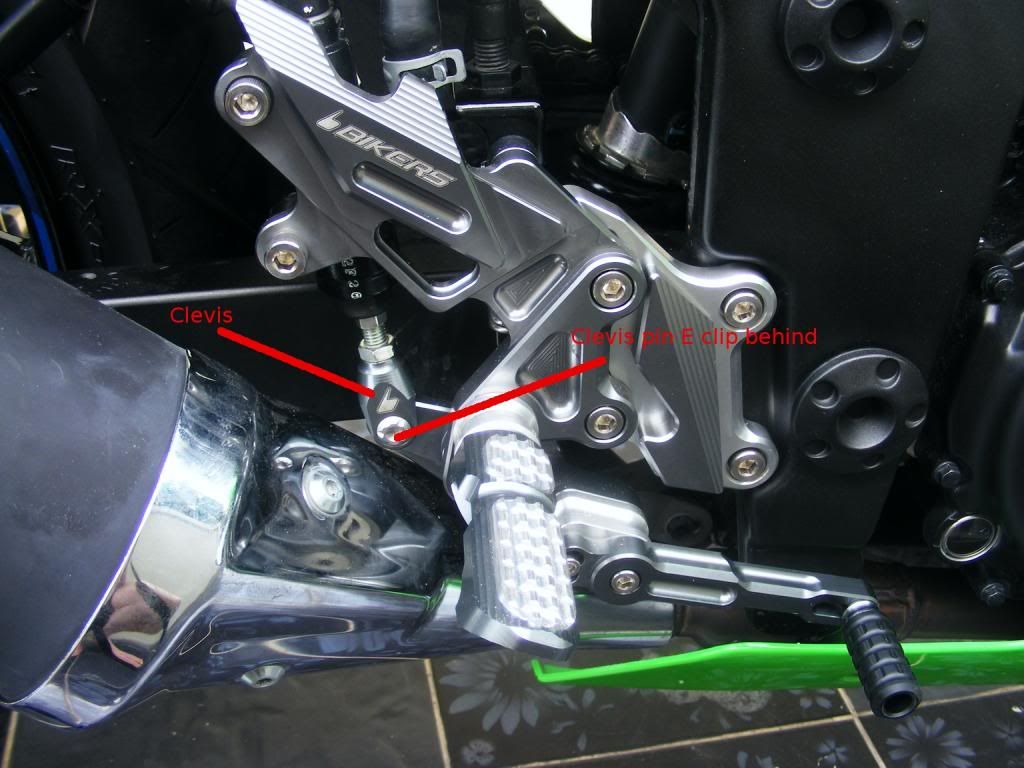 Step nineAdjust the brake lever hight and peg angle screw master cylinder rod in or out to give the correct brake lever hight then lock the nut 13mm. Step tenreplace the brake light switch and connect spring adjust as necessary. you are about done now take it for a short ride and readjust as you feel necessary. when you are happy fit the nyloc nuts and washers to the rear of the rear set to step bolts and tighten with a 13 mm spanner. check all other fittings for tightness and check you have used lock tight. The end result 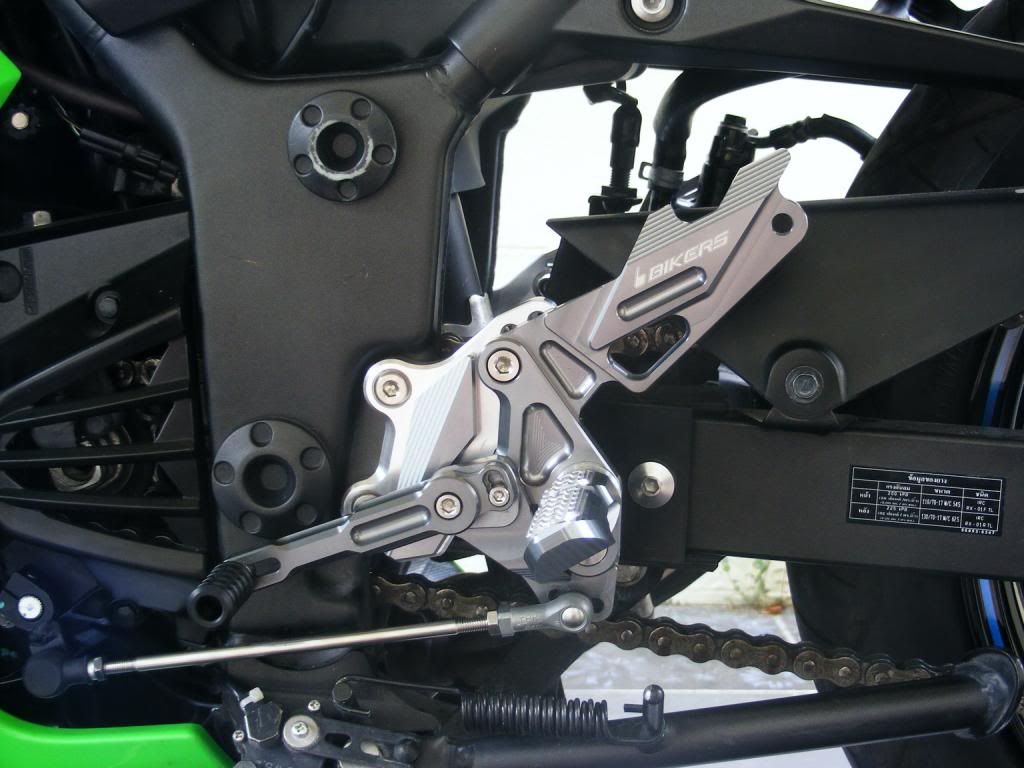 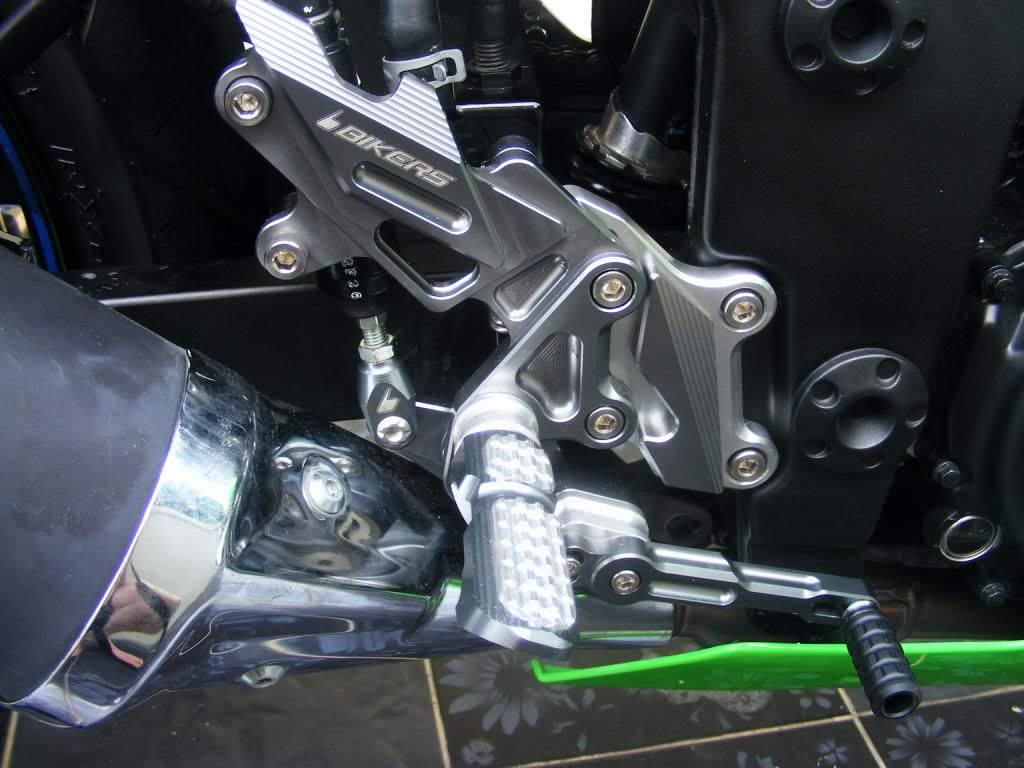
__________________________________________________
Be safe ride smart .....a dumb rider is a dead rider |

|

1 out of 1 members found this post helpful. |
|
December 8th, 2012, 10:22 PM
|
#2 |
|
The Corner Whisperer
Name: Chris (aka Reactor)
Location: Northern KY
Join Date: May 2011 Motorcycle(s): 2010 250 (track), 1992 250, 2006 R6 (street/track), 2008 R6 (track) Posts: Too much.
MOTY 2015, MOTM - Nov '12, Nov '13
|
Awesome writeup!
__________________________________________________
Goal: Shake A Million Hands | Look through the corners | Track Day Prep | Closest track? | The Mid-Ohio School |
|
|
|
|
December 8th, 2012, 10:31 PM
|
#3 |
|
ninjette.org guru
Name: Laurence
Location: Bangbuathong Thailand
Join Date: Jan 2012 Motorcycle(s): Green 2012 Ninja 250SE and a Yamaha fino scooter (my wife's really) Posts: 355
|
Thanks my first DIY hope people will find it useful
__________________________________________________
Be safe ride smart .....a dumb rider is a dead rider |
|
|
|
|
December 9th, 2012, 12:22 AM
|
#4 |
|
ninjette.org dude
Name: 1 guess :-)
Location: SF Bay Area
Join Date: Jun 2008 Motorcycle(s): '13 Ninja 300 (white, the fastest color!), '13 R1200RT, '14 CRF250L, '12 TT-R125LE Posts: Too much.
Blog Entries: 7
|
/linked from main diy thread
__________________________________________________
Montgomery Street Motorcycle Club / cal24.com / crf250l.org / ninjette.org ninjette.org Terms of Service Shopping for motorcycle parts or equipment? Come here first. The friendliest Ninja 250R/300/400 forum on the internet! (especially Unregistered) |
|
|
|
|
December 9th, 2012, 07:45 PM
|
#5 |
|
ninjette.org guru
Name: Eduardo
Location: Hollywood, Calirfnia
Join Date: Mar 2012 Motorcycle(s): 2010 Kawasaki Ninja 250r special edition Posts: 286
|
Super clean

|
|
|
|
 |
 Similar Threads
|
||||
| Thread | Thread Starter | Forum | Replies | Last Post |
| DIY - GSX-R Rear Shock | ForceofWill | 2008 - 2012 Ninja 250R Tech Talk | 79 | December 10th, 2022 05:17 PM |
| DIY - Adjusting the rear shock preload | noche_caliente | 2008 - 2012 Ninja 250R Tech Talk | 139 | April 6th, 2014 10:20 PM |
| DIY Bikers Rearsets Installation Video | Outlander Systems | 2008 - 2012 Ninja 250R Tech Talk | 17 | October 17th, 2011 10:24 PM |
| DIY: Rear Rotor Replacement | spooph | 2008 - 2012 Ninja 250R Tech Talk | 6 | February 28th, 2011 12:57 PM |
| Saturday project DIY rear stand. | Kitdog | 2008 - 2012 Ninja 250R Farkles | 15 | June 2nd, 2010 01:49 PM |
|
|


