
|
 January 6th, 2013, 05:21 PM
|
#1 |
|
Fast-Guy wannabe
Name: Jason
Location: Brentwood, Ca
Join Date: Oct 2011 Motorcycle(s): 2009 Ninja250, 2011 RM-Z250, 2004 NSR50, Posts: A lot.
MOTM - Jan '13
|
DIY Tire Mounting Stand by RojoRacing
Here's a DIY on making a tire mounting stand from various items that are rather easy and cheap to acquire. You don't have to use a VP race fuel can like it did, any circular can with an opening over 330mm should be able to accommodate all manner full sized street bike and dirt bike wheels.
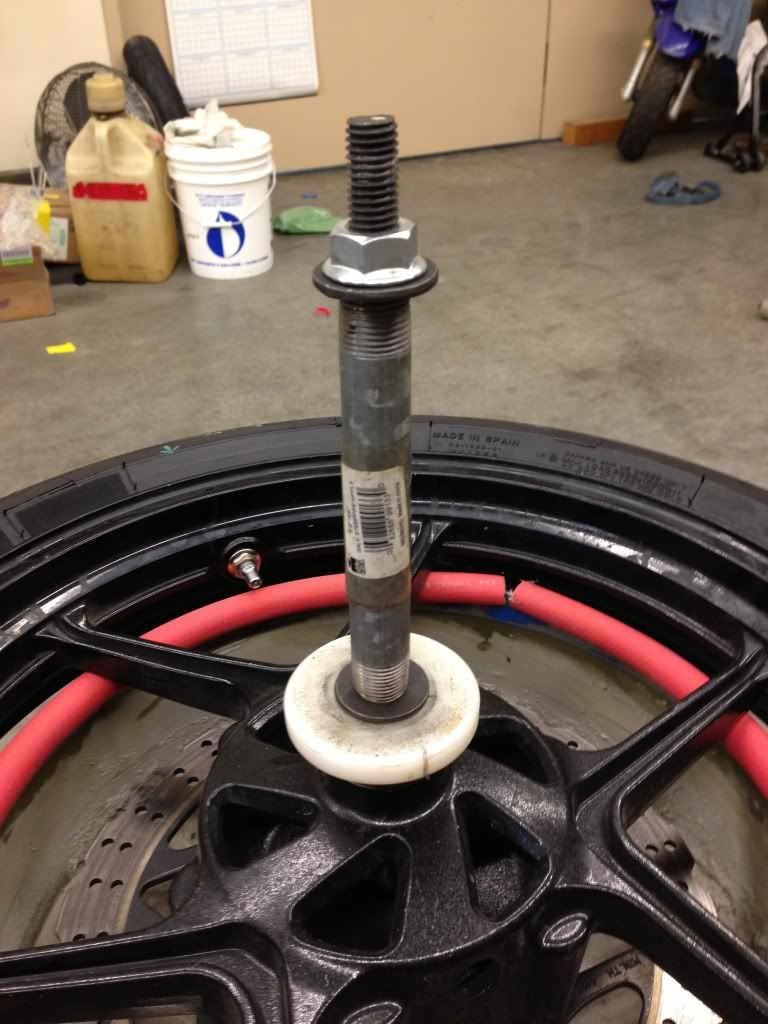
From Left to Right we have most of the parts you'll need 20-24oz bottle with 1.0-1.25" mouth,Tire lube applicator brush, 3/8" Rubber Air hose, 15gal VP Racing Fuel can, 2-3 cans of spay foam insulation, 1-2pcs of scrap steel bars, 3' of 1/2" or 9/16' threaded steel rod, three Female threaded wedge concrete anchores, 80 lbs of concrete, three 2",2",2" 90 angle brakets with two 1/2" holes, Three flanged nuts(same thread pitch as you threaded rod), four 2" long 3/8-16 fully threaded bolts, eight 3/8" washers, four 3/8-16 nuts. 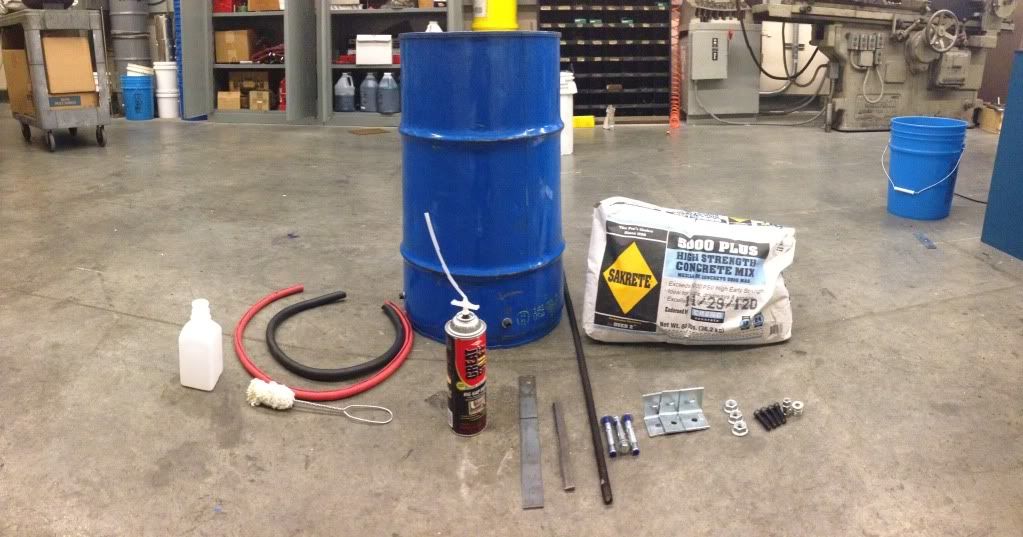 four 2" long 3/8-16 fully threaded bolts, eight 3/8" washers, four 3/8-16 nuts. 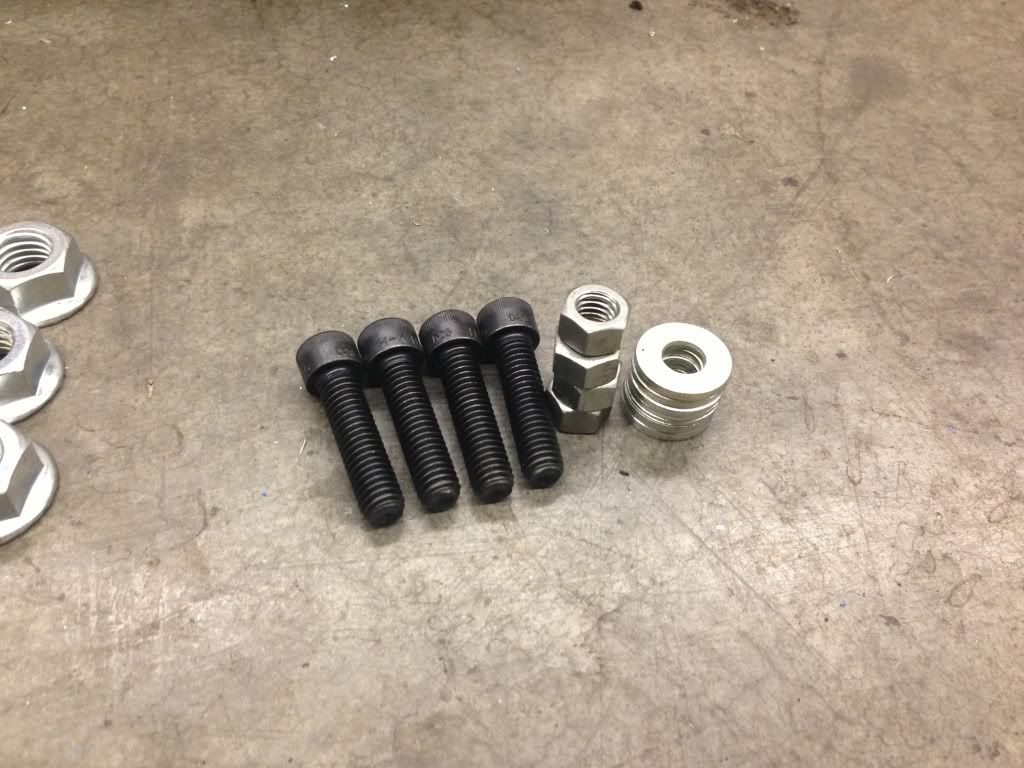 three Female threaded wedge concrete anchores, three 2",2",2" 90 angle brakets with two 1/2" holes  3' of 1/2" or 9/16' threaded steel rod,Three flanged nuts(same thread pitch as you threaded rod)  80 lbs of concrete, 2-3 cans of spay foam insulation  20-24oz bottle with 1.0-1.25" mouth,Tire lube applicator brush, 3/8" Rubber Air hose, 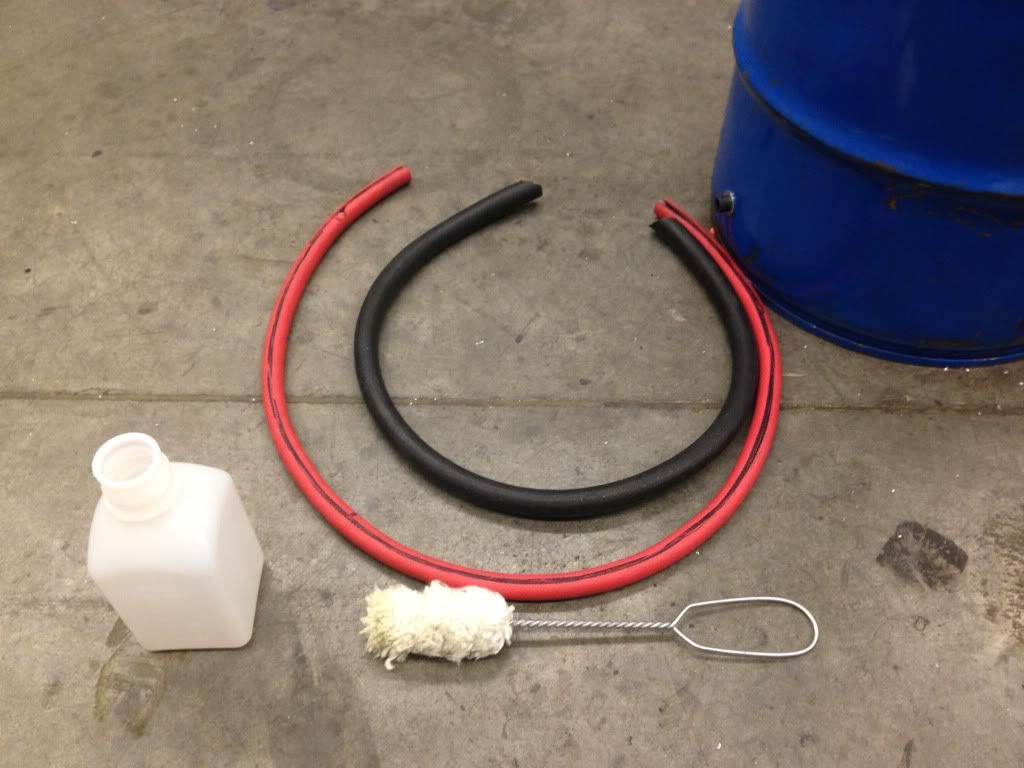 If your using a fuel can then your going to want to remove any fuel & fuel fumes before doing any cutting or welding(unless you have @Jiggles near by to capture the explosion at 240fpm) first fill the can completely with water then drain it. Then pour it about 20oz of simple green and fill it again, leave it for at least 30mins to dissolve any remaining combustibles. Dump and rinse it out and now your ready to cut. You need to remove the lid so grab your handy electric Sawsall and starting at the larger hole start cutting folowing the outer edge as a giude the best you can. 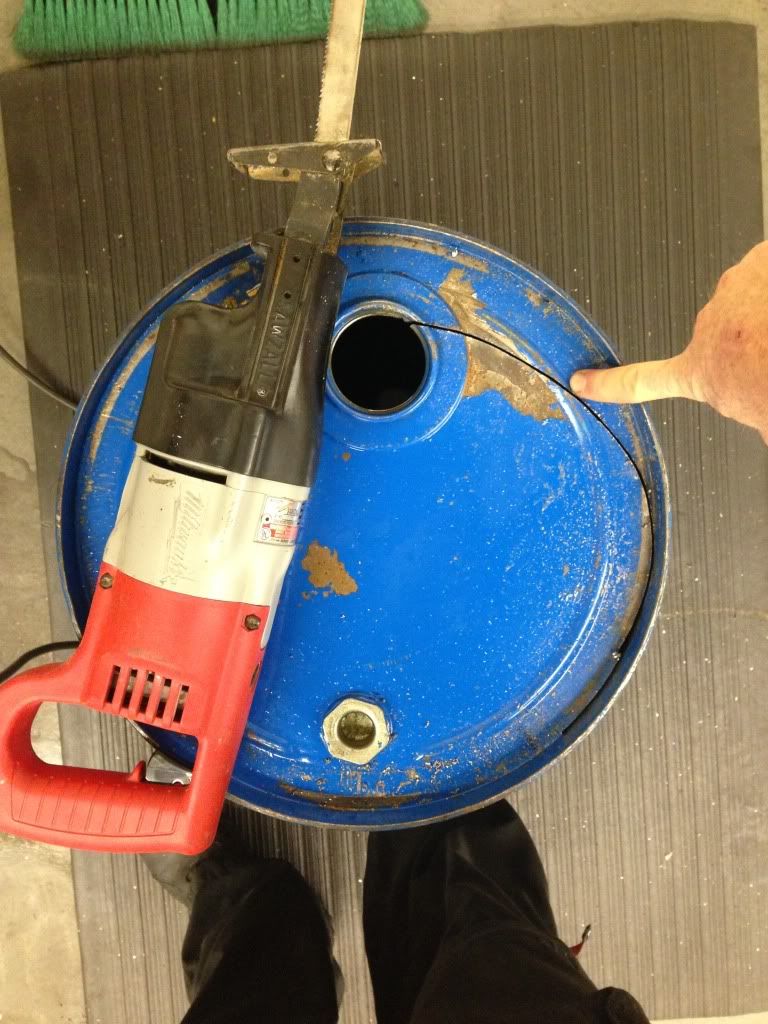 When you've removed the lid use a file or sand paper to file down the best you can the remaining sharp edges of the can. 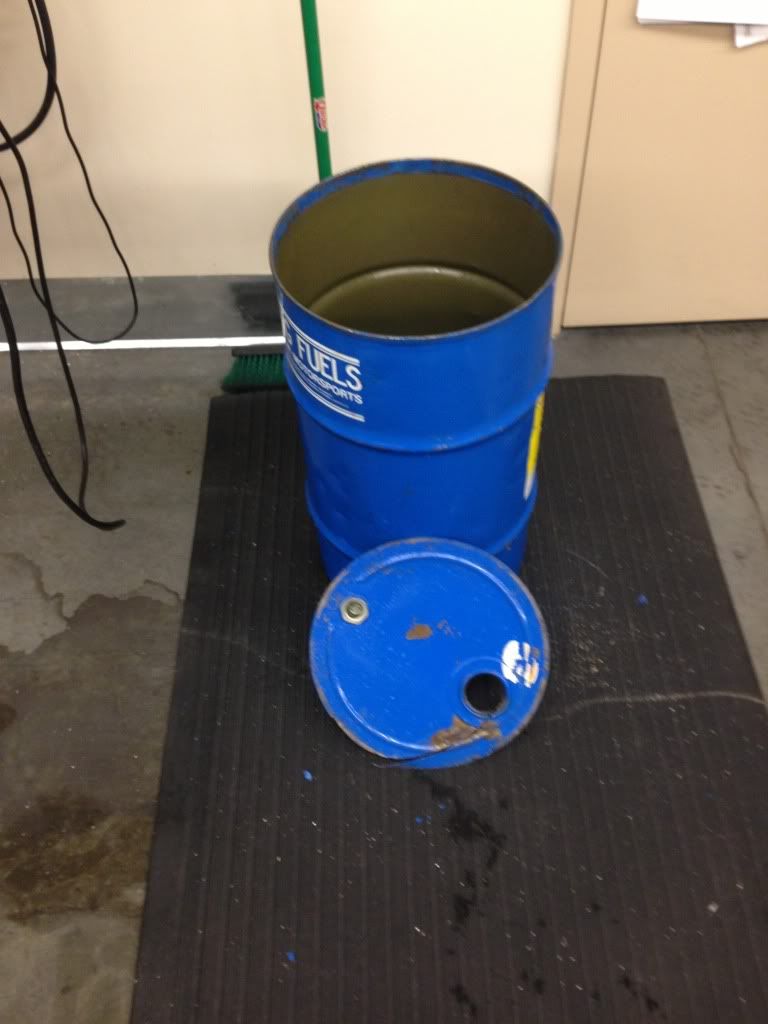 Find the center of the can and drill a 1/2 hole in the bottom so you can thread your rod in. 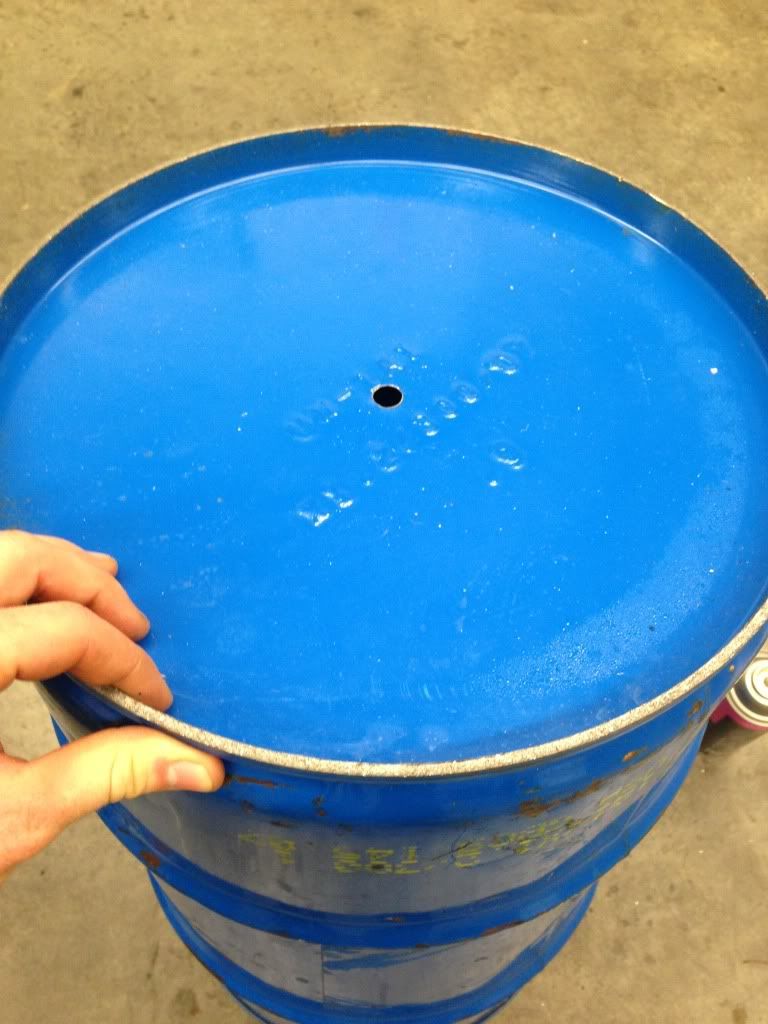 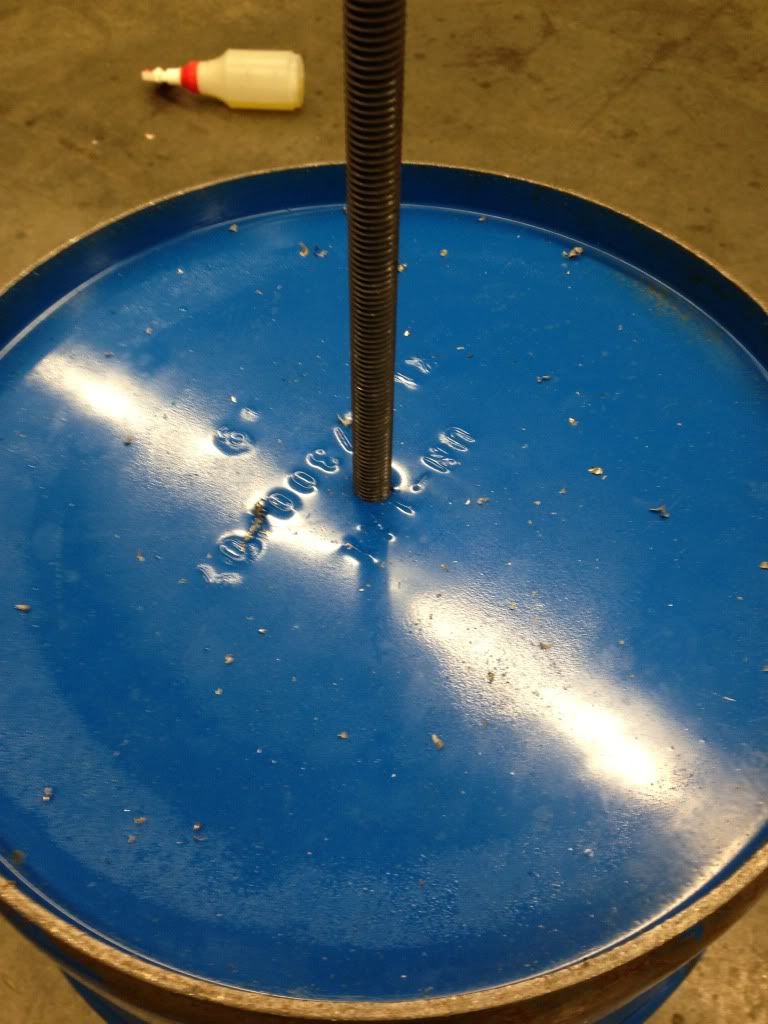 Drill four 3/8" holes about 2-1/2 above the bottom of the can at it's 3,6,9, and 12 o clock positions. With a washer on each side of the can thread you 3/8" bolts through and tighten with the matching nuts. 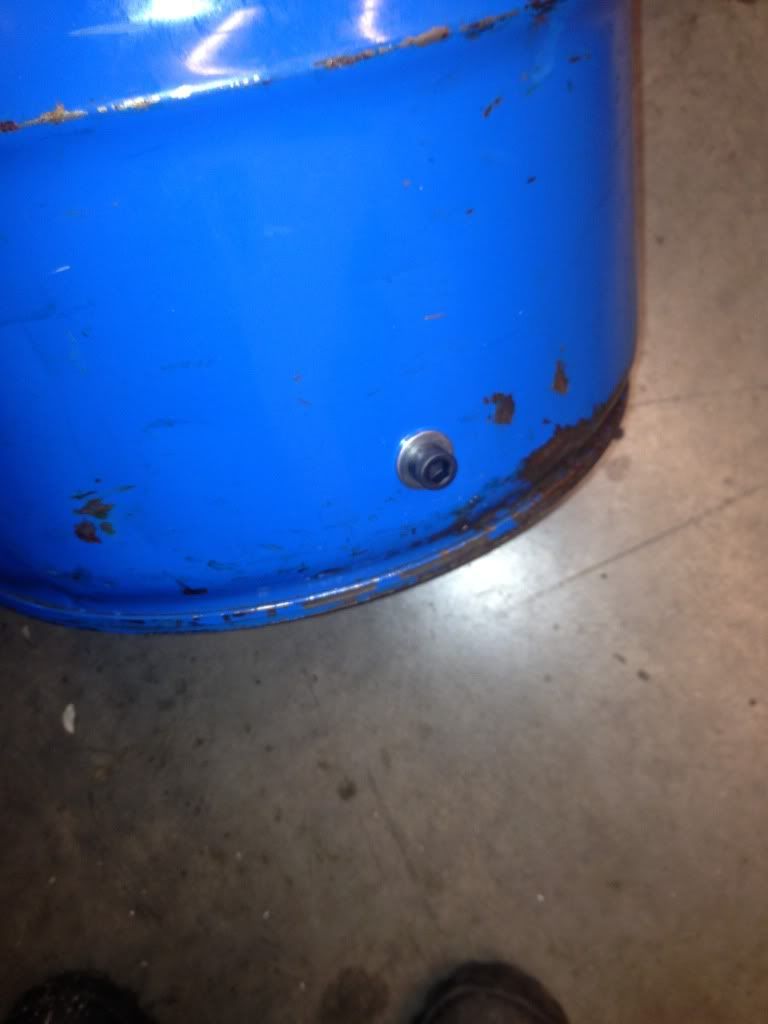 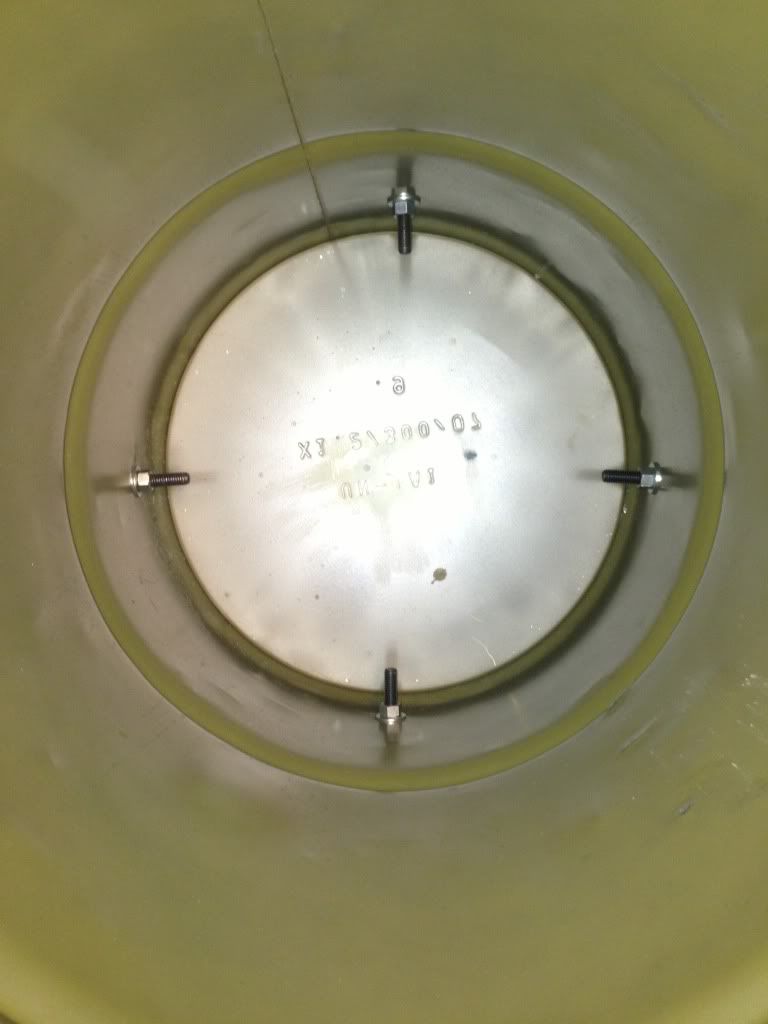 Weld your two steel plate to the bottom of you rod at opposing angles, leave about 2" of threads free at the bottom. theis will keep your rod from moving in the concrete. 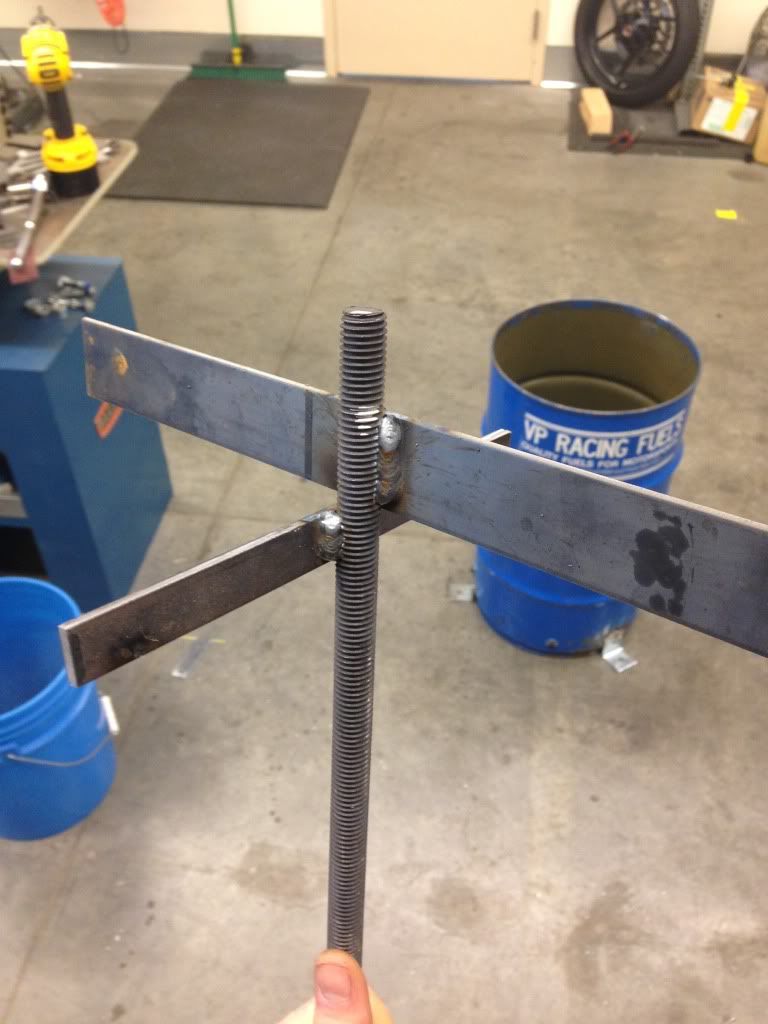 I forgot to take a pic of this and it will only work with the VP can or simular can that has a base that's at least a inch off the ground for clearance. So you want to take one of your three flanged nuts and thread it none flanged side first onto the 2" inches of thread below the plates you welded onto your rod. Then thread your rod through the bottom center hole of your can with the side that has the nut and plates. You should have around an inch of threaded rod sticking out the bottom of your can. Now take the second of your three nuts and with the flanged side first thread it onto the rod and lock it down against the nut inside of the can. Be sure the can is still sitting flat on the ground and isn't being lifted from the rod. If your can doesn't have the bottom clearance for that last step don't worry you just have to be extra careful that your rod stays centered when you pour inn the concrete. I hope the can your using is steel or else your going to have a hard time welding those brackets to your can. You need these brackets to mount your can to the floor or else its going to rotate and slide around on you while mounting tires. Weld at least 3 of these evenly around the can making sure they remain sitting flat to the ground. 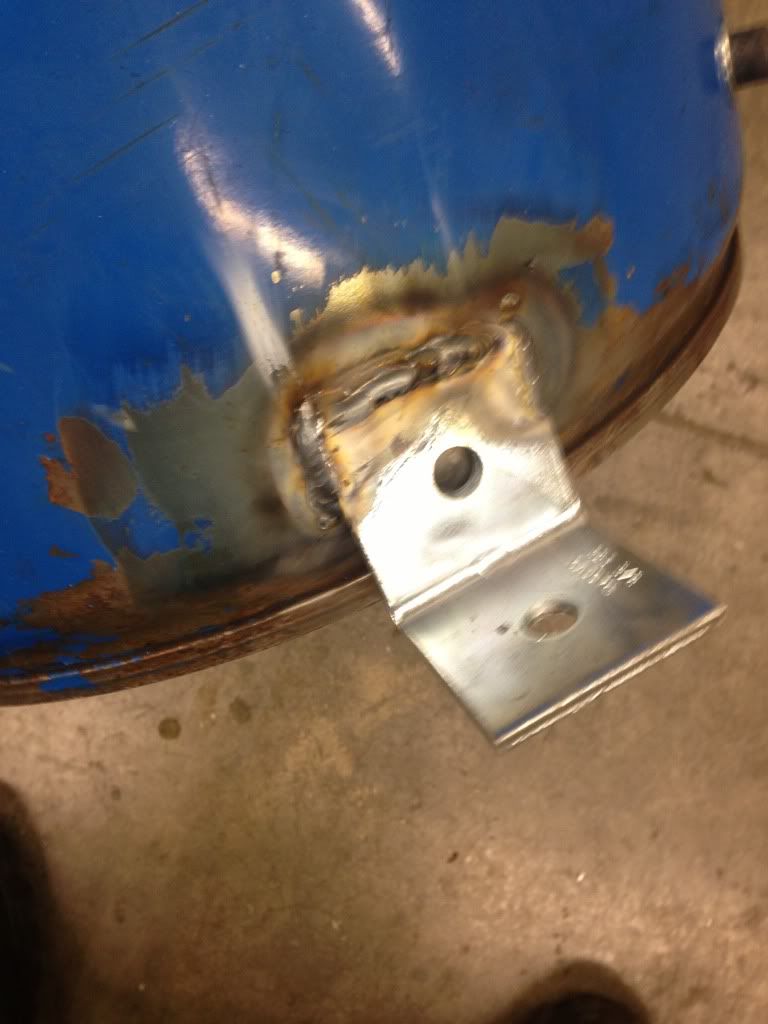 I'll edit in a picture of this later but now you want to use a hammer drill and masonry bit to drill and mount your female anchors. Male studs are more common but of you plan on unbolting you stand and sliding it away for storage then you don't want 2" studs stick up out of the ground. This is why I used female anchors, there like nuts that sit counter sunk into the ground. Measure twice and drill once because there not much room for error on this step. Next with you rod in place and can mounted you need to feel the bottom 5-6" of your can with concrete this will keep your rod in place. This was just below the first ridged line on the VP can. Don't use all 80lbs of concrete about 40lbs should, you don't want to fill the whole can because then it'll weight 250lbs and will be a pain to move around. If you never plan on moving it then go ahead and fill it to about 6 inches below the top. 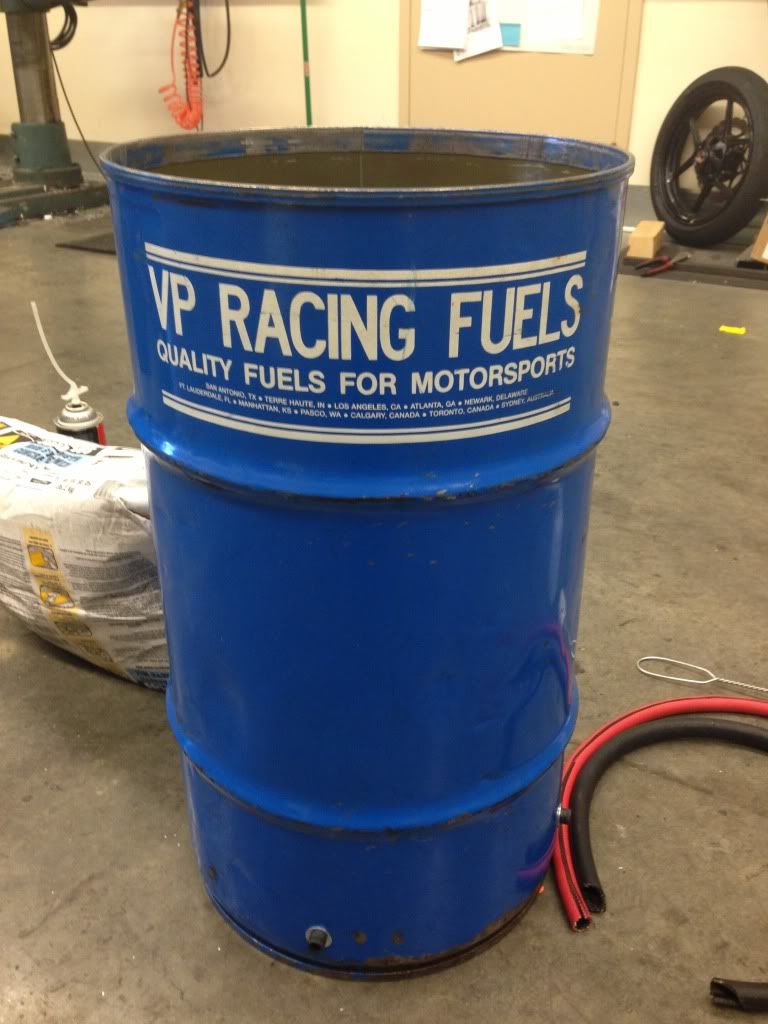 After the concrete sets then then you want to fill the center portion of the can with spray foam. This will allow us to fill the center of the can without adding weight and after dying it will be solid enough to pour our second and finally layer of concrete on top. Do this step in layers because the foam doubles in size over a hour and you need it to stop about 10 inches from the top. 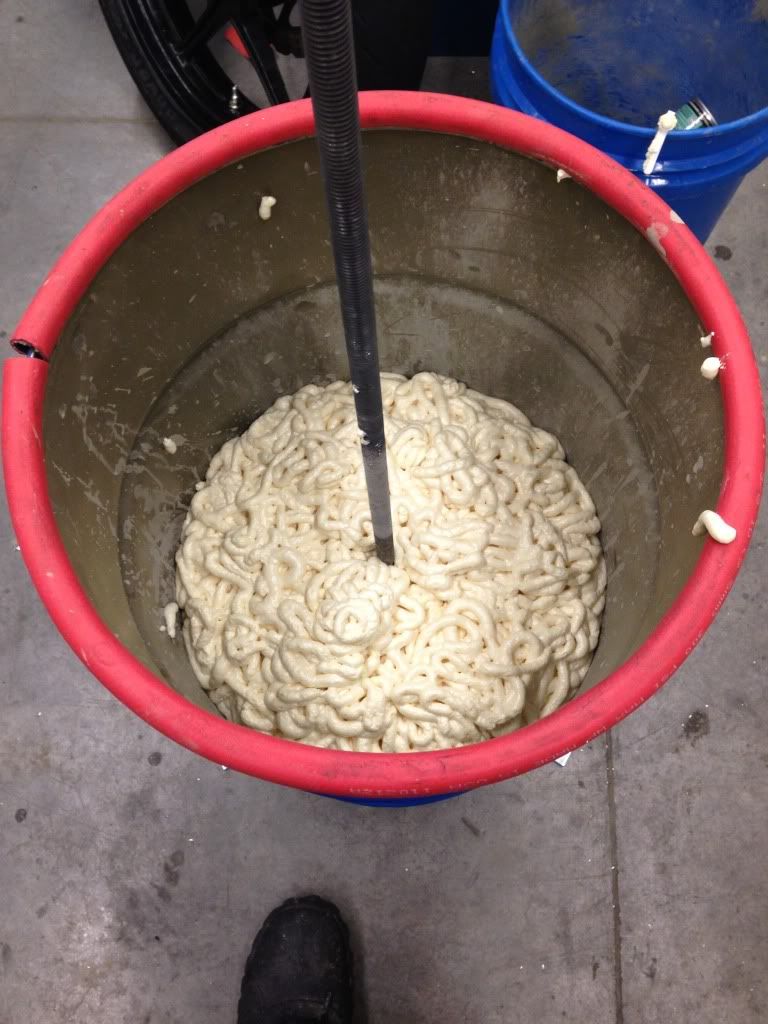  pics coming soon With the foam finally dry and solid fill the can with concrete stopping about 5-6 inches from the top. This second layer of concrete is necessary to keep the rod from flexing side to side. Take your 3/8" air hose and slice it length ways and slide it over the top edge of the can. This will protect your wheels as while as add the necessary traction to keep your wheel from spinning during tire mounting. After the second layer of concrete dries you done with your Tire Mounting Stand and it should work like this.
Link to original page on YouTube. |

|

|
|
January 6th, 2013, 05:36 PM
|
#2 |
|
ninjette.org certified postwhore
Name: Whodat
Location: Ware Is.,MA
Join Date: Jan 2009 Motorcycle(s): I pass the wind! Posts: A lot.
MOTM - Mar '13, Jun '14
|
Great video!
And the balancing?
__________________________________________________
If everything seems under control; you're just not going fast enough! |
|
|
|
|
January 6th, 2013, 05:49 PM
|
#3 |
|
Fast-Guy wannabe
Name: Jason
Location: Brentwood, Ca
Join Date: Oct 2011 Motorcycle(s): 2009 Ninja250, 2011 RM-Z250, 2004 NSR50, Posts: A lot.
MOTM - Jan '13
|
I welded together a wheel balancer out of some steel and some ball bearing wheels. It looks identical to the ones you see the tire vendors use at the races. I can post some detailed pics if you want but I think they sell them for semi cheap
 If you guys beg enough maybe ill make a DIY for the wheel balancer as well. |
|
|
|
|
January 6th, 2013, 06:12 PM
|
#4 |
|
ninjette.org sage
Name: Joe
Location: Lancaster, PA
Join Date: Nov 2012 Motorcycle(s): 2012 Ninja 250(Totaled) Posts: 984
Blog Entries: 2
|
Just because I love DIY's and making things I'd love to see one for the balancer
 Awesome DIY though, pretty cool idea!
__________________________________________________
"I am a creationist, I believe man created god." |
|
|
|
|
January 6th, 2013, 06:42 PM
|
#5 |
|
ninjette.org member
Name: JP
Location: Bear, DE
Join Date: Aug 2012 Motorcycle(s): Ninja 250 Posts: 123
|
Dang, you make it look so easy!
|
|
|
|
|
January 6th, 2013, 06:44 PM
|
#6 |
|
ninjette.org sage
Name: Joe
Location: Lancaster, PA
Join Date: Nov 2012 Motorcycle(s): 2012 Ninja 250(Totaled) Posts: 984
Blog Entries: 2
|
Also the foam pattern makes it look like you have a can of brains

__________________________________________________
"I am a creationist, I believe man created god." |
|
|
|
|
January 6th, 2013, 06:48 PM
|
#7 |
|
ninjette.org member
Name: Broc
Location: America
Join Date: Dec 2009 Motorcycle(s): 2009 Ninja 250R Black - Sold / 2011 Honda CB1000R Posts: 176
|
Great setup! I love the lubricant holder!
A balancer is very easy to make but you can pick up a very nice one from Harbor Freight for $50.00. They always have coupons, I paid $30.00 for mine. It works great! Never had a wheel come back.
__________________________________________________
2009 Black 250R - Stock and staying that way. No matter what you do it's still a 250 at the end of the day! Save your money for gear, riding lessons, & a 600cc |
|
|
|
|
January 6th, 2013, 06:54 PM
|
#8 | |
|
Fast-Guy wannabe
Name: Jason
Location: Brentwood, Ca
Join Date: Oct 2011 Motorcycle(s): 2009 Ninja250, 2011 RM-Z250, 2004 NSR50, Posts: A lot.
MOTM - Jan '13
|
Quote:

|
|
|
|
|
|
January 6th, 2013, 06:56 PM
|
#9 | |
|
Fast-Guy wannabe
Name: Jason
Location: Brentwood, Ca
Join Date: Oct 2011 Motorcycle(s): 2009 Ninja250, 2011 RM-Z250, 2004 NSR50, Posts: A lot.
MOTM - Jan '13
|
Quote:
The mounting bar makes it Sooooo easy |
|
|
|
|
|
January 6th, 2013, 07:16 PM
|
#10 |
|
Daily Ninjette rider
Name: Hernan
Location: Florida
Join Date: Mar 2011 Motorcycle(s): 2007 Ninja 250 Posts: A lot.
MOTY - 2016, MOTM - Dec '12, Jan '14, Jan '15, May '16
|
Very good DIY, Jason !!!
Suggestion: A piece of steel pipe (schedule 40) could protect the thread of the rod from the lever and would avoid having to spin the clamping nut all the way down.
__________________________________________________
Motofool  .................................Never ride faster than your guardian angel can fly "Mankind is composed of two sorts of men those who love and create, and those who hate and destroy. Love is the bond between men, the way to teach and the center of the world." - José Martí |
|
|
|
|
January 6th, 2013, 07:28 PM
|
#11 | |
|
Fast-Guy wannabe
Name: Jason
Location: Brentwood, Ca
Join Date: Oct 2011 Motorcycle(s): 2009 Ninja250, 2011 RM-Z250, 2004 NSR50, Posts: A lot.
MOTM - Jan '13
|
Quote:
Thanks for the input |
|
|
|
|
|
January 6th, 2013, 09:54 PM
|
#12 |
|
ninjette.org dude
Name: 1 guess :-)
Location: SF Bay Area
Join Date: Jun 2008 Motorcycle(s): '13 Ninja 300 (white, the fastest color!), '13 R1200RT, '14 CRF250L, '12 TT-R125LE Posts: Too much.
Blog Entries: 7
|
Very nice! /linked from main DIY sticky

__________________________________________________
Montgomery Street Motorcycle Club / cal24.com / crf250l.org / ninjette.org ninjette.org Terms of Service Shopping for motorcycle parts or equipment? Come here first. The friendliest Ninja 250R/300/400 forum on the internet! (especially Unregistered) |
|
|
|
|
January 6th, 2013, 10:10 PM
|
#13 | |
|
Fast-Guy wannabe
Name: Jason
Location: Brentwood, Ca
Join Date: Oct 2011 Motorcycle(s): 2009 Ninja250, 2011 RM-Z250, 2004 NSR50, Posts: A lot.
MOTM - Jan '13
|
Quote:
|
|
|
|
1 out of 1 members found this post helpful. |
|
January 6th, 2013, 11:13 PM
|
#14 |
|
Freedom for Germany
Location: This World
Join Date: May 2011 Motorcycle(s): Ninja 250R-FI Posts: A lot.
|
Awesome Jason
And fantastic to see how you're tightening the nut with both hands since i always do it with one only
|
|
|
|
|
January 7th, 2013, 12:56 AM
|
#15 |
|
CPT Falcon
Name: J.Emmett Turner
Location: Newnan, GA
Join Date: Apr 2009 Motorcycle(s): '08 CP Blue EX250J, '97 unpainted EX250F, 2nd '97 unpainted EX250F (no engine), '07 black EX250F Posts: A lot.
|
So, the foam is to fill it up without adding weight but why are we filling it up then? Just to stabilize the threaded rod?
I think being able to fill it with water so that it would be heavy enough to not require anchoring and so it would be portable when drained would be nifty. I'd probably make chambers of jugs/bottles or something with a stabilization brace made of the old lid that fits across the top. |
|
|
|
|
January 7th, 2013, 01:03 AM
|
#16 |
|
Beer Me!
Name: Jimmy
Location: SoCal 818
Join Date: Oct 2011 Motorcycle(s): '13 Ninja 300 Car(s): '09 Cube, '93 240SX (Coupe & 'Vert) Posts: 144
|
Love it! If I had the space I would so make this happen in my garage. I wonder if I could figure out a more portable solution.
|
|
|
|
|
January 7th, 2013, 05:18 AM
|
#17 | |
|
Fast-Guy wannabe
Name: Jason
Location: Brentwood, Ca
Join Date: Oct 2011 Motorcycle(s): 2009 Ninja250, 2011 RM-Z250, 2004 NSR50, Posts: A lot.
MOTM - Jan '13
|
Quote:
|
|
|
|
|
|
January 7th, 2013, 08:03 AM
|
#18 |
|
ninjette.org sage
Name: Joe
Location: Lancaster, PA
Join Date: Nov 2012 Motorcycle(s): 2012 Ninja 250(Totaled) Posts: 984
Blog Entries: 2
|
Can i just say I love that you even thought of using the female ends embedded into the ground so you don't have 4 inch bolts sticking up when the mounting station isn't there? Most people probably wouldn't have though of that! I love it!
__________________________________________________
"I am a creationist, I believe man created god." |
|
|
1 out of 1 members found this post helpful. |
|
January 7th, 2013, 10:05 AM
|
#19 | |
|
Fast-Guy wannabe
Name: Jason
Location: Brentwood, Ca
Join Date: Oct 2011 Motorcycle(s): 2009 Ninja250, 2011 RM-Z250, 2004 NSR50, Posts: A lot.
MOTM - Jan '13
|
Quote:
|
|
|
|
|
|
January 7th, 2013, 10:09 AM
|
#20 | |
|
Fast-Guy wannabe
Name: Jason
Location: Brentwood, Ca
Join Date: Oct 2011 Motorcycle(s): 2009 Ninja250, 2011 RM-Z250, 2004 NSR50, Posts: A lot.
MOTM - Jan '13
|
Quote:
|
|
|
|
|
|
January 7th, 2013, 10:22 AM
|
#21 | |
|
ninjette.org certified postwhore
Name: Jason
Location: Norfolk, VA
Join Date: Dec 2011 Motorcycle(s): 2012 EX250, 2014 EX300 Posts: A lot.
|
Quote:
except i thought it looked delicious.... BBBRRRAINNNSSSSSsss....
__________________________________________________
Ethioknight Memorial Fund- Sticker sale http://www.ninjette.org/forums/showthread.php?t=111700 |
|
|
|
|
|
January 7th, 2013, 10:23 AM
|
#22 | |
|
ninjette.org sage
Name: Joe
Location: Lancaster, PA
Join Date: Nov 2012 Motorcycle(s): 2012 Ninja 250(Totaled) Posts: 984
Blog Entries: 2
|
Quote:
__________________________________________________
"I am a creationist, I believe man created god." |
|
|
|
|
|
January 7th, 2013, 10:32 AM
|
#23 |
|
CVMA #74 WSMC #750
Name: Nemesis
Location: On the track
Join Date: Oct 2009 Motorcycle(s): All of them Posts: A lot.
|
Ha! That's cool, Jason!
__________________________________________________

|
|
|
|
|
January 7th, 2013, 11:07 AM
|
#24 | |
|
Daily Ninjette rider
Name: Hernan
Location: Florida
Join Date: Mar 2011 Motorcycle(s): 2007 Ninja 250 Posts: A lot.
MOTY - 2016, MOTM - Dec '12, Jan '14, Jan '15, May '16
|
Quote:
__________________________________________________
Motofool .................................Never ride faster than your guardian angel can fly "Mankind is composed of two sorts of men those who love and create, and those who hate and destroy. Love is the bond between men, the way to teach and the center of the world." - José Martí |
|
|
|
|
|
January 7th, 2013, 01:21 PM
|
#25 | |
|
Beer Me!
Name: Jimmy
Location: SoCal 818
Join Date: Oct 2011 Motorcycle(s): '13 Ninja 300 Car(s): '09 Cube, '93 240SX (Coupe & 'Vert) Posts: 144
|
Quote:
By portable, I'm wondering how this could be used at the track if you don't have a place to really secure it down. |
|
|
|
|
|
January 7th, 2013, 01:56 PM
|
#26 | |
|
Fast-Guy wannabe
Name: Jason
Location: Brentwood, Ca
Join Date: Oct 2011 Motorcycle(s): 2009 Ninja250, 2011 RM-Z250, 2004 NSR50, Posts: A lot.
MOTM - Jan '13
|
Quote:
You can try using one of these http://www.amazon.com/gp/aw/d/B001PF34IE and mount it to a larger piece of ply wood so you can stand on it. You can also do my idea but with a 5 gal bucket and just fill the whole thing with cement, it will double as a leg wieght for you canopy. But be warned the 5gal bucket is to small to fit any rotors over 280mm so it will most likely only work with single rotor wheels. Old steel 15 car wheels also make decent tire mounting stands. |
|
|
|
|
|
January 7th, 2013, 02:03 PM
|
#27 | |
|
Fast-Guy wannabe
Name: Jason
Location: Brentwood, Ca
Join Date: Oct 2011 Motorcycle(s): 2009 Ninja250, 2011 RM-Z250, 2004 NSR50, Posts: A lot.
MOTM - Jan '13
|
Quote:
|
|
|
|
|
|
January 7th, 2013, 04:02 PM
|
#29 | |
|
wat
Name: wat
Location: tustin/long beach
Join Date: Sep 2009 Motorcycle(s): wat Posts: Too much.
Blog Entries: 5
MOTM - Oct '12, Feb '14
|
Quote:
__________________________________________________
  
|
|
|
|
|
|
January 8th, 2013, 07:23 AM
|
#30 |
|
CPT Falcon
Name: J.Emmett Turner
Location: Newnan, GA
Join Date: Apr 2009 Motorcycle(s): '08 CP Blue EX250J, '97 unpainted EX250F, 2nd '97 unpainted EX250F (no engine), '07 black EX250F Posts: A lot.
|
I still want to get a pallet and attach the Harbor Freight tire changer to it then find a way to use an old rim on top as a motorcycle tire changer.
|
|
|
|
|
January 8th, 2013, 08:38 AM
|
#31 | |
|
Fast-Guy wannabe
Name: Jason
Location: Brentwood, Ca
Join Date: Oct 2011 Motorcycle(s): 2009 Ninja250, 2011 RM-Z250, 2004 NSR50, Posts: A lot.
MOTM - Jan '13
|
Quote:
|
|
|
|
|
|
January 8th, 2013, 09:40 AM
|
#32 |
|
Sexy Beast
Name: Mat
Location: Tampa
Join Date: Mar 2011 Motorcycle(s): 2010 Ninja 250R, 2006 ZX-14, 2012 Ducati Monster Posts: A lot.
|
This is pretty awesome.
|
|
|
|
|
January 8th, 2013, 10:17 AM
|
#33 | |
|
CPT Falcon
Name: J.Emmett Turner
Location: Newnan, GA
Join Date: Apr 2009 Motorcycle(s): '08 CP Blue EX250J, '97 unpainted EX250F, 2nd '97 unpainted EX250F (no engine), '07 black EX250F Posts: A lot.
|
Quote:
I also want to dip the mount/demount bar in some slippery plastic coating rather than cutting up rim savers. It really is the "po' man's" tire changer ($32 after coupon for the bar and stand), which I've already used on a few car tires. 
|
|
|
|
|
 |
 Similar Threads
|
||||
| Thread | Thread Starter | Forum | Replies | Last Post |
| Mounting Camera Above Front Tire | Ralgha | 2008 - 2012 Ninja 250R Farkles | 10 | June 30th, 2014 04:58 PM |
| tire mounting | atomicrm | General Motorcycling Discussion | 6 | April 30th, 2012 08:54 PM |
| Check out my DIY engine stand | headshrink | 2008 - 2012 Ninja 250R Tech Talk | 4 | January 1st, 2012 12:08 AM |
| diy wheel balancing stand? | alex.s | General Motorcycling Discussion | 31 | December 6th, 2011 10:21 AM |
| How much for tire mounting? | capt_bugaloo | 2008 - 2012 Ninja 250R Tech Talk | 5 | August 8th, 2010 10:46 AM |
|
|


