
|
 October 2nd, 2011, 09:47 PM
|
#1 |
|
I hate driving...
Name: S
Location: SW Ohio
Join Date: Jul 2010 Motorcycle(s): 13 Triumph Street Triple R, 09 Ninja 250r (Sold 4/20/12) Posts: A lot.
|
DIY spiegler stainless steel front brake line install
Alright, so I got some custom lines from Spiegler. You can order the lines in a variety of color combinations and they are of very high quality. This is how I installed them you may find better methods. To begin get a bottle, DOT4 brake fluid, your front brake line kit, a piece of clear aquarium tubing, and brake cleaner if needed plus tools of course. The kit will come with banjo bolts and aluminum crush washers.
step1line.jpg Inspect your line to make sure there are no problems and compare to the stock brake line. In order for mine to fit I had to rotate the top brake fitting. Spiedler includes two plastic blocks that you grip in a vise (I used a c-clamp) and a plastic piece that you insert in the middle to rotate the brake fitting. step2line.jpg Alright got it lined up so next the brake fluid needs to be drained out. Be careful not to waste any on the bike as brake fluid will eat your paint. If you do get it off asap. Next get a 8mm wrench and remove the rubber plug from the brake bleeder valve. step3line.jpg Attach one end of the clear rubber hose to the bleeder valve step4line.jpg Place the other end of the hose in the bottle fill the bottle with a little bit of brake fluid and submerge the other end of the tube in the fluid. step5line.jpg Next bleed the fluid from the bike by doing this procedure: 1. place you wrench on the bleeder valve 2. Now pull the brake in and open (loosen) the bleeder valve the lever should now move into the grip easily. 3. Close the bleeder valve (tighten) and then release the lever. 4. Repeat until flow of fluid stops Now open the master cylinder by removing the two screws. WARNING these screws are super soft I had to drill the head off of one. I used a phillips #2 and the first came out super easy. Anyways be careful. Have a towel under the master cylinder just in case some fluid leaks out. step6line.jpg Remove the rubber gasket or you can leave it for now up to you step7line.jpg Now to remove the stock line get a 12mm socket and remove the master cylinder banjo step8line.jpg Then a 10mm socket to remove the support... step9line.jpg Then the caliper banjo bolt. Some fluid may leak out so have a towel ready... step10line.jpg Remove the middle support from the stock line. It won't be tight on the new line but it will keep it where you want it. Its bendable so bend it open and then stick it on the new line. Route the new line through like so... step13line.jpg step14line.jpg Arrange the banjo bolt as shown. You should have bolt-aluminum washer-brake fitting-aluminum washer-into caliper or master cylinder step11line.jpg And here it is attached to the master cylinder...Ignore that I closed it up again testing the new bolts I bought haha. Tighten up the bolts hand tight. Check everything out and then tighten to 18ft-lbs. The new banjos where 14mm step12line.jpg Reattach our brake bleeding apparatus with the bottle to the caliper and fill the master cylinder. It is best to fill the master cylinder with the wheel turned all the way to the left (at least on my bike) to make the fluid level (Not pictured all the way to the left BTW). step15line.jpg step16line.jpg Brake Bleeding procedure again: Keep an eye on the master cylinder fluid level. Do not let it run dry or you will get air in the system again. To bleed the master cylinder simply pump the brakes until no bubbles can be seen rising out of the system. Don't mistake that for fluid being pushed out quickly out of the hole in the bottom of the master cylinder. For the rest of the system: 1. Pull your brake lever in 2. Open the bleeder valve you will see bubbles and brake lever will pull in easily 3. Close the bleeder valve 4. Let go of the lever completely 5. Check fluid level and top off if necessary 6.Repeat until no more bubbles are seen leaving the system 1-5 7. Top off fluid level to the top line of the reservoir (can be seen as an actual metal line) 8. Replace the rubber gasket and top cap. Tighten your screws and test for brake feel. Brakes should be firm. And that is it  step17line.jpg Enjoy your new brakes, hope that helps some of you. At first I didn't feel it changed much for as brake feel but the brake power has increased quite a bit. I skidded to a halt quite easily a few times. Be careful on those first few rides. Also as a side note these lines are DOT and TUV approved so they are legal for street use. Additionally they include a lifetime warranty. Best place to get the lines is from sportbiketrackgear.com.
__________________________________________________
 09 ninja 2fiddy SE  Driving slow things fast Driving slow things fast
|

|

|
|
October 2nd, 2011, 10:04 PM
|
#2 |
|
ninjette.org dude
Name: 1 guess :-)
Location: SF Bay Area
Join Date: Jun 2008 Motorcycle(s): '13 Ninja 300 (white, the fastest color!), '13 R1200RT, '14 CRF250L, '12 TT-R125LE Posts: Too much.
Blog Entries: 7
|
Good job!
/linked from the main DIY sticky
__________________________________________________
Montgomery Street Motorcycle Club / cal24.com / crf250l.org / ninjette.org ninjette.org Terms of Service Shopping for motorcycle parts or equipment? Come here first. The friendliest Ninja 250R/300/400 forum on the internet! (especially Unregistered) |
|
|
|
|
October 2nd, 2011, 10:09 PM
|
#3 |
|
ninjette.org member
Name: LOU
Location: Imperial County, California
Join Date: Nov 2010 Motorcycle(s): GreenSE 09 250R Posts: 247
|
Great wright up! Pics help a ton. How about a pic with a little more distance i have an 09 se and am interested in this

|
|
|
|
|
October 2nd, 2011, 10:25 PM
|
#4 | |
|
I hate driving...
Name: S
Location: SW Ohio
Join Date: Jul 2010 Motorcycle(s): 13 Triumph Street Triple R, 09 Ninja 250r (Sold 4/20/12) Posts: A lot.
|
Quote:
__________________________________________________
09 ninja 2fiddy SE Driving slow things fast
Last futzed with by 00NissanNinja; October 3rd, 2011 at 06:26 PM. |
|
|
|
|
|
October 3rd, 2011, 06:20 PM
|
#5 |
|
I hate driving...
Name: S
Location: SW Ohio
Join Date: Jul 2010 Motorcycle(s): 13 Triumph Street Triple R, 09 Ninja 250r (Sold 4/20/12) Posts: A lot.
|
Some more pics I snagged before leaving to work, as requested...
10032011108.jpg 10032011109.jpg I'll probably do the rear brake line in the future, probably once I hit 15,000 miles since you are supposed to replace the lines by then anyways (or inspect them don't remember). I already have 10,000 on my bike, its getting older haha.
__________________________________________________
09 ninja 2fiddy SE Driving slow things fast
|
|
|
|
|
October 3rd, 2011, 06:56 PM
|
#6 |
|
ninjette.org member
Name: LOU
Location: Imperial County, California
Join Date: Nov 2010 Motorcycle(s): GreenSE 09 250R Posts: 247
|
Thnx for the pics. Looks great guy, my green 09 is also getting older 12000, might just look into this when i service the lines.
|
|
|
|
|
October 4th, 2011, 07:51 PM
|
#7 | |
|
I hate driving...
Name: S
Location: SW Ohio
Join Date: Jul 2010 Motorcycle(s): 13 Triumph Street Triple R, 09 Ninja 250r (Sold 4/20/12) Posts: A lot.
|
Quote:
__________________________________________________
09 ninja 2fiddy SE Driving slow things fast
|
|
|
|
|
|
October 4th, 2011, 09:48 PM
|
#8 |
|
ninjette.org member
Name: LOU
Location: Imperial County, California
Join Date: Nov 2010 Motorcycle(s): GreenSE 09 250R Posts: 247
|
yeah got her brand new
 , so you could positively feel the difference with the new lines then. Runing the EBC HH pads? , so you could positively feel the difference with the new lines then. Runing the EBC HH pads?
|
|
|
|
|
October 4th, 2011, 10:21 PM
|
#9 |
|
I hate driving...
Name: S
Location: SW Ohio
Join Date: Jul 2010 Motorcycle(s): 13 Triumph Street Triple R, 09 Ninja 250r (Sold 4/20/12) Posts: A lot.
|
Yep I am running EBC HH brake pads as well. I felt like those pads sucked at first took some miles before they really started working good. Probably will try them on the track next and see if my top speed on the straights increases a bit thanks to the added braking power. Tried a canyon run but way to much traffic since people wanted to look at the trees haha.
__________________________________________________
09 ninja 2fiddy SE Driving slow things fast
|
|
|
|
|
November 10th, 2011, 10:07 PM
|
#10 |
|
I hate driving...
Name: S
Location: SW Ohio
Join Date: Jul 2010 Motorcycle(s): 13 Triumph Street Triple R, 09 Ninja 250r (Sold 4/20/12) Posts: A lot.
|
So one quick thing to add. I noticed some scratchy noises up front on my bike if I braked hard enough. I found that since the front end of the bike dives so much the brake line was rubbing on the metal on the support that comes off the forks. So to remedy this:
I got the old brake line and cut the rubber piece off with a knife I cut a slit across the rubber so it can be slipped over the new line: 10212011130.jpg This is what you will end up with: 10212011131.jpg It won't be super snug on the new line but it will keep the line from rubbing the metal. Pic 9 from the beginning shows where to place this piece at. Slip it over the line then the metal bracket and then bolt to the bike.
__________________________________________________
09 ninja 2fiddy SE Driving slow things fast
|
|
|
|
|
December 17th, 2011, 01:30 AM
|
#11 |
|
ninjette.org member
Name: David
Location: Arvada
Join Date: Apr 2011 Motorcycle(s): 2010 Ninja 250r Track bike, Honda CRF250r Dirt bike Posts: 137
|
thank you so much! i was nervous to do this by myself until i saw this! helped out a ton! well done!
|
|
|
|
|
December 18th, 2011, 12:27 AM
|
#12 | |
|
I hate driving...
Name: S
Location: SW Ohio
Join Date: Jul 2010 Motorcycle(s): 13 Triumph Street Triple R, 09 Ninja 250r (Sold 4/20/12) Posts: A lot.
|
Quote:
Will add rear brake lines soon. Had them on my bike for awhile just haven't had time to add them to the DIY.
__________________________________________________
09 ninja 2fiddy SE Driving slow things fast
|
|
|
|
|
|
December 18th, 2011, 01:46 PM
|
#13 |
|
crash 250, get supersport
Name: Richard
Location: San Diego, CA
Join Date: Apr 2010 Motorcycle(s): 2010 250R SE (Sold 6/9/14), 2009 ZX-6R (Sold 6/25/14), Subaru BRZ Posts: A lot.
|
Just completed the rear yesterday and will use this guide as I do the front, thanks for the help both in this thread and through PMs.
|
|
|
|
|
December 20th, 2011, 09:07 PM
|
#14 |
|
self wrencher
Name: john
Location: houston
Join Date: Dec 2008 Motorcycle(s): 08 250r and 07 600r Posts: A lot.
|
You got them directly from Spiegler?
|
|
|
|
|
December 20th, 2011, 09:43 PM
|
#15 |
|
crash 250, get supersport
Name: Richard
Location: San Diego, CA
Join Date: Apr 2010 Motorcycle(s): 2010 250R SE (Sold 6/9/14), 2009 ZX-6R (Sold 6/25/14), Subaru BRZ Posts: A lot.
|
I bought my set from Sportbiketrackgear.com
|
|
|
|
|
December 20th, 2011, 11:00 PM
|
#16 | |
|
I hate driving...
Name: S
Location: SW Ohio
Join Date: Jul 2010 Motorcycle(s): 13 Triumph Street Triple R, 09 Ninja 250r (Sold 4/20/12) Posts: A lot.
|
Quote:

__________________________________________________
09 ninja 2fiddy SE Driving slow things fast
|
|
|
|
|
|
January 2nd, 2012, 05:36 PM
|
#17 |
|
I hate driving...
Name: S
Location: SW Ohio
Join Date: Jul 2010 Motorcycle(s): 13 Triumph Street Triple R, 09 Ninja 250r (Sold 4/20/12) Posts: A lot.
|
So this can now be Spiegler brake lines install. The rear DIY is going to be a little more streamlined since you are doing basically the same thing as the front line install with just a few different things.
So to begin bleed the brakes as usual in the same procedure: Step1rear.jpg 1. place your wrench on the bleeder valve 2. Now press the brake pedal and open (loosen) the bleeder valve the lever should now move into the grip easily. 3. Close the bleeder valve (tighten) and then release the pedal. 4. Repeat until flow of fluid stops Next open up the reservoir (taken after I was done so its really clean). You will first need to remove the keeper bracket by removing the following screw: Step2rear.jpg Then you can unscrew the reservoir cap and set it and the keeper bracket aside. My fluid was kinda gross had little bits floating in it so I wiped all that mess out of there. step3rear.jpg Now with the fluid removed the bolts for the stock brake line can be removed, as always have a rag ready to catch any dripping fluid This bolt: step4rear.jpg and this bolt as visible from previous pictures: Step4.1rear.jpg Pull the line out towards the back of the bike and through the brake line keeper. Grab the new line and thread it through the brake line keeper and then bolt it to the rear caliper. Remember banjo bolt-->aluminum washer-->brake line fitting-->aluminum washer and then into the caliper/master cylinder. step5rear.jpg And at the master cylinder: step6rear.jpg Depending what mods you have done to your bike or plan to do now is a good time before bolting the line on tight to do any final rotations or angling of the fittings so your brake lines clear whatever you plan to stick back there like a hugger. Bolt the lines down hand tight and then tighten to 15lbft (Can't edit my original post but that's all you really need hand tight should be fine too as long as you check for leaks). The reason I say this is that I now realize that the bolts are aluminum which makes them much easier to break by over tightening the bolt. So I say err to the side of being just tight enough to not make leaks. Fill the reservoir with new fluid and reattach the brake bleeding apparatus. Bleed the brakes same as the fronts once again. Bleed the brake until the pedal regains firmness and check for leaks and if there are none that is it, done deal. step7rear.jpg Finally, this is how I rotated the fitting if that needs to be done(which I mentioned in the front line install) 11202011137.jpg
__________________________________________________
09 ninja 2fiddy SE Driving slow things fast
|
|
|
|
|
January 2nd, 2012, 05:37 PM
|
#18 |
|
ninjette.org dude
Name: 1 guess :-)
Location: SF Bay Area
Join Date: Jun 2008 Motorcycle(s): '13 Ninja 300 (white, the fastest color!), '13 R1200RT, '14 CRF250L, '12 TT-R125LE Posts: Too much.
Blog Entries: 7
|

__________________________________________________
Montgomery Street Motorcycle Club / cal24.com / crf250l.org / ninjette.org ninjette.org Terms of Service Shopping for motorcycle parts or equipment? Come here first. The friendliest Ninja 250R/300/400 forum on the internet! (especially Unregistered) |
|
|
|
|
August 19th, 2012, 10:20 AM
|
#19 |
|
User Title Free Since '12
Name: Floyd
Location: Barbados
Join Date: Dec 2010 Motorcycle(s): '10 Ninja 250R Special Edition Green Posts: A lot.
Blog Entries: 13
MOTM - Feb '12
|
Just wanted to say thanks to Nissan Ninja for a great DIY. Used a Mity Vac to help pull the fluid through. Between these instructions and the Mity Vac, took about 45 minutes with no problems at all.
The results were beyond my expectations. I regularly test maximum braking in front of my house from 40-0, 30-0 and 20-0 stops. With these stainless lines, there was noticeable improvement in the stops. Less sponge in the front brake particularly made it easier for me to apply right to maximum, which in turn allowed me to use rear brake a bit. I'd say overall improvement for me was about 5-10% in stopping distances.
__________________________________________________
 "Improvement makes straight roads, but the crooked roads without improvement, are roads of genius." William Blake |
|
|
|
|
August 22nd, 2012, 03:36 PM
|
#20 | |
|
I hate driving...
Name: S
Location: SW Ohio
Join Date: Jul 2010 Motorcycle(s): 13 Triumph Street Triple R, 09 Ninja 250r (Sold 4/20/12) Posts: A lot.
|
Quote:
__________________________________________________
09 ninja 2fiddy SE Driving slow things fast
|
|
|
|
|
|
August 23rd, 2012, 12:34 PM
|
#21 |
|
cuz
Name: Israel
Location: Houston (me) Galveston
Join Date: Jul 2011 Motorcycle(s): 09 ninja 250r Posts: A lot.
|
This is were I got mine from.Have yet to install them.
http://www.shop.kyleusa.com/product....categoryId=103 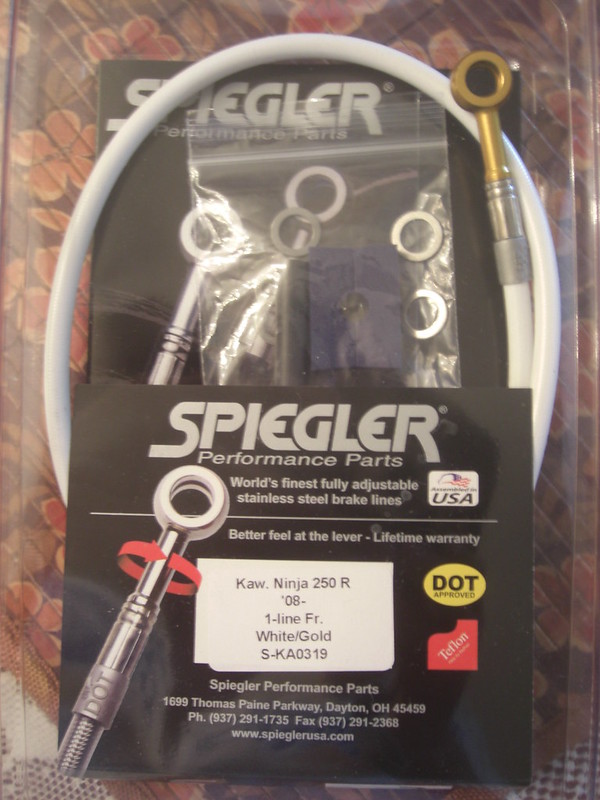 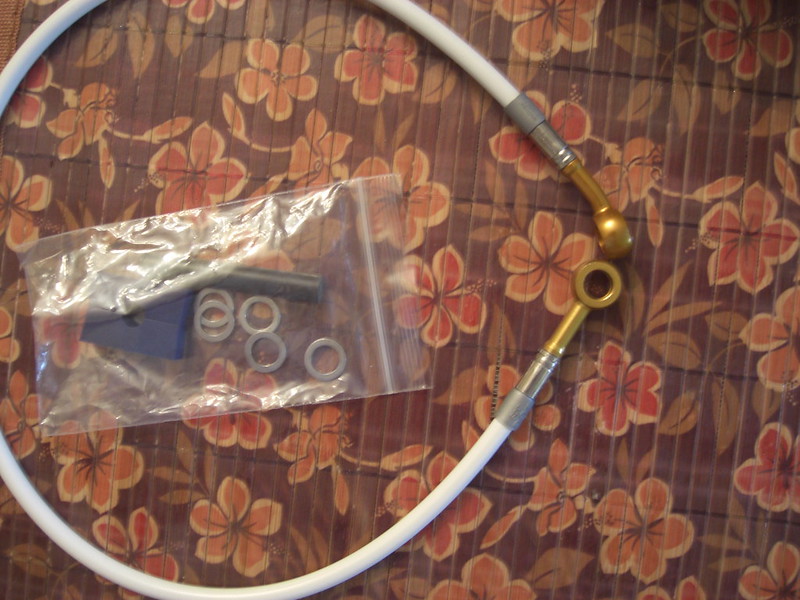
__________________________________________________
THE GOOD LIFE
|
|
|
|
|
August 23rd, 2012, 12:45 PM
|
#22 |
|
ninjette.org certified postwhore
Name: .
Location: .
Join Date: Feb 2011 Motorcycle(s): . Posts: Too much.
MOTM - Feb '13, Feb '14
|
Install those bad boys! You'll love them.
|
|
|
|
|
August 23rd, 2012, 03:04 PM
|
#23 | |
|
ninjette.org guru
Name: Kevin
Location: central Illinois
Join Date: Apr 2011 Motorcycle(s): 2011 Green 250R Posts: 346
|
Quote:
|
|
|
|
|
|
August 23rd, 2012, 03:36 PM
|
#24 |
|
cuz
Name: Israel
Location: Houston (me) Galveston
Join Date: Jul 2011 Motorcycle(s): 09 ninja 250r Posts: A lot.
|
@kevheads I went w/versah + the give u a sanding block how cool is that... Very
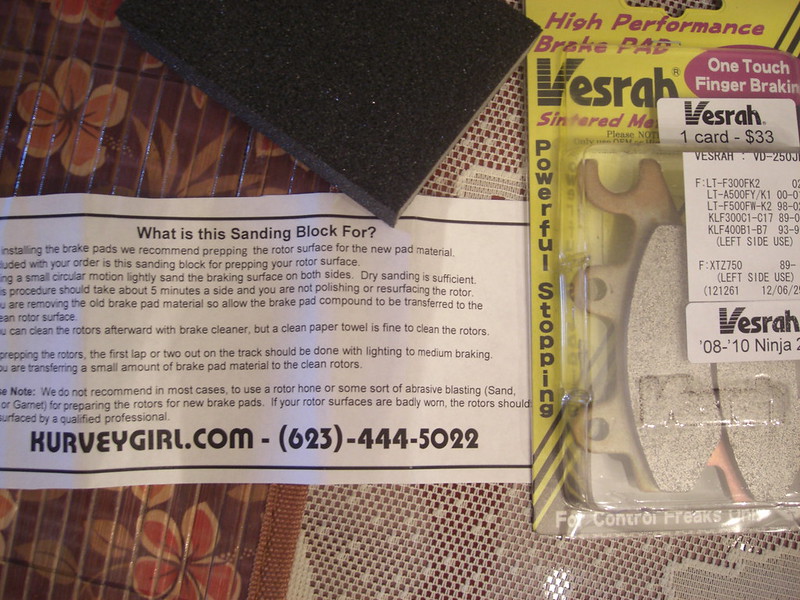 http://kurveygirl.com/shop/product_i...roducts_id=353
__________________________________________________
THE GOOD LIFE
|
|
|
|
|
August 25th, 2012, 01:53 PM
|
#25 |
|
ninjette.org guru
Name: Kevin
Location: central Illinois
Join Date: Apr 2011 Motorcycle(s): 2011 Green 250R Posts: 346
|
got my fronts installed today, went pretty easy, feels alittle different from stock, doesn't seem to have as much pressure applying the brakes as before, new ones seem to grab closer to fully pulled in, though they seem to work just fine.
Cuz, did yours come with new banjo bolts from Kyle's? Mine didn't, I just used the old ones. I assumed they should have came with new ones since OP has gold ones to match his banjo's and said they were 14mm instead of stock 12mm. |
|
|
|
|
August 25th, 2012, 01:54 PM
|
#26 |
|
ninjette.org dude
Name: 1 guess :-)
Location: SF Bay Area
Join Date: Jun 2008 Motorcycle(s): '13 Ninja 300 (white, the fastest color!), '13 R1200RT, '14 CRF250L, '12 TT-R125LE Posts: Too much.
Blog Entries: 7
|
Bleed them again.
__________________________________________________
Montgomery Street Motorcycle Club / cal24.com / crf250l.org / ninjette.org ninjette.org Terms of Service Shopping for motorcycle parts or equipment? Come here first. The friendliest Ninja 250R/300/400 forum on the internet! (especially Unregistered) |
|
|
|
|
August 25th, 2012, 01:57 PM
|
#27 |
|
ninjette.org certified postwhore
Name: .
Location: .
Join Date: Feb 2011 Motorcycle(s): . Posts: Too much.
MOTM - Feb '13, Feb '14
|
definitely bleed them again. When I did mine, I found that I wasn't pulling the handle rapidly enough and didn't get all the air out.
They're solid when you get them bleed right. |
|
|
|
|
August 26th, 2012, 07:00 PM
|
#28 | |
|
I hate driving...
Name: S
Location: SW Ohio
Join Date: Jul 2010 Motorcycle(s): 13 Triumph Street Triple R, 09 Ninja 250r (Sold 4/20/12) Posts: A lot.
|
Quote:
__________________________________________________
09 ninja 2fiddy SE Driving slow things fast
|
|
|
|
|
|
August 26th, 2012, 07:54 PM
|
#30 | |
|
ninjette.org guru
Name: Kevin
Location: central Illinois
Join Date: Apr 2011 Motorcycle(s): 2011 Green 250R Posts: 346
|
Quote:
|
|
|
|
|
|
August 27th, 2012, 05:31 AM
|
#31 |
|
Fighting Texas Aggie '05
Name: Neil
Location: Hutto, TX
Join Date: Feb 2009 Motorcycle(s): '07 ZX6R, '08 Versys, '09 250R Track, '93 F2/F3 Track Posts: A lot.
|
I had a hell of a time getting mine bled, even with speed bleeders and a pump.
|
|
|
|
|
August 27th, 2012, 10:48 PM
|
#32 |
|
I hate driving...
Name: S
Location: SW Ohio
Join Date: Jul 2010 Motorcycle(s): 13 Triumph Street Triple R, 09 Ninja 250r (Sold 4/20/12) Posts: A lot.
|
There is a technique I saw that I might try one blue moon to bleed the brakes. Its basically reverse bleeding them by injecting new fluid though the bleeder screw and into the master cylinder with a big syringe. Sounds like a good way to get all the air out.
__________________________________________________
09 ninja 2fiddy SE Driving slow things fast
|
|
|
|
|
August 27th, 2012, 11:05 PM
|
#33 |
|
User Title Free Since '12
Name: Floyd
Location: Barbados
Join Date: Dec 2010 Motorcycle(s): '10 Ninja 250R Special Edition Green Posts: A lot.
Blog Entries: 13
MOTM - Feb '12
|
The Mity Vac is pretty cheap (about $30) and does the job quite well. Keeps things nice and tidy and gets the air out much more quickly and reliably than gravity. You create suction with the hand pump open the bleeder valve, keep the reservoir full and it happens very easily. I'd never bled my own brakes before (I know, I'm lazy and always just relied on the local shop) so I took my time and fiddled around with doing it different ways just for my own education. Was able to do it no problem using instructions below and the Mity Vac - much simpler and more idiot proof than gravity bleed that I tried first. Recommended.
__________________________________________________
"Improvement makes straight roads, but the crooked roads without improvement, are roads of genius." William Blake |
|
|
|
|
August 28th, 2012, 06:56 AM
|
#34 |
|
ninjette.org certified postwhore
Name: .
Location: .
Join Date: Feb 2011 Motorcycle(s): . Posts: Too much.
MOTM - Feb '13, Feb '14
|
idk, once you master the gravity bleed, it takes about 60 seconds to blow all the bubbles out...
|
|
|
|
|
August 28th, 2012, 08:29 AM
|
#35 |
|
Fighting Texas Aggie '05
Name: Neil
Location: Hutto, TX
Join Date: Feb 2009 Motorcycle(s): '07 ZX6R, '08 Versys, '09 250R Track, '93 F2/F3 Track Posts: A lot.
|
I have tried gravity, force feed backwards, mity vac, and speed bleeders. None have been particularly fool proof or easy. All have been better than straight hand bleeding.
|
|
|
|
 |
 Similar Threads
|
||||
| Thread | Thread Starter | Forum | Replies | Last Post |
| Stainless steel braided brake lines install | Bob2010 | 2008 - 2012 Ninja 250R Tech Talk | 8 | June 11th, 2016 07:01 AM |
| Apex Stainless Steel brake line Install | Asspire | 2008 - 2012 Ninja 250R Tech Talk | 1 | August 26th, 2013 09:29 PM |
| DIY: Steel mesh brake line | Motofool | Videos | 4 | July 6th, 2013 02:00 AM |
| [webbikeworld.com] - Motorcycle Stainless Steel Brake Line Upgrade | Ninjette Newsbot | Motorcycling News | 0 | April 2nd, 2011 01:40 PM |
| Bremzen Stainless Steel Brake Line Kit | Jojah17 | 2008 - 2012 Ninja 250R Tech Talk | 5 | March 1st, 2011 09:28 AM |
|
|


