It had just occurred to me (or actually brought to my attention) that with this talk of air filters (and the ridiculous cost of the K&N drop-in filter I should bring my "Removing the air-box" thread over.
Welp no one seems to have done a how-to on installing air pods on here for the new 250's. That and I was hunting through K&N's catalog and after some measurements found a cool little air filter that would work bitching...


You'll notice that it's an oval filter that has two openings so it covers both carburetors. In the last picture you can see the neck is tilted down so the air filter ducks down a bit and clears the frame nicely...
You can order it through any major auto parts store (Kragen, Napa, Autozone, etc.) K&N P/N "R-0990" .
As simple as this little filter is, getting the stock air box out is a PITA to put it lightly. I chronicled my way through tearing out the factory air box. I think it goes without saying that your results may vary and even though I listed this in steps, you may do it however you please. FUTHERMORE, if you are one of those ass clowns that thinks installing this is going to double your horsepower and fuel economy (Hell and that's simply by just putting the sticker on your bike alone) you're going to probably be disappointed. I was surprised after jetting and re-shimming the needles that this does have a huge increase in acceleration though! I don't have any HP numbers though, but I'm sure there was actually a good 5 hp increase (Which could be partly due to the fine tuning with jets). This is mainly a good 'mod' to allow easier carburetor tuning and to clean up a bunch of clutter out of your bike. It's also not the easiest thing to do so if you're not very mechanically inclined save your time and money on this one!
Edit: Also I learned the hard way that you
NEED to re-jet before you can really run without the air box. If you're going to rip out the factory air box make sure you have a jet kit (with jet sizes 110-115 or so). Otherwise the bike will run so lean you won't be able to rev past 5k or so. (Look on the bright side, changing jets is a cinch after that damned air box is gone!)
OK... So to begin you literally have to rip
everything imaginable off of your bike (I'm not kidding).
Step 1:

Open up and remove the stock air filter. The seat's going to have to go and so are the front fairings
Step 2:

You can see I've pulled the air filter, yanked the seat and lifted the gas tank. If you don't know how to remove the gas tank I can sum it up really quick, or you can read kkim's post on how to do this (
http://www.kawiforums.com/showthread.php?t=110857). But basically make sure to disconnect the vacuum line to the fuel petcock, followed by the fuel line. Don't forget on the '08 models to disconnect the fuel level sensor as well (essentially anthing I circled in red). On the other side (I didn't show it) to disconnect either the single vent hose from the tank, or on California model tanks the 2 emissions hoses as well...
Step 3:

Everything here has to be moved (The air filter box components come out HERE). Remove the tank 'cross member' and set it aside. Also take notice how FRIGGIN BIG that box is. It literally goes from the battery (to the left of my hand) to the carburetors (In front of the two intake hoses in the picture). Wow
Step 4:

Might as well do the other side's disconnections now. The air filter box is mounted to the transmission via the screw circled in red. Remove this and let it hang there. It also has a clip to hold 2 wiring harnesses. Also circled in red is the breather which mounts to the bottom of the air filter box. Disconnect this bad boy
Step 5:

I'm not kidding when I say everything imaginable has to go. Here I'm yanking the battery and battery box. ..
Make sure to disconnect the NEGATIVE battery lead followed by the positive battery lead. It's a good habit to get into. Also as you might have guessed those rear fairings? They've got to come off.
Step 6:

To get the battery box out after you remove the top panel and leave it dangle, remove the battery AND remove the three screws holding the battery box to the frame...
There are two more screws underneath the battery pad which have to come out. I like to keep things together so I also circled in red the screws that hold the battery box down outside of the box. By keeping all these screws together in the battery box you're less likely to lose them.
Step 7:

Sigh... After you've removed the rear fairings and tail light assembly you're ready to drop the mud guard. The mud guard is only really held in by 4 screws (And the tail light assembly which should already be removed). The two screws in the side that also hold the fairings on (which have already been removed to remove those fairings, and there's a screw on each side of the bike underneath the passenger peg mounts.
It's kind of blurry, but here I removed the two screws holding one of the passenger mounts on and have removed the screw (circled in red) holding that side of the mud guard in. Pheww. It's the same thing on the other side.
Step 8:

I circled in red where the two intake hoses lead from the air box to the carburetors. I jabbed all around both hoses to break them free from their glue captors (I don't cater to their terrorism). With any luck you should be able to pull back slightly on the air box and separate the hose from the air box.
Step 9:

Here's where it starts getting hard to explain as there's a lot of yanking and cursing. The air box is comprised of two compartments. The side which lends access to the air filter element is removable from the main compartment. I **** you not there's 8 or so screws all around the air box attaching this guy in. Remove all of the screws and then check because there's probably 2-3 more. With any luck you'll get them all and the two compartments will separate.
With the mud guard dropped a bit you can finagle the air box around and with a lot of effort should be able to yank the small air box compartment up. Here I am pulling it through.
...
There's one wiring harness that I didn't look into what function it serves that connects on the mud flap. You need to disconnect that (otherwise you can't swing the mud flap around)...
So with a little effort and while making sure nothing is snagging you should be able to pull the mud flap out a bit and spin it. The main chamber of the air box pulls through where the mud flap goes and is FREE AT LAST. I didn't catch any pictures of this as I was pretty pissed off trying to get everything free...
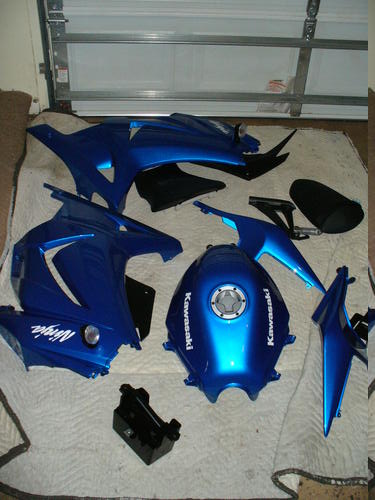
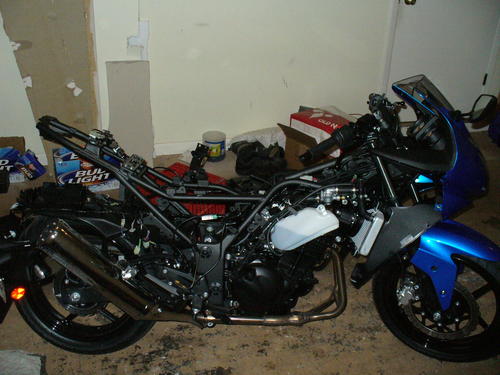
Edit: Thanks TheDuck for the pics of the bike disassembled! (I can lie and say their mine as MINE is also blue)
Here's a good idea of what you have to remove to take out this box (Something to consider)
And the bike will wind up looking something LIKE...
Next up I'll show more magical happy pictures as things go back together.