
|
 November 21st, 2008, 10:29 PM
|
#1 |
|
That's me!
Name: TJ
Location: Ames, IA
Join Date: Nov 2008 Motorcycle(s): 2008 Ninja 250r (Tis blue), 2008 CBR600RR Posts: 454
|
Now that these bikes have been out almost a year a lot of people are likely coming upon their 7,500 mile "Valve check" service. This isn't a "hard" thing to do, but it does involve you doing a fair amount of tearing into your bike. If you're not too confident with tearing your bike down, or don't consider yourself "Mechanically-Inclined" then I'd shy away from this one
 But anywho as I've learned with this style engine the valves wear in a manner that the gap (referred to as "valve lash") decreases over time. Therefore at 7,500 miles it's considered wise to check the valve lash to ensure it is within specs. This DIY delves into how to check the valve lash. I'll post a separate DIY on how to adjust the lash, but this gets you most of the way there Step 1 - First you need to remove the front fairings, gas tank (and consequently the seat) 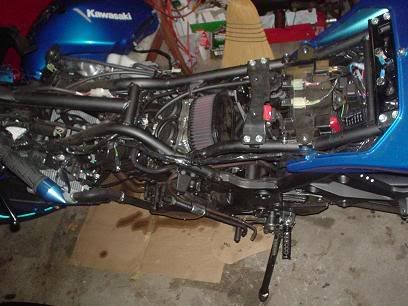 Step 2 - Get your bearings and take a note of what you're dealing with: 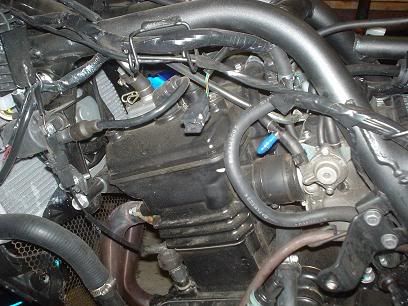 The valve cover has to come off (which in itself isn't too complicated as only 4 bolts secure it). It's the crap around it that makes it a little more complicated to remove... Step 3 - Pull the spark plug boots 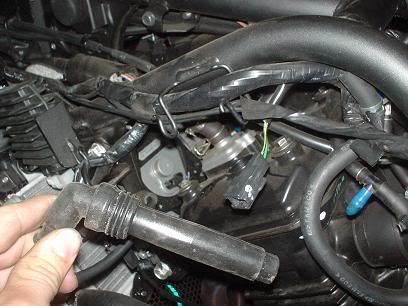 They can be a little tricky to get OUT and around the frame. Just be gentle and try to not rip them out. Simply set both boots out of the way... You don't HAVE to remove the spark plugs in this step (It's easier to wait actually). I don't have the Kleen-air system hooked up on my bike, but if you do on yours you need to move the hose. The one hose that connects in the middle of the valve cover is it and simply needs to be pulled and set aside. Step 4 - Remove valve cover bolts 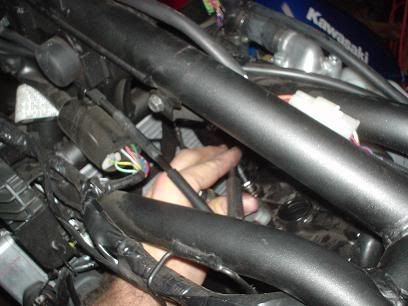 There are (4) 10mm perimeter bolts securing the valve cover. Remove them and try to get the washers underneath them out as well. Otherwise they'll fall off when you remove the valve cover and possibly get lost. Step 5 - Now you need to LOOSEN the upper radiator hose and thermostat housing. 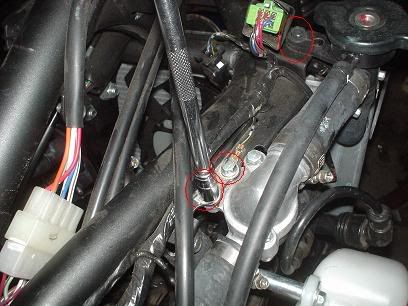 Start with the thermostat housing. There are (2) 8mm bolts (one has a grounding wire attached). Step 6 - Remove the radiator cap mount. 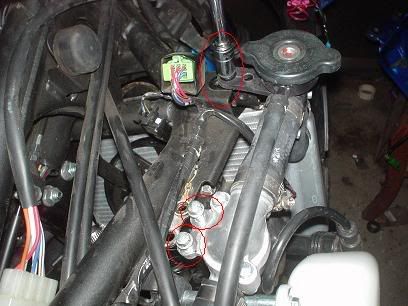 The circled 10mm bolt should be removed freeing the radiator cap. I also point out that whenever you can try to hand thead removed fasteners so you don't lose them and know EXACTLY where they belong. That's why I circled the previously removed bolts from the thermostat housing. Notice how I put them BACK into the thermostat housing and simply hand threaded them? Don't be that person with a 'bolt bin' with random nuts, bolts, and washers. Step 7 - Remove the radiator reservoir mount. 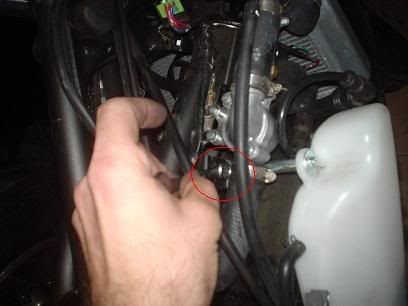 There should be a little more room between the thermostat housing and the frame to remove the 10mm bolt that the radiator reservoir mount attaches to. Remove that and the long 8mm bolt that goes through the radiator reservoir INTO the mount. The reservoir is now free to swing around. Step 8 - Remove the engine support... 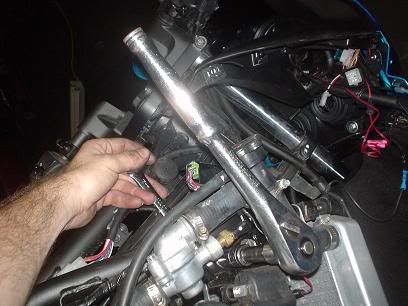 There are (2) 14mm bolts threading into matching 14mm nuts. The two in this picture go through the engine support and through the frame (for reference you can see they are RIGHT above the right side coil). I used a 14mm closed wrench and a 14mm socket wrench to remove these bastards. At the bottom of this mount is one more 14mm nut. THAT nut needs to be removed, but not the bolt. The bolt is a through-bolt that goes from one side of the from, through the engine mounts, out this side. So after you remove the nut simply PUSH the bolt about 2 inches in so that the support is free. Step 9 - Finish removing bolts attached to the support. 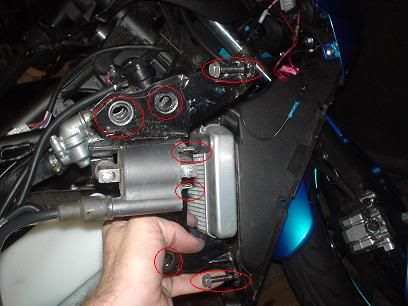 So let me break this picture down. The two side-by-side holes were the nuts/bolts I just removed. Where my hand is is the nut I removed and pushed the bolt in about 2". Above and below the radiator are 8mm bolts. Don't be confused by the picture. I removed them and HERE I've put them into the back of the bracket (again so I don't lose them). They aren't securing anything in this picture! Lastly make sure you pull the red and green wires from the coil... Step 10 - Pull the engine support mount 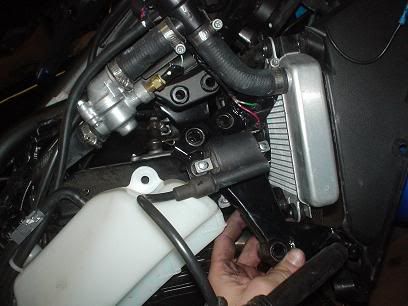 GENTLY shimmy the support mount down. You should have to apply a little pressure to push the radiator forward to help this along. The mount should slide down and it along with the attached coil can safely be removed. I point out to exercise caution here. If you're careless you can easilly bend fins or even puncture the core on the radiator. That'd be bad Step 11 - Remove valve cover. 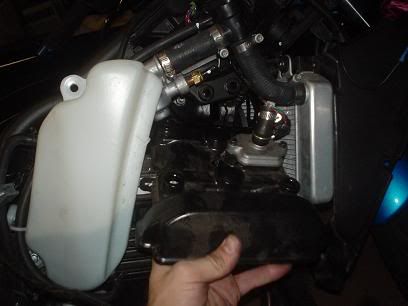 The valve cover is kind of tricky to get out, but with a little loving will come up and out. Notice how the reservoir swings upward along with the hoses. Step 12 - LOOSEN the spark plugs. 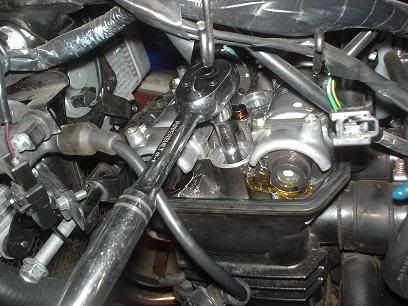 With a 5/8" spark plug socket loosen each of the spark plugs (It helps when you turn the engine over so that there is no compression present). You don't need to fully pull the plugs out, just loosen them and let them chill down there. Step 13 - Remove inspection plugs. 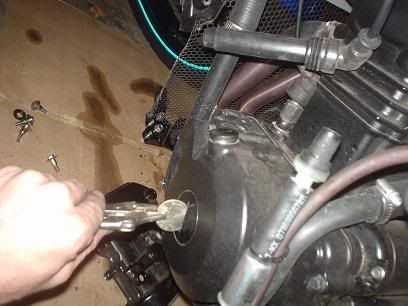 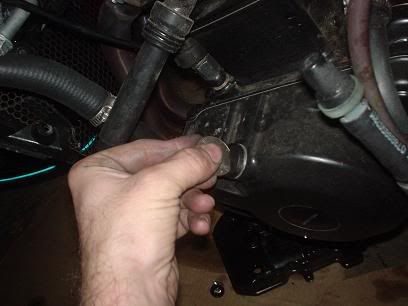 It's noted on the faq at Ninja250.org to use a nickle on these plugs, but I had a silver dollar which works even better. It is NOT recommended to use a flat blade screwdriver as this can damage the little plastic covers... |

|

|
|
November 21st, 2008, 10:33 PM
|
#2 |
|
That's me!
Name: TJ
Location: Ames, IA
Join Date: Nov 2008 Motorcycle(s): 2008 Ninja 250r (Tis blue), 2008 CBR600RR Posts: 454
|
Step 14 - Check the lash!
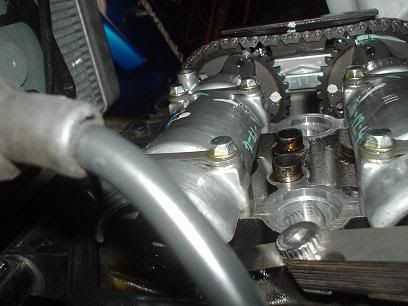 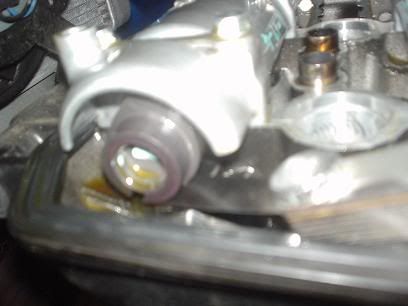 The service manual says to turn the engine over (Putting a 14mm socket wrench on the crankshaft bolt that you removed the cover from accomplishes this) until you see (in the upper sight hole that you accessed in the last step) shows a "2|T" marking. This annoyed me as it's 'pretty' accurate, as you can check the intake/exhaust valves on a single cylinder in one step. This method doesn't garauntee the camshaft is perfectly closed IMO... For absolute accuracy (you can kind of see it in the pictures above) I'd turn the engine until the lobes for that cylinders valves (on the camshaft) were pointing opposite the lifter. So for example in the cylinder above the camshaft lobe is opposite the lifter and I was able to check that and and lifter next to it (since there are 2 intake and 2 exhaust valves per cylinder). Stick the feeler gauge between the camshaft and the lifter and keep stepping up the thickness until you simply can't stick the feeler gauge between the two (If you're really having to force it, then that feeler gauge is TOO thick). Then write down the maximum thickness feeler gauge you could fit. Write each of these numbers down for EACH valve. With the further cylinder it's hard to see the lobes of the camshaft as that side of the engine is obscured by the timing chain and sprockets. To find each of those valves closed points you can look closely and see the lifters move. NOTE when the lifters are completely open (down) and take a look at the position of the camshaft ends. Then just turn the engine until the camshaft has turned 180 degrees. Then measure those two lifter's gaps . It might sound overly complicated, but once you SEE it for yourself it should make more sense. For an example here are my final results: Exhaust valves (the camshaft at the front of the engine) #1 = .0065" #2 = .0080" #3 = .0070" #4 = .0060" Intake valves (the camshaft at the back of the engine closest to the carburetors) #5 = .0095" #6 = .0070" #7 = .0075" #8 = .0080" The MINIMUM spec for the exhaust valves is .0087" and the maximum .0114" . So only ONE valve was showing within the recommended tolerances. As for the intake valves the specifications are a minimum of .0059" - .0094" . For the intakes every one was in spec (valve #5 was close enough ). I'll have to now remove the cam chain cover, cam chain, and cams to access the lifters. From here you have to measure each shim and find a new shim that brings you to the desired spec (See the upcoming "How to adjust your valves" thread for that)... Once you're satisfied everything goes back together in reverse of how you took it apart. Take note that I recommend using blue loctite on all bolt threads and anti-sieze on the spark plugs. OH, and I'll post this in the other thread, but if two things to consider upon re-assembly: 1.) Remove the two seals that seal the spark plug holes from the underside of the valve cover: 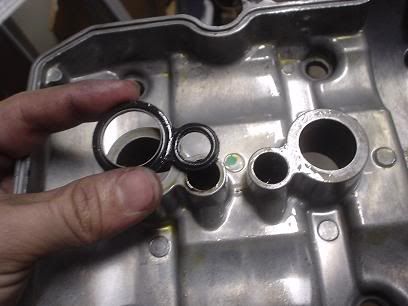 and set them over the holes on the head. I didn't do this at first and one moved and got crushed. This caused an oil leak which I discovered quick enough... RE-installing the CCT: 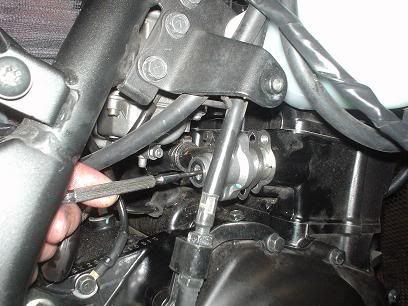 You need to 'reset' the CCT before reinstalling it!! This entails removing the 10mm bolt and inserting a little flat blade screwdriver. You're supposed to turn this clockwise (which in turn causes the shaft to pull backwards into the CCT housing... This is tricky to accomplish in this tight area so I.... 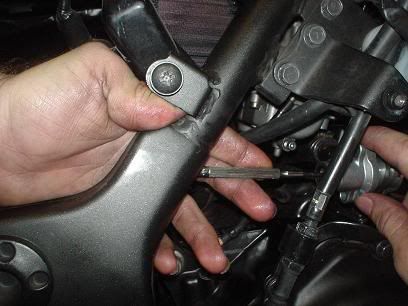 Held the little screwdriver with one hand and turned the housing COUNTER-clockwise (thus doing the same thing as simply turning the screwdriver clockwise). Once you can't turn this any more fully press the housing into the block and put one of the 8mm bolts in to hold things. THEN you can let go of the flat-blade screwdriver, install the other 8mm housing bolt and then lastly the 10mm cap. |
|
|
|
|
December 30th, 2008, 11:48 PM
|
#3 |
|
Join Date: Nov 2008 Posts: Too much.
|
Sorry if I missed it... How many miles was on your bike when you did this check?
|
|
|
|
|
December 31st, 2008, 03:51 AM
|
#4 |
|
That's me!
Name: TJ
Location: Ames, IA
Join Date: Nov 2008 Motorcycle(s): 2008 Ninja 250r (Tis blue), 2008 CBR600RR Posts: 454
|
Well it was supposed to be 7,500, but I was almost at 8,000

|
|
|
|
|
December 31st, 2008, 03:55 AM
|
#5 |
|
Join Date: Nov 2008 Posts: Too much.
|
you happen to know of anyone else that has checked/adjusted their valves on their 08/09 bikes? I'm trying to figure out if yours needing adjustment is normal or just from you pounding the crap out of it.

|
|
|
|
|
January 29th, 2009, 11:58 AM
|
#6 |
|
Don't Be Evil!
Name: Miles
Location: Excelsior, MN
Join Date: Jan 2009 Motorcycle(s): 08 250R Posts: 92
|
I have my bike torn down now. And tonight I will be checking the lash. I only have 5500 miles on it. But its winter so I figure ill get it over with. Ill post my findings tonight.
|
|
|
|
|
January 29th, 2009, 07:50 PM
|
#7 |
|
Don't Be Evil!
Name: Miles
Location: Excelsior, MN
Join Date: Jan 2009 Motorcycle(s): 08 250R Posts: 92
|
Here were my results at 5550 miles:
Exhaust: (Right to Left) 1.008 2.008 3.008 4.008 Intake: (Right to Left) 5.006 6.007 7.007 8.007 I need to get a set of feeler gauges that does ten thousandths. But all my exhausts are a little to tight. I dont know if ill change them out yet though. Last futzed with by maxedpenny; January 29th, 2009 at 09:04 PM. |
|
|
|
|
January 30th, 2009, 03:27 PM
|
#8 |
|
That's me!
Name: TJ
Location: Ames, IA
Join Date: Nov 2008 Motorcycle(s): 2008 Ninja 250r (Tis blue), 2008 CBR600RR Posts: 454
|
If you don't mind being without your bike for a week or so (while the shims are shipped) then I'd say; while you're there you might as well yank the cams and check the shims that are in there. As for getting more accuracy: Most feeler gauges include .0005" thickness gauges. You just slip your .00x" + that one in to give you a little closer guestimation of what you're dealing with. So you can narrow it down to being perhaps .0085"-.0090" (but since a .009" wouldn't fit you can figure it's probably .00875"
If that .0005" won't fit then you know you're closer to .0080" (so you can figure .00825"... If that .0005" JUST fits with a little effort then you know you're probably right at .0085" ... Did you have fun trying to get your valve cover off?
|
|
|
|
|
January 30th, 2009, 06:06 PM
|
#9 |
|
Don't Be Evil!
Name: Miles
Location: Excelsior, MN
Join Date: Jan 2009 Motorcycle(s): 08 250R Posts: 92
|
Ya. It was a blast. Why is there that f-ing tab under the coolant line? I swear it only there to make it harder. I wont get to ride till the snow melts
 so one week is no problem.But I need to buy a set that has the .0005 because mine didn't. For the life of me i couldn't find any thing written on my flywheel. I just went off cam position. so one week is no problem.But I need to buy a set that has the .0005 because mine didn't. For the life of me i couldn't find any thing written on my flywheel. I just went off cam position.
|
|
|
|
|
May 12th, 2010, 07:38 PM
|
#10 |
|
ninjette.org newbie
Name: Jeff
Location: Richmond
Join Date: May 2010 Motorcycle(s): 2009 250 Ninja Black Posts: 3
|
So if anyone is doing this for the first time, here are some things you should not do.
1. wait out a valve adjust (if it runs its fine, is not advice to listen to) I rode all 12000 miles hard in a year, and 3 of 4 exhausts do not take .038 mm feeler. All intakes are out of spec (.12-.15mm) but are not closed. 2. dump a little sand in the top end because you didnt clean off the bike before you start. Seriously, take the time to DIY or pay for it per periodic maintenance schedule. If you DIY, wash the F'ing bike, you will avoid a world of pain, a sad sad world of pain. Ride Safe. |
|
|
|
|
May 12th, 2010, 07:57 PM
|
#11 |
|
ninjette.org certified postwhore
Name: Dave
Location: Michigan
Join Date: May 2009 Motorcycle(s): 2009 Kawasaki Ninja 650RTE & 2009 Kawasaki Ninja 250R (SOLD) Posts: A lot.
|
Whats the common Price for having a Dealership do the 7,500 mile valve check?
Whats the common Price for having a Dealership sync the Carbs at the same time also? I ask so i have an Idea when i call my dealership, to know if their Wayyy overpriced or avg.! |
|
|
|
|
May 17th, 2010, 05:11 PM
|
#12 |
|
ninjette.org certified postwhore
Name: Paul
Location: Roanoke, VA
Join Date: Jun 2009 Motorcycle(s): 2008 Candy Plasma Blue 250R Posts: A lot.
|
I was charged ~$170 (incl parts) for the full 7,500mi maintenance which did include the valve check. This was done in Princeton, WV at Hillbilly Cycle Sales, August 2009
__________________________________________________
Proud member of the Blue Army |
|
|
|
|
May 17th, 2010, 06:33 PM
|
#13 | |
|
ninjette.org certified postwhore
Name: Dave
Location: Michigan
Join Date: May 2009 Motorcycle(s): 2009 Kawasaki Ninja 650RTE & 2009 Kawasaki Ninja 250R (SOLD) Posts: A lot.
|
Quote:
Did you get a discount? Like do you have connections to that dealership, so they only charged ya 50% of normal? $170 is waaay cheaper then i was imagining, i was thinking $300 just for the Valve check. |
|
|
|
|
|
May 17th, 2010, 09:02 PM
|
#14 |
|
That's me!
Name: TJ
Location: Ames, IA
Join Date: Nov 2008 Motorcycle(s): 2008 Ninja 250r (Tis blue), 2008 CBR600RR Posts: 454
|
That's just the valve check by the sound of it. If they didn't change any of the shims that's not terribly bad. If they DID have to adjust some of them then $170 would be killer.
|
|
|
|
|
May 18th, 2010, 05:35 PM
|
#15 | |
|
ninjette.org member
Name: steve
Location: central virginia
Join Date: Mar 2010 Motorcycle(s): 09 Ninja 250 Posts: 64
|
Quote:
lol aint that the truth....that thing is a pain.
__________________________________________________
"An armed society is a polite society" |
|
|
|
|
|
May 21st, 2010, 02:25 PM
|
#16 | |
|
ninjette.org certified postwhore
Name: Paul
Location: Roanoke, VA
Join Date: Jun 2009 Motorcycle(s): 2008 Candy Plasma Blue 250R Posts: A lot.
|
Quote:
 All that said: when I checked my valves some 2,500mi later I discovered they (probably) didn't clean off my cylinder head cover before opening the engine. I'm fairly sure it was them as they were the last ones in there and I cleaned the hell out of the cover before opening it. Left me about teaspoon-full of fine sand and gravel in the top end with the valves and cams. Doesn't seem to have screwed anything up though, thankfully.
__________________________________________________
Proud member of the Blue Army |
|
|
|
|
|
November 14th, 2010, 06:38 AM
|
#17 |
|
ninjette.org sage
Name: J
Location: Oklahoma
Join Date: Sep 2010 Motorcycle(s): 2008 250R Posts: 771
|
Be careful that you do not pull up the coolant hose going into the head when lifting off the valve cover? Mine came off during cover removal, and look what happened!
Lucky, I was able to suck most of it out with a small 2-way pump, and mop up a little more with some paper towels. I then just let the engine run for a few minutes and changed it before heading out. Oh, and if it comes out, make sure it goes back in all the way because it will definitely leak :P .
__________________________________________________
Factory Pro Jet Kit, K&N R-0990 Pod Filter, Sportisi VR Black Exhaust, BRT TIS Ignition, White Paint, and 16/41 Sprockets. Soon: Maybe a 37T Rear Sprocket if I get things running like I'd hoped. |
|
|
|
|
April 17th, 2011, 03:39 PM
|
#18 |
|
ninjette.org guru
Name: Mikel
Location: Valley of the Sun
Join Date: Mar 2009 Motorcycle(s): '09 Blue Kawasaki KLE650 Versys, '95 Ducati 900SS/CR (undergoing track conversion) Posts: 287
|
At 7,500 miles I had 2 intake valves on the same cylinder on the loose side, but the rest were fairly close to the mid line of the specs.
Now we fast forward to 10,500 and a problem with the bike idling and the power seeming a little sluggish. Can't find any vacuum leaks, but when trying to synch the carbs, kept getting the needles falling in the "Valve Timing/Intake Leak" read zone on my gauges... Pulled the cover, and checked the valves... The two intakes that were loose and readjusted to as close to .0085 as I could get now read .006 All 4 exhaust are now .004/.006/.000/.004 Yup, that's right, the 3rd exhaust valve has ZERO clearance which means the valve was no longer closing all the way. Dealer opens on Tuesday and I know THIS one has the shims in stock. (Went to a "dealer" today who told me they do not STOCK the shims at all for Customers, but only for the service department...headdesk Moral: Even if you don't skip the recommended adjustment, things can still change
__________________________________________________
2009 KLE650 LSL bars, Full Muzzy PC-V 1995 900SS/CR mildly modified |
|
|
|
|
April 17th, 2011, 05:28 PM
|
#19 | |
|
ex-ninjette.org guru :o
Name: Trevor
Location: Barrie, Ontario
Join Date: Jun 2010 Motorcycle(s): 2003 SV1000 S Posts: 475
|
Quote:
|
|
|
|
|
|
April 17th, 2011, 05:41 PM
|
#20 | |
|
ninjette.org dude
Name: 1 guess :-)
Location: SF Bay Area
Join Date: Jun 2008 Motorcycle(s): '13 Ninja 300 (white, the fastest color!), '13 R1200RT, '14 CRF250L, '12 TT-R125LE Posts: Too much.
Blog Entries: 7
|
Quote:
__________________________________________________
Montgomery Street Motorcycle Club / cal24.com / crf250l.org / ninjette.org ninjette.org Terms of Service Shopping for motorcycle parts or equipment? Come here first. The friendliest Ninja 250R/300/400 forum on the internet! (especially Unregistered) |
|
|
|
|
|
April 18th, 2011, 06:50 AM
|
#21 |
|
ninjette.org member
Name: Lisa
Location: DFW
Join Date: Apr 2009 Motorcycle(s): 09 Ninja 250 Posts: 184
|
Just had my 7500 mile valve adjustment done at the dealer and they said all of mine were out of spec. I was at 7300 miles when I had it done.
|
|
|
|
|
June 14th, 2011, 10:52 AM
|
#22 |
|
ninjette.org member
Name: parker
Location: STL
Join Date: Apr 2009 Motorcycle(s): 09 n250, 14 n300, 22 n400 Posts: 99
|
my first rodeo, need clarification:
1. "turn engine over." i've read on yeager group you go counter clockwise with your 14mm socket, is this correct? 2. i start checking cylinder 1, and right away my exhaust and intake are out of spec's. do i need to continue checking the rest of the valves, or can i go right to removing the cams and adjusting? 3. my feeler gauge start at .04mm/ .0015" and go up from there. should i invest in a .0005" gauge? tia, parker |
|
|
|
|
June 14th, 2011, 03:39 PM
|
#23 | |
|
ninjette.org certified postwhore
Name: Paul
Location: Roanoke, VA
Join Date: Jun 2009 Motorcycle(s): 2008 Candy Plasma Blue 250R Posts: A lot.
|
Quote:
2. Definitely check all of your specs. You need to know those clearances in order to put in the correct shims to get them in-spec. I advise taking each measurement at least twice if not three times, especially for your first time with valves. Also suggest turning the engine over between measurements (but of course returning to the correct cam position for the valve you're looking at) so you get a true second and third measure instead of just checking it repeatedly in the same position. That said, I'm a scientist by trade and like to be bloody sure of my measurements before I mess with anything, especially something that's gonna be moving 10-12,000 times/minute between my legs. 3. Personally, I'd invest in the smaller gauge leaves. Right now, if I'm understanding you right, your smallest blade is 0.04mm. You should be able to combine that one with anything between .11 and .25 to figure out if your valves are in spec, but the more accurate the measurement, the more accurately you can pick the right size of shim to get the desired clearance result. Long explanations, but I remember doing the valves my first time and loved it when people explained things better.
__________________________________________________
Proud member of the Blue Army Last futzed with by Momaru; June 15th, 2011 at 11:27 AM. |
|
|
|
|
|
June 14th, 2011, 08:33 PM
|
#24 |
|
ninjette.org member
Name: parker
Location: STL
Join Date: Apr 2009 Motorcycle(s): 09 n250, 14 n300, 22 n400 Posts: 99
|
thank you.
one correction: counter clockwise is correct when the engine is running. so i wasn't sure why the manual says clockwise. anyone have a preferred gauge brand? i'm checking on amazon and ebay- only .0005" ones on amazon are 12" long? Last futzed with by pb3; June 15th, 2011 at 08:39 AM. |
|
|
|
|
June 15th, 2011, 11:22 AM
|
#25 | |
|
ninjette.org certified postwhore
Name: Paul
Location: Roanoke, VA
Join Date: Jun 2009 Motorcycle(s): 2008 Candy Plasma Blue 250R Posts: A lot.
|
Quote:
I've got a 36-blade set of feelers from Craftsman (linky) that's served me well.
__________________________________________________
Proud member of the Blue Army |
|
|
|
|
|
August 3rd, 2011, 11:07 AM
|
#26 |
|
ninjette.org certified postwhore
Name: Cody
Location: NoVa
Join Date: Jan 2011 Motorcycle(s): 06 yzf r6r previously: 09 ninja 250r, black 07 zx6r Posts: A lot.
|
I have to get this done asap. I'm not gonna pay $200+ for a dealer to do it for me. Besides, I like to rip into my bike and get a good feel for the engine components. I'm sure I'll post back with some questions once I open her up.
__________________________________________________

|
|
|
|
|
March 3rd, 2012, 08:36 PM
|
#27 |
|
ninjette.org newbie
Name: mike
Location: So Cal
Join Date: Mar 2012 Motorcycle(s): 08' 250r Posts: 1
|
oops
Im at 14.5k ish
I have never checked my valves.... I kinda was following the theory of if something works don't fix it |
|
|
|
|
March 13th, 2012, 06:07 AM
|
#28 | |
|
CPT Falcon
Name: J.Emmett Turner
Location: Newnan, GA
Join Date: Apr 2009 Motorcycle(s): '08 CP Blue EX250J, '97 unpainted EX250F, 2nd '97 unpainted EX250F (no engine), '07 black EX250F Posts: A lot.
|
Quote:
|
|
|
|
|
|
March 13th, 2012, 01:40 PM
|
#29 |
|
ninjette.org certified postwhore
Name: .
Location: .
Join Date: Feb 2011 Motorcycle(s): . Posts: Too much.
MOTM - Feb '13, Feb '14
|
adjust those valves! They get tighter with mileage.
|
|
|
|
|
April 15th, 2013, 09:24 PM
|
#30 |
|
ninjette.org member
Name: Phil
Location: Weatherford, OK
Join Date: Nov 2012 Motorcycle(s): 2009 ninja 250R more awesome SE Posts: 108
|
If the valves where checked right at 7500 how many miles until the second inspection?
|
|
|
|
|
April 15th, 2013, 09:56 PM
|
#31 | |
|
CPT Falcon
Name: J.Emmett Turner
Location: Newnan, GA
Join Date: Apr 2009 Motorcycle(s): '08 CP Blue EX250J, '97 unpainted EX250F, 2nd '97 unpainted EX250F (no engine), '07 black EX250F Posts: A lot.
|
Quote:
|
|
|
|
|
|
August 6th, 2013, 10:29 AM
|
#32 |
|
Sarcasm: Yea that'll work
Name: Andy
Location: Essex Jct, VT
Join Date: Dec 2008 Motorcycle(s): '08 Ninja 250R Posts: 330
|
I'm about to start doing the valves on my bike (~8,300 miles) and I have a seemingly stupid question. After looking at the bike without it's fairings for some time now, it seems like it would be much easier to remove the valve cover from the left side of the bike...why aren't we pulling it out that way? Or is there some obvious thing that I'm missing here?
__________________________________________________
'08 Blue - Seat Cowl - A-Tech CF Fender Elim - Zartan's Exhaust Hanger - Dynojet Kit - Drilled Slides - Snorkel Removed - K&N Drop In Air Filter - Tech Spec Grips - Sportisi Windscreen & VR Exhaust |
|
|
|
|
May 16th, 2016, 01:51 PM
|
#33 |
|
ninjette.org guru
Name: Danger
Location: Canada
Join Date: Jan 2011 Motorcycle(s): 15 CBR300R, 14 BWS50, 09 FZ1, 09 Ninja 250, 06 CRF450R Motard, 03 ZX-6R Posts: 422
|
I checked the valves on my 2009 250 today. It has 11,195 kms (6956 miles).
Exhaust: #1=0.009, #2=0.009, #3=0.008, #4=0.007 Intake: #1= 0.007, #2=0.008, #3=0.006, #4=0.006 #3 and #4 exhaust valves are tight but I am wondering if they would be ok for another 3-4000kms (1800-2500 miles) when I will have more time to work on it. The bike will be used by my 16 year old son and I will be going with him on trips. He will not be going to the track with it until next year. What's everyone's thoughts? Thank you.
__________________________________________________
15 CBR300R, 14 BWS50, 09 FZ1, 09 Ninja 250, 06 CRF450R Motard, 03 ZX-6R 636 
|
|
|
|
|
May 16th, 2016, 02:08 PM
|
#34 |
|
Vintage Screwball
Name: B
Location: Washington
Join Date: Feb 2016 Motorcycle(s): 2011 Ninja 250, 2008 Ninja 250, 2019 KTM 1290SDR, 2017 FZ10 Posts: A lot.
MOTM - Mar '16
|
I always adjust to the middle-to-high end of the spec. This ensures that they stay in spec until the next service. You really don't want tight valves....and yours are out of spec.
.0087" and the maximum .0114" for exhaust. I'd put them somewhere around 0.010 at least. Two of your intakes are tight as well. Minimum spec is 0.006". max is 0.009. The should all be 0.008 or more IMO.
__________________________________________________
Goin' fast on slow bikes! 
|
|
|
|
|
May 16th, 2016, 02:15 PM
|
#35 |
|
ninjette.org guru
Name: Danger
Location: Canada
Join Date: Jan 2011 Motorcycle(s): 15 CBR300R, 14 BWS50, 09 FZ1, 09 Ninja 250, 06 CRF450R Motard, 03 ZX-6R Posts: 422
|
Its it odd to have the tight valves all on cylinder #2 and none on cylinder #1? I lined up the white dot (no 2T mark on my 2009) to measure at TDC for cylinder #2. Thank you for the reply.
__________________________________________________
15 CBR300R, 14 BWS50, 09 FZ1, 09 Ninja 250, 06 CRF450R Motard, 03 ZX-6R 636
|
|
|
|
|
May 16th, 2016, 02:26 PM
|
#36 | |
|
Vintage Screwball
Name: B
Location: Washington
Join Date: Feb 2016 Motorcycle(s): 2011 Ninja 250, 2008 Ninja 250, 2019 KTM 1290SDR, 2017 FZ10 Posts: A lot.
MOTM - Mar '16
|
Quote:
It never hurts to measure again...might even save you some work!
__________________________________________________
Goin' fast on slow bikes!
|
|
|
|
|
|
May 16th, 2016, 02:37 PM
|
#37 |
|
ninjette.org guru
Name: Danger
Location: Canada
Join Date: Jan 2011 Motorcycle(s): 15 CBR300R, 14 BWS50, 09 FZ1, 09 Ninja 250, 06 CRF450R Motard, 03 ZX-6R Posts: 422
|
Thank you. I checked again and came up with the same figures.
__________________________________________________
15 CBR300R, 14 BWS50, 09 FZ1, 09 Ninja 250, 06 CRF450R Motard, 03 ZX-6R 636
|
|
|
|
|
May 16th, 2016, 02:44 PM
|
#38 | |
|
Vintage Screwball
Name: B
Location: Washington
Join Date: Feb 2016 Motorcycle(s): 2011 Ninja 250, 2008 Ninja 250, 2019 KTM 1290SDR, 2017 FZ10 Posts: A lot.
MOTM - Mar '16
|
Quote:
One piece of paper is three thousandths (roughly). That means it is in spec by 1/10th the thickness of a piece of paper. 
__________________________________________________
Goin' fast on slow bikes!
|
|
|
|
|
|
May 16th, 2016, 02:46 PM
|
#39 |
|
ninjette.org guru
Name: Danger
Location: Canada
Join Date: Jan 2011 Motorcycle(s): 15 CBR300R, 14 BWS50, 09 FZ1, 09 Ninja 250, 06 CRF450R Motard, 03 ZX-6R Posts: 422
|
Damnit. I have only ever checked valves before. This is the 1st bike that I have owned where they were out of spec. Looks like I have some reading to do before adjusting. Thanks for your help.
__________________________________________________
15 CBR300R, 14 BWS50, 09 FZ1, 09 Ninja 250, 06 CRF450R Motard, 03 ZX-6R 636
|
|
|
|
|
May 16th, 2016, 02:55 PM
|
#40 | |
|
Vintage Screwball
Name: B
Location: Washington
Join Date: Feb 2016 Motorcycle(s): 2011 Ninja 250, 2008 Ninja 250, 2019 KTM 1290SDR, 2017 FZ10 Posts: A lot.
MOTM - Mar '16
|
Quote:
It's not that difficult if you take your time. You will also need a set of micrometers, NOT calipers, to measure the old shims so you know what size you need. As many people will poo poo them, the set from Harbor Freight are cheap and work just fine. I have checked them against my Mitutoyo's and found them to be just as accurate.
__________________________________________________
Goin' fast on slow bikes!
|
|
|
|
|
 |
 Similar Threads
|
||||
| Thread | Thread Starter | Forum | Replies | Last Post |
| DIY Valve Adjustment Video | ninja250 | 2008 - 2012 Ninja 250R Tech Talk | 287 | February 14th, 2023 05:58 AM |
| DIY - Adjusting Valves on '08+ 250r (WITH Pictures) | VeX | 2008 - 2012 Ninja 250R Tech Talk | 93 | August 21st, 2017 01:34 PM |
| DIY: How To Change/Replace Your Coolant w/ Pictures | gilmorec61 | 2008 - 2012 Ninja 250R Tech Talk | 38 | March 31st, 2015 01:34 PM |
| DIY: Removing the Valve Cover on a Pregen | n4mwd | Videos | 1 | July 1st, 2013 05:26 PM |
| Is there a way for the pictures to be reposted in old DIY threads? | Ben M | Forum Information | 1 | September 19th, 2012 08:34 PM |
|
|


