
|
 February 3rd, 2012, 06:46 AM
|
#1 |
|
That rider dude.
Name: Eric
Location: Orlando, Fl.
Join Date: Apr 2011 Motorcycle(s): 2011 White Ninja 250 SE. Posts: A lot.
|
LEDglow.com Product Review.
Are you in the market for LED lights? Well, I have a review for you. LEDglow.com is a website that sells LED lights for motorcycles, and here is my over all review of it. It's short, but good enough lol. This is only a review on their single colored lights. Not the multicolor, but I'm sure they're about the same.
Simplicity So lets start off with simplicity. When I first heard LEDs I was very turned off by the idea because the only thing that ran through my mind was "Man, that's a lot of wiring and crap I dont know". And its true, it was a lot of wiring and crap that I dont know about, but thanks to the kits that they sell, everything was plug and play. Plug the LED's into the control box (just snap them in), then connect the control box to the battery and a good ground. Then all you have to do if find where you want to mount them, and place them on the bike. The LEDs come with supplied double sided tacky stuff to do this. (Because who has time for technical terms right now?) Over All Simplicity: 10/10 Very simple, plug and play. Features and options To be honest, I didnt really think of this when I first got the kit. I did watch a video of someone with the same lights, but didnt really process what you're able to do with these lights. There are 3 basic settings that I think are all equally cool. The first is Solid: Obviously the light stays solid. The second is a Flash: The lights flash some what rapidly, and remind me of cops. For obvious reasons, you dont want to be riding around with this option on. The next is light the flash, but it more so fades on and off, so uh... the Fader: It fades on and off. All these have options of their own as well. Click the button for the solid light more then once, and you can change the brightness of the lights, from bright, to some what dim. Click the flasher button, and a cute girl pops out and... wait.. wait... no, thats not what happens. Just making sure you're paying attention  Click the flasher multiple times and the light flashes in a different more rapid pattern. And I think if you click the fader button, it fades on and off a bit quicker... I think... Click the flasher multiple times and the light flashes in a different more rapid pattern. And I think if you click the fader button, it fades on and off a bit quicker... I think...Over all Features and Options: 10/10 Got more then I expected! Quality Ok, so here's where things get serious. The quality of the lights are amazing, and work fine, it's plug and play buuttttt I did have a problem that costed me a lot of time and some more money. When I first connected the lights, they wouldnt turn on. I tried moving the ground wire to many different spots and got nothing. After a couple hours and more then a few curse words, I finally resorted to Ninjette. While I waited for replies I went to autozone and got more wire thinking maybe it's the power wires. Turns out, my remote wasnt working. A forum member asked if when I push the button on the remote, does the blue light turn on, which it didnt. The battery in the rand new remote was dead. A quick trip to radio shack, for 5 bucks I got a replacement and a spare. Finally the lights turned on and worked like a charm, and I was able to place them on the bike finally. It took many hours to figure out the problem, for something that should have only taken an hour. If you get a kit, it should only take you an hour if not less, but if somethings wrong and the light wont turn on, check the remote first before anything, because that's the only thing I can see that would go wrong. Over all quality: 9/10 Its good stuff, but I didnt need to waste my whole day because a damn remote battery didnt work. :\ Durability I put this for last. I had a couple LED's start to go out, and upon further inspection it's because some of the wires got pulled from their connecters. I handled the LED's delicately, but I think it's the fact that I hanged some off the side of the bike that was the problem. It was only for two of them, and all I had to do was push the wire back and duct tape it there to stay, and all works good now. Im just a little dissapointed, because I did handle it with care, or so I thought. Durability 8.5/10 Some wires came out, but I pushed them back in, and it works. Still dissapointed at how easy they pulled out though. Over with the whole product: 8.5/10 I have to take a point away because of the fact that I spent so much time thinking it was the wiring, when it was really the remote. I did pay $80, I would expect my remote to have a working battery. I also took .5 because of the durability issue. But over all I really love these LED's and really do have great things to say about them. They look amazing and I love the features. If you dont want to hassle with connecting wires and figuring out how to make everything work, I would recommend buying from these guys. It's so simple a cave man can... wait... this isnt a geico commercial, sorry Any ways. Hope this helped someone, somewhere, sometime. If there is any questions let me know. Here are a few pictures on my experiences.A word to the wise: There are a lot of wires in the aftermath. I just bundled them all up and shoved them under the seat (I know). But thats not bad. Also, if you get white, you may want to get some HID's too. Im now considering such because the overall coolness kinda looks off when you see the headlight is more yellow then the whole bike. :-) Also if you're wondering, I got the 10 LED strip set up. I find it good enough. I may have been a bit happier with the 12, but Im not sure where I would have put the extra 2. 10 lights up the bike great, for the white lights any who. Sorry for any typos or mishaps, been awake for almost 24 hours now. If any questions feel free to post. And if anyone else has bought from them feel free to share your own experience and your own pictures. When I finally got the light on after solving the remote issue (Thats not the remote on the tank btw, thats for my alarm. The remote is probably about the size of the round part.) 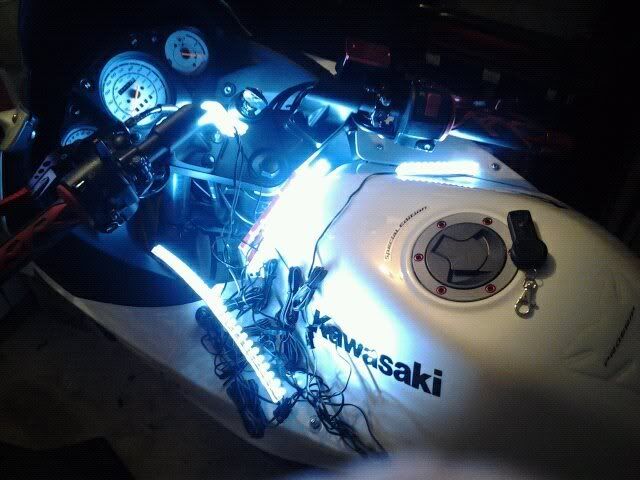 Left side when first completed:  Crappy picture:  Bad Ass picture:  As many people say with their LED's, much better looking in person x-) Im in love with my bike all over again.
__________________________________________________
Mods: flushmount Led front binkers, diode mod, pazzo levers, clear tank pad, racing replica grips, bike monkeys integrated tal light, zx-2r vinyls, rearsets, red bar ends, and more red accented stuff. |

|

|
|
February 3rd, 2012, 07:54 AM
|
#2 |
|
Avid Kitteh Poster
Name: Justin
Location: Norcal
Join Date: Sep 2011 Motorcycle(s): 2006 Yamaha TTR 50 SUCK IT Posts: A lot.
|
you should add a link to the kit you got.
__________________________________________________
I powdercoat stuff Help me pay for my addiction  I say funny stuff. http://twitter.com/JustinPWNSyou sometimes... I write like a 12 year old too, http://justinpwnsyou.wordpress.com/ |
|
|
|
|
February 3rd, 2012, 09:58 AM
|
#3 |
|
KThanksBye
Name: Kevin
Location: Orange County
Join Date: Mar 2011 Motorcycle(s): 2006 zx636r Posts: A lot.
|
I'm curious to how you mounted those LED strips. Pictures of her naked!!
__________________________________________________
----> My Youtube! <---- Unregistered, watch my youtube page! 
|
|
|
|
|
February 3rd, 2012, 10:47 AM
|
#4 |
|
Avid Kitteh Poster
Name: Justin
Location: Norcal
Join Date: Sep 2011 Motorcycle(s): 2006 Yamaha TTR 50 SUCK IT Posts: A lot.
|
I figure he uses double sided tape? Right?
you can get a certain type and it is straight up not coming up. Unless you use a razor blade on it.
__________________________________________________
I powdercoat stuff Help me pay for my addiction I say funny stuff. http://twitter.com/JustinPWNSyou sometimes... I write like a 12 year old too, http://justinpwnsyou.wordpress.com/ |
|
|
|
|
February 3rd, 2012, 02:26 PM
|
#5 |
|
hates stupid people
Name: Mark
Location: Oklahoma City
Join Date: Aug 2011 Motorcycle(s): 2005 ZX6R Posts: 860
|
Looks good man. I'm tempted to get some LEDs for my bike when I get it but kinda turned off by bundle of wires left over afterwards...Also, I thought it was funny that you referred to it as a fader. Could just be me but I usually see it referred to as the "breathing" mode. It's one of the options for the lights on my laptop keyboard as well....think about that when you look at your lights again and you'll see why.

__________________________________________________
My vlogging channel: Ma1iciousLogic |
|
|
|
|
February 3rd, 2012, 10:46 PM
|
#6 |
|
That rider dude.
Name: Eric
Location: Orlando, Fl.
Join Date: Apr 2011 Motorcycle(s): 2011 White Ninja 250 SE. Posts: A lot.
|
@Kevin, Ill take pictures. I only hae 2 leds on each side that are in the fairings. The front wheel has 2 in the very front (which i might wish thatI placed them on the back part since u can obviously see the LEDs when standing in front, but they're fine.) and then I have 4 LEDs on the back tail pointing down. You know how the tail on the bottom goes back, then dips and back more? I put 2 on the back on the side, then after the dip i put 2 more on the very back horizontally. Ill take pictures tomorrow when i get home.
@Justin yeah, double sided. the LEDs came with the double sided tape/tacky stuff on it. Works great and sticks great. @Mark the wires are managable, but there are a lot as you can see from the fist picture, and if your lazy like me, you'd probably just bundle them up and shove them in a spot lol.
__________________________________________________
Mods: flushmount Led front binkers, diode mod, pazzo levers, clear tank pad, racing replica grips, bike monkeys integrated tal light, zx-2r vinyls, rearsets, red bar ends, and more red accented stuff. |
|
|
|
|
March 20th, 2012, 08:20 PM
|
#7 |
|
ninjette.org newbie
Name: eXo
Location: Ottawa, Ontario
Join Date: Mar 2012 Motorcycle(s): 2010 Ninja 250R Special Edition Posts: 3
|
I have the same LEDGlow kit as you expect green. I'm having trouble with mine. It works perfectly fine expect my fuse burns out like every second day -_- ya not fun. I have mine wired directly to the battery. I have my positive (red wire) hooked up to the positive on the battery(red part on the battery and the negative (black wire) hooked up to the negative part of the battery (black part of battery). Does your fuse burn out? How do you have yours wired?
|
|
|
|
|
March 20th, 2012, 08:23 PM
|
#8 |
|
That rider dude.
Name: Eric
Location: Orlando, Fl.
Join Date: Apr 2011 Motorcycle(s): 2011 White Ninja 250 SE. Posts: A lot.
|
I havn't had any problems really. I have the wires connected directly to the battery as well. Have you checked and made sure that all the lights are connected and turned on when you turn on the LED's? In the instructions, it said make sure that all lights are plugged in before turning on the LED's, otherwise you could blow the fuse.
I know some wires did get pulled out of their connectors, and were flickering by the lightest touch. Nothing some tape didn't fix.
__________________________________________________
Mods: flushmount Led front binkers, diode mod, pazzo levers, clear tank pad, racing replica grips, bike monkeys integrated tal light, zx-2r vinyls, rearsets, red bar ends, and more red accented stuff. |
|
|
|
|
March 20th, 2012, 08:32 PM
|
#9 |
|
ninjette.org newbie
Name: eXo
Location: Ottawa, Ontario
Join Date: Mar 2012 Motorcycle(s): 2010 Ninja 250R Special Edition Posts: 3
|
So I just checked my wires and 1 of them was connected but it wasn't fully "clipped" in so I'm hoping that's what the problem was. We'll have to wait and see. Thanks you so much and thx for the quick reply! Great review by the way!
|
|
|
|
|
March 20th, 2012, 08:35 PM
|
#10 |
|
That rider dude.
Name: Eric
Location: Orlando, Fl.
Join Date: Apr 2011 Motorcycle(s): 2011 White Ninja 250 SE. Posts: A lot.
|
Not a problem. Hopefully that was it. I don't see (in my opinion) how that would be possible, but if the manual says it, then it must've happened to other people before lol. Perhaps more power but less disbursement causes the fuse to overload???
Keep me updated, and thanks! lol.
__________________________________________________
Mods: flushmount Led front binkers, diode mod, pazzo levers, clear tank pad, racing replica grips, bike monkeys integrated tal light, zx-2r vinyls, rearsets, red bar ends, and more red accented stuff. |
|
|
|
|
March 21st, 2012, 09:13 PM
|
#11 |
|
ninjette.org newbie
Name: eXo
Location: Ottawa, Ontario
Join Date: Mar 2012 Motorcycle(s): 2010 Ninja 250R Special Edition Posts: 3
|
So when I went to test it out today it was blown... again -_-. I really don't understand what's wrong. It works perfectly fine I'm able to turn it on and off multiple times. It randomly blows when I'm not using the bike.
|
|
|
|
|
March 22nd, 2012, 03:50 PM
|
#12 | |
|
Ninja World YAY
Name: Vik
Location: Bay Area
Join Date: Feb 2009 Motorcycle(s): Ninja 250 Posts: 102
|
Quote:
|
|
|
|
|
|
March 23rd, 2012, 01:15 AM
|
#13 |
|
ninjette.org member
Name: Brian
Location: Los Angeles
Join Date: Mar 2012 Motorcycle(s): 2008 Ninja 250r Red Posts: 93
|
Good thread! Nice read, am looking into getting some LED lights soon. Luckily my buddy works at al and eddy auto sound and can get things relativly cheap. Was going with the white lights.
Yours looks nice! The rear tire lit up looks sexy. More pics would be cool. See yuh man! |
|
|
|
|
April 22nd, 2012, 02:54 PM
|
#14 | |
|
ninjette.org member
Name: Ricke
Location: Spring Hilll, FL
Join Date: Apr 2012 Motorcycle(s): 2008 Black Ninja 250r Posts: 21
|
Quote:
|
|
|
|
|
|
December 1st, 2012, 12:51 PM
|
#15 |
|
ninjette.org newbie
Name: George
Location: San Diego
Join Date: Dec 2012 Motorcycle(s): YZFR6 Posts: 1
|
ledglow lights constantly on
The Ledglow lights are constantly on When I hook up the bikes negative wire on the battery. the lights work fine if the remote is hooked up to the positive and negative on the battery but as soon as the bikes negative is hooked up the lights come on solid and the remote doesnt work.
|
|
|
|
|
January 19th, 2013, 01:05 PM
|
#16 |
|
ninjette.org member
Name: Simon
Location: Toronto
Join Date: Jan 2012 Motorcycle(s): 2009 Kawi 250 Posts: 118
|
has anyone added additional leds to one of these kits? i got the 6pc motorcycle kit but i also have a whole bunch of ebay led strips that look exactly the same as the ledglow strips just the wiring is different. i see on the ledglow website it says it can be upgraded and that to do so you need to buy the additional led strips which come with an expansion power harness. im just wondering if anyone has figured out a way to add without buying their packages
|
|
|
|
 |
 Similar Threads
|
||||
| Thread | Thread Starter | Forum | Replies | Last Post |
| [motorcycledaily.com] - MD Product Review: Sena 20S Bluetooth Headset (News) (Product | Ninjette Newsbot | Motorcycling News | 0 | July 30th, 2014 07:00 PM |
| [motorcycledaily.com] - MD Product Review: Shoei RF-1200 Helmet (News) (Product Revie | Ninjette Newsbot | Motorcycling News | 0 | June 2nd, 2014 08:20 PM |
| [motorcycledaily.com] - MD Product Review: AXO 5 to 9 Riding Shoes (News) (Product Re | Ninjette Newsbot | Motorcycling News | 0 | January 3rd, 2014 10:30 AM |
| [motorcycledaily.com] - MD Product Review: Schuberth SR1 (News) (Product Reviews) | Ninjette Newsbot | Motorcycling News | 0 | November 22nd, 2013 06:10 PM |
| [motorcycledaily.com] - MD Product Review: The Bursig Stand (News) (Product Reviews) | Ninjette Newsbot | Motorcycling News | 0 | October 21st, 2013 05:00 PM |
|
|


