
|
 January 6th, 2009, 11:24 AM
|
#1 |
|
So slow I'm first!
Name: Sunny
Location: San Jose, CA
Join Date: Oct 2008 Motorcycle(s): 06 Kawasaki Ninja EX250 Posts: A lot.
Blog Entries: 10
|
Old Schooling Effect Tutorial
(Alex I am not sure where you would like to put this one feel free to move it to wherever.)
(Warning - I have never written a tutorial in my life. I am more of a hands on kind of person but can learn from tutorials... ) Not learned on my own. I did pick up the technique from DMc (on another board) all I did was adapt it to suit my version of Photoshop and switched two of the steps to make it easier. One of the hardest part about ‘old schooling’ a picture is finding the right one. I prefer images where the subject, what I want to enhance, is prominent in the picture. Aside from that you will need a photo editor that lets you work in layers. For this example we will use a picture of Tyke & her flower. 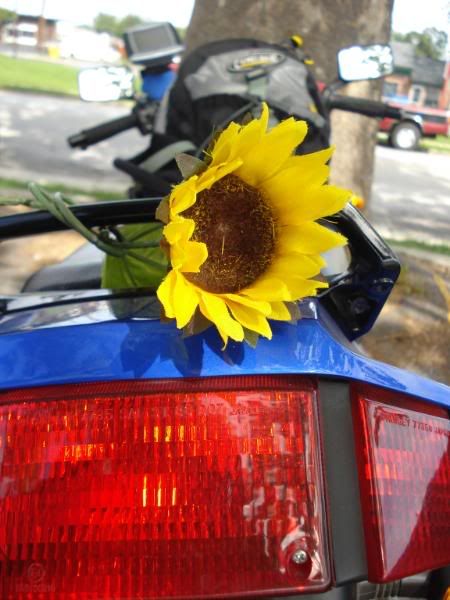 For this I think I want to just enhance the flower. So pull your image into your photo editor. Save it as a new image (I always do this so I don’t loose the original). For this I will be using Photoshop 5.0 LE. 1. Copy the image. I tend to do this into a new file/window so I still have the original. The copied image needs to be turned to grayscale. You can either do this by selecting your mode option and turning it to grayscale that way (just remember to put it back to RGB Color). Or you can use your Hue and Saturation option to take out the colors. I prefer the grayscale mode. 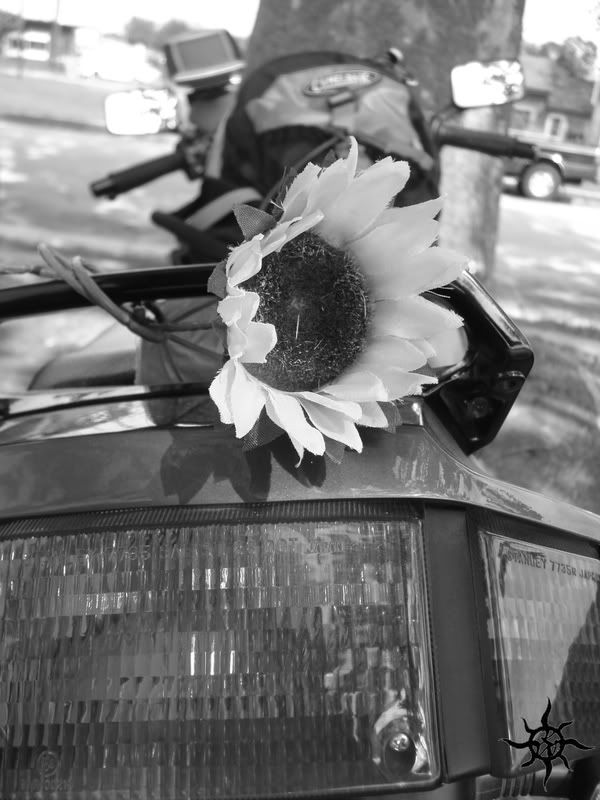 2. Copy the grayscale image into the color copy creating a new layer. (TIP: Keep your grayscale ‘original’ incase you delete/erase something that needed to be gray) What you are going to do now is take out what you don’t want affected. In this case, the flower. You can take this out of the grayscale by whatever means you feel comfortable with. Easier, magic wand, I prefer the Polygon Lasso tool . You are only going to delete from the grayscale image! It also does not have to be perfect but close is alright J (TIP: If you are having a hard time finding your lines change the Opacity levels of the grayscale image to help bring out the colors.) Should look something like this: 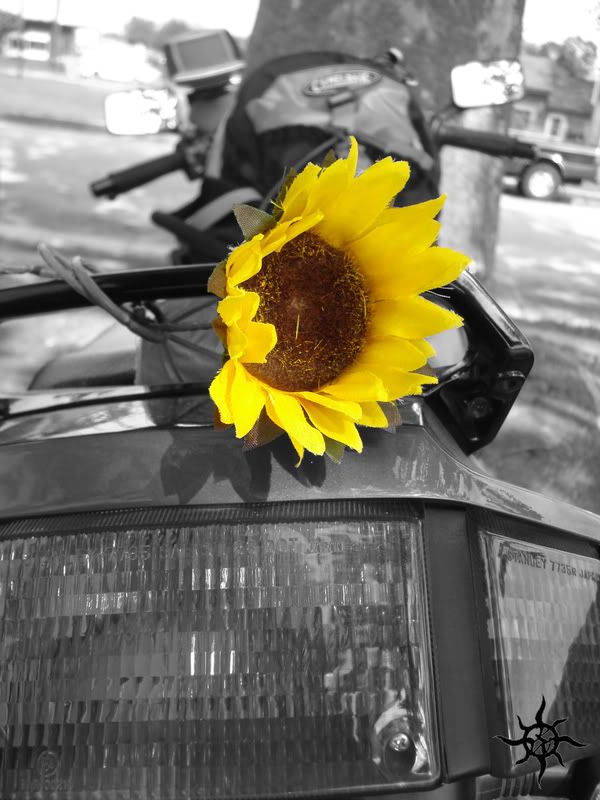 3. With your object now presented you want to bring it out more. So we are going to blur the grayscale layer. I prefer to use the Gaussian Blur. You can play around with this as it changes the ‘halo’ of the background. I usually go with 8 pixels. Remember you don’t want it to blurred to distort all of the background but enough to sharpen your object like this: 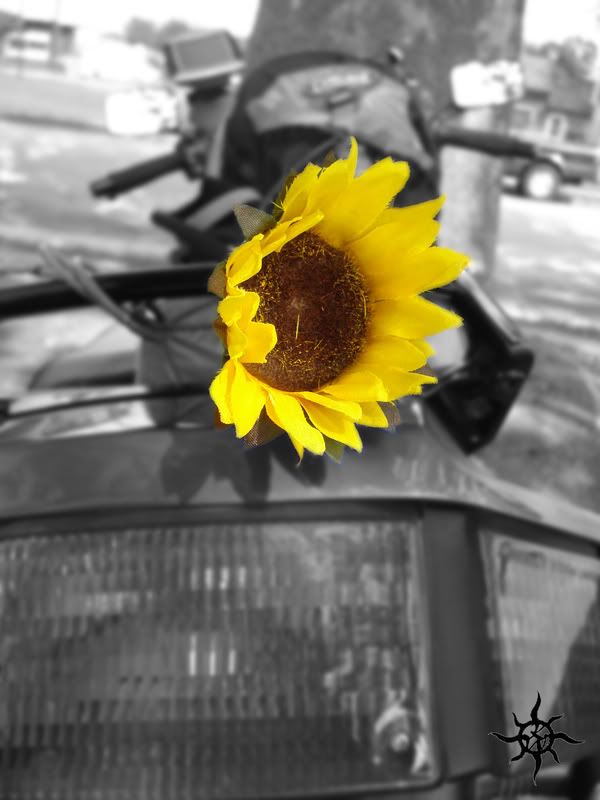 4. With that done we can now play with the Opacity of the grayscale image. This varies depending on the brightness of the image. I suggest playing with it until it gives you the effect you want. Also this is a good step to play with the Hue and Saturation of your original image. This is if you want to give brighter colors. Optional I think as some of the images don’t seem to need the colors to pop more. For this image I left the color alone and moved the Opacity to 77% 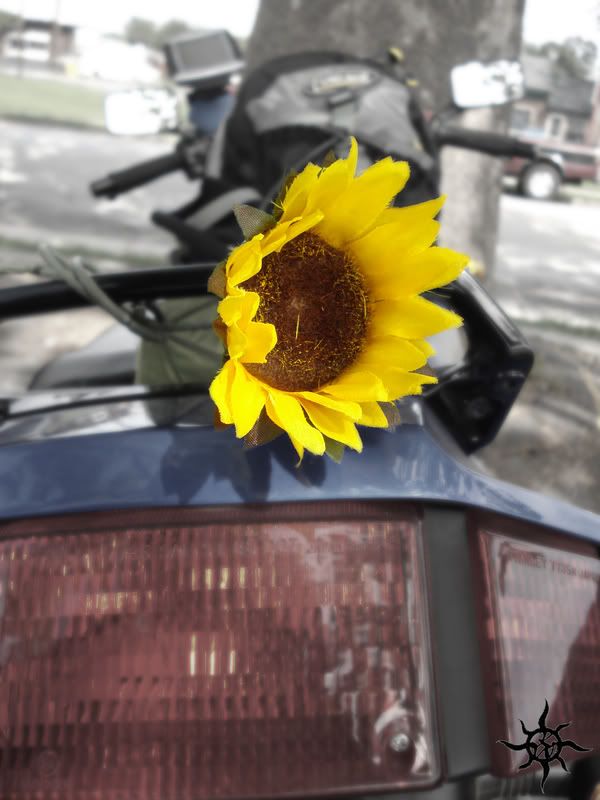 Remember the key to a great discovery is playing with what you have.
__________________________________________________
Learn from the mistakes of others, you cannot make them all yourself. Save yourself the trouble and Learn. Last futzed with by BlueTyke; January 6th, 2009 at 11:25 AM. Reason: Forgot the final image. Opps! |

|

|
|
January 6th, 2009, 11:28 AM
|
#2 |
|
ninjette.org dude
Name: 1 guess :-)
Location: SF Bay Area
Join Date: Jun 2008 Motorcycle(s): '13 Ninja 300 (white, the fastest color!), '13 R1200RT, '14 CRF250L, '12 TT-R125LE Posts: Too much.
Blog Entries: 7
|
Very slick, Sunny!
__________________________________________________
Montgomery Street Motorcycle Club / cal24.com / crf250l.org / ninjette.org ninjette.org Terms of Service Shopping for motorcycle parts or equipment? Come here first. The friendliest Ninja 250R/300/400 forum on the internet! (especially Unregistered) |
|
|
|
|
January 6th, 2009, 11:29 AM
|
#3 |
|
So slow I'm first!
Name: Sunny
Location: San Jose, CA
Join Date: Oct 2008 Motorcycle(s): 06 Kawasaki Ninja EX250 Posts: A lot.
Blog Entries: 10
|
 Thanks Alex! Thanks Alex!
__________________________________________________
Learn from the mistakes of others, you cannot make them all yourself. Save yourself the trouble and Learn. |
|
|
|
|
January 6th, 2009, 12:16 PM
|
#4 |
|
Join Date: Nov 2008 Posts: Too much.
|
Thanks, Sunny! Now I know what some might feel when they read a mechanical DIY that we have posted. I have no clue what you are talking about, but I'll use your instructions to play around with the editor I have to see what I can accomplish.
Thanks for taking the time. 
|
|
|
|
|
January 6th, 2009, 12:19 PM
|
#5 |
|
Live Life
Name: Don
Location: Lincoln, NE
Join Date: Nov 2008 Motorcycle(s): 2009 Green SE Ninja 250 Posts: A lot.
|
Nice work Sunny
Now we know who the Photoshop expert is.
__________________________________________________
- ATGATT - Scorpion EX700 Hi-Vis Helmet, First Gear MeshTek 3.0 Jacket, TourMaster Transition 2 Jacket and Flex Pants, Sidi Doha boots |
|
|
|
|
January 6th, 2009, 12:42 PM
|
#6 |
|
============
Name: Nick
Location: Occoquan, VA
Join Date: Nov 2008 Motorcycle(s): '09 Ninja 250R Posts: 518
|
Thanks for the tutorial!
This is actually exactly why I was looking for a photo editor.
|
|
|
|
|
January 6th, 2009, 12:58 PM
|
#7 | |
|
So slow I'm first!
Name: Sunny
Location: San Jose, CA
Join Date: Oct 2008 Motorcycle(s): 06 Kawasaki Ninja EX250 Posts: A lot.
Blog Entries: 10
|
Quote:
Though I have turned a gal that looks like Angelina Jolee into an elf...
__________________________________________________
Learn from the mistakes of others, you cannot make them all yourself. Save yourself the trouble and Learn. |
|
|
|
|
 |
 Similar Threads
|
||||
| Thread | Thread Starter | Forum | Replies | Last Post |
| Taking the fairings apart tutorial | cadd | 2013 - 2017 Ninja 300 Tech Talk | 3 | September 1st, 2014 10:29 AM |
| How To Change the Oil and Filter on Kawasaki Ninja 300 Motorcycle Video Tutorial | SON1C | 2013 - 2017 Ninja 300 Tech Talk | 5 | August 31st, 2014 10:01 AM |
| Ninja 300 K&N Air Filter How To Install Tutorial & Quick Review Video | SON1C | 2013 - 2017 Ninja 300 Tech Talk | 12 | June 27th, 2014 07:15 PM |
| DIY Key guard tutorial (With pictures, oh boy!) | Monkeytofu | 1986 - 2007 Ninja 250R Farkles | 4 | August 10th, 2012 02:19 PM |
| Custom Gauges: Tutorial-ish | A7xschecter6661 | 1986 - 2007 Ninja 250R Farkles | 10 | August 22nd, 2011 08:36 PM |
|
|


