
|
 November 19th, 2011, 05:28 PM
|
#1 |
|
RIP Alex
Name: Cuong
Location: Houston, TX
Join Date: Apr 2011 Motorcycle(s): '10 250r, '09 265r Posts: A lot.
Blog Entries: 2
|
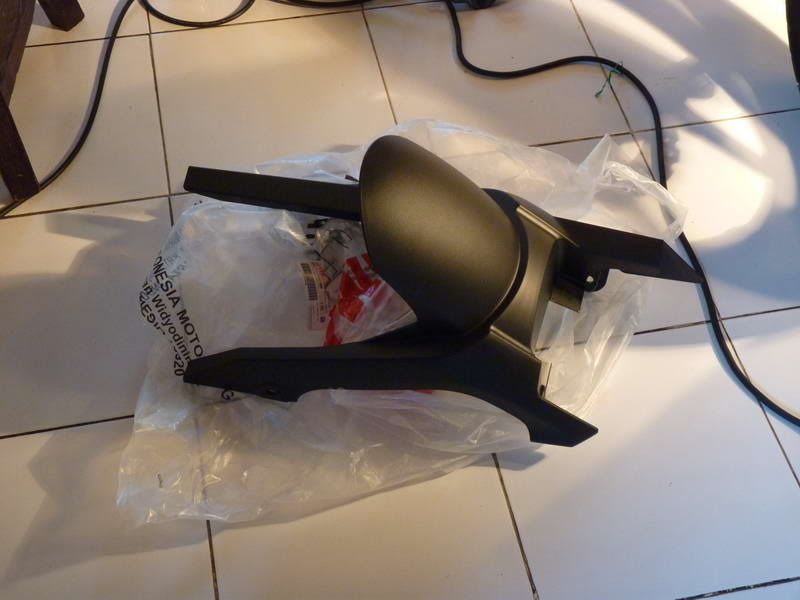
Yamaha Byson Tire Hugger install
Thanks to the efforts put out by Wayan and Cuong, some of us were able to obtain the Yamaha Byson tire hugger! With a little bit of modding, we can adapt the hugger to work on our Ninja 250. The hugger can fit up to a 160 width tire with some further modding.
 Tools needed: Some type of cutting tool: Hacksaw, hot knife, exacto knife, or dremel zip ties (preferably black) 4" piece of metal plate or similar item Note: This is how I did my install. I was basically starting as a guinea pig with this install trying to learn everything about it which you will see me noting in the steps and going off Wayan's install. The idea of this install was to make it work without modifying too much and needing extra parts. There is more than one way to skin a cat so you can check out these DIYs: Wayanlam: http://www.ninjette.org/forums/showthread.php?t=78803 Supermanster: http://www.ninjette.org/forums/showp...&postcount=165 ; http://www.ninjette.org/forums/showp...&postcount=167 Bennythegreat: http://bennythegreat.wordpress.com/2...-di-ninja-250/ BlueVolt: http://www.xbhp.com/talkies/do-yours...16-hugger.html 1. Lift up the rear of the bike so it will be easier to work on. Lifting the rear is not necessary and you can still work on the bike with it on the kickstand. 2. Remove factory chain guard. it's held in by two 10mm bolts. Save the bolts since you will be reusing them later on to secure your new hugger. If you haven't cleaned and lubed your chain, now is a good time. Also a good time to clean up and mess on your bike to keep the work space cleaner for all you neat freaks. 3. Remove the left side passenger foot rest bracket. This will give you more room to work with as you may be constantly removing/installing the hugger to test fit. 4. (OPTIONAL) Remove your exhaust muffler. This will free up gobs room for you to work with and access the rear brake line retainer loops and bend them in and away from the hugger and caliper. If you don't choose to, just make sure you can reach the rear brake line retainer loop to bend it outwards towards the rear and inwards towards the wheel to clear the hugger some. 5. Wayan and another DIY said you had to cut a piece of the Byson hugger so it can fit into the factory chain stay guard. In this install I found it not necessary but YMMV.  6. Next off, you will need to trim the front left section of the chain guard as it may rub the frame during suspension travel. You can trim it flush like so or at your own desired length. I opted to keep my on for the time being.    7. Trim/Notch the front right section of the hugger to clear the rear brake master.   8. Drill a hole on the right side of the hugger more towards the rear than what I pictured so you can run a zip tie through to secure it to the swing arm. NOTE: do not install zip tie yet.   9. In order for the hugger to clear the rear brake caliper and brake line you will need to cut a couple sections out. If you measure from the bottom edge up, make a mark at 1 5/8", 2 3/8", 3 1/8", and 5 7/8". This is a close measurement of the areas that will need to be cut to clear the brake caliper and brake line. The ending cut should be at the plastic brace/support on the inside of the hugger that gives it some rigidity. You should cut about half-way from the inside edge instead of all the way to the outside edge. The hugger will rub the caliper but you will need it to rub so it can pull the tire hugger more towards the right side to center up the hugger over the tire. This is because we are using the the rearmost factory chain guard bracket which pulls the hugger to the left some. As you notice, I made a dime size cut to clear part of the caliper and shaved down the rigid support. THIS IS NOT NECESSARY as this part of the hugger will push againsts the caliper and help pull the hugger to the right some too. You will notice on my hugger that the section cut out is bigger than necessary so I have the measurements corrected above. From there you can trim to fit your Ninja.     10. The hugger's right rear mounting hole will line up with the Ninja's brake line retainer stay. You will need to bend the brake line retain loops inward towards the wheel to help clear the hugger. Make a notch so the hugger will fit over the rear brake line retainer loop.    13. To help make the right side hugger sit flush with the swing arm, you will need to trim a section on the bottom of the hugger to clear the Ninja's rear brake line retainer loop. 14. I backed out the brake line banjo bolt on top of the rear brake master so I can pull the brake line outward to help clear the hugger and tighten it back down. So far it does not seem to be leaking. BE ADVISED: CRUSH WASHERS ARE A ONE TIME USE AND MAY NOT RESEAL AGAIN ONCE TORQUED DOWN. Brake fluid is highly corrosive and will eat paint finishes and can get on your rear tire and cause you to lose control if not sealed.  15. You will need about a 4" metal plate (or whatever you can come up with) to secure the left front hugger to the Ninja's factory mounting bracket.  16. Secure your hugger down with zip ties and your factory chain guard bolts. I used zip ties to secure the right side of the hugger to the swing arm and to the brake line bracket.  17. reinstall everything you took off. 18. Check to see if you have any clearance issues with the hugger over the tire and with the chain touching the guard. You may have to tweak the factory chain guard bracket inwards to prevent it from rubbing and it won't be squarely over the chain. All part of modding.   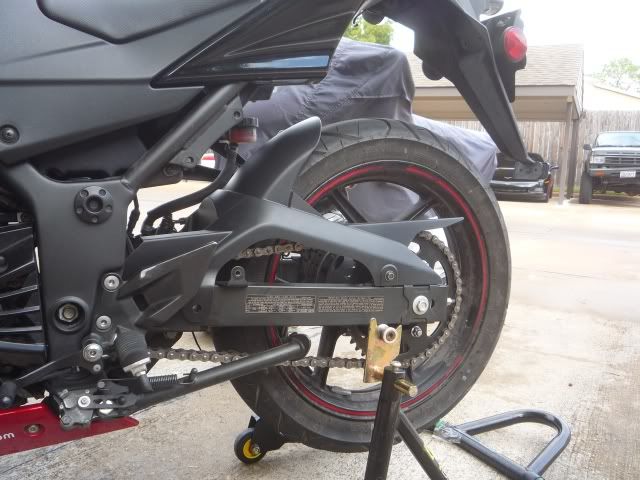   
__________________________________________________
HalfFast Racing Team Serving Greater Houston Area Riders:WFO Riders MotoHouston HPC CMRA Ride Smart Fastline Lone Star Track Days Last futzed with by cuong-nutz; November 22nd, 2011 at 07:21 AM. |

|

|
|
November 19th, 2011, 06:29 PM
|
#2 |
|
cuz
Name: Israel
Location: Houston (me) Galveston
Join Date: Jul 2011 Motorcycle(s): 09 ninja 250r Posts: A lot.
|
 great job to be continued of cores man can wait for mine y do i smell a DIY thread great job to be continued of cores man can wait for mine y do i smell a DIY thread 
__________________________________________________
 THE GOOD LIFE THE GOOD LIFE
|
|
|
|
|
November 19th, 2011, 08:42 PM
|
#3 |
|
ninjette.org dude
Name: 1 guess :-)
Location: SF Bay Area
Join Date: Jun 2008 Motorcycle(s): '13 Ninja 300 (white, the fastest color!), '13 R1200RT, '14 CRF250L, '12 TT-R125LE Posts: Too much.
Blog Entries: 7
|
Looking good! Tell me when you think it's ready for prime-time, and I'll link it from the DIY sticky.

__________________________________________________
Montgomery Street Motorcycle Club / cal24.com / crf250l.org / ninjette.org ninjette.org Terms of Service Shopping for motorcycle parts or equipment? Come here first. The friendliest Ninja 250R/300/400 forum on the internet! (especially Unregistered) |
|
|
|
|
November 20th, 2011, 07:31 AM
|
#4 |
|
ninjette.org guru
Name: Kevin
Location: central Illinois
Join Date: Apr 2011 Motorcycle(s): 2011 Green 250R Posts: 346
|
I've need messed with the brake lines on my bike yet. My question is, so you can loosen the bolt that holds the brake line to the caliper and tweak it left or right with no leakage?
|
|
|
|
|
November 20th, 2011, 07:38 AM
|
#5 |
|
RIP Alex
Name: Cuong
Location: Houston, TX
Join Date: Apr 2011 Motorcycle(s): '10 250r, '09 265r Posts: A lot.
Blog Entries: 2
|
You should be able to loosen the banjo bolts enough to tweak the lines. Put rags around the fittings so if there is a leak, the fluid doesn't eat your paint. The copper is a soft metal so it should reseal once you tighten the banjo bolts back down. You might have to tweak or flip the rear brake line retainer/stay so it's not in the way of the hugger. If it doesn't rain today I'll play with it after I get home from work.
__________________________________________________
HalfFast Racing Team Serving Greater Houston Area Riders:WFO Riders MotoHouston HPC CMRA Ride Smart Fastline Lone Star Track Days |
|
|
|
|
November 20th, 2011, 09:13 AM
|
#6 |
|
ninjette.org member
Name: Dash
Location: PA
Join Date: Jun 2011 Motorcycle(s): stolen :( Posts: 158
|
What was the price of this mod? ...I know that's probably in the thread..somewhere
|
|
|
|
|
November 20th, 2011, 11:00 AM
|
#7 |
|
ninjette.org guru
Name: Kevin
Location: central Illinois
Join Date: Apr 2011 Motorcycle(s): 2011 Green 250R Posts: 346
|
the price was $6 for the hugger, $33 for shipping from Indonesia to Cali. then price for shipping from Cali to your house. So $50-$60 total.
|
|
|
|
|
November 20th, 2011, 12:27 PM
|
#8 |
|
I hate driving...
Name: S
Location: SW Ohio
Join Date: Jul 2010 Motorcycle(s): 13 Triumph Street Triple R, 09 Ninja 250r (Sold 4/20/12) Posts: A lot.
|
Looking good. I was thinking I might just cut off that plastic tab on the left side, then rivet it on the hugger so I can use it with the stock mounting hole. I look forward to seeing what you come up with for the right side, I kinda feel like chopping it off since I feel like it gets in the way of to much but we shall see.
__________________________________________________
 09 ninja 2fiddy SE  Driving slow things fast Driving slow things fast
|
|
|
|
|
November 20th, 2011, 04:10 PM
|
#10 |
|
cuz
Name: Israel
Location: Houston (me) Galveston
Join Date: Jul 2011 Motorcycle(s): 09 ninja 250r Posts: A lot.
|
yea i guess but the price is what sold it for me plus helps w/rocks and water
__________________________________________________
THE GOOD LIFE
|
|
|
|
|
November 20th, 2011, 04:26 PM
|
#11 |
|
ninjette.org member
Name: Dan
Location: Mississauga
Join Date: Oct 2011 Motorcycle(s): 250 Ninja - Soon Posts: 96
|
Just as an FYI, once a crush washer has been used, it should not be reused, it can fail and start to leak, keep an eye on the one you reused......
|
|
|
|
|
November 20th, 2011, 11:28 PM
|
#12 |
|
RIP Alex
Name: Cuong
Location: Houston, TX
Join Date: Apr 2011 Motorcycle(s): '10 250r, '09 265r Posts: A lot.
Blog Entries: 2
|
Just a little more progress... Trying to find a perfect balance to center up the hugger over the tire. I hate trying to be a perfectionist
")  
__________________________________________________
HalfFast Racing Team Serving Greater Houston Area Riders:WFO Riders MotoHouston HPC CMRA Ride Smart Fastline Lone Star Track Days |
|
|
|
|
November 21st, 2011, 01:08 AM
|
#13 |
|
ninjette.org guru
Name: Nick
Location: Brooklyn
Join Date: Sep 2011 Motorcycle(s): :( Posts: 275
|
Hey,
Here's a random site I came across. http://procoupon.biz/x/7683/ they have a nice RedBull fairing set...5 more months 'til Spring? Posted via Mobile Device |
|
|
|
|
November 21st, 2011, 11:38 AM
|
#14 |
|
RIP Alex
Name: Cuong
Location: Houston, TX
Join Date: Apr 2011 Motorcycle(s): '10 250r, '09 265r Posts: A lot.
Blog Entries: 2
|
It's installed!.....for the most part!
__________________________________________________
HalfFast Racing Team Serving Greater Houston Area Riders:WFO Riders MotoHouston HPC CMRA Ride Smart Fastline Lone Star Track Days |
|
|
|
|
November 24th, 2011, 02:08 PM
|
#15 |
|
ninjette.org sage
Name: L
Location: WI
Join Date: Apr 2011 Motorcycle(s): '09 250R, '13 CBR500R Posts: 709
|
great write up. can't wait to install mine!
|
|
|
|
 |
 Similar Threads
|
||||
| Thread | Thread Starter | Forum | Replies | Last Post |
| Tire hugger | Viskoner | 2008 - 2012 Ninja 250R Farkles | 8 | August 13th, 2014 04:24 PM |
| Yamaha Byson Tire Hugger for ninja 250 | cuong-nutz | Motorcycle-related | 2 | September 28th, 2013 05:28 PM |
| Hacked up / damaged Byson hugger? | CZroe | Items Wanted | 0 | July 23rd, 2012 06:58 AM |
| DIY Yamaha tire hugger modification and install | headshrink | 2008 - 2012 Ninja 250R Tech Talk | 22 | February 24th, 2012 03:40 PM |
| tire hugger | bikermunda | 2008 - 2012 Ninja 250R Tech Talk | 26 | October 11th, 2009 01:52 PM |
|
|


