
|
 April 8th, 2018, 07:55 AM
|
#1 |
|
-
Name: -
Location: -
Join Date: May 2009 Motorcycle(s): - Posts: A lot.
|
Refurbishing and upgrading my '05 fuel injection project...
It's pretty quite around here these days.
I don't know how much enthusiasm there is for anything related to the "Pre-Gen" year models, but I'm still enjoying mine after 13 years of ownership. Posting here today because I'm going to be refurbishing the bike a bit and upgrading my do-it-yourself fuel injection system. I did the fuel injection conversion about 10 years ago. My EX250 was my first attempt at something like that and while it turned out well and the bike runs great to this day there's a lot about the overall qualities and features of the job I did that now (with more knowledge and experience) I know could be better. So I can just do my work quietly without posting anything, or I could do some pictures and words. |

|

|
|
April 8th, 2018, 02:49 PM
|
#2 |
|
ninjette.org certified postwhore
Name: .
Location: .
Join Date: Feb 2011 Motorcycle(s): . Posts: Too much.
MOTM - Feb '13, Feb '14
|
I vote pictures and words!
|
|
|
|
|
April 8th, 2018, 11:30 PM
|
#4 |
|
ninjette.org guru
Name: C
Location: Hawaii
Join Date: May 2011 Motorcycle(s): 250 Posts: 472
|
I definitely looking forward for more info on the use of the map sensor array.
__________________________________________________
"It ended up being the loose nut behind the wheel" 
|
|
|
|
|
April 9th, 2018, 06:59 AM
|
#5 |
|
ninjette.org certified postwhore
Name: AKA JacRyann
Location: Mesa, AZ
Join Date: Dec 2011 Motorcycle(s): CB125T CBR250R-MC19 CBR250RR-MC22 NSR350R-MC21 VF500F CBR600RR SFV650 VFR750F R1M ST1300PA Valkyrie-F6C Posts: A lot.
MOTY - 2018, MOTM - Nov '17
|
Please post progress! I’m using your previous threads as guidance for my 2003 pre-gen EFI project with Microsquirt. Gonna use a plenum to even out pulses and MAF sensor before throttle-body to get more accurate mass measurements.
Also stuffing 2007 EX500 into my other 2003 pre-gen frame for fun track toy. Going to try carbs first to get going quickly. Then Microsquirt it if packaging too tight for carbs. |
|
|
|
|
October 30th, 2019, 01:40 PM
|
#6 |
|
ninjette.org newbie
Name: Miggy
Location: IN
Join Date: Aug 2019 Motorcycle(s): Ninja 250 07 Posts: 1
|
Really curious to see what improvements youd make. I thought i had found your thread making it but i can't seem to find it.
|
|
|
|
|
October 30th, 2019, 04:31 PM
|
#7 |
|
ninjette.org certified postwhore
Name: Rick
Location: Alexandria, Louisiana
Join Date: Jan 2009 Motorcycle(s): 05 Blue Ninja 250 Posts: Too much.
MOTY - 2017, MOTM - Jan '19, Oct '16, May '14
|
Can’t wait to see the progress.
|
|
|
|
|
October 30th, 2019, 06:26 PM
|
#8 |
|
-
Name: -
Location: -
Join Date: May 2009 Motorcycle(s): - Posts: A lot.
|
Well, here's the way it eventually happened: I did all of the Fuel Injection system refurbishing and updating of the bike just as I'd intended to do.
-re-wired entire FI portion of bike's wiring harness (better, neater, more logical and functional) -replaced the Microsquirt V2 ECU I used in the original FI build-up with the new and improved Microsquirt V3 -re-installed the bike's original airbox (ditched the K&N 0990 filter pod which never performed as well as the original airbox) -built and installed a two-MAP-sensor Arduino Nano-controlled Intake Air pressure sensor circuit (one MAP sensor in each cylinder intake) -relocated battery-box portion of airbox to make room for FI fuel pump Plus (not FI related items): -removed the bike's original shunt-type Regulator/Rectifier and installed a MOSFET-type Regulator/Rectifier -replaced clutch with 2009 Next-Gen EX250 unit (new friction plates too) -replaced oil screen cover with Next-Gen EX250 "deep sump" cover/drain -re-covered the seat with new cover (better design, carbon-weave look) -replaced all lights with LED (headlight, turn signals, brakes, instrument) -swapped original turn signal flasher for an LED signal flasher -got new tires installed ... but while I was doing the work I just wasn't in the mood to go the extra mile of documenting the work. I was focused on getting the bike done so my daughter could start riding it. So I just got the work done without wasting any time. My daughter has been on the EX250 for over a year now. She doesn't ride it much, it's just something we occasionally do together but she enjoys it (it's good Daddy-Daughter time, which I really value). Here's a picture of my daughter on the EX250 just after I got most of the work done. 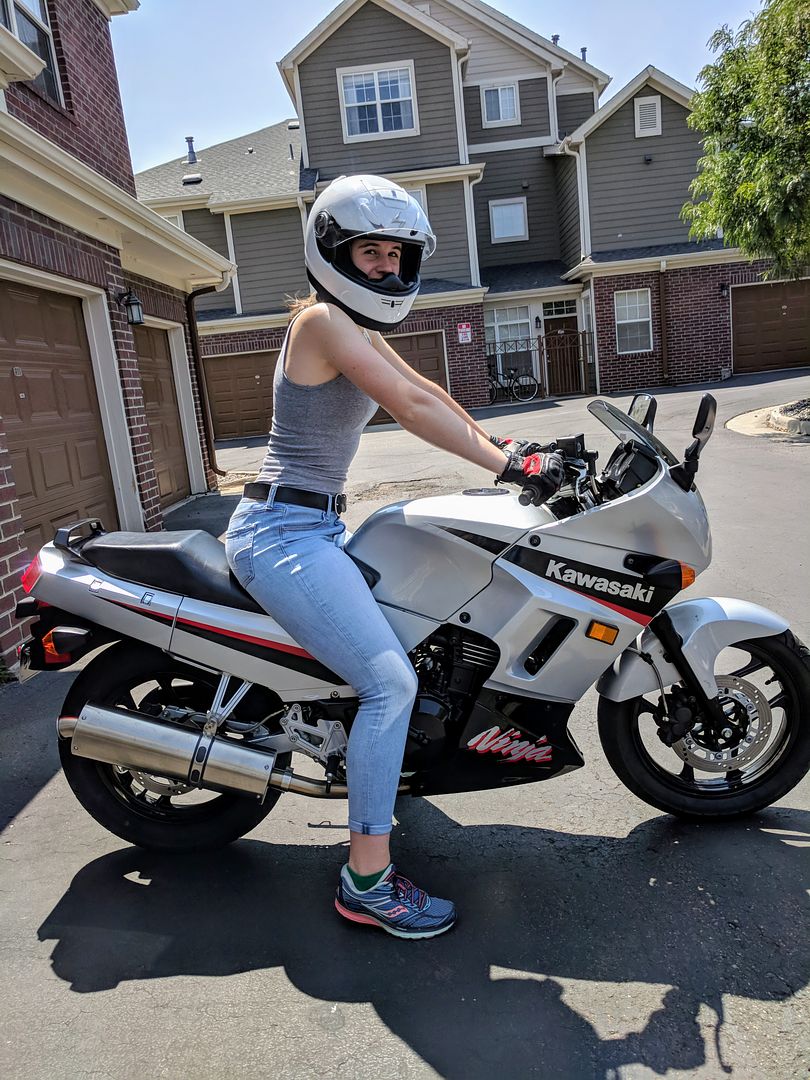
Last futzed with by greg737; October 30th, 2019 at 07:39 PM. |
|
|
|
|
October 30th, 2019, 06:27 PM
|
#9 |
|
-
Name: -
Location: -
Join Date: May 2009 Motorcycle(s): - Posts: A lot.
|
Here's a picture of the re-covered seat:

|
|
|
|
|
October 30th, 2019, 06:33 PM
|
#10 |
|
-
Name: -
Location: -
Join Date: May 2009 Motorcycle(s): - Posts: A lot.
|
Getting all the Fuel Injection items to fit behind the newly re-installed Airbox required moving the Coolant Overflow Reservoir slightly forward.
Here are a few pictures of the re-located Coolant Overflow Reservoir: 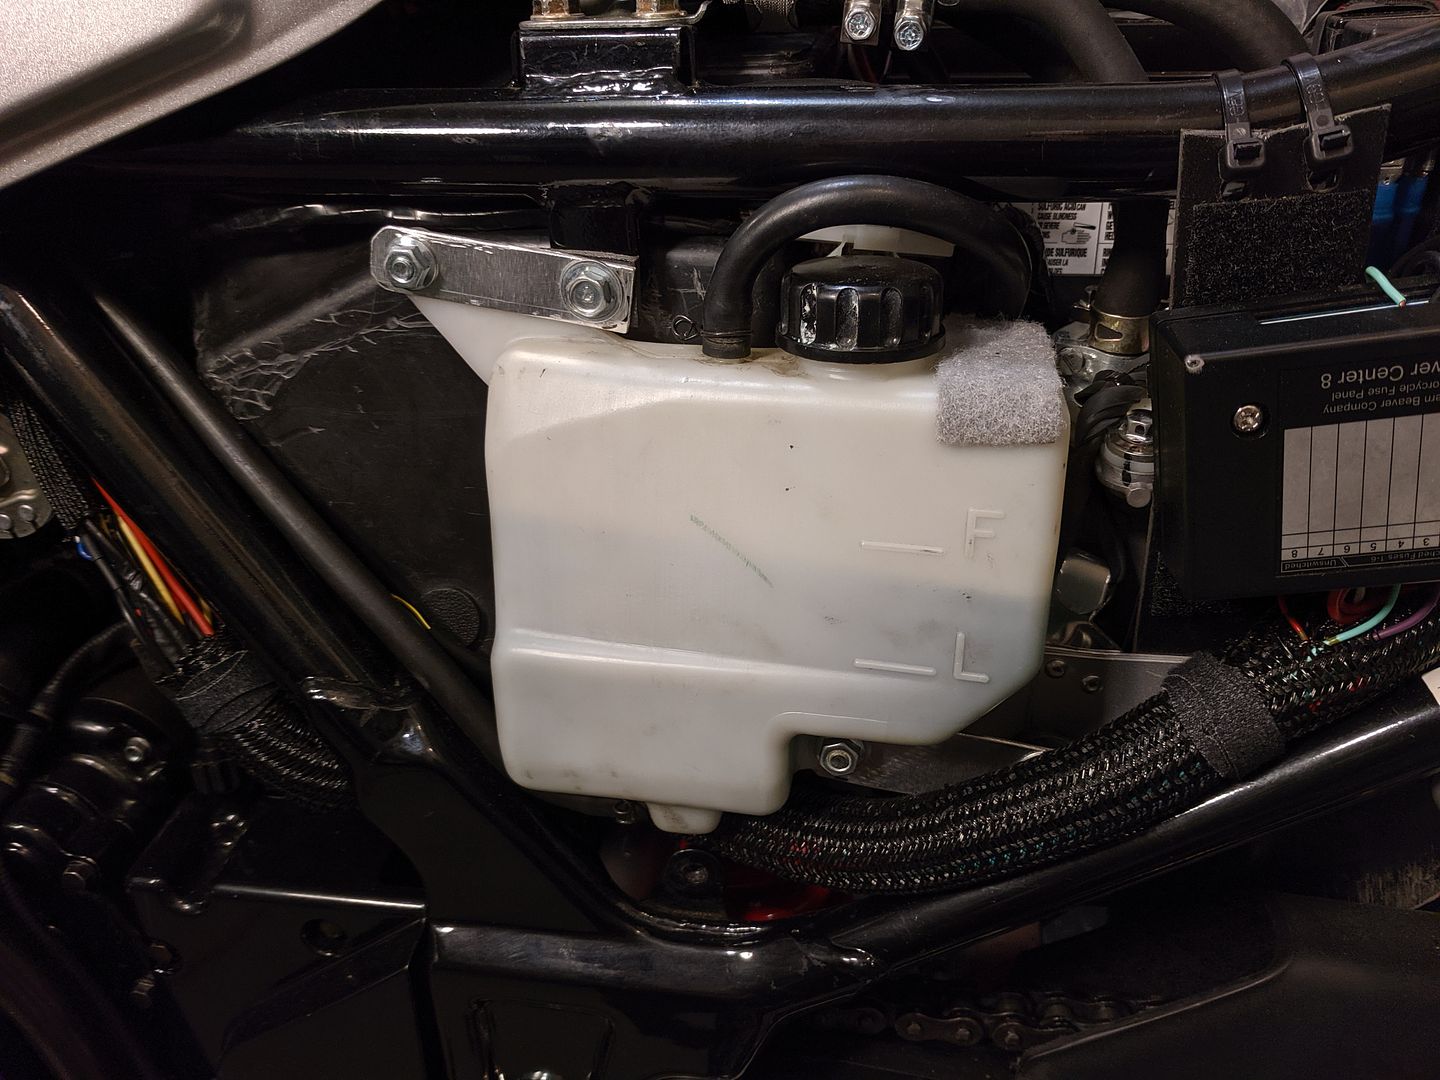 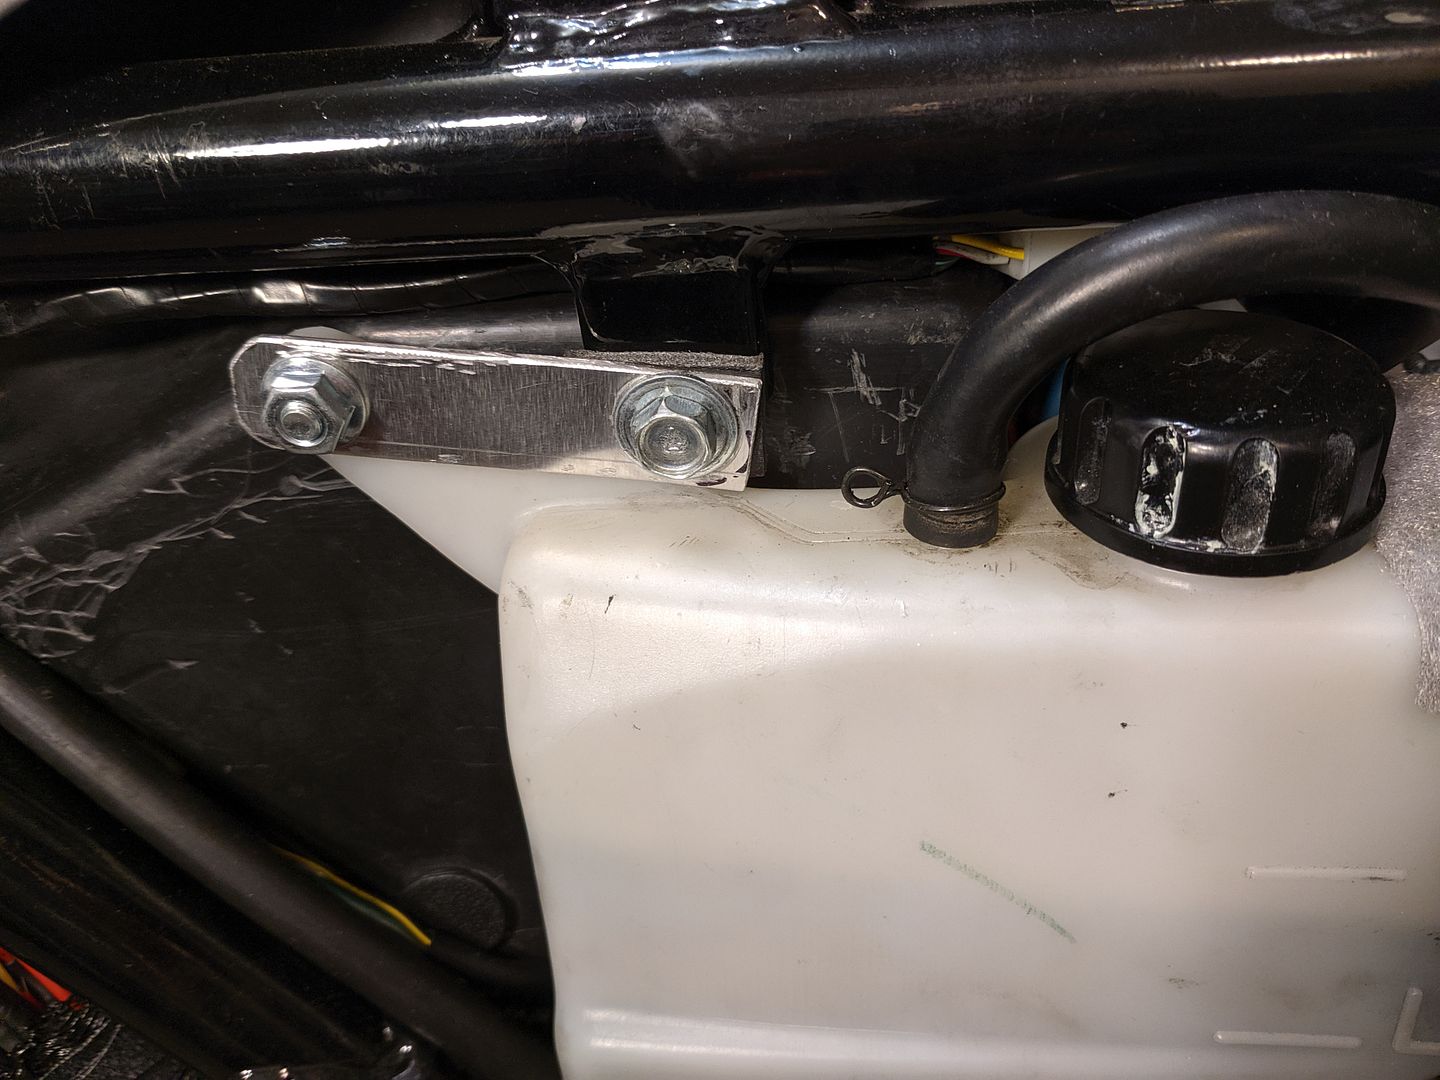 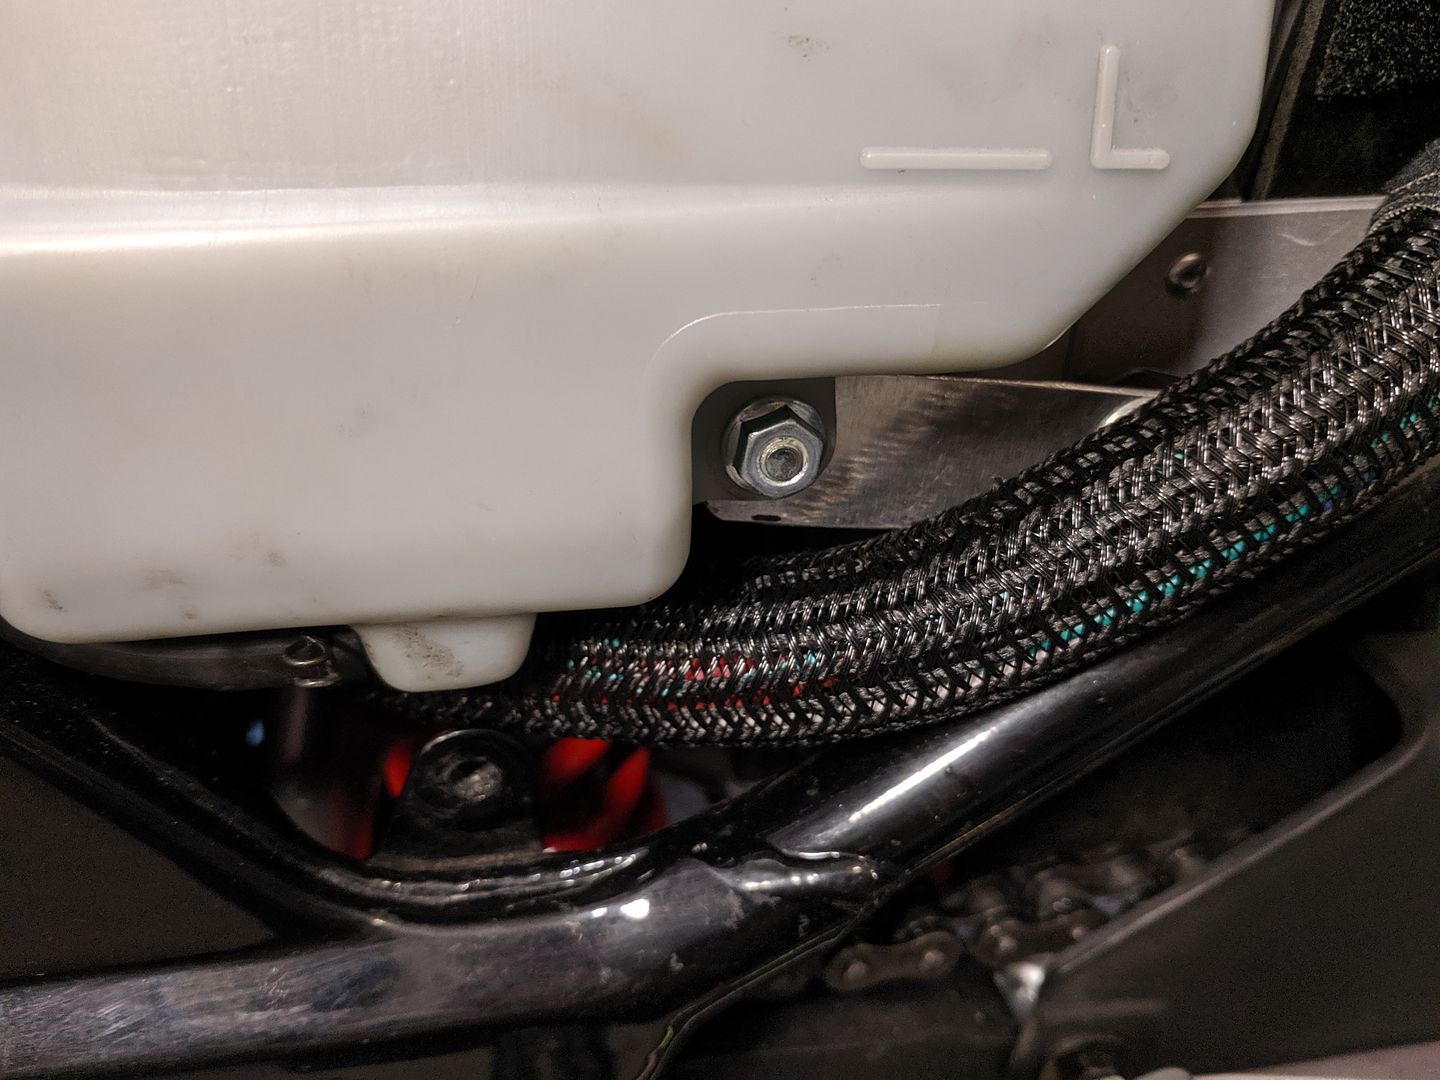
|
|
|
|
|
October 30th, 2019, 06:38 PM
|
#11 |
|
-
Name: -
Location: -
Join Date: May 2009 Motorcycle(s): - Posts: A lot.
|
I had to cut off and re-orient the Battery Tray portion of the Airbox.
This had to be done to provide enough room to locate the Honda TRX500 Rancher ATV Fuel Pump next to the Battery. Here are a few pictures of the relocation and arrangement of things: 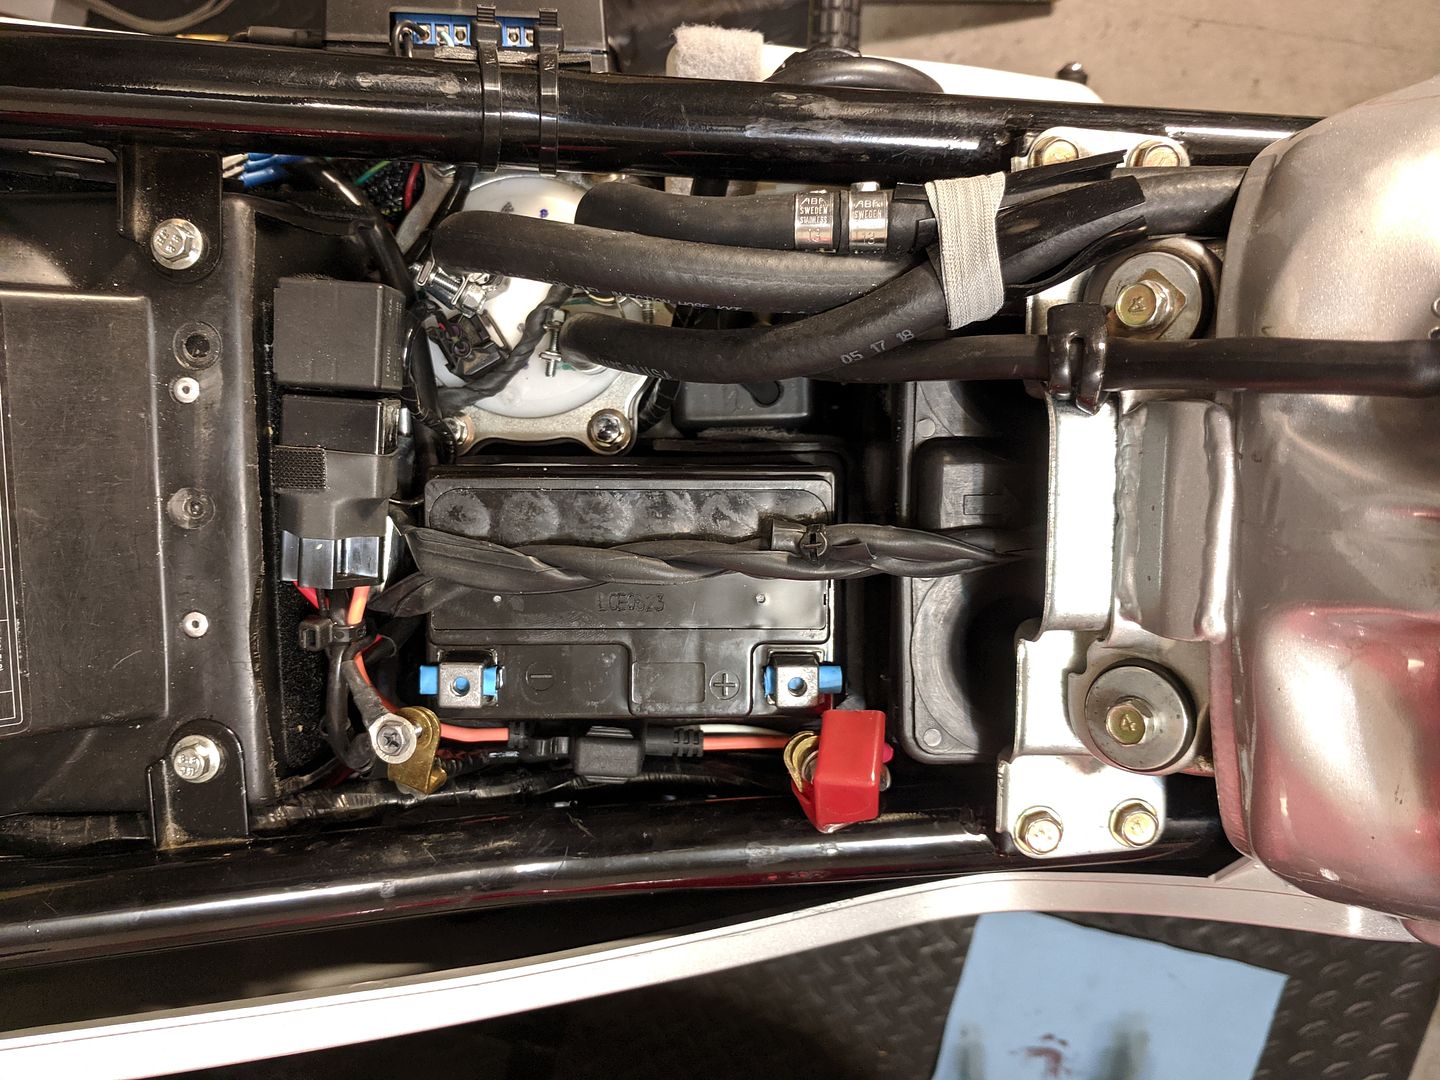 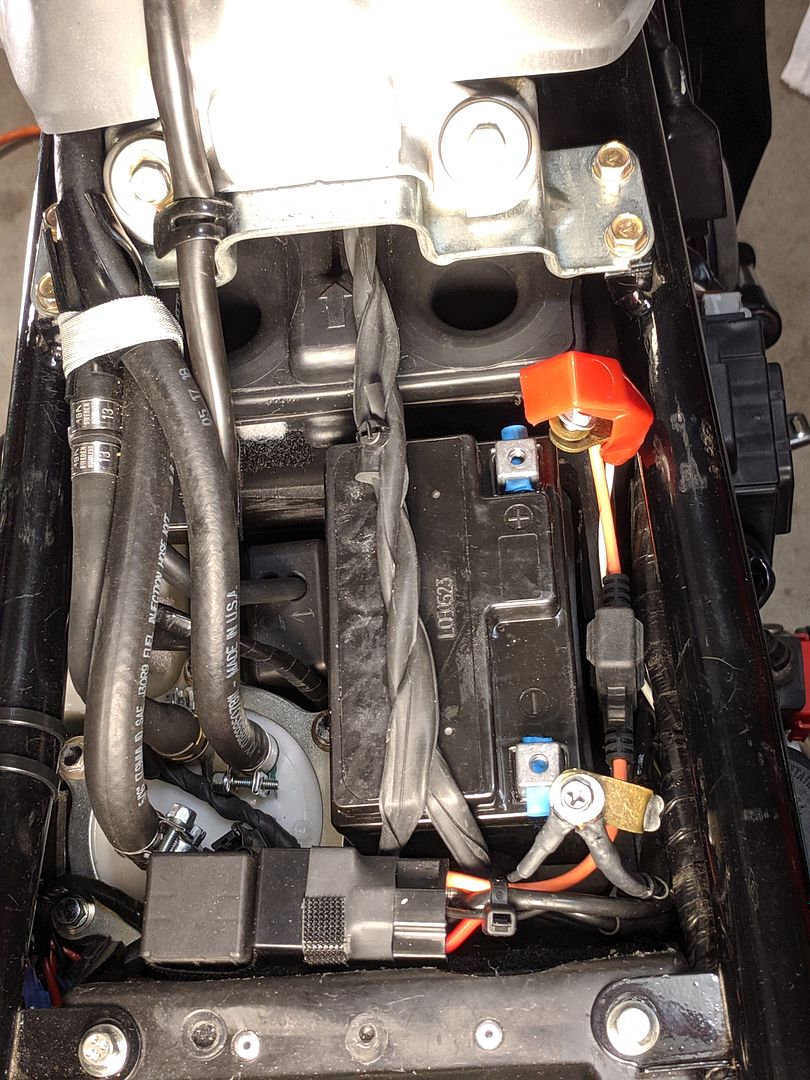 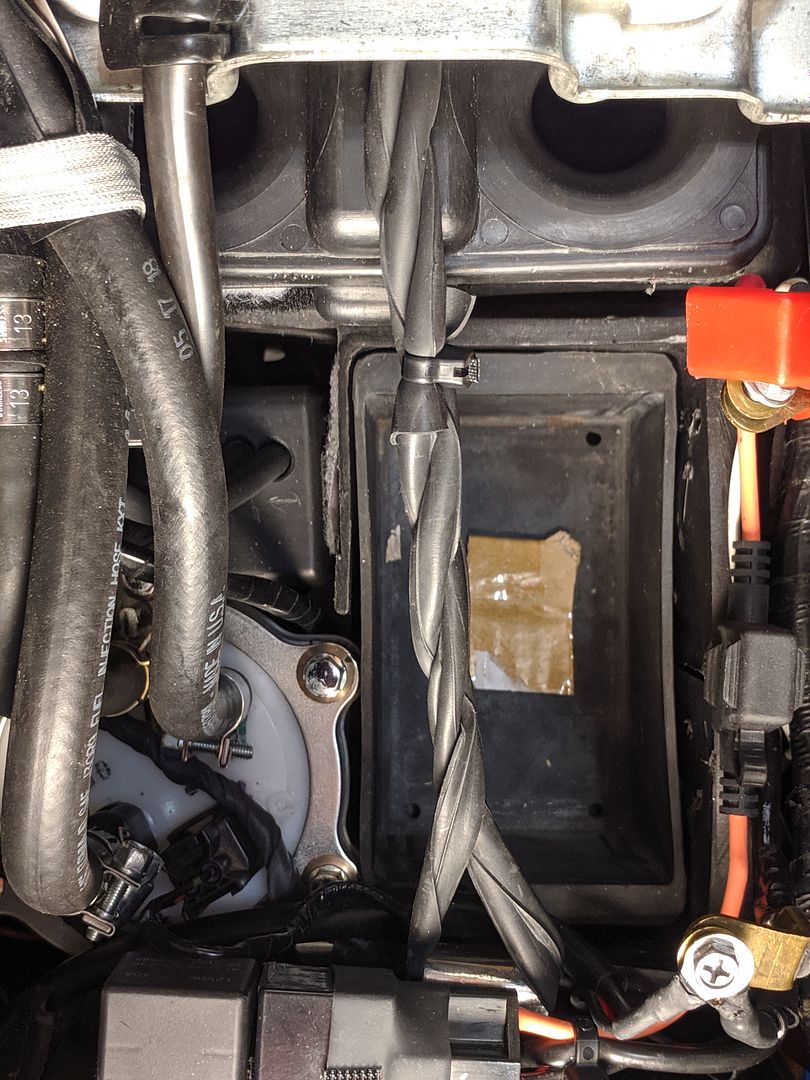 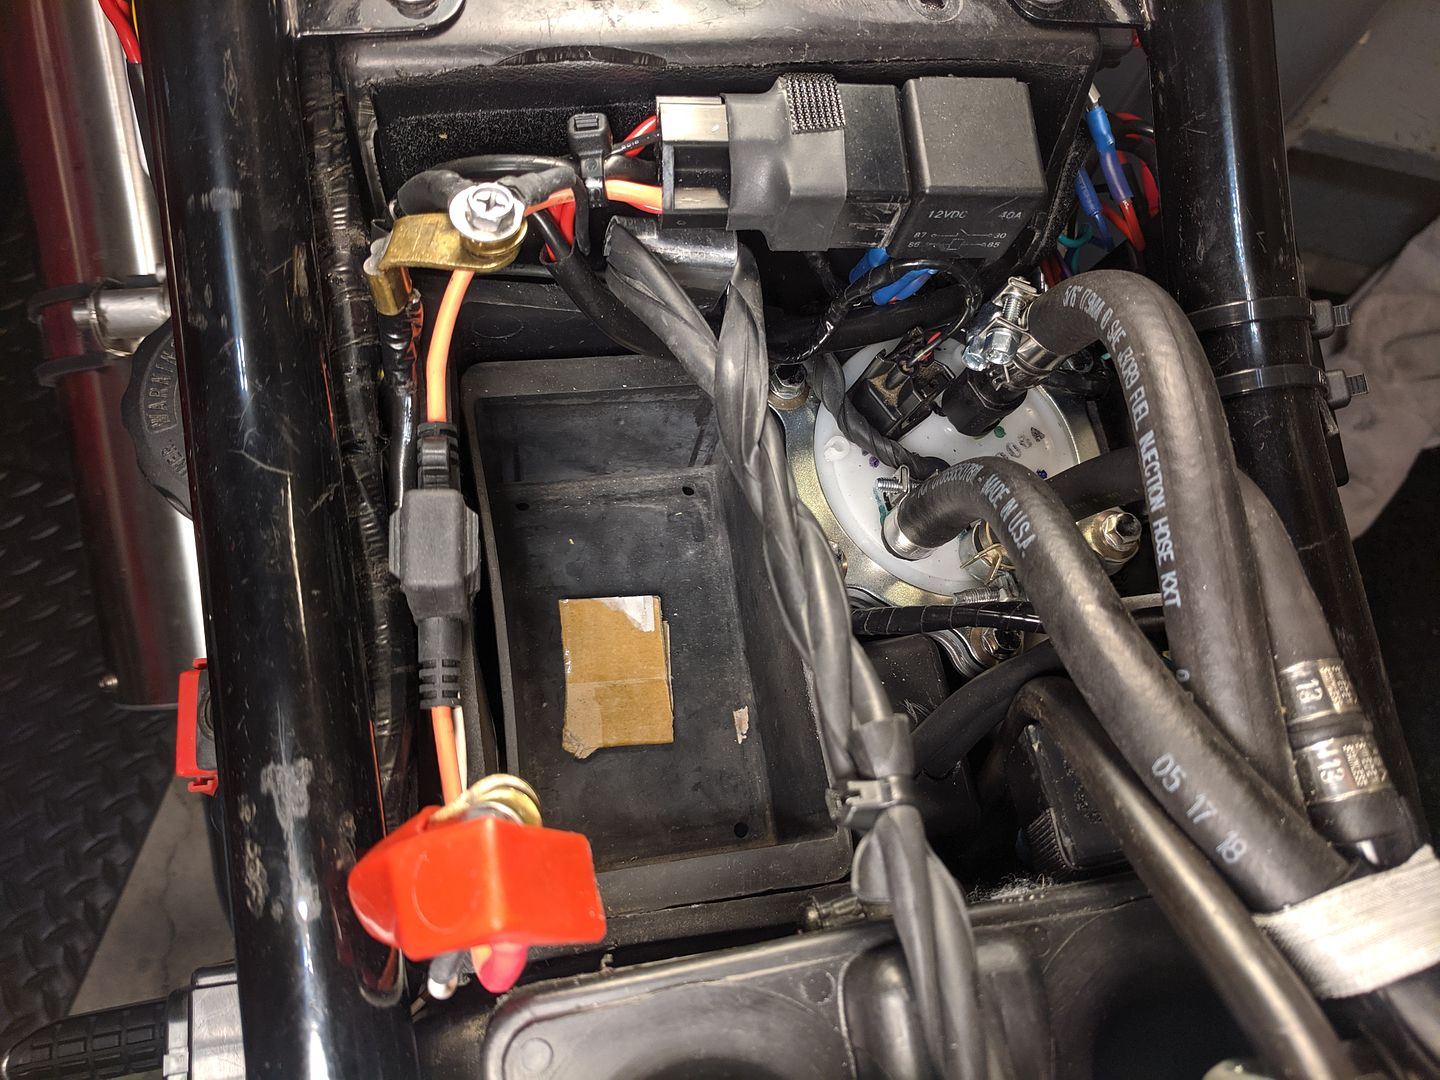
|
|
|
|
|
October 30th, 2019, 06:49 PM
|
#12 |
|
-
Name: -
Location: -
Join Date: May 2009 Motorcycle(s): - Posts: A lot.
|
I replaced my 2005 EX250's original clutch assembly with the clutch assembly from a 2009 Next-Gen EX250.
Here's a few pics of the work, showing that the 2009 Next-Gen clutch assembly is a bit lighter than the 2005 Pre-Gen clutch assembly: Pre-Gen clutch assembly (plus all the bolts, springs, washers and nuts) 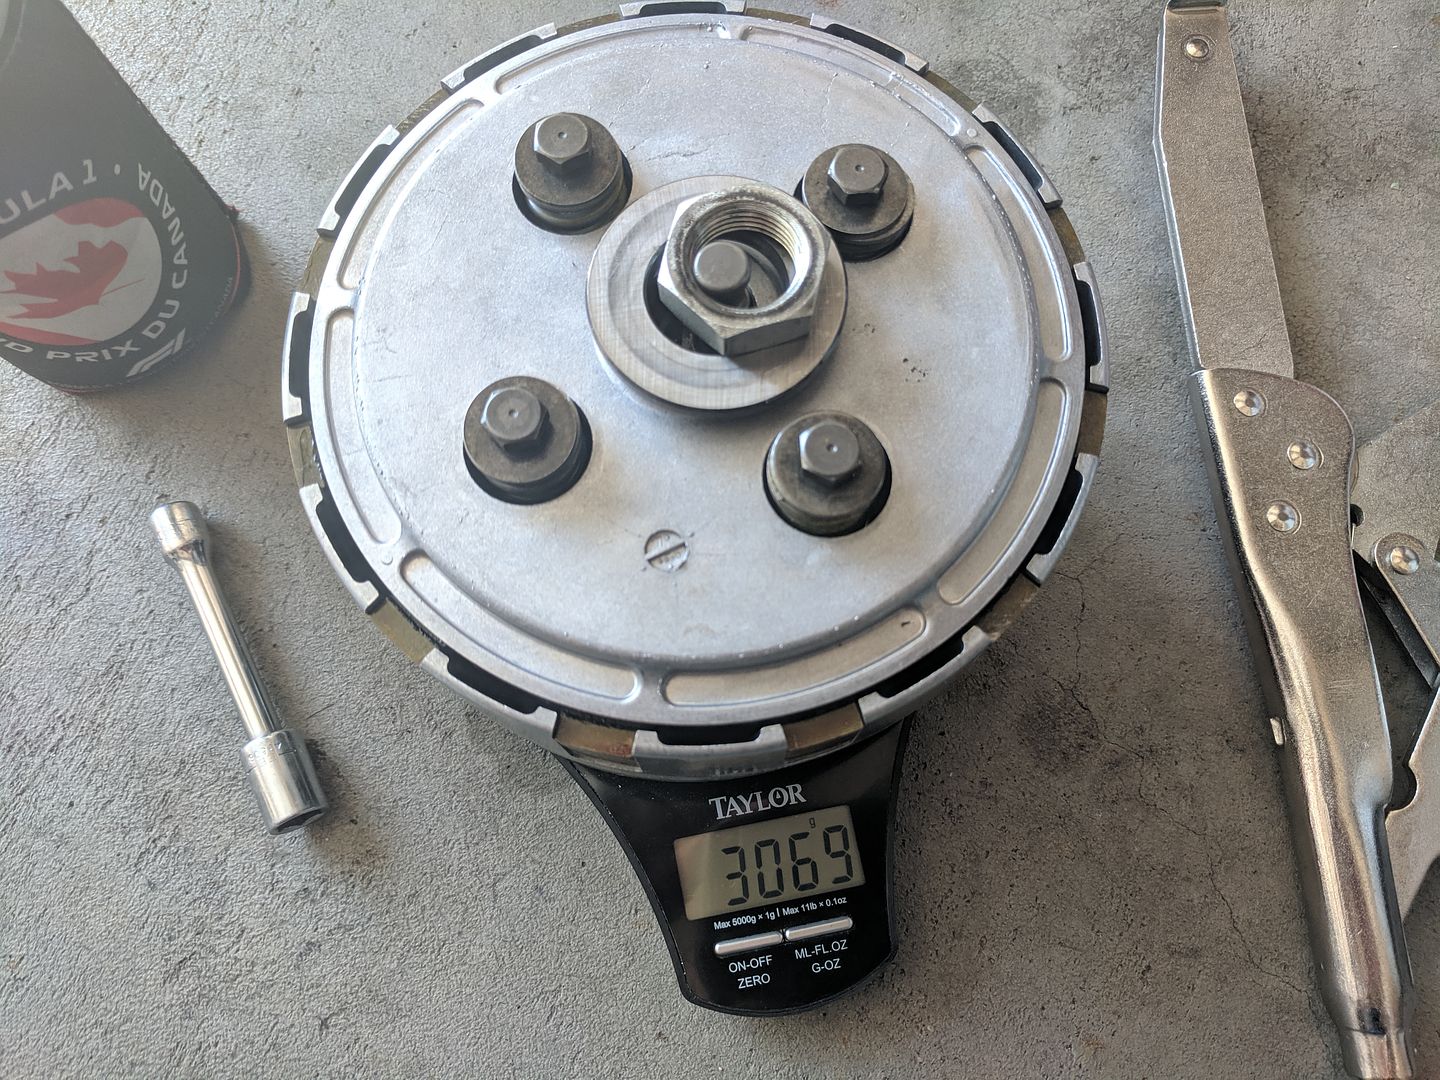 Next-Gen clutch assembly (plus all the bolts, springs, washers and nuts) 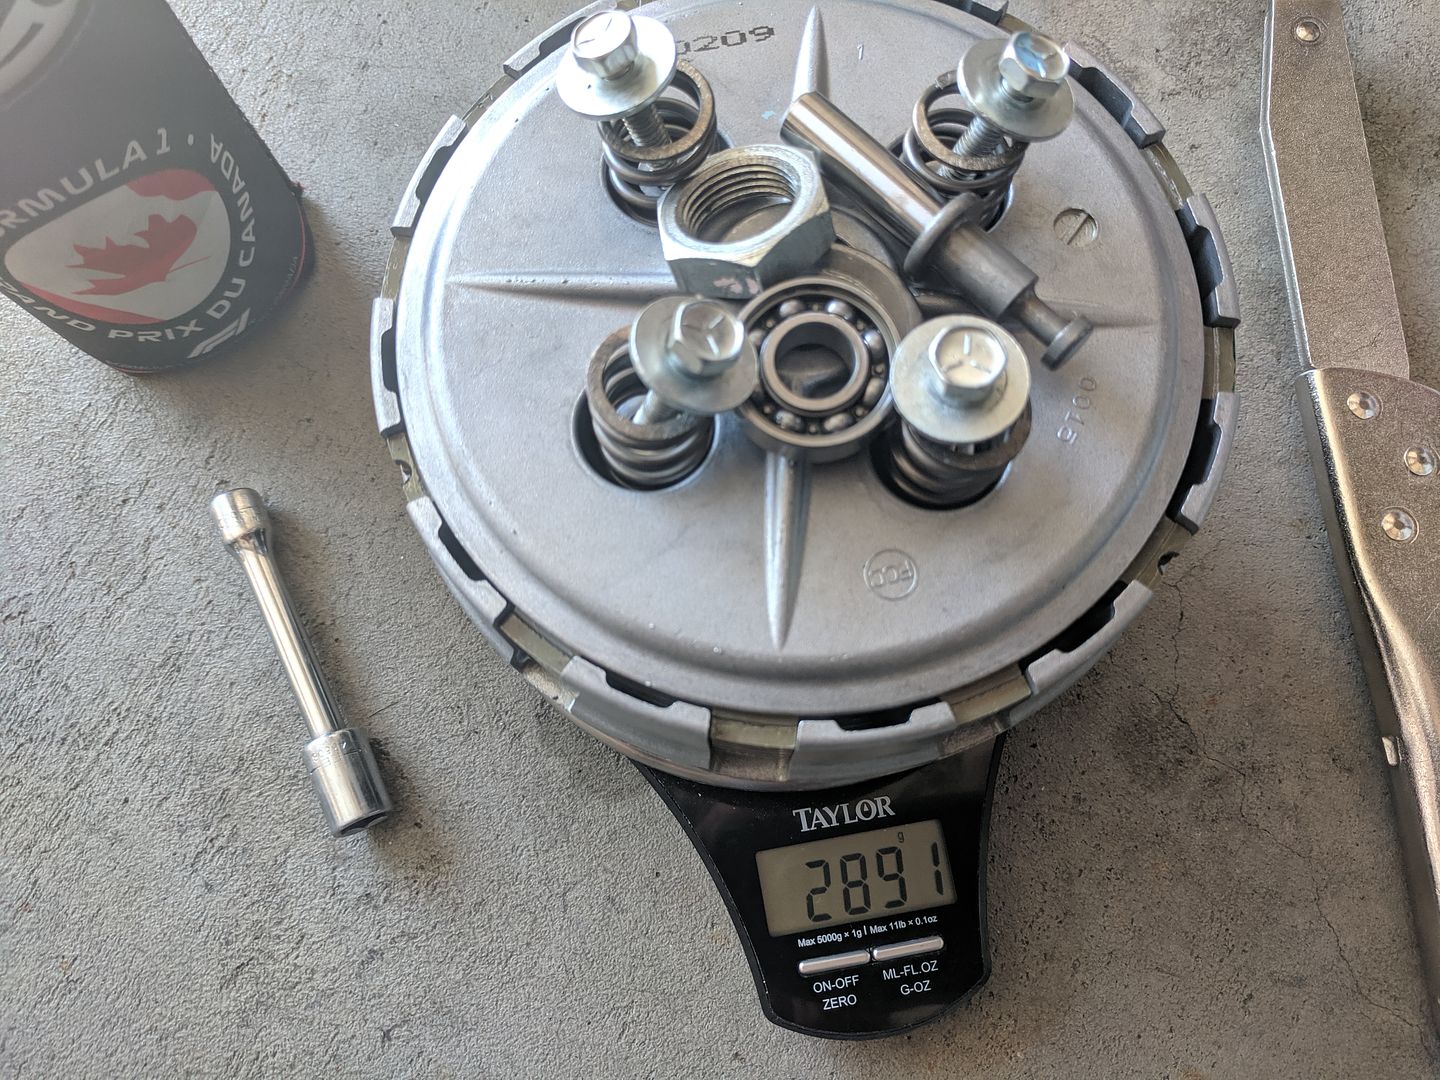 If you're going to swap a Pre-Gen clutch assembly for a Next-Gen clutch assembly you have to also get the correct "pusher" because the Next-Gen item is shorter than the Pre-Gen (if you try to use a Next-Gen clutch with a Pre-Gen "pusher" you won't have enough clutch-lever movement to work the clutch) 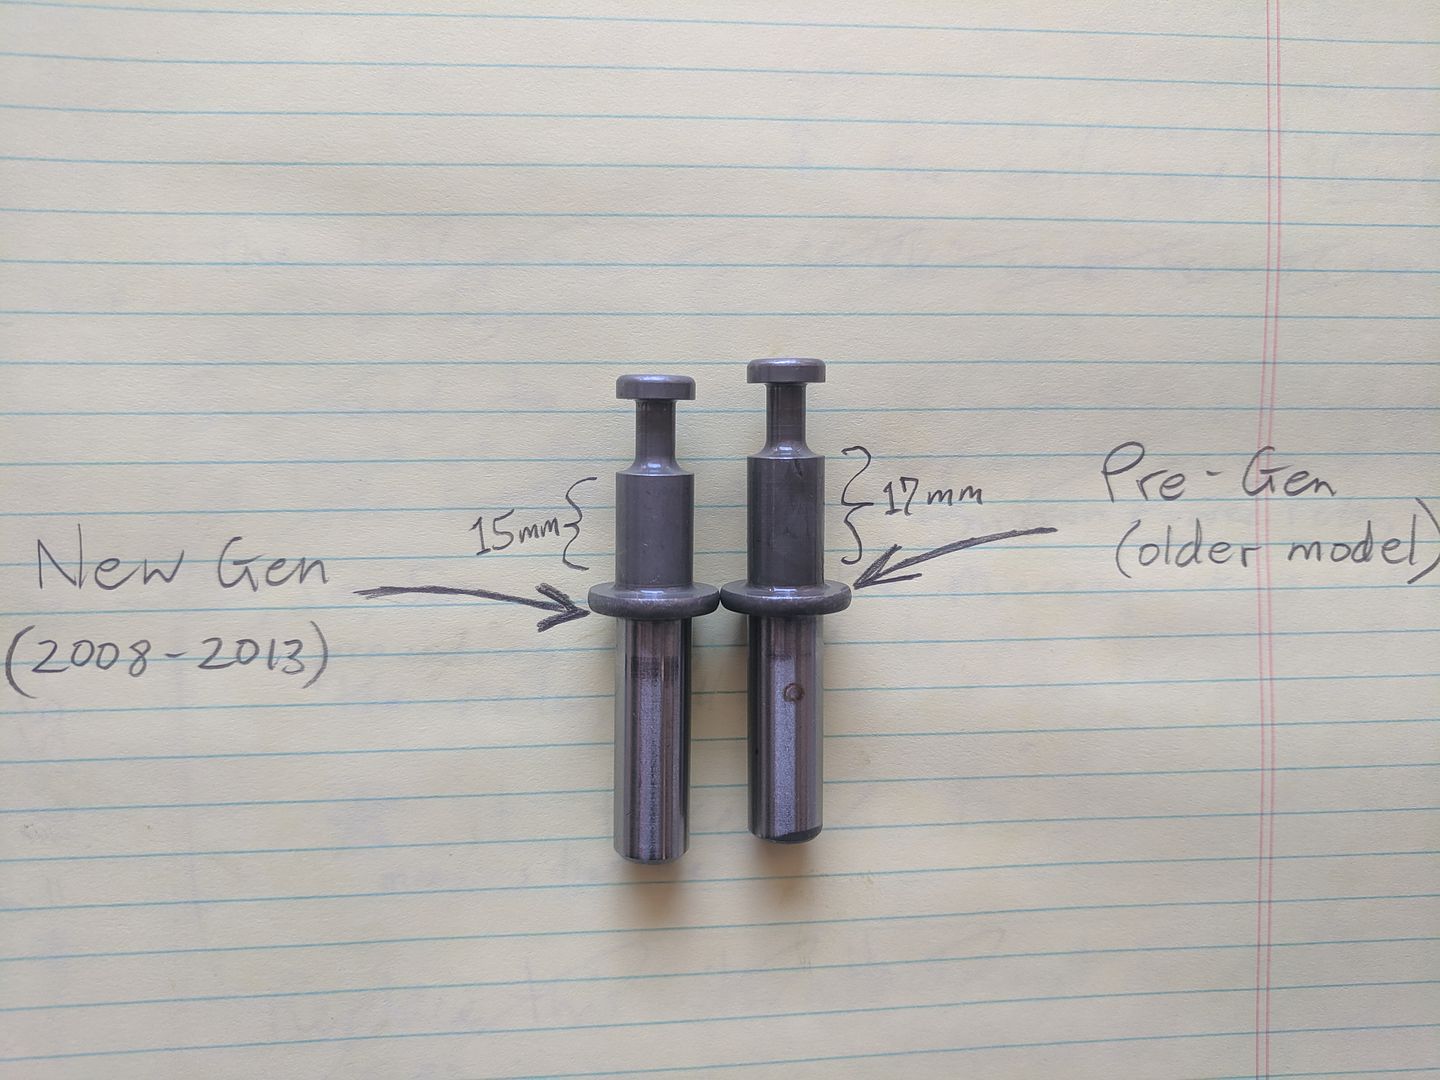
|
|
|
|
|
October 30th, 2019, 06:57 PM
|
#13 |
|
-
Name: -
Location: -
Join Date: May 2009 Motorcycle(s): - Posts: A lot.
|
Here's a picture of the bottom of the bike.
This picture shows the location of the Bosch 5-wire Wide-Band Oxygen Sensor. Also shown in this picture is the installation of a Next-Gen "deep sump" oil screen cover. The "deep sump" oil screen cover is a nice-to-have item because it increases the amount of oil the engine can hold and it also makes oil changes a little bit easier. 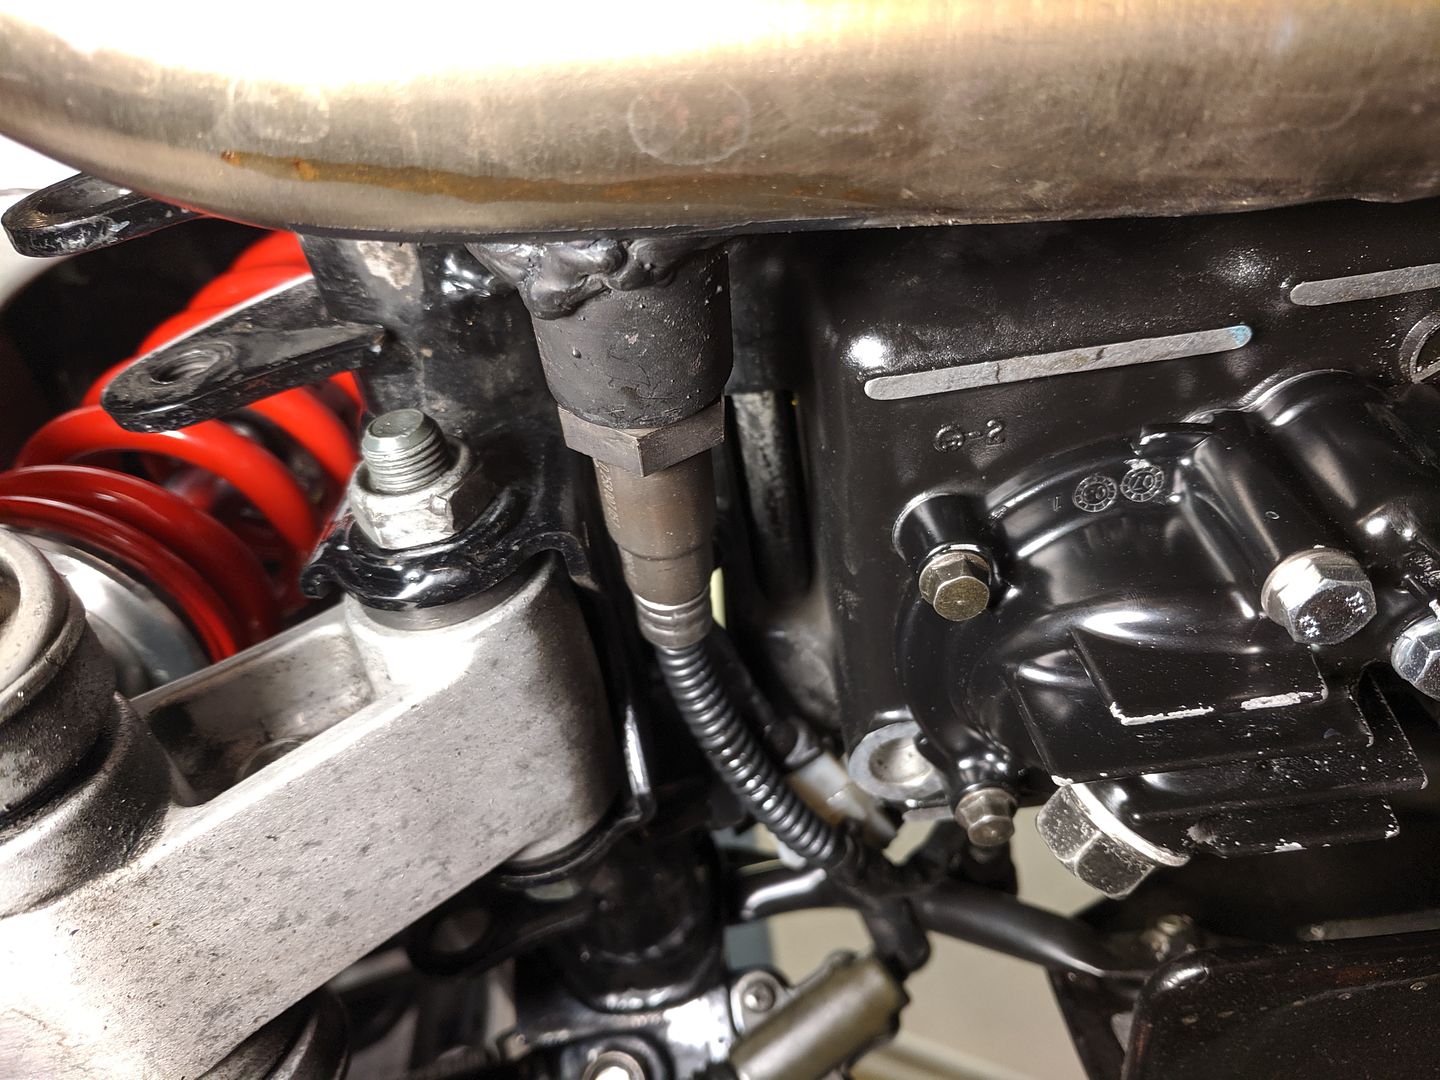
|
|
|
|
|
October 30th, 2019, 07:01 PM
|
#14 |
|
-
Name: -
Location: -
Join Date: May 2009 Motorcycle(s): - Posts: A lot.
|
Here's the nice, modern, MOSFET-type Regulator/Rectifier that I installed in place of the old-school Shunt-type R/R

|
|
|
|
|
October 30th, 2019, 07:07 PM
|
#15 |
|
-
Name: -
Location: -
Join Date: May 2009 Motorcycle(s): - Posts: A lot.
|
I replaced all the bike's lights with LED (headlight, turn signals, brakes, instrument panel lights).
When you replace the bike's turn signals with LEDs you have to replace the bike's original turn signal flasher with one that is specifically designed to work with LEDs. Here's a picture that shows the installed LED turn signal flasher (just above and to the left of the fuse box) 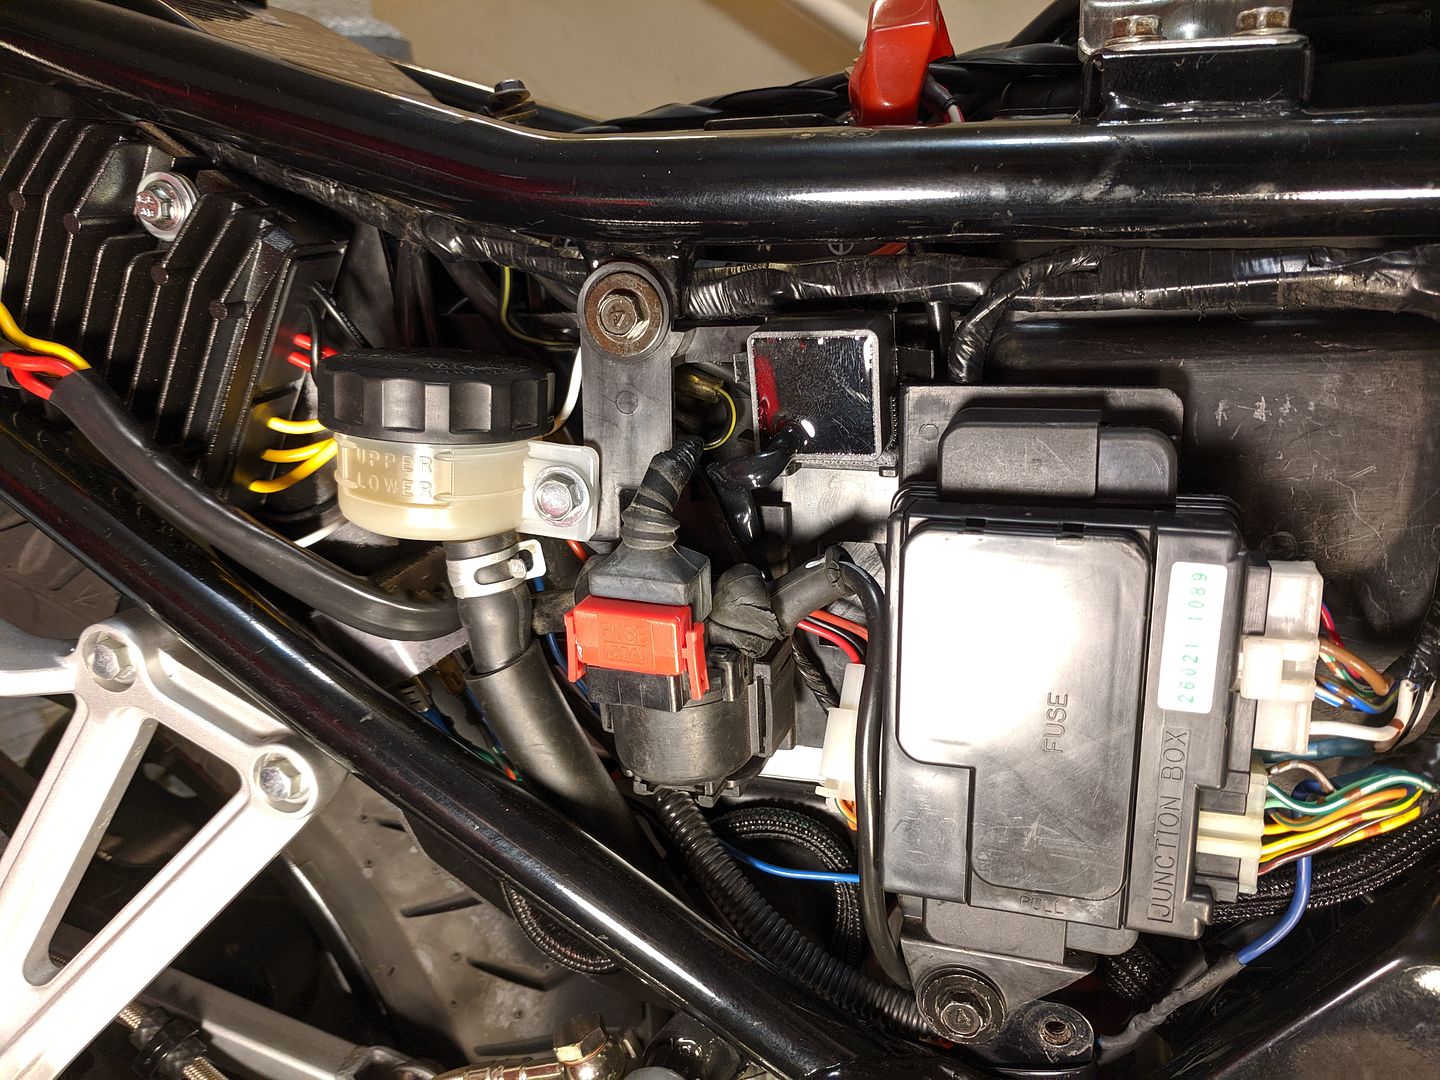
|
|
|
|
|
October 30th, 2019, 07:28 PM
|
#16 |
|
-
Name: -
Location: -
Join Date: May 2009 Motorcycle(s): - Posts: A lot.
|
The Arduino Nano-controlled 2-Manifold Absolute Pressure Sensor circuit was a home-made effort. I didn't design it, got the idea and a lot of help from a guy in Germany.
Small, high-revving pistons of small motorcycle engines (like the EX250) produce really jumpy-jagged-messy Manifold Absolute Pressure signals that aren't very good for input to an ECU. This circuit monitors each of the two cylinders individually. On a millisecond-by-millisecond basis the circuit determines which of the two cylinders is producing a lower signal (i.e. pulling more vacuum) and it send only that signal onward to the Microsquirt ECU. This discrimination smooths out the MAP signal for the Microsquirt ECU. In this picture: -the 2 rounded black plastic items are the MAP sensors -the green item is the Arduino Nano -the red item is a Digital-to-Analog converter -the brown item is just a piece of basic circuit board to hold/connect the items (lots of wire and soldering) 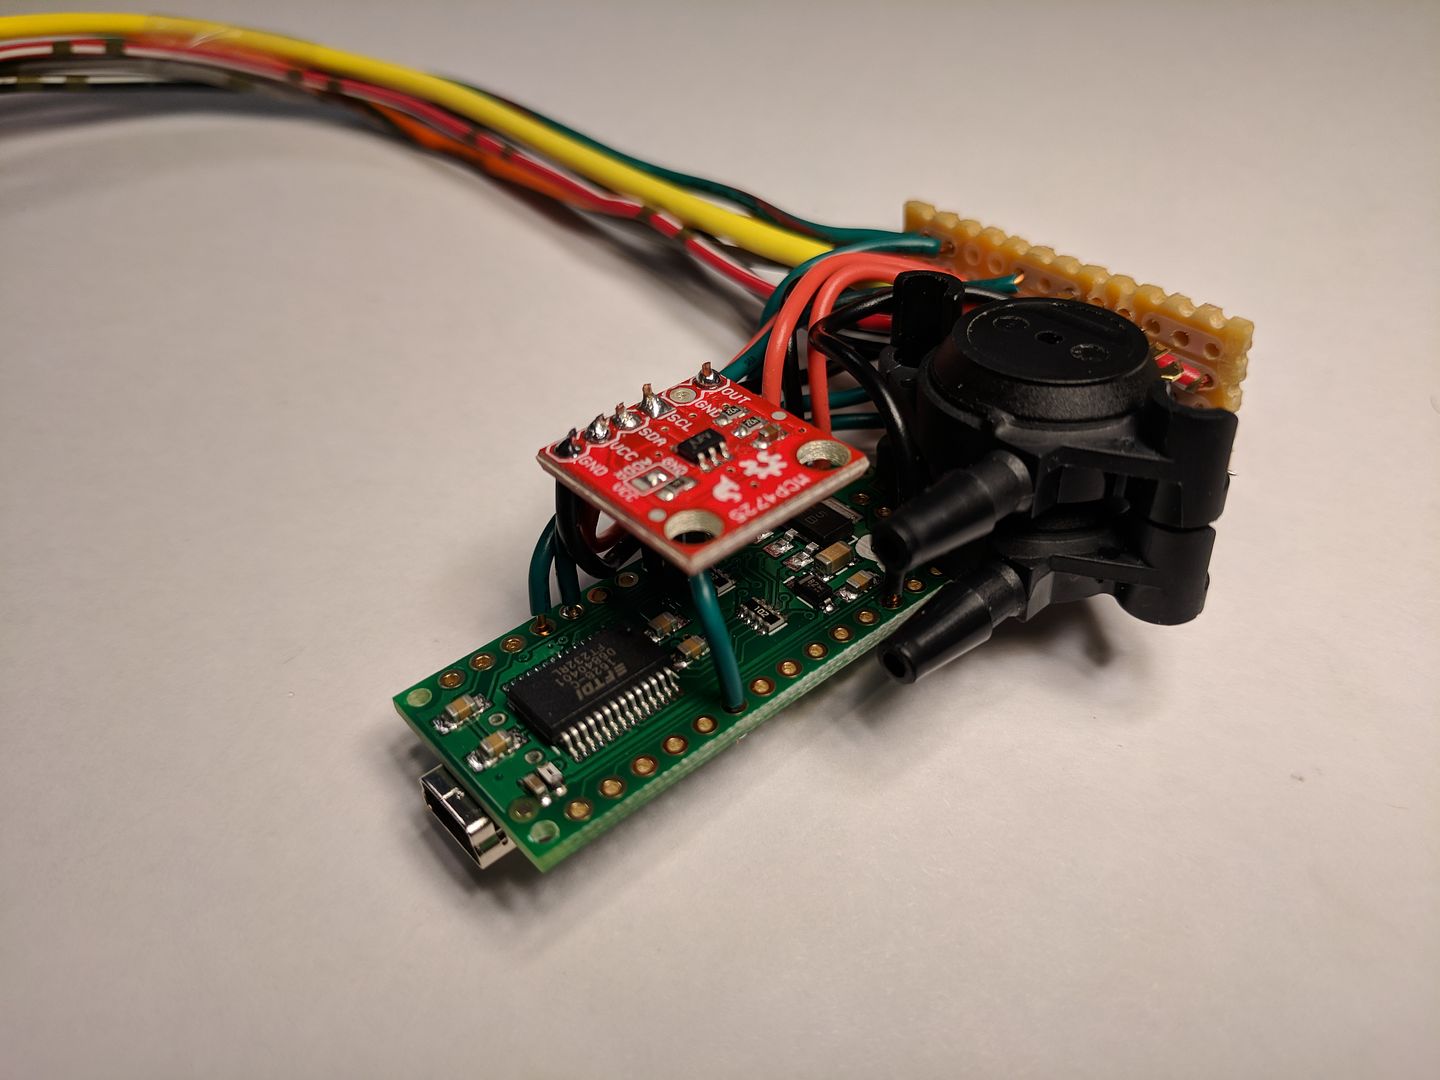 I put the whole thing into a weather-proof plastic project box. 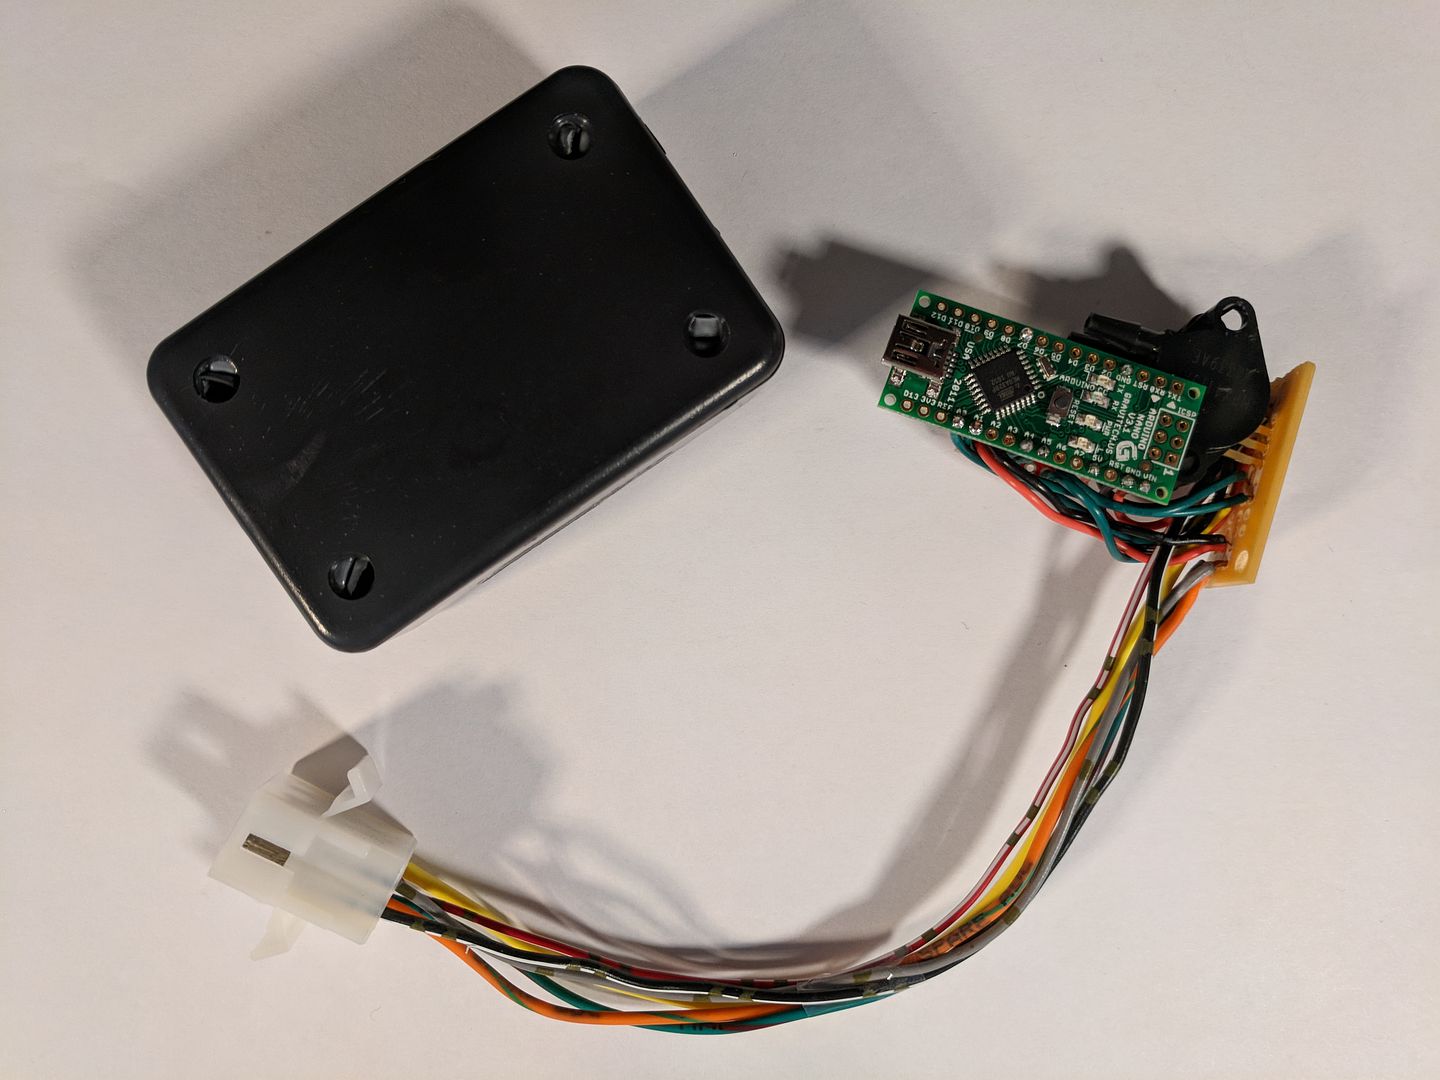 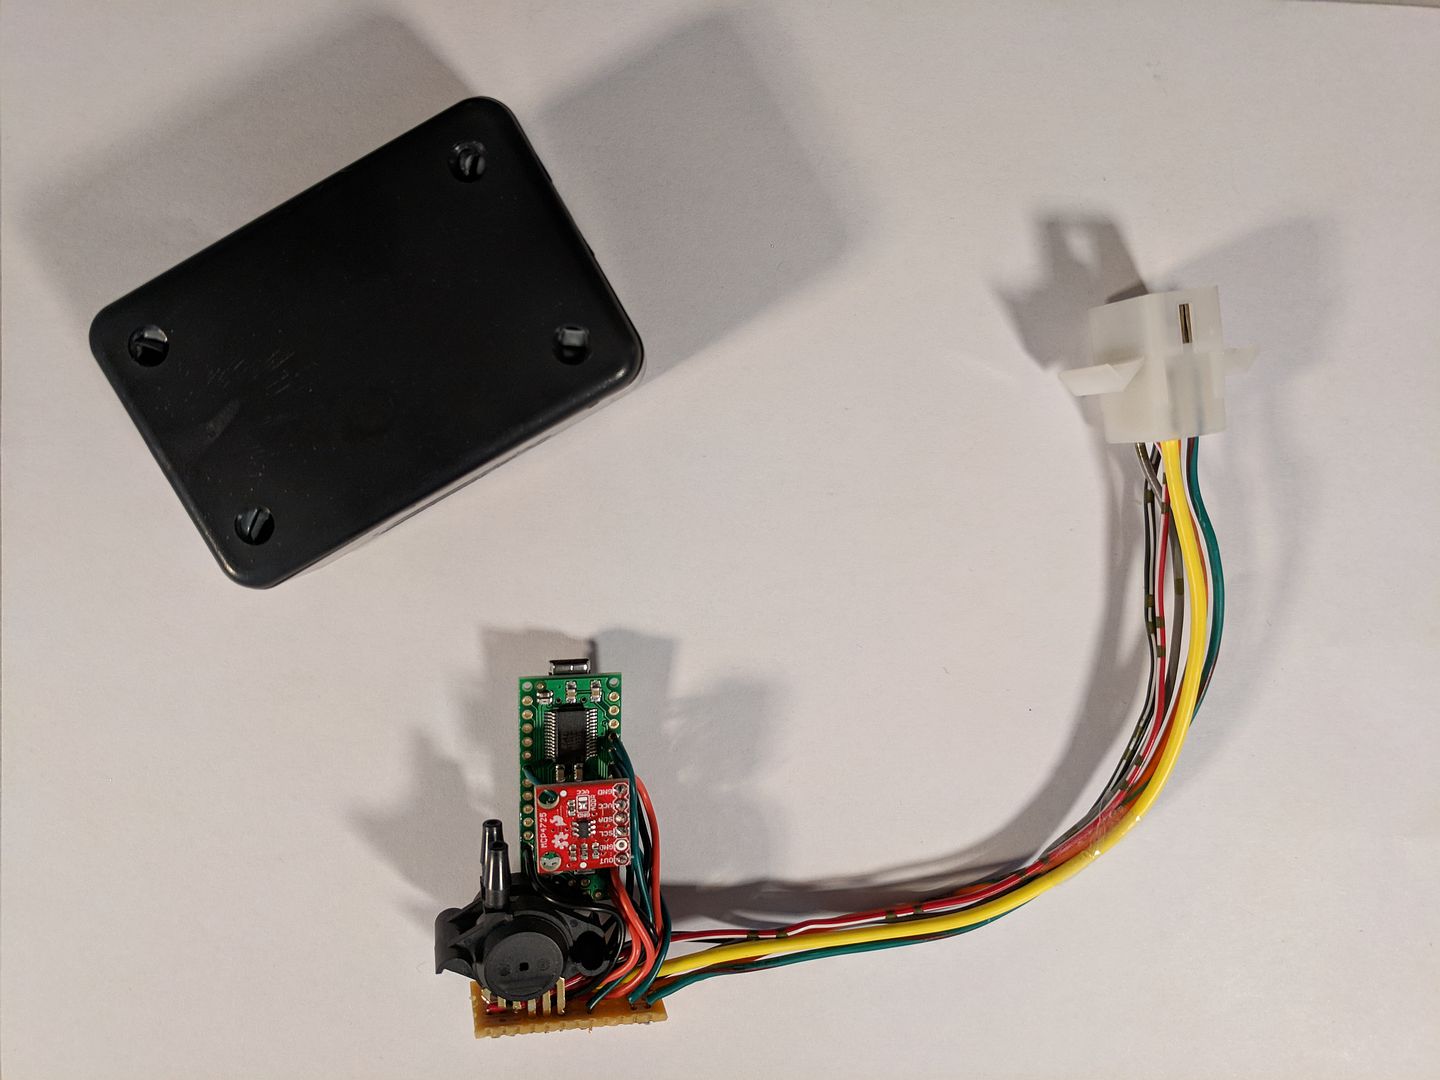 Not shown in these pictures are the rubber hoses that connect the MAP sensors to ports on the throttle body. |
|
|
|
|
October 31st, 2019, 03:46 PM
|
#17 |
|
ninjette.org certified postwhore
Name: .
Location: .
Join Date: Feb 2011 Motorcycle(s): . Posts: Too much.
MOTM - Feb '13, Feb '14
|
Great work, Greg!!! Thanks for sharing with us.
I'm playing with an Arduino for a car project myself. With an Arduino and a 3D printer, there's all kinds of opportunities in cars/bikes/anything. |
|
|
|
|
October 31st, 2019, 08:48 PM
|
#18 |
|
ninjette.org member
Name: Sergey
Location: Ontario, GTA
Join Date: Oct 2019 Motorcycle(s): Ninja ZZR250 (EX250H) Posts: 213
|
Awesome projects, thanks for sharing.. Cannot wait for my gaskets to come to start the clutch and the oil pan projects. EFI is over my head for me though

|
|
|
|
|
November 1st, 2019, 12:52 AM
|
#19 |
|
Socially inept. Yet FUN!
Name: C
Location: Houston Tx
Join Date: Oct 2015 Motorcycle(s): Current machines- 1992 SECA II 600, 2006 Ninja 250, 2008 Ninja 250 Posts: 231
|
Neat project! I'll be reading more!
I noticed the rather large exhaust. Just curious, which brand, or what other bike is it from? Looking to update my GFs 07. |
|
|
|
|
November 1st, 2019, 04:02 AM
|
#20 |
|
ninjette.org certified postwhore
Name: .
Location: .
Join Date: Feb 2011 Motorcycle(s): . Posts: Too much.
MOTM - Feb '13, Feb '14
|
Area P. Currently unobtanium.
|
|
|
|
 |
 Similar Threads
|
||||
| Thread | Thread Starter | Forum | Replies | Last Post |
| Refurbishing an old battery | MrAtom | 1986 - 2007 Ninja 250R Tech Talk | 23 | June 19th, 2015 03:15 PM |
| Video profile: my '05 EX250 fuel injection project. | greg737 | Videos | 6 | October 13th, 2011 10:30 AM |
| [roadracingworld.com] - Video: Upgrading The Front Brake Discs On The OTT Project Yam | Ninjette Newsbot | Motorcycling News | 0 | February 4th, 2011 01:50 PM |
|
|


