
|
 June 9th, 2009, 03:21 AM
|
#1 |
|
bae13
Name: Brad
Location: Melbourne
Join Date: May 2009 Motorcycle(s): Kawasaki Ninja 250R 08 "Yes Its GREEN!!" Honda CR125R 01 "Bills Pipe" Waaaaahhhhhhhh Posts: 23
|
DIY Install of the Bikemonkey Integrated LED tail light
Ive noticed a few people on here talking about my new integrated tail light
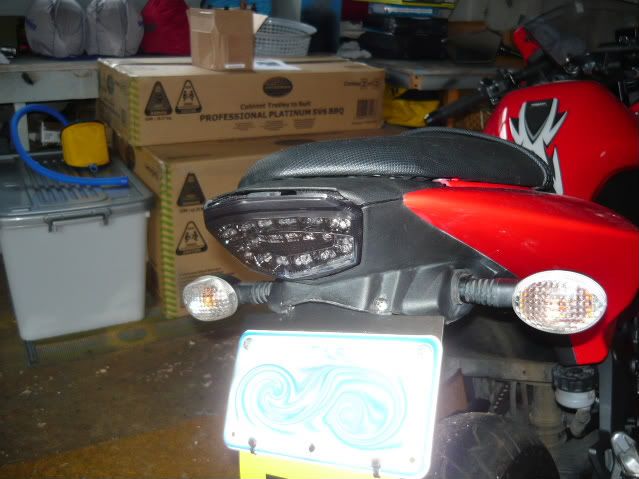
Q1- where do u get it? www.bikemonkey.com.au Q2- how do u install? Like this!! Mind u this is a no cut, so dont cut install! U may notice i have changed the rear fender with an eliminator. but thats irrelivant. its all the same! 1: here she is all pretty with here big red STOCK tail light and AM indicators DSC00633.JPG 2: Remove it all. Rear seat or cowl, black plastic sides, seat and rear fenders. (i left the right fender on coz ive done this before, this is just for you!) DSC00641.JPG 3: Remove the 2 bolts holding the tail light in place like so. remove the bulb from housing, then lift the stock light up and out, DSC00648.JPG DSC00649.JPG 4: Lay both lights out, removing the grey rubber grommets from the stock taillight and installing into the LED taillight in exactly the same way. DSC00650.JPG DSC00654.JPG 5: Install the new led bulb connector into the holder like so. Feed the wires into the back of the light and click in2 place. DSC00660.JPG DSC00661.JPG DSC00662.JPG Reinstall light as per removal DSC00663.JPG 6: I used the Acumen Kawasaki unversal fit, which didnt fit. so i made it fit, MY WAY. Leaving the option to go back if needed. Remember NO CUT. Factory flasher on the left Acumen on the right. DSC00644.JPG 7: Removed the plastic thingy and cut off the brass tips. DSC00669.JPG then attached the red spade connectors crimped and soldered. DSC00671.JPG Let it cool down and then plug into factory harness and cable tie the new flasher in. DSC00675.JPG 8: SIGNALS. here im an exeption to the rule of no cut. my previous after market indicators came with wires and connectors specific to the bike (and yes the aftermarket wires i got mean orange is my hot wire. so dont ask.) with the install the yellow and blue wires connect to their respective sides, left and right. (you'll figure that out. if the wrong side flashes, switch sides.) each of these wires go to the HOT side, or green wire from stock. leave the ground wire alone, the indicators take the ground from the black ground wire at the back of the LED taillight. heres mine. DSC00673.JPG If you dont want to keep the original indicators cut the wire here and use the green (HOT)side. DSC00714.JPG 9: After you have checked and then checked again that all the lights are flashing on the correct side and brake and running light are operational. tuck all the wires away and cable tie if necessary. DSC00676.JPG 10: refit all plastics and fairings with the correct bolts, remember dont confuse them as the bolts are are differant lengths, so take note of there location. DSC00677.JPG DSC00678.JPG 11: now stand back, cos your DONE!!! DSC00679.JPG Any questions, let me know..
__________________________________________________
No its not trick photography. Im actually this awesome all the time!! Last futzed with by bae13; June 9th, 2009 at 03:42 AM. Reason: Pictures didnt show up, reloaded. Also really bad spelling! |

|

|
|
June 9th, 2009, 06:13 AM
|
#2 |
|
============
Name: Nick
Location: Occoquan, VA
Join Date: Nov 2008 Motorcycle(s): '09 Ninja 250R Posts: 518
|
Nice DIY, Brad!
 To help anyone that may use this, the new electronic flasher used in Step 6 can be bought at most auto parts stores. |
|
|
|
|
June 9th, 2009, 09:07 AM
|
#3 |
|
ninjette.org dude
Name: 1 guess :-)
Location: SF Bay Area
Join Date: Jun 2008 Motorcycle(s): '13 Ninja 300 (white, the fastest color!), '13 R1200RT, '14 CRF250L, '12 TT-R125LE Posts: Too much.
Blog Entries: 7
|
Nice work; added to the DIY sticky at the top of the tech section.
__________________________________________________
Montgomery Street Motorcycle Club / cal24.com / crf250l.org / ninjette.org ninjette.org Terms of Service Shopping for motorcycle parts or equipment? Come here first. The friendliest Ninja 250R/300/400 forum on the internet! (especially Unregistered) |
|
|
|
|
June 9th, 2009, 09:34 AM
|
#4 |
|
WHEE!
Name: Andrew
Location: VA
Join Date: Apr 2009 Motorcycle(s): 2009 Black Kawi 250R Posts: 91
|
WOW! i love it!!!! i really want mine now!
|
|
|
|
|
July 13th, 2009, 01:21 AM
|
#5 |
|
sir posts a lot
Name: michael
Location: HI
Join Date: Jul 2009 Motorcycle(s): '09 Black 250R Posts: 267
|
is there a DIY for the photon flush mounts and this taillight?? thanks
|
|
|
|
|
July 13th, 2009, 01:35 AM
|
#6 |
|
bae13
Name: Brad
Location: Melbourne
Join Date: May 2009 Motorcycle(s): Kawasaki Ninja 250R 08 "Yes Its GREEN!!" Honda CR125R 01 "Bills Pipe" Waaaaahhhhhhhh Posts: 23
|
I never got around 2 doing a DIY install on the proton flushmounts. when it stops raining here ill pull em off my bike and do a re-instal, just 4 u.....
__________________________________________________
No its not trick photography. Im actually this awesome all the time!! |
|
|
|
|
July 13th, 2009, 01:43 AM
|
#7 |
|
bae13
Name: Brad
Location: Melbourne
Join Date: May 2009 Motorcycle(s): Kawasaki Ninja 250R 08 "Yes Its GREEN!!" Honda CR125R 01 "Bills Pipe" Waaaaahhhhhhhh Posts: 23
|
Must admit they do look good.......
__________________________________________________
No its not trick photography. Im actually this awesome all the time!! |
|
|
|
|
July 13th, 2009, 03:56 AM
|
#8 |
|
ninjette.org member
Name: Daniel
Location: somerset
Join Date: Jul 2009 Motorcycle(s): Red '08 Kawasaki Ninja 250R Posts: 36
|
Have got mine on order with a smoke lens, Cant wait!
|
|
|
|
|
July 16th, 2009, 01:09 PM
|
#9 |
|
ninjette.org member
Name: Jack
Location: Virginia
Join Date: Feb 2009 Motorcycle(s): 2009 NiNjA 250 Posts: 10
|
I have mine sitting at home. Both Proton Lights and Bike Monkey Integrated Tail Light (smoke lens). Picking up Diodes and Relay on my way home. Plan on doing a DIY for full install. If needed it can be posted.
4 LED's w/ relay and diodes. Have a visio drawing of the circuit (yeah bored at work) that i'll probably attach too.
|
|
|
|
|
July 16th, 2009, 02:03 PM
|
#10 |
|
ninjette.org certified postwhore
Name: Kim
Location: mundo de ensueño
Join Date: Nov 2008 Motorcycle(s): '08 250 Posts: A lot.
|
Jack, I don't think I've welcomed you! Where are you in VA? Have you posted in the new members section?
__________________________________________________
Progrip tank pad, blue rim stripes, blue Pazzos, Roaring Toyz lowering kit, Puig DB in dark smoke, Cortech sport tail, super mini tank, and saddlebags, OES swingarm spools and Intuitive frame sliders |
|
|
|
|
July 16th, 2009, 02:58 PM
|
#11 |
|
ninjette.org member
Name: Daniel
Location: SW Texas
Join Date: Jun 2009 Motorcycle(s): 08 Ninja 250 Posts: 87
|
Jack (dpinside) do you have a pic of what the smoke version looks like? My brother is thinking about getting one. Thanks
|
|
|
|
|
July 18th, 2009, 10:49 PM
|
#12 |
|
ninjette.org member
Name: Daniel
Location: somerset
Join Date: Jul 2009 Motorcycle(s): Red '08 Kawasaki Ninja 250R Posts: 36
|
Ok, so heres a picture of the smoke lens.
 Now the top cover is not fitting too well at the moment, however this will hopefully remedied soon. The indicators are not wired in yet and the old ones will soon be deleted and the rear fender removed completely(cut back so its flush)
__________________________________________________
  
|
|
|
|
|
July 18th, 2009, 10:59 PM
|
#13 |
|
ninjette.org member
Name: Daniel
Location: somerset
Join Date: Jul 2009 Motorcycle(s): Red '08 Kawasaki Ninja 250R Posts: 36
|
Actually, I just noticed something, bae13's rear end looks different to mine. The brace thats welded over the tail light is a different design. Is that because of different years?
Is it different because you have a rear seat cowl? is there modifications needed to put in the the cowl! I'm confused!
__________________________________________________
|
|
|
|
|
July 19th, 2009, 12:15 AM
|
#14 |
|
ninjette.org guru
Name: Dan
Location: Chicago, il....
Join Date: Jun 2009 Motorcycle(s): 2007 Suzuki GSX-R750 Posts: 378
|
put some velcro on the top of the tail light and bottom of the plastic piece that goes over the light....or use double stick tape.....
|
|
|
|
|
July 19th, 2009, 12:25 AM
|
#15 |
|
ninjette.org member
Name: Daniel
Location: somerset
Join Date: Jul 2009 Motorcycle(s): Red '08 Kawasaki Ninja 250R Posts: 36
|
Yeah, will be doing that when my new seat cowl arrives. I think I twisted it a bit when I removed it!
__________________________________________________
|
|
|
|
|
July 20th, 2009, 04:17 AM
|
#16 |
|
bae13
Name: Brad
Location: Melbourne
Join Date: May 2009 Motorcycle(s): Kawasaki Ninja 250R 08 "Yes Its GREEN!!" Honda CR125R 01 "Bills Pipe" Waaaaahhhhhhhh Posts: 23
|
correct with the velcro. i removed the velcro from the original tail light and stuck it on the interated. as im aware the 08 and 09 are virtually identical.
__________________________________________________
No its not trick photography. Im actually this awesome all the time!! |
|
|
|
|
July 20th, 2009, 06:46 AM
|
#17 |
|
ninjette.org member
Name: Daniel
Location: somerset
Join Date: Jul 2009 Motorcycle(s): Red '08 Kawasaki Ninja 250R Posts: 36
|
yeah my bad!! Realised tonight that I missed the clip that holds down that top cover at the rear. I transferred the velcro over no probs there and as to the brace, again, my bad must pay attention, they are the same but you have a rubber grommet in the hole and what looks like a cable tie going through the hole to tidy up the wires, am I correct?
__________________________________________________
|
|
|
|
|
July 21st, 2009, 02:48 AM
|
#18 |
|
bae13
Name: Brad
Location: Melbourne
Join Date: May 2009 Motorcycle(s): Kawasaki Ninja 250R 08 "Yes Its GREEN!!" Honda CR125R 01 "Bills Pipe" Waaaaahhhhhhhh Posts: 23
|
arrr, no that rubber grommet is for the cowl cover. unlike the seat which slides into the back, the cowl cover uses a pin which goes through the hole where the round grommet is. i used the cable tie to A) stop the grommet falling into the bike when inserted incorrectly, B) causes the pin to snap into place, as opposed to just sitting in there.
__________________________________________________
No its not trick photography. Im actually this awesome all the time!! |
|
|
|
|
July 24th, 2009, 10:23 AM
|
#19 |
|
ninjette.org sage
Name: Matt
Location: South East Florida/Rutgers University
Join Date: Dec 2008 Motorcycle(s): 2008 250r (Fastest Color) Posts: 914
|
Ok im a total noob when it comes to electronics. I got the light hooked up so that the running light and the brake light is working and now I cant figure out how to hook up the turn signals. I see my blue and yellow wire from the tail light. I followed the stock turn signal wires to where they connect. But how do I attach the blue and yellow wire to those connectors?
|
|
|
|
|
July 24th, 2009, 10:37 AM
|
#20 |
|
ninjette.org sage
Name: Matt
Location: South East Florida/Rutgers University
Join Date: Dec 2008 Motorcycle(s): 2008 250r (Fastest Color) Posts: 914
|
Ok I took a guess and removed the wires from the stock rear turn signal. I connected the yellow wire the the green wire(this is the hot one correct?) and the brake light for that side on the tail light goes out but the turn signal doesnt blink. Im guessing I have to ground this somewhere and somehow with the stock black wire but where and how?
|
|
|
|
|
July 24th, 2009, 10:39 AM
|
#21 |
|
ninjette.org sage
Name: Matt
Location: South East Florida/Rutgers University
Join Date: Dec 2008 Motorcycle(s): 2008 250r (Fastest Color) Posts: 914
|
Ok re-read the thread and if I understand correctly I leave the ground alone...so why isnt it blinking? I already switched out the flash relay with one that a member said worked. Please helppp
|
|
|
|
|
July 24th, 2009, 10:47 AM
|
#22 |
|
ninjette.org sage
Name: Matt
Location: South East Florida/Rutgers University
Join Date: Dec 2008 Motorcycle(s): 2008 250r (Fastest Color) Posts: 914
|
Disregard last 3 posts...I plead to being an idiot and not having my front turn signals installed...everything is working great and my smoked integrated turn signal looks fantastic!!
|
|
|
|
|
July 25th, 2009, 03:41 PM
|
#23 | |
|
ninjette.org member
Name: Daniel
Location: somerset
Join Date: Jul 2009 Motorcycle(s): Red '08 Kawasaki Ninja 250R Posts: 36
|
Quote:
I finally got indicators working and a fenderectomy done, but then my tail/brake light wouldn't work....I blew a fuse!!! 
__________________________________________________
|
|
|
|
|
|
July 25th, 2009, 03:44 PM
|
#24 |
|
ninjette.org sage
Name: Matt
Location: South East Florida/Rutgers University
Join Date: Dec 2008 Motorcycle(s): 2008 250r (Fastest Color) Posts: 914
|
Haha well I read...I guess not close enough though haha. Also a little confused with the wires as the OP didn't have stock rear turn signals but I figured it out soon enough lol
Posted via Mobile Device |
|
|
|
|
July 25th, 2009, 03:49 PM
|
#25 |
|
ninjette.org member
Name: Daniel
Location: somerset
Join Date: Jul 2009 Motorcycle(s): Red '08 Kawasaki Ninja 250R Posts: 36
|
Here's a pic of mine installed correctly with the fenderectomy
 I used a dremel for the operation, patient made a full recovery!!
__________________________________________________
|
|
|
|
|
July 25th, 2009, 05:46 PM
|
#26 |
|
sir posts a lot
Name: michael
Location: HI
Join Date: Jul 2009 Motorcycle(s): '09 Black 250R Posts: 267
|
Ok great job guys but I still need a DIY for flush mounts and BM tail lights. Any takers???
Posted via Mobile Device |
|
|
|
|
July 25th, 2009, 05:55 PM
|
#27 |
|
ninjette.org sage
Name: Matt
Location: South East Florida/Rutgers University
Join Date: Dec 2008 Motorcycle(s): 2008 250r (Fastest Color) Posts: 914
|
this thread is the thread for the bm tail light?
Posted via Mobile Device |
|
|
|
|
July 27th, 2009, 02:18 AM
|
#28 |
|
ninjette.org member
Name: Jack
Location: Virginia
Join Date: Feb 2009 Motorcycle(s): 2009 NiNjA 250 Posts: 10
|
Been pretty busy lately, but I got a chance to install the Proton turn signals this weekend, and got them to work with a new electronic flasher. The tail light on the other hand (Bikemonkey's) does not work, well the turn signals, the brake light works fine.
Bae13 did you install diodes under the dash? BTW, I am taking pictures. |
|
|
|
|
July 27th, 2009, 06:37 AM
|
#29 |
|
bae13
Name: Brad
Location: Melbourne
Join Date: May 2009 Motorcycle(s): Kawasaki Ninja 250R 08 "Yes Its GREEN!!" Honda CR125R 01 "Bills Pipe" Waaaaahhhhhhhh Posts: 23
|
ey dpinside, what do u mean the turn signals dont work? dont work at all? flashing funny? stays on? let us know what the prob is. and no, i didnt install diodes under the dash. and ive got the protons aswell, so wouldnt mind knowing what your problem is.
__________________________________________________
No its not trick photography. Im actually this awesome all the time!! |
|
|
|
|
July 27th, 2009, 06:54 AM
|
#30 | |
|
ninjette.org member
Name: Jack
Location: Virginia
Join Date: Feb 2009 Motorcycle(s): 2009 NiNjA 250 Posts: 10
|
Quote:
Posted via Mobile Device |
|
|
|
|
|
July 28th, 2009, 07:12 AM
|
#31 |
|
ninjette.org member
Name: Jack
Location: Virginia
Join Date: Feb 2009 Motorcycle(s): 2009 NiNjA 250 Posts: 10
|
Update.
I was thinking to myself it may be my relay. I went out and bought a 25 amp variable load electronic flasher which is 5 amps greater than the relay I had to see if that was the issue. Well It made it A LOT better, but now all the lights flash instead of not flashing at all when I turn the blinker on either left or right. When I turn the left blinker on, the left side lights up bright and acutally blinks, but the front right side blinker has a low dim pulse to it, almost like its getting backflow and the other half of BM's tail light pulses from red to yellow and vice versa. Maybe I need LED load balancers, or a bigger relay. Any suggestions? |
|
|
|
|
July 28th, 2009, 09:43 AM
|
#32 |
|
ninjette.org certified postwhore
Name: Kim
Location: mundo de ensueño
Join Date: Nov 2008 Motorcycle(s): '08 250 Posts: A lot.
|
go read through the proton flushmounts thread towards the end Jack - Mike explains it really well
__________________________________________________
Progrip tank pad, blue rim stripes, blue Pazzos, Roaring Toyz lowering kit, Puig DB in dark smoke, Cortech sport tail, super mini tank, and saddlebags, OES swingarm spools and Intuitive frame sliders |
|
|
|
|
July 28th, 2009, 02:47 PM
|
#33 |
|
ninjette.org member
Name: Jack
Location: Virginia
Join Date: Feb 2009 Motorcycle(s): 2009 NiNjA 250 Posts: 10
|
I did read that post. A couple times actually.
 Bae13 said he did not use diodes using Proton LEDs and Bikemonkeys LED tail light. Same setup minus the Acumen relay. I'll add the diodes under the dash and see if I can get it working. |
|
|
|
|
July 28th, 2009, 03:52 PM
|
#34 |
|
ninjette.org guru
Name: Dan
Location: Chicago, il....
Join Date: Jun 2009 Motorcycle(s): 2007 Suzuki GSX-R750 Posts: 378
|
You need to wire a diode under your dash to get the proton LED front turn signals to work with the bikemonkey led integrated tail light, I just did it a couple weeks ago, i made a D.I.Y, sort of, on how to wire in the diode..I dont know how bae13 got his to work without a diode...he probably just doesnt notice his opposite side flashing yet..
here's a link on hoe to do it-------> http://www.ninjette.org/forums/showthread.php?t=24500 |
|
|
|
|
July 28th, 2009, 04:05 PM
|
#35 |
|
ninjette.org member
Name: Jack
Location: Virginia
Join Date: Feb 2009 Motorcycle(s): 2009 NiNjA 250 Posts: 10
|
the man ----^
|
|
|
|
|
August 8th, 2009, 08:33 AM
|
#36 |
|
ninjette.org newbie
Name: Mike
Location: Charlotte
Join Date: Aug 2009 Motorcycle(s): 2008 Ninja 250R Posts: 7
|
Just tried this install and unfortunately the directions said the flashers would work just fine. Well....Everything works great with the exception of the turn signals don't flash. They come on but don't blink. Not sure exactly what I need to do. I connected each respective indicator to the hot wire (of course) and taped off the groud (coming from the harness). Any suggestions on what to do??
Thanks for your help!! Mike |
|
|
|
|
August 9th, 2009, 02:35 AM
|
#37 |
|
ninjette.org member
Name: Daniel
Location: somerset
Join Date: Jul 2009 Motorcycle(s): Red '08 Kawasaki Ninja 250R Posts: 36
|
You will need to get a flasher relay to replace the factory one that handles LEDs, available from most auto electrical places
__________________________________________________
|
|
|
|
|
August 9th, 2009, 09:38 AM
|
#38 |
|
ninjette.org newbie
Name: Mike
Location: Charlotte
Join Date: Aug 2009 Motorcycle(s): 2008 Ninja 250R Posts: 7
|
Thanks for the tip. I'll head over to the auto parts store and see what I can find. Is there anything in particular other than motorcycle flasher that will support LED lights? I hate to sound ignorant but I just want to make sure I get it right! Do I need one or two (another stupid question I'm sure)?
|
|
|
|
|
August 9th, 2009, 02:49 PM
|
#39 |
|
ninjette.org member
Name: Daniel
Location: somerset
Join Date: Jul 2009 Motorcycle(s): Red '08 Kawasaki Ninja 250R Posts: 36
|
If you tell the guys at the store what you are after, they should be able to tell you. Remove your relay(follow wires from tail back towards the tank, you will see it hanging by a rubber support) and take it in to compare with the new one
__________________________________________________
|
|
|
|
|
August 10th, 2009, 08:47 AM
|
#40 |
|
ninjette.org newbie
Name: Mike
Location: Charlotte
Join Date: Aug 2009 Motorcycle(s): 2008 Ninja 250R Posts: 7
|
Stopped in AutoZone. Talked to a guy and he handed me a package of Resistors (2 for $12). Installed in 5 minues and bingo, flashing signals. Thanks for the tip!
I used the lic bracket that came on the bike and bolted that throught he bottom of the fender as a no-cost fender eliminator. I left the bungeee hooks on but will be removing those once I get a small bit of hardware for the connections which will clean it up even more. Not bad. Tail is nice and clean now: http://picasaweb.google.com/f1fnatik...33892863113426 http://picasaweb.google.com/f1fnatik...33891700043906 |
|
|
|
 |
 Similar Threads
|
||||
| Thread | Thread Starter | Forum | Replies | Last Post |
| DIY Integrated Tail Light (cool way) | PsHYk | 2008 - 2012 Ninja 250R Tech Talk | 2 | July 18th, 2012 11:04 AM |
| DIY/Review of the Bikelitez Integrated Tail light | blbills | 2008 - 2012 Ninja 250R Farkles | 33 | May 2nd, 2011 04:40 PM |
| NON-integrated Bikemonkey light? | adouglas | 2008 - 2012 Ninja 250R Farkles | 30 | October 24th, 2009 04:57 AM |
| Video Request of BikeMonkey Integrated Tail | Cicarius | 2008 - 2012 Ninja 250R Farkles | 4 | September 11th, 2009 01:02 AM |
| Thread Tools | |
|
|


