
|
 July 16th, 2012, 08:00 AM
|
#2 |
|
ninjette.org certified postwhore
Name: Rick
Location: Alexandria, Louisiana
Join Date: Jan 2009 Motorcycle(s): 05 Blue Ninja 250 Posts: Too much.
MOTY - 2017, MOTM - Jan '19, Oct '16, May '14
|
I don't have any experience on installing these but the price is amazing!
|

|

|
|
July 16th, 2012, 08:13 AM
|
#3 | |
|
ninjette.org member
Name: Jason
Location: Radnor, PA
Join Date: Jul 2012 Motorcycle(s): 2010 Ninja 250r Posts: 27
|
Quote:
 I saw it on another thread here. I saw it on another thread here.
|
|
|
|
|
|
July 16th, 2012, 08:47 AM
|
#4 |
|
Ghost Rider
Name: Eric
Location: Westchester, NY
Join Date: Jun 2012 Motorcycle(s): 2012 Ninja 250r Posts: 84
|
That is an excellent price! For the install, I'll tell you what I did. I got a kit, so it had the LEDs, a harness to connect the different strips into one power line, a switch and a fuse.
The short way to say it is that you just need a complete circuit. For my system, I believe the start to finish is: positive -> fuse -> switch -> harness -> LEDs -> harness (negative return) -> negative As my system has a switch on it, I get power directly from the battery, then have it grounded on the frame. When I'm not riding, I click the switch and the power is off. Without a switch, you'd probably be interested in obtaining power through the fuse box. If you wire it in to something which turns on only when the bike is on, then you wouldn't have to worry about the lights staying on when the bike is turned off. The fuse which came with mine was a 2 Amp, 250 volt (5 x 20 mm size). I blew it once being an idiot while modding the harness to wire in some lights I got off ebay, so if you do use a fuse, make sure you have extras! I'd recommend a fuse of some sort, as it's better to have to replace a 50 cent fuse for the LED then do damage elsewhere in the electrical system. If you wanna add in a switch, then the kind you'd want would be based on where you want it. The back of my switch is flush mount and I have it hidden right near the gas tank. Reason why I hid it is so that I know where it is and can utilize it while riding if need be, but if it's parked somewhere and some genius sees the switch they don't turn it on and run my battery. LEDs use very little energy, so the battery wouldn't die, but still would rather not have that happen. I've tried to find a similar switch, but haven't had much luck. The LEDs themselves should have a double stick on them already, so it's a pretty simple peel and stick method for those. Mine came with 3M on it, and I've had no issues at all with them in the 300 miles I've ridden with them on. Depending on where you're mounting them, I'm sure you could even zip tie them down in one or two spots for extra security. Depending on how many you bought, the only issue I really had was wire management. I have a total of four separate pairs of wires running in to the harness at the front of the bike. I recently cleaned up the wires, but I pretty much just zip tied the wires to the little brackets right underneath the handlebars. One thing which I didn't mention up there which is super important is to watch out for HEAT! When placing the LEDs, when running the wire, make sure you're not too close to anything which gets too hot. Don't want any of the components melting! Other than that, I think you should be good to go. It's a pretty simple mod, but the results are pretty wild! |
|
|
|
|
July 16th, 2012, 09:16 AM
|
#5 | |
|
ninjette.org member
Name: Jason
Location: Radnor, PA
Join Date: Jul 2012 Motorcycle(s): 2010 Ninja 250r Posts: 27
|
Quote:
|
|
|
|
|
|
July 16th, 2012, 10:25 AM
|
#6 |
|
ninjette.org member
Name: Jason
Location: Radnor, PA
Join Date: Jul 2012 Motorcycle(s): 2010 Ninja 250r Posts: 27
|
Wait, I realize I don't know what a fuse, switch, etc are or where I can get it.
|
|
|
|
|
July 16th, 2012, 11:17 AM
|
#7 | |
|
Ghost Rider
Name: Eric
Location: Westchester, NY
Join Date: Jun 2012 Motorcycle(s): 2012 Ninja 250r Posts: 84
|
Quote:
Anyone feel free to correct or add to these Fuse - Connects to either the positive or negative wire (mine is on positive). For an in line fuse as is this case, it's a glass cylinder with two metal caps and a thin piece of metal in the center. What happens is if the current (someone verify that for me) becomes too strong, the metal inside the fuse will melt, thus disabling the circuit. The advantage of a fuse is that if the strong current were allowed to pass through, it would cause damage, most likely in this case, cause the LEDs to blow. As I said before, a fuse is about 50 cents, which is cheaper (and easier) to replace than other parts. Mine looks similar to this one:  Not too sure what you would need in terms of Amps and voltage as the kit I had came with it already. Mine is 2 Amp, 250 volt Switch - Allows for on/off capability. Specifically, mine is a button type switch. You press it once to complete the circuit and turn the lights on, then press it again to disable the circuit and turn the lights off. There are many different types of switches which you can use, rocker switches, toggle switches, I even believe there is a switch that you can mount right on the handlebar if you'd like. Wire harness - I'm not too sure how complex this part is, so I'll just explain my understanding of it. I'll use 6 pairs of wires as that is how many terminals I have. So you have 6 different pairs of wires, that means 6 positive leads and 6 negative leads. The harness combines all of the positives into 1 lead and all of the negatives into 1 lead, so at one end of the harness you'll have a total of 12 wires (6 positive 6 negative) and at the other end you'll have just 2 (1 positive 1 negative) The physics principal here is parallel circuitry, as all the terminals run parallel and not in series. This allows 1 power line to be split into the 6 positive terminals and the 6 negatives to combine into 1 negative (ground) line. Feel free to comment if that sounds confusing  haha I think it sounds about right though. haha I think it sounds about right though.I'll post up those pics later for ya! As far as where you can get these parts, in line fuse you could find probably in an autozone or somewhere similar, possibly even Radioshack. Same thing goes for the switch, though Radioshack would probably be best as they have some decent hobby parts. However, online can always work for anything. For the harness, you could always make your own if you're comfortable doing so. If you can fine some 2 pin connectors (not sure if that's the right name), you can connect all 6 positives into 1 side of it, all 6 negatives in the other, then use more 2 pin connectors, with 1 positive on 1 side and 1 negative on the other. You would then have 6 positive/negative connectors to go out to LEDs, and they would lead back to 1 positive 1 negative. I'm just not too sure where you could find those 2 pin connectors. When I modded my harness, I ended up having a separate connector for the positive and the negative (it was a single connection terminal so I couldn't have positive/negative in one connector). Feel free to say if anything doesn't make sense here! I'll gladly try to clear anything up! 
|
|
|
|
|
|
July 16th, 2012, 11:23 AM
|
#8 |
|
ninjette.org member
Name: Jason
Location: Radnor, PA
Join Date: Jul 2012 Motorcycle(s): 2010 Ninja 250r Posts: 27
|
This if fantastic, thanks for posting. I'm sure once I get the parts it'll make sense.
|
|
|
|
|
July 16th, 2012, 01:18 PM
|
#9 | |
|
Ex ninjette!
Name: Jack
Location: East sussex England
Join Date: Nov 2011 Motorcycle(s): Suzuki GSXR 600 K4, Kawasaki ninja 250r 08 Posts: 294
|
Quote:
__________________________________________________
Mods: Puig Double bubble windscreen, Targa Fender eliminator, Custom LED integrated Tail light, Exhaust Hanger, Two brothers titanium exhaust More on the way! |
|
|
|
|
|
July 16th, 2012, 01:36 PM
|
#10 |
|
RIP Alex
Name: Cuong
Location: Houston, TX
Join Date: Apr 2011 Motorcycle(s): '10 250r, '09 265r Posts: A lot.
Blog Entries: 2
|
I have those lights in pink on my girlfriend's bike. She's had them for roughly 7 months now and a few leds have stopped working. Still cheap nonetheless.
Figure out where you want your led strips. Extend the wire with speaker to where it joins to the next closest LED. Basically the speaker wire is the Spine and the leds are the ribs. I used insulated quick disconnects for removal of the fairings.. led led -----------\---------/--------\--------/ Battery fuse led
__________________________________________________
HalfFast Racing Team Serving Greater Houston Area Riders:WFO Riders MotoHouston HPC CMRA Ride Smart Fastline Lone Star Track Days |
|
|
|
|
July 16th, 2012, 01:41 PM
|
#11 |
|
MSF Coach!
Name: Lupe
Location: Antioch, Tennessee
Join Date: Jun 2012 Motorcycle(s): 2003 ninja 250 Posts: 886
|
I have 6 of these and I'm going to be wiring them soon, I plan on putting quick disconnects after each bar that way if you need to take off a fairing you just unplug one. As for how, I'm at work so when I get home I might try to draw a diagram if no one beats me to it.
Posted via Mobile Device |
|
|
|
|
July 16th, 2012, 02:18 PM
|
#12 |
|
I told you bro
Name: Noor
Location: Austin, Texas
Join Date: Jun 2012 Motorcycle(s): 1996 Ninja 250r Posts: 680
|
Advice up above is great. I'd recommend using seal all for adhesive. It holds the lights on strong if you don't go out of your way to remove them. But when you need to take them off they come off without hurting the plastic and just require a bit of slow pulling.
It may be easier to install connectors between your main set of wires and the if you don't ever want to take off the lights themselves. |
|
|
|
|
July 16th, 2012, 04:03 PM
|
#13 |
|
ninjette.org *********
Name: Eric
Location: Athens, Alabama
Join Date: Jul 2011 Motorcycle(s): 2008 Kawasaki Ninja 250r (忍者 250r; sold!) 2001 zx6r Posts: 347
|
.... i just realized its one strip with 24 leds inside of it lol
__________________________________________________
 
|
|
|
|
|
July 16th, 2012, 04:20 PM
|
#14 |
|
MSF Coach!
Name: Lupe
Location: Antioch, Tennessee
Join Date: Jun 2012 Motorcycle(s): 2003 ninja 250 Posts: 886
|
im not using an adhesive with mine, im going to use zip tie mounts.
 im going to sand spots smooth under the fairing then attach the zip tie mounts, then zip tie the bars on. that way i know im not going to loose any bars, i have been using these ziptie mounts for computer modding for years. got a huge bag at the home depot for around 5$. this way will also let me move them or replace them if i have any problems. when i get around to doing it i think im going to make a how to since the forum gets weekly questions on led jobs.
__________________________________________________
Hey Unregistered wanna ride the dragon? Ninjette group ride! May 16th-20th Join the Ride!!http://www.ninjette.org/forums/group.php?groupid=35 |
|
|
|
|
July 16th, 2012, 04:52 PM
|
#15 |
|
Ghost Rider
Name: Eric
Location: Westchester, NY
Join Date: Jun 2012 Motorcycle(s): 2012 Ninja 250r Posts: 84
|
Alright, so I wasn't able to get photos done today, but due to the added interest, I'll try to make a video instead! However, I did take a quick photo to show how you can merge 2 pairs of wires together into 1
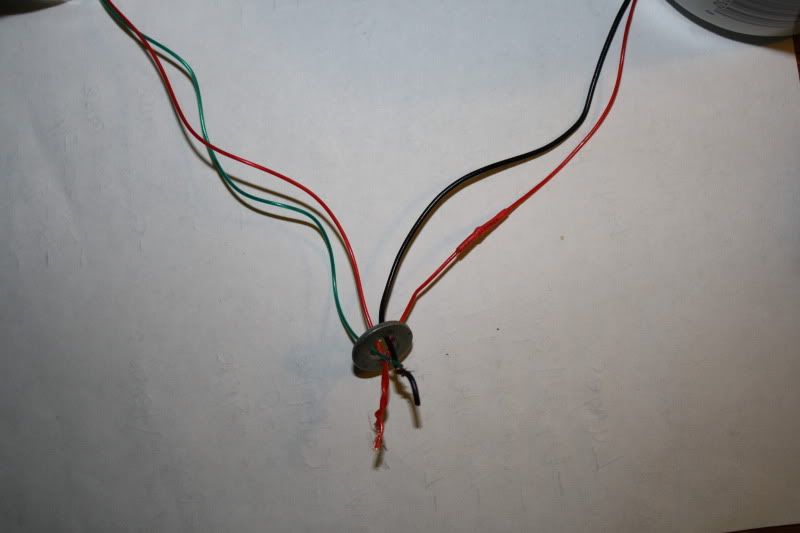 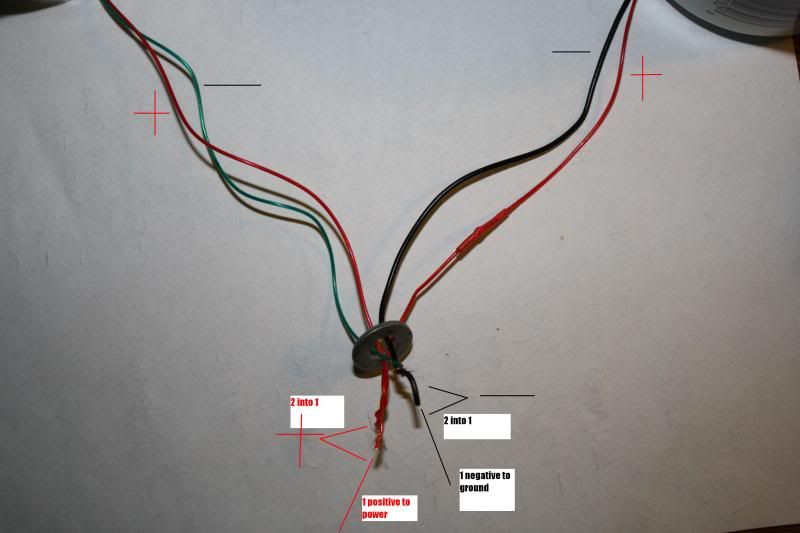 The 2 red wires are the positives, the green and black are the negatives. At the bottom (the washer is simply there as a weight to hold the wires down to the paper), the 2 positives are connected (becoming 1 wire) and the 2 negatives are connected (becoming 1 wire). In regards to the circuit, the 2 positives could be put into a connector, with the other end of the connector running to the power source (or first to a switch and fuse, however you have your circuit). The 2 negatives would also go into a connector, running to the ground. On the top of the photo, 1 negative is paired with 1 positive. Thus (in this case), you would have 2 strips of LEDs wired in from 1 power line and 1 ground line. It may be easier to think of it without the connectors. In this case, the positives at the bottom of the photo can be soldered/heatshrunk to 1 positive wire which would lead to a power source. The negatives also could be soldered/heatshrunk to 1 negative wire running to the ground. This system would work for however many outlets you want to make. Just make sure one side has all the positives and all the negatives, while the other side has 1 positive paired with 1 negative. Hope that helps a little! |
|
|
|
|
July 16th, 2012, 05:48 PM
|
#16 |
|
ninjette.org guru
Name: Noah
Location: K-Bay
Join Date: Feb 2012 Motorcycle(s): 07 R1 Posts: 262
|
Hmm been toying with the idea of getting LED lights for the Ninja as well. But just wasn't sure how long I'm planning on keeping her. Might as well seeing how cheap they are.
Electricity is pretty easy if you need more help with that let me know I work with electricity for my job kinda. It won't let me load any of Eric's pics here on my work network, but a nice place for switches could be under your center console, or just on the underside of naything that you can easily reach to and flip.
__________________________________________________
┌∩┐(◣_◢)┌∩┐ 
|
|
|
|
|
July 16th, 2012, 05:50 PM
|
#17 |
|
ninjette.org guru
Name: Noah
Location: K-Bay
Join Date: Feb 2012 Motorcycle(s): 07 R1 Posts: 262
|
Ohh also nother thing to make sure of is if it's legal to get extra lights and what colors. I know blue is a nono and I think red is in certain states. Just a friendly reminder to know when to and when not to turn them on if this would be an issue :P
__________________________________________________
┌∩┐(◣_◢)┌∩┐
|
|
|
|
|
July 16th, 2012, 06:46 PM
|
#18 | |
|
Ghost Rider
Name: Eric
Location: Westchester, NY
Join Date: Jun 2012 Motorcycle(s): 2012 Ninja 250r Posts: 84
|
Quote:
Not sure of state laws and such, but I did get the chance to ask a NY State Trooper at the Progressive Motorcycle Show in the city. His answer was pretty much, for NY, there are no laws for or against the lights (I asked about green lights). He went on to say that if an Officer felt like it, they could ticket for it. Emitting out the front, or out the back tends to be the iffy spots, as is the same with color and strobing effects are almost always a no no. A couple friends of mine had a few issues in their cars. Both were related to their turn signals, where the color flashing was the main issue. Like Noah said, that's where a switch is most beneficial, cuz then you can turn them on and off based on your route. Though I've been riding with no issues at all for a good while. I just ride smart and stick to the rules of the road, no need to call extra attention to yourself ay? |
|
|
|
|
|
July 16th, 2012, 07:00 PM
|
#19 | |
|
ninjette.org guru
Name: Noah
Location: K-Bay
Join Date: Feb 2012 Motorcycle(s): 07 R1 Posts: 262
|
Quote:
but we all follow the rules 100% of the time so its all good right ") I know in Cali and Hawaii Blue lights are a no no  and I cant remember I think Red was a no no as well in Cali... well from what I remember all underglow lights are a no no and I cant remember I think Red was a no no as well in Cali... well from what I remember all underglow lights are a no no  But since blue is a nono here in hawaii not sure what color to go with for my blue bike... Pink/Fuchsia? 
__________________________________________________
┌∩┐(◣_◢)┌∩┐
|
|
|
|
|
|
July 18th, 2012, 10:07 AM
|
#20 |
|
Ghost Rider
Name: Eric
Location: Westchester, NY
Join Date: Jun 2012 Motorcycle(s): 2012 Ninja 250r Posts: 84
|
http://www.youtube.com/watch?v=rnbCB...ature=youtu.be
Photo of the finished product: 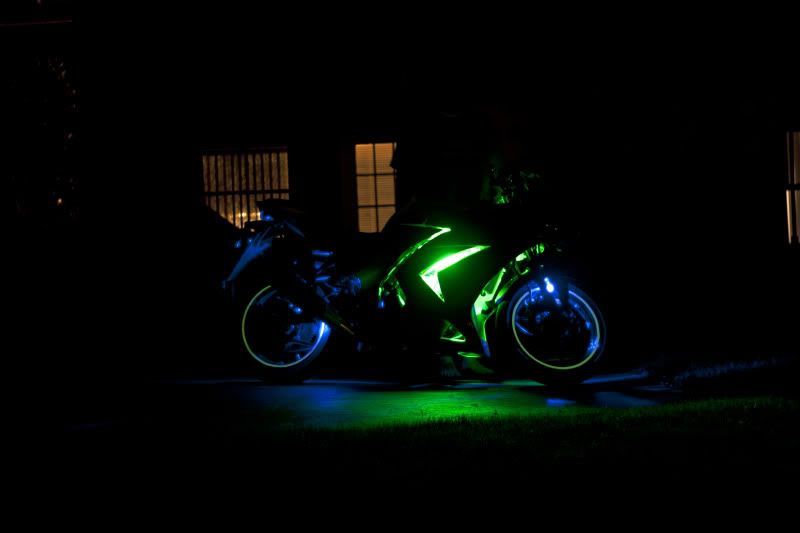 Did the best I could with the camera, hope it's helpful! |
|
|
|
|
July 18th, 2012, 10:40 AM
|
#21 | |
|
ninjette.org member
Name: Jason
Location: Radnor, PA
Join Date: Jul 2012 Motorcycle(s): 2010 Ninja 250r Posts: 27
|
Quote:
|
|
|
|
|
|
July 19th, 2012, 11:13 AM
|
#22 |
|
Ex ninjette!
Name: Jack
Location: East sussex England
Join Date: Nov 2011 Motorcycle(s): Suzuki GSXR 600 K4, Kawasaki ninja 250r 08 Posts: 294
|
That looks so good with them LEDS, where you have the green i want to get white to go with my black and white theme
__________________________________________________
Mods: Puig Double bubble windscreen, Targa Fender eliminator, Custom LED integrated Tail light, Exhaust Hanger, Two brothers titanium exhaust More on the way! |
|
|
|
|
July 20th, 2012, 08:54 PM
|
#23 |
|
ninjette.org guru
Name: Noah
Location: K-Bay
Join Date: Feb 2012 Motorcycle(s): 07 R1 Posts: 262
|
Idk what I can do for color scheme wise with a blue bike... Cant do blue cuz that's the only color cops get pissy about here in Hawaii from what I've been told.
__________________________________________________
┌∩┐(◣_◢)┌∩┐
|
|
|
|
|
July 21st, 2012, 01:19 AM
|
#24 |
|
Ghost Rider
Name: Eric
Location: Westchester, NY
Join Date: Jun 2012 Motorcycle(s): 2012 Ninja 250r Posts: 84
|
Thanks for the comments!
Jack, the black and white sounds wicked nice! Def wanna see some pics if you get them goin! Noah, that's a tough one. http://www.motorcycleledlights.com/ Right on the front page of this site, under "Featured Products," you can see all the colors they offer, perhaps you can find some inspiration from those? |
|
|
|
|
July 21st, 2012, 03:43 AM
|
#25 |
|
Ex ninjette!
Name: Jack
Location: East sussex England
Join Date: Nov 2011 Motorcycle(s): Suzuki GSXR 600 K4, Kawasaki ninja 250r 08 Posts: 294
|
Cheers will have to wait about 2-3 months need new tires, MOT and insurance (£900+) fml so once my bank has recovered i'll get them in!
__________________________________________________
Mods: Puig Double bubble windscreen, Targa Fender eliminator, Custom LED integrated Tail light, Exhaust Hanger, Two brothers titanium exhaust More on the way! |
|
|
|
|
July 22nd, 2012, 02:41 PM
|
#26 |
|
ninjette.org guru
Name: Noah
Location: K-Bay
Join Date: Feb 2012 Motorcycle(s): 07 R1 Posts: 262
|
Hmm i think the purple would look nice with the blue, just gatta wait till i got some time and extra moneies :P gatta get new tires first

__________________________________________________
┌∩┐(◣_◢)┌∩┐
|
|
|
|
 |
 Similar Threads
|
||||
| Thread | Thread Starter | Forum | Replies | Last Post |
| Next dumb question - body position transitions | adouglas | Ninjettes At Speed | 51 | January 22nd, 2015 06:15 PM |
| Universal Speedometer Installation - question on internal nightlight | Sarhaider | 1986 - 2007 Ninja 250R Farkles | 8 | October 16th, 2012 08:53 AM |
| Area P Installation Question | kevheads | 2008 - 2012 Ninja 250R Tech Talk | 18 | January 24th, 2012 12:10 AM |
| I'm getting LEDs.... | TxriderMike | 2008 - 2012 Ninja 250R Farkles | 18 | September 26th, 2011 08:31 AM |
| LED Question (Blue or White + Installation) | AeroXtasy | 2008 - 2012 Ninja 250R Tech Talk | 18 | August 26th, 2011 10:10 PM |
|
|


