
|
 September 9th, 2012, 10:13 PM
|
#1 |
|
ninjette.org member
Name: Zubair
Location: Houston
Join Date: Aug 2012 Motorcycle(s): 2012 Kawasaki Ninja 250R Posts: 34
|
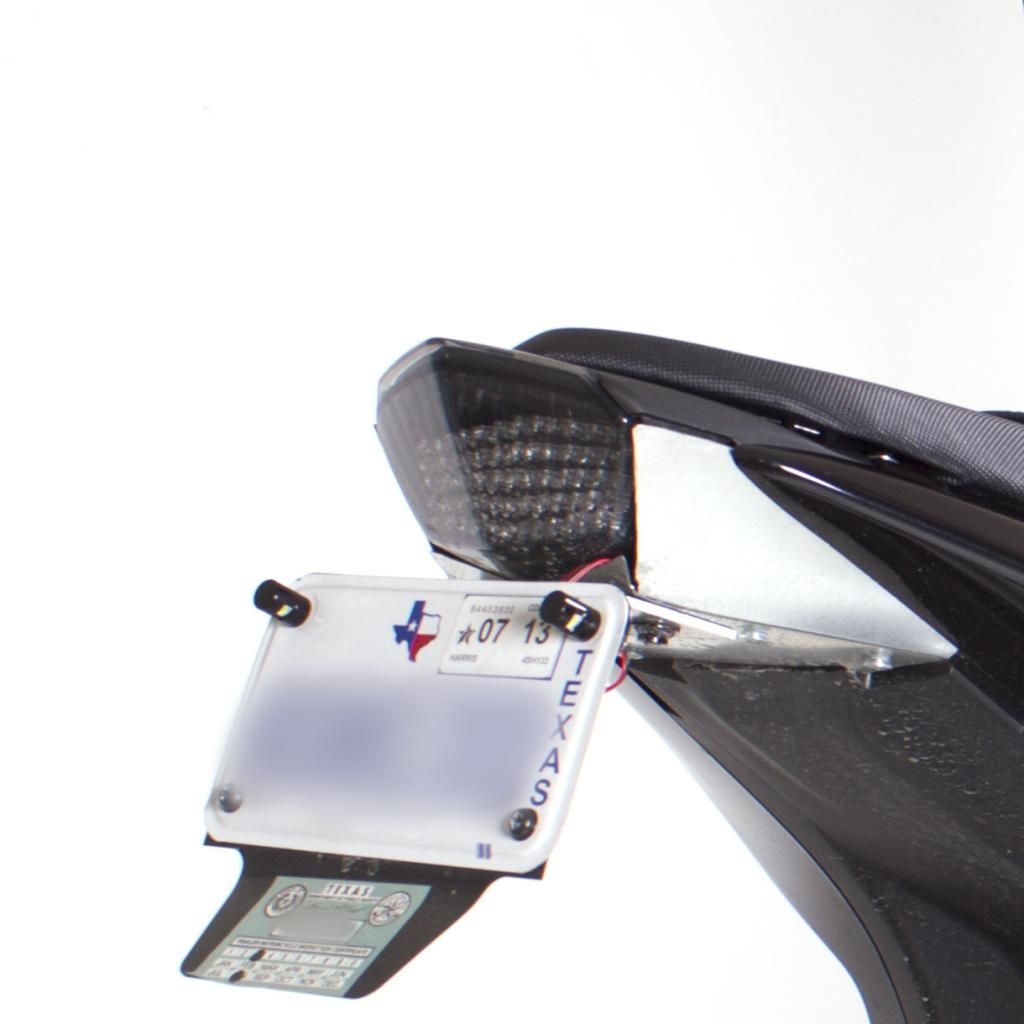
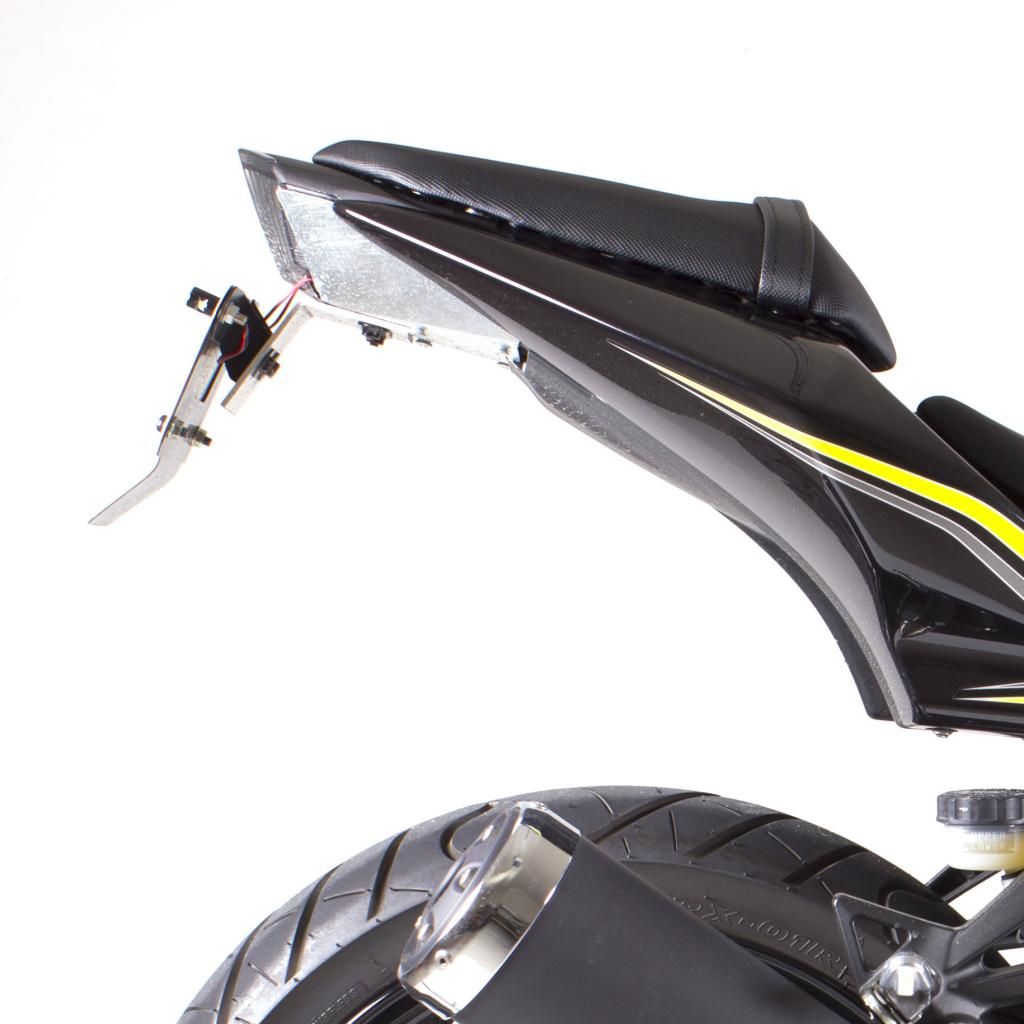
Fender eliminators are expensive! I don't know about you, but I'd rather spend my money on other things! So I decided to make my own! I have almost no knowledge of how to fabricate things, but I'm pretty smart, so I took on this project. I also have access to power tools like a bandsaw, grinder, drill etc at work which made my decision to go ahead easier.
Materials used: Bike tool kit (duh) Blue painters tape and Aluminum foil tape 20 gauge aluminum sheet 6"X18" from Home Depot 4 - M6 X 1 Screws and nuts from Lowes Band Saw (to cut the aluminum) Scissors, Box cutter/exacto knife Sharpie Card Stock paper for mockup First I took off the existing ugly ass fender; if you do not know how to do this, there are plenty of video online that explain how. Be careful while doing this and keep all your hardware in a place where you won't lose it. Took off the tail light from the plastic mudgaurd. I taped one half of the inside of the plastic part with blue tape, then went over it with foil tape, then pulled it off the part. This gave me a template to work with. I transferred the template to card stock, folded it in half and then cut it to get symmetrical sides. I marked the spots where the holes would go to hold it in place. 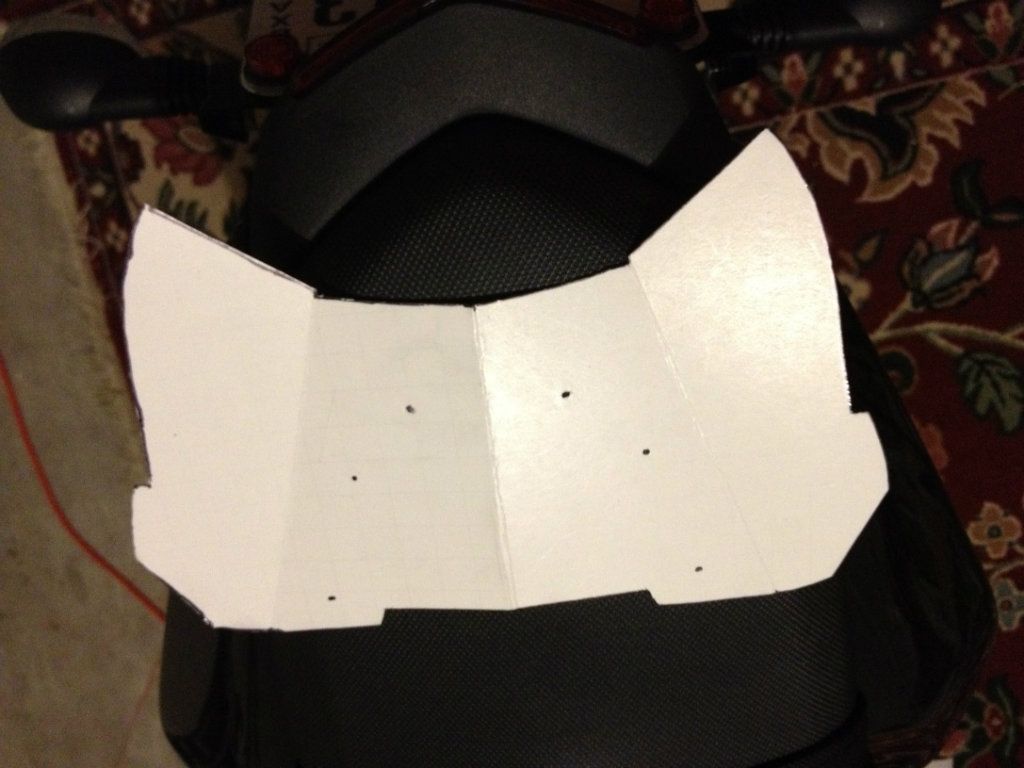 I put it up to the back where the fender used to be and tweaked it until it fit and I was happy with it. I realized that the piece of aluminum that I had was too small to make the whole piece with one sheet, so I decided to make it in halves. I realized after that it was the best way to do it since I could put both pieces up together to make sure they match, even drill the holes together. 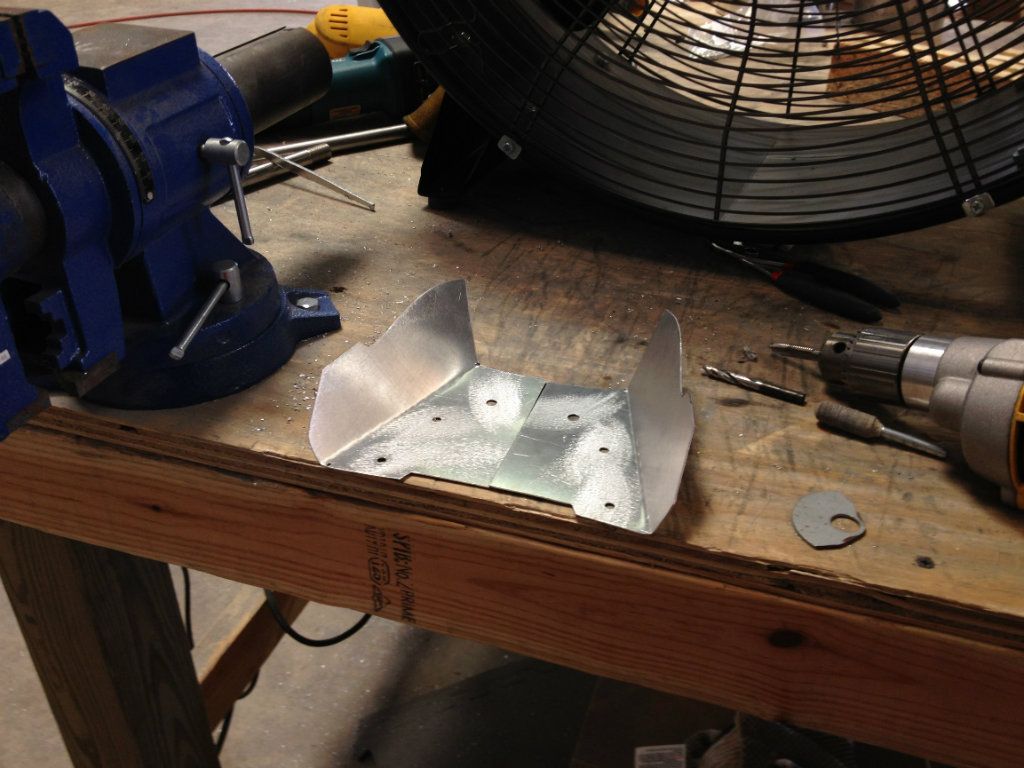 Stopped by Lowes on the way back home and got M6 X 1 Nuts, brought the piece back home and did a test fit on the bike. Ran into a few problems. I had drilled some of the holes too small and had to go back and re-drill them and the stock screws were too short, so I had to go get longer ones. Got back home and did a test fit and voila! 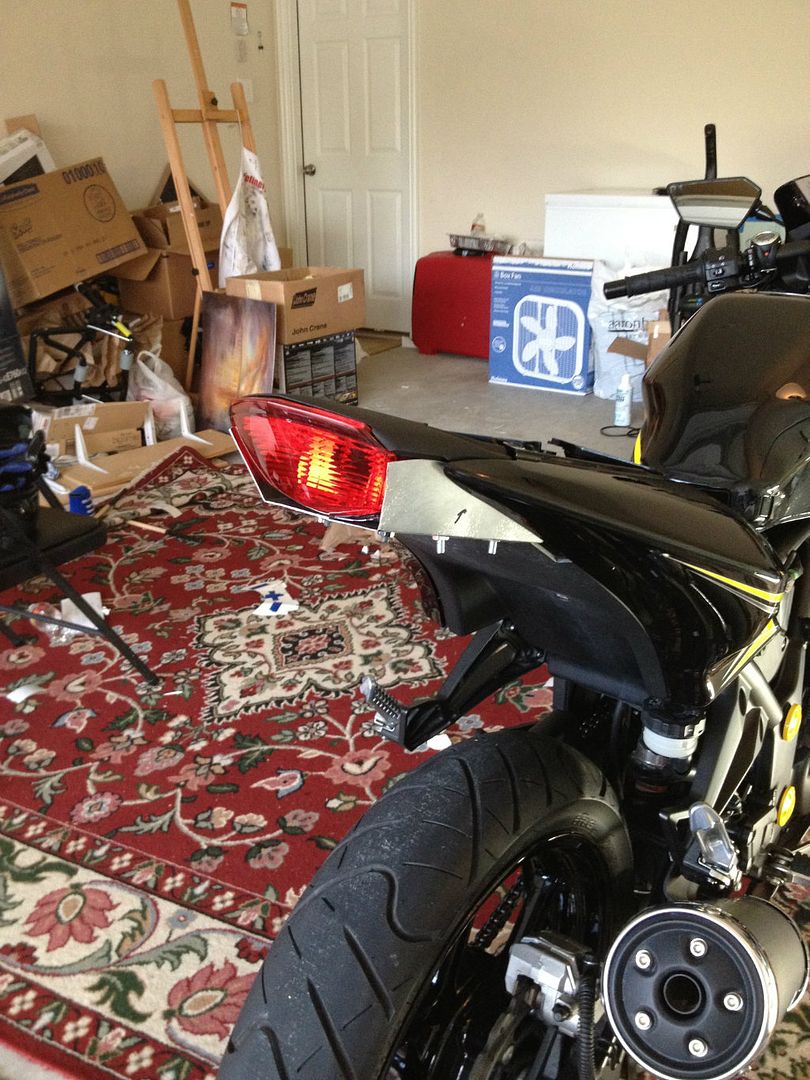 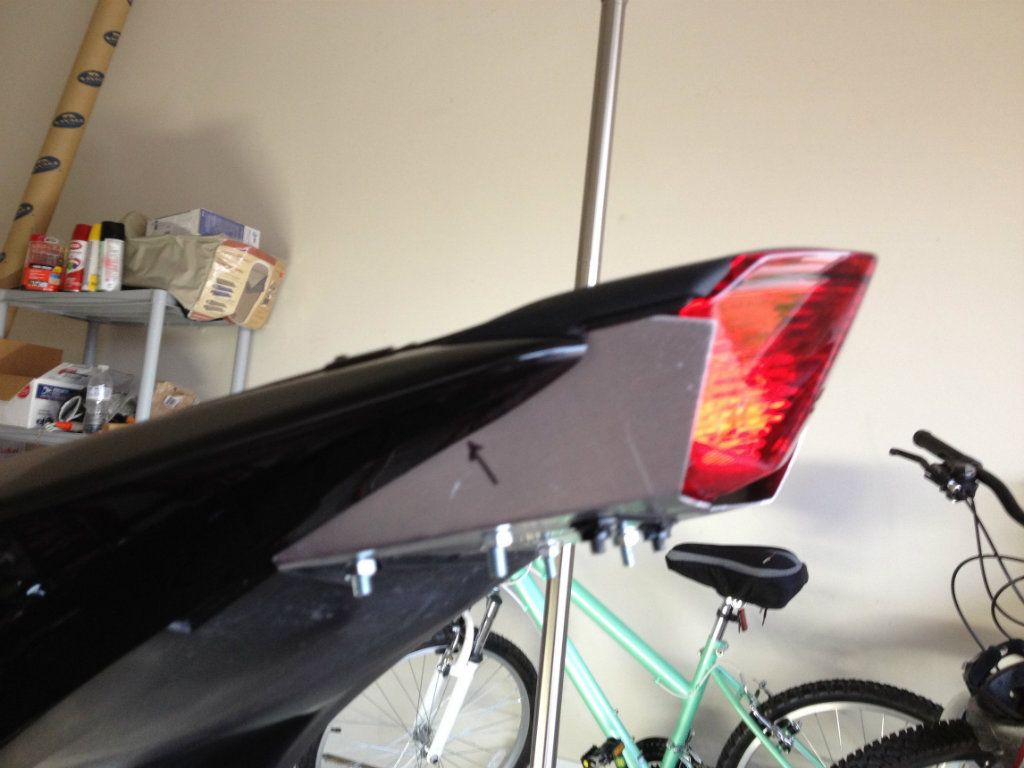 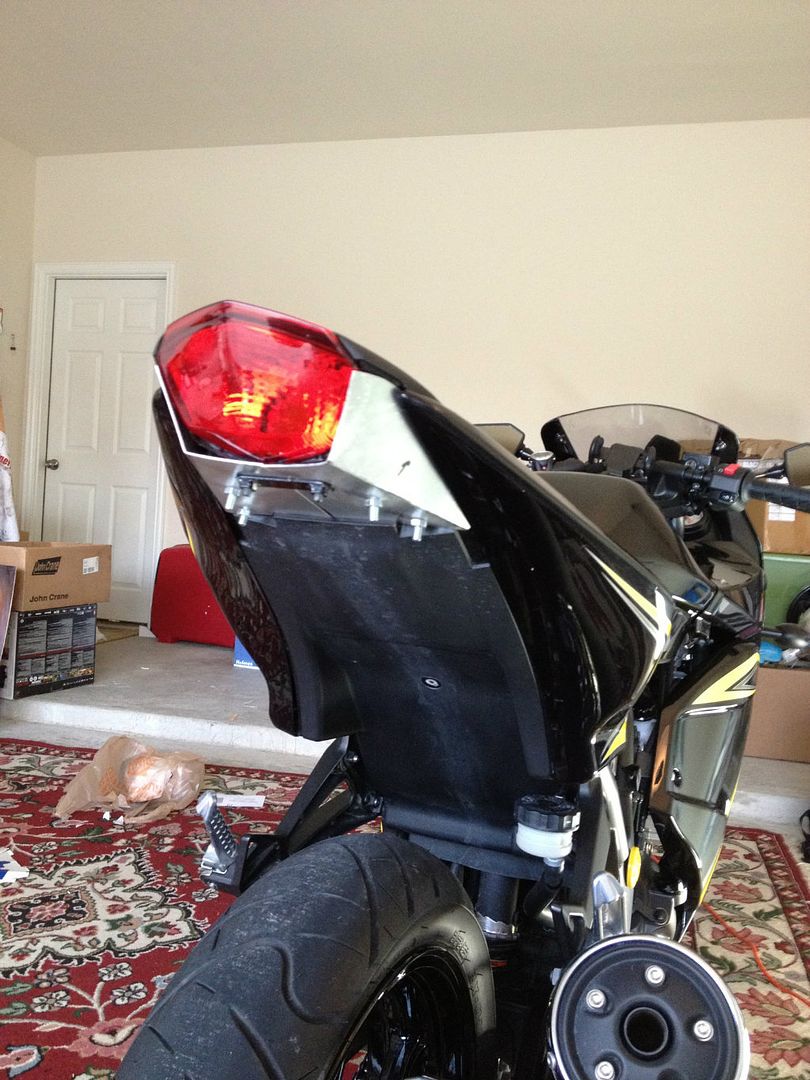 Next, I had to figure out a way to mount the license plate on there. I knew I was going to use the existing license plate mount, which worked out really well. I took a leftover piece of aluminum sheet and drilled 2 holes using the tail light bracket (black part) as a guide. 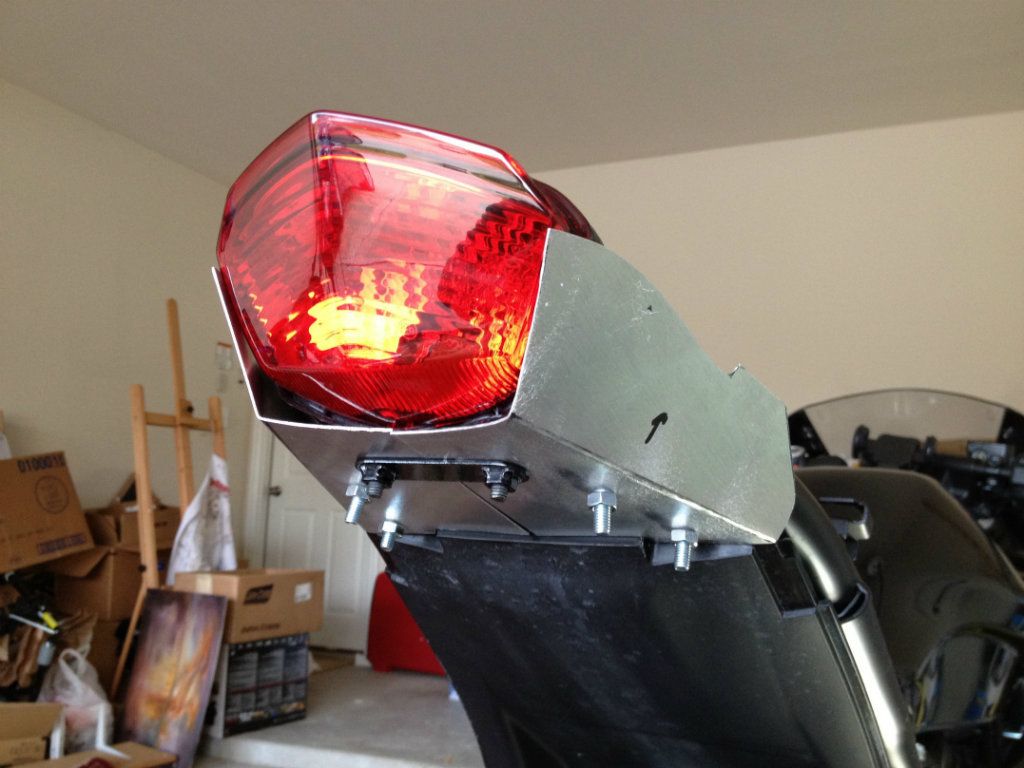 I drilled 2 other holes using the existing licence plate mount as a guide, getting the holes to center as much as possible. Then I bent the aluminum plate at an angle. I used existing hardware to screw and bolt everything into place. 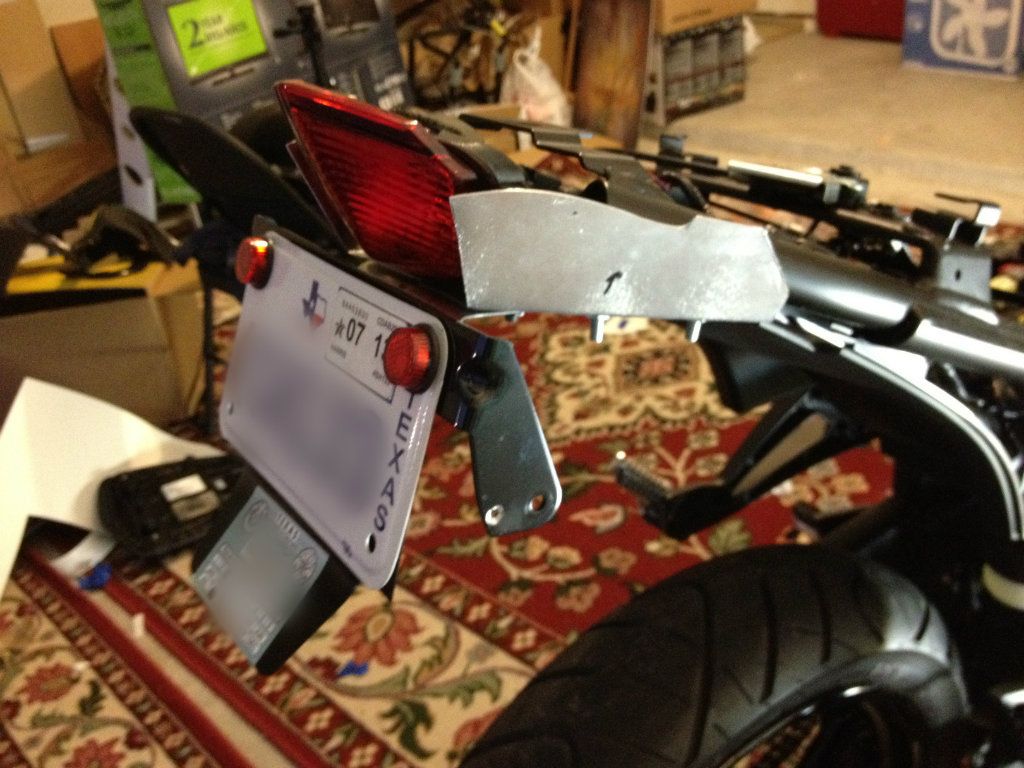 I could have stopped there, but I wanted to go on a ride on account of the beautiful weather, and since I don't have my integrated LED tail light yet, I had to put the signal lights back on. I took off the reflectors from the existing license plate mount, took off the turn signals from the plastic fender and immediately ran into a problem- The hole was too small for the wire to go through. No worries, since this is just a temporary thing, I used the existing holes that the reflector went through and existing hardware to mount the turn signals. They point down a bit but you could still see them. They were kinda loose even after tightening the nut, so I use black zip ties to hold them in place in case the nut were to come loose. And there you have it! Custom Fender eliminator. I think it cleaned up the back a whole lot. 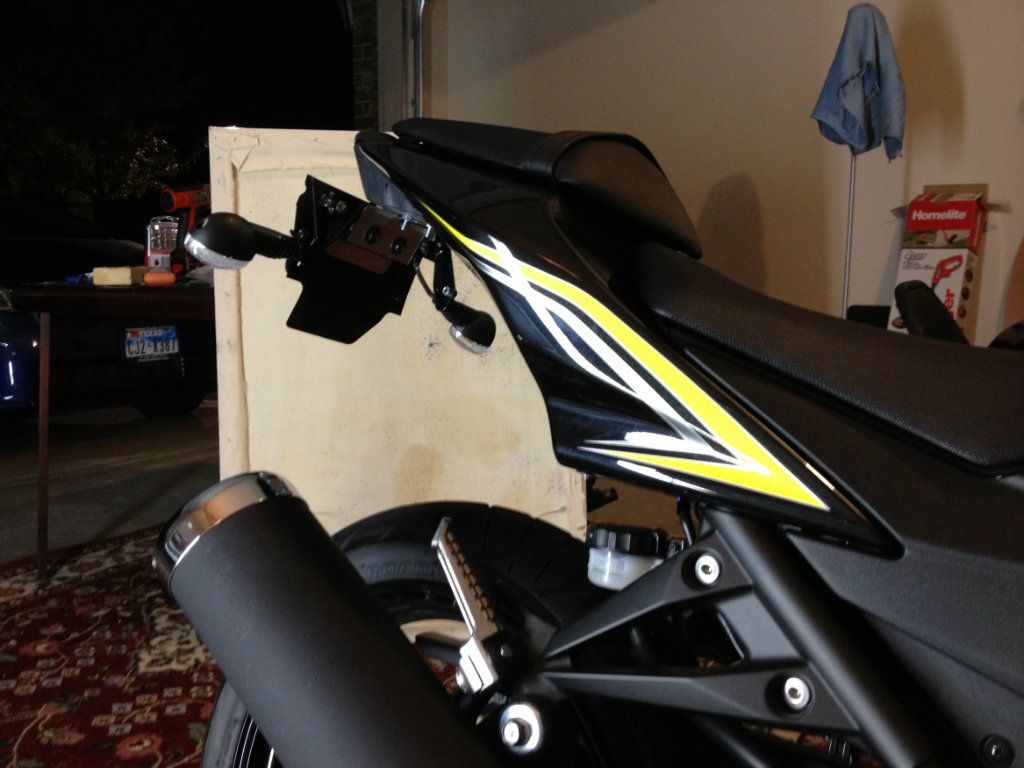 For those who want to try this themselves, I can get you the dimensions of the template and probably even make a scaled printable copy (no promises on when though) Next step is to take it back apart, clean up corners with a grinder, take out burrs and get it ready for paint. I want to paint it black, of course. I can't decide if I want to get it powder coated or just spray paint it myself. I'm leaning more towards powder coat right now, hope it doesn't cost an arm and a leg though. Last futzed with by BearZ; September 9th, 2012 at 10:31 PM. Reason: resized images |

|

|
|
September 10th, 2012, 11:21 AM
|
#2 |
|
The Corner Whisperer
Name: Chris (aka Reactor)
Location: Northern KY
Join Date: May 2011 Motorcycle(s): 2010 250 (track), 1992 250, 2006 R6 (street/track), 2008 R6 (track) Posts: Too much.
MOTY 2015, MOTM - Nov '12, Nov '13
|
Hey! That is pretty cool.
__________________________________________________
Goal: Shake A Million Hands | Look through the corners | Track Day Prep | Closest track? | The Mid-Ohio School |
|
|
|
|
September 11th, 2012, 02:37 PM
|
#3 |
|
ninjette.org sage
Name: Brian
Location: Orange County, CA
Join Date: Apr 2012 Motorcycle(s): '12 ninja 250r Posts: 762
|
The rear signals are pointing down?
|
|
|
|
|
September 12th, 2012, 07:33 AM
|
#4 | |
|
ninjette.org member
Name: Zubair
Location: Houston
Join Date: Aug 2012 Motorcycle(s): 2012 Kawasaki Ninja 250R Posts: 34
|
Quote:
|
|
|
|
|
|
November 17th, 2012, 11:19 PM
|
#5 |
|
ninjette.org member
Name: Michael
Location: San Antonio
Join Date: Jul 2012 Motorcycle(s): None yet Posts: 29
|
Current pics of it with the new tail light?
|
|
|
|
|
November 18th, 2012, 04:07 AM
|
#6 |
|
Accesories Guru
Name: Dave
Location: Centreville, VA
Join Date: May 2011 Motorcycle(s): '99 EX250(Cafe/fighter project) Posts: 537
|
Looking good, homie.
|
|
|
|
|
November 18th, 2012, 05:23 AM
|
#7 |
|
ninjette.org certified postwhore
Name: Hansveer
Location: Bombay, India
Join Date: Jan 2012 Motorcycle(s): Ninja 250r - Track whore, Ninja 300 - SOLD, KTM RC390 - Orange Hulk, Ducati 899 Panigale - Red Devil. Posts: A lot.
|
Love what you've done... Looks absolutely fantastic!!! I'm sure you've cleaned it up a lot from the current pics, so please post the new ones if possible. I really wanted to do this too, but got too lazy... lol I just cut off my fender while still on the bike and in the process broke a lot of things...
") I'll probably follow what you've done. If you can post a template for the same it'd be awesome. I'll probably follow what you've done. If you can post a template for the same it'd be awesome. 
|
|
|
|
|
November 20th, 2012, 10:28 AM
|
#8 |
|
ninjette.org member
Name: Zubair
Location: Houston
Join Date: Aug 2012 Motorcycle(s): 2012 Kawasaki Ninja 250R Posts: 34
|
Set up the seamless paper and some lights and did a quick shoot the other night, here are some of the highlights. enjoy!
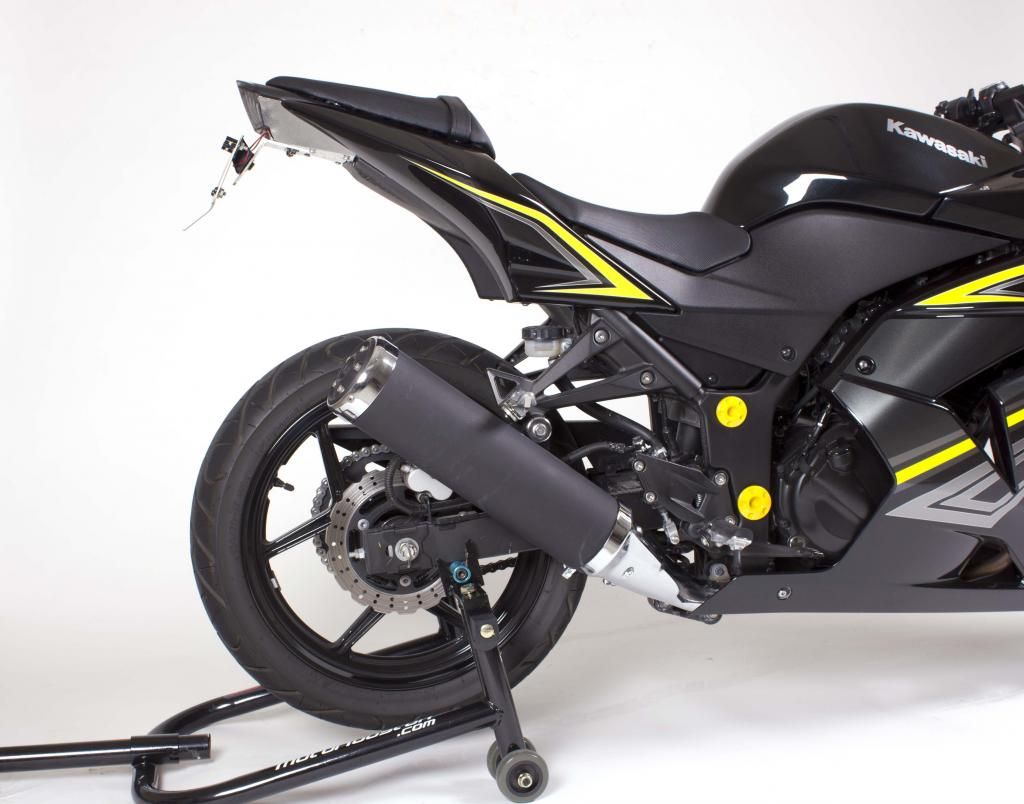   I will eventually get around to painting/powder coating the fender eliminator. I actually fabricated a new one with a brand new design, this time I used sheet metal instead of aluminum, a little harder to bend and cut. I went through about 8 cutting wheels on my Dremel tool. Pretty cheap to make if you already own a Dremel tool, I didn't so I spent $80 on that, but it will be useful on future projects. I installed LED license plate lights but haven't figure out a way to hide those wires yet. Unfortunately the design is not water proof by any means, maybe I could add a gasket or something to prevent water from entering the rear end. @Hans, I can post a drawing up, it's the original one I made on the computer before mocking it up on the bike and changing it a bit. I have not update the drawing since, I can still post it, just be sure you mock it up in paper or cardboard before you cut any sheet metal. maybe I will go back and redraw it for everyone with a proper tutorial, however I am short on free time these days. Extra goodie:  Link to Drawing: https://dl.dropbox.com/u/25018889/fe...m_A1_PRINT.pdf This is laid out on A1 size paper for large format printers, if you can figure out a way to print it on a desktop printer, good on you, if not, sorry... I have all the dimensions on there so you can make a drawing from scratch if you really feel up to it. Disclaimer: I take not responsibility if you mess things up, the drawing is for reference only and in no way should be used for monetary gain. I am releasing this drawing under a Creative Commons license. Last futzed with by BearZ; November 20th, 2012 at 10:29 AM. Reason: added link |
|
|
|
|
November 20th, 2012, 01:36 PM
|
#9 |
|
dirty boy
Name: Joe
Location: Johnstown, PA
Join Date: Sep 2012 Motorcycle(s): I don't even know anymore?? Posts: A lot.
MOTM - Apr '14
|
paint it black and i think it will be even nicer. JMO
But yeah, i am not going to spring for a kit, I will just do a quick mod of the factory fender when i finally get around to it. |
|
|
|
|
November 20th, 2012, 02:02 PM
|
#10 |
|
ninjette.org sage
Name: Katherine
Location: Schofield Barracks, HI
Join Date: Dec 2011 Motorcycle(s): 2009 Ninja 250R SE Posts: 767
|
agreed^^^ paint it black!
__________________________________________________
 
|
|
|
|
|
November 20th, 2012, 02:37 PM
|
#11 |
|
dirty boy
Name: Joe
Location: Johnstown, PA
Join Date: Sep 2012 Motorcycle(s): I don't even know anymore?? Posts: A lot.
MOTM - Apr '14
|
Better yet, Cerakote it!! hell ya. Not sure what the material you used was? but Cerakote should work on it.
http://cerakote.net/ |
|
|
|
|
December 1st, 2012, 05:19 PM
|
#12 | |
|
ninjette.org member
Name: Zubair
Location: Houston
Join Date: Aug 2012 Motorcycle(s): 2012 Kawasaki Ninja 250R Posts: 34
|
Quote:
|
|
|
|
|
|
December 11th, 2012, 01:38 PM
|
#13 |
|
ninjette.org newbie
Name: Carson
Location: Lancaster, PA
Join Date: Dec 2012 Motorcycle(s): 2010 Kawasaki Ninja 250r Special Edition Posts: 4
|
Hey that's a really sick write up! I'm new to the forums here and actually new to riding in general. I just purchased a bike a few months back and this was going to be my first mod. I work for a custom laser cutting company and run a Cincinnati laser. I've been working on designing one of these as well so hopefully here in a couple weeks I can show you what mine looks like. I plan to cut it out of 16ga aircraft grade aluminum and weld on a license plate holder. Your drawing looks pretty accurate, I think I may copy some of it. Did you end up powder coating it then?
|
|
|
|
|
December 11th, 2012, 01:46 PM
|
#14 | |
|
ninjette.org sage
Name: Katherine
Location: Schofield Barracks, HI
Join Date: Dec 2011 Motorcycle(s): 2009 Ninja 250R SE Posts: 767
|
Quote:
__________________________________________________
|
|
|
|
|
|
December 18th, 2012, 09:35 PM
|
#15 | |
|
ninjette.org member
Name: Zubair
Location: Houston
Join Date: Aug 2012 Motorcycle(s): 2012 Kawasaki Ninja 250R Posts: 34
|
Quote:

|
|
|
|
|
|
December 18th, 2012, 09:43 PM
|
#16 | |
|
ninjette.org member
Name: Zubair
Location: Houston
Join Date: Aug 2012 Motorcycle(s): 2012 Kawasaki Ninja 250R Posts: 34
|
Quote:
|
|
|
|
|
|
December 19th, 2012, 08:02 AM
|
#17 |
|
ninjette.org member
Name: Duey
Location: FLorida
Join Date: Nov 2012 Motorcycle(s): Ninja 250R Posts: 71
|
i'd buy it. would you make me one? paint it black. it would look nicer.
|
|
|
|
|
January 1st, 2013, 07:49 PM
|
#18 |
|
ninjette.org member
Name: John
Location: Vancouver
Join Date: Jun 2012 Motorcycle(s): '05 Warrior 1700 , '09 Aprilia Mana 850, Ninja 250 still looking Posts: 74
|
Nice work,
I would paint it yellow
__________________________________________________
"I hate to advocate drugs, alcohol, violence or insanity to anyone, but they've always worked for me." -Hunter S. Thompson- |
|
|
|
|
April 17th, 2013, 02:06 PM
|
#19 | |
|
ninjette.org member
Name: Zubair
Location: Houston
Join Date: Aug 2012 Motorcycle(s): 2012 Kawasaki Ninja 250R Posts: 34
|
Quote:
|
|
|
|
|
 |
 Similar Threads
|
||||
| Thread | Thread Starter | Forum | Replies | Last Post |
| Custom Fender Eliminator | brianhilker | Videos | 5 | November 23rd, 2009 05:43 PM |
| Jardine fender eliminator pics | adouglas | 2008 - 2012 Ninja 250R Farkles | 4 | October 7th, 2009 12:32 PM |
|
|


