
|
 December 1st, 2008, 09:33 PM
|
#1 |
|
Join Date: Nov 2008 Posts: Too much.
|
DIY- Using the Passenger Pegs as Front Pegs
I wanted to do this mod, but wanted the pegs to be spring loaded and be a bit grippier than the stock passenger pegs come from the factory.
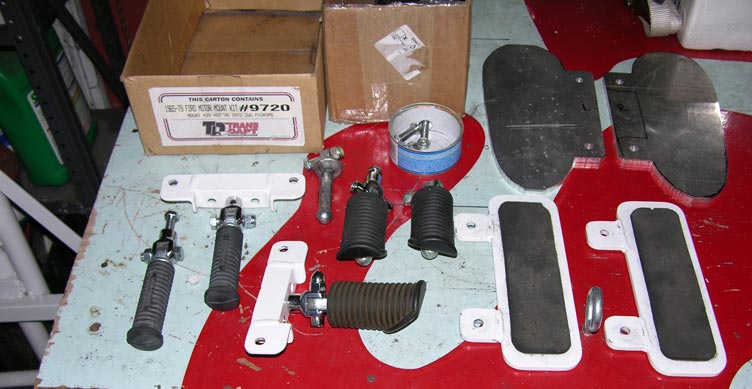
Story behind this... I was a cheap bastid and ordered some $20 pegs that looked good, but in the end proved to be a POS as they ended up sagging.  What I learned, though, is that I liked the feel of a non rubber covered type of peg. It lets you feel more of what the bike is doing through the pegs. I decided one day I would do this and well... today's the day. What I learned, though, is that I liked the feel of a non rubber covered type of peg. It lets you feel more of what the bike is doing through the pegs. I decided one day I would do this and well... today's the day.  You need to first drill out the original passenger pegs. I sourced a spare set of pegs(thanks, richard ).I wanted the hole to be as small as possible so the peg pin that holds the peg to the bike would be as tight as possible. Using the stock peg as a guide, I found a 15/32" bit was the largest bit that would fit through the stock peg's hole. -015.jpg Using a 1/2" drill, drill the passenger pegs out from the bottom. Try to be as square with the peg as possible so the hole will be perpendicular to the peg surface. Sorry, I have no pics of the actual drilling, but I will caution you to have the pegs securely in a vise and get the drill up to speed before putting the bit into the hole. Also, do not press hard when drilling as this will cause the drill bit to bind in the peg hole and twist the drill out of your hands. A 1/2" drill has a LOT of torque. Ask me how I know?  Instead, use a light pressure and let the drill bit do the cutting/enlarging of the hole. You end up with a smoother finished hole. This is the pegs after you've drilled them out. -016.jpg remove the old pegs by removing the c-clip on the bottom of the peg pin. -017.jpg and slip the pin out of the peg... -018.jpg notice the way the spring is mounted in the original peg... the passenger peg is not constructed the same, so some re engineering of that spring will need to take place. see the width mounting surface of the two? At first, I thought I would need to shim the passenger peg, but it turns out you don't need to if you are going to use the springs. -019.jpg I had to use the right side peg spring on the left side peg to get things to work. Some re bending of the spring will be needed as it is a bit wider than the space that was available. -020.jpg The right peg was bit more interesting as there is no "lip" on the peg guard to hook the spring on. Some bending of the spring with a couple of pliers did the trick. -021.jpg The final spring position after it was bent and mounted on the right side. notice the little tab on the spring faces towards the rear. I had to bend it 90 degrees. -022.jpg shot of how the spring "mounts" to the underside of the peg. The little tang just digs into the soft aluminum and doen't move. -023.jpg with the new pegs mounted, I noticed how smooth they were... very dangerous when wet, I would imagine. -024.jpg hit the pegs up with a very coarse file.. -025.jpg pegs after filing. They have a grippy surface like rough sandpaper. If ever they get smooth, I'll hit them up with the file again. -026.jpg A comparison shot showing the differences between the three pegs I've tried. -027.jpg The new pegs feel much sturdier than the POS pegs I had purchased and they do not sag at all. Grippy, non rubber covered, OEM quality, spring loaded pegs at a price that is hard to beat... free, provided you are removing your passenger pegs anyway! -028.jpg |

|

|
|
February 17th, 2009, 12:09 PM
|
#2 |
|
ninjette.org member
Name: Levi
Location: St. George, Utah
Join Date: Dec 2008 Motorcycle(s): 2008 Ninja 250R, CR125R Posts: 191
|
Hey Kelly, did you bend the actual peg at all, or just the spring?? Kind of a dumb question, i am just a little lost.
|
|
|
|
|
February 17th, 2009, 12:10 PM
|
#3 |
|
Join Date: Nov 2008 Posts: Too much.
|
Just reshaped the spring.
|
|
|
|
|
February 17th, 2009, 12:45 PM
|
#4 |
|
ninjette.org member
Name: Faiyaz
Location: Davis, Ca
Join Date: Jan 2009 Motorcycle(s): Black 08 Ninja 250 Posts: 70
|
sounds like a great winter project to work on. I hate the feel of the rubber peds--they are just too squishy in my opinion. Though I might have to use the drill press at the machine shop at school to drill the holes in the pegs.
__________________________________________________
2008 Ninja 250 - Yoshi Exhaust, Brake Light Modulator, HID Kit To Come: Sliders, Fender Elim, Flush Mounts, Hugger (much later...no $  ) )
|
|
|
|
|
February 17th, 2009, 12:52 PM
|
#5 | |
|
Join Date: Nov 2008 Posts: Too much.
|
Quote:
It helps that the pegs are aluminum and the bit cuts it quite easily, but also, I think that's part of the problem on why the bit gets caught when drilling, due to the metal being so soft. |
|
|
|
|
|
February 17th, 2009, 01:06 PM
|
#6 |
|
ninjette.org sage
Name: Howard
Location: Cypress, So. Cal.
Join Date: Feb 2009 Motorcycle(s): '09 Candy Thunder Blue Ninja 250R Posts: 618
|
kkim how many tools do you have? are you like the handy man on the block? pics of your garage!
|
|
|
|
|
February 17th, 2009, 01:09 PM
|
#7 |
|
Join Date: Nov 2008 Posts: Too much.
|
ummm... nothing special. Just crap I've collected over the past 56 years of my life.
 The heavy duty stuff, I usually do at work as we have a shop there with heavy machinery tools.
|
|
|
|
|
February 17th, 2009, 03:32 PM
|
#8 | |
|
ninjette.org member
Name: Faiyaz
Location: Davis, Ca
Join Date: Jan 2009 Motorcycle(s): Black 08 Ninja 250 Posts: 70
|
Quote:
Probably stuff you already know tho.
__________________________________________________
2008 Ninja 250 - Yoshi Exhaust, Brake Light Modulator, HID Kit To Come: Sliders, Fender Elim, Flush Mounts, Hugger (much later...no $ )
|
|
|
|
|
|
February 17th, 2009, 03:38 PM
|
#9 |
|
Join Date: Nov 2008 Posts: Too much.
|
lol... after it got stuck when I tried using the drill at the slow speed, I maxed out the speed to get the bit turning as fast as I could and instead of pushing down on the drill, I just let the bit do the work a little bit at a time so it would end up biting too much off at once and getting stuck. It worked much better that way.
 I have no idea at what rpm it was turning.
|
|
|
|
|
February 17th, 2009, 05:38 PM
|
#10 |
|
ninjette.org member
Name: Levi
Location: St. George, Utah
Join Date: Dec 2008 Motorcycle(s): 2008 Ninja 250R, CR125R Posts: 191
|
Why not just make a drill that redlines at 13 thousand RPM and cut that hole in no time
 Anyway can you put the front pegs on the rear? or is that not possible? Anyway can you put the front pegs on the rear? or is that not possible?
|
|
|
|
|
February 17th, 2009, 07:41 PM
|
#11 |
|
Join Date: Nov 2008 Posts: Too much.
|
I don't think it would work as we're making the hole bigger so the front peg pin will fit the passenger pegs. If you put the front pegs in the back, the hole will be too big for the passenger peg pins.

|
|
|
|
|
February 19th, 2009, 02:43 PM
|
#12 |
|
ninjette.org member
Name: Michael
Location: Little Rock, AR
Join Date: Feb 2009 Motorcycle(s): 2009 Ninja 250R Posts: 65
|
just finished up my peg swap...did not use the rear pegs though. If you do not have to drill the holes out the entire process takes about 20 minutes. a few before and afters....
__________________________________________________
2009 Kawasaki Ninja 250R Special Edition |
|
|
|
|
February 19th, 2009, 04:26 PM
|
#13 |
|
ninjette.org member
Name: Levi
Location: St. George, Utah
Join Date: Dec 2008 Motorcycle(s): 2008 Ninja 250R, CR125R Posts: 191
|
So did you not have to drill out the holes on those ones?
|
|
|
|
|
February 19th, 2009, 07:08 PM
|
#14 |
|
ninjette.org member
Name: Michael
Location: Little Rock, AR
Join Date: Feb 2009 Motorcycle(s): 2009 Ninja 250R Posts: 65
|
no drilling whatsoever...straight swap. pull the c-clip, push the pin through, take off the peg, and reverse those steps with the new peg (obviously including the spring)
__________________________________________________
2009 Kawasaki Ninja 250R Special Edition |
|
|
|
|
February 19th, 2009, 07:20 PM
|
#15 |
|
Live Life
Name: Don
Location: Lincoln, NE
Join Date: Nov 2008 Motorcycle(s): 2009 Green SE Ninja 250 Posts: A lot.
|
And you found them where?
__________________________________________________
- ATGATT - Scorpion EX700 Hi-Vis Helmet, First Gear MeshTek 3.0 Jacket, TourMaster Transition 2 Jacket and Flex Pants, Sidi Doha boots |
|
|
|
|
February 19th, 2009, 09:30 PM
|
#16 |
|
ninjette.org member
Name: Levi
Location: St. George, Utah
Join Date: Dec 2008 Motorcycle(s): 2008 Ninja 250R, CR125R Posts: 191
|
^^ x2
|
|
|
|
|
February 19th, 2009, 09:39 PM
|
#17 |
|
Her name is Itoshii
Name: Nani
Location: Charlotte, NC
Join Date: Feb 2009 Motorcycle(s): 2007 Kawasaki Ninja 250 Posts: 311
Blog Entries: 3
|
kkim are the passenger pegs forever gone from your bike?
__________________________________________________
"A frog in a well can not see the ocean" ~ Japanese proverb 
|
|
|
|
|
February 19th, 2009, 09:44 PM
|
#18 |
|
Join Date: Nov 2008 Posts: Too much.
|
Actually, I still have my original passenger pegs still mounted on the brackets in a box on a shelf. I bought some passenger pegs from Richard to do this project, just in case the GF was ever crazy enough to want to go for a ride as a passenger.
She's not asked yet!! I wonder why?? 
|
|
|
|
|
February 19th, 2009, 11:27 PM
|
#19 |
|
Her name is Itoshii
Name: Nani
Location: Charlotte, NC
Join Date: Feb 2009 Motorcycle(s): 2007 Kawasaki Ninja 250 Posts: 311
Blog Entries: 3
|
Let me get this right... mounted on the brackets in a box on a shelf??
__________________________________________________
"A frog in a well can not see the ocean" ~ Japanese proverb
|
|
|
|
|
February 19th, 2009, 11:31 PM
|
#20 |
|
Join Date: Nov 2008 Posts: Too much.
|
yep, the pegs with brackets simply unbolt from the bike as a unit on both sides.
http://www.ninjette.org/forums/showthread.php?t=9851 |
|
|
|
|
February 19th, 2009, 11:46 PM
|
#21 |
|
Her name is Itoshii
Name: Nani
Location: Charlotte, NC
Join Date: Feb 2009 Motorcycle(s): 2007 Kawasaki Ninja 250 Posts: 311
Blog Entries: 3
|
I just imagined you GF looking over and seeing something like this:
 And wondering what they were doing there and not on the bike for her to use, lol
__________________________________________________
"A frog in a well can not see the ocean" ~ Japanese proverb
|
|
|
|
|
February 19th, 2009, 11:54 PM
|
#22 |
|
Join Date: Nov 2008 Posts: Too much.
|
.... I've offered to take her for a spin... even offered to buy a larger displacement bike for two up riding if she's interested. She's not gotten back to me on that yet, so I continue zipping around on my own. 
|
|
|
|
|
February 20th, 2009, 12:11 AM
|
#23 |
|
Her name is Itoshii
Name: Nani
Location: Charlotte, NC
Join Date: Feb 2009 Motorcycle(s): 2007 Kawasaki Ninja 250 Posts: 311
Blog Entries: 3
|
Nice!!
I'll confess though, before getting my moto I was afraid for some time on getting on a 2 wheel vehicle. Luckily my first experience was as a passenger on a cruiser and it was so smooth my fear subsided. Thus, I decided to be the rider this time and I feel a connection with Ninjas - I've been seeing them since I was little. I know everyone's different, but I guess the cruiser ride is worth a shot, see if she likes that teaser... 
__________________________________________________
"A frog in a well can not see the ocean" ~ Japanese proverb
|
|
|
|
|
February 20th, 2009, 12:16 AM
|
#24 |
|
Join Date: Nov 2008 Posts: Too much.
|
nah... some people are best left to travel on 4 wheels. I'm not about to lure anyone onto a bike if they aren't enthusiastic about it.
She has her interests, I have mine.. main thing is we have fun on the common ground areas.
|
|
|
|
|
February 20th, 2009, 08:02 AM
|
#25 |
|
Her name is Itoshii
Name: Nani
Location: Charlotte, NC
Join Date: Feb 2009 Motorcycle(s): 2007 Kawasaki Ninja 250 Posts: 311
Blog Entries: 3
|
That's good then, whatever floats the boat...
__________________________________________________
"A frog in a well can not see the ocean" ~ Japanese proverb
|
|
|
|
|
February 20th, 2009, 11:39 AM
|
#26 | |
|
ninjette.org member
Name: Michael
Location: Little Rock, AR
Join Date: Feb 2009 Motorcycle(s): 2009 Ninja 250R Posts: 65
|
Quote:
__________________________________________________
2009 Kawasaki Ninja 250R Special Edition |
|
|
|
|
|
February 20th, 2009, 12:22 PM
|
#27 |
|
IC2(SW)
Name: Kerry
Location: Pensacola
Join Date: Nov 2008 Motorcycle(s): . Posts: A lot.
|
^ Gilles makes some nice one's too, if ya got the $
< there still working out nice
|
|
|
|
|
March 2nd, 2009, 06:20 PM
|
#28 |
|
ninjette.org member
Name: Michael
Location: Texas
Join Date: Feb 2009 Motorcycle(s): 08 Ninja 250R Posts: 112
|
So could I order some passenger foot pegs off ebay and drill them out for the front? or will it not accept the spring? Im having trouble finding some nice foot pegs for the front.
|
|
|
|
|
March 2nd, 2009, 07:16 PM
|
#29 |
|
Join Date: Nov 2008 Posts: Too much.
|
if you're going to buy some rear pegs to put on the front, I would just buy something like what hogfan83 has. They look pretty good to me or is that something you don't care for?
|
|
|
|
|
March 2nd, 2009, 11:52 PM
|
#30 |
|
ninjette.org member
Name: Michael
Location: Texas
Join Date: Feb 2009 Motorcycle(s): 08 Ninja 250R Posts: 112
|
Ya ive seen those but some of the rear pegs on ebay look more like aftermarket rear sets pegs. Solid aliminum and fully round like wood crafts.
|
|
|
|
|
March 2nd, 2009, 11:57 PM
|
#31 |
|
Join Date: Nov 2008 Posts: Too much.
|
Michael,
Finding pegs that will fit properly is hard enough when looking at just front pegs. Trying to guess if rear pegs form other bikes would fit ours would be a real gamble. I'm not saying it can't be done, but you're going to be awfully lucky to find a set that would work. I knew these would work only because someone else had tried the swap first. |
|
|
|
|
March 3rd, 2009, 07:10 PM
|
#32 |
|
ninjette.org member
Name: Michael
Location: Texas
Join Date: Feb 2009 Motorcycle(s): 08 Ninja 250R Posts: 112
|
True maybe I should just by an extra set of stock rear pegs so I can keep my originals aside. Just in case.
|
|
|
|
|
March 3rd, 2009, 07:15 PM
|
#33 |
|
Join Date: Nov 2008 Posts: Too much.
|
well, if you want to do that, I know Richard has a bunch for sale.
http://www.ninjette.org/forums/showthread.php?t=13607 |
|
|
|
|
December 6th, 2011, 12:16 AM
|
#34 |
|
ninjette.org member
Name: Steve
Location: New Mexico
Join Date: Nov 2011 Motorcycle(s): 2008 Kawasaki Ninja 250R, 2006 Suzuki Hayabusa GSX1300R, 2004 Kawasaki ZRX1200R, 1985 Kawasaki 750 Turbo Posts: 118
|
I thought I would revive this thread even though it is a sticky.
Another DIY user here. Thanks for giving me the chance to save a few bucks. I am building a Road Race 250 on a budget.......this is another DIY I had to do. On previous bikes I have owned or still own, replacing the foot pegs could also save significant weight. On my Hayabusas I replaced them with GSXR 1K pegs and saved over a 1lb for each peg. How? Well they have weights on the bottom to dampen vibration a lot. The 250 doesn't have that and only has the rubber and the curb feelers(that's what I call them) to be a little heavier than the passenger pegs. How much you ask? Stock - 5oz. Stock passenger peg - 2oz. I am a fanatic when it comes to weight loss. I trimmed almost 60lbs from the Hayabusa with it still looking stock. I measure everything down to the ounce. I also take in account any added weight to be fair. Thank goodness this Ninja will only be a track only bike so I could care less of the looks for the most part. I will document the weight removal for my own delight as I know many have stripped their Ninjas of weight since the dawn of time and I am sure plenty of info out there. Back to the subject. I followed this DIY here but found that the way the spring was used didn't seem to be as good as the factory setup. So I did a few things different that really didn't take anymore time than sipping a beer as I did this.....Ok, I don't drink but you get the idea. I cut the grooves deeper with a dremel and added a couple grooves at the end of the pegs. I did the same filing to make it rougher as well and did them at a crosshatch in two directions.This won't last long IMHO and I will have to hit it with a file often when it feels slippery again. Keep in mind that since the spring is squeezed between the peg and the mount there is a lot of tension that can prevent the peg from folding up and down easily. I suggest adding a tiny bit of bearing grease to the spring and pin area then it will move like the factory setup. The one thing I did to the spring for the right side was twist the hook side 180' so that it could mount into the hole I drilled. I then drilled a hole in the foot peg bracket for the other stem of the spring to reside in as this side did not have the lip as the otherside does. This has been mentioned in the originators post but this is what I did to make it work like the factory. I'll post a pic of that tomorrow. Here are some pics: 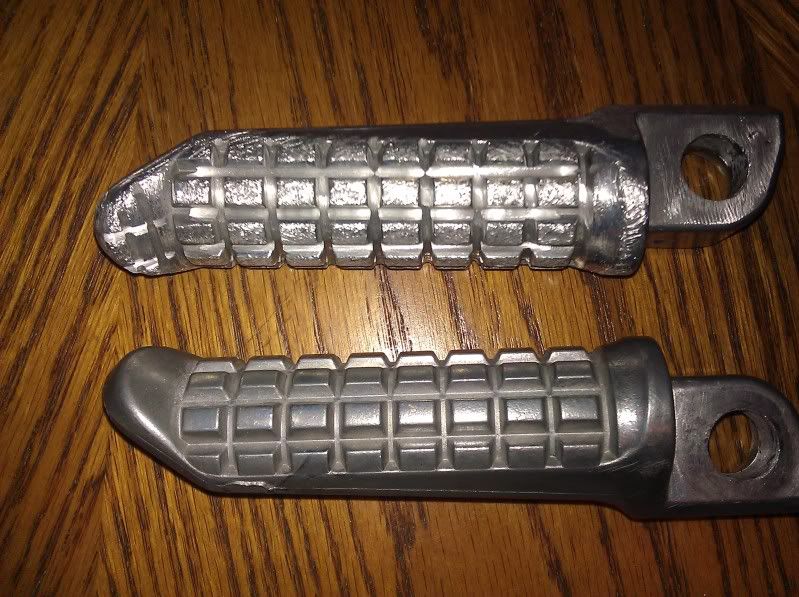 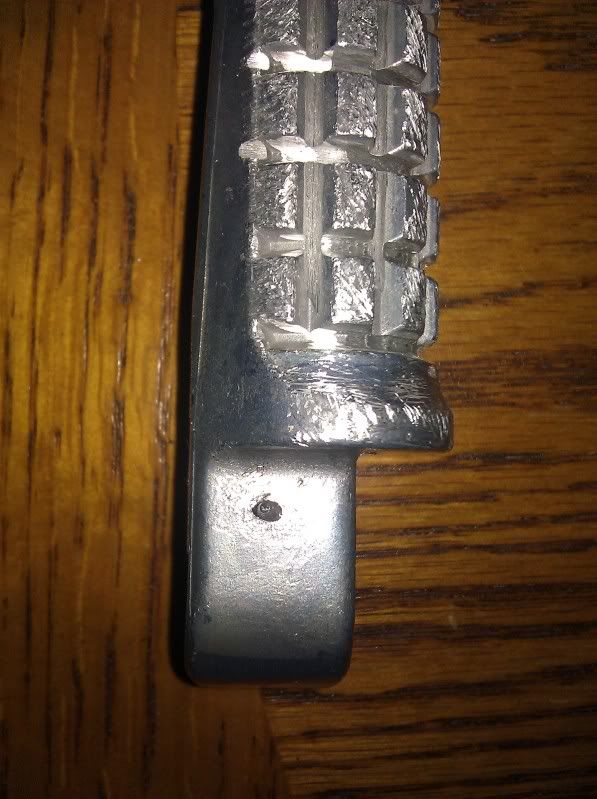  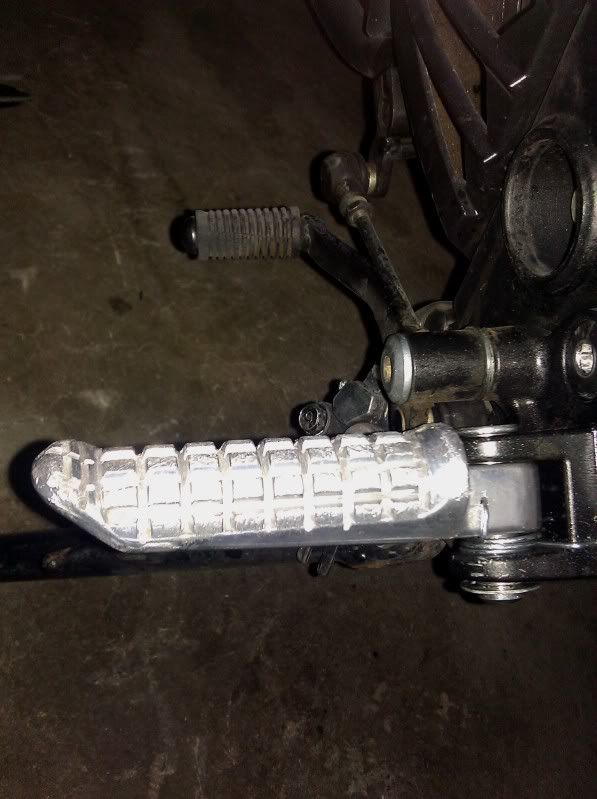 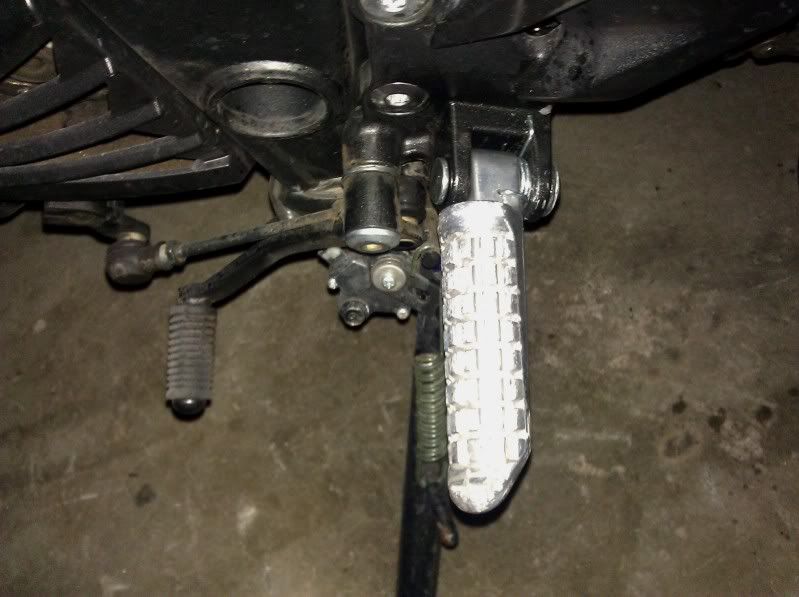 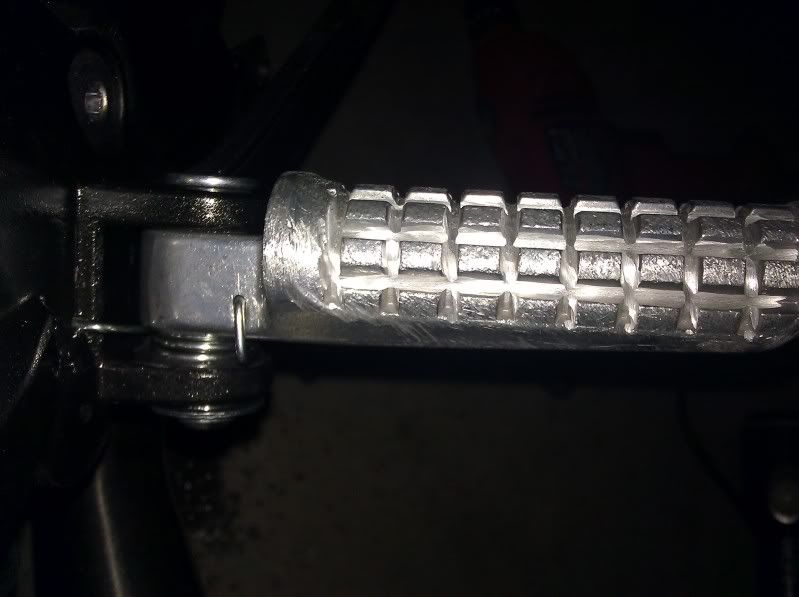 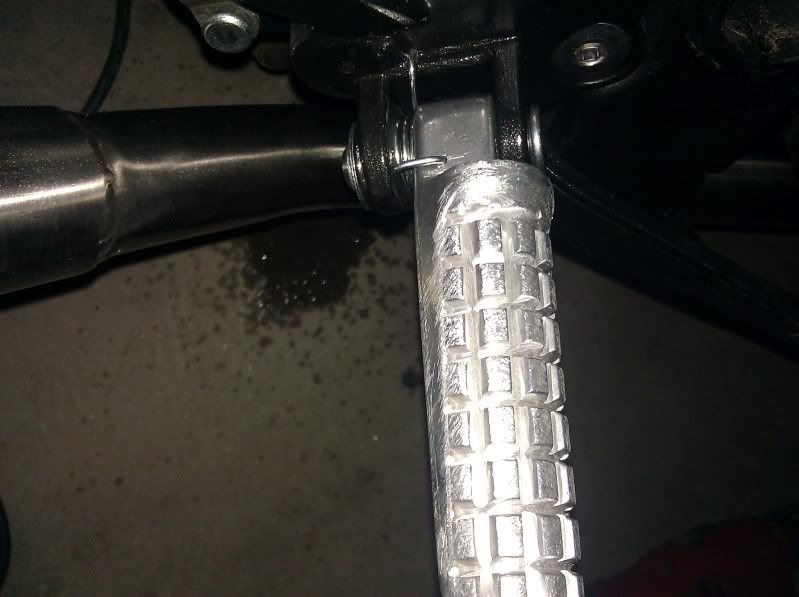 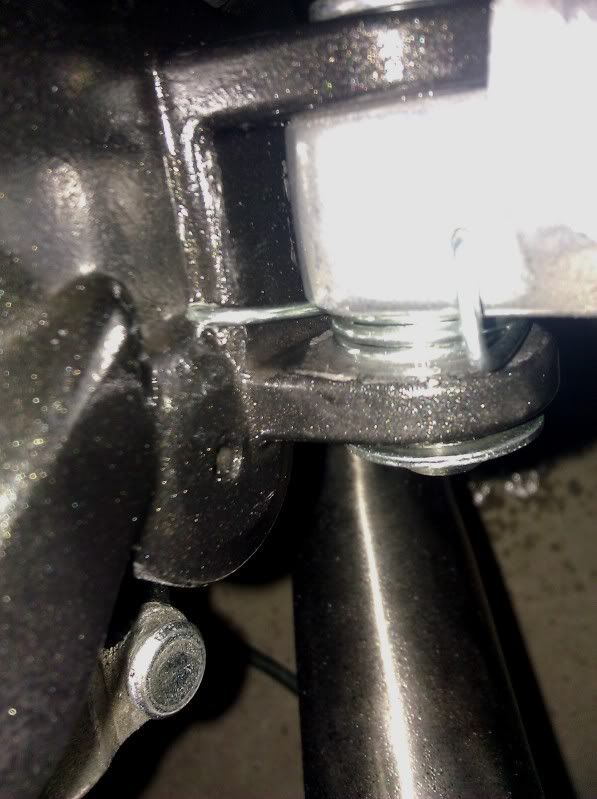
Last futzed with by icbm; December 6th, 2011 at 08:47 PM. |
|
|
|
 |
 Similar Threads
|
||||
| Thread | Thread Starter | Forum | Replies | Last Post |
| Passenger Pegs & Brackets, Rider Pegs 2012 250r | GlassAnkles | Motorcycle-related | 2 | March 7th, 2012 11:17 AM |
| Painted Passenger Pegs | saxnbass | 2008 - 2012 Ninja 250R Farkles | 20 | January 3rd, 2012 08:06 PM |
| passenger pegs disassembly | the big mike | 2008 - 2012 Ninja 250R Tech Talk | 3 | August 21st, 2011 08:31 PM |
| Passenger Pegs | NicoleH28 | 2008 - 2012 Ninja 250R Tech Talk | 2 | April 25th, 2011 08:43 AM |
| Pink passenger pegs | demp | 2008 - 2012 Ninja 250R Farkles | 21 | August 26th, 2010 09:45 AM |
|
|


