
|
 August 24th, 2011, 07:36 AM
|
#1 |
|
ninjette.org sage
Name: Zach
Location: Michigan
Join Date: Aug 2011 Motorcycle(s): 2008 Kawasaki Ninja 250R, 2003 Honda CBR600RR Posts: 721
Blog Entries: 1
|
I Know This Should be Really Easy but...
Okay so I'm a total noob with the Ninja, first bike, first attempt at self servicing, pretty much first everything. I've spent quite a while searching the forums and Youtube for how to do the: "Engine vacuum synchronization - inspect" portion of the 7500 service, but I can't seem to do it lol... I found those modified methods of carb syncing with the bottles and liquid, but should't be that hard to do with a real vacuum gauge right? That's what I'm attempting. First of all... Perhaps the question that gauges my inexperience the most is, where the heck are the vacuum lines???? I'm assuming it's not the one from the gas tank, because I'm at least good with math (1 vacuum line for 2 carbs? I don't think so, nothing to compare). Also if someone could help me out with the "sub fuel tank" I'd be greatly appreciative. I've been using a small syringe with the stopper out of it and just pouring gasoline into it as the engine sucks it down (I found out that the engine doesn't like to suck gas up through a bottle, seems to prefer gravity helping it along the way, unless I'm totally going about this the wrong way too...) Or it could just be the engine's reaction to freshly cleaned and oiled carb filters, idk.
These are the pics showing what I'm attempting to work with. If a video would make it easier for you guys then I can do that too and show you what all I'm doing. In the meantime I'm going to push on with my 7500 service until I figure out how to do this one, also I'll just keep using this thread as I run into problems that I can't solve lol... So keeping an eye on this one would also be greatly appreciated.
__________________________________________________
ATGATT 
|

|

|
|
August 24th, 2011, 07:45 AM
|
#2 |
|
ninjette.org certified postwhore
Name: Jason
Location: Jacksonville, Florida
Join Date: May 2010 Motorcycle(s): 09 Ninja 250R SE, 07 Honda CRF230F, 06 Honda CRF150F Posts: A lot.
|
Have you read threw this thread? It shows you where to make the vacuum connections.
http://www.ninjette.org/forums/showthread.php?t=9754
__________________________________________________
09 250R SE: Paying it forward one post at a time!   Don't forget to add yourself to our Member Map Don't forget to add yourself to our Member Map
|
|
|
|
|
August 24th, 2011, 07:49 AM
|
#3 |
|
ninjette.org sage
Name: Zach
Location: Michigan
Join Date: Aug 2011 Motorcycle(s): 2008 Kawasaki Ninja 250R, 2003 Honda CBR600RR Posts: 721
Blog Entries: 1
|
Yeah I read that one a few times, but he said he made permanent "vacuum taps" and I don't see that T connection of the lines on my bike, I'll upload more pics, maybe I'm missing something.
Are these them? Closest things I can find to what I think may be them, but the first time I tried to use the one off the tank it overpowered my gauge.
__________________________________________________
ATGATT
|
|
|
|
|
August 24th, 2011, 07:55 AM
|
#4 |
|
ninjette.org certified postwhore
Name: Jason
Location: Jacksonville, Florida
Join Date: May 2010 Motorcycle(s): 09 Ninja 250R SE, 07 Honda CRF230F, 06 Honda CRF150F Posts: A lot.
|
I would think your setup would need to be the same to hook your gauges to right. Should be like this?
__________________________________________________
09 250R SE: Paying it forward one post at a time! Don't forget to add yourself to our Member Map
|
|
|
|
|
August 24th, 2011, 08:08 AM
|
#5 |
|
ninjette.org sage
Name: Zach
Location: Michigan
Join Date: Aug 2011 Motorcycle(s): 2008 Kawasaki Ninja 250R, 2003 Honda CBR600RR Posts: 721
Blog Entries: 1
|
I would have thought so too which is why I tried to use it at first lol. But I don't see that T, I have a picture from the same position, and there's no T there. Should I be doing the valve inspection before this anyway?
Edit: Was just chatting with my MSF instructor and he says to do the valve inspection first because it can affect carb syncing.
__________________________________________________
ATGATT
|
|
|
|
|
August 24th, 2011, 08:23 AM
|
#6 |
|
ninjette.org certified postwhore
Name: Jason
Location: Jacksonville, Florida
Join Date: May 2010 Motorcycle(s): 09 Ninja 250R SE, 07 Honda CRF230F, 06 Honda CRF150F Posts: A lot.
|
And he would be correct. Valves first.
__________________________________________________
09 250R SE: Paying it forward one post at a time! Don't forget to add yourself to our Member Map
|
|
|
|
|
August 24th, 2011, 08:27 AM
|
#7 | |
|
ninjette.org sage
Name: Zach
Location: Michigan
Join Date: Aug 2011 Motorcycle(s): 2008 Kawasaki Ninja 250R, 2003 Honda CBR600RR Posts: 721
Blog Entries: 1
|
Quote:
 saying, "I didn't sign up for this!" saying, "I didn't sign up for this!"  okay lol, I'll do the valve inspection once the engine cools, thanks! okay lol, I'll do the valve inspection once the engine cools, thanks!
__________________________________________________
ATGATT
|
|
|
|
|
|
August 24th, 2011, 08:55 AM
|
#8 |
|
ninjette.org certified postwhore
Name: Jason
Location: Jacksonville, Florida
Join Date: May 2010 Motorcycle(s): 09 Ninja 250R SE, 07 Honda CRF230F, 06 Honda CRF150F Posts: A lot.
|
We are all here for you.
 BTW...The service manual recommends your engine be room temperature before measuring/making any valve adjustments. GL!
__________________________________________________
09 250R SE: Paying it forward one post at a time! Don't forget to add yourself to our Member Map
|
|
|
|
|
August 24th, 2011, 09:13 AM
|
#9 |
|
ninjette.org sage
Name: Zach
Location: Michigan
Join Date: Aug 2011 Motorcycle(s): 2008 Kawasaki Ninja 250R, 2003 Honda CBR600RR Posts: 721
Blog Entries: 1
|
Yeah she's cooling off, for now I'm doing easier stuff on the service sheet haha. HOPEFULLY I can get a grip on the valve inspection. I see plenty of DIY threads on that everywhere at least!
__________________________________________________
ATGATT
|
|
|
|
|
August 24th, 2011, 09:17 AM
|
#10 |
|
ninjette.org certified postwhore
Name: Jason
Location: Jacksonville, Florida
Join Date: May 2010 Motorcycle(s): 09 Ninja 250R SE, 07 Honda CRF230F, 06 Honda CRF150F Posts: A lot.
|
I just did mine this past week. It wasn't toooooo bad. Have you seen the new video's for the valve adjustment? I haven't finished watching them but they seem pretty good for reference.
__________________________________________________
09 250R SE: Paying it forward one post at a time! Don't forget to add yourself to our Member Map
|
|
|
|
|
August 24th, 2011, 09:35 AM
|
#11 |
|
ninjette.org sage
Name: Zach
Location: Michigan
Join Date: Aug 2011 Motorcycle(s): 2008 Kawasaki Ninja 250R, 2003 Honda CBR600RR Posts: 721
Blog Entries: 1
|
I haven't watched them yet, but I saw them pop up on the threads, I figure using the video in combination with that really really thorough picture thread, it shouldn't be too bad, but I mean I'm no mechanic haha, never worked on any vehicles before, this is my first vehicle with a motor. I've only had bicycles before this, but I loved doing maintenance on those! I figured what better way to learn the Ninja than to dive in on the big service?
__________________________________________________
ATGATT
|
|
|
|
|
August 24th, 2011, 05:04 PM
|
#12 |
|
ninjette.org certified postwhore
Name: Cuong
Location: San Diego
Join Date: Jul 2010 Motorcycle(s): 2008 Ninja 250r, 2007 Daytona 675 Posts: A lot.
|
I believe only the CA bikes have that T since the other end connects to our CA emmissions. The hoses you're using are on either side of your choke cable.
Here's a pic that shows a non-CA bike: 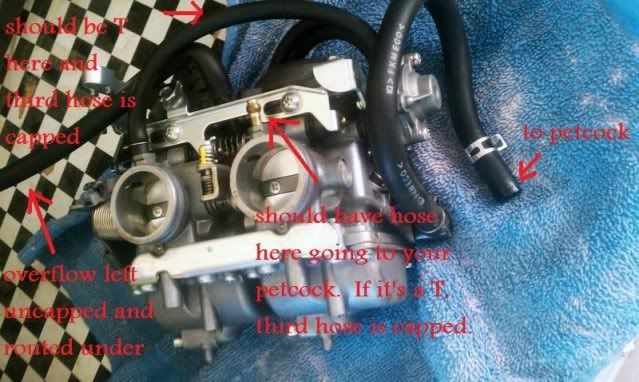 The two hoses you're using are left/center above your carb openings (in pic above, the arrow in the middle points to a nozzle without the hose). The arrow at the very top points to where a T is for our CA bikes. If you're gonna do carb syncing on your own, might as well install permanent taps. 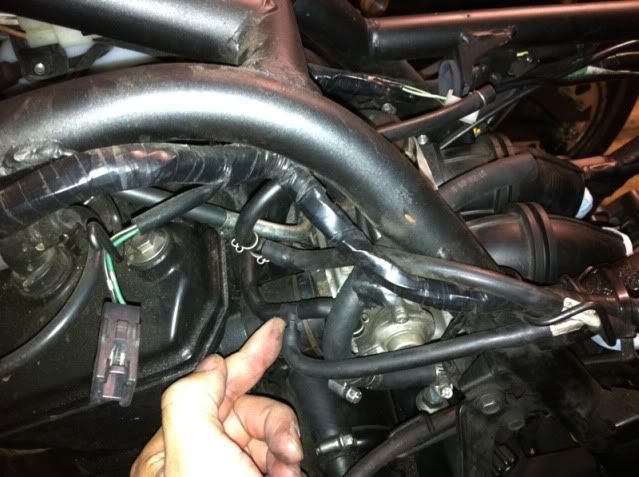 I have my hoses capped off with the V and it makes syncing in the future really convenient. |
|
|
|
|
August 24th, 2011, 09:01 PM
|
#13 |
|
ninjette.org sage
Name: Zach
Location: Michigan
Join Date: Aug 2011 Motorcycle(s): 2008 Kawasaki Ninja 250R, 2003 Honda CBR600RR Posts: 721
Blog Entries: 1
|
I think I've got them figured out lol, I guess we'll find out when I attempt that carb sync again. Been running errands for most of the day, finally have some time to get back to work on the valve inspection. Are these engine mount bolts supposed to be this hard to get off? Literally been at the 6 of those things for over an hour now.
Edit: I'm going to go on a limb here and say these engine mounting bolts aren't what originally came with the bike... One of the DYI forums said that all of the engine mounting bolts were 14mm. The two top bolts were 14's, but the two bottoms (yep, there's two actual legitimate bolts) are 17mm and they just spin inside of their cylindrical casing. The casings have holes at the ends that I'm assuming some sort of tool inserts into that prevents them from spinning so you can extract the bolts, but after sticking a screwdriver and bending the tip, I'd say I'm short on ideas. Any help on this one? I tried WD-40 to loosen them up, didn't make much of a difference, the casings just spin easier now lol... And yes those WERE sliders. I'm looking to take them off during this service though, MSF instructor said they can cause more damage than good by bending the frame in a crash. I'm assuming that's where this whole set up came from, those sliders.
__________________________________________________
ATGATT
|
|
|
|
|
August 25th, 2011, 01:00 AM
|
#14 |
|
ninjette.org guru
Name: Domagoj
Location: Rijeka, Croatia
Join Date: Aug 2010 Motorcycle(s): Ninja 250r 2009 Posts: 396
|
You are right, this solution is probably provided by frame slider manufacturer.
It is a very strange solution too, as the "usual" types use a single bolt similar to the one that came with the bike from the factory. In fact I do not like these at all, as they stress the engine in a different way... Is there any hint on the frame sliders to guess the manufacturer? I have tried to google them, but they don't seem to be any of the common ones. (t-rex, psr, intuitive) Maybe if you find the manufacturer, you can find some sort of installation manual which gives a hint how to handle those... things. Have you tried to support the engine from below (oil filter cap)? If you haven't, there is quite a lot of friction between the frame, engine block and those bolts caused by engine weight. You should support the engine, it might "relax" the stuff a bit. But do not lift the engine too much, because you will be lifting the entire bike. Ah, If you will be removing the sliders, try to get an original front engine mounting bolt from the dealer. It may be expensive, but the bolt is M10 fine thread (I think...), with socket wrench opening 14. These are non standard, and I couldn't find them anywhere where I live (standard for M10 is 17). Besides, original Kawi bolt is really awesome quality, compared to all the stuff you can usually get in the hardware stores. edit: Try this link from the ninjette wiki for some more info and opinions on the frame sliders. edit 2: Screwdrivers are not very strong. Maybe try the same with 6 mm allen wrench, to get some leverage. |
|
|
|
|
August 25th, 2011, 04:38 AM
|
#15 |
|
ninjette.org certified postwhore
Name: Jason
Location: Jacksonville, Florida
Join Date: May 2010 Motorcycle(s): 09 Ninja 250R SE, 07 Honda CRF230F, 06 Honda CRF150F Posts: A lot.
|
If it helps.... I did my valve adjustment without taking the engine mount off. You have to remove the coolant hose (right at the valve cover) and the left ignition coil but then the valve cover will come up and out the left side. I left my radiator and most its hoses mounted as well. I guess the idea is to gain easier access to the valve cover and cams but the service manual makes no mention of taking either the mount or the radiator out. GL!
If your feel the need to take the slider bolts out then we can address that too. Up to you.
__________________________________________________
09 250R SE: Paying it forward one post at a time! Don't forget to add yourself to our Member Map
|
|
|
|
|
August 25th, 2011, 10:24 AM
|
#16 | ||
|
ninjette.org sage
Name: Zach
Location: Michigan
Join Date: Aug 2011 Motorcycle(s): 2008 Kawasaki Ninja 250R, 2003 Honda CBR600RR Posts: 721
Blog Entries: 1
|
Quote:
I also did bring out an overkill floor jack last night to try getting the weight of the engine up. (When I realized how much pressure was on the other bolts, I was afraid that the engine might drop and brought the jack out just in case) Doesn't make a difference at all though. By this point there isn't any pressure on it, only the last bolt to the engine remains, this bolt only takes off that frame connecting piece that the spark plug caps attach to, just to get it out of the way for this top end inspection I'm assuming. The other bolt that I actually managed to get out had quite a bit of rust on the threads (of course...) which is obviously why these things are giving me so much trouble. I've soaked the last one in WD-40 for a while, but it's just not working on this one I considered trying an allen wrench, but you wouldn't believe how many allen wrenches I've destroyed in the past putting them up to tasks like this that they weren't designed for lol. I'll be sure to post up a picture of that one if this thing manages to shear off the top of the wrench haha, but it's worth a shot. I'll look into the OEM bolt too, certainly beats this rust issue. Thanks! Edit: I also didn't mean to make it seem like the screwdriver was the only thing I've tried... Here's a list: The screw driver, several nails, a cotter pin, a flat piece of metal (to try and wedge the whole cylinder), sandpaper, sandpaper WITH the wedge, the bolt from the other side (tried to push it through) and now your allen wrench P.S. your allen wrench just tore the cylinder up, still no progress lol. Certainly the most leverage I've had so far though! Quote:
Yes though, the sliders are definitely coming out lol. Not dealing with this ever again
__________________________________________________
ATGATT
|
||
|
|
|
|
August 25th, 2011, 10:32 AM
|
#17 |
|
ninjette.org certified postwhore
Name: Jason
Location: Jacksonville, Florida
Join Date: May 2010 Motorcycle(s): 09 Ninja 250R SE, 07 Honda CRF230F, 06 Honda CRF150F Posts: A lot.
|
Your right. I just looked at the SM again and it does mention removing the radiator. Trust me though, this can be done without doing that. I kinda went at it with the mind set that I'll remove what's in my way to get what I need to get to. The radiator was not one of them.
__________________________________________________
09 250R SE: Paying it forward one post at a time! Don't forget to add yourself to our Member Map
|
|
|
|
|
August 25th, 2011, 10:38 AM
|
#18 |
|
ninjette.org certified postwhore
Name: Jason
Location: Jacksonville, Florida
Join Date: May 2010 Motorcycle(s): 09 Ninja 250R SE, 07 Honda CRF230F, 06 Honda CRF150F Posts: A lot.
|
I would suggest if you want the slider bolts out that you use the bent screw and insert the end of it in the hole in the cylinder that the bolts screw in then take a breaker bar if you have one and put it on the bolt heads. The screwdriver should hold the cylinder still once it comes in contact with the engine block and the bolt heads should break loose after that. You will however need the original engine mount bolt or a new set of sliders that comes with one.
Edit: Looks like you got them off. Way to go!
__________________________________________________
09 250R SE: Paying it forward one post at a time! Don't forget to add yourself to our Member Map
|
|
|
|
|
August 25th, 2011, 10:43 AM
|
#19 |
|
ninjette.org sage
Name: Zach
Location: Michigan
Join Date: Aug 2011 Motorcycle(s): 2008 Kawasaki Ninja 250R, 2003 Honda CBR600RR Posts: 721
Blog Entries: 1
|
Yep, I'm doing it your way lol. Pushing on! Thanks haha
__________________________________________________
ATGATT
|
|
|
|
|
August 25th, 2011, 10:53 AM
|
#20 |
|
ninjette.org certified postwhore
Name: Jason
Location: Jacksonville, Florida
Join Date: May 2010 Motorcycle(s): 09 Ninja 250R SE, 07 Honda CRF230F, 06 Honda CRF150F Posts: A lot.
|
A bit of additional advice. Remove the valve cover slowly and lift it as straight up as possible. There are some alignment pins in there you don't want to come up and fall in the engine. Once the cover is off, I kinda stuffed some paper towels done beside the cams and such to fill any cavity to avoid losing anything down the engine. Also once you remove your cams (if adjustment is needed) zip tie the cam chain to a bolt or something to keep from loosing it too.
You got this. Let us know if you have more questions.
__________________________________________________
09 250R SE: Paying it forward one post at a time! Don't forget to add yourself to our Member Map
|
|
|
|
|
August 25th, 2011, 11:04 AM
|
#21 |
|
ninjette.org sage
Name: Zach
Location: Michigan
Join Date: Aug 2011 Motorcycle(s): 2008 Kawasaki Ninja 250R, 2003 Honda CBR600RR Posts: 721
Blog Entries: 1
|
And if I lose an alignment pin lol...? Fish it out with a magnet or something? Excellent advice though, very glad you told me as a reminder. Wasn't even thinking about them. We'll see how this goes!
__________________________________________________
ATGATT
|
|
|
|
 |
 Similar Threads
|
||||
| Thread | Thread Starter | Forum | Replies | Last Post |
| Is it easy to bend your forks? | nr19952910 | 2008 - 2012 Ninja 250R Tech Talk | 7 | March 21st, 2015 10:11 AM |
| Easy Lift | kfilla | General Motorcycling Discussion | 6 | February 21st, 2015 08:53 PM |
| go easy on me - i'm new. | vsnizzle | General Motorcycling Discussion | 11 | May 12th, 2014 05:47 AM |
| [visordown.com] - Not so easy | Ninjette Newsbot | Motorcycling News | 0 | March 21st, 2014 12:20 PM |
| [superbikeplanet.com] - Ah, The Easy Life | Ninjette Newsbot | Motorcycling News | 0 | March 7th, 2012 09:10 AM |
|
|


