
|
 March 29th, 2010, 02:46 AM
|
#81 |
|
Join Date: Nov 2008 Posts: Too much.
|
I didn't modify the runners at all. I can't remember the ribs, but I do use grease at all the joints for a better seal to insure against leaks.
|

|

|
|
March 29th, 2010, 04:06 AM
|
#82 | |
|
ninjette.org certified postwhore
Name: Wayan
Location: Bali - Indonesia
Join Date: Apr 2009 Motorcycle(s): 2014 Z250 Posts: A lot.
|
Quote:
 ive just slid the sucker in, and the two rubber surfaces seem to adjust to the shape, and i cant hear any sounds indicating that its leaking. ive noticed that you actually stuck the rubber runners all the way in, which would give an even better seal, but your filter is a bigger version than mine, and if i would have stuck it that deep the mouth of the runners would have been sitting on the inside wall of the filter, and im sure it would have restricted the air flow. 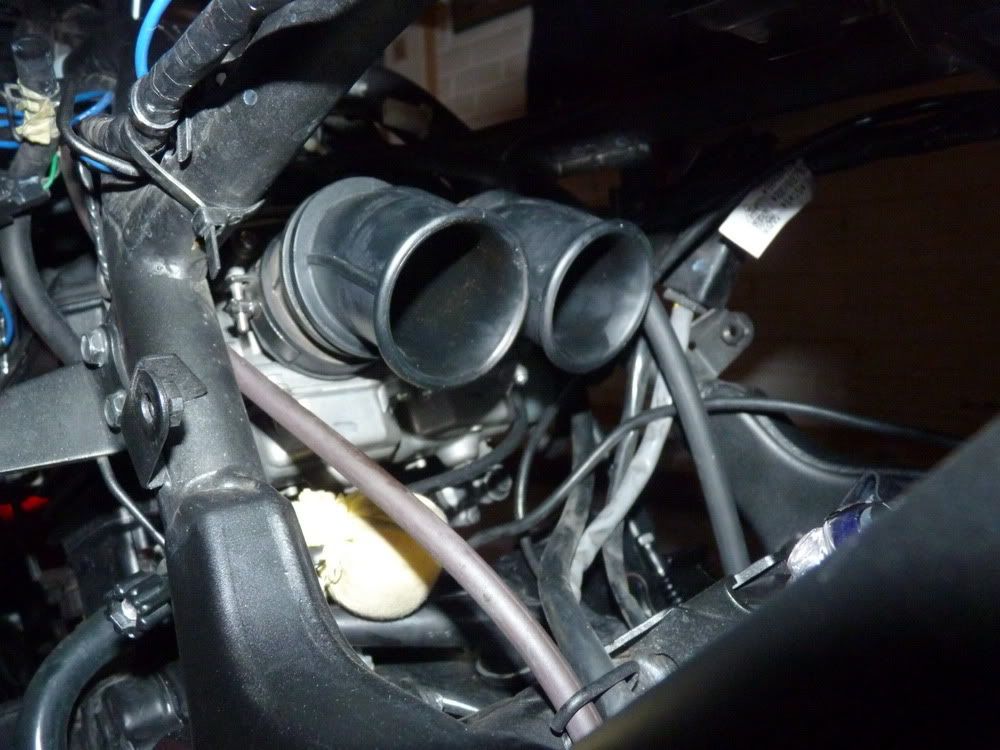  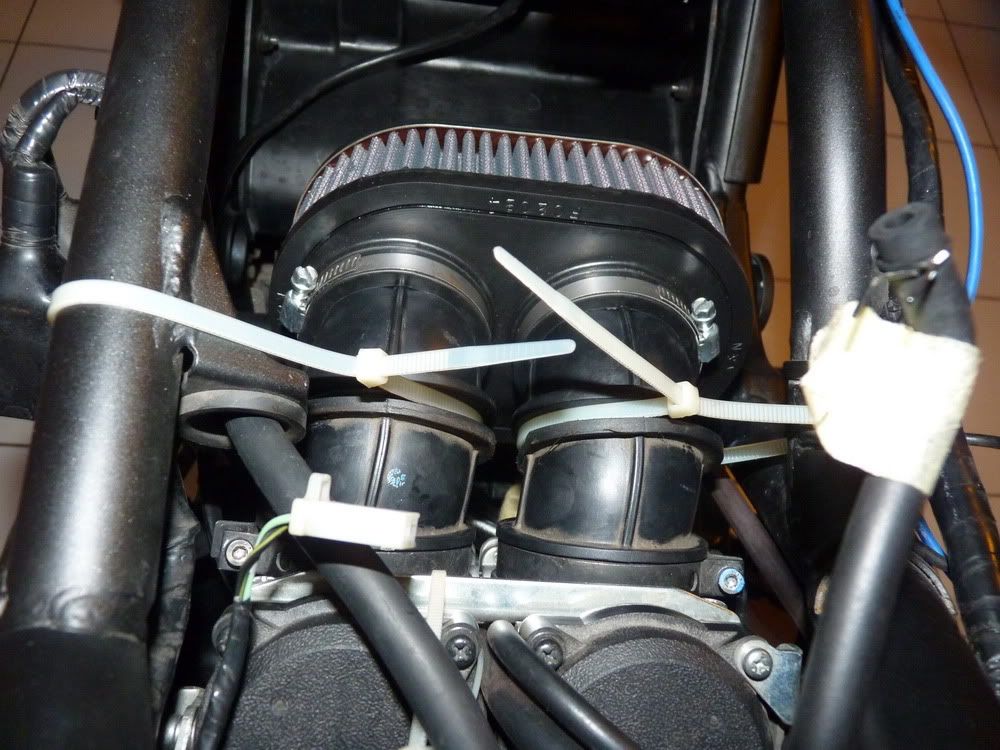 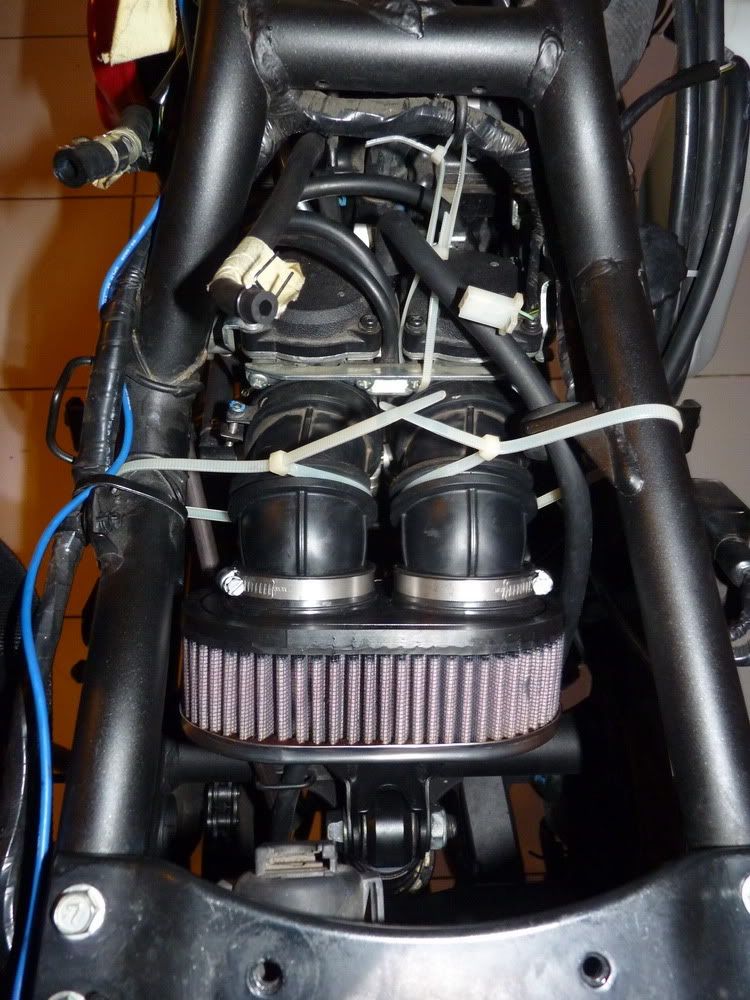 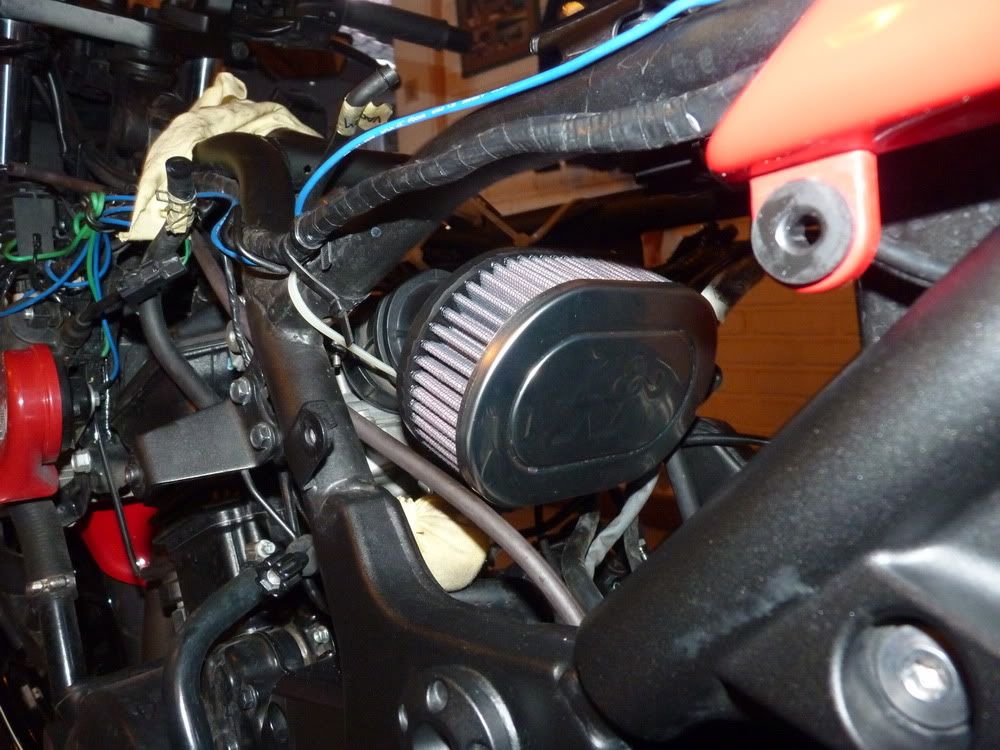 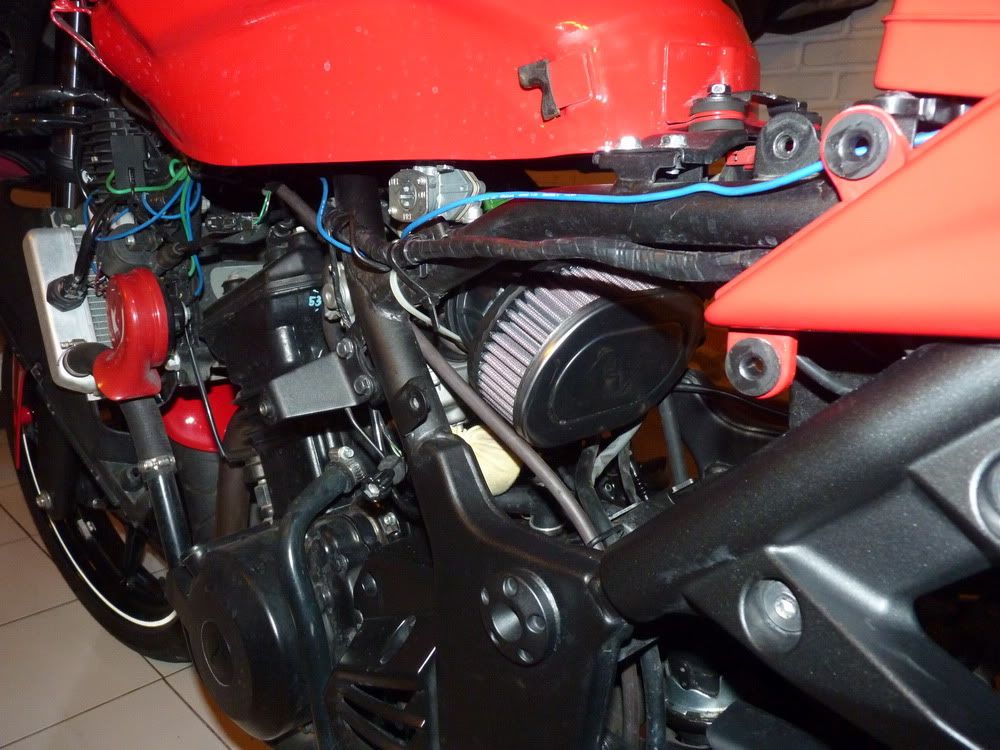 i decided to add another 2 cable ties to the extension pipes, cos im afraid that gravity might get the best of me and pull the filter off the carbs. initially had a tricky time to make it all stay together after i tightened it all up. so i feel better with the added safety ties ") thanks for the greasy tip 
__________________________________________________
Kawasaki Z250, Bored up to 300cc with 12.8 CR, 41hp at wheel 27nm torque, Two bros full exhaust with DB killer Dynojet Power Commander V, KnN Open filter, intake and exhaust ported, Puig Windshield |
|
|
|
|
|
March 29th, 2010, 11:50 AM
|
#83 |
|
Join Date: Nov 2008 Posts: Too much.
|
what model of K&N is that and why didn't you just order a r-0990?
|
|
|
|
|
March 29th, 2010, 05:58 PM
|
#84 | |
|
ninjette.org certified postwhore
Name: Wayan
Location: Bali - Indonesia
Join Date: Apr 2009 Motorcycle(s): 2014 Z250 Posts: A lot.
|
Quote:
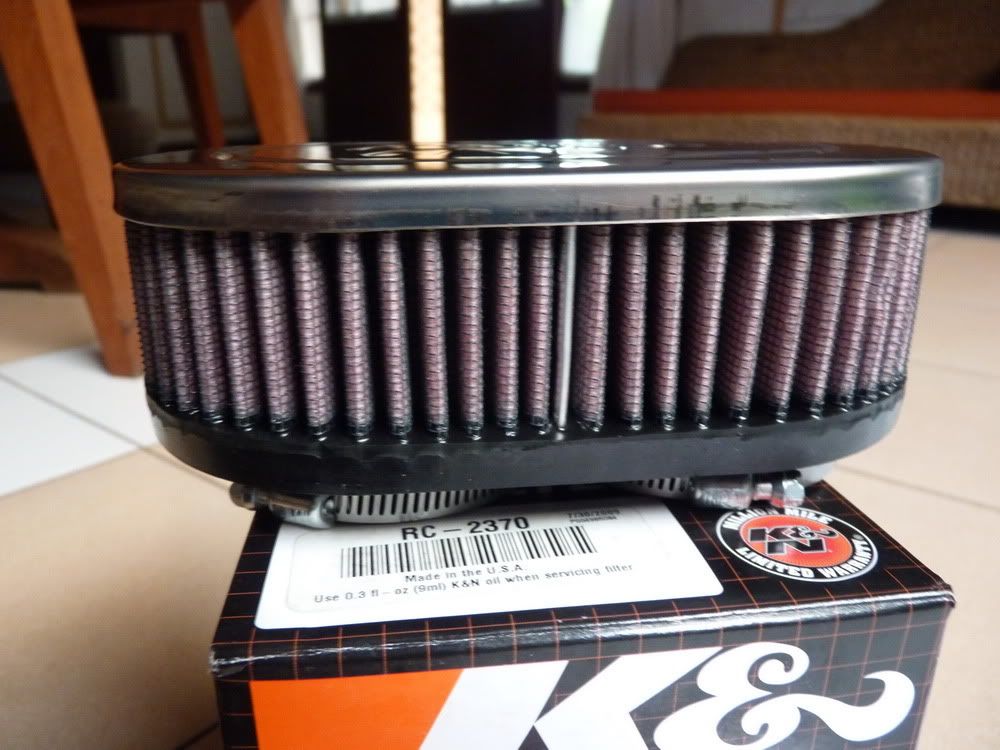 got this one cos this is whats available here. the only options to choose from was the plastic, or metal cap cover, and the metal one looks neat, so i went with that. im glad that i extended the runners cause the wire mesh was already starting to wear down after just one day. now that ive had a couple rides on the bike, i am noticing quite a difference, the bike pulls a lot harder once its in the upper rev range. much more than it used to~! im also getting used to the raspy sound from the new filter... although i noticed that now its REALLY hard to talk over the sound of the exhaust/carbs/wind when im riding with my gf... d-oh! any reason why i should have gone with the r-0990? they look bigger, so i assume they have an even bigger air flow?  i probably would have gone with the r-0990 if i had the choice; bigger is better right? really curious to see the dyno result!
__________________________________________________
Kawasaki Z250, Bored up to 300cc with 12.8 CR, 41hp at wheel 27nm torque, Two bros full exhaust with DB killer Dynojet Power Commander V, KnN Open filter, intake and exhaust ported, Puig Windshield |
|
|
|
|
|
March 29th, 2010, 07:23 PM
|
#85 |
|
Join Date: Nov 2008 Posts: Too much.
|
I mention the 0990 filter only because others have used it and it seems to work w/o surprises you find, like with your filter.
Yes, bigger is better.  I'm curious to see your dyno numbers, too. If possible, try runs w/ one size larger and one size smaller mains than what's presently in the bike. GL
|
|
|
|
|
March 29th, 2010, 07:49 PM
|
#86 | |
|
ninjette.org certified postwhore
Name: Wayan
Location: Bali - Indonesia
Join Date: Apr 2009 Motorcycle(s): 2014 Z250 Posts: A lot.
|
Quote:
gonna order the other mains then
__________________________________________________
Kawasaki Z250, Bored up to 300cc with 12.8 CR, 41hp at wheel 27nm torque, Two bros full exhaust with DB killer Dynojet Power Commander V, KnN Open filter, intake and exhaust ported, Puig Windshield |
|
|
|
|
|
March 29th, 2010, 08:26 PM
|
#87 |
|
Join Date: Nov 2008 Posts: Too much.
|
If you read on how to tune the mains, you keep changing them out till you find the set that gives you the most HP. That you're using a dyno takes out the "butt dyno" so you will at least have proof of what mains give you the most power.
Don't do it on my account if money is an issue, but if a dyno were available to me, you can be assured that's how I would tune for max HP. 
|
|
|
|
|
March 29th, 2010, 09:31 PM
|
#88 | |
|
ninjette.org certified postwhore
Name: Wayan
Location: Bali - Indonesia
Join Date: Apr 2009 Motorcycle(s): 2014 Z250 Posts: A lot.
|
Quote:
my greatest fear is for them to thread a screw or something stupid like that while opening and closing the carbs like 5 times with the air box delete, its a lot more spacious to get to the carbs tho, so im quite happy about that. id be so tempted to get the BRT tis while im there as well, lol it would be almost the ultimate performance you can get out of the ninjette without rebuilding the entire engine
__________________________________________________
Kawasaki Z250, Bored up to 300cc with 12.8 CR, 41hp at wheel 27nm torque, Two bros full exhaust with DB killer Dynojet Power Commander V, KnN Open filter, intake and exhaust ported, Puig Windshield |
|
|
|
|
|
June 22nd, 2010, 05:47 AM
|
#89 |
|
ninjette.org member
Name: Jerry
Location: Ontario, Canada
Join Date: Jun 2009 Motorcycle(s): 09 EX250 LE Posts: 117
|
So I just finished pulling my air box. As I'm putting the mud flap back on, I notice that theres a small gap between the frame and the mud flap on the left side of the bike. Did I miss a washer or something or is this normal?
Another question. Where exactly does the brake light wire get threaded into the mud flap? I dug up some pictures and it seems its supposed to hang off a small hook below the right passenger foot peg but where does it go from there? I currently have it sorta pinched between the mud flap and the frame... |
|
|
|
|
June 22nd, 2010, 07:28 AM
|
#90 |
|
ninjette.org certified postwhore
Name: Jason
Location: Jacksonville, Florida
Join Date: May 2010 Motorcycle(s): 09 Ninja 250R SE, 07 Honda CRF230F, 06 Honda CRF150F Posts: A lot.
|
Check out the original DIY by Vex. Look at "Step #7" The pic shows the brake wiring running up the side of the flap and how it is secured with the "bendable" metal fastener. It comes back in near the brake assembly. I guess the gap you speak of could be where this wiring is running. Depends on which side of the bike you mean when you say "left"
Here's a pic I found on another thread that will show how it comes back to the brake light assembly.
__________________________________________________
09 250R SE: Paying it forward one post at a time!   Don't forget to add yourself to our Member Map Don't forget to add yourself to our Member Map
Last futzed with by dubojr1; June 22nd, 2010 at 10:18 AM. Reason: Added a picture |
|
|
|
|
September 18th, 2010, 06:36 PM
|
#91 |
|
Eddie
Name: Eduardo
Location: Colton, CA
Join Date: Jul 2010 Motorcycle(s): None. Posts: 53
|
hey Vex, GREAT DIY..I have a question..whats the diameter/size of the breather you used?
Thanks in advance.. |
|
|
|
|
September 20th, 2010, 01:23 AM
|
#92 |
|
ninjette.org certified postwhore
Name: Wayan
Location: Bali - Indonesia
Join Date: Apr 2009 Motorcycle(s): 2014 Z250 Posts: A lot.
|
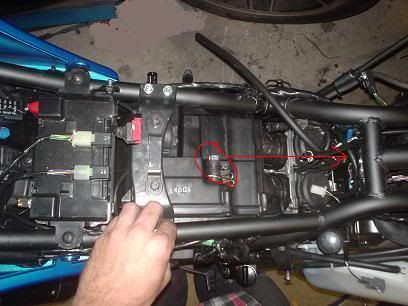
by the way, if you remove the brake reserve, and the back wheel, i am almost certain that the air box can be removed completely through the back end. without having to crack it open.
i was a hairline off giving up and taking the back wheel off to try it when i was trying to take the air box out, but then gave it one last shot and managed to bend that metal mesh and slide the box apart while in that confined space. if i had to do it again i would remove the back wheel and try that approach from the start, lol. has anyone tried it this way?
__________________________________________________
Kawasaki Z250, Bored up to 300cc with 12.8 CR, 41hp at wheel 27nm torque, Two bros full exhaust with DB killer Dynojet Power Commander V, KnN Open filter, intake and exhaust ported, Puig Windshield |
|
|
|
|
September 23rd, 2010, 03:10 PM
|
#93 |
|
ninjette.org certified postwhore
Name: Bob
Location: CA
Join Date: Dec 2008 Motorcycle(s): '08 Ninja 250r, '14 CBR500r Posts: A lot.
|
Questions:
1.0) Can the air box be removed w/o damaging or bending the metal mesh inside? 1.5) Is it difficult to get the air box back IN w/o damaging the metal mesh? 2.0) I see a few different methods used with and w/o the runners. Is there a GENERAL consensus on this (predictable performance, most often used method)? |
|
|
|
|
September 28th, 2010, 08:40 PM
|
#94 | |
|
ninjette.org certified postwhore
Name: Wayan
Location: Bali - Indonesia
Join Date: Apr 2009 Motorcycle(s): 2014 Z250 Posts: A lot.
|
Quote:
i almost took the back wheel off cos i was getting so frustrated with the air box and the metal mesh inside, lol... i was hoping to get the metal mesh out without bending it, but there was no way around it. if you can get the air box out through the back tire space, then it should be easy to put it back in. IF that doesnt work, then i wouldnt think that you can get he airbox back in without warping the metal mesh again... meaning that its gonna be a PITA to get it reassembled in that small space with the metal mesh. that would also mean that they install the air filter BEFORE they install the engine block... lol! go figure  i believe that if you dont use the original air filter runner, the K&N filter will get damaged on a piece of metal that used to hold the original air-filter-box. that piece sticking out of the body tubing to the right of the two red circles that i squiggled in. 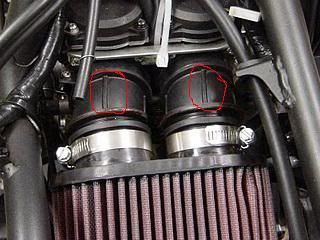 this was a pic i took after i added the runner. i only had the filter in for one day without the runners and i noticed that the metal ring was denting the filter mesh. you can see the dent forming on the right side of the filter. a friend of mine who added the K&N filter but didnt bother adding the runner has a hole going right through the mesh now! basically a gaping hole in the air filter  hope that helps, hehe
__________________________________________________
Kawasaki Z250, Bored up to 300cc with 12.8 CR, 41hp at wheel 27nm torque, Two bros full exhaust with DB killer Dynojet Power Commander V, KnN Open filter, intake and exhaust ported, Puig Windshield |
|
|
|
|
|
September 30th, 2010, 09:13 PM
|
#95 |
|
ninjette.org certified postwhore
Name: Scott
Location: Carlise Ohio
Join Date: Apr 2010 Motorcycle(s): Yahama v star 650 classic Posts: A lot.
|
Anyone doing this mod- Im in the middle of it now =/ I found its easier to just take the rear wheel off and you can slid the whole air box out with out taking all thoses 8-10 screws out. Saves a few min. on the job.
|
|
|
|
|
October 1st, 2010, 01:26 AM
|
#96 | |
|
ninjette.org certified postwhore
Name: Wayan
Location: Bali - Indonesia
Join Date: Apr 2009 Motorcycle(s): 2014 Z250 Posts: A lot.
|
Quote:
good to know for all the people that still want to do this mod, and great to know in case we need to put the box back in! thanks for going where no one has gone before!
__________________________________________________
Kawasaki Z250, Bored up to 300cc with 12.8 CR, 41hp at wheel 27nm torque, Two bros full exhaust with DB killer Dynojet Power Commander V, KnN Open filter, intake and exhaust ported, Puig Windshield |
|
|
|
|
|
October 1st, 2010, 07:29 AM
|
#97 |
|
ninjette.org certified postwhore
Name: Scott
Location: Carlise Ohio
Join Date: Apr 2010 Motorcycle(s): Yahama v star 650 classic Posts: A lot.
|
Haha, don't thank me, it was my wife who thought it!!
|
|
|
|
|
October 1st, 2010, 09:14 AM
|
#98 |
|
ninjette.org certified postwhore
Name: Scott
Location: Carlise Ohio
Join Date: Apr 2010 Motorcycle(s): Yahama v star 650 classic Posts: A lot.
|
I need help!! Lol 1st, do you have to put new jets in with this mod? Shimming just is'nt enuff? 2nd, that vac hose that was on top of the airbox, what do you do wit it? Pic below to show what one.
 I did this and the bike runs like poo when you give it a little throttle. =( |
|
|
|
|
October 1st, 2010, 12:59 PM
|
#99 |
|
Join Date: Nov 2008 Posts: Too much.
|
main jets need to be changed to larger 112.5 or 110 Keihin sized jets.
a better pic of the hose would help.
|
|
|
|
|
October 1st, 2010, 01:05 PM
|
#100 |
|
ninjette.org certified postwhore
Name: Scott
Location: Carlise Ohio
Join Date: Apr 2010 Motorcycle(s): Yahama v star 650 classic Posts: A lot.
|
I got the hose thing figured out. lol Where can I buy these jets at? Im having a hard time finding just jets.
|
|
|
|
|
October 1st, 2010, 01:07 PM
|
#101 |
|
Join Date: Nov 2008 Posts: Too much.
|
|
|
|
|
|
October 1st, 2010, 01:14 PM
|
#102 | |
|
ninjette.org certified postwhore
Name: Scott
Location: Carlise Ohio
Join Date: Apr 2010 Motorcycle(s): Yahama v star 650 classic Posts: A lot.
|
Quote:
. Will just replacing the jets be fine? Will a 200 work?! lol JK 110 or a 112? What would you recomend?
|
|
|
|
|
|
October 1st, 2010, 01:18 PM
|
#103 |
|
Join Date: Nov 2008 Posts: Too much.
|
take your time to peruse the jetting database. find someone who has a similar setup as you and use their info as a base to start your jetting from. there is no one right answer as every bike and location requires different settings to make it run well/best.
http://www.ninjette.org/forums/showthread.php?t=10208 |
|
|
|
|
October 1st, 2010, 01:20 PM
|
#104 |
|
ninjette.org certified postwhore
Name: Scott
Location: Carlise Ohio
Join Date: Apr 2010 Motorcycle(s): Yahama v star 650 classic Posts: A lot.
|
True, I will look that over! Thanks again!
|
|
|
|
|
October 1st, 2010, 09:44 PM
|
#105 | |
|
ninjette.org member
Name: Miko
Location: Jakarta, Indonesia
Join Date: Nov 2009 Motorcycle(s): my lovely and cute Asuka 250R and my 125cc honda moped Posts: 23
|
Quote:
I just installed R 0990 on my bike and yes, I dented the filter at the same place when I struggling to install the filter. but after installed, there is actually enough room between the filter and the metal ring for the carb and the filter to move around. |
|
|
|
|
|
October 1st, 2010, 11:24 PM
|
#106 | |
|
ninjette.org certified postwhore
Name: Wayan
Location: Bali - Indonesia
Join Date: Apr 2009 Motorcycle(s): 2014 Z250 Posts: A lot.
|
Quote:
__________________________________________________
Kawasaki Z250, Bored up to 300cc with 12.8 CR, 41hp at wheel 27nm torque, Two bros full exhaust with DB killer Dynojet Power Commander V, KnN Open filter, intake and exhaust ported, Puig Windshield |
|
|
|
|
|
October 2nd, 2010, 01:01 AM
|
#107 |
|
ninjette.org member
Name: Miko
Location: Jakarta, Indonesia
Join Date: Nov 2009 Motorcycle(s): my lovely and cute Asuka 250R and my 125cc honda moped Posts: 23
|
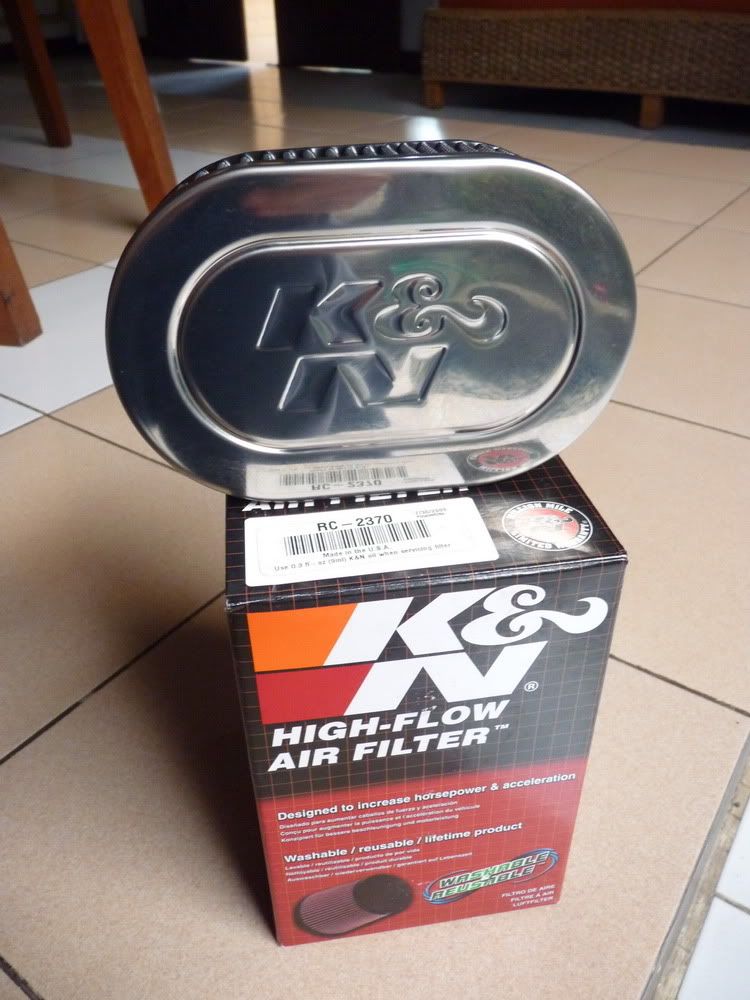
this 2 are commonly used K&N filters for 250r here
RC-2370 Product Style: Dual Flange Oval Universal Air Filter Flange Center to Center: 2.625 in (67 mm) Flange Inside Diameter: 2 in (51 mm) Flange Length: 0.625 in (16 mm) Flange Type: Offset Height: 2 in (51 mm) Outside Length: 6.25 in (159 mm) Outside Width: 4 in (102 mm) Top Style: Metal Top Material/Finish: Chrome Filter Material: Cotton Gauze Base Outside Length: 6.25 in (159 mm) Base Outside Width: 4 in (102 mm) Filter Re-Oiling Amount: 0.3 oz (9 ml) Flange Offset: 0.25 in (6 mm) Footnote 1: Offset is vertical Top Outside Length: 6.25 in (159 mm) Top Outside Width: 4 in (102 mm) Weight: 1 lb (0.5 kg) R-0990 Product Style: Dual Flange Oval Universal Air Filter Flange Center to Center: 2.625 in (67 mm) Flange Inside Diameter: 1.875 in (48 mm) Flange Length: 0.625 in (16 mm) Flange Type: Offset Height: 3 in (76 mm) Outside Length: 6.125 in (156 mm) Outside Width: 3.875 in (98 mm) Top Style: Rubber Top Material/Finish: None Filter Material: Cotton Gauze Base Outside Length: 6.125 in (156 mm) Base Outside Width: 3.875 in (98 mm) Filter Re-Oiling Amount: 0.57 oz (17 ml) Flange Offset: 0.375 in (10 mm) Footnote 1: Offset is horizontal Top Outside Length: 6.125 in (156 mm) Top Outside Width: 3.875 in (98 mm) Weight: 1 lb (0.5 kg) as you can see that RC 2370 is wider than R 0990. thats why the R 0990 has more clearance I will post a picture when I got the chance and the flange diameter for R 0990 is tighter than RC 2370. thats why R 0990 is tougher to install |
|
|
|
|
October 2nd, 2010, 08:28 AM
|
#108 |
|
Moroccan Gold Imports
Name: RJ
Location: MT
Join Date: Sep 2010 Motorcycle(s): '03 ZX9R, '03 ZX7R & wife's '09 250R Posts: 136
|
Is there a different K&N filter version of the 0990 that has filter, as opposed to a plastic cap, at the top/end of the filter? I know their car filters come in a variety of options, with a velocity stack on the end, metal or plastic cap, or just more filter material.
|
|
|
|
|
October 2nd, 2010, 09:39 AM
|
#109 | |
|
Eddie
Name: Eduardo
Location: Colton, CA
Join Date: Jul 2010 Motorcycle(s): None. Posts: 53
|
Quote:
i purchased from these guys, cuts the price in half i believe http://www.psep.biz/index.htm |
|
|
|
|
|
October 2nd, 2010, 09:45 AM
|
#110 | |
|
ninjette.org certified postwhore
Name: Scott
Location: Carlise Ohio
Join Date: Apr 2010 Motorcycle(s): Yahama v star 650 classic Posts: A lot.
|
Quote:
|
|
|
|
|
|
October 2nd, 2010, 10:17 AM
|
#111 | |
|
Eddie
Name: Eduardo
Location: Colton, CA
Join Date: Jul 2010 Motorcycle(s): None. Posts: 53
|
Quote:
|
|
|
|
|
|
October 2nd, 2010, 10:36 AM
|
#112 | |
|
ninjette.org certified postwhore
Name: Scott
Location: Carlise Ohio
Join Date: Apr 2010 Motorcycle(s): Yahama v star 650 classic Posts: A lot.
|
Quote:
Thats good info for anyone who needs to buy new jets for this mod.
|
|
|
|
|
|
October 2nd, 2010, 12:04 PM
|
#113 |
|
Join Date: Nov 2008 Posts: Too much.
|
be aware there is a price difference (and quality difference) between genuine Keihin jets and copies made by other companies that produce jets... roughly half the price of the genuine pieces.
|
|
|
|
|
October 2nd, 2010, 12:10 PM
|
#114 |
|
ninjette.org certified postwhore
Name: Scott
Location: Carlise Ohio
Join Date: Apr 2010 Motorcycle(s): Yahama v star 650 classic Posts: A lot.
|
Kkim, you make a good point. You sometimes get, "what you pay for"
|
|
|
|
|
October 2nd, 2010, 12:25 PM
|
#115 | |
|
Eddie
Name: Eduardo
Location: Colton, CA
Join Date: Jul 2010 Motorcycle(s): None. Posts: 53
|
Quote:
I will see how these do..if theyre not worth it, I will DEFINITELY be purchasing genuine brand.. make sure you tell me how yours turn out Scott i will be looking forward to your feedback
|
|
|
|
|
|
October 2nd, 2010, 01:04 PM
|
#116 |
|
Join Date: Nov 2008 Posts: Too much.
|
In my experience working on other Keihin carbs, I've found the brass to be of a different hardness and have broken jets (twisted off at the base) while installing them. When I checked, they were not genuine Keihin jets but aftermarket jets I had bought from the local motorcycle shops around here.
Upon closer inspection, I noticed that the aftermarket jets mar or misshape easier than the genuine Keihin jets I also had in my jet case that I've built up over the years. With finding that, I have to wonder of the quality control of the holes they drill for the jets. Are they really the correct size or might they be off from what they should be? In any case, I now purchase only Keihin jets when I have a choice. Keep in mind, the jets I talk about have been installed and removed numerous times, so if you work on your jetting only a few times, you may be okay w/ aftermarket jets. Just be really careful when removing and installing them. I now make sure I always use the proper sized box wrenches and screwdrivers when rejetting my carbs.
|
|
|
|
|
October 2nd, 2010, 01:07 PM
|
#117 | |
|
ninjette.org certified postwhore
Name: Scott
Location: Carlise Ohio
Join Date: Apr 2010 Motorcycle(s): Yahama v star 650 classic Posts: A lot.
|
Quote:
What do I do now with no bike to ride???? O well, good time to do other stuff to it I guess.
|
|
|
|
|
|
October 17th, 2010, 10:16 PM
|
#118 |
|
Eddie
Name: Eduardo
Location: Colton, CA
Join Date: Jul 2010 Motorcycle(s): None. Posts: 53
|
So Scotty, how's your ninjette running? I had received my jets a while ago but I can't install them because for some reason they are SUPER long! >_< haha, after installing the main jet in the carburetor, i was unable to place the cap back onto the carbs to seal the bottom portion of the carbs shut -.-
Are the jets you ordered working good? Is your ninjette running smoothly now? Look forward for your reply
|
|
|
|
|
October 18th, 2010, 12:30 PM
|
#119 | |
|
ninjette.org certified postwhore
Name: Scott
Location: Carlise Ohio
Join Date: Apr 2010 Motorcycle(s): Yahama v star 650 classic Posts: A lot.
|
Quote:
But yes! I did get my main jets in. I ordered two 110's. Installing them was a snap. Just held the outside part of the jet with a 8mm(no idea what its called) and I unscrewd the jet itself with a screw driver. Bike runs great with them. Did you install the rite jet in the rite location? Rite jet? Here is a pic of the main jet. 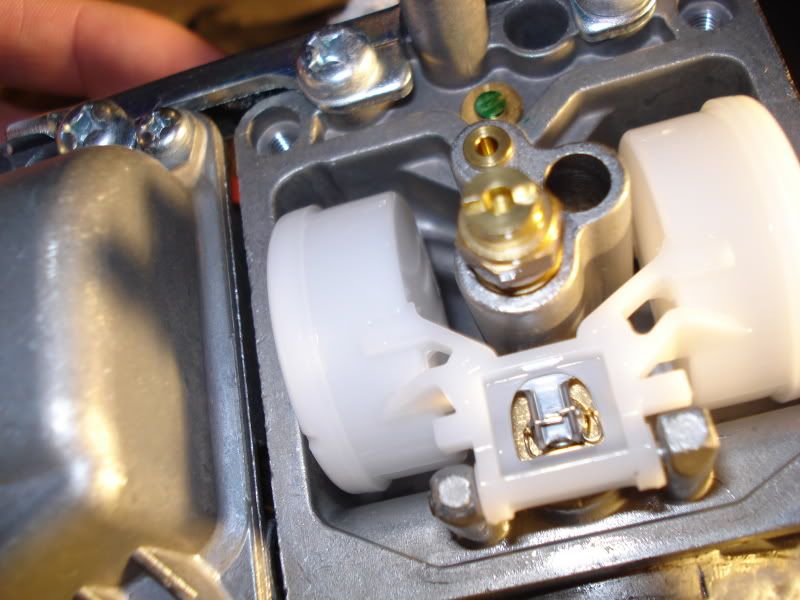
|
|
|
|
|
|
October 18th, 2010, 12:47 PM
|
#120 |
|
Eddie
Name: Eduardo
Location: Colton, CA
Join Date: Jul 2010 Motorcycle(s): None. Posts: 53
|
Hmm yea, looks good, yea i installed the jet in the right spot, but the reason why i couldn't screw the bottom cap back on was because the jets i ordered were SUPER long, so they stuck outward ridiculously..so when it came time to screw the cap back on the main jet kept the cap from closing..there was like 1/3 gap between the carbs and the cap o_0 so I just put everything back and am now just gonna order from the website recommended by Kkim..
a few questions..did your bike go out of sync? did you re-sync it? and do you have an aftermarket f/s or s/o exhaust? |
|
|
|
 |
 Similar Threads
|
||||
| Thread | Thread Starter | Forum | Replies | Last Post |
| DIY- Removing the Kleen Air System Hoses and Plugging the Holes on a 08 250R | kkim | 2008 - 2012 Ninja 250R Tech Talk | 152 | March 15th, 2019 07:37 PM |
| K&N air filter to stock air box | Graugaard | 2008 - 2012 Ninja 250R Tech Talk | 29 | July 28th, 2012 06:33 AM |
| Air Filter Box Question | Little Green Machine | 2008 - 2012 Ninja 250R Tech Talk | 7 | July 14th, 2012 06:25 AM |
|
|


