
|
 July 20th, 2017, 03:00 PM
|
#1 |
|
All the news that's fit to excerpt
Name: newsie
Location: who knows?
Join Date: Jun 2008 Motorcycle(s): only digital replicas Posts: Too much.
|
[motorcycle.com] - MO Wrenching: How To Install Frame Sliders
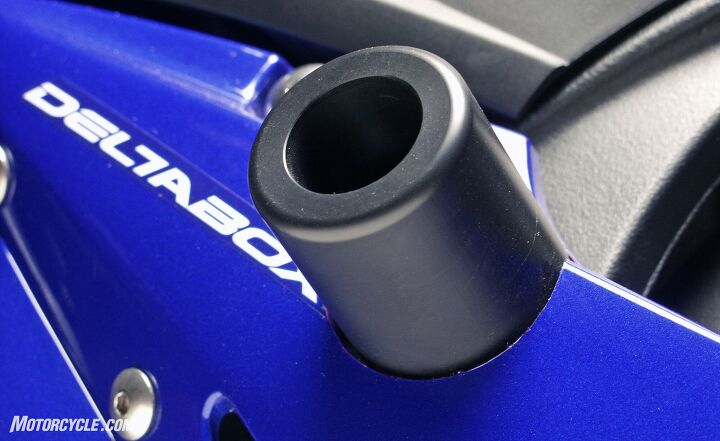 Frame sliders definitely have blossomed beyond their club racer roots and into the street market. Unfortunately, in the quest to make installation easier, some manufacturers are selling street sliders that dont require the bodywork to be drilled. If you look around, youll find people who have had those protectors break after something as minor as the bike falling off the side stand. While this doesnt happen with all street sliders, it happens often enough to warrant a little research on your part if youre that afraid of drilling your bodywork. Choose wrong, and you could end up with sliders that will damage the very bodywork youre trying to protect. Why are people reluctant to drill plastic to mount frame sliders? Well, mistakes in locating the holes are painfully obvious, and replacement bodywork is expensive. However, with careful planning and a steady drill hand, you can mount frame protectors in a couple of hours.  If youre lucky, installing frame sliders will be as easy as torquing a bolt in place with no cutting involved. Some flat black spray paint on the aluminum spacer (seen to the inside of the black slider) would make it visually vanish. If youre lucky, installing frame sliders will be as easy as torquing a bolt in place with no cutting involved. Some flat black spray paint on the aluminum spacer (seen to the inside of the black slider) would make it visually vanish.If your bike doesnt require that the bodywork be drilled for the sliders, you can install them in three easy steps with your eyes closed. Step one: Remove the stock mounting bolt. Step two: Slide the replacement bolt through the frame slider and spacer. Step three: Apply blue Loctite to the threads and torque to factory specification. See you later, have fun riding. The rest of us have a little more work ahead of us. The most important part of the whole process is finding the proper location for the pilot hole in the bodywork. With the bodywork mounted, look to see approximately where the bolt lines up. Remove the bodywork and loosen the bolt until it will almost reach the bodywork when it is in position. Do not loosen the bolt so far that it droops off its usual axis, or youll risk locating the pilot hole too low. Mash a thin layer of modeling clay or some similar substance to the back of the bodywork. Remount the panel and press it against the bolt. You now have an exact indentation marking the location of the bolt in reference to the plastic. 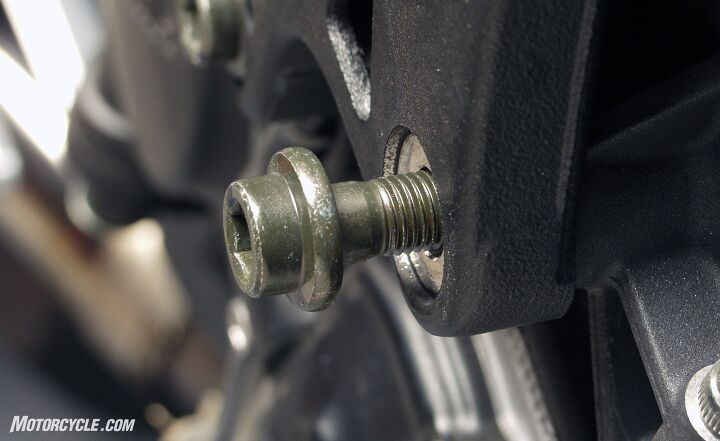 Unscrew the stock mounting bolt until it reaches almost all the way to the bodywork. Unscrew the stock mounting bolt until it reaches almost all the way to the bodywork.Remove the panel and inspect the mark. You want a neat, easy-to-see, negative impression of the bolt cap. (If you dont have one, smooth the clay and try again.) Stick a layer of masking or painters tape over the finished side of the bodywork. Make sure the tape covers the entire area the hole saw will cut. Drill a small pilot hole through the center of the bolt impression. You can now remove the clay. Before you crank up the hole saw and reach the point of no return, remount the panel and check to see that the hole lines up with the bolt. Eyeballing the bolt through the hole isnt very accurate. Instead, try sticking something through the hole and see if reaches to the bolt at the correct angle. If its long enough, the drill bit would be perfect for this test. Now, its safe to move on. 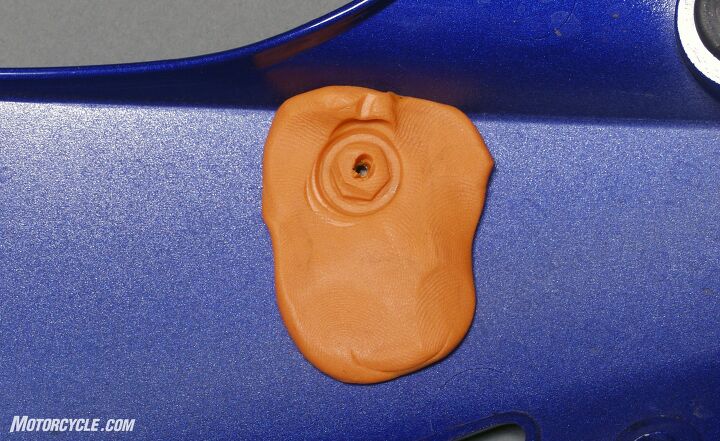 The impression in the clay gives you an easy target for drilling the pilot hole. Check to make sure this hole lines up with the bolt before using the hole saw. The impression in the clay gives you an easy target for drilling the pilot hole. Check to make sure this hole lines up with the bolt before using the hole saw.When using the hole saw, youll want to cut from the shiny side of the bodywork, so that the cleanest part of the cut will be what is visible. Only run the drill fast enough to cut the plastic and no faster. Trying to use a high speed can melt the plastic and lead to a messy installation. When you are drilling, make sure you keep the drill perpendicular to the bodywork. If you let the hole saw cut at an angle, youll end up with a oval hole with a large gap on parts of the frame slider. Similarly, if the panel makes any radical curves (as the top of this R6 panel does), you may want to angle the hole saw back toward the center of the cut when youre going through the curved portion. This will help keep the hole round as it cuts through the plastics bend. 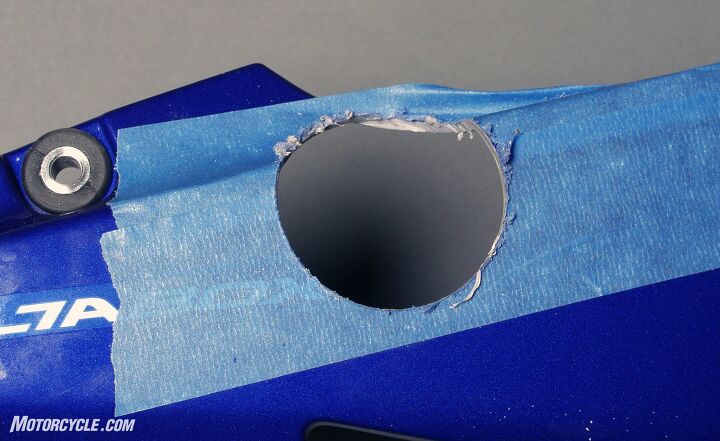 Covering the bodywork with tape and drilling from the outside makes the part of the hole that others will see much cleaner. Covering the bodywork with tape and drilling from the outside makes the part of the hole that others will see much cleaner.Remove the tape. Clean off the plastic burrs with a knife. If any rough spots remain use a file or a rotary tool (again at a low speed) to finish neatening up the holes edges. Temporarily mount the bodywork and the slider to see if the hole lines up perfectly. If you were careful, everything should be in line. However, if the space is too tight on one side, you can grind away more of the plastic with the rotary tool. Apply blue Loctite to the bolt threads and torque the frame slider in place. If youve got factory touch-up paint, a quick application can help make the inside of the hole disappear. You can also do this with a Sharpie for standard colors like blue, black or red, but check the color on an inconspicuous place first. 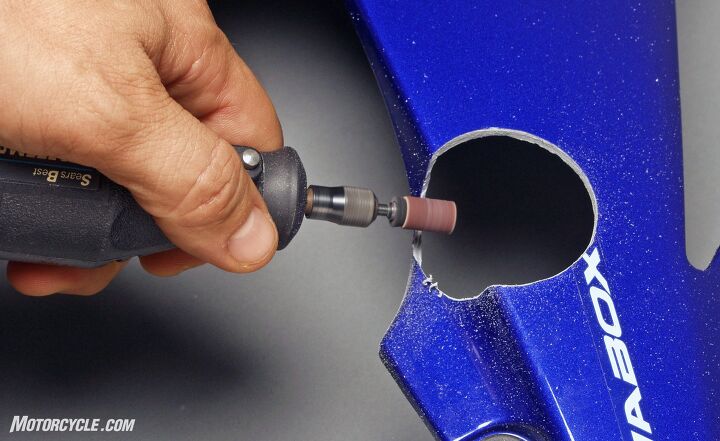 Clean up any rough edges with a rotary tool or a file. Work slowly. You dont want to melt or crack the plastic. Clean up any rough edges with a rotary tool or a file. Work slowly. You dont want to melt or crack the plastic.Once everything is remounted and in position, you can add the finishing touch to black frame sliders by giving the silver bolts inside the plastic pucks a spritz of flat black paint. This way there will be nothing bright to draw the eye to the slider. Instead, it will hide in plain sight. Careful measuring and drilling will give you a hole that has an equal distance on all sides of the slider.[This article was adapted from Evans Brasfields book 101 Sportbike Performance Projects. Learn more about it here. Read the MO review here.] MO Wrenching: How To Install Frame Sliders appeared first on Motorcycle.com. Click here for full story...
__________________________________________________
I'm a bot. I don't need no stinkin' signature... |

|

|
 |
 Similar Threads
|
||||
| Thread | Thread Starter | Forum | Replies | Last Post |
| Streetbikes Unlimited Frame Sliders Install????? | jboyd12 | 2008 - 2012 Ninja 250R Tech Talk | 3 | July 1st, 2012 12:50 PM |
| Frame sliders - Install Help | BenBris | 2008 - 2012 Ninja 250R Tech Talk | 5 | May 23rd, 2012 06:51 PM |
| Easiest Frame Sliders to Install? | ajcadoo | 2008 - 2012 Ninja 250R Tech Talk | 4 | February 22nd, 2012 12:30 AM |
| Frame sliders install | nixthewiz | 2008 - 2012 Ninja 250R Tech Talk | 1 | October 28th, 2011 10:23 AM |
| Remove fairing and install generic frame sliders for my sister to practice... | CZroe | 2008 - 2012 Ninja 250R Tech Talk | 8 | January 23rd, 2011 11:39 PM |
|
|


