
|
 August 17th, 2009, 05:51 PM
|
#1 |
|
ninjette.org member
Name: Michael
Location: Texas
Join Date: Feb 2009 Motorcycle(s): 08 Ninja 250R Posts: 112
|
DIY: Exhaust Hanger (no welding)
I decided to make my own exhaust hanger so I could get rid of my pass pegs. It dosnt look the best but it only came out to $5!
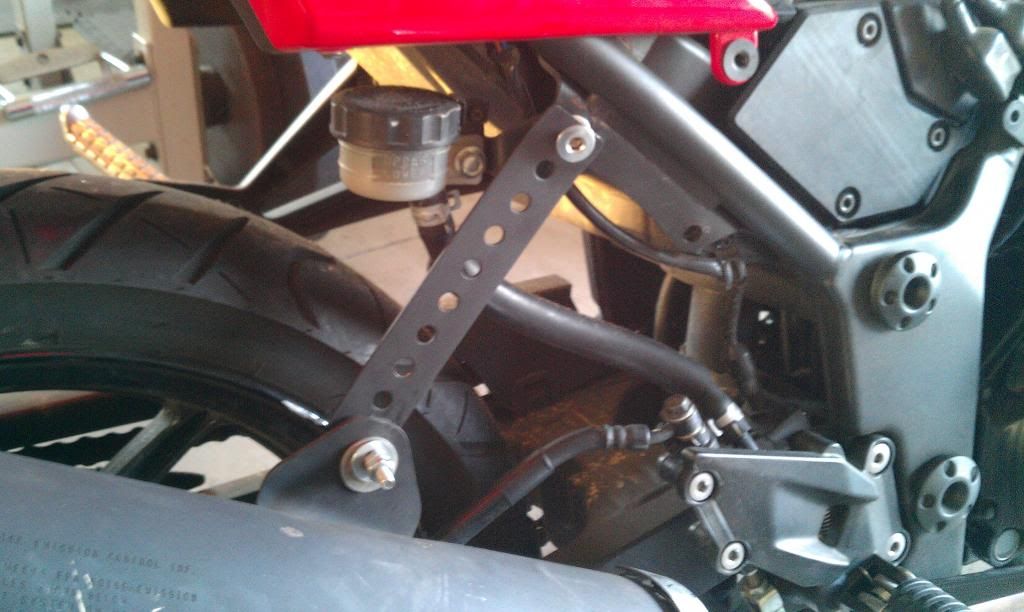
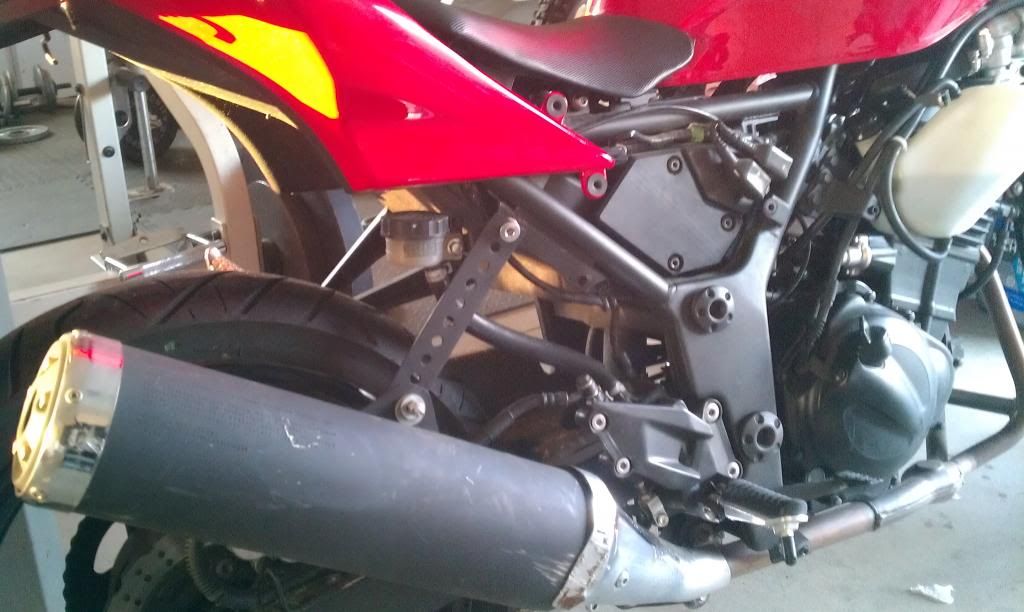
 First I would just like to say I havn't had this long so Im not sure its bullet proof if you can afford it I would just buy Zartans. Anyway here are the things you will need. First I would just like to say I havn't had this long so Im not sure its bullet proof if you can afford it I would just buy Zartans. Anyway here are the things you will need. 1. Flat punched zinc plated metal brace which I bought at Home Depot for about $5. (size states 1-3/8" x 36") 2. Good Hacksaw 3.Original bolts and pegs (and paint if you want to paint it).  First you will need to remove your orignal pass pegs which has all ready been covered by Kelly in another DIY. I measured the pieces I wanted to cut but I didnt write down the measurements but all you have to do is using the hacksaw cut one strip with 10 holes and one strip with 11 holes. simple   Loosely bolt the bracket with 11 holes on the thread towards the front of the bike. You will also need to put 1 or 2 washers behind the bracket to bring it foward a little. I will discuss it later.  Next loosely bolt the bracket with 10 holes on the other side with washers.  Now this is the slightly tricky part. As you can see the brackets are flat and do not bend foward to the exhaust like most hanger do. Get your right pass peg (exhaust side) and pull out the bushings in side the bolt hole. we will use these as spacers.  Now the last holes of the bracket should line up. Place your long exhaust bolt through your clamp then place the bushing in between the clamp and bracket and loosely tighten. I used one original bushing (black) and the one that came with my exhaust (silver). The purpose is to keep the brackets and exhaust from being pulled together since the brackets are flat.    Once you have test fit it and tweaked it where it will fit just paint and your done. I used hi temp flat black.  Finished! Look mine has circles like Zartans!     Sorry for the blurry pics. Im not sure if this will work with the stock exhaust but the holes lined up very close the original but my exhaust bracket is movable. Like i said not the best but seems to hold fine so far and it was only 5 bucks. Last futzed with by Shift250R; August 17th, 2009 at 10:36 PM. |

|

|
|
August 17th, 2009, 10:52 PM
|
#2 |
|
ninjette.org member
Name: Nick
Location: SALT LAKE CITY, UT
Join Date: Jun 2009 Motorcycle(s): Red '08 250 Posts: 233
|
Looks good! i wanted to get rid of my passenger pegs but I was worried about this
|
|
|
|
|
August 17th, 2009, 10:57 PM
|
#3 |
|
ninjette.org guru
Name: Dan
Location: Chicago, il....
Join Date: Jun 2009 Motorcycle(s): 2007 Suzuki GSX-R750 Posts: 378
|
Nice job man, it actually looks pretty decent when painted..
Did you use the same paint, to do the heat shield?? |
|
|
|
|
August 18th, 2009, 05:24 AM
|
#4 |
|
Pedal Power
Name: Rob
Location: Winterpeg (Winnipeg)
Join Date: Jun 2009 Motorcycle(s): 2008 Ninja EX250R Posts: 401
|
WOW that looks great after it is painted, at first I thought that there is probably a lot nicer things you could have used, but that looks great once done.
The only thing I would have done differently was to cut them a little bit longer (extra 1/8" or at the bottom of the hole that is being cut off) and round the metal off so there is no sharp corners. Once again, awesome mod, gonna have to do that to mine when I get it back
__________________________________________________
Using Pedal Power |
|
|
|
|
August 18th, 2009, 08:58 AM
|
#5 |
|
ninjette.org member
Name: Michael
Location: Texas
Join Date: Feb 2009 Motorcycle(s): 08 Ninja 250R Posts: 112
|
Thanks guys but ya I used the same paint for my heat shield and that has lasted months with no fading or chips. I thought about cutting the corners and then grinding the edges but I got to carried away with how it was coming together and I forgot. Ill probably do it later.
|
|
|
|
|
August 18th, 2009, 09:49 AM
|
#6 | |
|
Pedal Power
Name: Rob
Location: Winterpeg (Winnipeg)
Join Date: Jun 2009 Motorcycle(s): 2008 Ninja EX250R Posts: 401
|
Quote:
__________________________________________________
Using Pedal Power |
|
|
|
|
|
August 18th, 2009, 03:12 PM
|
#7 |
|
ninjette.org guru
Name: Tor
Location: TX
Join Date: Dec 2008 Motorcycle(s): 09 250r (*sold*), 2010 Daytona 675 Posts: 301
|
lmao, that is an awesome idea!
Very clever and doesn't look half bad at all for only $5. Cool stuff man.
|
|
|
|
|
July 9th, 2010, 11:27 AM
|
#8 |
|
ninjette.org member
Name: Colin
Location: Ottawa
Join Date: Jun 2010 Motorcycle(s): 2008 ninja 250 Posts: 168
|
I did this to my bike! Thanks alot!!! Great tutorial!
|
|
|
|
|
September 8th, 2011, 05:12 PM
|
#9 |
|
ninjette.org member
Name: Dave
Location: DFW, US
Join Date: Mar 2010 Motorcycle(s): 2008 Ninja TwoFiddy Posts: 160
|
Nice work!
|
|
|
|
|
September 8th, 2011, 07:02 PM
|
#10 |
|
Ridin Dirty
Name: Ed
Location: Delaware
Join Date: Jun 2011 Motorcycle(s): 2011 white se 250r , 2008 zx6R Posts: 921
|
looks good black! nice.. i eliminated my rear foot peg bracket completely and just mounted the exhaust hanger off one of the rear set bolts then off the exhaust clamp were the slip on meets the head pipe, you look at my bike it doesnt even look like anything is supporting my exhaust.
__________________________________________________
#1 |
|
|
|
|
September 8th, 2011, 08:24 PM
|
#11 | |
|
ninjette.org member
Name: Dave
Location: DFW, US
Join Date: Mar 2010 Motorcycle(s): 2008 Ninja TwoFiddy Posts: 160
|
Pic plz...
Quote:
|
|
|
|
|
|
September 8th, 2011, 08:44 PM
|
#12 |
|
ninjette.org member
Name: nick
Location: Twin Cities, MN
Join Date: Jun 2010 Motorcycle(s): ninja 250 Posts: 168
|

|
|
|
|
|
September 9th, 2011, 01:08 AM
|
#13 |
|
Milkshake Drinker
Name: Skippii
Location: Richmond, Va
Join Date: Aug 2011 Motorcycle(s): 2007 Orange DRZ400-S, 2005 Ninja 250 & Custom Thundercunt Dirt Chopper Posts: A lot.
|
I followed your instructions exactly, but it still doesn't work!!!

__________________________________________________
"What a sweetheart."- ninja_sleeper to me |
|
|
|
|
September 9th, 2011, 04:28 AM
|
#14 |
|
CPT Falcon
Name: J.Emmett Turner
Location: Newnan, GA
Join Date: Apr 2009 Motorcycle(s): '08 CP Blue EX250J, '97 unpainted EX250F, 2nd '97 unpainted EX250F (no engine), '07 black EX250F Posts: A lot.
|
Jeff left me with some of this stuff after we used it to mount my plate but then I gave him my high-temp black paint XD
|
|
|
|
|
September 10th, 2011, 08:33 PM
|
#15 | |
|
Ridin Dirty
Name: Ed
Location: Delaware
Join Date: Jun 2011 Motorcycle(s): 2011 white se 250r , 2008 zx6R Posts: 921
|
Quote:
__________________________________________________
#1 |
|
|
|
|
|
September 10th, 2011, 09:08 PM
|
#16 |
|
ninjaknobs
Name: Lee
Location: thousand oaks, california
Join Date: Oct 2010 Motorcycle(s): 2010 Kawasaki Ninja 250r Posts: 34
|
exhaust hanger for sale on ebay
http://cgi.ebay.com/ebaymotors/_W0QQ...Q3aMESELXQ3aIT
check out my listing for a custom aluminum black anodized exhaust hanger |
|
|
|
|
September 11th, 2011, 12:27 AM
|
#17 | |
|
ninjette.org member
Name: nick
Location: Twin Cities, MN
Join Date: Jun 2010 Motorcycle(s): ninja 250 Posts: 168
|
Quote:
|
|
|
|
|
|
September 11th, 2011, 09:57 AM
|
#18 |
|
Ridin Dirty
Name: Ed
Location: Delaware
Join Date: Jun 2011 Motorcycle(s): 2011 white se 250r , 2008 zx6R Posts: 921
|
mine was just a simple pc of steel i found at work..lol! i drilled 2 holes in each end, one mounts to the rear set bracket, the other on the end of the exhaust clamp. works perfect. painted it with wrinkle finish high heat paint. barely tell its there
 cost..free basically ! cost..free basically !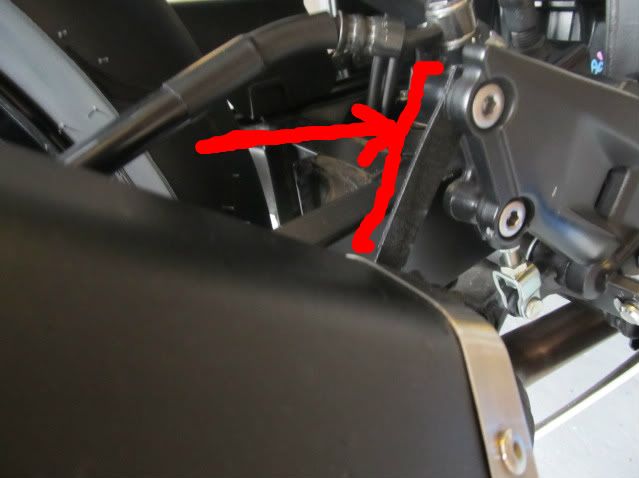 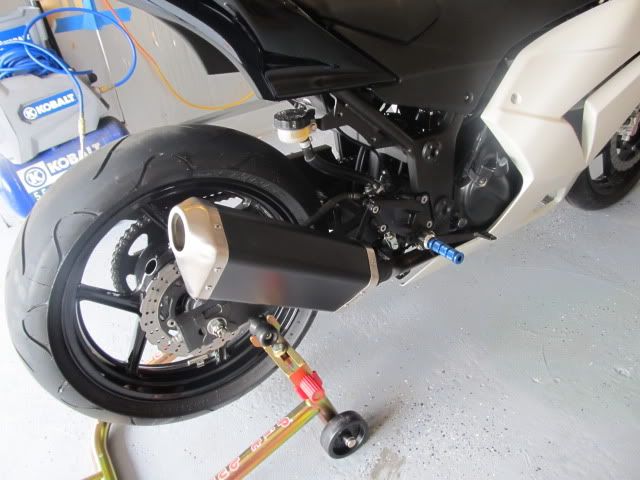
__________________________________________________
#1 |
|
|
|
|
September 11th, 2011, 11:31 AM
|
#19 |
|
CPT Falcon
Name: J.Emmett Turner
Location: Newnan, GA
Join Date: Apr 2009 Motorcycle(s): '08 CP Blue EX250J, '97 unpainted EX250F, 2nd '97 unpainted EX250F (no engine), '07 black EX250F Posts: A lot.
|
It already has support there (the pipe). You need to support it farther back to lower the force on the pipe and your mount. It really isn't doing the same amount of stabilization and protection as the original mount.
|
|
|
|
|
September 11th, 2011, 01:03 PM
|
#20 |
|
Ridin Dirty
Name: Ed
Location: Delaware
Join Date: Jun 2011 Motorcycle(s): 2011 white se 250r , 2008 zx6R Posts: 921
|
well my pipe isnt stock.. its a area p with dan moto slip on .. so the original support doesnt work. so this bracket is the only support for the exhaust, trust me it works. would definitely work on stock exhaust with aftermarket slipon.. my exhaust doesnt move and ive had it installed for about 1k miles with no issues
__________________________________________________
#1 |
|
|
|
|
September 12th, 2011, 07:29 AM
|
#21 |
|
DUCEATR
Name: Dan
Location: El Paso, Texas
Join Date: Apr 2011 Motorcycle(s): RVT1000R Posts: 628
|
Nice work. I made one using barstock steel and I drilled it and bent it just like the ones you can buy. I then finally made one out of aluminum doing the same thing. Works great and I only needed one hanger.
__________________________________________________
2001 SP1 RC51- #62 -Akrapovic Ti, PCIII, Colin Edward's first baby tooth, Honda Racing sticker, some Japanese doods best attempt at Engrish scribbled on my engine block, little touch of soul. |
|
|
|
|
August 26th, 2012, 06:09 PM
|
#22 | |
|
n00b
Name: Alli
Location: Stevens Point, WI
Join Date: Sep 2011 Motorcycle(s): 2012 Ninja 250, 2000 Ninja 250 Posts: 1
|
Quote:
|
|
|
|
|
|
August 26th, 2012, 06:14 PM
|
#23 | |
|
ninjette.org certified postwhore
Name: .
Location: .
Join Date: Feb 2011 Motorcycle(s): . Posts: Too much.
MOTM - Feb '13, Feb '14
|
Quote:
|
|
|
|
|
|
September 4th, 2012, 06:18 PM
|
#24 |
|
ninjette.org member
Name: Amy
Location: PA
Join Date: Mar 2012 Motorcycle(s): 2009 Ninja 250R EFI Posts: 58
|
did this as well.
i can cut two more pieces with what i have leftover if anyone is interested.   |
|
|
|
|
September 5th, 2012, 04:28 AM
|
#25 |
|
The A Team
Name: Aufitt
Location: Western Australia
Join Date: Aug 2012 Motorcycle(s): Z50, CB125, RZ500, MC22, R3. Posts: 394
|
I made one up for my cbr from 3mm alloy.
  Thread on making it here- http://www.cbr250.net/forum/cbr250-a...bracket-3.html |
|
|
|
|
September 5th, 2012, 04:49 AM
|
#26 |
|
ninjette.org member
Name: dennis
Location: swmo
Join Date: Mar 2012 Motorcycle(s): 2003 Honda Shadow, 2008 ninja 250 Posts: 237
|
it looks like it was built using knex pieces. Not horrible when painted but not my cup of tea. As a metal fabricator I would have to make some extreme mount if i decided to make a new one but for now ive just got the rear pegs taken off.
|
|
|
|
|
September 5th, 2012, 04:58 AM
|
#27 | |
|
The A Team
Name: Aufitt
Location: Western Australia
Join Date: Aug 2012 Motorcycle(s): Z50, CB125, RZ500, MC22, R3. Posts: 394
|
Quote:
|
|
|
|
|
|
September 6th, 2012, 12:00 PM
|
#28 | |
|
ninjette.org certified postwhore
Name: .
Location: .
Join Date: Feb 2011 Motorcycle(s): . Posts: Too much.
MOTM - Feb '13, Feb '14
|
Quote:
|
|
|
|
|
|
September 6th, 2012, 12:34 PM
|
#29 | |
|
wat
Name: wat
Location: tustin/long beach
Join Date: Sep 2009 Motorcycle(s): wat Posts: Too much.
Blog Entries: 5
MOTM - Oct '12, Feb '14
|
Quote:
__________________________________________________
  
|
|
|
|
|
|
September 6th, 2012, 06:37 PM
|
#30 |
|
The A Team
Name: Aufitt
Location: Western Australia
Join Date: Aug 2012 Motorcycle(s): Z50, CB125, RZ500, MC22, R3. Posts: 394
|
I'll make one up for the 2013 Ninja when it arrives here and the Akrapovic goes on.
|
|
|
|
|
January 12th, 2013, 08:07 PM
|
#31 |
|
ninjette.org newbie
Name: Taylor
Location: Yosemite
Join Date: Jan 2013 Motorcycle(s): 2010 Ninja 250r Red and another 2010 Ninja 250r Red Posts: 6
|
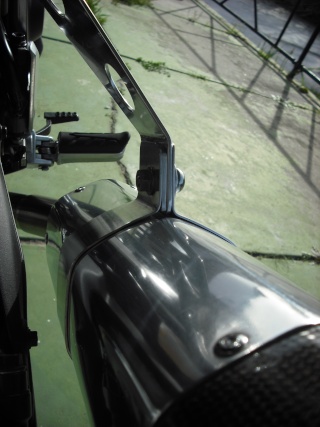
Okay, This literally took me 30 minutes to cut/file/paint and install on the bike. Nothing better than saving 90% on a motorcycle part.
  IMAG0324.jpg IMAG0323.jpg |
|
|
|
|
January 12th, 2013, 08:09 PM
|
#32 |
|
ninjette.org newbie
Name: Taylor
Location: Yosemite
Join Date: Jan 2013 Motorcycle(s): 2010 Ninja 250r Red and another 2010 Ninja 250r Red Posts: 6
|
Just wanted to make sure it would fit. Now I am going to paint the screws, nuts, and washers flat Black. Should be just fine.
This will hold me over until I get a Two Bros. Exhaust
|
|
|
|
 |
 Similar Threads
|
||||
| Thread | Thread Starter | Forum | Replies | Last Post |
| DIY exhaust hanger, real nice!! | subxero | 2008 - 2012 Ninja 250R Farkles | 3 | April 14th, 2014 11:23 AM |
| DIY- Installing Zartan's Exhaust Hanger | kkim | 2008 - 2012 Ninja 250R Farkles | 45 | April 26th, 2011 06:43 PM |
| DIY- AP Exhaust Hanger | kkim | 2008 - 2012 Ninja 250R Farkles | 12 | June 18th, 2010 12:39 PM |
| DIY: Evotech Exhaust Hanger | schneider_11 | 2008 - 2012 Ninja 250R Farkles | 7 | May 22nd, 2010 01:42 PM |
| Exhaust Hanger | kevsninja | 2008 - 2012 Ninja 250R Farkles | 13 | March 7th, 2010 10:42 PM |
|
|


