
|
 April 5th, 2013, 02:17 PM
|
#81 |
|
ninjette.org guru
Name: Scott
Location: Buffalo, NY
Join Date: Mar 2012 Motorcycle(s): 2008 Ninja 250R Posts: 257
|
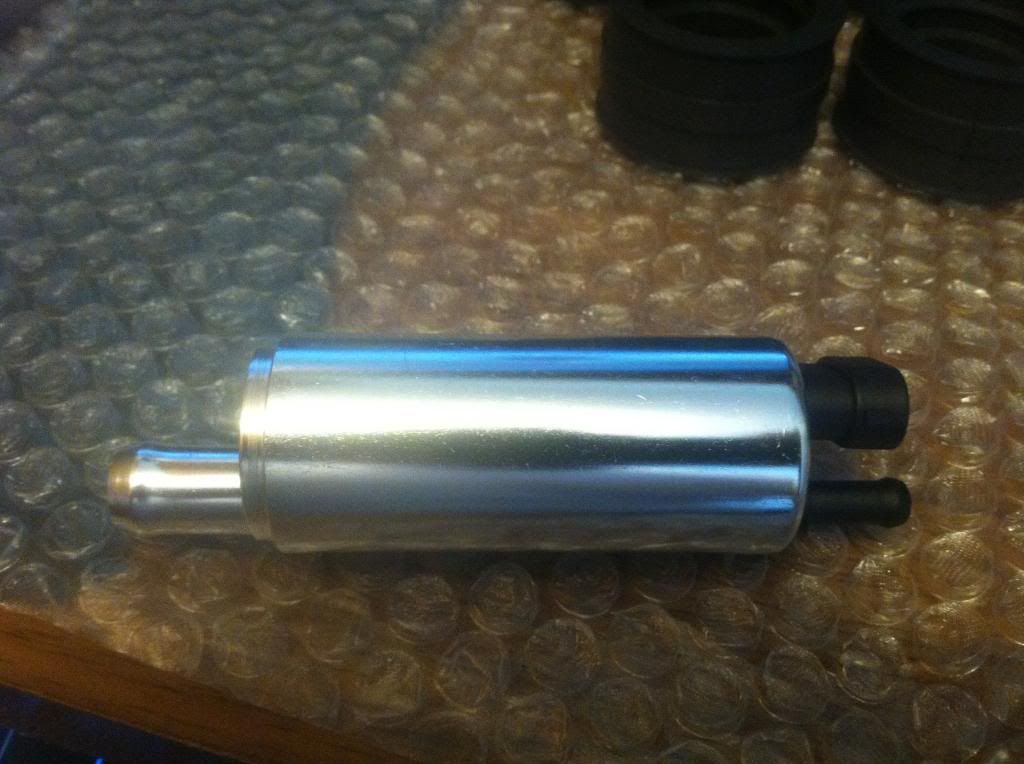
quick question tho, the fuel pump that's included is different than the one in the picture. it only has two outlets. One on the top and one on the bottom along with the + and - plug connection. Is it the correct pump? Shouldn't it have the inlet, outlet, and bubbler?
|

|

|
|
April 5th, 2013, 05:03 PM
|
#82 | |
|
ninjette.org certified postwhore
Name: D
Location: Palm Beach, FL
Join Date: Oct 2010 Motorcycle(s): 2006 Ninja 250R, 2007 EFI Ninja 250R Posts: A lot.
Blog Entries: 1
|
Quote:
__________________________________________________
My Ninja Blog  Proud member of ABATE.My NYC Road Rage documentary - CENSORED! |
|
|
|
|
|
April 5th, 2013, 05:34 PM
|
#83 |
|
ninjette.org guru
Name: Scott
Location: Buffalo, NY
Join Date: Mar 2012 Motorcycle(s): 2008 Ninja 250R Posts: 257
|
Yeah Im not sure. I was waiting for a response from ecotrons on here to see what the difference is. I haven't emailed then yet about it. Gotta wait till I get home later
|
|
|
|
|
April 5th, 2013, 06:45 PM
|
#84 | |
|
ninjette.org certified postwhore
Name: D
Location: Palm Beach, FL
Join Date: Oct 2010 Motorcycle(s): 2006 Ninja 250R, 2007 EFI Ninja 250R Posts: A lot.
Blog Entries: 1
|
Quote:
__________________________________________________
My Ninja Blog Proud member of ABATE.My NYC Road Rage documentary - CENSORED! |
|
|
|
|
|
April 6th, 2013, 06:58 AM
|
#85 | |
|
ninjette.org guru
Name: Scott
Location: Buffalo, NY
Join Date: Mar 2012 Motorcycle(s): 2008 Ninja 250R Posts: 257
|
Quote:
|
|
|
|
|
|
April 6th, 2013, 07:51 AM
|
#86 | |
|
ninjette.org certified postwhore
Name: D
Location: Palm Beach, FL
Join Date: Oct 2010 Motorcycle(s): 2006 Ninja 250R, 2007 EFI Ninja 250R Posts: A lot.
Blog Entries: 1
|
Quote:
What are the port sizes on the new fuel pump? One looks a lot bigger than the other.
__________________________________________________
My Ninja Blog Proud member of ABATE.My NYC Road Rage documentary - CENSORED! |
|
|
|
|
|
April 6th, 2013, 08:19 AM
|
#87 |
|
ninjette.org guru
Name: Scott
Location: Buffalo, NY
Join Date: Mar 2012 Motorcycle(s): 2008 Ninja 250R Posts: 257
|
I don't have a caliper like you have, but the black inlet near the power connections looks the same size as you had. The 6mm. But the other side looks 2-3 times bigger. I'd say 1/2" or something
|
|
|
|
|
April 6th, 2013, 08:33 AM
|
#88 |
|
ninjette.org sage
Name: Byron
Location: Reno, NV
Join Date: Dec 2011 Motorcycle(s): Ninja ex250 1990 Posts: 761
|
well the kit does keep getting better. So not surprised they upgraded the pump and connections. Looks awesome. Wish I had that pump :P. Wonder what else they updated. Excited for the new guys in the group buy, looks like the install will be even easier.
__________________________________________________
1990 250F. ex300 motor swap, 15/42 gearing, flush side markers, newgen intergrated front fairing, rear integrated turn signals, DB Touring Bubble, zx600 rear shock, Custom DanMoto Exhaust |
|
|
|
|
April 6th, 2013, 08:36 AM
|
#89 | |
|
ninjette.org certified postwhore
Name: D
Location: Palm Beach, FL
Join Date: Oct 2010 Motorcycle(s): 2006 Ninja 250R, 2007 EFI Ninja 250R Posts: A lot.
Blog Entries: 1
|
Quote:
__________________________________________________
My Ninja Blog Proud member of ABATE.My NYC Road Rage documentary - CENSORED! |
|
|
|
|
|
April 6th, 2013, 08:39 AM
|
#90 | |
|
ninjette.org sage
Name: Byron
Location: Reno, NV
Join Date: Dec 2011 Motorcycle(s): Ninja ex250 1990 Posts: 761
|
Quote:

__________________________________________________
1990 250F. ex300 motor swap, 15/42 gearing, flush side markers, newgen intergrated front fairing, rear integrated turn signals, DB Touring Bubble, zx600 rear shock, Custom DanMoto Exhaust |
|
|
|
|
|
April 9th, 2013, 12:36 PM
|
#91 |
|
ninjette.org member
Name: Phil
Location: Weatherford, OK
Join Date: Nov 2012 Motorcycle(s): 2009 ninja 250R more awesome SE Posts: 108
|
It comes with a two inch long piece of fuel hose with barbed end to connect the fuel rail on the outlet of the pump. I think I said that right. I know for sure that it's an adapter. Wish I had a camera. I still kind of wondering about the bubble line.
|
|
|
|
|
April 9th, 2013, 02:01 PM
|
#92 |
|
ninjette.org member
Name: Matt
Location: MI
Join Date: Jul 2011 Motorcycle(s): Ninja 250 Posts: 169
|
New fuel pump connection: see below pictures.
The new fuel pump combines the inlet and bubble port together, the bubble is supposed to be pushed back to inlet, and hopefully float back to the fuel filter. This is why the inlet is much bigger than the outlet. This simplifies the structure of the pump, and hopefully more reliable mechanically. To make sure about this, the fuel pump is better to be positioned so that the outlet is a little lower than the inlet. it can be even vertical positioned as the outlet at the bottom. In case you have other questions, I will try to answer as quickly as I can. |
|
|
|
|
April 11th, 2013, 07:02 AM
|
#93 |
|
ninjette.org guru
Name: Scott
Location: Buffalo, NY
Join Date: Mar 2012 Motorcycle(s): 2008 Ninja 250R Posts: 257
|
@ecotrons @n4mwd @choneofakind @drphils87 @EMSRacer07
Just to ask, i want to get an answer to see if i have this correct. Tagged a few of you to make sure you see it and maybe get a common answer/agreement between you all. It goes: 1. Tank -> Filter (possibly close to the tank as you suggested @n4mwd?) -> Pump -> Then it Y's off to the 1. Regulator -> Tank Return / 2. The other side of the Y goes to the Fuel Rail. Does that mean i should just plug/put the test port in the other side of the fuel rail? 2. Or instead of using the Y, go directly into the fuel rail after the Pump and use the other side of the rail as @n4mwd did in his video and send that to the regulator and THEN back to the tank? If i have the whole flow of it in my head correctly, then my 2nd train of thought should work since the bubbles shouldn't go past the pump into the fuel rail. As long as i keep the inlet side higher than the outlet along with a constant upwards slant to the tank before the pump. The slant shouldn't matter after the pump. So in theory that way should work correct? Since there's no bubbler outlet, it simplifies/eliminates routing of hoses. It actually makes it a lot easier in comparison to looks even when you see @n4mwd 's final product to what i believe i can see in my head. So any responses would be wonderful lol i knew i'd have a bunch of questions even with all the research i did beforehand. Thanks guys. |
|
|
|
|
April 11th, 2013, 08:21 AM
|
#94 | |
|
ninjette.org certified postwhore
Name: D
Location: Palm Beach, FL
Join Date: Oct 2010 Motorcycle(s): 2006 Ninja 250R, 2007 EFI Ninja 250R Posts: A lot.
Blog Entries: 1
|
Quote:
With a pass through fuel rail (like in the video), bubbles in the fuel rail are forcefully blown back into the tank. They cannot accumulate in the fuel rail. The fuel pump needs to be tilted so the outlet is lower than the inlet and also the outlet needs to be on the left side of the bike. This way when you put the kickstand down, you aren't tilting it back the other way. The large inlet tube should not be zip-tied to the new fuel pump - it needs to slant the other way. Whether the new fuel pump design is better than the old one remains to be proven. The old one had more plumbing required, but it was simpler in terms of proper routing. I think if I had one of the new pumps I would use the large tubing all the way to the filter and then reduce it at the last minute. Also, in the video I used a smaller filter because the pump inlet was smaller. With the new pump, I would just use the filter in the kit which is 5/16" I think.
__________________________________________________
My Ninja Blog Proud member of ABATE.My NYC Road Rage documentary - CENSORED! |
|
|
|
|
|
April 11th, 2013, 08:33 AM
|
#95 | |
|
ninjette.org sage
Name: Byron
Location: Reno, NV
Join Date: Dec 2011 Motorcycle(s): Ninja ex250 1990 Posts: 761
|
Quote:
Post pics of the rail and all the components so we can get a bigger picture of what was changed.
__________________________________________________
1990 250F. ex300 motor swap, 15/42 gearing, flush side markers, newgen intergrated front fairing, rear integrated turn signals, DB Touring Bubble, zx600 rear shock, Custom DanMoto Exhaust |
|
|
|
|
|
April 11th, 2013, 12:51 PM
|
#96 |
|
ninjette.org guru
Name: Scott
Location: Buffalo, NY
Join Date: Mar 2012 Motorcycle(s): 2008 Ninja 250R Posts: 257
|
The fuel rail hasn't changed. The only thing that differs from the previous kit is the fuel pump. If you still want me to post pictures tho I can
|
|
|
|
|
April 11th, 2013, 02:38 PM
|
#97 | |
|
ninjette.org sage
Name: Byron
Location: Reno, NV
Join Date: Dec 2011 Motorcycle(s): Ninja ex250 1990 Posts: 761
|
Quote:
Tank>filter> pump>fuel rail> pressure regulator> back to tank Hmm wonder why he posted that pic, could of been a general pic for another bike. Ecotrons does do universal kits and kits for other bikes so u can probably disregard that pic but I would ask Matt would he would suggest.
__________________________________________________
1990 250F. ex300 motor swap, 15/42 gearing, flush side markers, newgen intergrated front fairing, rear integrated turn signals, DB Touring Bubble, zx600 rear shock, Custom DanMoto Exhaust |
|
|
|
|
|
April 12th, 2013, 10:47 AM
|
#99 |
|
ninjette.org member
Name: Matt
Location: MI
Join Date: Jul 2011 Motorcycle(s): Ninja 250 Posts: 169
|
sorry for the confusion, the previous picture is for the universal efi kit for scooter engines.
Here is the picture for Ninja 250 kit: |
|
|
|
|
April 13th, 2013, 11:41 PM
|
#100 |
|
ninjette.org member
Name: Phil
Location: Weatherford, OK
Join Date: Nov 2012 Motorcycle(s): 2009 ninja 250R more awesome SE Posts: 108
|
Work and school busy busy busy. So this sounds so simple to install. I don't have a choice anyway but I think I'm going to wait until your bike @Red250R is running until I even start mine. Well I've already made the brackets and pump holder so yeah I've started but yeah like I said this is my only vehicle. That and I'm STILL waiting for stuff I order almost two weeks ago to get here. That gasket maker just shipped yesterday. Unbelievable. That and the 1/4 double barbed elbows that I got in the mail were not 1/4. 1/4 inches is the diameter of the inside of the fitting right? because these that I have are 1/16. Or is it the case were 1/8 npt has a 3/8 diameter and I just ****ed myself again.

|
|
|
|
|
April 14th, 2013, 07:00 AM
|
#101 | |
|
ninjette.org certified postwhore
Name: D
Location: Palm Beach, FL
Join Date: Oct 2010 Motorcycle(s): 2006 Ninja 250R, 2007 EFI Ninja 250R Posts: A lot.
Blog Entries: 1
|
Quote:
The 1/4" barbed fittings are supposed to be 1/4" on the outside (smallest section not the barbed part). Brass, aluminum or stainless can be used for these. Plastic is too thick. What you need for the threaded fittings are 1/8" NPT threads. They also make a fitting called "1/8 x 1/4 barbed fitting" at Lowes that is backwards. It is 1/4" NPT x 1/8" barbed and that wont work so don't buy that. The barbed part is too small and the threaded part is too big. Here is a source for 1/4" barbed elbows if you can't find them at your local hardware store. Here is a place that looks promising, but I've never ordered from them before. They list in MIPS and FIPS which is the same as MNPT and FNPT respectively. 1/8" MNPT close nipple (also at Lowes) Brass 1/8" NPT Tee (also at Lowes) If you plan on skipping the test port for now, here is a plug to take its place temporarily. Or you can just use an elbow instead of a Tee. Sometimes ebay has the best prices on stuff. Here is a straight 1/4" barb to 1/8" NPT adapter. Compared to Amazon. But before you order anything, you need to check with your local hardware store, plumbing supply store, hydraulic supply store, and beverage supply store. EDIT: With the new fuel pump, you don't need the barbed tee because there is no bubbler line. You don't absolutely have to have barbed elbows, but they make everything a lot easier.
__________________________________________________
My Ninja Blog Proud member of ABATE.My NYC Road Rage documentary - CENSORED! |
|
|
|
|
|
April 14th, 2013, 05:29 PM
|
#102 |
|
ninjette.org guru
Name: Scott
Location: Buffalo, NY
Join Date: Mar 2012 Motorcycle(s): 2008 Ninja 250R Posts: 257
|
Yeah I went to like 5 different stores to find everything. I only had to order a couple pieces online. No biggie. It'll prolly be a week or so before I get it pieced together. Between working 3rd shift and class at night before work, it's hard to find time to sleep AND work on it. Not to mention it's been raining quite a bit here and I have no garage lol
|
|
|
|
|
April 15th, 2013, 06:28 PM
|
#103 |
|
ninjette.org member
Name: Phil
Location: Weatherford, OK
Join Date: Nov 2012 Motorcycle(s): 2009 ninja 250R more awesome SE Posts: 108
|
I got everything else at the only hardware store that is understocked in the small town that I live in. All the store didn't have was barbed elbows, gasket maker and some other things. It's gonna be a while before I do anything.
|
|
|
|
|
April 15th, 2013, 06:31 PM
|
#104 |
|
ninjette.org certified postwhore
Name: .
Location: .
Join Date: Feb 2011 Motorcycle(s): . Posts: Too much.
MOTM - Feb '13, Feb '14
|
Refresh my memory: what's the gasket maker for again?
|
|
|
|
|
April 15th, 2013, 07:07 PM
|
#105 | |
|
ninjette.org certified postwhore
Name: D
Location: Palm Beach, FL
Join Date: Oct 2010 Motorcycle(s): 2006 Ninja 250R, 2007 EFI Ninja 250R Posts: A lot.
Blog Entries: 1
|
Quote:
I'm really not all that crazy about the permatex because, although its gasoline resistant, its not alcohol resistant. So far it hasn't been a problem on my bike, but with congress talking about 15% ethanol in the gas coming soon, who knows? But, like I said, its the best I could find. EDIT: Here are some possibly local sources: Advance Auto Parts NAPA Walmart Most of those URLs allow you to check your local store inventory online to see if they carry it.
__________________________________________________
My Ninja Blog Proud member of ABATE.My NYC Road Rage documentary - CENSORED! |
|
|
|
|
|
April 15th, 2013, 07:51 PM
|
#106 | |||
|
ninjette.org member
Name: Phil
Location: Weatherford, OK
Join Date: Nov 2012 Motorcycle(s): 2009 ninja 250R more awesome SE Posts: 108
|
Quote:
Quote:
Quote:
|
|||
|
|
|
|
April 15th, 2013, 08:55 PM
|
#107 | |
|
ninjette.org certified postwhore
Name: .
Location: .
Join Date: Feb 2011 Motorcycle(s): . Posts: Too much.
MOTM - Feb '13, Feb '14
|
Quote:
...aaaaand http://www.ninjette.org/forums/showthread.php?t=9924 It's definitely not a pregen under the hood. |
|
|
|
|
|
April 15th, 2013, 10:20 PM
|
#108 |
|
ninjette.org guru
Name: Scott
Location: Buffalo, NY
Join Date: Mar 2012 Motorcycle(s): 2008 Ninja 250R Posts: 257
|
Are you saying we HAVE to do a valve adjustment for this?
|
|
|
|
|
April 15th, 2013, 10:29 PM
|
#109 |
|
ninjette.org member
Name: Phil
Location: Weatherford, OK
Join Date: Nov 2012 Motorcycle(s): 2009 ninja 250R more awesome SE Posts: 108
|
If it's around 7500 mile according to one of the posts he put there. I'm at 6500 so I might as well look at them at least while the tank is off.
|
|
|
|
|
April 15th, 2013, 10:36 PM
|
#110 |
|
ninjette.org guru
Name: Scott
Location: Buffalo, NY
Join Date: Mar 2012 Motorcycle(s): 2008 Ninja 250R Posts: 257
|
Ah alright. Cuz I'm at I think 7000 or close to it and I'm due for it soon but the DIY makes it look like a nightmare. I know my ****, but I also know a headache when I see one.
|
|
|
|
|
April 16th, 2013, 11:12 AM
|
#111 |
|
ninjette.org newbie
Name: Matt
Location: Jackson, mi
Join Date: Jun 2012 Motorcycle(s): 94 250, 07 solar yellow 500 Posts: 2
|
MPG gains, possible buyer
I just found this thread, is the group buy still open? Also, anyone have an idea of mpg gains? I was planning on doing this but now that the 300 is out I don't know. I'll have to compare the specs on both but I do know I enjoy my pregen and wanted to try EFI before the 300 came out. Too bad there wasn't a kit for the 500, I got a mint one last year.
|
|
|
|
|
April 16th, 2013, 11:37 AM
|
#112 | |
|
ninjette.org certified postwhore
Name: .
Location: .
Join Date: Feb 2011 Motorcycle(s): . Posts: Too much.
MOTM - Feb '13, Feb '14
|
Quote:
... With a little time, I'm sure you could retrofit one of Matt's kits to a 500. Ecotrons makes other size throttle bodies, and the software would be very similar to the 250 since the engines are both parallel twins. It wouldn't be a huge favor to ask Matt if he'd be willing to work with you and set up a kit for your 500. |
|
|
|
|
|
April 16th, 2013, 11:52 AM
|
#113 |
|
ninjette.org certified postwhore
Name: D
Location: Palm Beach, FL
Join Date: Oct 2010 Motorcycle(s): 2006 Ninja 250R, 2007 EFI Ninja 250R Posts: A lot.
Blog Entries: 1
|
The group buy is over and done with. You can contact ecotrons directly to see if he will let you in this late.
For a Ninja 500, the existing ecotrons TB wont work right because its too small. You might look into getting a TB for a 650 which might be exactly what you need. You'll still need some kind of reducers because the 500 is 34mm and the 650 is 38mm. Once you have that, it might be possible to adapt the rest of the kit.
__________________________________________________
My Ninja Blog Proud member of ABATE.My NYC Road Rage documentary - CENSORED! |
|
|
|
|
April 16th, 2013, 04:32 PM
|
#114 |
|
ninjette.org guru
Name: Scott
Location: Buffalo, NY
Join Date: Mar 2012 Motorcycle(s): 2008 Ninja 250R Posts: 257
|
|
|
|
|
|
April 16th, 2013, 05:24 PM
|
#115 |
|
ninjette.org certified postwhore
Name: D
Location: Palm Beach, FL
Join Date: Oct 2010 Motorcycle(s): 2006 Ninja 250R, 2007 EFI Ninja 250R Posts: A lot.
Blog Entries: 1
|
Chris, Did you upset Alex again?
__________________________________________________
My Ninja Blog Proud member of ABATE.My NYC Road Rage documentary - CENSORED! |
|
|
|
|
April 16th, 2013, 05:28 PM
|
#116 | ||
|
ninjette.org certified postwhore
Name: .
Location: .
Join Date: Feb 2011 Motorcycle(s): . Posts: Too much.
MOTM - Feb '13, Feb '14
|
Quote:
Quote:
No, that's me at greek week. Just thought it was a funny picture. It's on my facebook profile too. That's the one picture that the official ONU photographer got of me the entire week. I think he shy'd away from me after he knew I was going to make faces at him 
|
||
|
|
|
|
April 16th, 2013, 11:00 PM
|
#117 |
|
ninjette.org member
Name: Phil
Location: Weatherford, OK
Join Date: Nov 2012 Motorcycle(s): 2009 ninja 250R more awesome SE Posts: 108
|
That's like the first picture of an actual person I've seen on this sight.
|
|
|
|
|
April 17th, 2013, 06:33 AM
|
#118 |
|
ninjette.org certified postwhore
Name: .
Location: .
Join Date: Feb 2011 Motorcycle(s): . Posts: Too much.
MOTM - Feb '13, Feb '14
|
There's a few pictures of a few of us on here. You just have to know where to look
 Mostly we just have pictures of our beloved ninjettes. Mostly we just have pictures of our beloved ninjettes.
|
|
|
|
|
April 22nd, 2013, 03:00 PM
|
#119 |
|
ninjette.org member
Name: Phil
Location: Weatherford, OK
Join Date: Nov 2012 Motorcycle(s): 2009 ninja 250R more awesome SE Posts: 108
|
I kind of disappointed there wasn't a decal that came with it. Every other aftermarket thing I've got for this bike had a decal.
|
|
|
|
|
April 23rd, 2013, 07:00 AM
|
#120 |
|
ninjette.org member
Name: Matt
Location: MI
Join Date: Jul 2011 Motorcycle(s): Ninja 250 Posts: 169
|
Do you like this one? It's about half the letter size.
Anybody else wants it? Just need to cover the shipping cost. Later on, it can be included in the kit. Ask for it to be sure. |
|
|
|
 |
 Similar Threads
|
||||
| Thread | Thread Starter | Forum | Replies | Last Post |
| ECOTRONS EFI Kit Question | patriots21 | 2008 - 2012 Ninja 250R Tech Talk | 20 | October 3rd, 2015 09:19 AM |
| Ecotrons EFI (Fuel Injection) kit Group Buy: June 2013 | n4mwd | Motorcycle-related | 94 | October 12th, 2014 08:36 PM |
| Ecotrons EFI for ninja 250 (GROUP BUY) | ninja_thresh_hold | Motorcycle-related | 101 | March 4th, 2013 05:45 PM |
| Group Buy: EFI (Fuel Injection) Conversion Kit | Jiggles | Motorcycle-related | 874 | November 30th, 2012 04:54 AM |
|
|


