
|
 March 16th, 2011, 02:59 PM
|
#1 |
|
ninjette.org member
Name: Terry
Location: Euless, TX
Join Date: Dec 2010 Motorcycle(s): '09 Ninja 250R Posts: 43
|
DIY: Installation of the Givi HR-4 Monokey rack on the Ninjette.
Background: For the practical-minded among us, one of the weak points of the new-gen Ninja is the availability of hard luggage mounting solutions. A lot of people have found clever home-made ways to hang soft bags off both generations of Ninjette, but to my knowledge there is no major-manufacturer-built, U.S.-available hard luggage mounting system out there for the '08+. In Southeast Asia, however, Givi sells an HR-4 Monorack and accessory side racks for mounting Givi hard luggage to the back of the new-model Ninja 250. They introduced these products not long after the 2008 redesign. You can look at pictures, and read about some of these things (sometimes via Google translation, if you don't speak the local languages) here:
Home-brew mount for V35s in Indonesia HR4 review, Indonesia Phillipines forum thread with pictures of an HR4 and V46 on the Ninjette (halfway down) Givi Malaysia's product page for the main rack and side racks: Givi Malaysia - HR4 product page Givi Malaysia - SBX-401 sideracks for V35 cases Givi Malaysia - SB-435 sideracks for smaller cases Recently there was some discussion here and on another forum (forgot where exactly) about the availability of these products through Mr. Thitinan "Alvin" Sirisithichoke at thaimotorbox.com. Thai Motor Box's product page for the HR4 I don't know his exact position so I will say he's "Head Givi Guy" in Bangkok; I think he runs their authorized dealership there, and he does speak English, and is willing to ship to the United States. After some e-mail communication with him, and in consideration of my near-total lack of other acceptable options, I decided to order one of these rack systems from him. Here are the facts about ordering: - Arrangements are best made via e-mail to Alvin directly via his e-mail at the contact page: Thai Motor Box contact page - Final shipped price for me, from Bangkok to DFW, Texas, USA, for the Givi HR-4 rack and SBX-401 side racks, was $425.00 via Western Union. This may vary a bit due to exchange rate. Yes, it's expensive, due to shipping costs; no, it may not be worth it to you. I don't see myself buying a bigger bike with a domestically available luggage system anytime soon, and nobody has tried this solution yet that I can find, so I figured, what the heck... I'll take the plunge. I sent the money from the Western Union counter at a local grocery store and gave Alvin the Money Transfer Control Number. I think I got lucky with timing, in that my e-mail with the MTCN reached him first thing in the morning in Bangkok, because he shipped the rack within about six hours of me e-mailing him the number. - Shipping is via Thai EMS. Alvin provided a tracking number which was updated timely and told me accurately where everything was. Transit time should normally be about a week. Unfortunately the package was shipped on Jan. 29th; if you remember the weather in the U.S. at that time, you know that a couple of days later we experienced a series of country-crossing ice and snow storms that disrupted just about every form of transport. This was the situation only a couple of days after I ordered the rack:  According to the shipping papers on the box I received, the package left Thailand, passed through Hong Kong, arrived in Chicago, and then on to DFW via, I believe, China Air Cargo. I live within shouting distance of DFW and regularly drive the airport road which runs past the cargo terminals. The day after my tracking said the package had been flown from Chicago to DFW, I drove down that road and noticed that there were two CAC 747's unloading (there is usually only one) due to the weather-induced backlog. I'm pretty sure my package was on one of those planes. Unfortunately security would frown on me stopping at the fence and asking anybody at the terminal if they could get a box off the plane for me... So I had to wait for USPS to receive the package, not deliver it, and leave me a card that told me I had to drive to post office to get it, where I finally took it over the counter from an overworked-but-friendly Asian lady who was about as tall as the box was long. Here is the received box after unpacking. Alvin apparently just pulls the items off the shelf and sends them right to you, no muss, no fuss. The box was a little banged up but that's to be expected after being shipped across a quarter of the planet. Individual components were wrapped in Givi-logo bags and were laid loose in the box, and customs at any given point (or country) may or may not have gone through it, so things will get jumbled but there was no damage to components. Alvin did repack the SBX-401s into the HR4 box for me, so I was only waiting for one box.  Here are the parts as delivered - the HR4 rack and the SBX-401 side racks for V35s, and their respective small parts bags. I won't be installing the V35 racks right now, as I don't have V35 boxes and won't be purchasing them anytime soon. I bought the racks for future use.   Next are the "instructions". Givi is notorious for bad instructions, and keeping with tradition, these are just plain bad. Basically it's a parts diagram loosely illustrated with poor, out-of-date photographs. On the right side of the diagram page is the parts list. Unfortunately there are not many cues to help you link the list to the actual parts. Some things are obvious, like the bigger pieces, but to match up which screw type matched which number, I eventually realized that I should measure the length of each screw's threaded portion in millimeters and compare it to the "Part No." which actually describes the length of the threaded portion of the screws. Folks in the civilized world who use the Metric system may not face any confusion. There are also missing items from the instructions; the diagram doesn't show where you install #7 (the big M8 nylock nuts for the screws which secure the tail platform), and #16, the M6 nylock nuts, weren't included in the parts bag; I think they assumed that the bike's undertail screws are secured with M6 nuts that you can re-use. I had to buy those from a hardware store. I should note that Alvin did offer to answer any questions I had about installation, but I decided that I'd do my best to figure it out myself.  I eventually got the small parts sorted out in a compartmented art supply bin which I use for wrenching:  Here is a rough arrangement of how the major assemblies fit together.  Next post: Installation. |

|

|
|
March 16th, 2011, 03:37 PM
|
#2 |
|
ninjette.org member
Name: Terry
Location: Euless, TX
Join Date: Dec 2010 Motorcycle(s): '09 Ninja 250R Posts: 43
|
Now on to installation. I won't go through all the trials and tribulations, but I will just lay out the essential facts up front: this is an Italian-designed rack, manufactured in Malaysia, for a relatively low-cost Japanese bike built in Thailand. On my bike there were some flex-and-fitment issues, and it took three separate Sunday afternoons and a couple of trips to hardware stores to get everything all together. In retrospect I think the best thing to do would be to start by loosening the whole undertail and trying to put the whole rack on loose as a whole, to work out any fitment issues, and then lock everything down. I would also advise that if you have any electrical mods to do on the turn signals or tail lights, get those done first, since you'll be installing a fairly permanent structure into the tail compartment which might hinder any later activity in that area. I also can't say for sure whether this rack would be compatible with any of the tail tidy/fender eliminator kits out there, since it fits up into the stock undertail/fender system.
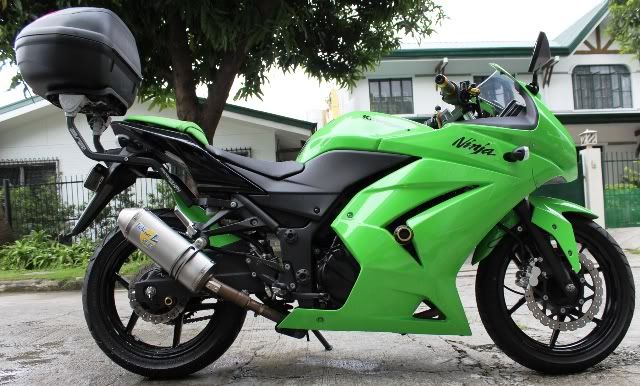
The tools I used should mostly be in your toolkit for working on a Metric bike already: - Nylon-headed jewelry hammer (helped with getting the cap pieces onto the rack's arms). - Chapman modular screwdriver system, metric hex bits of appropriate size, and mini-ratchet - I have this all in one little kit box. - Garden-variety ratcheting wrench with a driver extension and Metric hex sockets (helps with getting under the tail, holding down the nylock nuts, etc.). - M6 nylock nuts, and M6 and M8 washers, purchased separately for shimming, and to replace what didn't come with the kit. - Blue Loctite is optional, and I didn't really need my $20 Harbor Freight torque wrench, because it required a fair bit of effort to get all this together anyway. Here is your basic work space in the tail compartment. The little oblong bar will go across the frame ahead of the locking bar for the cowling/seat.  There are four screws (two shown here, on the right) which will be replaced by two types of long M6 screws that secure the handle-like lower rack support through the undertail, up into the tail compartment, and through the oblong piece. I will warn you up front that you should not do anything to endanger, lose, or damage the longest two coated stainless steel 90mm screws, as they are apparently a proprietary shape for this installaton; you can't get direct replacements at any average hardware store. Believe me, I looked.  This is your undertail workspace, and here is how the handle-shaped piece will be placed. The bottoms of the left-hand pair of undertail securing screws can be seen.  Now, this is where I ran into a LOT of trouble; the instructions seem to indicate that you should run the main, largest (90mm) M6 screws through the assemblies from the top down. This is WRONG, because you have to juggle a lot of fit issues at once. Aligning the 90mm screws through the top bar, the collars, then the frame, and the undertail, lower collars, handle piece, etc. while accomodating the routing of wiring all in one go is really not feasible.  I took a cue from a small photo I found on a Philippine forum and put them in from the bottom. The big screws go up through the "handle", then through stainless steel collars (this enables them to stand off from the turn signal wires)...  ...then they come up through the undertail, and into the big, thick, heavy, plastic-coated collars, which should be pre-set in such a way that they don't cramp the wires inside the tail compartment. One of the big hangups was the alignment of the undertail and fender pieces vs. the frame; I needed to apply pressure to the fender assembly to get things to line up right. This is why I say it would be best to completely unsecure the undertail/fender before test-fitting. The rubbing on the right collar piece is from where I spent a whole afternoon trying to get things done the previous incorrect way. Worse yet, the core of one of these black collars was bored out too small towards one end, and again, there is no direct replacement or equivalent for such a heavy-duty coated collar piece available from conventional sources (believe me again... I looked!). I eventually got the 90mm screw to bite through that collar with help from my friend Seňor Manuel Labor, but if had access to shop equipment I would have tried to use real machine-work to fix it.  Eventually I got the screws driven up through all the pieces, and the oblong plate, and then I capped them off with M6 nylock nuts and washers (purchased at Lowes because they should have been in the parts bag but weren't). This is the final arrangement of the installed handle piece. The strange wiring routing is due to the No-Cut Tail Light Modulator which, by the way, is a fantastic mod, especially in conjunction with a 2357LL tail-light bulb.  Here is the installed "handle" as seen from below.  After this, the arms were fairly easy, or at least the right side was. On the right it was very simple: take out one of the exhaust hanger screws, hold the standoff collar in place, line up the arm, and screw in the M8 screw with washers, then the other M8 screw into the arm/handle. Super easy, and I was feeling great, until I went to install the left one... There, I found that the arm's rear screw alignment with the handle piece was off by quite a bit. Argh! Rather than tear everything out and re-install, and against my better judgement, I made it work by wiggling things around and forcing it in stages. After I got all the screws reasonably well started in the two holes (which took a bit of pushing and pulling at both ends of the assembly) I had a hell of a time torquing down the left front screw, and it went in, but it didn't go in clean. It's done and fixed in place, but I'm a little apprehensive about ever taking it out again. Here are the arms in place with the platform-supporting cap assemblies installed. The lower caps are "cuffs" over the arm tops; inside the arm tops are holes which hold thick collar nuts. The collar nuts receive the M8 JCCB screws that secure the platform. The "cuffs" fit over the collar nuts (inside the arms) are designed to be a force fit, so make sure you have the collar nuts installed with their screw openings vertical, to receive the JCCB screws; if you put them in wrong, and then secure the cuff down over it, you'll probably never get it off again. Once the cuff is pressed down over the collar nut, you can use the JCCB screws like levers, rotating the collar nuts fore and back, to set the pitch of the platform caps. It's difficult to write but if you ever see the real thing, the arrangement is obvious.  Since I had removed my left passenger peg mount, I shimmed the resulting collar-to-arm gap with M8 washers from the hardware store. I measured that it would take five extra washers, based on the thickness of the passenger peg mount, and that turned out to be exactly right. If you have an aftermarket exhaust with a thinner, lighter-weight hanger on the right, you will also have to shim with a couple of washers on that side, but this is no big deal as everything secures well once it's lined up.  Platform, base pieces, and cuffs, secured with the M8 screws and big nylock nuts, seen from underneath.  Close-up of the cuff/base assembly. The upper base pieces have teeth which sit loose on top of the lower "cuffs", and they have (barely visible) index marks on the outside to help you set the pitch angle of the platform.  Here is the assembly order for installing the platform, seen from overhead: Inboard, a hex cap M8 screw through the platform, then washer, then through the inboard hole in the base piece, to be secured underneath by the bigger M8 nylock nuts. Outboard side is the JCCB screw which sits UNDER the platform (across from the washer) and goes through the base piece and the cuff piece, into the collar nut which is hidden inside the top of the arm and force-fit secured by the cuff.  Now another fitment issue peculiar to American bikes; the arms interfere with the standard positioning of the DOT reflector bar which is attached to the back of the license plate. Most people, I think, would take the opportunity to shed the reflectors, but I like to keep all stock components on my bike. In the end, all I had to do was flip the assembly inverted to be fitted on the lower license plate screws instead of the upper ones. Unfortunately the lower plate screws on my bike were horrible, corroded, torn-up philips-head pot-metal screws, so I replaced them with some new 16mm long socket-cap M6's, secured by wingnuts, just like the top screws.   Basic installation complete, with a Givi V46 mounted. I chose the V46 because judging by Google Image Search results, it seemed to be a popular choice on this rack overseas, and it wasn't too big, not too small, and the styling seemed pretty good. The rack and box don't spoil the lines of the bike quite as badly as you might expect, although IMO it does take a little bit away from the sporty, bigger-bike vibe that Kawasaki tried to breed into the '08 redesign. Maybe it tilts the overall aesthetic feel from "Ninjette" to "Super Scooter"?  
|
|
|
|
|
March 16th, 2011, 04:02 PM
|
#3 |
|
ninjette.org member
Name: Terry
Location: Euless, TX
Join Date: Dec 2010 Motorcycle(s): '09 Ninja 250R Posts: 43
|
And the verdict:
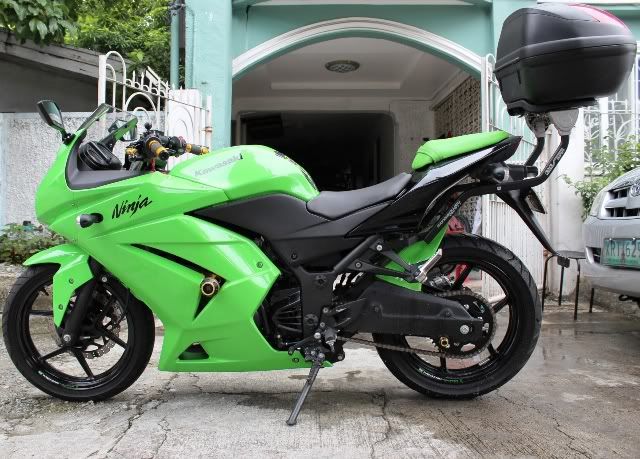
The overall mechanical feel of the installed rack is good and solid. I was worried that it might feel wobbly or cheap, but once secured, the undertail handle frame is absolutely rock-solid and while there is a tiny bit of natural up-and-down flex to those long side arms with the case installed, it's nothing worrisome. An illustration from my first local test run of the case. I found that it holds my XL-sized Shoei RF-1100 and Bags-Connection tank bag with, admittedly, an occasional small bit of difficulty in closing and latching. The latching system for the V46 is a little bit tricky to operate when the case is really full with helmet and bigger items; I probably need to take the document holder out. That should help. Locking the case to the platform is very solid and secure, with a "CLACK" loud enough to echo when I put the case on the rack in the morning before work.  Further along on my 135-mile test run. This is final config with inverted DOT reflectors installed, and some black and red Reflexite tape highlights added to the rack (as well as other parts of the bike).  About the Reflexite; I was concerned that the tail box and rack might obscure the tiny taillight on the bike from higher angles, so I added Reflexite SOLAS tape under the V46's transparencies (per a suggestion at ADVRider.com), and colored Reflexite V92 in other places.  The next day I went on a 420-mile round-trip from Dallas/Fort Worth to Austin and back, and then on the day following that I commuted to work carrying my (full) coffee pot, spare shoes and work clothes, breakfast, lunch, phone, brake disc lock, and other small items. In my opinion the rack and V46 have no effect on bike handling. If anything, it feels a little more stable in windy conditions, and at worst I think I might have lost a couple of miles an hour in top speed. I can't really speak for gas mileage, because I was fighting headwinds on the way down to Austin, and on the way back I was too knackered to pay attention. I'm in agreement with the notion that the Ninja 250's speed limitation is mostly aerodynamic in nature; my bike tops out at about 88-90 on the speedo no matter who rides it. The box itself is exactly as wide as my body on the bike, so it's probably mostly in wind shadow. For me, this is a great mod which makes an otherwise useless "learner" bike into something real-world practical. Whether it's worth the expense and trouble is up to you. A lot of people have a real negative reaction to investing anything in a Ninja 250, but if Givi would bring this rack to the U.S. at domestic market prices, I think that might change, especially since Givi luggage can be transferred from bike to bike. |
|
|
|
|
March 16th, 2011, 04:40 PM
|
#4 |
|
Motorcyclist
Name: James
Location: Maryland
Join Date: May 2010 Motorcycle(s): 2014 Ninja 300 ABS Posts: A lot.
|
Great mod, love it! Thanks for the write up and time you took to share this.
|
|
|
|
|
March 16th, 2011, 07:51 PM
|
#5 |
|
ninjette.org dude
Name: 1 guess :-)
Location: SF Bay Area
Join Date: Jun 2008 Motorcycle(s): '13 Ninja 300 (white, the fastest color!), '13 R1200RT, '14 CRF250L, '12 TT-R125LE Posts: Too much.
Blog Entries: 7
|
Fantastic! /linked from the main DIY sticky
__________________________________________________
Montgomery Street Motorcycle Club / cal24.com / crf250l.org / ninjette.org ninjette.org Terms of Service Shopping for motorcycle parts or equipment? Come here first. The friendliest Ninja 250R/300/400 forum on the internet! (especially Unregistered) |
|
|
|
|
March 16th, 2011, 08:08 PM
|
#6 |
|
ninjette.org certified postwhore
Name: Sean
Location: Mary Esther, FL
Join Date: Jan 2009 Motorcycle(s): 2008 Ninja 250 1998 HD Road King Posts: A lot.
|
Bike looks good with the case.
 I would love to have hard bags but after researching it, givi is just too rich for my blood. I would love to have hard bags but after researching it, givi is just too rich for my blood.
|
|
|
|
|
March 16th, 2011, 08:34 PM
|
#7 |
|
ninjette.org dude
Name: 1 guess :-)
Location: SF Bay Area
Join Date: Jun 2008 Motorcycle(s): '13 Ninja 300 (white, the fastest color!), '13 R1200RT, '14 CRF250L, '12 TT-R125LE Posts: Too much.
Blog Entries: 7
|
__________________________________________________
Montgomery Street Motorcycle Club / cal24.com / crf250l.org / ninjette.org ninjette.org Terms of Service Shopping for motorcycle parts or equipment? Come here first. The friendliest Ninja 250R/300/400 forum on the internet! (especially Unregistered) |
|
|
|
|
March 16th, 2011, 09:01 PM
|
#8 |
|
ninjette.org certified postwhore
Name: Brian
Location: Detroit, MI
Join Date: Jun 2010 Motorcycle(s): 2009 Ninja 250R Green Posts: A lot.
|
That looks awesome. Funny, the mount points used are the exact mount points I thought would be good places to connect to the frame with.
That's crazy expensive though. How fast can you remove/install the setup? Like if I woke up in the morning and wanted to go grab groceries and then swing out for some leisurely rides with some friends without it or are we looking at more of a permanent installation? |
|
|
|
|
March 16th, 2011, 09:45 PM
|
#9 |
|
ninjette.org member
Name: Terry
Location: Euless, TX
Join Date: Dec 2010 Motorcycle(s): '09 Ninja 250R Posts: 43
|
The box comes off the platform in about half a second. Turn key to unlock, push release button, pull back and lift off. Install is the reverse; push in and down, *clack* goes the button, turn the key to lock position and remove it. Super-easy.
The rack is essentially permanent. You could probably take the arms off in a minute or two (leaving the handle piece under the tail), but you'd have to reinstall and torque the original screws for the passenger peg/exhaust mounts every time. The practical way to remove the box would be just that... Leave the box at home. The box is pretty much a permanent companion on the bike though, now that I've installed it. It's really not noticeable while riding, it gives the bike a bigger visual presence in busy parking lots, it lets me lock up my gear for extended stops, and I can go do minor shopping if I want. I don't keep it outdoors while parked at home, obviously, but it's a great enabler for almost any ride. It just doesn't look all that sexy. |
|
|
|
|
March 16th, 2011, 11:09 PM
|
#10 |
|
ninjette.org certified postwhore
Name: Brian
Location: Detroit, MI
Join Date: Jun 2010 Motorcycle(s): 2009 Ninja 250R Green Posts: A lot.
|
Interesting. I wonder if you could swap out the bolts that go to the passenger pegs with something easier to remove. Like those plastic T-handles. Although it might make it less secure I suppose. Still cool though. Great job on the DIY. I'm sure it's much handier now that you've got permanent storage.
After purchasing my tailbag, it's been much easier to transport things as opposed to a backpack so I can only imagine what kind of convenience a trunk would provide. |
|
|
|
|
March 17th, 2011, 04:15 PM
|
#11 |
|
Motorcyclist
Name: James
Location: Maryland
Join Date: May 2010 Motorcycle(s): 2014 Ninja 300 ABS Posts: A lot.
|
I may go this route for saddlebags, still researching and deciding. As far as trunks go your setup looks great! I mounted my hard locking trunk to the rear seat pan and the plan was to remove it when I didn't want to carry it or wouldn't need it but I haven't taken it off since installing... like you said, it's nice to be able to bring "stuff". I use it every time I ride for something... lunch, extra gloves, rain gear and stop by the store on the way home, run errands for little things. Many times already my trunk has offered me the opportunity to take my bike to the store for quick trips rather than having to take my Jeep (20mpg). I'm thinking the saddlebags would be really nice too... but I probably wouldn't take them off either, LOL. I had Givi E21's on my ZX14 and went the route of setting up quick release brackets... I never took them off either, LOL.
|
|
|
|
|
March 18th, 2011, 12:39 AM
|
#12 |
|
ninjette.org certified postwhore
Name: Brian
Location: Detroit, MI
Join Date: Jun 2010 Motorcycle(s): 2009 Ninja 250R Green Posts: A lot.
|
Interesting. I wonder if others with hard luggage feel the same after they've put them on. Actually, with that in mind, I'ma make a quick little poll.
|
|
|
|
|
March 18th, 2011, 03:46 PM
|
#13 |
|
ninjette.org guru
Name: Al
Location: Bay Area
Join Date: Mar 2011 Motorcycle(s): C-250R-ST Posts: 287
|
Nice write up !!
Looks Great !! I plan on the hard top case using the stock seat base. Also looking to mount hard side cases...somehow?? |
|
|
|
|
March 18th, 2011, 04:09 PM
|
#14 | |
|
Motorcyclist
Name: James
Location: Maryland
Join Date: May 2010 Motorcycle(s): 2014 Ninja 300 ABS Posts: A lot.
|
Quote:
|
|
|
|
|
|
March 18th, 2011, 04:59 PM
|
#15 | |
|
ninjette.org guru
Name: Al
Location: Bay Area
Join Date: Mar 2011 Motorcycle(s): C-250R-ST Posts: 287
|
Quote:
|
|
|
|
|
|
March 18th, 2011, 06:53 PM
|
#16 | |
|
Motorcyclist
Name: James
Location: Maryland
Join Date: May 2010 Motorcycle(s): 2014 Ninja 300 ABS Posts: A lot.
|
Quote:
I had E21's on my ZX14 and loved em. I only had saddlebags on that bike, no top case so I never took them off. My consideration for my 250 is either get the V35's for long trips, camping, etc and just take them off when not needed since they are very large or maybe get E21's again and do the same or just leave on all the time depending on how I go about mounting them and how easy they are to remove. |
|
|
|
|
|
March 25th, 2011, 08:16 PM
|
#17 |
|
ninjette.org certified postwhore
Name: Brian
Location: Detroit, MI
Join Date: Jun 2010 Motorcycle(s): 2009 Ninja 250R Green Posts: A lot.
|
If we can rig up something for under the tail like in this setup and have the 2nd mount point around the pegs, I think you could probably manage to mount some hard saddlebags. Question is how to make the mounts.
|
|
|
|
|
March 30th, 2011, 01:52 AM
|
#18 |
|
ninjette.org newbie
Name: carlosmanowar
Location: spain
Join Date: Mar 2011 Motorcycle(s): Kawasaki Ninja 250R Posts: 1
|
Thanks to Shalev.
Hello
I am from Spain. Thanks to Shalev for this post. I bought de HR4 Rack in Thai Motor Box, very professional people. Thanks again. |
|
|
|
|
April 1st, 2011, 01:51 PM
|
#19 |
|
Motorcyclist
Name: James
Location: Maryland
Join Date: May 2010 Motorcycle(s): 2014 Ninja 300 ABS Posts: A lot.
|
I really like these mounts and the idea of having saddlebags but don't think I would use them enough.
I have decided to stick with the medium size trunk I have for now. Maybe get a large trunk later to mount the same way as my current one for long trips, etc. This works really well, is fairly cheap and easy to swap on/off as needed (between the stock seat, medium trunk mounted on seat pan and later a large trunk mounted on seat pan). Thanks for the great post, keep us up to date on your future luggage. |
|
|
|
|
April 3rd, 2011, 05:21 PM
|
#20 |
|
ninjette.org member
Name: Terry
Location: Euless, TX
Join Date: Dec 2010 Motorcycle(s): '09 Ninja 250R Posts: 43
|
Small update, I just bought some Cortech Sport Saddlebags as a soft luggage option for now (the Givi hard boxes would be way too much $$ at the moment); the HR-4's arms are just the right place to loop the clips for the saddlebags. I haven't ridden with them yet though.
I also upped the shock preload by 1 more setting because I think there actually HAS been a handling change in the bike with a full tail box, it's just very subtle. There's a very little bit more weight in a high, rearward place that gets transferred around during turns, and I think it is noticeable. I don't know what the shock preload might do, but I figured it was worth tweaking to see if it makes a difference. 
|
|
|
|
|
June 10th, 2011, 06:50 PM
|
#21 |
|
ninjette.org certified postwhore
Name: Brian
Location: Detroit, MI
Join Date: Jun 2010 Motorcycle(s): 2009 Ninja 250R Green Posts: A lot.
|
Thanks for the update on the handling.
I am currently, slowly, trying to rig up a little undertail "handle" as you call it but hit the same snag with the M6 screw length. Do you think the oblong bar makes much of a difference? I wonder if I can get away with skipping that part of the handle. How sturdy do you think that welded piece is? This would be potentially for side-cases and I wouldnt have an arm extending so far to the rear of the bike... yet. |
|
|
|
|
August 23rd, 2011, 06:19 PM
|
#22 |
|
ninjette.org newbie
Name: eric
Location: philippines
Join Date: Aug 2011 Motorcycle(s): ninja 250r Posts: 6
|
had mine installed
  my givi box is the monolock type so i have to get a monokey base to monolock base adapter. bring on the rain! im ready! ;-) |
|
|
|
|
August 24th, 2011, 08:00 PM
|
#23 | |
|
ninjette.org guru
Name: Kurgan
Location: Texas
Join Date: Aug 2011 Motorcycle(s): '09 Ninja 250R Posts: 260
|
Quote:
I just don't like the permanent mounting or the high up in the air position of the high box. I don't plan on having another person on my bike because that would overload the weight limit. |
|
|
|
|
|
August 24th, 2011, 08:44 PM
|
#24 | |
|
ninjette.org certified postwhore
Name: Brian
Location: Detroit, MI
Join Date: Jun 2010 Motorcycle(s): 2009 Ninja 250R Green Posts: A lot.
|
Quote:
|
|
|
|
|
|
August 24th, 2011, 11:47 PM
|
#25 | |
|
ninjette.org guru
Name: Kurgan
Location: Texas
Join Date: Aug 2011 Motorcycle(s): '09 Ninja 250R Posts: 260
|
Quote:
If you used a luggage box mounted to a rear seat pan I don't see that coming off, and I can think of a couple different ways to make some bolt-in braces for both the front and back of the pan to hold it even more securely by bracing under the frame rails, or a few other things in the trunk. Quick release braces would be possible, but much more difficult. |
|
|
|
|
|
August 25th, 2011, 08:20 AM
|
#26 | |
|
ninjette.org certified postwhore
Name: Brian
Location: Detroit, MI
Join Date: Jun 2010 Motorcycle(s): 2009 Ninja 250R Green Posts: A lot.
|
Quote:
|
|
|
|
|
|
August 25th, 2011, 12:55 PM
|
#27 | |
|
ninjette.org member
Name: Nathan
Location: Portland, Oregon
Join Date: Apr 2011 Motorcycle(s): 2009 V-Strom 650 ABS Posts: 166
|
Quote:
Do not under any circumstances mount a top case to just the seat. There is a huge difference between the forces involved with a small 1 inch thick seat largely pushing downwards due to gravity, and the order of magnitude increased sideways forces that will be encountered if a top case is added. |
|
|
|
|
|
August 25th, 2011, 01:33 PM
|
#28 |
|
ninjette.org guru
Name: Kurgan
Location: Texas
Join Date: Aug 2011 Motorcycle(s): '09 Ninja 250R Posts: 260
|
I definitely wouldn't rely on just the strength of the key latch to hold a full box in place.
Four bolt-in braces would be easy and would be the strongest possible mounting method. Just use the 4 holes already present on the 2 flat steel pieces that connect the round frame tubes in the trunk and run the bolts UP through those holes, and into a modified seatpan, the hardbox is mounted to the modded seatpan. If those 2 flat pieces were thicker, you could just tap & thread those holes for an easy bolt-in mount, but they don't look thick enough to me. |
|
|
|
|
August 25th, 2011, 02:28 PM
|
#29 | |
|
ninjette.org certified postwhore
Name: Brian
Location: Detroit, MI
Join Date: Jun 2010 Motorcycle(s): 2009 Ninja 250R Green Posts: A lot.
|
Quote:
|
|
|
|
|
|
August 25th, 2011, 10:11 PM
|
#30 | |
|
ninjette.org guru
Name: Kurgan
Location: Texas
Join Date: Aug 2011 Motorcycle(s): '09 Ninja 250R Posts: 260
|
Quote:
I was tired of trying to visualize what I wanted so I started designing my own bikes in 3DSMax. So far it's just a couple HD bobbers and an incomplete chopper, I still can't get smooth bodywork down right to do sportbikes. http://img.photobucket.com/albums/v1...els/OldNo7.jpg http://img.photobucket.com/albums/v1...ArmyBobber.jpg |
|
|
|
|
|
August 25th, 2011, 10:48 PM
|
#31 | |
|
ninjette.org certified postwhore
Name: Brian
Location: Detroit, MI
Join Date: Jun 2010 Motorcycle(s): 2009 Ninja 250R Green Posts: A lot.
|
Quote:
|
|
|
|
|
|
June 18th, 2014, 08:45 AM
|
#32 |
|
ninjette.org newbie
Name: DrDEVIL666
Location: ra6ka
Join Date: Dec 2013 Motorcycle(s): ninja 250r Posts: 1
|
Hello there
Any chance you can list the rack for sale on eBay with shipping to Russia or US? I`m having a hard time getting the item. Let me know if it is possible, please. I ride Kawasaki Ninja 250 I would really like to have the ability to care few more items during long trips. Thank you |
|
|
|
 |
 Similar Threads
|
||||
| Thread | Thread Starter | Forum | Replies | Last Post |
| Rear Seat + Givi Monokey adapter plate (integrated) $70 shipped | Galaxieman | Motorcycle-related | 2 | March 5th, 2015 12:07 PM |
| Rear rack for cooler or Givi | Bill E Bob | 2008 - 2012 Ninja 250R Farkles | 8 | May 14th, 2012 10:34 PM |
| DIY: Installation of the Givi SBX-401 hard luggage racks. | The Blue Rider | Cargo Space | 6 | February 25th, 2012 03:42 PM |
| Givi E52 Maxia Monokey Topcase/Top Trunk | dubojr1 | Motorcycle-related | 2 | December 12th, 2011 12:46 PM |
| [motorcyclistonline] - GIVI's NEW B33 Monokey & Monolock Trunk for 2011 | Ninjette Newsbot | Motorcycling News | 0 | October 14th, 2011 02:50 PM |
|
|


