
|
 September 15th, 2009, 08:37 AM
|
#1 |
|
Da Duckman
Name: Duckman
Location: Pensacola, FL
Join Date: Nov 2008 Motorcycle(s): '08 250R, '06 Chopper, '80 Puch Magnum II, '01 SV650, '99 CR250/CR500AF Sportbike. '02 CRF450/CR500AF Dirt Posts: 480
|
DIY- Front Fork Preload Spacers
I'm 6'3" and 250lbs and always found the front end to be kinda "mooshy." The rear was kinda sloppy too, but it is adjustable so I've set it to the ma but that only makes the front end work harder. I did some reading and many folks recommended installing preload spacers in the forks. I did a little more research and found that pre-gen 250s had a similar fork setup and copied what some of the other riders my size have done. They recommended to cut spacers from PVC pipe 1/2" to 3/4" and insert them into the tops of the forks. So without having to go crazy measuring sag and doing excessive calculations I used someone else's homework.
Here's how: 1. Go to the local hardware store and buy this stuff, the washer is 31mm outside diameter, the PVC coupler is 28mm diamter and about 1.5" in length. Find something about these sizes, if you find a washer that is bigger, you'll have to grind it down a little. 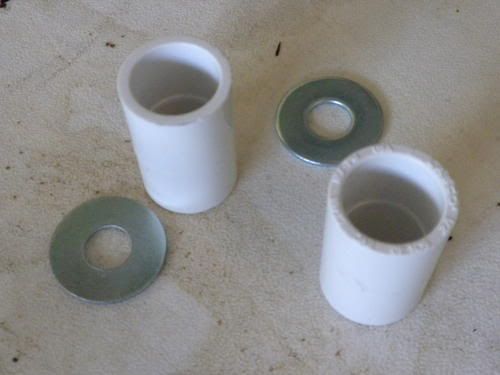 2. Put bike on a triple stand, do not attempt to do anything past this point with the front wheel on the ground. If you must, hang the bike by some other means SAFELY with the front suspension dangling without any weight on it whatsoever! A stand that goes under the bottom of your forks is not good here, either! 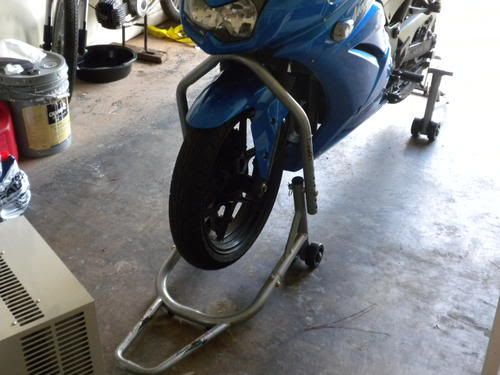 3. Remove handlebars, there are 2 allen bolts on each bar, then the bar should just lift off the top tree. 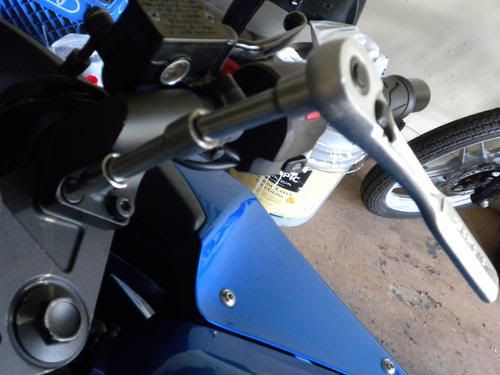 4. Cut your PVC spacers to 3/4" (you can always come back and cut more later if its too stiff for you. Remember that I am 250lbs, if you weigh less, you'll want shorter. If you weigh more or want a slightly taller ride height and stiffer front end you'll want the spacer to be longer.) 5. Press down on the plugs in the top of the forks with a wooden dowel or a screwdriver, you may need to your weight into this to compress the springs. While pushing the plug down, gently pry out the snapring with a smaller screwdriver... take care not to scratch up the inside of the fork leg. I couldn't take any pictures here, I don't have a 3rd hand. 6. Once the plugs are out, I found that my washer was a good idea, the steel collar below is thin metal and will probably chop through the PVC spacer. The washer will act as a buffer between the two. 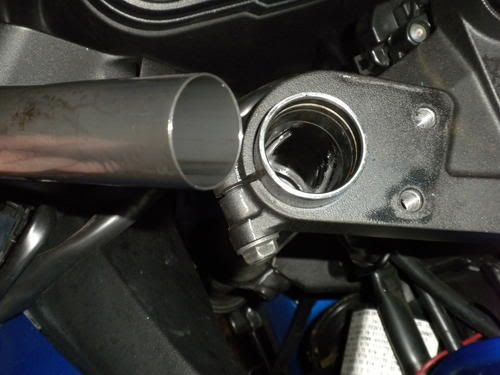 7. Drop in the washer on top of the collar, then the PVC spacer on top of it, and finally put the plug back on top of this stack. 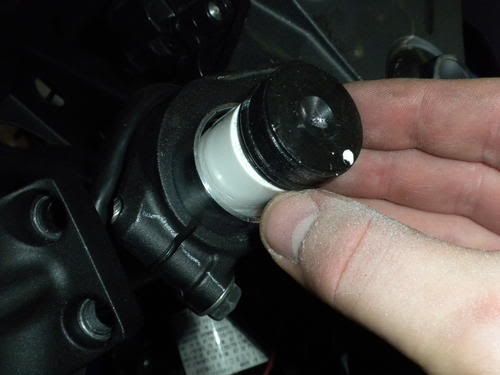 8. Make sure you have your wooden dowel, and the snapring that you took out earlier in your hand, and push the whole stack of spacers and plugs down into the fork it will stop when it can't go any further. This will require more force than before because of the extra 3/4" + washer thickness worth of spring compression required. Then gently slip the snapring back into its groove, make sure it is fit snugly around the entire circumference so that it doesn't pop back out. No pics again, no extra hands! 9. Finally re-attach your handlebars and torque the respective allen bolts to 18ft/lbs. Mine were kinda loose when I went to take them off so I added a little locktite even though the service manual doesn't call for it. 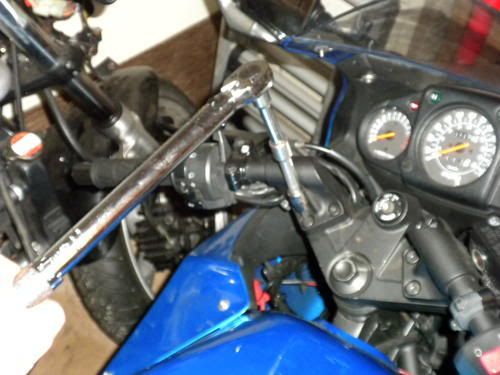 First impression when sitting on the bike is that the handlebars seem a little closer to me as the front end is sitting slightly higher under weight. Upon my first ride I found that I could feel more of the cracks and bumps on the road than before, but the front end felt stiffer and more sporty. It also helped control a little bit of the nose-dive I was experiencing under heavy braking. I think I will experiment with a heavier fork oil in the near future to try and help resist the nose-dive even further. |

|

|
|
September 15th, 2009, 04:13 PM
|
#2 |
|
ninjette.org member
Name: Clint
Location: Utah
Join Date: Aug 2009 Motorcycle(s): 2009 ER-6n 2009 Ninja 250 sold :( Posts: 61
|
I was thinking about this very thing over the weekend and was hoping to find someone that had already tried it so I could get a rough idea of what was needed before I took everything apart. I had done something very similar on a mountain bike I had years ago and was wondering if it would work well on the ninja. Thanks for taking the time to take pictures and write up a guide, I will have to give it a try

__________________________________________________
"Never argue with an idiot, they will just drag you down to their level and beat you with experience" -Unknown |
|
|
|
|
September 15th, 2009, 08:03 PM
|
#3 |
|
ninjette.org dude
Name: 1 guess :-)
Location: SF Bay Area
Join Date: Jun 2008 Motorcycle(s): '13 Ninja 300 (white, the fastest color!), '13 R1200RT, '14 CRF250L, '12 TT-R125LE Posts: Too much.
Blog Entries: 7
|
Fantastic writeup! Added to the main DIY sticky thread...
__________________________________________________
Montgomery Street Motorcycle Club / cal24.com / crf250l.org / ninjette.org ninjette.org Terms of Service Shopping for motorcycle parts or equipment? Come here first. The friendliest Ninja 250R/300/400 forum on the internet! (especially Unregistered) |
|
|
|
|
September 15th, 2009, 08:31 PM
|
#4 | |
|
Da Duckman
Name: Duckman
Location: Pensacola, FL
Join Date: Nov 2008 Motorcycle(s): '08 250R, '06 Chopper, '80 Puch Magnum II, '01 SV650, '99 CR250/CR500AF Sportbike. '02 CRF450/CR500AF Dirt Posts: 480
|
Quote:
Next one I will do a writeup of changing the fork oil to something thicker. EDIT: Looks like that was already covered: http://www.ninjette.org/forums/showthread.php?t=23200 |
|
|
|
|
|
August 10th, 2010, 08:50 PM
|
#5 |
|
ninjette.org certified postwhore
Name: eddie
Location: Lawnguylind
Join Date: Nov 2009 Motorcycle(s): 300, WeeStrom Posts: A lot.
|
Excellent DIY...creative and cheap and nicely explained.
|
|
|
|
|
October 4th, 2010, 01:29 PM
|
#6 |
|
ninjette.org certified postwhore
Name: eddie
Location: Lawnguylind
Join Date: Nov 2009 Motorcycle(s): 300, WeeStrom Posts: A lot.
|
I have an '09 and decided to try this method but ran into what may be a problem:
I cannot compress the "stack" any more than maybe 3/8"...it feels like its' coming to a hard stop...any ideas or experience with this ? |
|
|
|
|
October 4th, 2010, 01:37 PM
|
#7 |
|
Join Date: Nov 2008 Posts: Too much.
|
do you have the front end lifted off the ground?
|
|
|
|
|
October 4th, 2010, 01:54 PM
|
#8 |
|
ninjette.org certified postwhore
Name: eddie
Location: Lawnguylind
Join Date: Nov 2009 Motorcycle(s): 300, WeeStrom Posts: A lot.
|
affirmative-o
|
|
|
|
|
October 4th, 2010, 02:00 PM
|
#9 |
|
ninjette.org certified postwhore
Name: eddie
Location: Lawnguylind
Join Date: Nov 2009 Motorcycle(s): 300, WeeStrom Posts: A lot.
|
Made the mistake of not buying triple stand for front. Had it up on a jack and...yeah...the front wheel mayhave been on the ground when I applied pressure to the plug.....gonna try this again
|
|
|
|
|
October 4th, 2010, 02:07 PM
|
#10 |
|
Join Date: Nov 2008 Posts: Too much.
|
be very careful if you have the bike lifted from under the engine and get the front end off the ground and then press down on the front. It may pivot on the jack under the engine and become unstable.
|
|
|
|
|
October 4th, 2010, 02:43 PM
|
#11 |
|
ninjette.org certified postwhore
Name: eddie
Location: Lawnguylind
Join Date: Nov 2009 Motorcycle(s): 300, WeeStrom Posts: A lot.
|
Yes, lifting from the engine was quite unstable.
Had it up with wheel off ground and could not compress plug more than 3/8" Tried pulling fork down from wheel ...no movement. Should i have pumped fork before lifting bike ? I've always heard that a hammer has no place in a mechanics tool box...am I mistaken...might I have tried to tap the steel tube down while washers were on top. Have no experience here and I don't want to damage anything given the fact that it handles just fine as is...although, I could def live without the quick dive she sometimes takes |
|
|
|
|
October 4th, 2010, 02:49 PM
|
#12 |
|
Join Date: Nov 2008 Posts: Too much.
|
no...no hammer. everything should slide down smoothly into the fork tube with some pressure.
perhaps you should PM duck and ask him. I have no direct experience w/ the ninja, but have done this on similar forks with other bikes. |
|
|
|
|
October 4th, 2010, 03:07 PM
|
#13 |
|
self wrencher
Name: john
Location: houston
Join Date: Dec 2008 Motorcycle(s): 08 250r and 07 600r Posts: A lot.
|
There are two 12mm bolts per fork tube. One is at triple tree and the other at the lower fork clamp. When loosened, fork should slide right out.
|
|
|
|
|
October 4th, 2010, 05:25 PM
|
#14 |
|
ninjette.org certified postwhore
Name: Rick
Location: Alexandria, Louisiana
Join Date: Jan 2009 Motorcycle(s): 05 Blue Ninja 250 Posts: Too much.
MOTY - 2017, MOTM - Jan '19, Oct '16, May '14
|
^^^ He is not trying to slide the fork tubes out. He is trying to compress the fork springs down from the top of the tubes to set a pre-load spacer on top of the springs.
|
|
|
|
|
July 10th, 2011, 10:32 AM
|
#15 |
|
CPT Falcon
Name: J.Emmett Turner
Location: Newnan, GA
Join Date: Apr 2009 Motorcycle(s): '08 CP Blue EX250J, '97 unpainted EX250F, 2nd '97 unpainted EX250F (no engine), '07 black EX250F Posts: A lot.
|
I gotta ask: If I do this with clipons, is there any risk of the things shooting out the fork tubes under heavy braking? The bar risers would no longer "cap" the tubes.
|
|
|
|
|
July 10th, 2011, 02:00 PM
|
#16 | |
|
Da Duckman
Name: Duckman
Location: Pensacola, FL
Join Date: Nov 2008 Motorcycle(s): '08 250R, '06 Chopper, '80 Puch Magnum II, '01 SV650, '99 CR250/CR500AF Sportbike. '02 CRF450/CR500AF Dirt Posts: 480
|
Quote:
But no, if you install it the circlips correctly and don't damage the area they seat in it isn't likely to happen.
__________________________________________________
DuckmanCycles Youtube Channel - VvTheDuckvV Youtube Channel SkeeterTheDuck on Youtube! - SkeeterTheDuck Facebook Page |
|
|
|
|
|
July 16th, 2011, 11:27 PM
|
#17 |
|
CPT Falcon
Name: J.Emmett Turner
Location: Newnan, GA
Join Date: Apr 2009 Motorcycle(s): '08 CP Blue EX250J, '97 unpainted EX250F, 2nd '97 unpainted EX250F (no engine), '07 black EX250F Posts: A lot.
|
Thanks. Now, I noticed that there are no pics of certain steps because, as you said, you only have two hands (FREAK!). We all have that problem, but you also have a serious presence on YouTube so you're the first person I thought of when I saw the Looxcie wearable POV camera a few days ago. It seems perfect for DIY videos and motorcycle ride DVRs because it's always recording, whether you have anything interesting to say or not, and it will save a 30-second clip when you press the button. It also has a higher-quality camcorder mode for when you want to do a traditional moto-vlog. It's a shame that they don't seem to be marketing it to us in the motorcycle community. I already asked them to look into it. I am crossing the country soon and would like to live-stream it over 3G, which is another promised feature. If someone like you were to contact them, I'm sure they'd see that you can help them promote their product. Perhaps they'll send us one to pass around? Svengalie is always showing his latest camera equipment on his moto-vlog so I think he should get a crack at it too (UK). Maybe Mordeth13 too (Taiwan). We should bombard them with requests.

|
|
|
|
 |
 Similar Threads
|
||||
| Thread | Thread Starter | Forum | Replies | Last Post |
| DIY preload adjuster | alex.s | General Motorcycling Discussion | 69 | May 14th, 2020 05:57 AM |
| DIY - Slingshot Racing Preload Adjusters | sixstring | 2008 - 2012 Ninja 250R Tech Talk | 24 | May 3rd, 2012 03:14 PM |
| Front Suspension: Preload Vs Stiffer Springs or Fork Oil | Daniel_Malloy | 2008 - 2012 Ninja 250R Tech Talk | 2 | February 12th, 2012 01:39 AM |
| WTB: preload fork adjusters fr 2010 250 | Shaol1n Monk | Items Wanted | 0 | July 24th, 2011 10:02 PM |
| External, fork preload adjusters. | JS73 | 2008 - 2012 Ninja 250R Tech Talk | 34 | June 20th, 2010 08:25 PM |
|
|


