
|
 April 15th, 2011, 09:38 PM
|
#41 |
|
ninjette.org member
Name: Brahmantio
Location: Jakarta
Join Date: Dec 2008 Motorcycle(s): N250R Posts: 101
|
Heres an easy solutions for you guys using our hugger sets , all you need are some washers :
To Avoid rearset hitting the cover right side, put 2 washers or more under the rearset , so the set will come out abit leaving the cover in peace  If you tighten the left cover to tight on the ex chain cover bolt hole you'll crack the cover and the bottom cover will tilt up just like in your pics, we design the hugger not just to make ur swing arm look bigger but also look nice,so in some parts the cover will not sit flush to the arm, this especially on front right side of the cover. and on the left side sometimes there a gap between the cover and the ex chaincover bolt hole, thats why if u tighten it to tight, cover will crack and the bottom part of cover will tilt up. solution is TO ALSO PUT a washer between the cover and bolt hole  you can glue it to the hole like so so its easy to install :  And for THOSE CARRYING PASSENGER, there's a possibility sometimes the rear brake cup will hit the hugger tip, solution also using washers , put it under the rear footpeg so the the peg will move out a bit. If you need anything you can contact Matt directly . |

|

|
|
April 15th, 2011, 10:47 PM
|
#42 |
|
ninjaholic
Name: Dustin
Location: Oceanside, CA
Join Date: Jun 2010 Motorcycle(s): 09' SE 250R (sold), 03' ZX-6R, 99' XL1200C SP Posts: A lot.
Blog Entries: 3
|
It would have been nice to know these things ahead of time... an actual set of instructions would have been nice or at least including all these extra washers in the set would have been helpful. As for the cracking paint I have no idea how you don't get the cracking paint because I was extremely careful and it still cracked the paint exactly the same as the OP's cover. I also had to use washers between the hugger and the cover because even with my slightly worn stock tire there was no way it was going to clear without the washers. I just expected for nearly $300 (I have the carbon one) it would have fit better all around. I will figure out ways to make it work out... but I'm definitely disappointed. It looks good from a glance but once you look close and see all the misaligned areas and the stress cracks it's a different story.
__________________________________________________
09' SE Ninja 250R $2,547.83 worth of mods installed... come on Unregistered, you know you want to know what? Check my Blog "Modification List" 
|
|
|
|
|
April 15th, 2011, 11:00 PM
|
#43 | |||||
|
CPT Falcon
Name: J.Emmett Turner
Location: Newnan, GA
Join Date: Apr 2009 Motorcycle(s): '08 CP Blue EX250J, '97 unpainted EX250F, 2nd '97 unpainted EX250F (no engine), '07 black EX250F Posts: A lot.
|
Quote:
Quote:
Quote:
Quote:
Quote:
 The "paint cracks" I described appeared before installation when it was only carefully straightened. Considering that it normally needs to be moved beyond that point to be worked around the swingarm and installed, it was not stressed or flexed too much. I believe that it was soft and flexible when it was first packed for it to bend like that in the first place and that most of your installs occur with a new cover or at least one that was straight to start with. Consequently, it became hard and brittle by the time it arrived, which is why it didn't "pop back" after it was unpacked. It seems that it "cured" that way in transit and, thus, was too hard/brittle to correct with the little amount of flexing it could tolerate. The right-side crack appeared before I even knew what the L-bracket and threaded U-clip were for and after I removed the brake line holder, so it had nothing to do with it. The scratches from the brake line holder touching it were from trying to reinstall the caliper with the cover lifted and loosely touching it, which was only done because I was not going to assume that it needed to be torn off until I was told so (that would be a pretty drastic thing to assume, especially when it was treated as if you only had to unscrew it). I secured it before riding with tape (upside-down; as shown in the video), so it did not cause the crack. It seems to be related to whatever is causing it to stick out in the front-right even though it seems to fit well further back on the swingarm (as long as you are NOT using the L-bracket). My primary issue right now is the right-side fitment. I need to solve it before I try to fix it cosmetically. Sticking it to the swingarm with double-sided tape or something would make chain adjustment nearly impossible and make it difficult to lift without damaging it during chain adjustments, installation, etc. Perhaps I could make some kind of wire hook that holds it against the swingarm, like a bent coat hanger, but what should I use to fasten it to the fiberglass? I don't want it to rip off when the cover tries to pull away from the swingarm like it currently is. Last futzed with by CZroe; April 16th, 2011 at 09:16 AM. |
|||||
|
|
|
|
April 16th, 2011, 05:07 AM
|
#44 |
|
self wrencher
Name: john
Location: houston
Join Date: Dec 2008 Motorcycle(s): 08 250r and 07 600r Posts: A lot.
|
That's why I love abs. No cracking

|
|
|
|
|
April 16th, 2011, 09:05 AM
|
#45 | |
|
CPT Falcon
Name: J.Emmett Turner
Location: Newnan, GA
Join Date: Apr 2009 Motorcycle(s): '08 CP Blue EX250J, '97 unpainted EX250F, 2nd '97 unpainted EX250F (no engine), '07 black EX250F Posts: A lot.
|
I'm splitting this off as a new post and adding my idea about fixing the problem with the front-right sticking out:
Anyway, I thank you for your direct support for my issues. I love your products and just want to help you get the kinks worked out. In fact, I want to order a lot more from you (GP solo seat cowl, windscreen, integrated taillight, etc). Now we know that the huggers need some kind of inner brace before shipping (cardboard tube?) and that the instructions need to be updated to address the brake line holder removal. I think that the right mounting hole problem could be fixed by using a plastic rivet like the ones that hold the LH and RH lower fairings together on the bottom along with a much larger and lower hole in the L-bracket. Instructions indicating that the left hole may need to be widened anyway, as it appears that mine requires, would help so that people can check alignment before they screw it all down. It was the first thing I screwed in, so I had no idea that it was getting "forced" as I tightened down my adjuster nuts and screwed the rubber chain guide back down. As for the cover flexing outward on the front-right, you know, I think I know why. The DVD case that I used to straighten the left must have also pushed the right out even though it did not have the thin connecting piece that the left had (the first part you would expect to flex/bend). I literally only left it like that for less than an hour before I noticed the cracks on the left side, so clearly that is where the majority of the bending took place (as intended), so I didn't consider that the right had moved much, especially when the left was still bent and needed to be "hung" overnight to straighten it. If I'm right, it shouldn't be a problem for most customers as long as it doesn't bend and deform during shipping like mine. As far as repairing it, if I could hold it down against the swingarm with something and apply heat, will it reform so that it lays flat against the swingarm or does fiberglass not really respond to heat like that? I have no idea if it "softens" with a little heat like plastic would. I don't have any way to plug in a heat gun when I'm near my bike (no garage; has to sit in a parking lot), and removing the swingarm to do this inside isn't an option either, so I'll have to figure out some other way. Please let me know if I should bother. Quote:
|
|
|
|
|
|
April 16th, 2011, 07:04 PM
|
#46 |
|
ninjette.org member
Name: Brahmantio
Location: Jakarta
Join Date: Dec 2008 Motorcycle(s): N250R Posts: 101
|
Well , my Yamaha R6 fairing is ABS and it still cracks
theres a fast and cheap way to fix fiberglass, all you need is a piece of fiber sheet and a power glue (cyanoacrylate).  surface paint crack can be fixed by quick dry putty like I said before, easy. a full crack can be fixed, by puting a layer of fiber sheet on the crack from behind,then you put powerglue on top of it, this will hold the crack from widening and hold it firmly. Sometimes if u cant find a fiber sheet you can just use a cigarette wrap paper and dont use heat gun on fiberglass .After that use quickdry putty on top, sand it, spray it with black matte paint and you're done. The cover is also sprayed with clear coating, but for a small quickfix you dont need this. Once again IMPORTANT point to remember when installing the hugger : 1.Dont put the hugger on a paddock stand when installing unless you modified the paddock spool, you'll never fit the cover with the spool on and the bike on a stand. 2.Remove the brake line holder all the way and loosen the brake line then loop it over the cover. 3.Easier to remove the exhaust muffler when isntalling cover 4.Also loosen the right rear set, or take it off and put washers under it after finishing the cover install. 5.after finishing the hugger install, with side stand down ask someone to tilt the bike to left side so the rear tire is off the ground and use your hand to spin the tire, make sure it doest touch anything, if it does , stop! and correct the install. 6.DO NOT RUSH the install, as this is product is quite delicate during install process, although the product you receive is already through some perfectioning process from when we first designed it. I'll show you video we will stretch it, yank it, and it doesnt crack . But maybe the shipping process and the repackaing of the cover caused some more stress on the covers and caused it to crack easily, we'll make sure to pack it better next time and find a better courier service. All the product is handmade and we make sure the finish is top notch , you can find lots of hugger in Indonesia copying our style , but its gonna behard to find the same quality and finish that we offer You can ask Matt about that. And 'chef' is also a westerner living in Bali, if you read his post he love the product, and our mechanic in Bali Installed it without issue , no cracks!Just dont rush it . And Thank you for using our product - keep you updated with the version 4 of the hugger cover set. |
|
|
|
|
April 16th, 2011, 07:59 PM
|
#47 | |||||||||
|
CPT Falcon
Name: J.Emmett Turner
Location: Newnan, GA
Join Date: Apr 2009 Motorcycle(s): '08 CP Blue EX250J, '97 unpainted EX250F, 2nd '97 unpainted EX250F (no engine), '07 black EX250F Posts: A lot.
|
Quote:
Quote:
Quote:
Quote:
I couldn't grab the cover+swingarm to tell that it wasn't fitting against it unless I removed either the cover or the wheel. At the same time, I found a big dent on the underside that the dealer probably made when changing my brake pads, but at least you can't see it normally. I managed without removing it the first time using the things from the OEM tool kit on the caliper mounting bolts. I should mention that you usually have to move the tire forward or backwards to get a hex key through the brake line holder, so it's probably best to do that before you remove your spools and put it back on the side-stand. I inserted the corner of the hex key into the flattened end of the handle piece that works with the spanner/preload-adjuster and axle nut wrench. I then put the wrench in the other side to extend it. This made a 45-degree angle that could leverage the end of the hex key without a 90-degree pipe bar like shown in your video. It worked great! FAR better than my ratcheting hex key sockets or folding hex key set.Quote:
Quote:
Quote:
Quote:
Quote:
Oh! This is a little off-topic, but would you guys consider making a solo seat cowl that more closely resembles the Kawasaki design as opposed to the GP cowl? Perhaps one with the helmet notch on the other side? It could be a cheaper alternative that could compete even at the same price because it's easier to hang your helmet off the right side when you get off on the left. How about one that covers the stock seat and can be removed easily, like this one (costs too much to import and only comes unpainted; painting would make it cost as much as the full OEM cowl!). And, though I like your undertail, I'd love to see a little triangular wedge over the brake light like the Hotbodies undertail. I think it *really* fits the style of the bike (there is a triangular wedge on the headlight already). Matching the style of the bike is particularly why your hugger is not only much better than Scott's eBay hugger or Skidmarx's hugger style, but also the GSX-R style one that is popular over there. Also, the first video of a Hotbodies undertail for the 250R was CP blue and looked like a HORRIBLE paint match (you guys did MUCH better). Perhaps it was just because it was a prototype but I didn't want to risk it, especially when theirs cost so much more. They are local so I might have been able to swing by their headquarters to check it out, but I already knew that I wanted your hugger so I never bothered. |
|||||||||
|
|
|
|
April 16th, 2011, 08:24 PM
|
#48 | ||||
|
CPT Falcon
Name: J.Emmett Turner
Location: Newnan, GA
Join Date: Apr 2009 Motorcycle(s): '08 CP Blue EX250J, '97 unpainted EX250F, 2nd '97 unpainted EX250F (no engine), '07 black EX250F Posts: A lot.
|
Hmm... I didn't see you post before this one.
Quote:
Quote:
Quote:
I wasn't ready to install the hugger piece so I didn't look into it yet. Thanks for the info!Quote:
|
||||
|
|
|
|
April 17th, 2011, 01:30 AM
|
#49 | |
|
CPT Falcon
Name: J.Emmett Turner
Location: Newnan, GA
Join Date: Apr 2009 Motorcycle(s): '08 CP Blue EX250J, '97 unpainted EX250F, 2nd '97 unpainted EX250F (no engine), '07 black EX250F Posts: A lot.
|
Quote:
Last futzed with by CZroe; April 17th, 2011 at 08:28 AM. |
|
|
|
|
|
April 17th, 2011, 02:48 AM
|
#50 | |
|
ninjette.org member
Name: Brahmantio
Location: Jakarta
Join Date: Dec 2008 Motorcycle(s): N250R Posts: 101
|
Quote:
|
|
|
|
|
|
April 17th, 2011, 08:21 AM
|
#51 |
|
ninjette.org member
Name: joe
Location: virginia
Join Date: Oct 2010 Motorcycle(s): 250 Posts: 78
|
Available
I was looking for prices and availability on the Hugger, but didn't even see it listed on the USA site. Is this still available? Do they have a number?
|
|
|
|
|
April 24th, 2011, 07:24 PM
|
#52 |
|
ninjette.org sage
Name: Cab
Location: Miami Beach
Join Date: Mar 2010 Motorcycle(s): Blue 10 250r Posts: 697
|
I didn't know I couldn't use this with my swing arm spools. I decided to Dremmel the cover. Here is my install. Prepped everything up, removed chain cover, rear brake and wash it all clean. P.S. Please note chewed up and spit out chicken strips. LOL
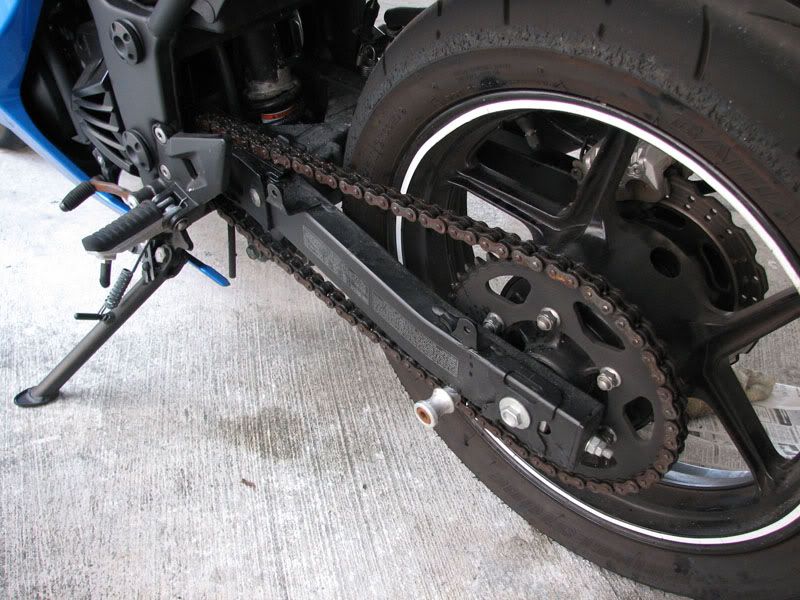 Then I slid the cover as close into position as possible. I read about people having trouble lining up the holes, but with some minor (careful it cracks) fudging I managed to line everything up.   Then once I had a good ideas where the spools would end up i grind it out a semicircle. 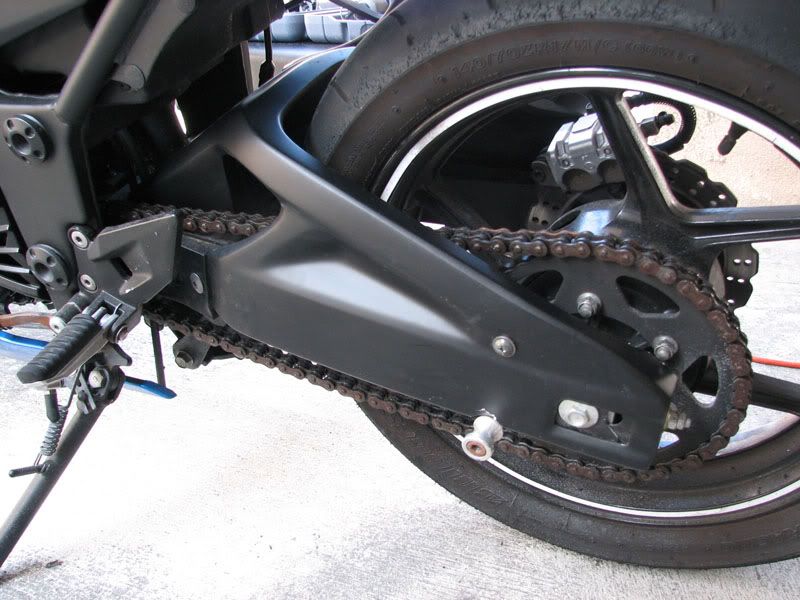 The left side came out very clean, but when pressing it into position, it cracked around the grind. no big deal, black paint should hide it well. The right side however was a pain. Re-tightening the rear brake was a *^$#*&$ pain in the ($^*#(^$%##. Unfortunately I had to grind out a larger space on the right to accommodate sliding it around the installed brake. I think black tape might camouflage it just fine, plus you really only see it from bellow.  All and all, the instal is not as easy as it appears on the video, but if you take your time and be very careful with plastic, everything lines up and the result looks very good. I didn't have a problem straightening out the rear (keeping it from bowing out) with the two large washers that you provided. Thanks Mat |
|
|
|
|
April 26th, 2011, 02:13 AM
|
#53 |
|
ninjette.org member
Name: Brahmantio
Location: Jakarta
Join Date: Dec 2008 Motorcycle(s): N250R Posts: 101
|
Nice JOB! we would prefer to grind the spool itself so it wont press against the cover when tighten.
You need to loosen the rear brake line on the rear master cylinder then rotate it so it loop above the cover then use cable ties tot tie it to the passenger footstep bracket |
|
|
|
|
April 27th, 2011, 09:42 PM
|
#54 | |
|
Perpetual Lurker
Name: Chief Brody
Location: Virginia
Join Date: Oct 2009 Motorcycle(s): 2008 Kawasaki Ninja 250R Posts: 1
|
Quote:
|
|
|
|
|
|
April 28th, 2011, 04:45 PM
|
#55 |
|
ninjette.org member
Name: Aaron
Location: Kansas City, MO
Join Date: Jul 2009 Motorcycle(s): 2009 Black Ninja 250, 2009 Black ZX-6r Posts: 80
|
^ that would be very useful information.
__________________________________________________
Black '09 250R: Bridgestone BT-021s-Yoshi CF Slip-On-Fender Eliminator-Corbin Seat-Seat Cowl-Proton Flushmounts-BikeLiteZ Taillight-LED Glow-HIDs-Reflective Rimtape-Yoshi Rearsets-MRA DB Windscreen |
|
|
|
|
April 28th, 2011, 10:03 PM
|
#56 | |
|
ninjette.org sage
Name: Jonathan
Location: Beaverton OR
Join Date: Jul 2010 Motorcycle(s): Candy Thunder blue 2009 kawasaki 250r, 2010 Dark Stealth Ducati Monster 696. Posts: 891
|
Quote:
http://www.ninjette.org/forums/showthread.php?t=71110 |
|
|
|
|
|
April 29th, 2011, 09:30 PM
|
#57 |
|
ninjaholic
Name: Dustin
Location: Oceanside, CA
Join Date: Jun 2010 Motorcycle(s): 09' SE 250R (sold), 03' ZX-6R, 99' XL1200C SP Posts: A lot.
Blog Entries: 3
|
Figured I'd throw in a picture of mine installed with the CF hugger:
Couple more pics in my gallery... not the easiest install... but the outcome looks good
__________________________________________________
09' SE Ninja 250R $2,547.83 worth of mods installed... come on Unregistered, you know you want to know what? Check my Blog "Modification List"
|
|
|
|
|
April 30th, 2011, 01:14 AM
|
#58 | |
|
ninjette.org sage
Name: Jonathan
Location: Beaverton OR
Join Date: Jul 2010 Motorcycle(s): Candy Thunder blue 2009 kawasaki 250r, 2010 Dark Stealth Ducati Monster 696. Posts: 891
|
Quote:
|
|
|
|
|
|
April 30th, 2011, 03:08 AM
|
#59 | |
|
self wrencher
Name: john
Location: houston
Join Date: Dec 2008 Motorcycle(s): 08 250r and 07 600r Posts: A lot.
|
Quote:
|
|
|
|
|
|
May 6th, 2011, 06:22 PM
|
#60 | |
|
ninjette.org member
Name: Brahmantio
Location: Jakarta
Join Date: Dec 2008 Motorcycle(s): N250R Posts: 101
|
Quote:
Cazper has done a great job considering his hugger (the kevlar one) is the hardest to install, cause its thicker and stiffer
|
|
|
|
|
|
May 6th, 2011, 11:39 PM
|
#61 |
|
ninjaholic
Name: Dustin
Location: Oceanside, CA
Join Date: Jun 2010 Motorcycle(s): 09' SE 250R (sold), 03' ZX-6R, 99' XL1200C SP Posts: A lot.
Blog Entries: 3
|
Trust me it wasn't easy... and you can see in the picture that I made a grave error when I drilled the hole for the left side screw. Because it was so stiff I drilled and mounted the center hole first... then rotated the hugger and marked the left hole and drilled. then I went to do the right one and realized I had to press the two sides together and that my left hole no longer lined up. I was pretty mad at myself and the hugger doesn't cover my mistake. Oh, well though nothing I can do about it now.
__________________________________________________
09' SE Ninja 250R $2,547.83 worth of mods installed... come on Unregistered, you know you want to know what? Check my Blog "Modification List"
|
|
|
|
|
May 6th, 2011, 11:51 PM
|
#62 |
|
Join Date: Nov 2008 Posts: Too much.
|
sorry, but I need to ask the obvious... why doesn't this product come with clear, printed installation instructions? it's abundantly clear by this thread, installation is not as intuitive to anyone that's not a mechanic by trade.
|
|
|
|
|
May 6th, 2011, 11:55 PM
|
#63 |
|
ninjaholic
Name: Dustin
Location: Oceanside, CA
Join Date: Jun 2010 Motorcycle(s): 09' SE 250R (sold), 03' ZX-6R, 99' XL1200C SP Posts: A lot.
Blog Entries: 3
|
Good question... I probably wouldn't have screwed it up had there been clear instructions or someone had done a real DIY beforehand.
Also, with all these washers that are needed... would have been nice to at least have been provided them so that I could have tried to figure it out on my own since there were no instructions. He certainly isn't adding washers in the video... but they are definitely needed for this to fit correctly.
__________________________________________________
09' SE Ninja 250R $2,547.83 worth of mods installed... come on Unregistered, you know you want to know what? Check my Blog "Modification List"
|
|
|
|
|
May 8th, 2011, 11:15 PM
|
#64 | ||
|
CPT Falcon
Name: J.Emmett Turner
Location: Newnan, GA
Join Date: Apr 2009 Motorcycle(s): '08 CP Blue EX250J, '97 unpainted EX250F, 2nd '97 unpainted EX250F (no engine), '07 black EX250F Posts: A lot.
|
Quote:
Quote:
|
||
|
|
|
|
May 9th, 2011, 06:20 AM
|
#65 |
|
ninjette.org member
Name: Brahmantio
Location: Jakarta
Join Date: Dec 2008 Motorcycle(s): N250R Posts: 101
|
this is the new updated installation manual, hope the link work :
http://www.filesonic.com/file/952718204 |
|
|
|
|
May 10th, 2011, 10:36 PM
|
#66 |
|
ninjaholic
Name: Dustin
Location: Oceanside, CA
Join Date: Jun 2010 Motorcycle(s): 09' SE 250R (sold), 03' ZX-6R, 99' XL1200C SP Posts: A lot.
Blog Entries: 3
|
That would have been helpful especially the extra washers for the different areas... those would have been nice to be provided or maybe a spacer for the left side provided like the "L" bracket was provided for the right side.
Either way I did end up making mine work... not perfectly... but at least only I usually notice the defects.
__________________________________________________
09' SE Ninja 250R $2,547.83 worth of mods installed... come on Unregistered, you know you want to know what? Check my Blog "Modification List"
|
|
|
|
|
May 12th, 2011, 02:02 AM
|
#67 | |
|
CPT Falcon
Name: J.Emmett Turner
Location: Newnan, GA
Join Date: Apr 2009 Motorcycle(s): '08 CP Blue EX250J, '97 unpainted EX250F, 2nd '97 unpainted EX250F (no engine), '07 black EX250F Posts: A lot.
|
Quote:
|
|
|
|
|
 |
 Similar Threads
|
||||
| Thread | Thread Starter | Forum | Replies | Last Post |
| Sportisi Headlight Cover | FBR_BDavis | Items Wanted | 2 | July 25th, 2018 12:17 AM |
| sportisi headlight cover | ryker | 2008 - 2012 Ninja 250R Farkles | 25 | August 3rd, 2015 12:58 PM |
| Black '12 with Sportisi's Headlamp Cover. | Aggrotech | 2008 - 2012 Ninja 250R Farkles | 8 | June 18th, 2013 04:31 AM |
| My new Sportisi Headlamp cover | justinswidebody | 2008 - 2012 Ninja 250R Farkles | 16 | June 11th, 2012 10:21 PM |
| WTB Sportisi hugger/swingarm cover | Live2ride | Items Wanted | 7 | August 15th, 2011 02:56 AM |
|
|


