|
 December 4th, 2014, 09:41 AM
|
#81 | |
|
ninjette.org guru
Name: Bob
Location: Chicago
Join Date: Sep 2012 Motorcycle(s): '06 Ninja 250, 2018 Honda GL1800B Posts: 315
|
Quote:
|
|

|

|
|
December 4th, 2014, 09:56 AM
|
#82 | |
|
ninjette.org member
Name: Thom
Location: Virginia
Join Date: Dec 2014 Motorcycle(s): 2013 zx6r and 1995 250r Posts: 69
|
Quote:
__________________________________________________
spend all the spare time on two wheels |
|
|
|
|
|
March 25th, 2015, 10:08 AM
|
#83 |
|
ninjette.org guru
Name: Bob
Location: Chicago
Join Date: Sep 2012 Motorcycle(s): '06 Ninja 250, 2018 Honda GL1800B Posts: 315
|
Lightening project - smaller headlight, and a rear mudguard
We spent a few hours this weekend replacing our 7" headlight with a 5" Bates-style one we got for about $45 from Amazon. These lights are becoming more common in cafe and scrambler builds, so we thought we'd try it. It reduces the front profile of the bike, and is also lighter. It's a bottom-mount light that mounts to the horn bolts on the bike's lower triple clamp, with a small aluminum bracket we made. We remounted the turn signals to the coil bolts (near where they were on the bike originally).
Surprisingly, this light seems just as bright as the larger one. 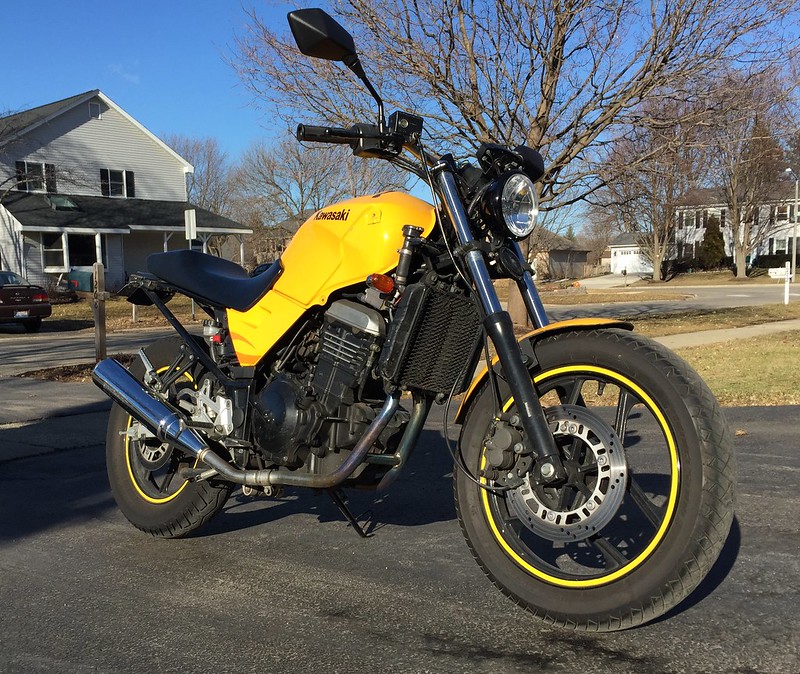 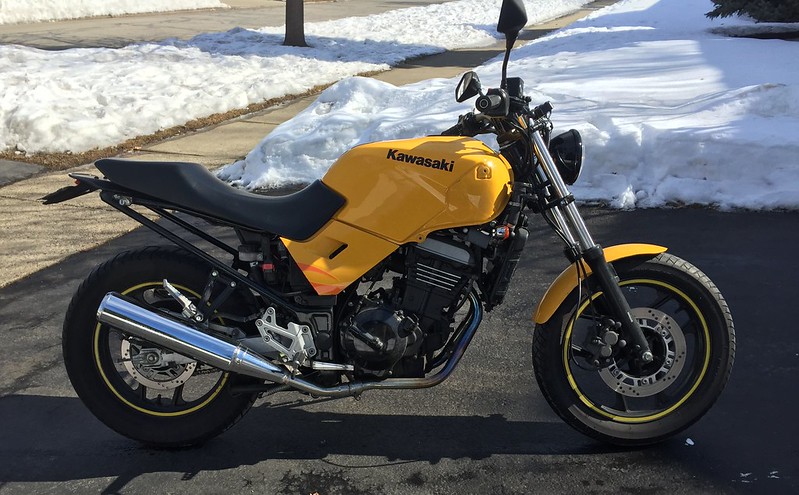  That rear mudguard is is also new. It's made from formed 1/16" aluminum and a dirtbike fender extender with a tiny LED tail and brake light. We also swapped the cafe-style rear turn signals with little lights mounted in the ends of the frame tubes. It's all very lightweight, and the mudguard protects the rider's back from the prodigious amounts of moisture on the roads around here, especially this time of year. 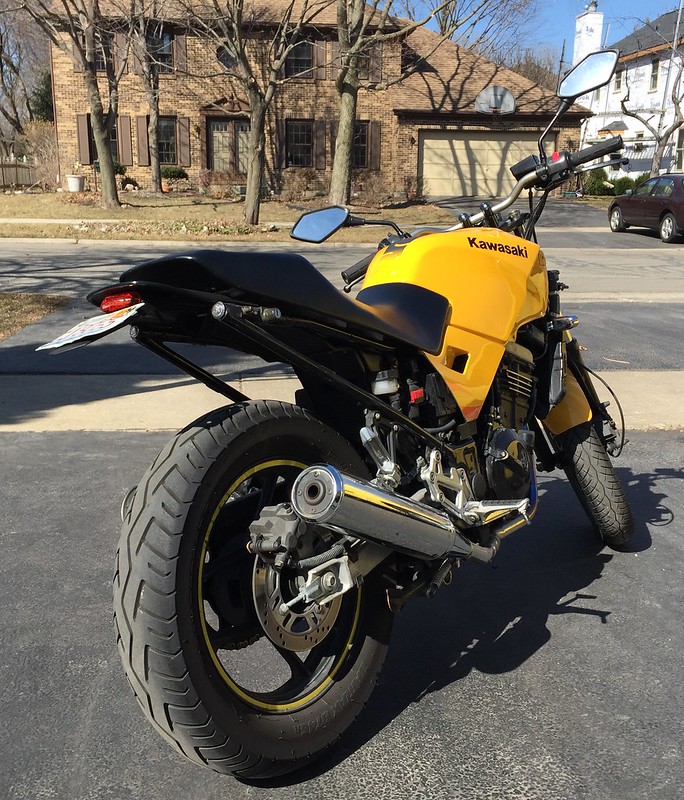 Anyhow, the bike's up and running around. Just need some decent weather. |
|
|
1 out of 1 members found this post helpful. |
|
March 25th, 2015, 10:22 AM
|
#84 |
|
The Corner Whisperer
Name: Chris (aka Reactor)
Location: Northern KY
Join Date: May 2011 Motorcycle(s): 2010 250 (track), 1992 250, 2006 R6 (street/track), 2008 R6 (track) Posts: Too much.
MOTY 2015, MOTM - Nov '12, Nov '13
|

__________________________________________________
Goal: Shake A Million Hands | Look through the corners | Track Day Prep | Closest track? | The Mid-Ohio School |
|
|
|
|
March 25th, 2015, 10:40 AM
|
#85 |
|
I'm crazy,your excuse is?
Name: Winston
Location: Connecticut
Join Date: May 2013 Motorcycle(s): 250 2007 ninja Posts: A lot.
|
Getting better and better!

|
|
|
|
|
March 26th, 2015, 03:03 AM
|
#86 |
|
ninjette.org guru
Name: harry
Location: Central Florida
Join Date: Sep 2013 Motorcycle(s): 2006 Ninja 250, 2004 Buell XB12s, Honda 110 Elite Posts: 332
|
nekkid frame tubes in the back
I just can't get past the look of the nekkid frame tubes in the back. The rest looks great.
__________________________________________________
"They don't pay me enough to ride this thing!" Kenny Roberts after winning the Indy Mile on the TZ750 powered Grand National bike. |
|
|
|
|
April 15th, 2015, 11:33 AM
|
#87 | |
|
ninjette.org member
Name: Dan
Location: .
Join Date: Feb 2015 Motorcycle(s): . Posts: 46
|
Quote:
|
|
|
|
|
|
April 15th, 2015, 12:18 PM
|
#88 | |
|
ninjette.org certified postwhore
Name: Fish
Location: co
Join Date: Apr 2013 Motorcycle(s): 250/300 Posts: A lot.
|
Quote:
__________________________________________________
Hey Unregistered never go faster than your brakes can be applied... |
|
|
|
|
|
April 15th, 2015, 04:56 PM
|
#89 | |
|
ninjette.org member
Name: Jeff
Location: Niagara Region
Join Date: Mar 2013 Motorcycle(s): 2005 Ninja 250 Posts: 64
|
Quote:
image.jpg |
|
|
|
2 out of 2 members found this post helpful. |
|
April 17th, 2015, 07:40 AM
|
#91 | |
|
ninjette.org certified postwhore
Name: Colin
Location: Bay Area
Join Date: Feb 2011 Motorcycle(s): '96 EX250 Posts: A lot.
|
Quote:
__________________________________________________
Ç¥ñ頻| ßÿ Ñâ7µ®é. Äñt¡~§º¢Ïä| ßý Çhøî©è. |
|
|
|
|
|
April 17th, 2015, 08:48 AM
|
#92 | |
|
I'm crazy,your excuse is?
Name: Winston
Location: Connecticut
Join Date: May 2013 Motorcycle(s): 250 2007 ninja Posts: A lot.
|
Quote:
Click VVVV |
|
|
|
|
|
April 17th, 2015, 11:00 AM
|
#93 | |
|
ninjette.org member
Name: Jeff
Location: Niagara Region
Join Date: Mar 2013 Motorcycle(s): 2005 Ninja 250 Posts: 64
|
Quote:
Hangars are just some nuts and 1/4" rod welded up and powdercoated |
|
|
|
|
|
April 17th, 2015, 12:14 PM
|
#94 | |
|
ninjette.org certified postwhore
Name: Colin
Location: Bay Area
Join Date: Feb 2011 Motorcycle(s): '96 EX250 Posts: A lot.
|
Quote:
__________________________________________________
Ç¥ñ頻| ßÿ Ñâ7µ®é. Äñt¡~§º¢Ïä| ßý Çhøî©è. |
|
|
|
|
|
August 24th, 2016, 04:10 PM
|
#95 |
|
ninjette.org guru
Name: Bob
Location: Chicago
Join Date: Sep 2012 Motorcycle(s): '06 Ninja 250, 2018 Honda GL1800B Posts: 315
|
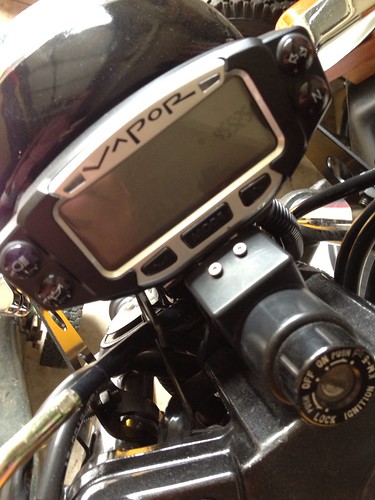
Remounted the Vapor gauge
We recently made a new bracket and remounted the Trail Tech Vapor gauge in an offset position. Its a little more compact this way.
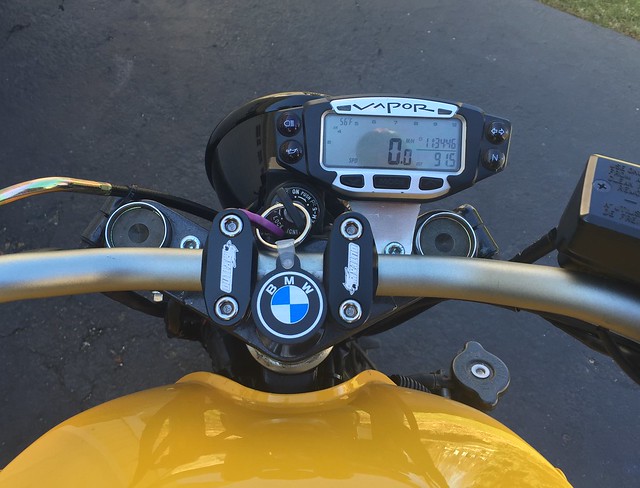  Another thing - finally got rid of the yellow rim tape, which I hate. We couldn't figure out how to remove it, so a wide black Sharpie came to the rescue 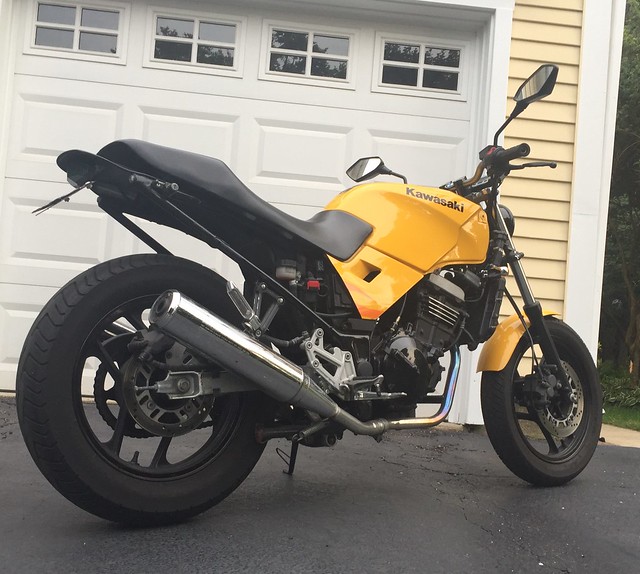 Also, saw 98 mph on the highway. Couldn't get any more, even with a speedway tuck. 15T front sprocket may be hindering top gear revs. |
|
|
|
|
August 24th, 2016, 04:37 PM
|
#96 |
|
Guy Who Enjoys Riding
Name: Jim
Location: North Carolina
Join Date: Jul 2016 Motorcycle(s): Ninja 250 Posts: A lot.
MOTM - Oct '18, Aug '17, Aug '16
|
Good to see you here, Bob. I don't know if you saw my post on the other board about the 250 I did after seeing yours, but I posted in your thread to say thanks.
|
|
|
|
|
August 25th, 2016, 12:41 AM
|
#97 |
|
Certifiable nontundrum
Name: Harper
Location: NC Milkshake stand
Join Date: Mar 2013 Motorcycle(s): 2013 SE NINJA 300 Posts: Too much.
MOTM - Sep '13, Sep '16
|
Looks way better without rim tape... Never thought I'd say that
__________________________________________________

|
|
|
|
|
August 25th, 2016, 06:11 AM
|
#98 |
|
ninjette.org certified postwhore
Name: Tom
Location: Northern Virginia
Join Date: Jul 2015 Motorcycle(s): 2001 Ninja 250, 2019 Harley Ultra Classic, 2001 Suzuki SV650 Posts: A lot.
MOTM - Jan '16
|
What handlebars, mounts and cables did you use?
Looking to do a similar thing on one of mine. |
|
|
|
|
August 25th, 2016, 06:45 AM
|
#99 |
|
ninjette.org guru
Name: Bob
Location: Chicago
Join Date: Sep 2012 Motorcycle(s): '06 Ninja 250, 2018 Honda GL1800B Posts: 315
|
Renthal low bars (Ultra or Super Low, can't remember what they call it). Outlaw bar mounts from Amazon (many other types available there, too). We used hex-drive bolts, rather than the bolts supplied by Outlaw, so they could be tightened from above.
Stock cables and wires, with a stock-length Venhill braided steel brake line. I had to reroute the clutch cable a little, I think. It's been a few years. |
|
|
|
|
December 3rd, 2016, 02:50 PM
|
#100 |
|
ninjette.org member
Name: Adam
Location: logan
Join Date: Nov 2016 Motorcycle(s): 2005 ninja 250 Posts: 74
|
[QUOTE=Chicagobob;592913] fabbed a taillight mount and turn signal mounts,
How did you fab the taillight and signal mounts and what did you use? Also wehre did you get the taillight? |
|
|
|
|
December 3rd, 2016, 03:16 PM
|
#101 | |
|
ninjette.org guru
Name: Bob
Location: Chicago
Join Date: Sep 2012 Motorcycle(s): '06 Ninja 250, 2018 Honda GL1800B Posts: 315
|
[QUOTE=acook3323;1148652]
Quote:
|
|
|
|
|
|
December 11th, 2016, 11:28 AM
|
#102 |
|
ninjette.org guru
Name: Chris
Location: Bristol, UK
Join Date: Feb 2016 Motorcycle(s): ZZR250, VFR800 Posts: 478
|
You might want to remove the paint on the expansion tank just the rectangle between the upper & lower mark lines so you can see what the fluid level is.
Bike does look good. |
|
|
|
|
December 11th, 2016, 02:15 PM
|
#103 | |
|
ninjette.org member
Name: Adam
Location: logan
Join Date: Nov 2016 Motorcycle(s): 2005 ninja 250 Posts: 74
|
[QUOTE=Chicagobob;1148656]
Quote:
|
|
|
|
|
|
December 11th, 2016, 02:50 PM
|
#104 | |
|
ninjette.org member
Name: Adam
Location: logan
Join Date: Nov 2016 Motorcycle(s): 2005 ninja 250 Posts: 74
|
[QUOTE=Chicagobob;1148656]
Quote:
|
|
|
|
|
|
December 12th, 2016, 08:31 PM
|
#105 | |
|
ninjette.org guru
Name: Bob
Location: Chicago
Join Date: Sep 2012 Motorcycle(s): '06 Ninja 250, 2018 Honda GL1800B Posts: 315
|
[QUOTE=acook3323;1149871]
Quote:
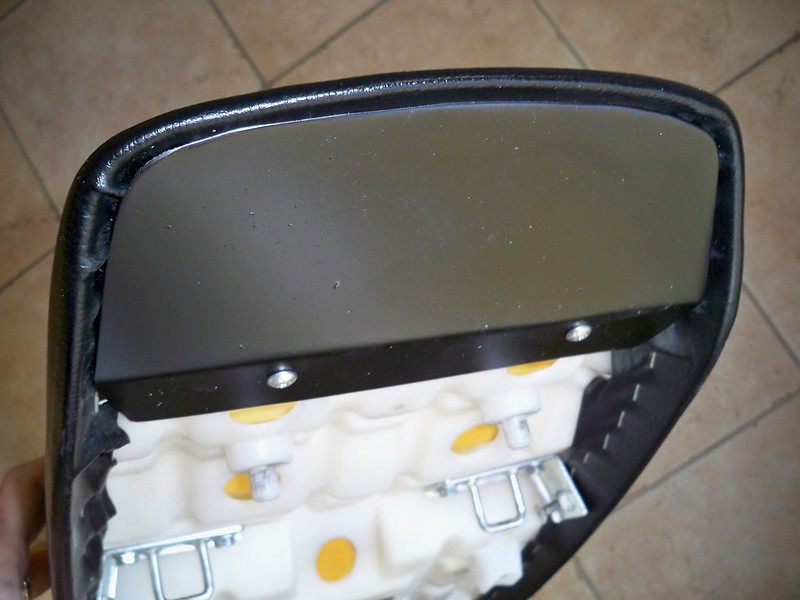
 The taillight is mounted (with double-sided foam tape, because its original bolts have failed) to a small aluminum bracket that is bolted to the bottom of this plate, like so: 
|
|
|
|
|
|
May 16th, 2017, 10:01 AM
|
#106 |
|
.
Name: .
Location: .
Join Date: Aug 2014 Motorcycle(s): . Posts: A lot.
MOTM - July '15
|
Hey, Bob. I've slowly been seeing more and more of your style of bike on here. I did some of your mods to my bike a while ago, and have since seen more and more in the wild, and a few on Craigslist. You're famous-ish
|
|
|
|
|
May 16th, 2017, 11:03 AM
|
#107 | |
|
ninjette.org guru
Name: Bob
Location: Chicago
Join Date: Sep 2012 Motorcycle(s): '06 Ninja 250, 2018 Honda GL1800B Posts: 315
|
Quote:
 
|
|
|
|
1 out of 1 members found this post helpful. |
|
May 16th, 2017, 12:51 PM
|
#108 | |
|
ninjette.org certified postwhore
Name: Bill
Location: Port Huron, Michigan
Join Date: Mar 2017 Motorcycle(s): 2007 Kawasaki 250 Ninja, 1982 Honda Ascot FT500 Posts: A lot.
|
Quote:
Cheers, Bill |
|
|
|
|
|
May 19th, 2017, 07:23 PM
|
#109 | |
|
ninjette.org member
Name: Craig
Location: San Luis Obispo, CA
Join Date: Jul 2016 Motorcycle(s): 2014 Ninja 300 ABS, 2007 Yamaha FZ6 Posts: 210
|
Quote:
Also, yes; you want to make sure plenty of air is getting to it, BUT a stock Ninja 250 has it hidden under fairings anyway where I'm assuming not a whole lot of air can get to it, so I wouldn't be too worried about it. |
|
|
|
|
|
May 19th, 2017, 10:50 PM
|
#110 | |
|
ninjette.org certified postwhore
Name: Bill
Location: Port Huron, Michigan
Join Date: Mar 2017 Motorcycle(s): 2007 Kawasaki 250 Ninja, 1982 Honda Ascot FT500 Posts: A lot.
|
Quote:
Bill |
|
|
|
|
|
July 5th, 2017, 11:47 PM
|
#111 |
|
ninjette.org newbie
Name: Tom
Location: Fremont
Join Date: Jul 2017 Motorcycle(s): Ninja 250 Posts: 2
|
Late
Pretty late to the party but I was curious how you went about fabricating your aluminum sheets.. any particular tools?? Are they all 1/16" thick? all the ones near me at like lowes are so thin. Also did you end up keeping the original rear fender? I'm having alot of issues trying to replicate what you did with the fender extender.. would this work similarly? (except removing the light) https://www.amazon.com/dp/B01FLNOH1I...=2C9AOJJEB0HUS
|
|
|
|
|
July 6th, 2017, 04:33 AM
|
#112 |
|
ninjette.org guru
Name: Bob
Location: Chicago
Join Date: Sep 2012 Motorcycle(s): '06 Ninja 250, 2018 Honda GL1800B Posts: 315
|
I'm not sure how thick mine is, but I've used 1/16 and 1/32, aluminum plate, which you can get from various eBay sellers. Hardware stores don't usually carry it. I've been able to get a 24" X 24" plate on occasion. It is very useful for fabrication.
And that looks exactly like the Acerbis light we used. Last futzed with by Chicagobob; July 7th, 2017 at 05:11 AM. |
|
|
|
|
July 30th, 2017, 02:36 PM
|
#113 |
|
ninjette.org guru
Name: Bob
Location: Chicago
Join Date: Sep 2012 Motorcycle(s): '06 Ninja 250, 2018 Honda GL1800B Posts: 315
|
New taillight and "fender"
So, inspired by Rielen's $10 Amazon Acerbis knockoff dirt bike taillight/fender from this thread, we decided to again change the rear of the ultralight Ninjette cafe/scrambler. The idea was to control rainwater spray while adding as little bulk as possible to the rear of the bike. This light weighs only a few ounces, looks sleek, and is bright.
We replaced the $6 Chinese taillight and plate aluminum license holder with the dirt bike item, but then what to do about the license plate? Fortunately, we had one of those bobber-style axle mounted plate brackets. It needed a little trimming to thin the mounting hole area enough to allow the axle nut to fully seat, but it fits, and the curve even matches the bike's 16" wheel, so on it went: 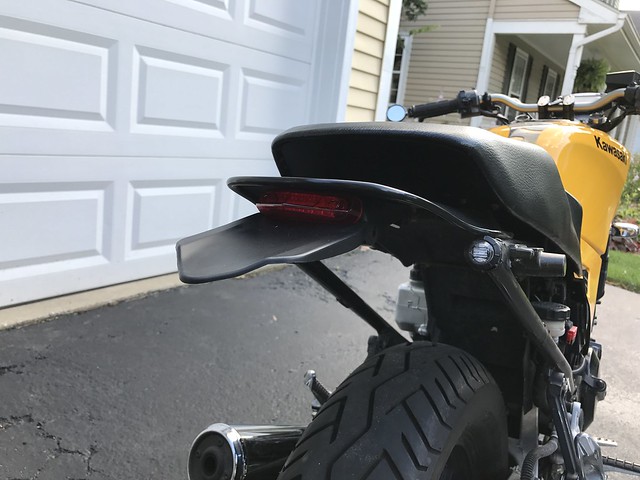 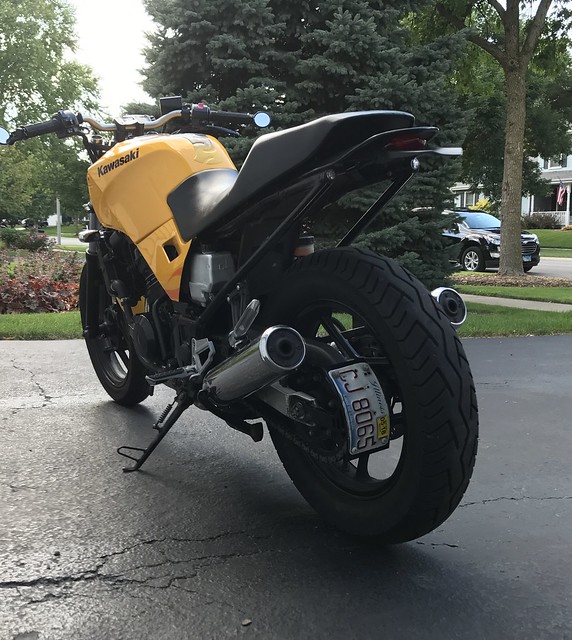  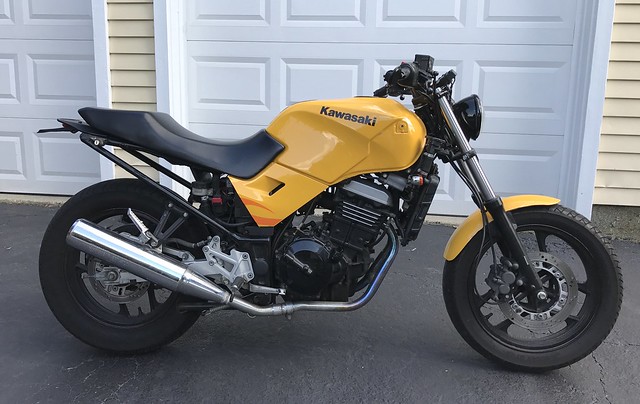
|
|
|
|
|
July 30th, 2017, 02:38 PM
|
#114 | |
|
ninjette.org guru
Name: Bob
Location: Chicago
Join Date: Sep 2012 Motorcycle(s): '06 Ninja 250, 2018 Honda GL1800B Posts: 315
|
Quote:
|
|
|
|
|
|
July 30th, 2017, 03:40 PM
|
#115 | |
|
ninjette.org member
Name: Craig
Location: San Luis Obispo, CA
Join Date: Jul 2016 Motorcycle(s): 2014 Ninja 300 ABS, 2007 Yamaha FZ6 Posts: 210
|
Quote:
|
|
|
|
|
|
August 22nd, 2017, 01:25 PM
|
#116 |
|
ninjette.org member
Name: Chris
Location: Dawson Springs
Join Date: Aug 2017 Motorcycle(s): 2007 Ninja 250 Posts: 17
|
Chicagobob, found your bike in google image search months ago. You have been my inspiration for my build. I cannot find the pic of how you mounted the brain and rectifier. I'm guessing the battery looks to be in the stock position as well as the fuse box. Love how you trimmed the side pieces. Looks good. Just the right amount of naked.
|
|
|
|
|
August 22nd, 2017, 02:55 PM
|
#117 | |
|
ninjette.org guru
Name: Bob
Location: Chicago
Join Date: Sep 2012 Motorcycle(s): '06 Ninja 250, 2018 Honda GL1800B Posts: 315
|
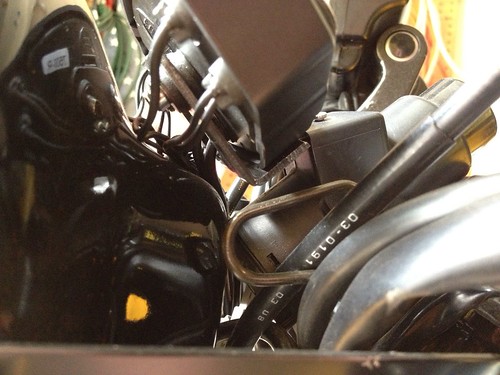
Quote:
 Since this was taken, we switched to a Ballistic 4-cell battery, very small and light, which is in the battery box, leaving room for the ECU in there also. The rectifier is still bolted to the airbox like it is in this photo. We cut out the part of the rear fender that had the rectifier mounting lugs, and screwed it to the airbox with sheet metal screws. We've also since painted the coolant reservoir silver. |
|
|
|
|
|
August 22nd, 2017, 07:46 PM
|
#118 | |
|
ninjette.org newbie
Name: Steve
Location: Wentzville, MO
Join Date: Aug 2017 Motorcycle(s): 2009 Ninja 250 Posts: 3
|
Quote:
|
|
|
|
|
|
August 23rd, 2017, 05:32 AM
|
#119 | |
|
ninjette.org guru
Name: Bob
Location: Chicago
Join Date: Sep 2012 Motorcycle(s): '06 Ninja 250, 2018 Honda GL1800B Posts: 315
|
Quote:
|
|
|
|
|
|
August 23rd, 2017, 10:28 AM
|
#120 |
|
ninjette.org member
Name: Chris
Location: Dawson Springs
Join Date: Aug 2017 Motorcycle(s): 2007 Ninja 250 Posts: 17
|
Thank you very much. I'll throw the airbox back in. I was going to go with the two cone air filters, but seems like using the airbox for a the battery box as well as a mounting surface works great. I'm gonna pull the fender and trim it up as well. I am very sorry for copy catting your build. bike looks great and everything you've done is amazing. I will be doing some differences for the lights front and back, so they will be a little different =)
this front light https://www.amazon.com/gp/product/B0...A1YO4CUGMH8FEZ this rear light https://www.amazon.com/gp/product/B0...=ARHL164GNCEO7 and these turns https://www.amazon.com/gp/product/B0...A2O0WRO2IFEXV7 I will be running the same look for handlebars. its a great look. and the trailtech looks great. I'm going to try the cheap knockoff first. Its 40.00. I'm sure i will hate myself for it. https://www.amazon.com/gp/product/B0...=AY1GFLIL9VDFX
__________________________________________________
 "the field mouse is fast, but the owl sees at night" "the field mouse is fast, but the owl sees at night"
|
|
|
|
 |
 Similar Threads
|
||||
| Thread | Thread Starter | Forum | Replies | Last Post |
| Lightening her up | Chicagobob | 1986 - 2007 Ninja 250R Tech Talk | 57 | October 7th, 2014 10:55 AM |
| [RoadRUNNER] - The Lightening LS-218 the Electric Superbike | Ninjette Newsbot | Motorcycling News | 0 | May 26th, 2014 03:01 AM |
| [motorcyclistonline] - VIR Cancels Suzuki White Lightening Nationals, AMA Pro Road Ra | Ninjette Newsbot | Motorcycling News | 0 | July 11th, 2011 07:30 PM |
| [superbikeplanet.com] - VIR Decides No DMG: "White Lightening" Indeed | Ninjette Newsbot | Motorcycling News | 0 | July 11th, 2011 04:30 PM |
| [superbikeplanet.com] - MotoGP: Thunder & Lightening On The Grid | Ninjette Newsbot | Motorcycling News | 0 | March 16th, 2010 09:50 AM |
|
|