
|
 April 24th, 2012, 10:38 PM
|
#1 |
|
Milkshake Drinker
Name: Skippii
Location: Richmond, Va
Join Date: Aug 2011 Motorcycle(s): 2007 Orange DRZ400-S, 2005 Ninja 250 & Custom Thundercunt Dirt Chopper Posts: A lot.
|
Imagine this: You're out riding one day, you're miles from home, and you start to get low on gas.
You pull up to a gas station, insert you key into the tank...and it doesn't turn. You squirt half a bottle of WD40 into the keyhole, but nothing works. What do you do? After it happened to me, I was surprised by how many other people had the same thing happen. A few days ago, a friend asked me for advice when it happened to her. The next day, on my second bike as I opened the tank, the thought occurred to me that the key wasn't turning quite as smoothly as it once did. I decided to go through the procedure again on this bike to avoid being stranded again, and take lots of pictures to help my friend and anyone else who wanted to keep their lock in good mechanical condition. The black motorcycle is my 2005 Kawasaki Ninja 250--the one on which I got stranded. I'd taken a few pics at the time, but not too many. The orange one is my 1995 Kawasaki Ninja 500. The lock was just starting to get sticky, but it still opened. The issue seems to happen mostly on bikes stored outside. How often they are ridden (and therefore, the tank opened) doesn't seem to make much difference. I'll also mention three important things if you find yourself stuck and unable to open the gas tank lock: #1: Because of how the lock drains rain, spraying a penetrating lubricant into the keyhole won't fix your problem. I sprayed half a can in my first one, only to find the corroded parts completely dry. The lube just won't go to the problem part. #2. Be absolutely positive you have (and know the location of) your spare key before you try to force the lock open. Keys snap pretty easily, even just from extended periods of jiggling. #3. Although the application of heat can work wonders on stuck nuts and bolts, it is NOT recommended you point a blowtorch at your gas tank. Step 1. If you're doing preventative maintenance, skip the first two steps and go to step 3. If you're stuck, here's what you need to do on a pre-gen Ninja 250 or Ninja 500R. Remove the allen bolts around the tank cap. Try not to lose them. 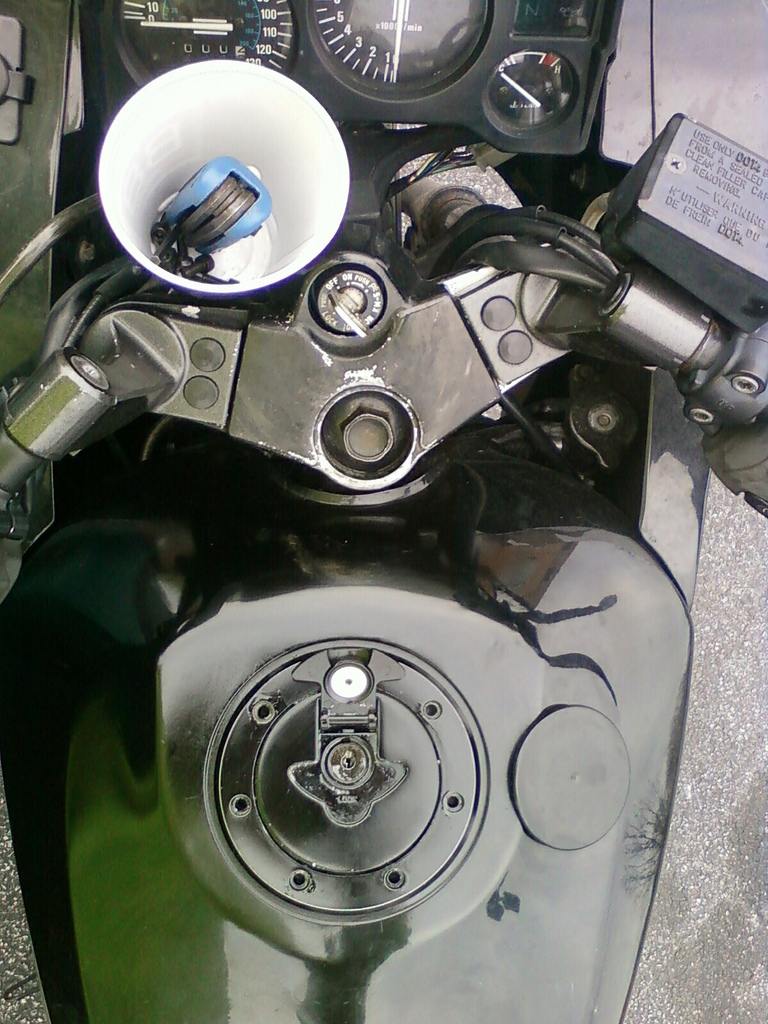 Step 2. There is one more screw preventing you from removing the cap, and it's underneath the cap. You need to drill a hole to access it. The hole won't effect anything. It's above the gasket that keeps water from entering the tank, so there's no need to seal it back up when you're done or anything. In fact, if you do ever have it happen again, you'll be glad you only need to screwdriver and an allen wrench from your toolkit to fill up and get home.) The hole goes in about the 2:30 position. Study the pic carefully so you know where to drill. Leave the key in the lock while you drill or put a bit of tap over the keyhole as you do not want to get any metal shaving in there. You just need a hole big enough to get a Phillips screwdriver in there. If I remember correctly, you don't even need to make it big enough to pull the screw through it--you just have to loosen it all the way. Here is where I drilled the hole on the Ninja 250: 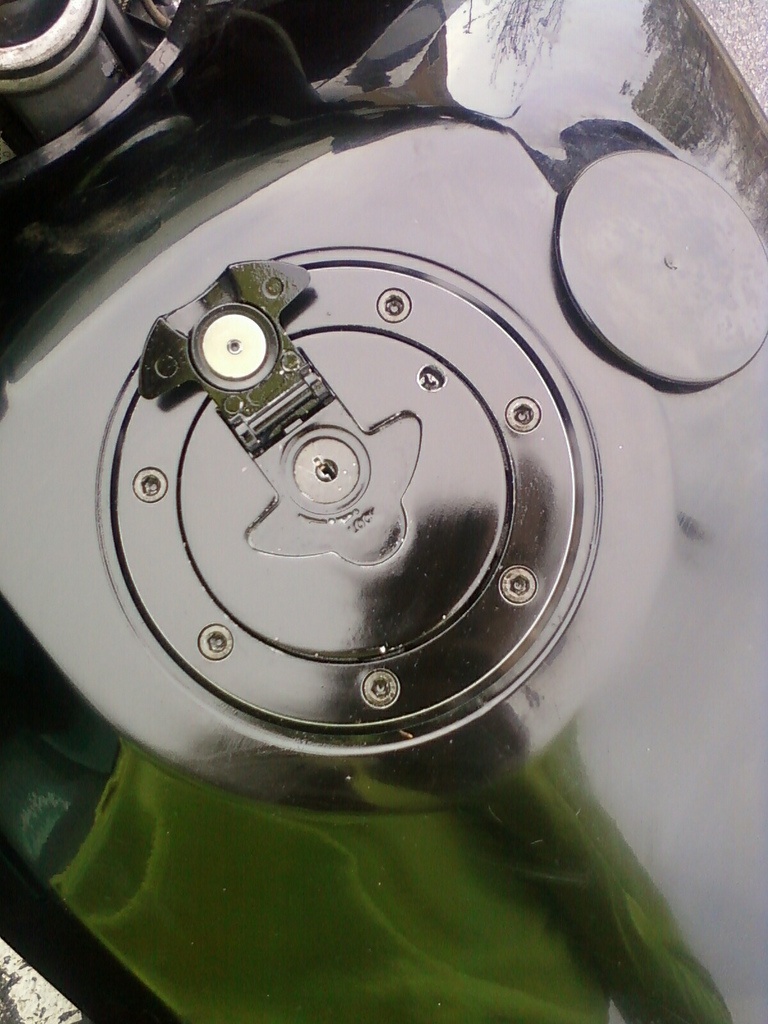 Here is where you can see the screw on the Ninja 500R (which didn't need to be drilled): 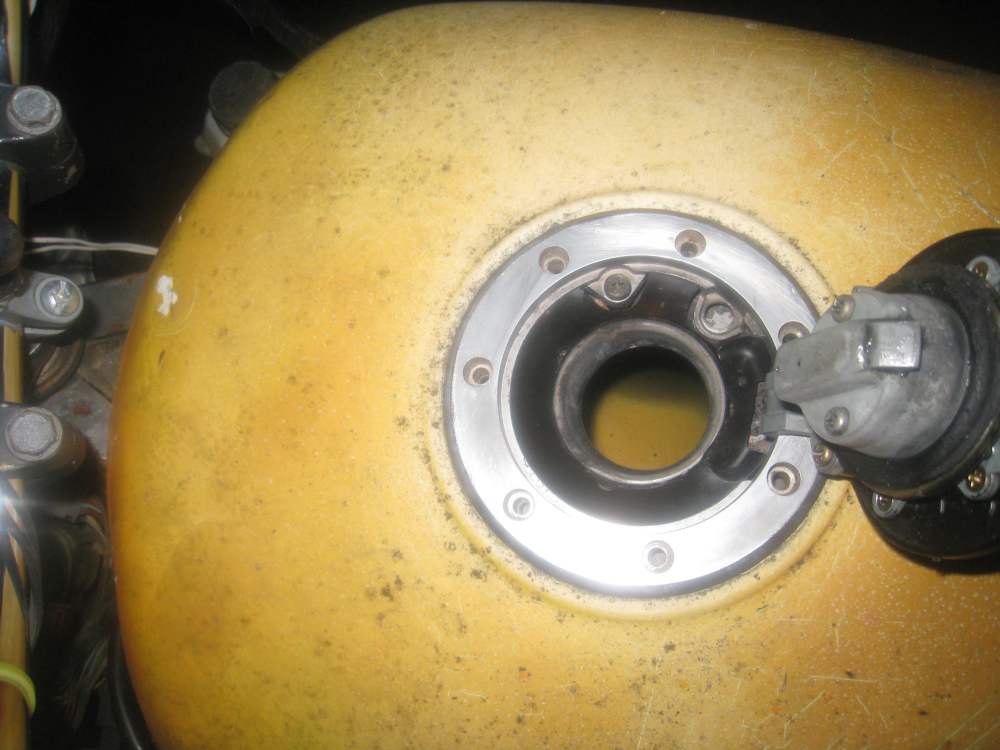 Step 3. Remove the cap. The rest of these pictures will be from the orange 500, unless otherwise noted. Stuff a clean rag in the hole so no dirt goes into your tank while you're working.  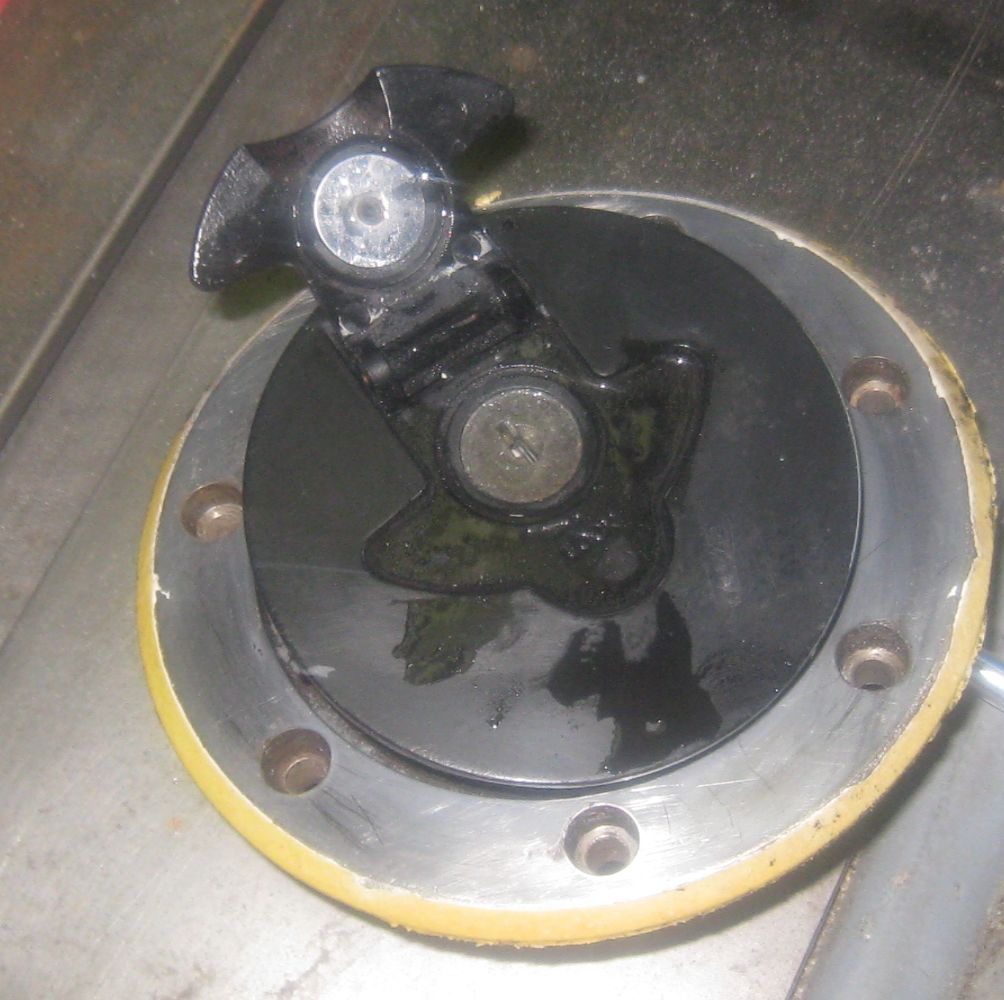 Step 4. Pull off that rubber gasket from the bottom of the cap assembly. 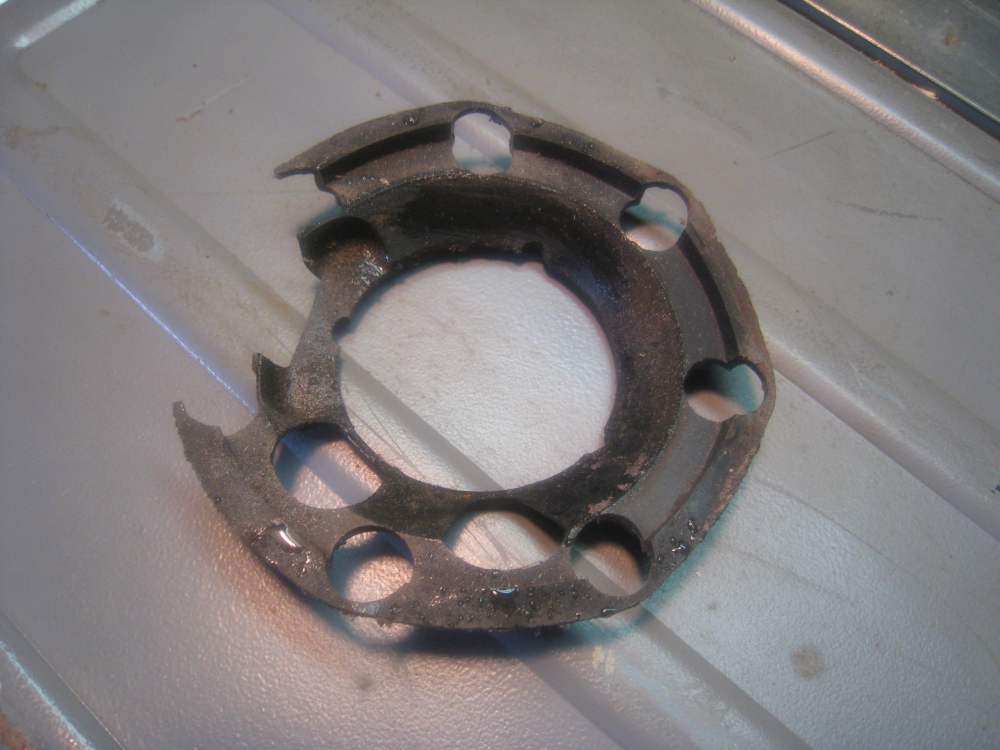 Step 5. Clean it.  Step 6. Remove those 2 brass screws that connect the two parts. 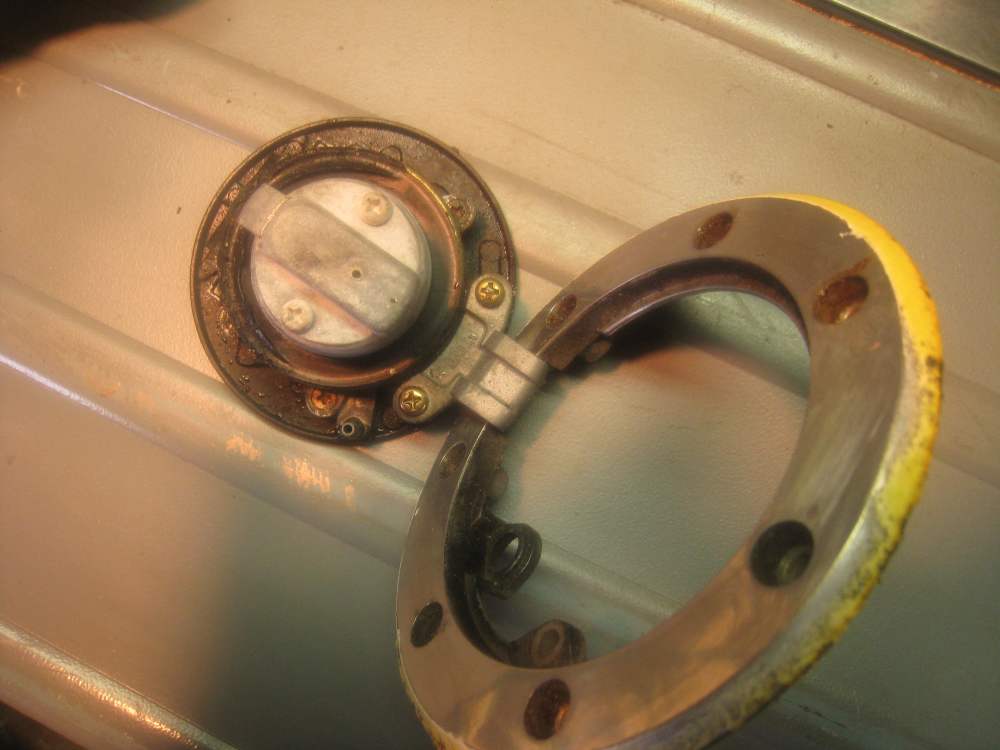 Here's the lock mechanism:  Step 7. Clean it up with a toothbrush. Any hotel/motel should give you a handful of these disposable ones for free if you ask. 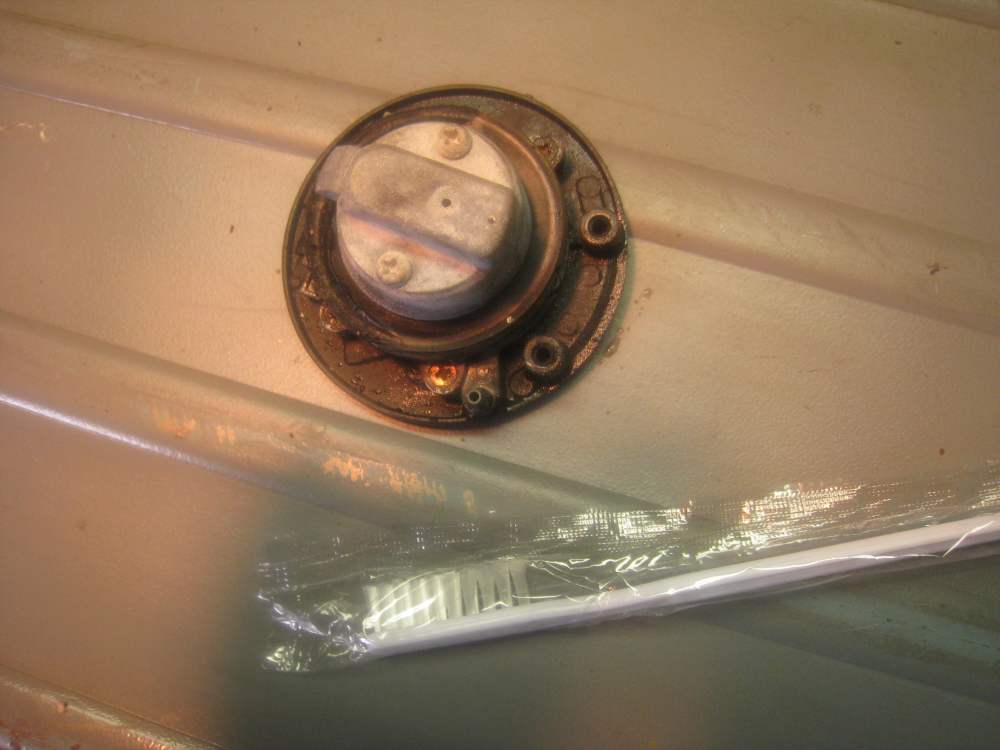 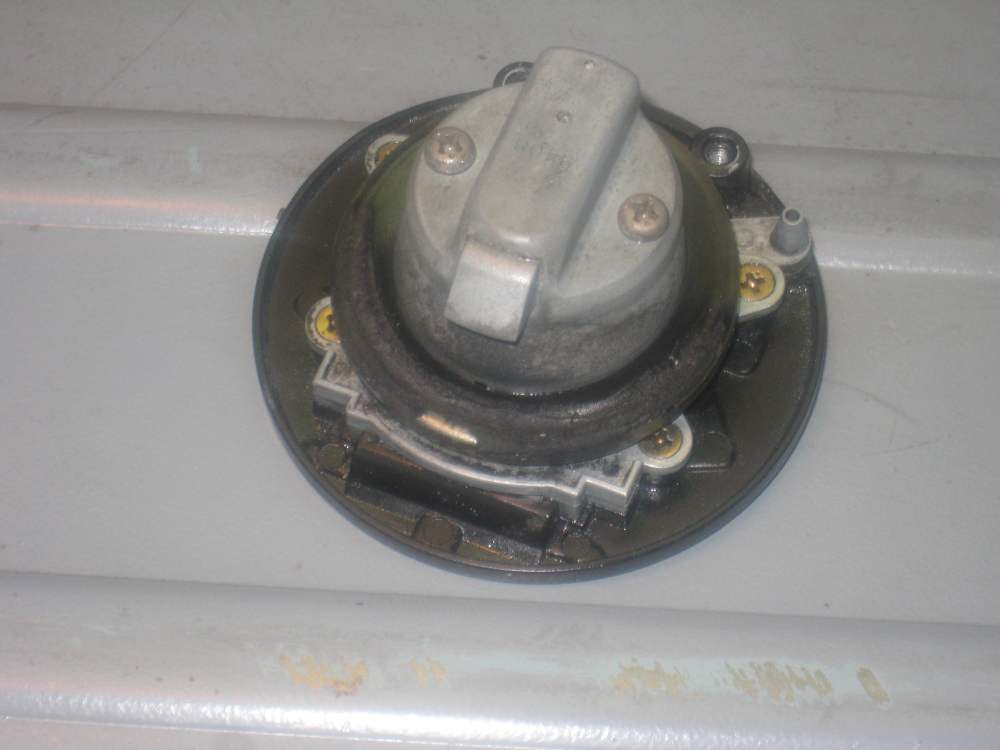 Step 8. Remove those two screws on top. Use a GOOD quality screwdriver. Those screws will be corroded and stuck. You do not want to strip them. If they won't come out, use a penetrating lube.   Step 9. As you are working, from completely out of nowhere, some random cat will pounce on your worktable.  Seriously, I have no idea where this cat came from. She pounced on the table and knocked over all the stuff I was working on. Then she jumped into my arms and started purring. Once you have thrown the cat outside, shut the door, and picked all the parts off the floor, continue to step 10. Step 10. Gently clean up those corroded screws with a wire brush.  Step 11. Pull apart the top and bottom of the lock. 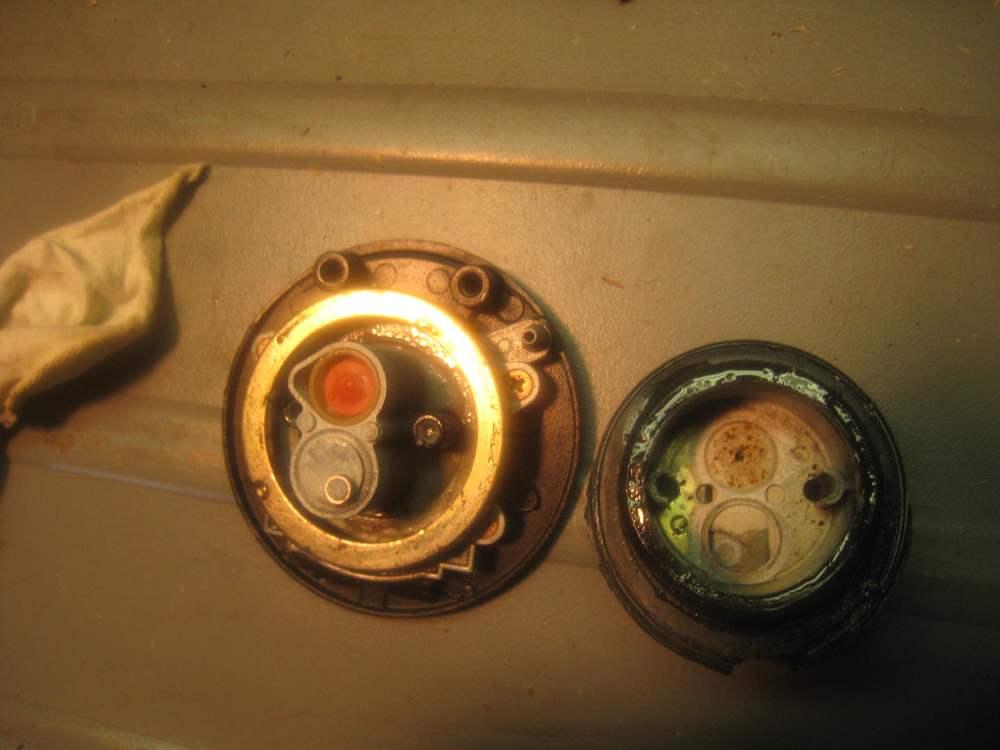 The column shaped like a figure-8 on the left has a cap on the lower circle with a smaller circle inside. That cap comes off if you're not careful--make sure you don't lose it. Remove the big brass ring on the left side. Step 12. Under the brass ring are 5 springs. Remove them and put them somewhere safe where they won't get knocked over by random cats. 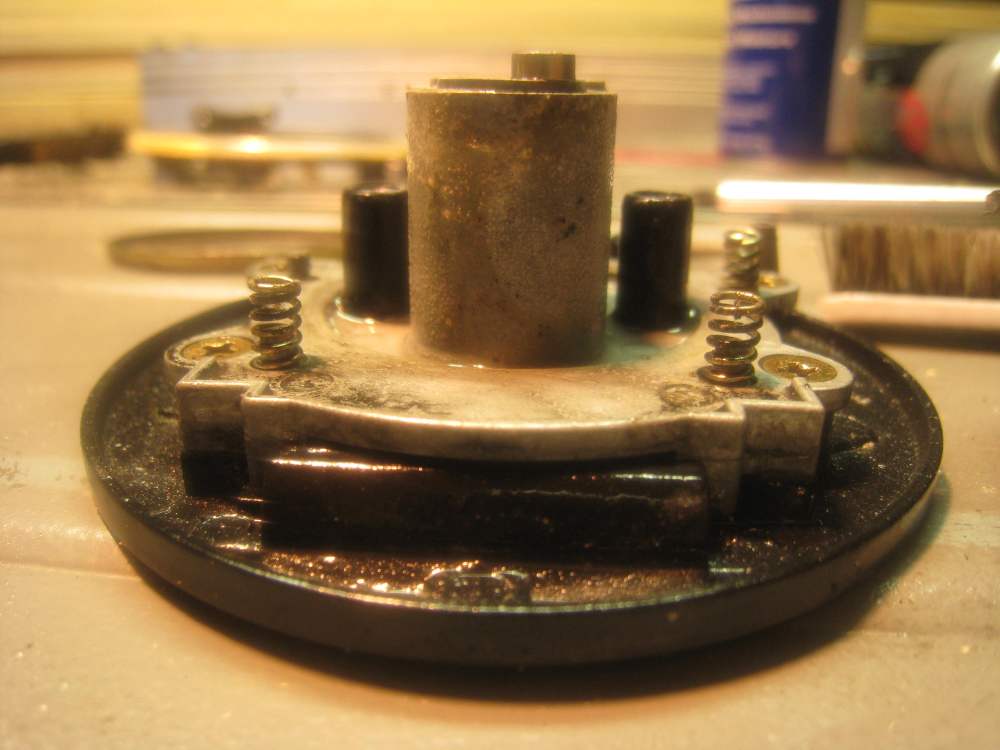 Step 13. Remove the rubber gasket from the lower part of the assembly (the part on the right on the pics above) This gasket is looking pretty worn and needs to be replaced. It's unlikely you just happen to have a spare one lying around, though, so it'll have to do for now. 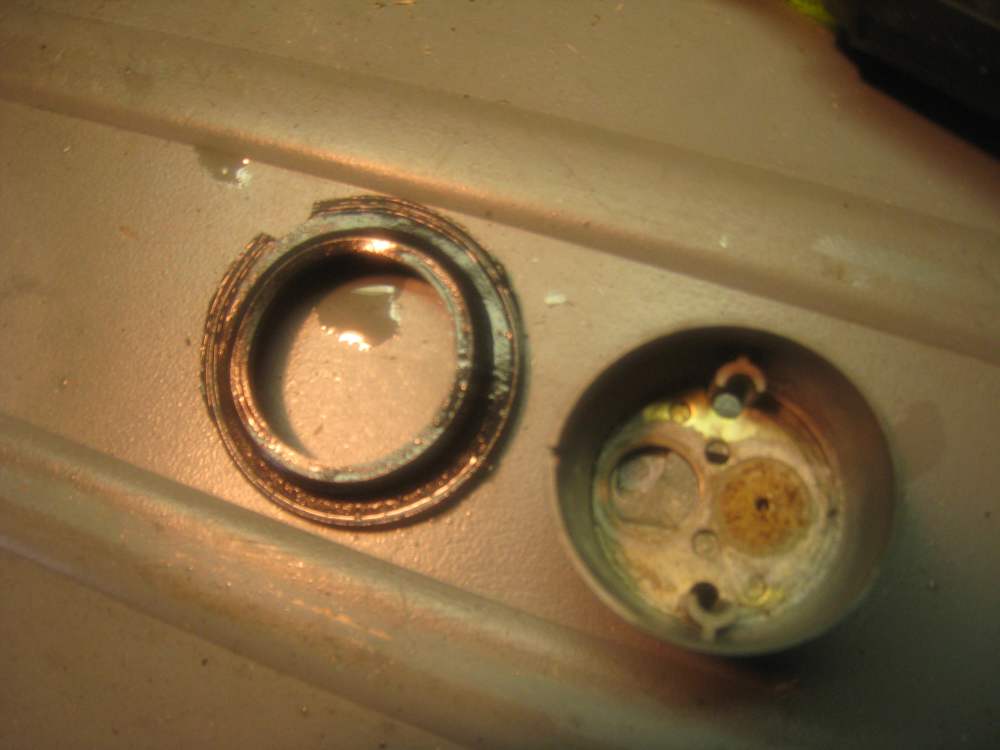 Step 14. Start cleaning everything with the toothbrush and WD-40, or whatever you like to use for cleaning with a toothbrush. Toothpaste might seem to be the logical choice, but it would likely cause more problems with corrosion in the future. Here are a couple picture from the 250 to give you an idea of what you're likely to see: big flakes of metal coming off everything and jamming up the latch.  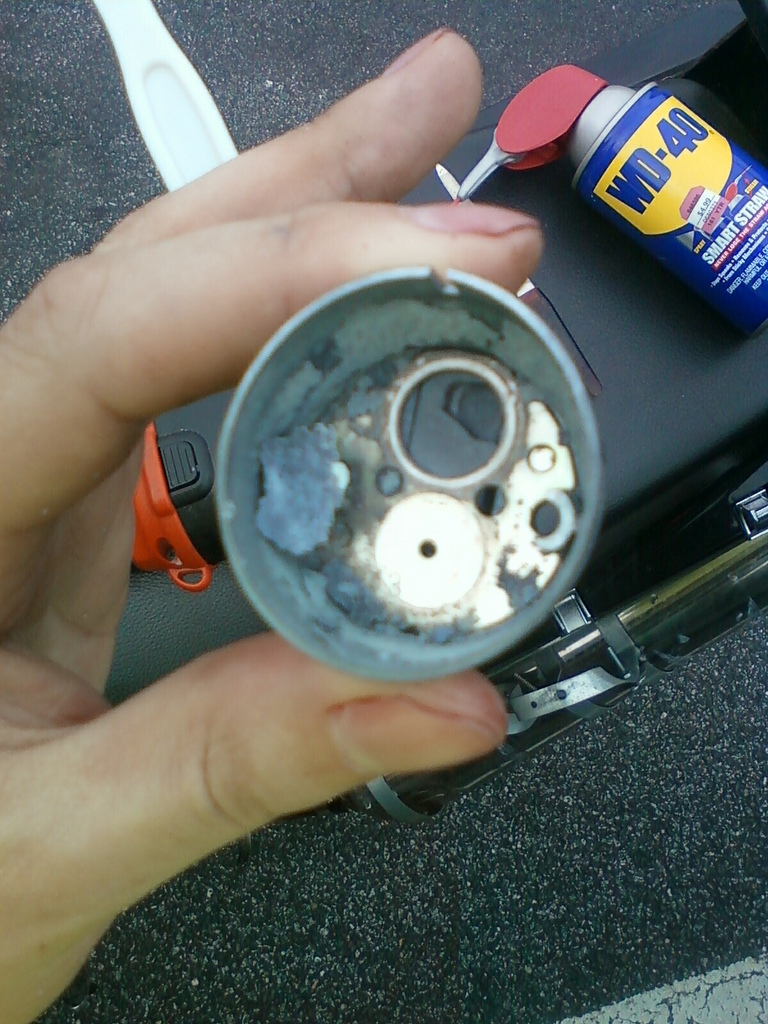 The lock works by that little knob circle cap I mentioned in #11 twists in the base of the cup, pulling the latch, shown here, inward. 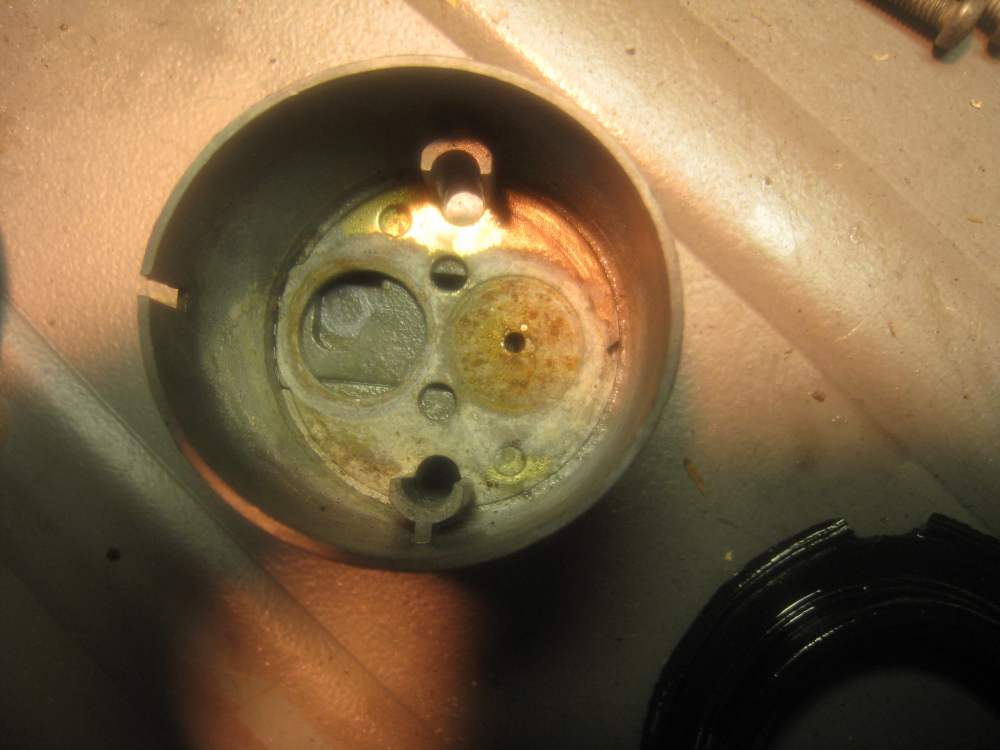 Step 15. Once everything is reasonably clean (no flakes of stuff left), lube it all up with some grease: I could only find this stuff this time. Last time I used marine grease, which, since it's supposed to be used on boat trailer wheel bearings that regularly get submerged, probably is more water resistant. I doubt there's really much difference in grease choice for this application, considering that this isn't anything that Kawasaki thinks ever needs to be lubed and can be left dry. They're wrong, but any kind of grease should probably last for years. Vasoline would probably work just fine. 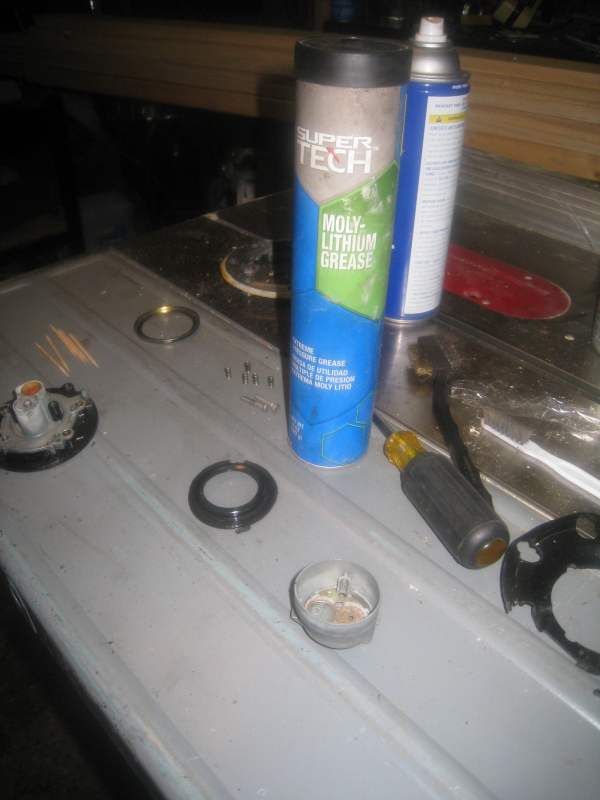 Don't be stingy with the grease. Dump a good glob on there and use a toothpick to make sure it gets into all the little tight spots. Get grease all along the latch both inside and outside. Push in the latch projecting out of the lock, and really work it back and forth to make sure the grease is well distributed.  Step 16. Then just use the toothbrush to make sure all the surfaces are covered in grease. 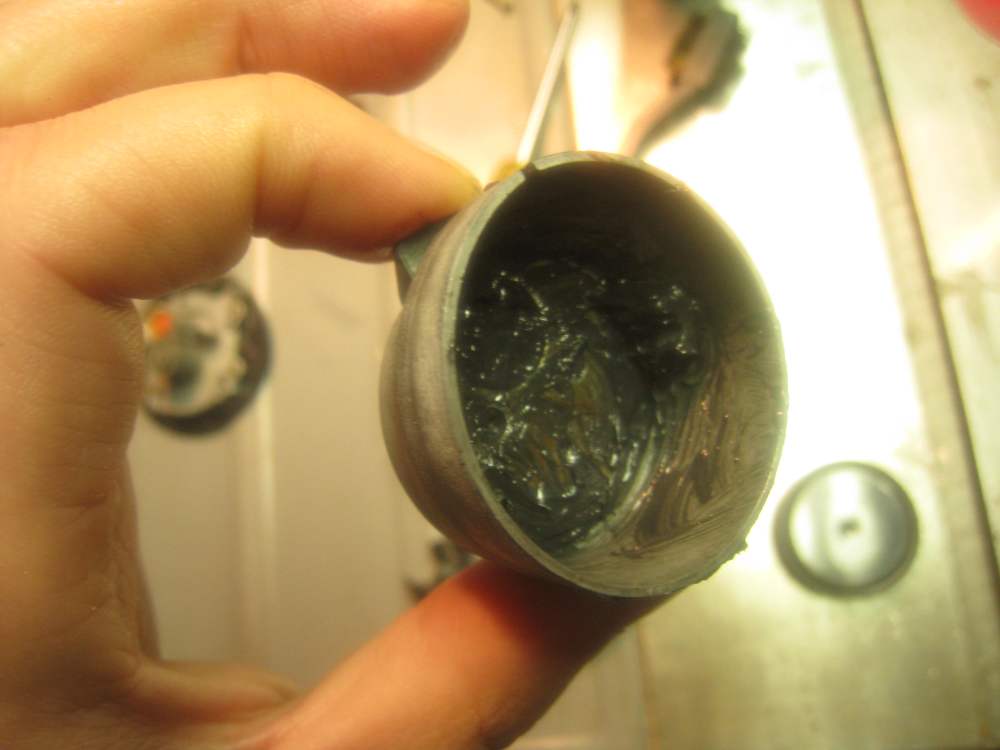 Step 17. Put the rubber gasket back on. (A new one if you have one, otherwise, just clean the old one.)  Step 18. Okay, seriously, where the hell did this thing come from? I guess I left the door open when I went back to the house for dinner... 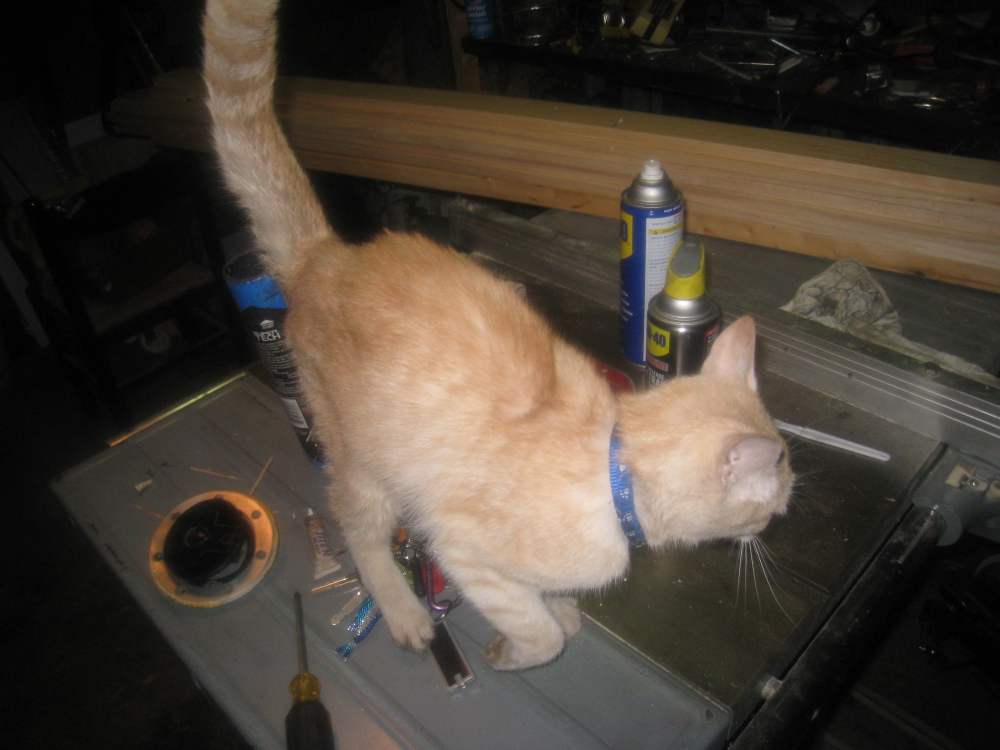 It's really skinny, but it does have a collar, so I guess it's not a stray. It's really starting piss me off though. It's hard to be mad at a cat that keeps jumping into your arms and purring, though. I put it down on the ground, and it starts headbutting my legs. Then it jumps back up on the table and headbutts the cans and tube of grease, knocking them over and onto the floor before I can stop it. Step 19. Reassemble the lock. Remember to put the 5 springs back under the brass ring.  Those screws in the top need to be tight enough that they won't fall into the gas tank, but not so tight that the actually press on the lock, which will make it harder to open with your key. Low-strength loctite would be a good option here if you can get all the grease out of the holes and off the screws. I used "Loctite Tite'n" which is their lowest strength--it's more of a thread sealant, so it prevents corrosion of the metals while still being easy to remove. You can see the tube by my keys under the cat in step 18. Insert your key and work the lock back and forth with the key to make sure everything is nice and smooth again. Step 20. Screw the lock back to the rim.  Put it back on the bike, and you're all done. If you feel the key start to stick again, repeat this procedure at the first sign of trouble...it's not worth getting stranded at a gas station. I did this about a year ago on the 250 and it's worked perfectly ever since (and it's always been stored outside with no cover, and has seen plenty of rain). I'll post an update if I ever have to do it again, but so far everything has been smooth.
__________________________________________________
"What a sweetheart."- ninja_sleeper to me |

|

|
|
April 24th, 2012, 11:28 PM
|
#2 |
|
TylersEM2
Name: Tyler
Location: Washington
Join Date: Apr 2012 Motorcycle(s): None yet Posts: 58
|
Nice write-up! I read the whole thing, even though I still don't even have a motorcycle...
__________________________________________________
Stanced 02 Civic, Check! 08+ 250r, ...Not yet... |
|
|
|
|
April 27th, 2012, 04:01 PM
|
#3 |
|
ninjette.org guru
Name: Bill
Location: Orlando
Join Date: Dec 2008 Motorcycle(s): 2008 Ninja 250r - Traded for 2009 ER-6N Posts: 424
|
My ER-6n had the same issue... All ready to ride, and me and a friend are looking at each other like "what now?"
I cheated. We were 5 minutes from the dealer I bought it at, they were open, and the bike was under warranty. They dosed it liberally with WD-40 to unstick it, then recommended I lube it occasionally with something a bit more permanent such as lithium grease. Which I hit it with occasionally. I suspect a decent chain wax would work, as well.
__________________________________________________

|
|
|
|
|
April 29th, 2012, 06:40 PM
|
#4 |
|
ninjette.org certified postwhore
Name: Jono
Location: Memphis, TN
Join Date: Sep 2011 Motorcycle(s): 2009 Triumph Street Triple, 2009 KLX250SF, 2003 Suzuki SV650S (Sold), 2006 Ninja 250 (Sold) Posts: A lot.
|
Nice write-up.
BUT, you should have just bought graphite powdered lubricant. It works great for sticky locks. http://www.acehardware.com/product/i...ductId=1295694 |
|
|
1 out of 1 members found this post helpful. |
|
April 29th, 2012, 07:02 PM
|
#5 |
|
ninjette.org certified postwhore
Name: Frugal
Location: Dallas/Fort Worth (DFW)
Join Date: Mar 2010 Motorcycle(s): Several Posts: A lot.
|
FWIW, the lock cylinder is separated from the latch with rubber seals designed to keep gasoline from coming up through the key hole. Any lube you spray into the lock cylinder will have no effect on the latch, which is usually the culprit due to corrosion resulting from water condensation.
|
|
|
|
|
April 30th, 2012, 12:26 AM
|
#6 |
|
ninjette.org dude
Name: 1 guess :-)
Location: SF Bay Area
Join Date: Jun 2008 Motorcycle(s): '13 Ninja 300 (white, the fastest color!), '13 R1200RT, '14 CRF250L, '12 TT-R125LE Posts: Too much.
Blog Entries: 7
|
Great thread! Where should I link this from, is it applicable to new-gens as well? (makes it easier to put in the DIY thread there)
__________________________________________________
Montgomery Street Motorcycle Club / cal24.com / crf250l.org / ninjette.org ninjette.org Terms of Service Shopping for motorcycle parts or equipment? Come here first. The friendliest Ninja 250R/300/400 forum on the internet! (especially Unregistered) |
|
|
|
|
May 2nd, 2012, 10:04 AM
|
#7 | |
|
Milkshake Drinker
Name: Skippii
Location: Richmond, Va
Join Date: Aug 2011 Motorcycle(s): 2007 Orange DRZ400-S, 2005 Ninja 250 & Custom Thundercunt Dirt Chopper Posts: A lot.
|
Quote:
Would this perhaps go best in the wiki section? If so, do you want to host the pics in case I forget to pay my hosting bills and lose them? (It's happened before--although I try to remember to keep backups these days!)
__________________________________________________
"What a sweetheart."- ninja_sleeper to me |
|
|
|
|
|
May 2nd, 2012, 06:18 PM
|
#8 |
|
ninjette.org dude
Name: 1 guess :-)
Location: SF Bay Area
Join Date: Jun 2008 Motorcycle(s): '13 Ninja 300 (white, the fastest color!), '13 R1200RT, '14 CRF250L, '12 TT-R125LE Posts: Too much.
Blog Entries: 7
|
Wiki would be fine. Pics can be loaded directly to the wiki, or it can link elsewhere (other sites, or into picture albums here on this site).

__________________________________________________
Montgomery Street Motorcycle Club / cal24.com / crf250l.org / ninjette.org ninjette.org Terms of Service Shopping for motorcycle parts or equipment? Come here first. The friendliest Ninja 250R/300/400 forum on the internet! (especially Unregistered) |
|
|
|
|
April 28th, 2013, 06:41 AM
|
#9 |
|
ninjette.org newbie
Name: Dragineez
Location: Annapolis
Join Date: Apr 2013 Motorcycle(s): 2005 Ninja 250, 2001 SV-650, 1994 ZX-9R Posts: 7
|
Agree that this is too good to languish in the forum and should be in the wiki. One minor note. After removing the bolts I thought the cap would just lift out of the tank. It doesn't. You have to rotate the cap about a quarter turn counter clockwise to remove the cap from the tank.
__________________________________________________
+-+-+-+-+-+-+-+-+ Motorcycle Roadracing - as a matter of fact it IS rocket science! |
|
|
|
|
April 28th, 2013, 12:26 PM
|
#10 |
|
ninjette.org newbie
Name: Dragineez
Location: Annapolis
Join Date: Apr 2013 Motorcycle(s): 2005 Ninja 250, 2001 SV-650, 1994 ZX-9R Posts: 7
|
NEVER Remove The Keyhole Flap!
Filed under the category of learning from the mistakes of others....
Never, ever, under any circumstances, remove that little flap that covers the keyhole. There are two tiny ball bearings, then a tiny little spring, held by a tiny little copper dowel on each side. These will, of course. come shooting out at high mach speed numbers - never to be seen again. Even if you do, somehow, maintain possession of these miniscule parts - good luck re-assembling the hinge.
__________________________________________________
+-+-+-+-+-+-+-+-+ Motorcycle Roadracing - as a matter of fact it IS rocket science! |
|
|
1 out of 1 members found this post helpful. |
|
April 28th, 2013, 01:10 PM
|
#11 |
|
ninjette.org newbie
Name: Dragineez
Location: Annapolis
Join Date: Apr 2013 Motorcycle(s): 2005 Ninja 250, 2001 SV-650, 1994 ZX-9R Posts: 7
|
Task Completed
I want to extend my thanks to Skippii, the author of this thread. Great "how-to" that has been ~mostly~ successful in my own gas cap rebuild project. A couple of "gotchas" that you might want to watch out for if you have to do this yourself.
Got this bike (2005 Ninjette) off Craig's List as my daughter's first bike. I'm firmly convinced it's been sitting in a shed since at least 2006. Cosmetically, it's beautiful. Though the battery was dead, it took a charge and all the electric stuff works and it did crank. Couldn't get the gas cap open though. After doing much research I tried everything mentioned anywhere by anybody on how to get a stuck gas cap open. No go. Nothing was going to get the key to turn. Then I stumbled upon this thread and realized I'd have to go the complete removal route. Gotcha #1: The OP is right, after drilling a hole to get at the inside screw it is NOT necessary to completely remove the screw. Since he didn't sound sure about that and since - after drilling the hole and unscrewing the inside screw - I could not get the cap to come off. So I figured he was wrong and complete removal of the screw was necessary. What I didn't know was that you can't just lift the cap straight out. You have to rotate the cap a quarter turn counter clockwise. Then it comes right out. So, my mistake was first trying for complete screw removal. My first mistake of many. Though my first hole was nearly as pretty as the OP's, subsequent attempts to widen the hole added ugly on top of ugly. Bad Ugly Hole Upon removal it immediately became apparent that absolutely no method whatsoever would ever have gotten that key to turn. The rust and crud had basically welded the locking mechanism. Condition Upon Removal The cause was likewise immediately apparent. The entire inside of the gas tank sported some sort of complex crystalline matrix of rust. Crystalline Entity Removing those two bottom screws became a nightmare. One I was able to successfully extract. The other? No way. I'm not a gifted or overly experienced mechanic, but I know my way around a wrench. This is far from the first stubborn screw I've ever had to deal with. No extraction method I tried would get the other screw out. I finally had to resort to cutting the head off the screw with a Dremel. After disassembly, it still took a lot of persuasion with a pair of vice grips and lots of penetrant to finally get the screw out. I replaced both with M4-.7x20mm Hex head bolts. Gotcha #2: Filed under the category of learning from the mistakes of others.... Never, ever, under any circumstances, remove that little flap that covers the keyhole. There are two tiny ball bearings, then a tiny little spring, held by a tiny little copper dowel on each side. These will, of course. come shooting out at high mach speed numbers - never to be seen again. Even if you do, somehow, maintain possession of these miniscule parts - good luck re-assembling the hinge. Following the instructions in this thread, the rest went fairly smoothly. I now have a working gas cap. Partial Reassembly - Slathered With Lithium Grease Yes, that's lithium grease - get your mind out of the gutter! Partial Reassembly - New Bottom Bolts You can see where I had to decapitate the original screw. Reassembly Complete! Ready for re-installation. Next up - rust treatment of the gas tank. Footnote: No cats were harmed in the performance of this maintenance.
__________________________________________________
+-+-+-+-+-+-+-+-+ Motorcycle Roadracing - as a matter of fact it IS rocket science! Last futzed with by Dragineez; May 28th, 2013 at 04:07 PM. Reason: Improvement - linked instead of embedded image |
|
|
1 out of 1 members found this post helpful. |
|
April 28th, 2013, 01:41 PM
|
#12 |
|
Riding Ruby..
Name: Stephen
Location: SoCal
Join Date: Sep 2012 Motorcycle(s): 2014 Yamaha Bolt R-Spec, 2007 Ninja 250R Posts: 392
|
Awwww kitty ��
Also great write up!
__________________________________________________
Unregistered |
|
|
|
|
April 28th, 2013, 03:08 PM
|
#14 |
|
ninjette.org newbie
Name: Sammy
Location: San Francisco
Join Date: Mar 2013 Motorcycle(s): Kawasaki Ninja 300 ABS SE Posts: 7
|
Write up TLDR (though I should) but just wanted to up-vote for the cat

|
|
|
|
|
April 28th, 2013, 06:33 PM
|
#15 |
|
ninjette.org dude
Name: 1 guess :-)
Location: SF Bay Area
Join Date: Jun 2008 Motorcycle(s): '13 Ninja 300 (white, the fastest color!), '13 R1200RT, '14 CRF250L, '12 TT-R125LE Posts: Too much.
Blog Entries: 7
|
__________________________________________________
Montgomery Street Motorcycle Club / cal24.com / crf250l.org / ninjette.org ninjette.org Terms of Service Shopping for motorcycle parts or equipment? Come here first. The friendliest Ninja 250R/300/400 forum on the internet! (especially Unregistered) |
|
|
|
|
May 26th, 2013, 07:30 PM
|
#16 |
|
ninjette.org certified postwhore
Name: Jason
Location: Monroe, MI
Join Date: May 2013 Motorcycle(s): '75 CB550:.'82 XV920:.'00 KLR650:.'00 EX250:.'08 Ninja 250 Posts: A lot.
MOTM - June '15
|
Thanks! I used your write up to re-key my tank lock!
|
|
|
|
|
April 9th, 2014, 10:25 AM
|
#17 |
|
ninjette.org newbie
Name: Christina
Location: Columbus Ohio
Join Date: Apr 2014 Motorcycle(s): 2005 Kawasaki Ninja 500R Posts: 1
|
Great write up - the pictures are great. I do have one question, I would like to purchase the fuel cap gasket in advance but I can't seem to find a part number for it. Does anyone have a link to a schematic or the part number? Thanks
|
|
|
|
|
April 9th, 2014, 10:53 AM
|
#18 |
|
ninjette.org newbie
Name: Dragineez
Location: Annapolis
Join Date: Apr 2013 Motorcycle(s): 2005 Ninja 250, 2001 SV-650, 1994 ZX-9R Posts: 7
|
Is That Necessary?
While I won't dispute that you need new gaskets, I will ask if you're sure. I can't imagine an intact tank and cap in worse shape than mine and new gaskets were not necessary.
Depending upon the age of the bike, I'd want to find out if it had ever had the recall service done. I took my bike to a Kawasaki dealer to get the carb sorted out and they gave me a brand new tank - for free. The tank had been recalled because of rusting problems. You might want to see if you can get the same recall service performed.
__________________________________________________
+-+-+-+-+-+-+-+-+ Motorcycle Roadracing - as a matter of fact it IS rocket science! |
|
|
|
|
April 9th, 2014, 11:31 AM
|
#19 | |
|
RIP Alex
Name: Cuong
Location: Houston, TX
Join Date: Apr 2011 Motorcycle(s): '10 250r, '09 265r Posts: A lot.
Blog Entries: 2
|
Quote:
__________________________________________________
HalfFast Racing Team Serving Greater Houston Area Riders:WFO Riders MotoHouston HPC CMRA Ride Smart Fastline Lone Star Track Days |
|
|
|
|
|
April 9th, 2014, 12:00 PM
|
#20 | |
|
ninjette.org guru
Name: Jesse
Location: Maryville, TN
Join Date: Nov 2012 Motorcycle(s): Ugly 89 frankenstien special ex250, and the "Zooks" : 1982 GS450 and 1979 GS1000 Posts: 327
|
Quote:

__________________________________________________
 Oh god the bikes are multiplying!!! Oh god the bikes are multiplying!!!
|
|
|
|
|
|
April 9th, 2014, 12:45 PM
|
#21 |
|
ninjette.org newbie
Name: Dragineez
Location: Annapolis
Join Date: Apr 2013 Motorcycle(s): 2005 Ninja 250, 2001 SV-650, 1994 ZX-9R Posts: 7
|
Kawasaki Dealer Service
That was in June of last year. So if the bike is covered by the recall and the recall service hasn't been done yet, the bike should be eligible.
__________________________________________________
+-+-+-+-+-+-+-+-+ Motorcycle Roadracing - as a matter of fact it IS rocket science! |
|
|
|
|
April 11th, 2014, 10:15 PM
|
#22 |
|
ninjette.org member
Name: Juan
Location: Rancho Cucamonga
Join Date: Jan 2013 Motorcycle(s): 1995 Kawasaki Ninja EX250 with 8500 miles!! Posts: 41
|
awesome write up, will keep this in mind for the future
__________________________________________________
are you aware? |
|
|
|
|
May 10th, 2014, 10:37 AM
|
#23 |
|
CPT Falcon
Name: J.Emmett Turner
Location: Newnan, GA
Join Date: Apr 2009 Motorcycle(s): '08 CP Blue EX250J, '97 unpainted EX250F, 2nd '97 unpainted EX250F (no engine), '07 black EX250F Posts: A lot.
|
Just so you know, replica replacement fuel doors are less than $20 on eBay, if you don't mind carrying another key.
|
|
|
|
|
May 13th, 2014, 04:59 AM
|
#24 |
|
ninjette.org certified postwhore
Name: Paul
Location: UK
Join Date: Apr 2014 Motorcycle(s): Ninja 250, Yamaha RS200 (classic) Posts: A lot.
|
Duplicated

|
|
|
|
|
May 13th, 2014, 05:07 AM
|
#25 |
|
ninjette.org certified postwhore
Name: Paul
Location: UK
Join Date: Apr 2014 Motorcycle(s): Ninja 250, Yamaha RS200 (classic) Posts: A lot.
|
Yep I had this. It's because rain gets in past the flap seal as it gets older. I put a large plastic lid on when it is parked out the back, no trouble since.
Your real problem is that the water that gets in will corrode the tank I suggest anyone with a pregen take the invisible internal screw out now whilst it opens and carry an allen key in the tool tray that way it can never ever leave you stranded. |
|
|
|
|
May 13th, 2014, 05:31 AM
|
#26 |
|
ninjette.org member
Name: todd
Location: pittsburgh
Join Date: Apr 2014 Motorcycle(s): 1995 ninja 250r Posts: 130
|
Just did this yesterday. Between 14 and 15 I turned the bottom piece over and gave it a smack on the ground and the back plate that covers The slider came out. That area was filled with crud on mine too.
|
|
|
|
|
May 13th, 2014, 07:41 AM
|
#27 |
|
ninjette.org member
Name: Phil
Location: Austin, Tx
Join Date: Jul 2013 Motorcycle(s): 2006 Kawasaki Ninja 250 Posts: 12
|
Did this this past weekend as well as ordered a keyless gas cap. Just pointing out that it did work and mine was filled with white rust? Not sure what it was, but I got it cleaned out and working until the new cap comes in. Thanks for the write up
|
|
|
|
|
June 5th, 2014, 12:15 PM
|
#28 |
|
ninjette.org member
Name: Max
Location: UK
Join Date: Jan 2012 Motorcycle(s): Kawasaki Ninja EX250 K8F Posts: 89
|
ty so much for the write up. helped me loads. my lock is now working again
 ) saved me a snapped key! ) saved me a snapped key!
|
|
|
|
|
August 26th, 2014, 07:33 AM
|
#29 |
|
ninjette.org newbie
Name: Camilo
Location: fort lauderdale,fl
Join Date: Aug 2014 Motorcycle(s): ninja 250r 2012 Candy Lime Green Posts: 3
|
Hey have you found the fuel cap gasket?
|
|
|
|
|
June 29th, 2016, 03:13 PM
|
#30 |
|
ninjette.org newbie
Name: DarqueStarr
Location: Texas
Join Date: Jun 2016 Motorcycle(s): 1987 Honda Nighthawk 650; 2007 Ninja 250 Posts: 6
|
Hey Guys!...
I know this is an old post...but this is the problem I am currently having with my Ninja. My locking mechanism has been soaking in penetrating lubricant for a few DAYS now and that crystallized build-up is NOT breaking down!!! Any other suggestions for breaking it down and getting it cleaned? Thanks! |
|
|
|
|
June 30th, 2016, 03:15 AM
|
#31 |
|
ninjette.org certified postwhore
Name: Paul
Location: UK
Join Date: Apr 2014 Motorcycle(s): Ninja 250, Yamaha RS200 (classic) Posts: A lot.
|
 You say you can see the crud and the lock mechanism is soaking which suggests you already have it off? You say you can see the crud and the lock mechanism is soaking which suggests you already have it off?If it is off just dismantle clean and grease it (being careful with the catch spring,) it is not particularly complex. Skippii's OP post is very good On reassembly the critical thing is to ensure the little rubber seal on the key flap is in good shape and seats cleanly. That little sod is what lets the rain in, not usually the big chunky rubber the bolts go through. Once again unless fuel theft is a major risk omit the one allen bolt under the flap then you can always unbolt the lock in an emergency. Don't drill unless there is no choice because a thief can easily see the drilling but not an omitted bolt under an undrilled cap. |
|
|
|
|
June 30th, 2016, 06:17 PM
|
#32 |
|
ninjette.org certified postwhore
Name: Frugal
Location: Dallas/Fort Worth (DFW)
Join Date: Mar 2010 Motorcycle(s): Several Posts: A lot.
|
|
|
|
|
|
December 6th, 2017, 02:55 PM
|
#33 |
|
ninjette.org newbie
Name: Paul
Location: Cornfield, IL
Join Date: May 2013 Motorcycle(s): '98 Ninja 250 Posts: 1
|
I had this problem this past summer on a 98' I had noticed my lock getting tricky to open, but i assumed it was because my key was pretty worn and the age of he bike, but it worked so i just saw it as a characteristic of the bike. Well I was on my way home from school for the summer (750 mi ride) and my bike kept dying on the interstate like it was running out of gas. long story short, got a lift home, assumed it was carbs, rebuilt carbs, jetted and did pods, The carbs looked super clean but i did it anyway. Fired up and rode 30 miles and it died again... Got a hair up my ass from hearing people talk about vapor lock and give taking apart the gas cap a shot and this is what found. This is only a fraction of what didn't fall out when i took it a part. there was double that amount on my lap. It was so corroded that the breather in the cap had be blocked and a vacuum would build in my tank starving the carbs of fuel.
TLDR: If your gas cap is sticky and think you have carb/fuel problems LOOK AT YOUR GAS CAP  
|
|
|
|
|
December 6th, 2017, 05:13 PM
|
#34 | |
|
ninjette.org certified postwhore
Name: Bill
Location: Port Huron, Michigan
Join Date: Mar 2017 Motorcycle(s): 2007 Kawasaki 250 Ninja, 1982 Honda Ascot FT500 Posts: A lot.
|
Quote:
Two locksmiths have told me NEVER to squirt WD-40 into a tumbler lock. The first situation was when I worked at a bank and the on-payroll bank locksmith came out to work on our main vault. I casually mentioned that the front door lock was sticky and I would spray it with WD-40. He calmly put down his tools, stood up, looked me straight in the face and said "Don't you dare!", and returned to his work. This past spring I had keys made for my Ninja by a locksmith who worked out of his home. After he cut my keys I asked him what I should use to lubricate my lock tumblers. He walked me over to his van and pulled out a can of "WD-40 SPECIALIST WATER RESISTANT SILICONE LUBRICANT". So, I have hit each lock on my Ninja with CRC Electroinic Cleaner followed by a shot of WD-40 silicone. Regular WD-40 gums-up after a while and your lock will work very poorly - maybe not at all. I hate locking gas caps and replaced mine with an aftermarket non-locking cap. Nice write-up. Bill
__________________________________________________
Insanity: doing the same thing over and over again expecting different results each time. |
|
|
|
|
|
December 6th, 2017, 05:35 PM
|
#35 |
|
Guy Who Enjoys Riding
Name: Jim
Location: North Carolina
Join Date: Jul 2016 Motorcycle(s): Ninja 250 Posts: A lot.
MOTM - Oct '18, Aug '17, Aug '16
|
I'm with Jono as far as using graphite lock lubricant powder. Oil of any kind risks making a dirt paste in there. It's similar to clockmakers not oiling or greasing exposed gears in clock towers.
|
|
|
|
|
May 6th, 2021, 09:03 PM
|
#36 |
|
ninjette.org newbie
Name: DarqueStarr
Location: Texas
Join Date: Jun 2016 Motorcycle(s): 1987 Honda Nighthawk 650; 2007 Ninja 250 Posts: 6
|
PICS
What happened to the pics on this thread?
|
|
|
|
 |
 Similar Threads
|
||||
| Thread | Thread Starter | Forum | Replies | Last Post |
| Another stuck gas cap! HELP! :) | mmiles19 | 1986 - 2007 Ninja 250R Tech Talk | 2 | August 8th, 2014 09:39 PM |
| The Guts of the Ninja 250 gas cap lock | cuong-nutz | 2008 - 2012 Ninja 250R Tech Talk | 13 | December 31st, 2013 06:44 AM |
|
|


