
|
 January 13th, 2015, 02:03 PM
|
#1 |
|
Lostcause enthusiast
Name: Graham
Location: Austin, TX
Join Date: Jan 2015 Motorcycle(s): 2000 EX250F Posts: 178
|
Check out this junk!
 Woof! 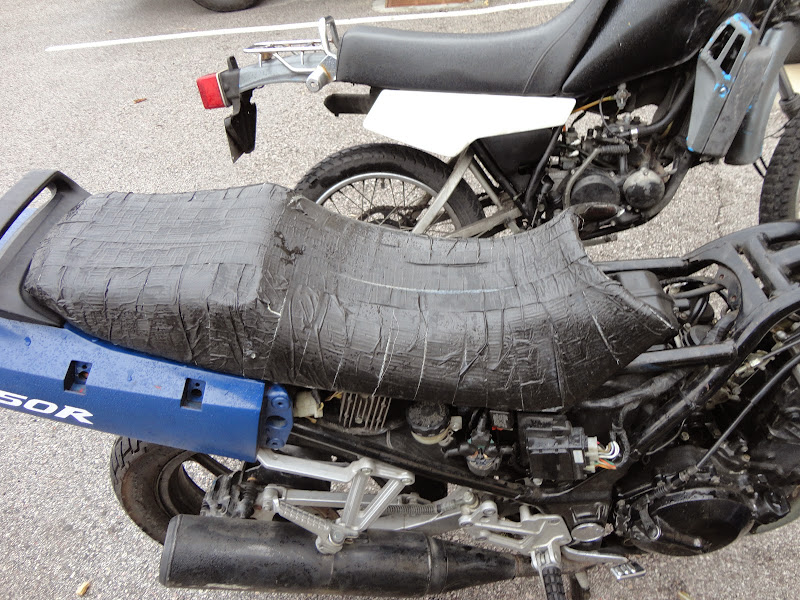 Duct tape seat is custom- you pay extra for that! She's been rode hard and put up wet. Every single part that isn't essential to it running (and some that are) is Cracked, Stripped, Bent, Broken or just totally gone. Its like every single ham fisted moron in the state has passed this thing around and thrown away all the hardware every time they took off a body part, then somebody tried to 'fix it up' with zip ties and blue rattle can, most of which is peeling itself off. The good news is it turns over, has new tires, new battery and SICKKKK UNDERBODY LEDZ!!! Which are no doubt wired wrong and probably going to start it on fire once i get it running. Engine sounds like it has good compression. 13,xxx miles on the odometer although the speedo cable might be shot. Mechanically in pretty good shape, chain good, sprockets good. Has oil (about a gallon, up to the fill hole) and coolant, and they are not mixed! Anyhow. I'm a lost cause enthusiast from Austin Tx. I mostly do vintage stuff, small stuff, mopeds and dirtbikes, but i've been looking to pick one of these up for a while to be a beater/commuter that i can leave out in the rain and not worry about scratching up or washing or whatever. The game plan is to do some kind of mad max/war plane looking thing. Rivet the farings back together and patch with aluminum panels. Rattle can charcoal grey paint job. As much of the bodywork as it is practical to re-construct and not much else. I think these are pretty good looking bikes as-is, i'm into the dorky 80's sportbike look, but I don't want to make it purposely look like crap, the fine line between 'totally embarrassing' and 'afraid to scratch' anyhow thats me, thats my bike, looks like an awesome forum, already got some good info and i'll try to contribute in return, although you guys look like you got things pretty well figured! |

|

3 out of 3 members found this post helpful. |
|
January 13th, 2015, 02:05 PM
|
#2 |
|
The Corner Whisperer
Name: Chris (aka Reactor)
Location: Northern KY
Join Date: May 2011 Motorcycle(s): 2010 250 (track), 1992 250, 2006 R6 (street/track), 2008 R6 (track) Posts: Too much.
MOTY 2015, MOTM - Nov '12, Nov '13
|
Welcome! Good luck with that.

__________________________________________________
Goal: Shake A Million Hands | Look through the corners | Track Day Prep | Closest track? | The Mid-Ohio School |
|
|
|
|
January 13th, 2015, 02:08 PM
|
#3 |
|
I'm crazy,your excuse is?
Name: Winston
Location: Connecticut
Join Date: May 2013 Motorcycle(s): 250 2007 ninja Posts: A lot.
|
welcome and thank you for rescuing her!!

|
|
|
|
|
January 13th, 2015, 02:33 PM
|
#4 | |
|
Lostcause enthusiast
Name: Graham
Location: Austin, TX
Join Date: Jan 2015 Motorcycle(s): 2000 EX250F Posts: 178
|
Quote:
Its weird to be buying parts that you can still get from the manufacturer, or the manufacturer is still in business for that matter!! How boring. decided to give up on the carbs... between the torn diaphragms and rebuild kits I would have been out nearly 80 bucks, so a friendly Ninjette member is selling me some clean ones. New carbs should be all it needs to fire up, but this weekend she'll get a new oil filter, new oil, plugs, and the valve lash adjustment. |
|
|
|
|
|
January 13th, 2015, 02:41 PM
|
#5 |
|
Fighting Texas Aggie '05
Name: Neil
Location: Hutto, TX
Join Date: Feb 2009 Motorcycle(s): '07 ZX6R, '08 Versys, '09 250R Track, '93 F2/F3 Track Posts: A lot.
|
howdy
__________________________________________________
Keep it rubber side down and enjoy the ride Get healthy - Get Fit - Change Your Life Click Here Or PM Me To Find More - Advocare |
|
|
|
|
January 13th, 2015, 09:54 PM
|
#6 |
|
ninjette.org certified postwhore
Name: Ken
Location: Indio, CA
Join Date: Dec 2008 Motorcycle(s): '08 Kawasaki EX250 "Yoshi", '99 Kawasaki Concours "Grace", '06 Concours "Belle", '06 Yamaha YZF600R "Slick" Posts: A lot.
Blog Entries: 3
|
__________________________________________________
< ATGATT > Sweat you can wipe off, Road rash you can't. HEY!! Unregistered!! Does your bike have a name? 
|
|
|
|
|
January 13th, 2015, 11:11 PM
|
#7 |
|
Inline 4!!!
Name: Danny
Location: MA
Join Date: May 2014 Motorcycle(s): 2008 CBR600rr, 1987 KLR 250 Posts: A lot.
|
Just spend $50 and get a new seat.. please lol
Something like this, if you look harder you'll find one better.. $45 shipped small rip http://www.ebay.com/itm/06-Kawasaki-...39df28&vxp=mtr
__________________________________________________
Be careful. Remember you are invisible |
|
|
|
|
January 14th, 2015, 08:29 AM
|
#8 |
|
Lostcause enthusiast
Name: Graham
Location: Austin, TX
Join Date: Jan 2015 Motorcycle(s): 2000 EX250F Posts: 178
|
seriously, you guys think i should replace the duct tape? I thought it was pretty cool that way, kinda like one of those fancy motorcross 'grip seat covers'
Yeah good looking out on that ebay auction, thanks, i'll grab that, the covers alone are selling for $50 and it would be nice to have a spare if i want to try some seat modifications. |
|
|
|
|
January 14th, 2015, 08:49 AM
|
#9 |
|
Lostcause enthusiast
Name: Graham
Location: Austin, TX
Join Date: Jan 2015 Motorcycle(s): 2000 EX250F Posts: 178
|
hey how do i 'find this post helpful' ??
looked through the FAQ's and couldn't find anything about it. |
|
|
1 out of 1 members found this post helpful. |
|
January 14th, 2015, 09:00 AM
|
#10 | |
|
The Corner Whisperer
Name: Chris (aka Reactor)
Location: Northern KY
Join Date: May 2011 Motorcycle(s): 2010 250 (track), 1992 250, 2006 R6 (street/track), 2008 R6 (track) Posts: Too much.
MOTY 2015, MOTM - Nov '12, Nov '13
|
Quote:
Happy posting!
__________________________________________________
Goal: Shake A Million Hands | Look through the corners | Track Day Prep | Closest track? | The Mid-Ohio School |
|
|
|
|
|
January 14th, 2015, 10:30 AM
|
#11 |
|
ninjette.org member
Name: danny
Location: Austin, tx
Join Date: Aug 2014 Motorcycle(s): 2013 636 Posts: 55
|
looks like a nice project! haha keep us updated on it
|
|
|
|
|
January 14th, 2015, 10:42 AM
|
#12 |
|
ninjette.org guru
Name: Ray
Location: 48162
Join Date: Aug 2013 Motorcycle(s): 2012 Ninja 250 Posts: 450
|
That may have been someone else's junk at one time but it is now your treasure.
Not terribly bad looking and looks like it would be road worthy with just a few parts. |
|
|
|
|
January 14th, 2015, 01:08 PM
|
#13 |
|
Motorcycle Hypermiler
Name: Vic
Location: Livermore CA
Join Date: Jan 2012 Motorcycle(s): 1999 & 2005 Kawasaki Ninja 250R's Posts: A lot.
|
Welcome Graham! Your Ninjette looks like what I was originally looking for when I started looking for a Ninjette to modify for hypermiling: a moto with a straight frame/forks and a decent running motor. I found one in much better condition with rough bodywork and a good seat. I sold the good fairing parts and the seat as I make my own. These are great commuter bikes: fun, adequate performance, very tough and durable and with mods they offer astounding fuel economy. Best wishes on your project

__________________________________________________
235 MPG Hypermotorcycling to a better tomorrow
Last futzed with by greenaero; January 15th, 2015 at 09:22 AM. |
|
|
|
|
January 14th, 2015, 03:44 PM
|
#14 |
|
Lostcause enthusiast
Name: Graham
Location: Austin, TX
Join Date: Jan 2015 Motorcycle(s): 2000 EX250F Posts: 178
|
So far i've picked up
The carbs- $80 (cheaper than buying the parts to rebuild the old ones) That ebay seat- $45 Raptor 'non vac' petcock- $7 china generic I've got a good list for fastenal I'm going to go pick up a pile of someone else's leftover parts bike junk for 100 bucks from my buddy craig this weekend. Mostly stuff that nobody wants- like a title-less frame- but I'm hoping it has most of the leftover odds and ends that will nickel and dime me to death from kawi. The only thing that i still haven't figured out is if i can locally source the fairing grommets and hardware. thats all gonna be tough to come by, maybe just take some in and dig through the bins at fastenal. |
|
|
|
|
January 15th, 2015, 08:15 AM
|
#15 |
|
Certifiable nontundrum
Name: Harper
Location: NC Milkshake stand
Join Date: Mar 2013 Motorcycle(s): 2013 SE NINJA 300 Posts: Too much.
MOTM - Sep '13, Sep '16
|
Thanks for keeping Austin weird
 Can't wait to see this build thread and where your project goes
__________________________________________________

|
|
|
|
|
January 15th, 2015, 05:08 PM
|
#16 |
|
Lostcause enthusiast
Name: Graham
Location: Austin, TX
Join Date: Jan 2015 Motorcycle(s): 2000 EX250F Posts: 178
|
cool, thanks!
This morning on my ride into work (45 minutes to think) i remembered that at one point in time i had wanted to paint one of my old dirtbikes with a black and white cow pattern motif and call it the Cow-asaki, but it got stolen, I cant help but think that this might be just the right project to pull out that half baked scheme and implement it. genuine holstien hair-on leather seat cover? damn how cool would that be?! i dunno i don't ever build bikes with fairings... its a big canvas, makes me want to do something kindof absurd. There is a lot of freedom starting with a bike knowing that nobody will ever see it and say 'he ruined that thing' haha! |
|
|
|
|
January 15th, 2015, 05:13 PM
|
#17 |
|
The Corner Whisperer
Name: Chris (aka Reactor)
Location: Northern KY
Join Date: May 2011 Motorcycle(s): 2010 250 (track), 1992 250, 2006 R6 (street/track), 2008 R6 (track) Posts: Too much.
MOTY 2015, MOTM - Nov '12, Nov '13
|
__________________________________________________
Goal: Shake A Million Hands | Look through the corners | Track Day Prep | Closest track? | The Mid-Ohio School |
|
|
|
|
January 15th, 2015, 05:15 PM
|
#18 | |
|
The Corner Whisperer
Name: Chris (aka Reactor)
Location: Northern KY
Join Date: May 2011 Motorcycle(s): 2010 250 (track), 1992 250, 2006 R6 (street/track), 2008 R6 (track) Posts: Too much.
MOTY 2015, MOTM - Nov '12, Nov '13
|
Quote:
__________________________________________________
Goal: Shake A Million Hands | Look through the corners | Track Day Prep | Closest track? | The Mid-Ohio School |
|
|
|
|
|
January 15th, 2015, 05:56 PM
|
#19 |
|
Lostcause enthusiast
Name: Graham
Location: Austin, TX
Join Date: Jan 2015 Motorcycle(s): 2000 EX250F Posts: 178
|
I ride 365 days a year, rain or shine (not so much snow in texas but road salt when i lived in wisconsin was a killer) so I try to start with something that I wont feel bad about running into the ground. If i took a clean vintage bike with 1000 some miles on it and rode it into the ground in a year i'd feel real bad. If i take something that was bound for scrap, coax it back to life, then completely wear it slap out (from use, not neglect) I don't feel bad.
Most of the time when i'm done with a bike it is just completely un-fixably-gone... like motor is shot, suspension is shot, bearings are shot, tires are shot, just completely used up, even then i try to part it out and just end up with a bunch of worn out trash in a rubbermaid in my garage... |
|
|
|
|
January 15th, 2015, 06:35 PM
|
#20 | |
|
.
Name: .
Location: .
Join Date: Aug 2014 Motorcycle(s): . Posts: A lot.
MOTM - July '15
|
Quote:
|
|
|
|
|
|
January 16th, 2015, 06:51 PM
|
#21 |
|
ninjette.org member
Name: Mark
Location: Folsom Ca
Join Date: Jan 2015 Motorcycle(s): DL1000 V-Strom, KLR650 Posts: 20
|
You probably knew this Graham, but for others who may be new to the gig...
At least half the time, the parts fiche has a part number for the bolts that tells you the dimensions. For example in the pic below for the upper motor mounts, the diagram shows part 130 for this page/view has part number 130G0840 - and then tells you in the description that this an 8mm bolt that is 40mm in length. So even if the description doesn't tell you - often times the part number gives it away (130G0840 - the 08 is diameter and the 40 is the length). Not always there - but knowing this trick can really help. This detail makes it easy to get the right parts out of the big tray of leftover fasteners - or the correct length when you stop by the FastenAll store. Ref # Part # ... ... Description ... ... Qty Required 130 130G0840 BOLT-FLANGED,8X40 4 Good luck with the project, and keep the pics coming! 
|
|
|
|
|
January 16th, 2015, 08:18 PM
|
#22 |
|
sammich maker
Name: snot
Location: West Ohio - in the kitchen
Join Date: Feb 2012 Motorcycle(s): 2013 white 300, 09 KLX 250 SF, 09 thunder blue 250(traded) Posts: A lot.
MOTM - Apr '15
|
Welcome
__________________________________________________
 https://www.brocksperformance.com/VZ...0035+C450.aspx |
|
|
|
|
January 17th, 2015, 06:43 PM
|
#23 | |
|
Lostcause enthusiast
Name: Graham
Location: Austin, TX
Join Date: Jan 2015 Motorcycle(s): 2000 EX250F Posts: 178
|
Quote:
I ordered 10 of every size metric SHCS fastner from M5-M10 in regular and common length increments a couple years ago from fastenal. Its probably saved me a couple hundred bucks over going to the hardware store and I cant even think of all the hours running back and forth. I went online and got grade 10.8 zinc plated SHCS and they were like .10-.50 cents each. I'm not always the sharpest tool in the shed, but that was probably the smartest thing i've ever done in regards to restoring old bikes. Now the BSA's...  half the bolts that go in that thing you can't even buy. half the bolts that go in that thing you can't even buy.
|
|
|
|
|
|
January 17th, 2015, 08:56 PM
|
#24 |
|
ninjette.org guru
Name: Vlad
Location: Weaverville, NC
Join Date: Jul 2014 Motorcycle(s): 2011 Ninja 250R (Sold), 2015 Rocky Mountain Soul (Runs on fat) Posts: 404
|
Yo brother, in India, this is luxury.
|
|
|
|
|
February 4th, 2015, 11:21 AM
|
#25 |
|
Lostcause enthusiast
Name: Graham
Location: Austin, TX
Join Date: Jan 2015 Motorcycle(s): 2000 EX250F Posts: 178
|
I'm not doing like a 'build thread' or anything official but I figured I'd post up my progress from the weekend. I see a lot of these bikes in this condition so maybe just to give folks an idea of what it takes to bring them back from this state...
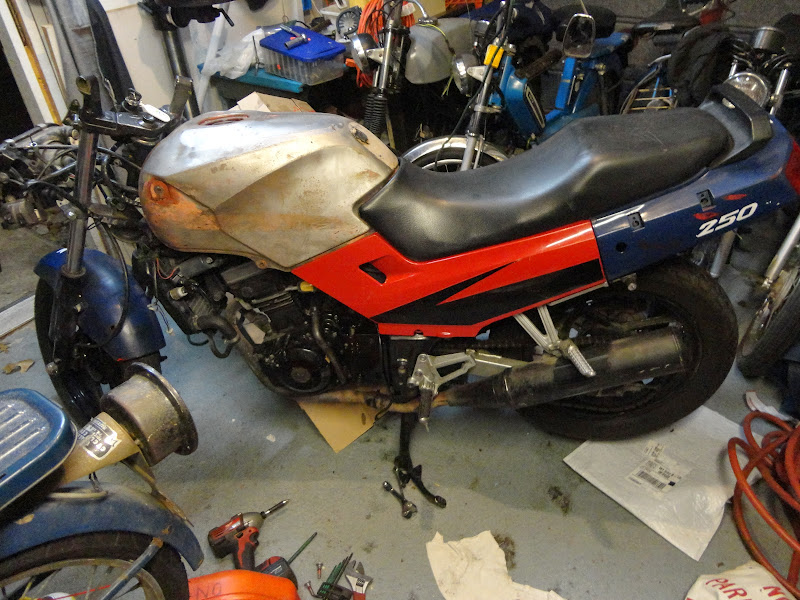
First was the carbs. They were pretty crusty, but that wasn't the bad part. 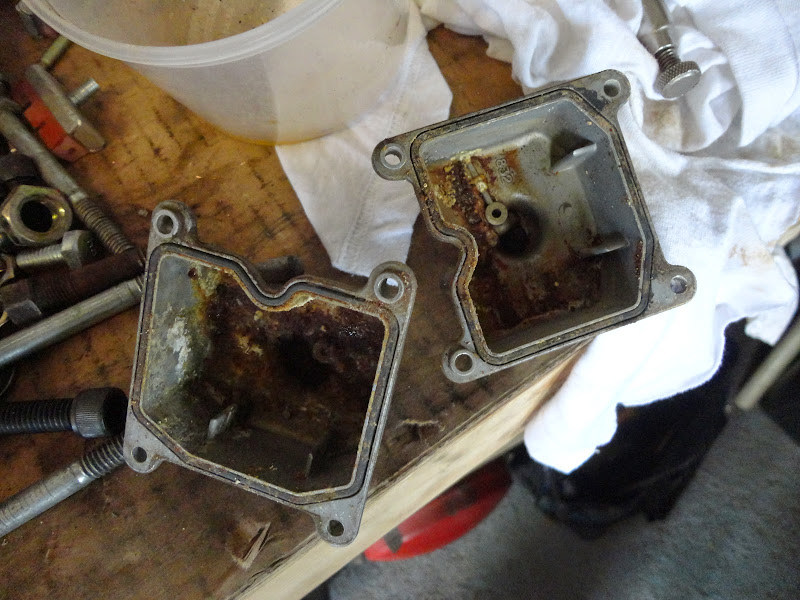 The diaphragms were torn and the air bleed screws were pretty buggered up, the threads weren't stripped per-se but they were cross threaded and it looked like someone had stuck a too-big screwdriver down there and tore the threads out the sides of the wells they sit in. I got a set of used carbs off a 2008 'J' model.  I didn't take any 'before' pictures, but the main things that i changed were: 1) 105 mains and Emulsion tubes from the F swapped into the J carbs 2) Tank petcock vac hose had a barbed Tee on it, i put a cap on it and plugged it off. If you were retaining the vac petcock feature, you would just hook up a single hose to that, i think the tee is for emissions? 3) Needles from F swapped into the J 4) Both carbs had 38 pilot jets so those were drilled out from a #79 wire gauge to a #80 wire gauge 5) Idle adjust linkage from F swapped on to J 6) Air bleed screw adjustment covers/plugs drilled out using a small drill bit and pried out with an icepick. 7) Air bleed screws set to 2.5 turns out 8) thorough cleaning and all passages checked for blow-through 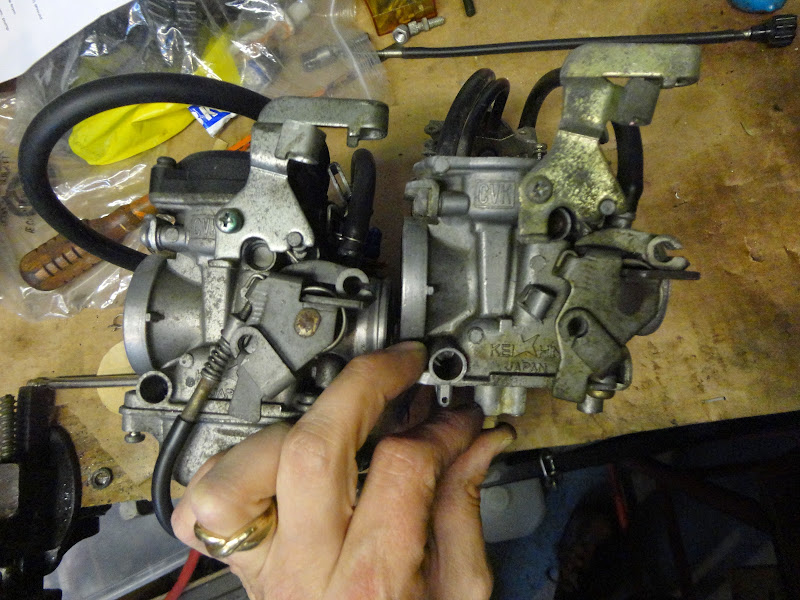 As far as i can tell, the bodies of the carbs are identical. The only changes between the years is covered by the re-arranging of components I performed. I'm guessing that they will need re-synch after this. The two carbs were tuned differently with different air mix screw settings, different needles, some folks have suggested it is due to the unequal length header... I think it could be for emissions, the one rich cylinder makes it start easier and the lean cylinder makes it run cleaner? I dunno. Either way they are identical now, so they should only need minor futzing with the throttle balance screw and the air bleed. Next the bike got treated to some fresh oil. The oil that came out was actually pretty clean. I think someone added 2 liters of new oil to an already full crankcase of used old oil. It was full to the top of the fill hole.  The filter and screen weren't in bad shape either. The filter had been changed at some point in the bike's life, so that's a good sign. 13,000 miles even with 2 filter changes isn't terrible. While everything was apart I checked the valve clearances. They were darn close. The .010 gauge cleared under them so maybe a little loose but that is just fine with me. When its warmed up and running there is no clackety valve noise so I'm not worried. The plugs also got checked and both looked good. They could probably stand to be replaced as they were a little dark but i'm sure one good run up to highway speeds will clean them up just fine. Keeping with the theme of the build, not spending any money where i don't have to, including spark plugs. Next was re-fitting the carbs. They were real stubborn to get off due to the intake boots being somewhat stiff. I wiped some of the used motor oil on the boots and the carbs slipped right into place. The airbox boots, not so much. A previous owner had forced the carbs in without lining up the intake boots and they were collapsed in a funny shape, and extremely hardened from age. I spent a solid 2 hours in between dealing with my 3 year old son who was not taking a nap and being a huge jerk. The key to fitting these, if you didn't know, is to put them in boiling water on the stove. It makes them super soft and compliant. I had to do it at least 5 times because just when i got one on and it cooled down, i'd start wrestling the other one on and pop the now-cool and hardened other boot off! ARGH! Needless to say I wasn't taking any pictures. The way i finally got them on was to remove the inner fender and airbox completely, at least enough to push them back 3-4 inches.. this meant removing the CDI from the fender to slip it through the frame. I was able to get the boots onto the carbs, then, working very quickly, pop the airbox on and force the boots into it. Luckily i was able to just barely fit my hand into the airbox to help it along. I took a break in there while the boots were boiling away to bend all the bent footpegs, brackets, etc. back into place. The mufflers were hitting the swingarm so i just put my foot on the swingarm, sat down next to the bike, and pulled them out. The driver's peg on the left was the worst, i had to get a big crescent wrench on the aluminum bracket casting and pry that out trying not to snap the bracket in half. I was able to get it pretty straight. Next I reassembled most of the underbody plastics... fender, airbox, etc. And dug through my nuts and bolts to get them all strapped down. Many of the weld-nuts were cross-threaded and required chasing with a M6 tap. By this point the oil was all drained out, I put in a new oil filter and cleaned out the screen, torqued the oil filter bolt, drain bolt and 5 x 8mm headed screen cover bolts. Measured out 1.9L of Rotella T6 5w40 and filled the case, checked the sight glass level which was kinda low, then i added a bit more to bring it to the top of the sight glass. At this point it was getting dark so I rolled the bike in the garage, hooked up a bottle of fuel, and tried to fire her up. The battery was low to begin with and died quickly, hooked up the charger. Gave it a hit of either while it was cranking and after coughing and sputtering for a minute, she sprang to life. Barely running at first, fiddling with the choke and throttle at the same time, i was able to coax her up to a good 4000 rpm idle for a couple minutes, then choke off and she's running happily down at 800 rpm. Put her through a full warm up cycle, about 15 minutes until the electric fan kicked on- good that's working. High beam, low beam- working. Turn signals... not only working but the 'side tail light' turnsignal mod has already been done!! Awesome that was the first thing i was going to do. Looks like both brake lights work and temp gauge works. Measured stator output at 13.6V... seems pretty good to me. Ended the night looking like this  She doesn't look like much, but that my friends, is a running motorcycle!! So that was sunday, last night I picked up the freshly hot-tank'd and stripped gas tank. I'm going to have to get some pictures tonight. Looks pretty good. Kinda expensive but not having to strip the paint myself is pretty nice, I still have to weld up the bolt holes but at least i have a nice clean start. Problem now is scope creep... i've got this nice clean tank sitting in front of me, makes me want to do a nice paint job... but if I do a nice paint job my fairings should get matching paint but then i have to replace my fairings or slather them with a gallon of bondo arghhhhh 
|
|
|
|
|
February 4th, 2015, 11:39 AM
|
#26 |
|
Lostcause enthusiast
Name: Graham
Location: Austin, TX
Join Date: Jan 2015 Motorcycle(s): 2000 EX250F Posts: 178
|
Oh yeah totally forgot.
Also took the handlebars off and bent them back using a torch. Cleaned off a bunch of nasty gunk and electrical tape no idea why that was on there... someone was trying to use electrical tape to hold the grips on? I dunno. Took the gauge cluster off, all the mounting posts were broke off, and glued them back on with Otey ABS pipe cement. Broke one back off to see how securely it stuck on there... it was pretty good, not great but it should hold for what the gauge cluster is doing. I drew up a handlebar to have made out of solid stainless. Gonna get a couple done and see if the vibes are better or worse, either way you'll never bend them again! Gonna shop some quotes this week and see if i cant get them made for a reasonable cost, maybe make them available to the community if there is a market. I notice ebay prices are pretty high for these but the clip-ons are super cheap so its tough to get a read on if folks would want them. They'll probably be like $40-50 a piece. Might be worth it if they kill vibes really well. otherwise... i dunno. |
|
|
|
|
February 4th, 2015, 11:58 AM
|
#27 |
|
The Corner Whisperer
Name: Chris (aka Reactor)
Location: Northern KY
Join Date: May 2011 Motorcycle(s): 2010 250 (track), 1992 250, 2006 R6 (street/track), 2008 R6 (track) Posts: Too much.
MOTY 2015, MOTM - Nov '12, Nov '13
|
Nice progress!
__________________________________________________
Goal: Shake A Million Hands | Look through the corners | Track Day Prep | Closest track? | The Mid-Ohio School |
|
|
|
|
February 4th, 2015, 01:53 PM
|
#28 |
|
Certifiable nontundrum
Name: Harper
Location: NC Milkshake stand
Join Date: Mar 2013 Motorcycle(s): 2013 SE NINJA 300 Posts: Too much.
MOTM - Sep '13, Sep '16
|
Way to get ya motor runnin... Now ya just got to head oh on the highway.
Def make it a cow a saki
__________________________________________________
|
|
|
|
|
February 4th, 2015, 02:17 PM
|
#29 |
|
Lostcause enthusiast
Name: Graham
Location: Austin, TX
Join Date: Jan 2015 Motorcycle(s): 2000 EX250F Posts: 178
|
 Thanks guys! Yeah my wife has already said this bike is too ugly for her to ride (of course she always says that when i start on a project) but i think that means i have liberty to make it kindof obnoxious. At this point i'll probably just shoot white on everything and if i change my mind later its easy to cover. My first instinct is just flat black, but that is so overdone and makes it look stolen. White is OK but it really looks like hell when its not done well or if you never wash it. Part of me wants to do that terrible rattle-can gold because it reminds me of this guy in the ghetto we called 'stabby' who used to brandish a 1911-style 45 auto pistol that was spraypainted gold... Grey is too close to the color of roads and its really hard to see... same for silver... i don't want to do a primary color and green...eh.. tough to get it right maybe maaaaybe a 'sage' green would look good but i'm also not trying to make it look like a military vehicle. i dunno. decisions decisions. this is why i just paint everything black. |
|
|
|
|
February 5th, 2015, 08:43 AM
|
#30 |
|
Lostcause enthusiast
Name: Graham
Location: Austin, TX
Join Date: Jan 2015 Motorcycle(s): 2000 EX250F Posts: 178
|
Steady Mobbin'
 Didn't get much actual work done but I was able to fit up the new tank and get my parts ordered from Fastnal and Partzilla. Everything should be here Saturday but i've got guests coming into town today for the weekend so I don't think I'll have much time to work on stuff. Bummer, I could probably get primer on the tank and have the whole bike back on the road with 2-3 hours more work. Anyhow, This is the gauge cluster I patched back together 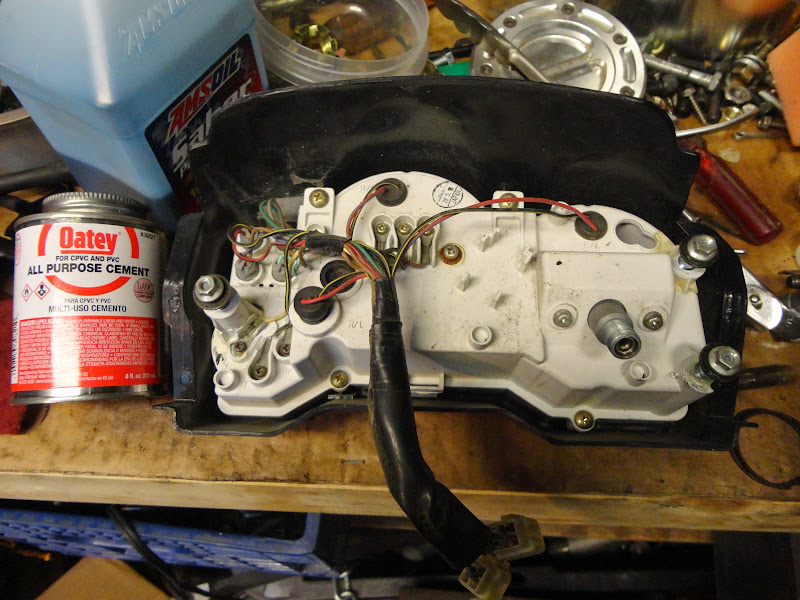 This is kindof a bummer, the 'Raptor' petcock doesn't quite clear...  who the hell designs a tank that protrudes lower than the petcock anyhow? WTF Cacawaki? Is that supposed to be some sort of water/filth trap to rust your tank out faster? 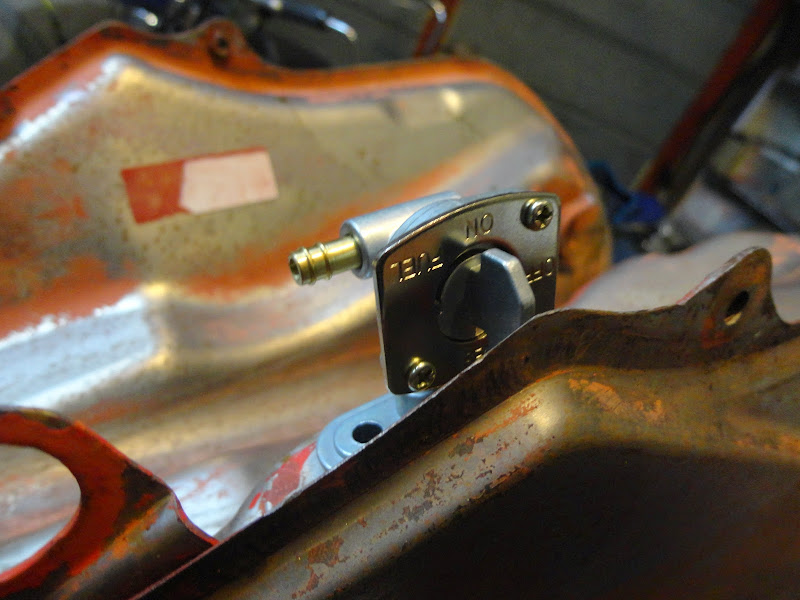 I was thinking I might actually cut the fuel lever off short, then make some kind of little 'key' by putting a slot in a piece of metal. You'd have to have the right little slotted piece of metal to fish up there and turn the cock. Hide the key under the seat or something, so if anyone steals the bike they won't get very far... haha! I know how easy it is to just force these tumblers with a big flathead screwdriver... i've bought a couple bikes where it had been done. The tank itself, you can see in the first picture, came out pretty good. All the rattle can is off, and most of the OEM paint. They did a really nice job with it, the inside is pretty darn near spotless. I took it to 'Mr. Cool Radiator' in Austin, Texas... so here's a shout out! Good dudes over there. Unfortunately taking off the paint showed up some bad bondo underneath and a mystifying patch of JB Weld... no idea whats under there, but it doesn't appear to be leaking so i'll leave it alone. I still have to cut off the fairing mount tabs and braze the holes closed. Hmm maybe 2-3 hours is a bit optimistic, that repair alone will probably take a solid 2. Since the weld-nuts on those tabs are totally stripped, i'm going to have to make tabs or figure out something else to do. I could stick bolts out of the tabs and weld heads on the backside, then put an acorn nut on there. It would be clean and impossible to put a bolt through the tank again, but if something happened to those studs, it would be a total re-do. I dunno, decisions decisions. This is the handlebar I got 'almost' straight before running out of gas in my torch... Damn always happens that way. They always run out when you're using them...   The other one came out great, a shot of black paint and we're back in business. Then this is next on the list... Woof! 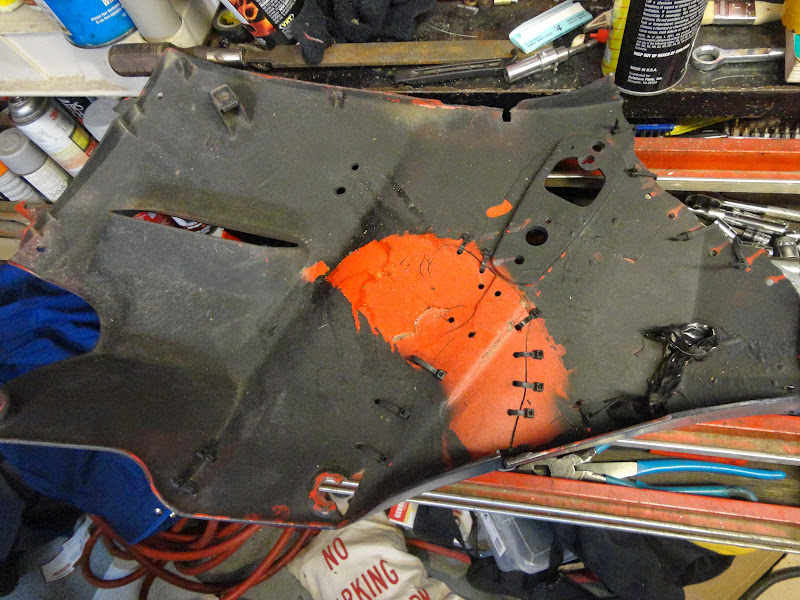 Might be kinda fun, like arts and crafts time for grown ups. I've got some 1/8x2" strip that i'm going to lay along the crack, drill holes through both, apply epoxy to both, and pop rivet them together. Should be pretty damn strong. Another good reason to do Holstein spots... camouflage the raggety patch work. |
|
|
|
|
February 5th, 2015, 12:30 PM
|
#31 |
|
I'm crazy,your excuse is?
Name: Winston
Location: Connecticut
Join Date: May 2013 Motorcycle(s): 250 2007 ninja Posts: A lot.
|
You could use a soldering iron to melt the plastics at the crack instead of rivets and such. If you are worried a bout the strength you could kb weld on some mesh to the back of the cracks.
|
|
|
|
|
February 5th, 2015, 01:17 PM
|
#32 |
|
ninjette.org certified postwhore
Name: Fish
Location: co
Join Date: Apr 2013 Motorcycle(s): 250/300 Posts: A lot.
|
They make a plastic welder that you can find for cheap. Or just use a heat gun on the back and a filler rod of plastic.
__________________________________________________
Hey Unregistered never go faster than your brakes can be applied... |
|
|
|
|
February 5th, 2015, 01:27 PM
|
#33 |
|
Lostcause enthusiast
Name: Graham
Location: Austin, TX
Join Date: Jan 2015 Motorcycle(s): 2000 EX250F Posts: 178
|
eh i've never had much luck doing that. the polyethylene stuff like dirtbike fairings, fenders, etc works pretty good but the ABS stuff is always super brittle and cracks again.
besides i really don't care about this looking good, i just want it tough and not vibratey. i'll post up what it looks like as i'm patching it up, you'll see why this is so tough. Ive fixed different ABS bumper covers, fairings, etc over the years and this method seems to be the toughest, albeit kinda ratty lookin' |
|
|
|
|
February 5th, 2015, 02:16 PM
|
#34 |
|
Lostcause enthusiast
Name: Graham
Location: Austin, TX
Join Date: Jan 2015 Motorcycle(s): 2000 EX250F Posts: 178
|
eh i've never had much luck doing that. the polyethylene stuff like dirtbike fairings, fenders, etc works pretty good but the ABS stuff is always super brittle and cracks again.
besides i really don't care about this looking good, i just want it tough and not vibratey. i'll post up what it looks like as i'm patching it up, you'll see why this is so tough. Ive fixed different ABS bumper covers, fairings, etc over the years and this method seems to be the toughest, albeit kinda ratty lookin' |
|
|
|
|
February 6th, 2015, 06:45 AM
|
#35 |
|
ninjette.org member
Name: Charley
Location: Northern California
Join Date: Jun 2013 Motorcycle(s): 2013 Kawasaki EX300 , 1999 Kawasaki ZRX1200. Posts: 164
|
Man , I applaud you for this kind of project..
 The humor works too " They always run out when you're using them."
__________________________________________________
IBA # 59523 |
|
|
|
|
February 6th, 2015, 01:49 PM
|
#36 |
|
ninjette.org guru
Name: Jason
Location: WV
Join Date: Apr 2012 Motorcycle(s): 2008 Ninja 650R & 2007 Buell Blast Posts: 323
|
Welcome ninjunk! That's quite the project you're taking on; a real Frankenbike. I love it.
|
|
|
|
|
February 6th, 2015, 08:23 PM
|
#37 | |
|
ninjette.org member
Name: Mark
Location: Folsom Ca
Join Date: Jan 2015 Motorcycle(s): DL1000 V-Strom, KLR650 Posts: 20
|
Quote:
Suggest you see if you could take a cutoff wheel in the dremel and slice off about 1/4 inch from the selector handle.  May need to take 2 passes at it to be sure you don't cut too much. And any of the sharp edges will need to be cleaned up to prevent cuts or nicks. Too much time spent fabbing - you start seeing everything as plastic or malleable, shape-able. Or could you turn the selector handle to the inside of the tank (don't know if its gonna be usable or get hung up on something  ) )Keep up the good work Texas ninjunk!
|
|
|
|
|
|
February 6th, 2015, 09:12 PM
|
#38 |
|
RIP Alex
Name: Cuong
Location: Houston, TX
Join Date: Apr 2011 Motorcycle(s): '10 250r, '09 265r Posts: A lot.
Blog Entries: 2
|
I have had good luck melting abs plastic in a jar of acetone and using it to repair cracks.
__________________________________________________
HalfFast Racing Team Serving Greater Houston Area Riders:WFO Riders MotoHouston HPC CMRA Ride Smart Fastline Lone Star Track Days |
|
|
1 out of 1 members found this post helpful. |
|
February 7th, 2015, 12:57 AM
|
#39 | |
|
wat
Name: wat
Location: tustin/long beach
Join Date: Sep 2009 Motorcycle(s): wat Posts: Too much.
Blog Entries: 5
MOTM - Oct '12, Feb '14
|
Quote:
__________________________________________________
  
|
|
|
|
|
 |
 Similar Threads
|
||||
| Thread | Thread Starter | Forum | Replies | Last Post |
| Junk small engine bits | subxero | Items Wanted | 5 | September 5th, 2014 06:32 PM |
| How do YOU adjust the junk? | spc2125 | General Motorcycling Discussion | 193 | August 16th, 2014 07:00 PM |
| WTB: junk J frame | alley | Items Wanted | 0 | April 28th, 2013 06:50 AM |
| Turn that junk off | fyv0h | 2008 - 2012 Ninja 250R Tech Talk | 10 | May 21st, 2011 04:48 PM |
| [topix.net] - ...And still more junk pulled from ..... | Ninjette Newsbot | Motorcycling News | 0 | September 20th, 2010 05:50 AM |
| Thread Tools | |
|
|


")


