
|
 December 31st, 2008, 09:32 AM
|
#1 |
|
Live Life
Name: Don
Location: Lincoln, NE
Join Date: Nov 2008 Motorcycle(s): 2009 Green SE Ninja 250 Posts: A lot.
|
DIY: Brake Pedal Replacement
Need to replace a brake pedal?
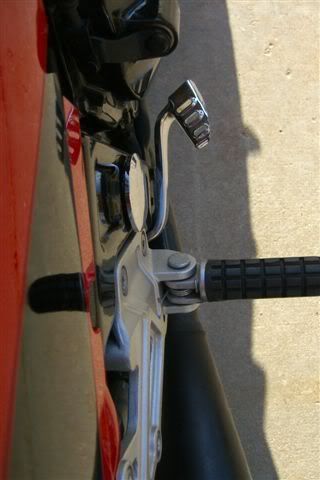 Once youve done this its a piece of cake. But the first time you might want a couple of ideas. The books talk about taking the muffler off to replace the brake pedal but after doing it I think you can do it without removing the muffler once you know what to do. What you will need: New Brake Pedal (Kawasaki Part 43081-1226, $67.19 + S&H from CheapCycleParts.com) 6 mm hex key 10 mm combination wrench Standard or long nose pliers New cotter pin (maybe) 3 pennies Grease (I used some hi-temp brake caliper grease I had since it is right above the muffler) If youre going to take the muffler off you will need: 17 mm combination wrench 12 and 17 mm socket and drive You arent really going to be wrenching hard so I was able to do this on the side stand and not use the paddock stand. Just be careful that your torque is always going towards the stand not towards you. It is easiest to remove the cotter key from the clevis pin while it is still mounted. 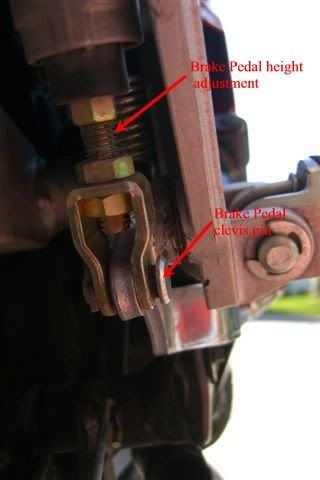 Remove the three 6mm bolts with the hex wrench from the mounting plate. Be careful to not bend the brake hose too sharply. 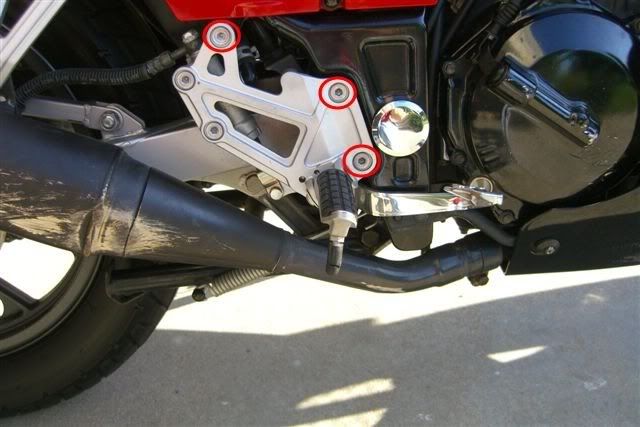 Depress the brake pedal and insert 3 pennies in the spring to hold it stretched out. It is then easy to unhook from the pin. The small spring for the brake switch comes right off.  Remove the retaining bolt and washer, pedal, second washer and clean the rod.  Put the second washer back on, apply new grease to the grove and put the new brake pedal, washer and retaining nut on the shaft. Reattach the springs and remove the pennies. 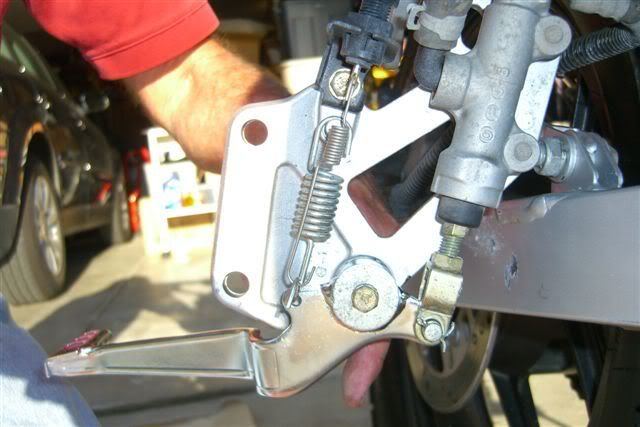 Reattach the mounting plate. Start with the upper left bolt first, then the other two then tighten all three. Be sure the brake switch wires and brake hose are not pinched. If you took the muffler off, be careful of the gasket. Its a $12.00 part. 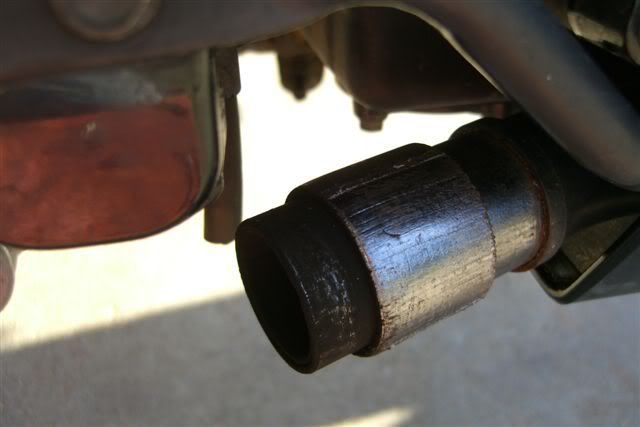 The book says the nominal height from the foot peg to the pedal is 40 mm. Adjust so it is comfortable for you and your foot naturally goes to it. 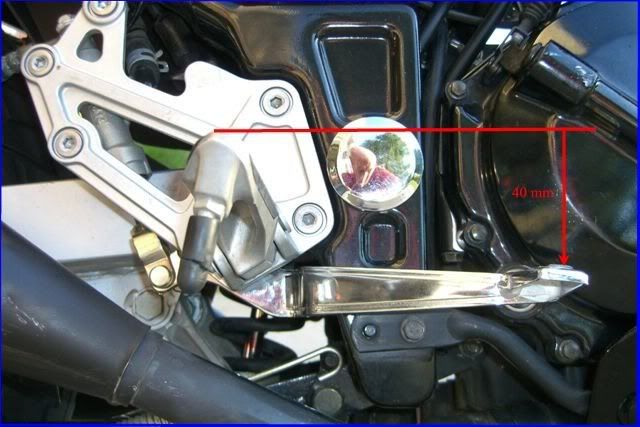 Check the brakes and brake light and you are good to go. 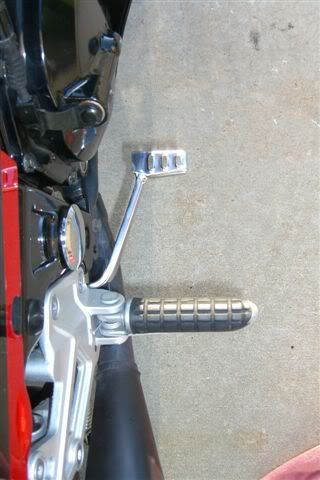 Ride safe and have fun.
__________________________________________________
- ATGATT - Scorpion EX700 Hi-Vis Helmet, First Gear MeshTek 3.0 Jacket, TourMaster Transition 2 Jacket and Flex Pants, Sidi Doha boots |

|

|
|
December 31st, 2008, 10:27 AM
|
#2 | |
|
ninjette.org certified postwhore
Name: Kim
Location: mundo de ensueño
Join Date: Nov 2008 Motorcycle(s): '08 250 Posts: A lot.
|
Quote:
|
|
|
|
|
 |
 Similar Threads
|
||||
| Thread | Thread Starter | Forum | Replies | Last Post |
| Emergency Shifter Holder Onner Bolt Thingy Replacement DIY | Ytse Frobozz | General Motorcycling Discussion | 7 | June 18th, 2011 07:24 AM |
| DIY: 2008+ front rotor replacement | spooph | 2008 - 2012 Ninja 250R Tech Talk | 104 | May 31st, 2011 05:31 PM |
| DIY: Rear Rotor Replacement | spooph | 2008 - 2012 Ninja 250R Tech Talk | 6 | February 28th, 2011 12:57 PM |
| Brake pedal | DRivero | 1986 - 2007 Ninja 250R Tech Talk | 1 | June 18th, 2010 05:38 PM |
| [usridernews.com] - DIY Replacement Billet Master Cylinders | Ninjette Newsbot | Motorcycling News | 0 | July 22nd, 2009 07:50 PM |
|
|


