
|
 June 15th, 2012, 11:13 AM
|
#1 |
|
Ghost Rider
Name: Eric
Location: Westchester, NY
Join Date: Jun 2012 Motorcycle(s): 2012 Ninja 250r Posts: 84
|
Cool way to install flush mounts (BikeMaster Universal)
Hey everyone!
While trying to see how these (http://www.motorcycle-superstore.com...Light-Kit.aspx) flush mounts would look on a Ninja, I came across this video:
Link to original page on YouTube. |

|

|
|
June 15th, 2012, 09:20 PM
|
#2 |
|
ninjette.org dude
Name: 1 guess :-)
Location: SF Bay Area
Join Date: Jun 2008 Motorcycle(s): '13 Ninja 300 (white, the fastest color!), '13 R1200RT, '14 CRF250L, '12 TT-R125LE Posts: Too much.
Blog Entries: 7
|
They look clean.

__________________________________________________
Montgomery Street Motorcycle Club / cal24.com / crf250l.org / ninjette.org ninjette.org Terms of Service Shopping for motorcycle parts or equipment? Come here first. The friendliest Ninja 250R/300/400 forum on the internet! (especially Unregistered) |
|
|
|
|
June 17th, 2012, 05:25 PM
|
#3 |
|
ninjette.org member
Name: Derrick
Location: Livermore
Join Date: Apr 2012 Motorcycle(s): 2012 250 CLG Posts: 51
|
I like this! Was looking for a way to do flush mounts for my blinkers and was dreading taking the fairings off or cutting wires. The adhesive looks like it may be an issue but more easily resolved.
|
|
|
|
|
June 17th, 2012, 07:07 PM
|
#4 | |
|
Ghost Rider
Name: Eric
Location: Westchester, NY
Join Date: Jun 2012 Motorcycle(s): 2012 Ninja 250r Posts: 84
|
Quote:
|
|
|
|
|
|
June 17th, 2012, 08:23 PM
|
#5 |
|
ninjette.org member
Name: Mar
Location: Los Angeles
Join Date: May 2012 Motorcycle(s): 2009 Ninjette Posts: 150
|
I have these - got them put on after I tore my right stock signal off being stupid...
 I like them. Very visible and angled towards the front. |
|
|
|
|
June 18th, 2012, 03:44 PM
|
#6 |
|
CPT Falcon
Name: J.Emmett Turner
Location: Newnan, GA
Join Date: Apr 2009 Motorcycle(s): '08 CP Blue EX250J, '97 unpainted EX250F, 2nd '97 unpainted EX250F (no engine), '07 black EX250F Posts: A lot.
|
I've had the clear lens, black housing version (no CF) of these. A local guy gave them to me when I gave him a pregen turn signal, so I didn't get all the stuff (notably: the double-sided adhesive).
vVtheduckVv has them too, but he painted the housing and somehow color-match Candy Plasma Blue! I wonder if he'll trade housings with me. Hmm... Anyway, I wouldn't use Crazy Glue or anything meant to be permanent, so I guess that pretty much just leaves silicone, right? |
|
|
|
|
June 18th, 2012, 04:00 PM
|
#7 |
|
ninjette.org certified postwhore
Name: Sean
Location: Middle TN
Join Date: Apr 2012 Motorcycle(s): 2010 Ninja 250r (sold) / '03 CBR 600RR Posts: A lot.
|
After dealing with gorilla glue on my old cracked fairing, I would advise against it. Couldn't get it off, even after using lots of Mineral Spirits
|
|
|
|
|
June 18th, 2012, 10:35 PM
|
#8 |
|
Ghost Rider
Name: Eric
Location: Westchester, NY
Join Date: Jun 2012 Motorcycle(s): 2012 Ninja 250r Posts: 84
|
Thanks for the heads up! Haha they're scheduled to be delivered tomorrow, so I read your posts just in time! I'll most likely just go with the black silicone, and add some of my own 3M to it, as (from the video) it doesn't seem like the adhesive they give is 3M, so I suppose the quality is up in the air on that
LostDaemon they look really nice! Glad to hear that the visibility of the signal is good, as that was one of my concerns getting a flush mount (though I preferred that this one faces forward as opposed to the side) |
|
|
|
|
June 20th, 2012, 11:38 AM
|
#9 |
|
Ghost Rider
Name: Eric
Location: Westchester, NY
Join Date: Jun 2012 Motorcycle(s): 2012 Ninja 250r Posts: 84
|
Alright the install is finished pretty much, just waiting on the silicone to dry.
Question though, when I turn on the turn signals, the back of the bike makes a grinding noise before the signals come on. The noise is coming from the trunk. Think I need a relay for this set up? The new signal is a single filament, pretty sure it's 55watt. The signal does blink faster than the stock ones though. Any suggestions? Edit: Found the solution Think I found the issue through this thread: http://www.ninjette.org/forums/showt...n+signal+noise Checking the wattage on the new bulb. They are 23watt, stocks are 10watt. Just gotta pick up some replacement bulbs and it should be fine. Never played around much where wattage was an issue, so I never knew to check for it, but that's why it's called learning haha Future reference to anyone looking at these turn signals (couldn't find bulb size online and no info is printed on the bulb besides 12v 23w). I went to Autozone and picked up a pair of Sylvania "Long Life 97" (97 LL) Bulbs. They are 13.5Volt, 9.3watts, but they seem to have done the trick as the flash pattern seems back to normal and the noise isn't very present anymore (still slightly there, but the same sound was there with the stock signals too - my understanding is that it is the relay engaging?). One thing to note is that I only found the bulb with a clear lens, I know some places have issues with clear turn signals, though I'm sure it can be found in amber as well. Last futzed with by Maielstrom; June 20th, 2012 at 02:30 PM. Reason: Found solution |
|
|
|
|
June 20th, 2012, 02:43 PM
|
#10 |
|
Recalculating. . .
Name: Jason
Location: Colorado
Join Date: Nov 2011 Motorcycle(s): '09 250 (sold) '12 Ninja 650 Posts: 353
|
Thanks for the heads up, I actually went and ordered some yesterday!
__________________________________________________
jasontracewell.com |
|
|
|
|
June 20th, 2012, 03:36 PM
|
#11 |
|
CPT Falcon
Name: J.Emmett Turner
Location: Newnan, GA
Join Date: Apr 2009 Motorcycle(s): '08 CP Blue EX250J, '97 unpainted EX250F, 2nd '97 unpainted EX250F (no engine), '07 black EX250F Posts: A lot.
|
OK. I think I might use these just to sell my stalk ones and make a tiny bit of money. Because mine have clear lenses, I guess I'll be looking for 10W amber bulbs. Gotta spend money to make money! The stock bulbs are amber but the post arrangement probably won't allow them to fit normally. Have you tried?
|
|
|
|
|
June 20th, 2012, 04:19 PM
|
#12 | |
|
Ghost Rider
Name: Eric
Location: Westchester, NY
Join Date: Jun 2012 Motorcycle(s): 2012 Ninja 250r Posts: 84
|
No probz iceknyght! Like in the original video I posted, you'll notice the back of the light doesn't stick too well. This is because of the shape of the stick pad, it leaves an entire section (think its the top) without any adhesive on it! I was going to use some 3M double side to remedy this, but the 3M tape was too thin (the adhesive they give is fairly thick) I'd say their adhesive should hold well enough, but the silicone I put on will make a water seal so as not to worry about any water getting in there. I'm leaving it alone to set until tomorrow (crazy hot weather in NY today), so I can't really give a test ride just yet.
As a separate note regarding the connection itself. In the video, the person opened up one of the connectors so the other would fit inside and make the connection. I tried getting the BikeMaster bullet connectors to fit inside the OEM, but that didn't work and I didn't want to mess up the OEM connectors (in case I need to put the stocks back on). Instead, I clipped off the bullet connectors of the BikeMaster's and stripped off about 3 inches of insulation to expose the wire. The OEM connector is set up like two cylinders next to each other (best description I can give  ) kinda looks like this OO. I twisted the exposed BikeMaster wire so it wouldn't separate and fed it through one of the cylinders, then wrapped it around the beginning of the wire. After that, I used electrical tape to insulate the connections. Not sure how wise of a method this is, but I didn't have to mess with the OEM connector. Let me know if this description makes much sense, as I'm not sure how helpful it is haha ) kinda looks like this OO. I twisted the exposed BikeMaster wire so it wouldn't separate and fed it through one of the cylinders, then wrapped it around the beginning of the wire. After that, I used electrical tape to insulate the connections. Not sure how wise of a method this is, but I didn't have to mess with the OEM connector. Let me know if this description makes much sense, as I'm not sure how helpful it is haha  Quote:
|
|
|
|
|
|
June 20th, 2012, 04:23 PM
|
#13 | |
|
Recalculating. . .
Name: Jason
Location: Colorado
Join Date: Nov 2011 Motorcycle(s): '09 250 (sold) '12 Ninja 650 Posts: 353
|
Quote:
Thanks for the help!
__________________________________________________
jasontracewell.com |
|
|
|
|
|
June 20th, 2012, 06:36 PM
|
#14 |
|
CPT Falcon
Name: J.Emmett Turner
Location: Newnan, GA
Join Date: Apr 2009 Motorcycle(s): '08 CP Blue EX250J, '97 unpainted EX250F, 2nd '97 unpainted EX250F (no engine), '07 black EX250F Posts: A lot.
|
I've wired signals that way before.
 Can't say it's particularly stable. Can't say it's particularly stable.  Anyway, I just wanted you guys to note that there is a drainage slit in the rubber that is supposed to face down, so that means that there is a correct left or right position for each signal. |
|
|
|
|
June 20th, 2012, 09:17 PM
|
#15 | ||
|
Ghost Rider
Name: Eric
Location: Westchester, NY
Join Date: Jun 2012 Motorcycle(s): 2012 Ninja 250r Posts: 84
|
Quote:
Quote:
Ya see I saw that, and I thought there was one on each side, if water got in one side, it would go out the other (ridiculous system I know). So as it is, I have mine on the wrong side haha. Convenient enough though, I can just unscrew and switch the covers making them right side up. Thanks for the notice! Never would have looked at that (Though I should have as I spent an hour applying and checking the silicone to make sure there were no holes in the seal and that I cleaned it up nice -_-)That's just about the only issue I had with this set of signals was that it comes with no directions, or even a paper with specifications. It is just the two signals, the adhesives, and the nuts/bolts for a screw in mount and that's it. Edit: Last night, I thought the vent was a part of the plastic cover, turns out it is actually a part of the rubber seal of the signal (which sits up against the bike). Since the silicone is already set, I decided to silicone the vents (which are now facing up) and I'm gonna just carve out my own later. So make sure to check that you're facing the vents in the correct direction before you put it on! Last futzed with by Maielstrom; June 21st, 2012 at 08:58 AM. |
||
|
|
|
|
June 25th, 2012, 08:45 PM
|
#16 |
|
Recalculating. . .
Name: Jason
Location: Colorado
Join Date: Nov 2011 Motorcycle(s): '09 250 (sold) '12 Ninja 650 Posts: 353
|
So apparently finding some of the parts I wanted was not an easy task... I tried finding male spade connectors to make a nice & easy connection, but NOBODY around here sells them in the size I needed... And finding an amber version of the bulb has proven to be quite difficult too...
So, I just cut the new light connectors off about halfway and crimped the wires to the female spade connectors and used heat shrink tubing to make it all nice and neat. For the adhesive, I found some grey 3M double sided tape at Target that I lined the edges with. It seems to be sticking very well so far! And without finding the right bulbs (I'll have to order some online), I am using the ones that came with the mounts (that definitely blink too fast!) until they come in... But they're on and definitely look better than the stock stalks!
__________________________________________________
jasontracewell.com |
|
|
|
|
June 25th, 2012, 09:04 PM
|
#17 | |
|
Ghost Rider
Name: Eric
Location: Westchester, NY
Join Date: Jun 2012 Motorcycle(s): 2012 Ninja 250r Posts: 84
|
Quote:
And just as a little update, the silicone cured/dried/sealed up nicely. Did a decent job cleaning up around the edges. The black silicone definitely looks good, so I'm absolutely satisfied with the outcome! I can highly recommend these signals, they look great and the price is excellent on them! |
|
|
|
|
|
June 25th, 2012, 09:12 PM
|
#18 |
|
Recalculating. . .
Name: Jason
Location: Colorado
Join Date: Nov 2011 Motorcycle(s): '09 250 (sold) '12 Ninja 650 Posts: 353
|
Yeah, the bulbs make me nervous, but I have only been riding the bike about twice a week to work, so 1 or maybe 2 days with the bulbs in there should be fine... I'll just try not to use them much until then...
 And the 3M tape works well, but it's also not a full connection like using the silicone, but I don't ride in bad weather so it shouldn't be a problem. But I did only use 2 pieces (curved from the middle of the front to the middle of the back, top and bottom), so it's not too bad overall...
__________________________________________________
jasontracewell.com |
|
|
|
|
June 26th, 2012, 11:29 AM
|
#19 | |
|
Ghost Rider
Name: Eric
Location: Westchester, NY
Join Date: Jun 2012 Motorcycle(s): 2012 Ninja 250r Posts: 84
|
Quote:
Absolutely the 3M is a good option! I was gonna go with that myself, but I didn't have any haha so the silicone was a good alternative. Sounds like you've got a good stick though! I've got 3M holding some 12 inch LED trips inside the fairing, and I've had absolutely no problem with it. |
|
|
|
|
|
June 26th, 2012, 11:37 AM
|
#20 |
|
Recalculating. . .
Name: Jason
Location: Colorado
Join Date: Nov 2011 Motorcycle(s): '09 250 (sold) '12 Ninja 650 Posts: 353
|
I just lucked out on finding the 3M tape at Target! I am sure they'd probably have the same stuff at Lowes or Home Depot too... I bought some silicone too, just in case...
And I rode to work today with them, and was on the freeway doing over 80 (for about 10 minutes straight) with no problems, so I think I am good!
__________________________________________________
jasontracewell.com |
|
|
|
|
June 27th, 2012, 06:15 AM
|
#21 |
|
ninjette.org member
Name: James
Location: Sydney
Join Date: Jun 2012 Motorcycle(s): 2012 black Ninjette Posts: 75
|
hey guys great write up..! how exactly did you do the silicone? do you mind uploading some pics?
also did you have to take the fairings off at all to install these? sorry.. im totally new to bikes!
__________________________________________________
Ride safe, be safe..! |
|
|
|
|
June 27th, 2012, 08:37 AM
|
#22 |
|
Recalculating. . .
Name: Jason
Location: Colorado
Join Date: Nov 2011 Motorcycle(s): '09 250 (sold) '12 Ninja 650 Posts: 353
|
I went with the tape instead of silicone, but I would assume you would just lay a bead around the center of the rubber gasket and then press them on in place.
Unless you plan on using the screws to install them, you won't need to remove the fairings. If you watch the video up top, it shows how to remove the stock lights (just a couple screws) and gives a good idea on how to install them too...
__________________________________________________
jasontracewell.com |
|
|
|
|
June 27th, 2012, 03:42 PM
|
#23 |
|
CPT Falcon
Name: J.Emmett Turner
Location: Newnan, GA
Join Date: Apr 2009 Motorcycle(s): '08 CP Blue EX250J, '97 unpainted EX250F, 2nd '97 unpainted EX250F (no engine), '07 black EX250F Posts: A lot.
|
What type of silicone is easiest to remove from fairings if I have to? I know some kinds can be as bad as solid (aquarium glue *grrr*).
|
|
|
|
|
June 27th, 2012, 11:25 PM
|
#24 | |
|
Ghost Rider
Name: Eric
Location: Westchester, NY
Join Date: Jun 2012 Motorcycle(s): 2012 Ninja 250r Posts: 84
|
Quote:
In regards to what kind of silicone is easy to get off the fairings, I haven't a clue. Didn't think to test it at all before hand. I used GE silicone (think it was silicone II). From what I remember, the tube says it can be removed with mineral spirits, but in regards to the fairing, not sure how easy it is. I can only go off of prior experience where I've used silicone around the house, and it's peeled off pretty cleanly and easily. My thought was that since the fairing is plastic, it should be the same? |
|
|
|
|
|
June 27th, 2012, 11:42 PM
|
#25 | |
|
ninjette.org member
Name: James
Location: Sydney
Join Date: Jun 2012 Motorcycle(s): 2012 black Ninjette Posts: 75
|
Quote:
And yes please! a vid or some pics would, but not trouble mate! 
__________________________________________________
Ride safe, be safe..! |
|
|
|
|
|
June 28th, 2012, 12:24 PM
|
#26 |
|
Ghost Rider
Name: Eric
Location: Westchester, NY
Join Date: Jun 2012 Motorcycle(s): 2012 Ninja 250r Posts: 84
|
http://www.youtube.com/watch?v=7tMoyz7fx_8
Quick video of them Photos: Right Side: http://i12.photobucket.com/albums/a2...980/Right3.jpg http://i12.photobucket.com/albums/a2...980/Right2.jpg http://i12.photobucket.com/albums/a2...980/Right1.jpg LeftSide: http://i12.photobucket.com/albums/a2...1980/Left3.jpg http://i12.photobucket.com/albums/a2...1980/Left2.jpg http://i12.photobucket.com/albums/a2...1980/Left1.jpg I saw the tri mounts, those definitely look cool too! Just keep in mind though, that those are LEDs, so there may be some extra work to do on them (I think something with the relay? Don't hold me to it haha) It's your bike, so go for whichever one you like the look of best!
|
|
|
|
|
July 1st, 2012, 01:44 PM
|
#27 |
|
Recalculating. . .
Name: Jason
Location: Colorado
Join Date: Nov 2011 Motorcycle(s): '09 250 (sold) '12 Ninja 650 Posts: 353
|
I finally got around to cleaning the bike and taking some pics of my blinkers installed... I have ridden close to 200 miles with them on so far (all the way up to 80 mph) with no problems... Solid as a rock!
And I got some amber bulbs (10w 12v) from online so now the blinkers work as they should!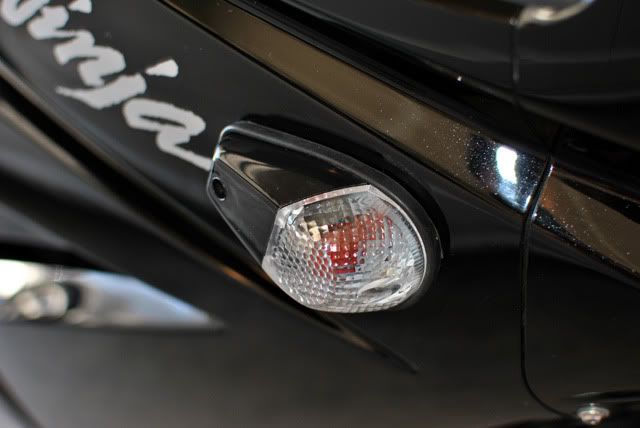 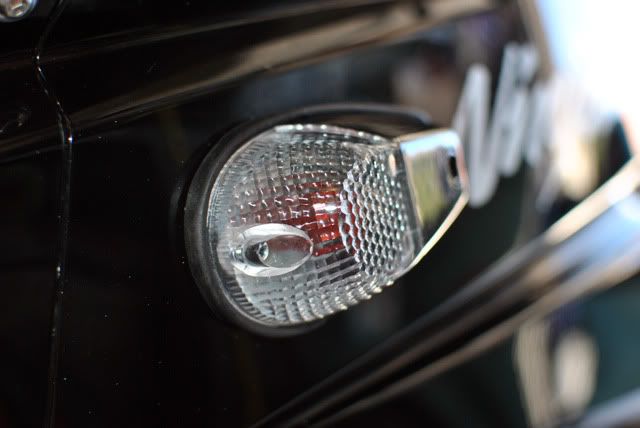 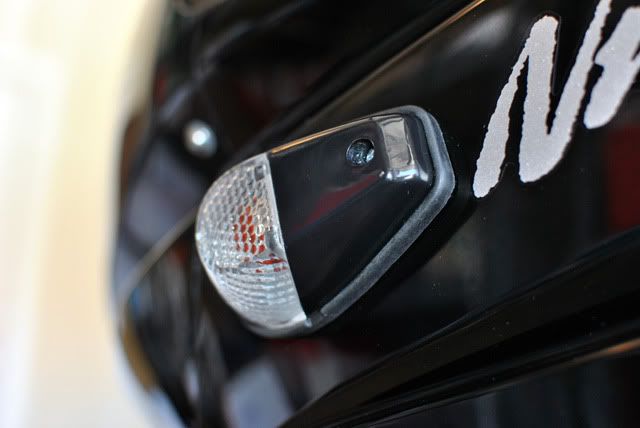 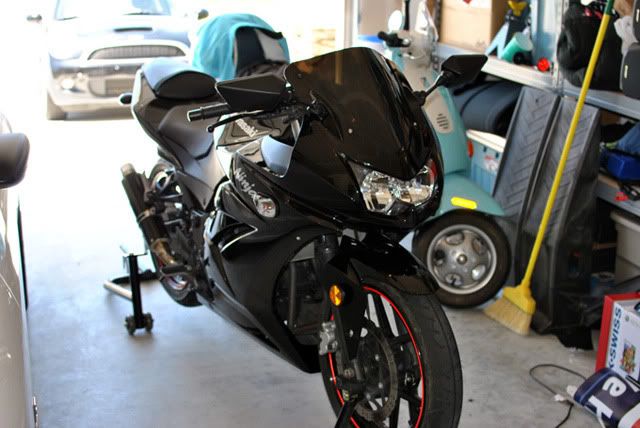
__________________________________________________
jasontracewell.com |
|
|
|
|
July 2nd, 2012, 02:52 AM
|
#28 | |
|
CPT Falcon
Name: J.Emmett Turner
Location: Newnan, GA
Join Date: Apr 2009 Motorcycle(s): '08 CP Blue EX250J, '97 unpainted EX250F, 2nd '97 unpainted EX250F (no engine), '07 black EX250F Posts: A lot.
|
Quote:
|
|
|
|
|
|
July 2nd, 2012, 07:49 AM
|
#29 |
|
Ghost Rider
Name: Eric
Location: Westchester, NY
Join Date: Jun 2012 Motorcycle(s): 2012 Ninja 250r Posts: 84
|
Good looks! They came out awesome! Also diggin the red rim tape, your bike looks sick!
|
|
|
|
|
July 2nd, 2012, 08:55 AM
|
#30 | ||
|
Recalculating. . .
Name: Jason
Location: Colorado
Join Date: Nov 2011 Motorcycle(s): '09 250 (sold) '12 Ninja 650 Posts: 353
|
Quote:
http://www.ebay.com/itm/290639562194...r#ht_500wt_970 Quote:
__________________________________________________
jasontracewell.com |
||
|
|
|
|
July 2nd, 2012, 01:27 PM
|
#31 | |
|
CPT Falcon
Name: J.Emmett Turner
Location: Newnan, GA
Join Date: Apr 2009 Motorcycle(s): '08 CP Blue EX250J, '97 unpainted EX250F, 2nd '97 unpainted EX250F (no engine), '07 black EX250F Posts: A lot.
|
Quote:
|
|
|
|
|
|
July 5th, 2012, 05:25 PM
|
#32 |
|
Frak It
Name: Sean
Location: SWFL
Join Date: Dec 2008 Motorcycle(s): 2008 Ninja 250R Posts: 199
|
Nice thread! I ordered these along with black silicone and the proper bulbs. I used a Dremel to shave a bit off a spade connector to make it fit.
BikeMaster Universal Marker Light Kit - Pair Wagner 97 Miniature Bulb - Pack of 10 Permatex 82180 Ultra Black Maximum Oil Resistance RTV Silicone Gasket Maker - 3.35 oz. 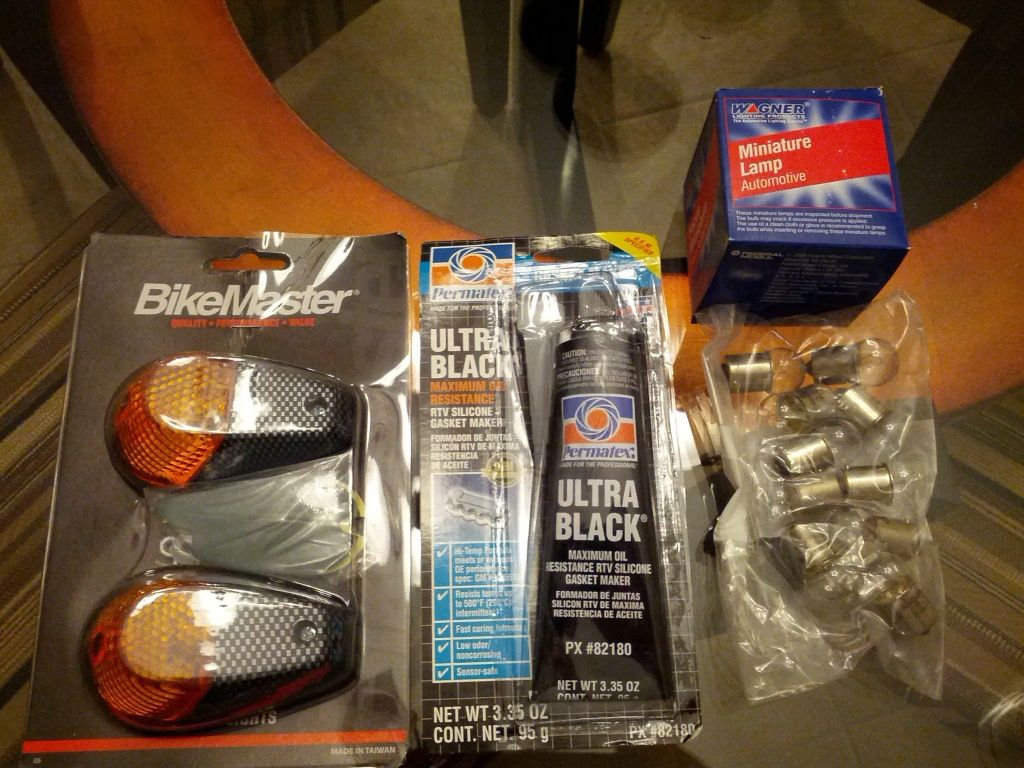 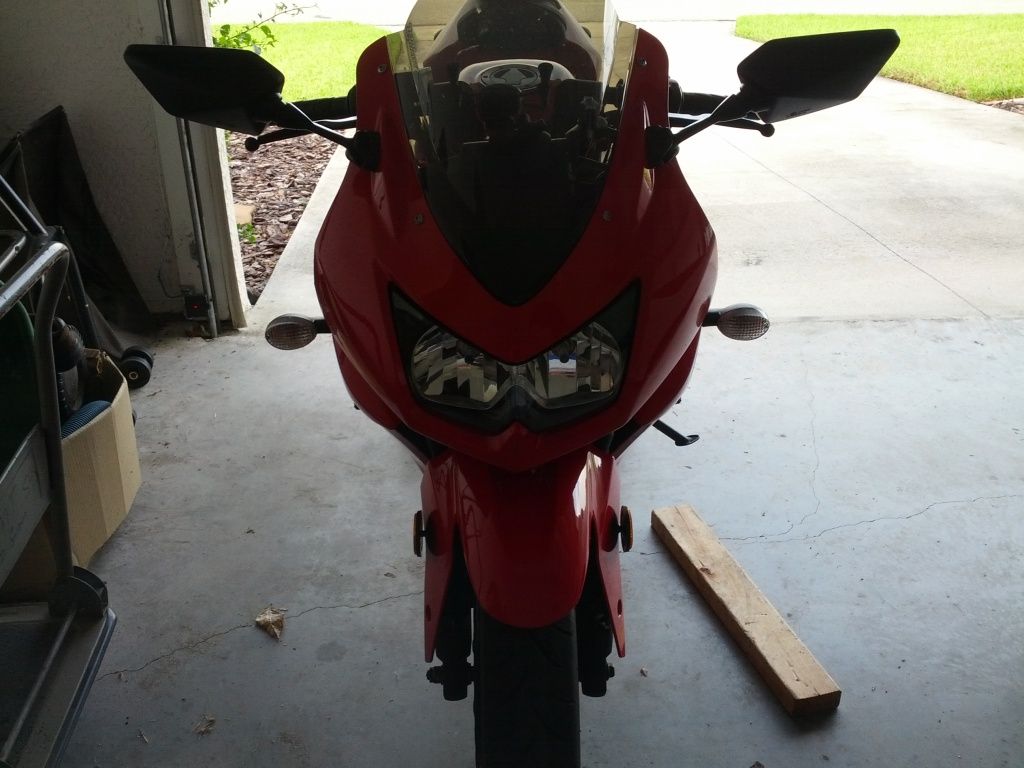 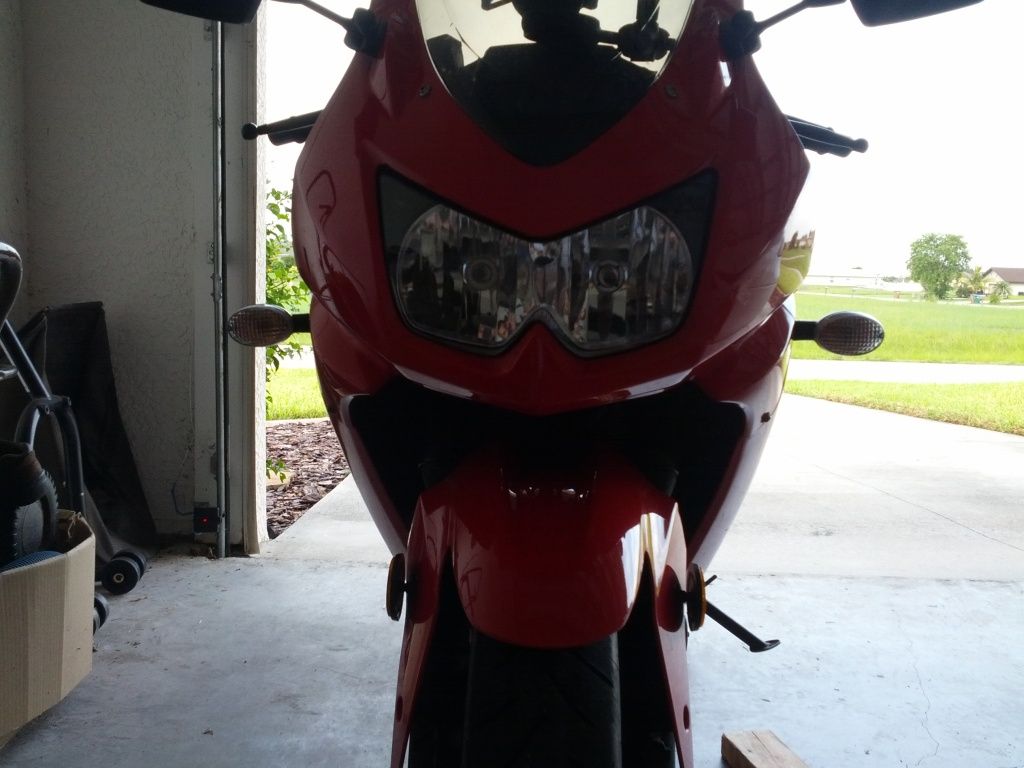 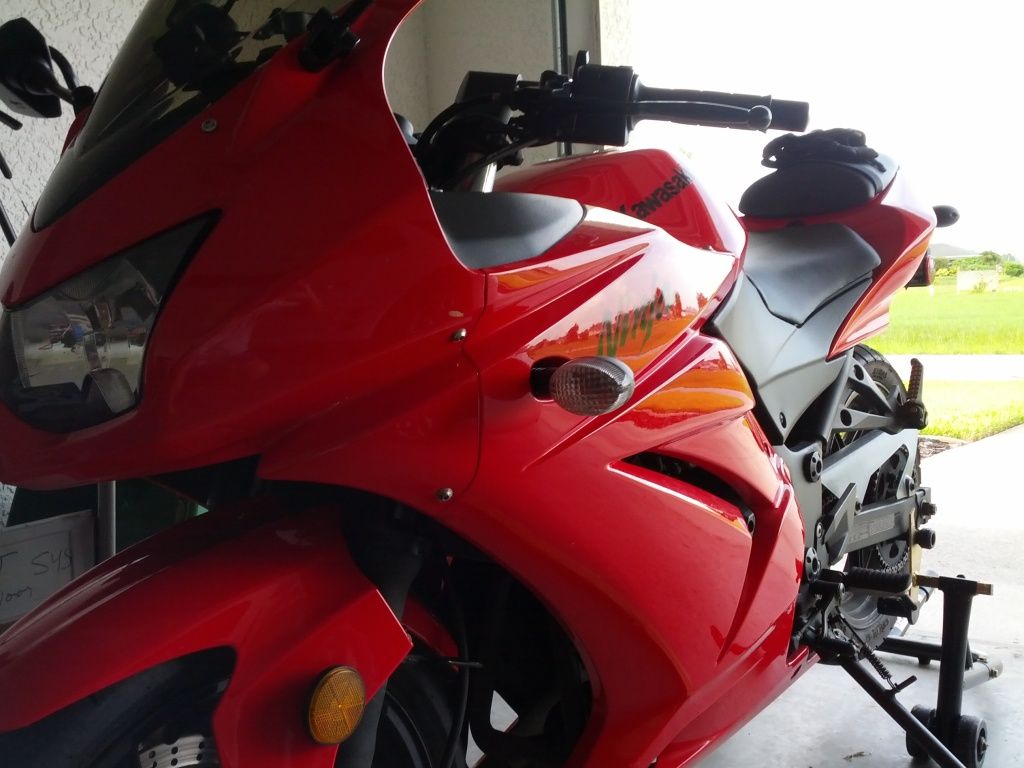  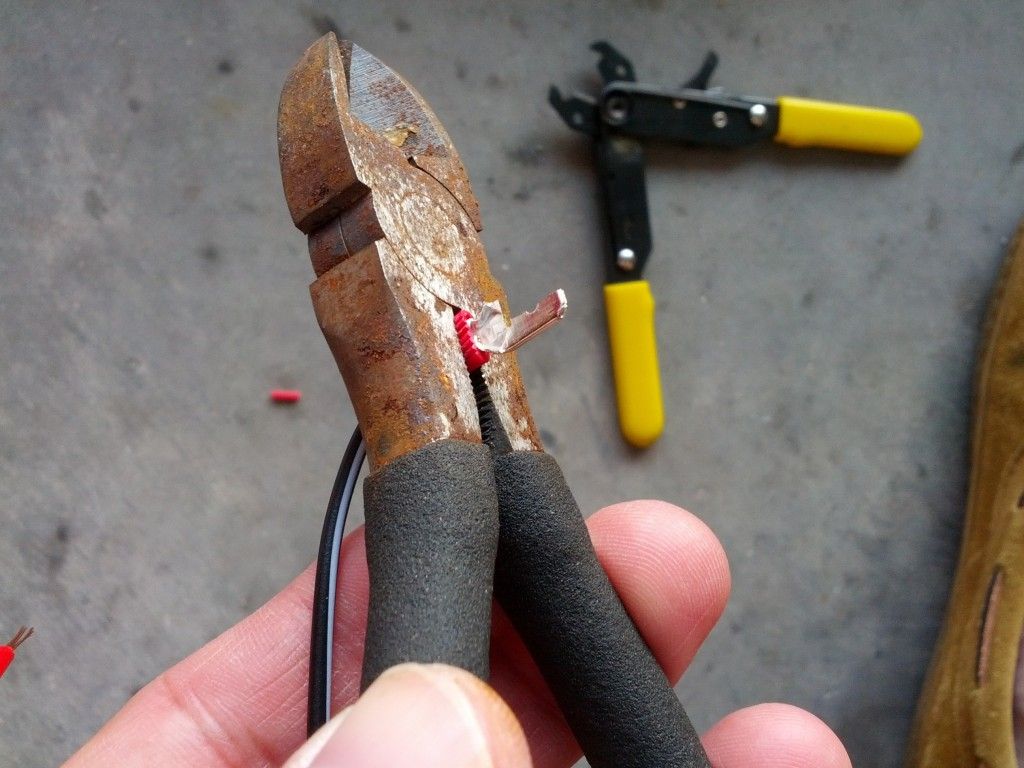 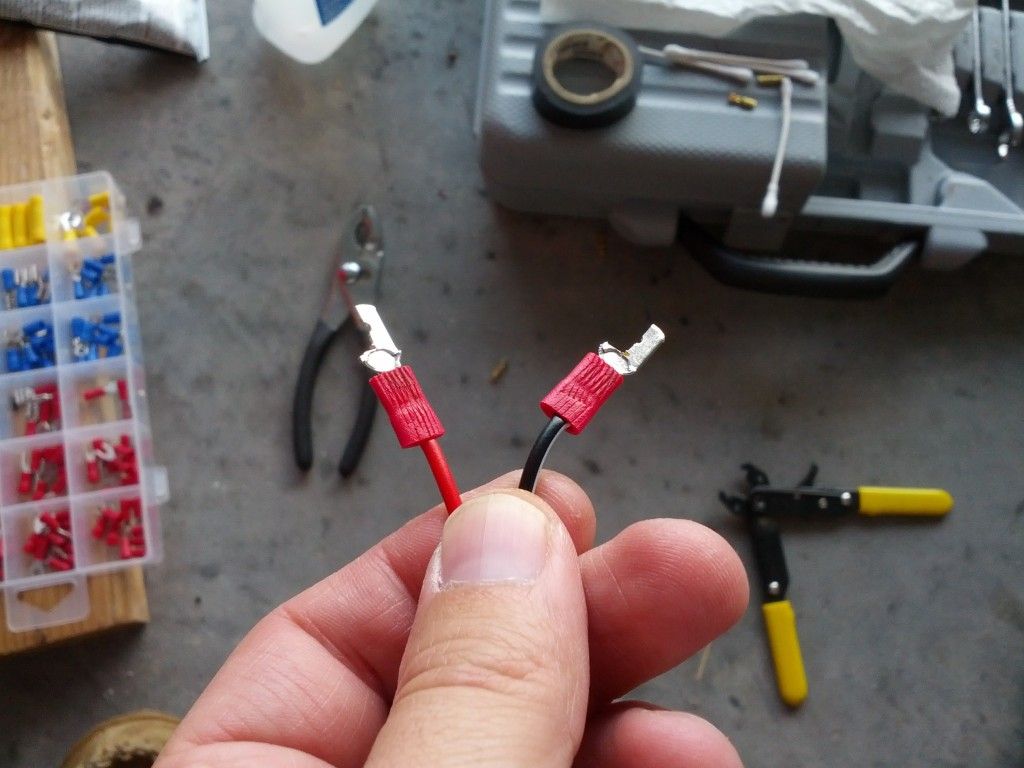 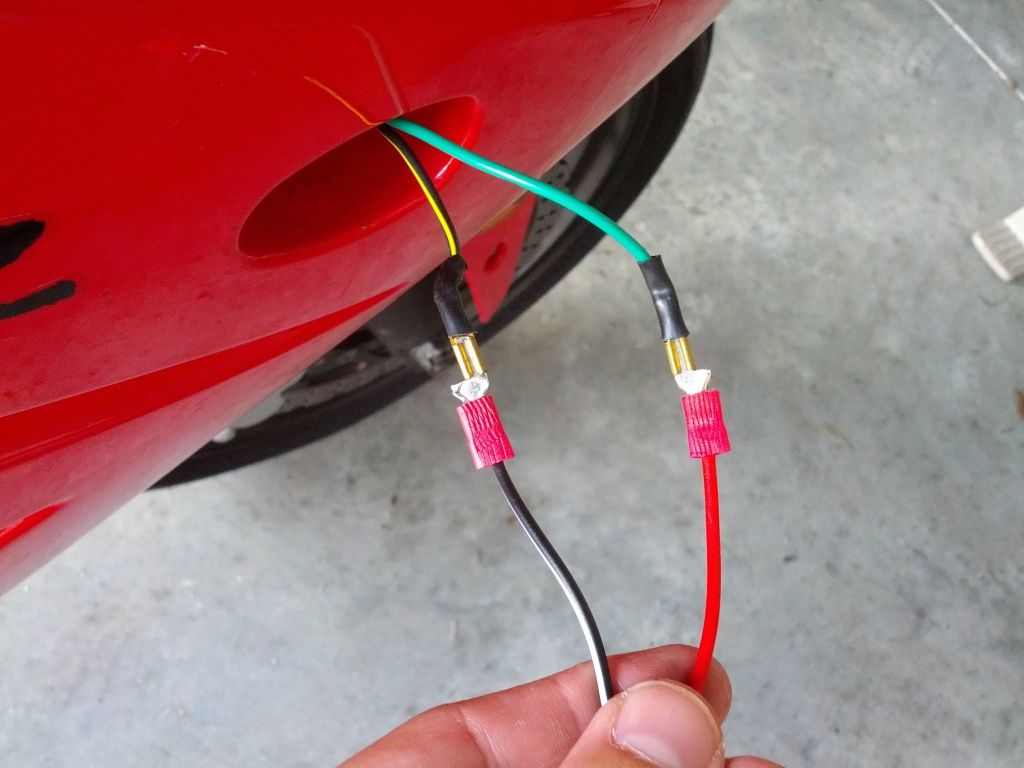 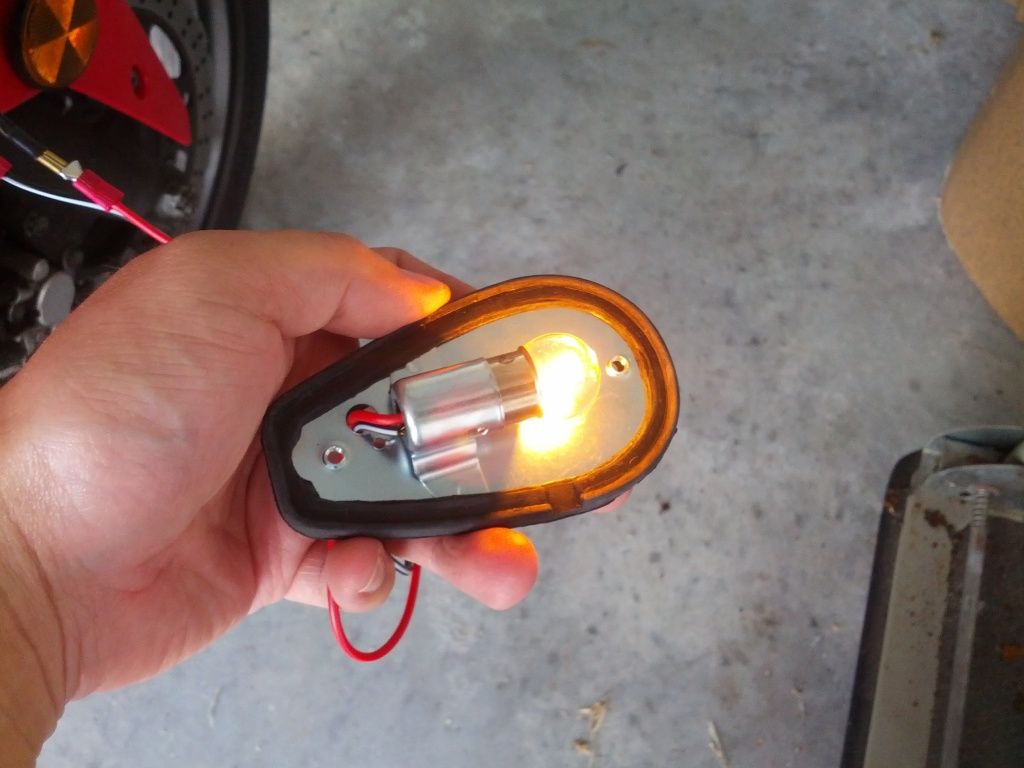 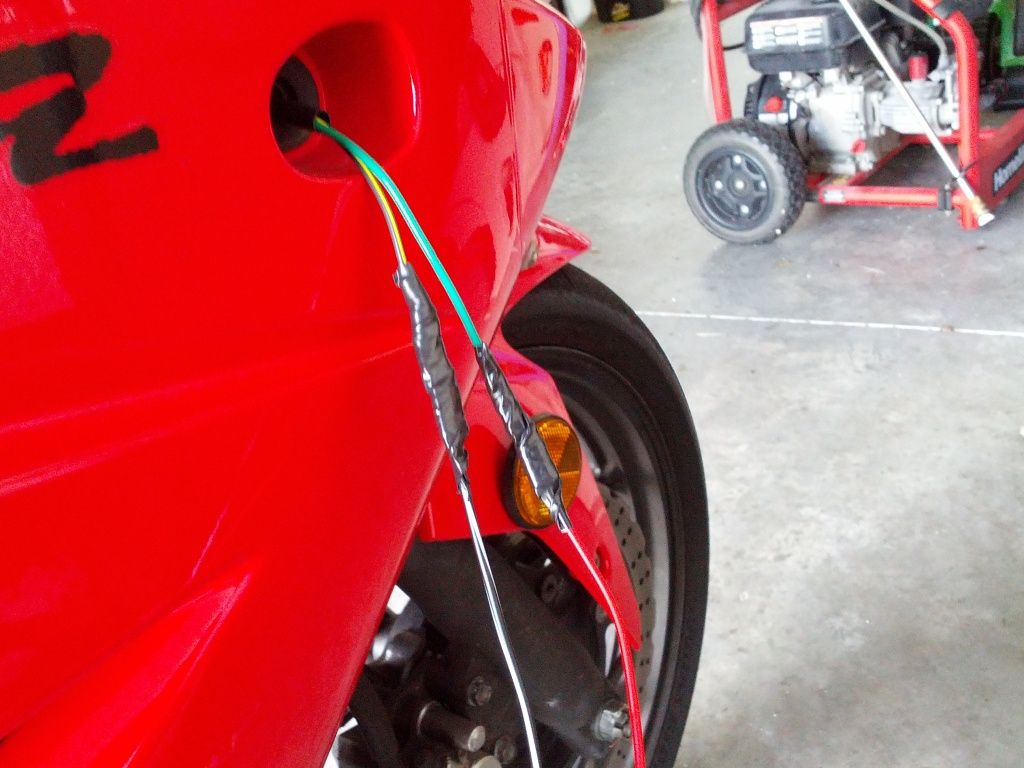 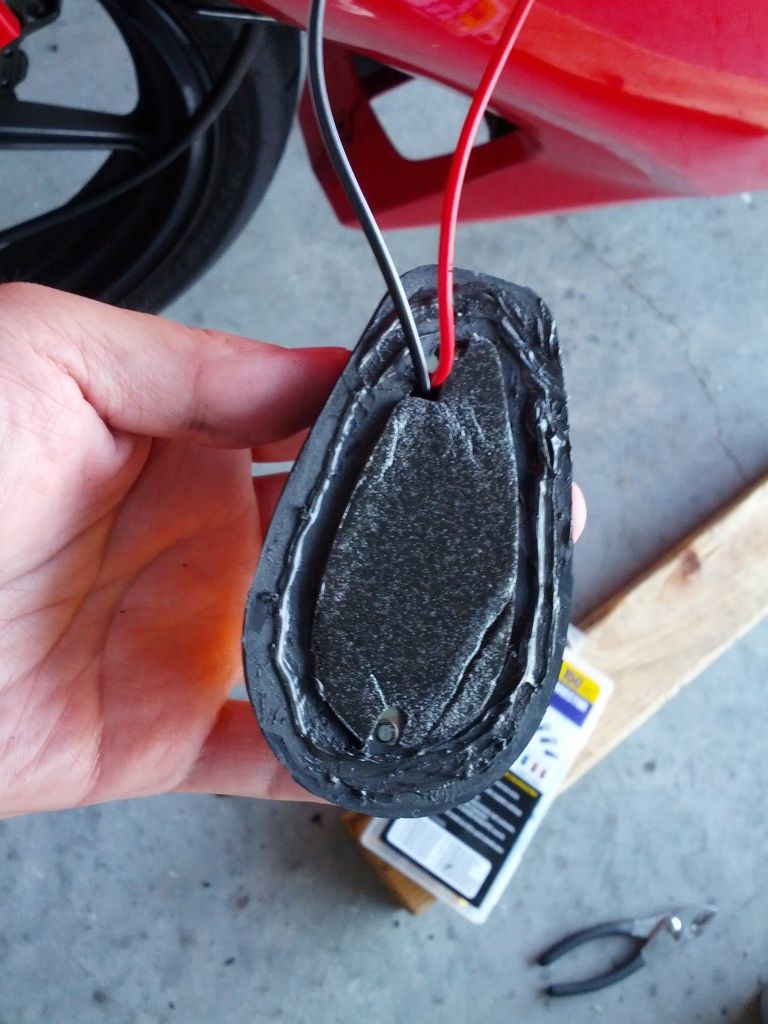  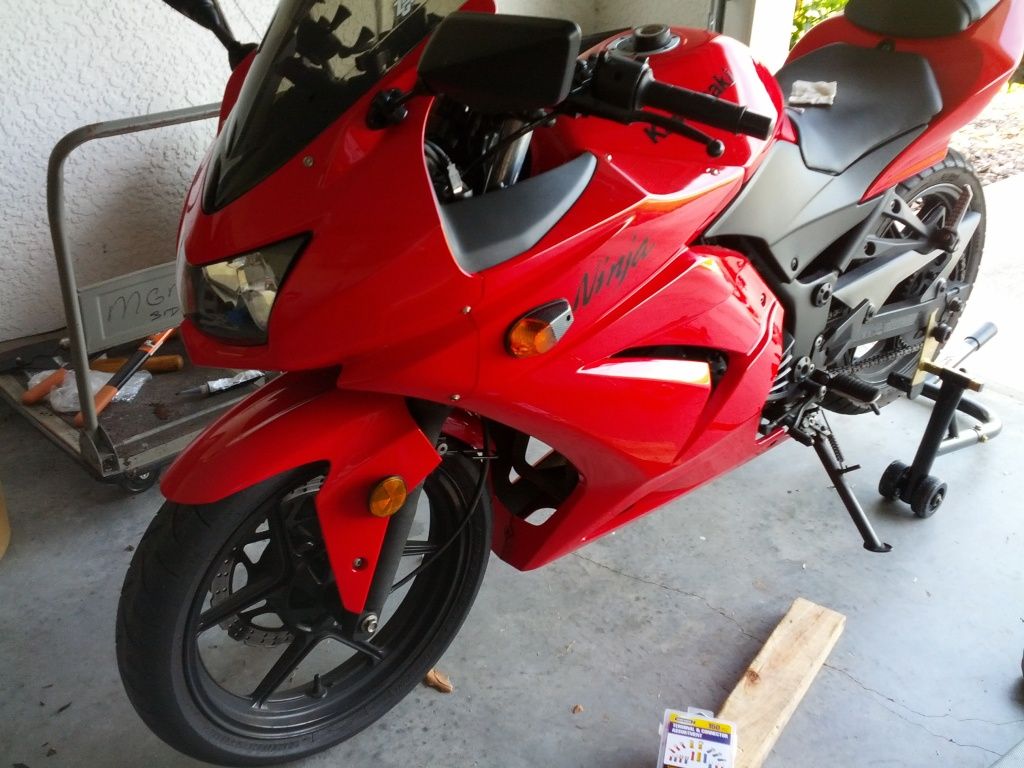
|
|
|
|
|
July 5th, 2012, 10:55 PM
|
#33 |
|
Recalculating. . .
Name: Jason
Location: Colorado
Join Date: Nov 2011 Motorcycle(s): '09 250 (sold) '12 Ninja 650 Posts: 353
|
I thought about doing that with the spade connector... I probably should have! Nice job!
__________________________________________________
jasontracewell.com |
|
|
|
|
July 6th, 2012, 05:43 PM
|
#34 | |
|
Ghost Rider
Name: Eric
Location: Westchester, NY
Join Date: Jun 2012 Motorcycle(s): 2012 Ninja 250r Posts: 84
|
Quote:
 Haha didn't even think of doing that though Looks like it came out great too! The orange lens was definitely a fantastic choice, it blends sooooo nice with the red of your bike! And 2 bucks for 10 of those bulbs is a helluva lot better than what I paid haha nice find! |
|
|
|
|
 |
 Similar Threads
|
||||
| Thread | Thread Starter | Forum | Replies | Last Post |
| Flush Mounts?! | scubaru | 1986 - 2007 Ninja 250R Farkles | 62 | January 1st, 2014 02:39 PM |
| Is it possible to install flush mounts without drilling into the fairings? | kirbie | 2008 - 2012 Ninja 250R Tech Talk | 18 | February 25th, 2013 04:46 PM |
| Flush mounts too small... | Incognito | 2008 - 2012 Ninja 250R Farkles | 13 | October 2nd, 2012 05:42 PM |
| Flush Mounts | fredhsu | 2008 - 2012 Ninja 250R Farkles | 16 | August 27th, 2012 10:55 AM |
| Flush Mounts for 500 | reondadomino | General Motorcycling Discussion | 9 | December 19th, 2009 03:01 PM |
|
|


