
|
 June 6th, 2011, 09:51 AM
|
#201 |
|
Always.
Name: Alex
Location: Calgary, AB
Join Date: Mar 2011 Motorcycle(s): '08 Ninja 250, '05 GSX-R600 Posts: A lot.
|
Well I have a perfect condition green solo seat cowel that I don't use, and haven't ever used it.
Anyone who would like a picture or to make a possible offer please reply! It is for New gen! |

|

|
|
June 6th, 2011, 09:38 PM
|
#202 |
|
ninjette.org dude
Name: 1 guess :-)
Location: SF Bay Area
Join Date: Jun 2008 Motorcycle(s): '13 Ninja 300 (white, the fastest color!), '13 R1200RT, '14 CRF250L, '12 TT-R125LE Posts: Too much.
Blog Entries: 7
|
Alex - why don't you post it up in the marketplace; all of our for sale type threads are in there.
__________________________________________________
Montgomery Street Motorcycle Club / cal24.com / crf250l.org / ninjette.org ninjette.org Terms of Service Shopping for motorcycle parts or equipment? Come here first. The friendliest Ninja 250R/300/400 forum on the internet! (especially Unregistered) |
|
|
|
|
June 7th, 2011, 09:52 AM
|
#203 |
|
Always.
Name: Alex
Location: Calgary, AB
Join Date: Mar 2011 Motorcycle(s): '08 Ninja 250, '05 GSX-R600 Posts: A lot.
|
Thank you, I'll go do that! =]
|
|
|
|
|
June 9th, 2011, 12:39 PM
|
#204 |
|
ninjette.org member
Name: kevin
Location: rancho, cali
Join Date: May 2011 Motorcycle(s): 250r Posts: 27
|
http://cgi.ebay.com/ebaymotors/KAWAS...item4aabb62fc9
i found this on ebay im bidding on it now im just wondering why they are so cheap and is the black gonna match my 09 black 99996-1360-H8 part number |
|
|
|
|
June 9th, 2011, 03:14 PM
|
#205 |
|
Ramen Rider
Name: Gary
Location: Honolulu, Hawaii
Join Date: Jan 2009 Motorcycle(s): 2015 BMW R1200R, 08 Honda VFR800A (sold), 09 Ninja 250R (sold) Posts: A lot.
|
chefdota, it would be easier if you ask the seller. in the pic, it is missing the pad that faces the rider's back. maybe the seller has it, but didn't take a pic of it? again probably easier if you ask him/her.
|
|
|
|
|
June 9th, 2011, 03:32 PM
|
#206 |
|
Ride this!
Name: Mike
Location: Salt Lake City, UT
Join Date: Aug 2010 Motorcycle(s): 2009 Kawasaki Ninja 250R Posts: 78
|
I replaced the POS grommet that continued to fall out no matter what I did with Velcro. Problem solved

|
|
|
|
|
June 9th, 2011, 07:52 PM
|
#207 |
|
ratlab
Name: reese
Location: tracy, ca
Join Date: May 2011 Motorcycle(s): gsxr1000,R3x2,RC390,FZ07,XR100 Posts: 132
|
i have a 2010 cowl has no gap and grommet stays in -maybe they fixed it
|
|
|
|
|
June 27th, 2011, 12:34 PM
|
#208 | |
|
ninjette.org member
Name: Jason
Location: Hamilton
Join Date: Aug 2010 Motorcycle(s): Blue 2010 Kawasaki Ninja 250r Posts: 170
|
Quote:

|
|
|
|
|
|
June 27th, 2011, 02:40 PM
|
#209 |
|
ninjette.org certified postwhore
Name: Joe
Location: Buffalo NY
Join Date: Jan 2009 Motorcycle(s): 08 Ninja 250 "Wasabi", 82 Yamaha xj650j Posts: A lot.
|
I don't understand what problem you guys are having with the cowl fitment.
I didnt have to shave bumpers, swap this and buy that. If a side is high when on the bike, put that end of the bracket only into a vise and tap it in the same direction you want the cowl to go. Gently tighten the two front bolts and secure with Loc-tite.
__________________________________________________

|
|
|
|
|
June 27th, 2011, 04:27 PM
|
#210 |
|
ninjette.org sage
Name: Joseph
Location: Winter Park, FL
Join Date: May 2011 Motorcycle(s): 2011 250R Black, 2005 ZX-6R Blue Posts: 623
|
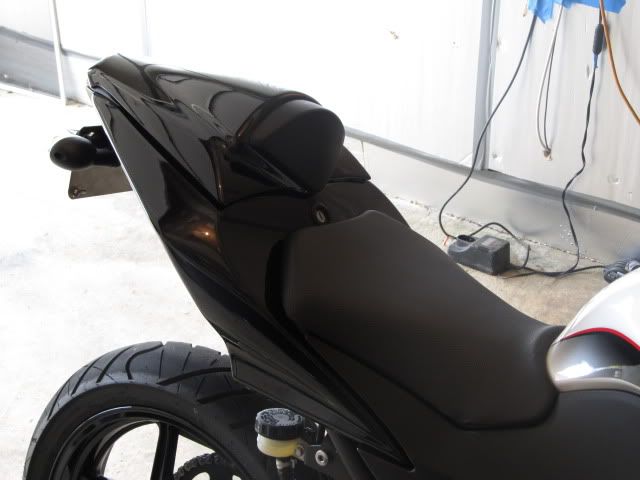
I got mine pretty flush. I did a combination of slightly bending the front bracket on the cowl. To get the pin to lock I also had to shave the rubber bumpers on the cowl. On the back side I had to bend the bracket on the bike that holds the grommet a little bit and shave the bumpers on that side. Then I had to muck with the seat tab on the back bracket on the bike to get the seat to be usable. I think it looks so much better.
 From this view you can also see my fly guitar pick washers because the bolts in my led license frame were a little too small for the tag bracket I made. |
|
|
|
|
June 27th, 2011, 05:55 PM
|
#211 |
|
ninjette.org member
Name: Jason
Location: Hamilton
Join Date: Aug 2010 Motorcycle(s): Blue 2010 Kawasaki Ninja 250r Posts: 170
|
Further to my post earlier I made some "adjustments" to my solo cowl to bring it flush with my slightly droopy hotbodies undertail. I had to lower the rear of the cowl further than the rear seat bracket would permit. This involved cutting the rear plastic pokey part and lowering it as well as reinforcing the two side tabs. Ultra-high-temp hot glue FTW. I also lowered the front by bending the bracket and shaving the helmet-lock side rubber grommet
Last futzed with by Jerkson; June 27th, 2011 at 07:49 PM. |
|
|
|
|
June 27th, 2011, 06:33 PM
|
#212 | |
|
ninjette.org newbie
Name: choy
Location: Perth, Australia
Join Date: Jun 2011 Motorcycle(s): 2009 ninja 250r Posts: 3
|
Quote:
|
|
|
|
|
|
June 27th, 2011, 10:23 PM
|
#213 | |
|
ninjette.org certified postwhore
Name: Joe
Location: Buffalo NY
Join Date: Jan 2009 Motorcycle(s): 08 Ninja 250 "Wasabi", 82 Yamaha xj650j Posts: A lot.
|
Quote:
This sucks when someone spends their hard earned money on something to only get stuck with more work to make it look right. Is this common for these undertails to be "droopy"? Looks great btw
__________________________________________________
|
|
|
|
|
|
June 28th, 2011, 05:18 AM
|
#214 | |
|
ninjette.org member
Name: Jason
Location: Hamilton
Join Date: Aug 2010 Motorcycle(s): Blue 2010 Kawasaki Ninja 250r Posts: 170
|
Quote:
Many people find it sags due to the fact that it is no longer bolted to the frame of the bike. Some choose to add two bolts just behind the turn signals to bolt it up and reduce the sag. I used the pipe insulation stuff around the frame to hold up the side farings a little higher to compensate some...but there was still an extra gap in addition to the gap many experience with the solo cowl in the first place. |
|
|
|
|
|
June 29th, 2011, 08:02 PM
|
#215 |
|
Ridin Dirty
Name: Ed
Location: Delaware
Join Date: Jun 2011 Motorcycle(s): 2011 white se 250r , 2008 zx6R Posts: 921
|
ill have mine in a few days.. cant wait to see how it fits..loL!
|
|
|
|
|
July 7th, 2011, 05:12 PM
|
#216 | |
|
ninjette.org member
Name: Saint
Location: Japan
Join Date: Dec 2010 Motorcycle(s): 2009 KAW Ninja250r Posts: 72
|
Quote:
|
|
|
|
|
|
July 7th, 2011, 07:39 PM
|
#217 | |
|
ninjette.org member
Name: nah
Location: north america
Join Date: Apr 2011 Motorcycle(s): n/a Posts: 34
|
Quote:
Right? Edit: youre in japan so no lowes (ithink..), the measurement of the grommet might also be in this thread, |
|
|
|
|
|
July 7th, 2011, 09:25 PM
|
#218 |
|
ninjette.org member
Name: Saint
Location: Japan
Join Date: Dec 2010 Motorcycle(s): 2009 KAW Ninja250r Posts: 72
|
I'm not missing anything. 09 in Japan doesn't come with a rear grommet. Even if it did...it's still a horrible product design
 . I've place the front grommets for the old one onto the new one blah blah blah...end result same. Long story short. I'll make something that will work and looks professional. Having to do this to make a product worthwhile is WORTHLESS. Oh and BTW, nice job on pointing out that I should have read the thread beforehand nah... (my you burn so brightly) Anyway, you missed the point. Bigger sin than missing a grommet. . I've place the front grommets for the old one onto the new one blah blah blah...end result same. Long story short. I'll make something that will work and looks professional. Having to do this to make a product worthwhile is WORTHLESS. Oh and BTW, nice job on pointing out that I should have read the thread beforehand nah... (my you burn so brightly) Anyway, you missed the point. Bigger sin than missing a grommet.
Last futzed with by SaintJPN; July 7th, 2011 at 11:01 PM. |
|
|
|
|
July 9th, 2011, 07:50 PM
|
#219 | |
|
CPT Falcon
Name: J.Emmett Turner
Location: Newnan, GA
Join Date: Apr 2009 Motorcycle(s): '08 CP Blue EX250J, '97 unpainted EX250F, 2nd '97 unpainted EX250F (no engine), '07 black EX250F Posts: A lot.
|
Quote:
|
|
|
|
|
|
July 9th, 2011, 08:09 PM
|
#220 | |
|
ninjette.org member
Name: nah
Location: north america
Join Date: Apr 2011 Motorcycle(s): n/a Posts: 34
|
Quote:
http://www.ninjette.org/forums/showp...8&postcount=54 which links to http://www.ninjette.org/forums/showp...07&postcount=6 sure id rather the cowl secure ie the stock pillon but i sure as hell dont have a rattle rattle flap flap FYI the grommet doesnt come with the bike, it comes with the cowl. which you bought used ... and like czroe said the DAMPERS on the seat do come loose and fall off easily if not properly inserted the gap on the front of the cowl is by design, and the rattle flap is you not having a grommet in the rear hole http://www.ninjette.org/forums/showp...07&postcount=6 correct me if im wrong......... |
|
|
|
|
|
July 9th, 2011, 09:00 PM
|
#221 |
|
Ridin Dirty
Name: Ed
Location: Delaware
Join Date: Jun 2011 Motorcycle(s): 2011 white se 250r , 2008 zx6R Posts: 921
|
I got mine to fit best by using no rubber grometts on the actual seat cowl itself, 4 of them.. the seat cowl did come with a rubber gromett for the rear connection, on the bike .. basically I had to bend down the rear tab on the bike just a little bit with a hammer and putting a towel over it not to scratch it all up.. then I bent the locking tab front bracket on the seat cowl itself in a little .. fits nice now with hardly any gap and perfect and tight .. no play at all in it.
__________________________________________________
#1 |
|
|
|
|
July 10th, 2011, 07:01 PM
|
#222 |
|
ninjette.org member
Name: Saint
Location: Japan
Join Date: Dec 2010 Motorcycle(s): 2009 KAW Ninja250r Posts: 72
|
Like I said before, I'll make something work. I took 15 minutes out of my schedule over the weekend and looked into my rear seat cowl. I've owned 2 brand new 2009's and both did not have this infamous rear grommet here in Japan and my cowl didn't come with one either. I'm sure that my cowl is different from many other people's cowls in how it is made also..BUT! That does not matter because grommets do not lock. FYI-if you're into small little rubber holes, you're into something entirely different than rear solo seat cowls. It does involve the word "solo".
 I had two options that I was toying around with in my head. The first was to fabricate a sleeve for the rear tab to slide into and the second was to use the guts of an extra rear seat I had (from my first 2009). I wanted to do this without using a lot of money because I believe that I've already paid enough just purchasing the seat cowl. I had two options that I was toying around with in my head. The first was to fabricate a sleeve for the rear tab to slide into and the second was to use the guts of an extra rear seat I had (from my first 2009). I wanted to do this without using a lot of money because I believe that I've already paid enough just purchasing the seat cowl.  I went with gutting the extra rear seat. Turned out to be pretty simple and almost everything aligns with a little slight modding here and there. There was a little cutting, shaving, and a couple of holes had to be made. I'll post pictures and provide step by step what I did. The end results: A rear cowl that locks into place without any rattling or movement and no one can walk by and lift up on your cowl to get at whatever is under your seat. There is a small gap all the way around but it is uniform and looks good. Out of pocket expense was only $1.00 for a small pack of bolts (I think M5). Tools I used as a saw, knife or a drill (to make the two holes), extra rear seat, two short and small bolts with 2 washers each, and some electrical tape (any color ok because it won't be visible). I went with gutting the extra rear seat. Turned out to be pretty simple and almost everything aligns with a little slight modding here and there. There was a little cutting, shaving, and a couple of holes had to be made. I'll post pictures and provide step by step what I did. The end results: A rear cowl that locks into place without any rattling or movement and no one can walk by and lift up on your cowl to get at whatever is under your seat. There is a small gap all the way around but it is uniform and looks good. Out of pocket expense was only $1.00 for a small pack of bolts (I think M5). Tools I used as a saw, knife or a drill (to make the two holes), extra rear seat, two short and small bolts with 2 washers each, and some electrical tape (any color ok because it won't be visible).Can't promise exactlly when the pictures will be posted (I've already taken them) due to some really important things I've got to take care of before that will happen. Should be in a few days I think. |
|
|
|
|
July 13th, 2011, 01:41 PM
|
#223 |
|
ninjette.org certified postwhore
Name: Joe
Location: Buffalo NY
Join Date: Jan 2009 Motorcycle(s): 08 Ninja 250 "Wasabi", 82 Yamaha xj650j Posts: A lot.
|
 Hitting the bike with hammers, shaving, filing and shimming!! Even losing the rear grommet before getting the cowl  When receiving the cowl you should have received a grommet. Put the grommet in the frame hole and check that the bottom of it is as flush as the top. Stick your pinky finger in there and press around the inside of the grommet. When assembling the cowl, the bracket only goes on one way. Pay attention to the location of the pin in the cowl plastic and the receiving end of the bracket. When installing the cowl, place the rear pin in the grommet. It will be noticeable when it seats in there properly. Make sure it actually seats itself in there with a slight push, pull. It will feel snug with very little but also noticeable play. Then push down the front of the cowl plastic right above the bumper with the base of your palm until you hear the lock click. I refuse to believe any of the major modifications being made in this thread are necessary to get the cowl to fit unless there is a non-OEM part involved. Kawasakis QC is much better than what this thread is saying. The only major problem with the cowl is the bracket. It is what causes the cowl to fit funny. It was designed and manufactured with the right dimensions. However, it comes bent in the middle. This deformation is from the pin weld cooling and can be fixed very easily. If one or both sides are too high or low for your liking, take the bracket off and put the side you want to adjust into a vise. With a hammer, gently tap the opposite side of the bracket to adjust the side in the jaws. I.e. tap the top of the opposite side on the top if you want to lower the side in the vise jaws. Test the fit often until youre satisfied. You'll notice that the closer to perpendicular you get the pin, the better the cowl will fit. Except for the modification to the helmet lock slots, all OEM cowls are identical. There is a possibility for there to be some warpage of the frame brackets from welding. If your stock passenger seat fit fine, the cowl will too.
__________________________________________________
|
|
|
|
|
September 16th, 2011, 12:11 AM
|
#224 |
|
ninjette.org sage
Name: Jonathan
Location: Beaverton OR
Join Date: Jul 2010 Motorcycle(s): Candy Thunder blue 2009 kawasaki 250r, 2010 Dark Stealth Ducati Monster 696. Posts: 891
|
How I fix my solo seat Cowl Gap
Terrible gaps before mod:
Front side gap before.jpgLeft Side Gap before 1.jpgLeft Side Gap before 2.jpgRight side gap before 1.jpg 1. Remove the front OEM bracket and two OEM metal clips from the seat cowl: OEM bracket.jpgOEM Clip.jpg 2.Use Dremel tool to cut the bracket at both ends so it can fit underneath the plastic part of the seat cowl: Dremel tool.jpgAfter cut 1.jpgAfter cut 2.jpg 3. Use Dremel to cut on one side of the plastic part of the seat cowl so the bracket can slide in: plastic cut off.jpg 4.Slide the bracket in: Slide in 1.jpgSlide in 2.jpgSlide in 3.jpg 5.Tighten the bracket to the plastic part using 2 OEM M6 bolts and 2 6mm nuts: Nut 1.jpgNut 2.jpg 6. Patch the cutting place on plastic part using 15min Epoxy: Patch.jpg 7. use 2 washers under the lock ASSY to raise it up: Washer.jpg 8. Install the seat cowl and look at the gap now  Right side after fix.jpgLeft side after fix.jpgFront side after fix.jpg Last futzed with by vnranger; September 16th, 2011 at 01:27 AM. Reason: Pics was not in order |
|
|
|
|
September 16th, 2011, 12:39 AM
|
#225 |
|
ninjette.org sage
Name: Jonathan
Location: Beaverton OR
Join Date: Jul 2010 Motorcycle(s): Candy Thunder blue 2009 kawasaki 250r, 2010 Dark Stealth Ducati Monster 696. Posts: 891
|
How to keep the rubber grommet on the seat cowl
I lost two of these rubber grommet already
 . So now I 'm using paper clip part to keep them stay in place . So now I 'm using paper clip part to keep them stay in place Clip 1.jpgClip 2.jpgClip 3.jpg |
|
|
|
|
October 15th, 2011, 10:22 PM
|
#226 | |
|
CPT Falcon
Name: J.Emmett Turner
Location: Newnan, GA
Join Date: Apr 2009 Motorcycle(s): '08 CP Blue EX250J, '97 unpainted EX250F, 2nd '97 unpainted EX250F (no engine), '07 black EX250F Posts: A lot.
|
Quote:
Last futzed with by CZroe; October 19th, 2011 at 06:06 AM. |
|
|
|
|
|
October 19th, 2011, 06:10 AM
|
#227 | |
|
CPT Falcon
Name: J.Emmett Turner
Location: Newnan, GA
Join Date: Apr 2009 Motorcycle(s): '08 CP Blue EX250J, '97 unpainted EX250F, 2nd '97 unpainted EX250F (no engine), '07 black EX250F Posts: A lot.
|
It's actually the LOWES part number. The Hillman part number is H# 881261. Now, I know I have the right part: The bin said "Lowes: 139377 H#: 881261" and it is labeled "32/32OD x 1/2ID H# 881261" on the sealed package.
I test-fitted it in the store and it just falls right off of the nipple but I found that it tightens up perfectly when I get it in the bike. Now, regarding fitment, mine is a used cowl that seems to fit perfectly fine. The bracket appears straight and unmodified and the gap is minimal (didn't really notice even until I took the picture). Question: Why does the nipple have a ridge around only half of it? I see others in this thread exactly the same way. Quote:
Now, I will be putting my contact info on the inside somewhere and using Loctite though I myself have not personally experienced it coming off (haven't ridden with it yet). 
|
|
|
|
|
|
October 19th, 2011, 08:03 AM
|
#228 |
|
Ridin Dirty
Name: Ed
Location: Delaware
Join Date: Jun 2011 Motorcycle(s): 2011 white se 250r , 2008 zx6R Posts: 921
|
the only rubber pc i am using on mine is the back one that inserts into the bike, i actually superglued it on so it wouldnt keep falling out when i would remove the cowl.. but the 4 rubber pcs on the seat cowl itself i have removed, i dont have any issues with it, fits nice and flush and doesnt move around or anything.. its all in bending the front bracket.. the rear i slightly had to bend after installing the hotbodies undertail , but otherwise it was all just the front bracket on the cowl..
__________________________________________________
#1 |
|
|
|
|
October 21st, 2011, 11:25 PM
|
#229 | |
|
CPT Falcon
Name: J.Emmett Turner
Location: Newnan, GA
Join Date: Apr 2009 Motorcycle(s): '08 CP Blue EX250J, '97 unpainted EX250F, 2nd '97 unpainted EX250F (no engine), '07 black EX250F Posts: A lot.
|
Quote:
Without a place to put it while you secure or retrieve your helmet, it clearly wasn't designed to be taken on and off regularly. That's why the grommet is as likely to push through when mounting the cowl as it is to fit correctly. |
|
|
|
|
|
October 26th, 2011, 08:43 PM
|
#230 |
|
ninjette.org member
Name: JT
Location: NorCal
Join Date: May 2011 Motorcycle(s): 2010 250R SE Green Machine, 2011 250R SE White Lightning Posts: 155
|
Awesome thread, Lowe's gasket
Now can someone post a pic of the bent bar and how to properly do it. Thanks!
|
|
|
|
|
December 14th, 2011, 11:37 PM
|
#231 |
|
ninjette.org member
Name: Avais
Location: Philadelphia, PA. USA
Join Date: Dec 2011 Motorcycle(s): 2010 Ninja 250R Special Edition Posts: 180
|
Thanks, this thread helped a lot. Gonna pay a visit to Lowe's tomorrow. A+ for you.!
__________________________________________________
249cc FTW..! 
|
|
|
|
|
March 3rd, 2012, 04:03 AM
|
#232 | ||
|
CPT Falcon
Name: J.Emmett Turner
Location: Newnan, GA
Join Date: Apr 2009 Motorcycle(s): '08 CP Blue EX250J, '97 unpainted EX250F, 2nd '97 unpainted EX250F (no engine), '07 black EX250F Posts: A lot.
|
Quote:
Quote:
|
||
|
|
|
|
March 11th, 2012, 12:57 AM
|
#233 |
|
ninjette.org certified postwhore
Name: Joe
Location: Buffalo NY
Join Date: Jan 2009 Motorcycle(s): 08 Ninja 250 "Wasabi", 82 Yamaha xj650j Posts: A lot.
|
@vnranger. Epoxy, cutting oem design, paper clamp, f-ing LATEX GLOVES!!!!
Do you realize that all you had to do was use just that vise you have and put the bracket into it, tap both ends of the bracket to bend towards the direction of the lock post, and it would have achieved the same... exact... effect. Wow!! yes your cowl looks great now, but "You went full retard" ~ Robert Downey Jr.
__________________________________________________
|
|
|
|
|
January 21st, 2013, 06:03 AM
|
#234 | |
|
ninjette.org member
Name: Max
Location: UK
Join Date: Jan 2012 Motorcycle(s): Kawasaki Ninja EX250 K8F Posts: 89
|
Quote:
I live in the uk and we dont have lowe. Do you know anywhere I can get this in the uk or if i was looking what the part is actually called? ty |
|
|
|
|
|
January 21st, 2013, 09:42 AM
|
#235 | |
|
CPT Falcon
Name: J.Emmett Turner
Location: Newnan, GA
Join Date: Apr 2009 Motorcycle(s): '08 CP Blue EX250J, '97 unpainted EX250F, 2nd '97 unpainted EX250F (no engine), '07 black EX250F Posts: A lot.
|
Quote:
Last futzed with by CZroe; January 21st, 2013 at 11:39 AM. |
|
|
|
|
|
January 21st, 2013, 09:45 AM
|
#236 | |
|
ninjette.org member
Name: Max
Location: UK
Join Date: Jan 2012 Motorcycle(s): Kawasaki Ninja EX250 K8F Posts: 89
|
Quote:
We have something called bnq. i'll have a look there. much appreciated
|
|
|
|
|
|
June 19th, 2013, 08:04 PM
|
#237 |
|
ninjette.org sage
Name: Justin
Location: Fresno CA
Join Date: Jun 2012 Motorcycle(s): 12' Ninja 250 Posts: 831
|
Rise old thread!
I just bought a cowl from a link in the marketplace section with teh Ebay bot. Came with 4 little rubber dampers and no instruction. took off my seat, put the bigger dampers in front, installed seat cowl, didnt move left/right, but the rear end i could completely lift up..took it off, double checked and i seemed to have lost my grommet. been waiting a good 5 days to get one in from Partzilla, they offered a tracking number but it still has not updated, lame. Last futzed with by Aggrotech; June 20th, 2013 at 01:28 AM. |
|
|
|
|
June 20th, 2013, 01:13 AM
|
#238 |
|
ninjette.org member
Name: Max
Location: UK
Join Date: Jan 2012 Motorcycle(s): Kawasaki Ninja EX250 K8F Posts: 89
|
I found my old one a month ago under my caravan. Must of falled off when i changed to my seat.
|
|
|
|
|
June 20th, 2013, 04:01 PM
|
#239 |
|
ninjette.org sage
Name: Justin
Location: Fresno CA
Join Date: Jun 2012 Motorcycle(s): 12' Ninja 250 Posts: 831
|
If anyone is still curious after all these pages. I bought this grommet from Partzilla (#KP-92071-056 92071-056 GROMMET) Fits perfectly. Put some glue on the inside all around it, installed with no problems.
Installed my rear cowl, getting the wobbles to the left/right, swapped out the rear cowl rubber feet with the 2 rubber feet of the OEM seat and its more flush but the wobble is there. Dont want to really fck with any brackets so im not quite sure what imma do |
|
|
|
|
July 1st, 2013, 08:10 AM
|
#240 | |
|
ninjette.org member
Name: Zoe
Location: UK
Join Date: Aug 2009 Motorcycle(s): CBR650F replacing the Ninja 300 Posts: 122
|
Quote:
The only (UK) grommet I can find is this one: http://www.kawasakitripleparts.com/i...&product_id=72 thanks to Aggrotech posting the part number.
__________________________________________________
Current: Honda CBR650F - Pearl Metalloid White Previous: Kawasaki Ninja 300 ■ Ninja 250R ■ Kawasaki ER5 ■ Honda Hornet CB600 |
|
|
|
|
 |
 Similar Threads
|
||||
| Thread | Thread Starter | Forum | Replies | Last Post |
| Rear Seat Key Hole Grommet HELP! | aurbz | 2008 - 2012 Ninja 250R Tech Talk | 7 | March 14th, 2015 12:07 AM |
| Rubber nubs for passenger seat? | 249cc | 2008 - 2012 Ninja 250R Tech Talk | 13 | February 3rd, 2013 11:06 PM |
| wtb: 08+ front cowl & solo seat cowl | gt_turbo | Items Wanted | 3 | November 9th, 2011 08:37 AM |
| Rubber bumper fell off my seat cowl, where can I get a replacement?? | LoneRonin | Items Wanted | 5 | October 13th, 2011 02:29 PM |
| Fender Eliminator, Corbin Seat, Rear Seat Cowl Installed | k-os | Pictures | 9 | February 10th, 2009 08:56 AM |
|
|


