
|
 April 23rd, 2014, 08:23 AM
|
#41 |
|
ninjette.org member
Name: rich
Location: new jersey
Join Date: Nov 2013 Motorcycle(s): 636 250r Posts: 183
|
I think I figured out how I need to wire all the dash lights. Now I gotta wait till friday *sigh*
|

|

|
|
April 23rd, 2014, 08:23 AM
|
#42 |
|
ninjette.org member
Name: rich
Location: new jersey
Join Date: Nov 2013 Motorcycle(s): 636 250r Posts: 183
|
Just wrote up a quick to-do list:
-Wire up the dummy lights -Adjust the handlebar crap. -Make a bracket for the fairing. -Cut the fender. -Cut the side panels. -Tuck the harness. -Bleed the front brakes. -Torque down the rotor bolts. -Install the tank. -Swap the gas cap and petcock. -Install the foot controls. -Put the grips on. -Paint the fender and side panels -Install exhaust -Fill coolant -Find a solution to hold the rear of the seat down. -Wash the bike Its supposed to be 68 on sunday so thats my cue to get that thing washed and take it for a spin. |
|
|
|
|
April 23rd, 2014, 08:24 AM
|
#43 |
|
ninjette.org member
Name: rich
Location: new jersey
Join Date: Nov 2013 Motorcycle(s): 636 250r Posts: 183
|
Well after last night the electrical is still plaguing me. I get 4 ways blinking rediculously fast when I try to use a turn signal. I got a diagram with resistance specs between each part of the circuit. Now I just gotta find my dmm.
I think the oil pressure sensor is also bad. I cant get a light out of it. |
|
|
|
|
April 23rd, 2014, 08:24 AM
|
#44 |
|
ninjette.org member
Name: rich
Location: new jersey
Join Date: Nov 2013 Motorcycle(s): 636 250r Posts: 183
|
the problem i was having was that when i had the bulb wired like stock, the bulb would just act as a jumper and i would get 4 way flashers with either left or right turn signal. The stock setup seems suspect in itself because i cant see how where the power goes to be grounded without causing the other side to light up with it...such a pain in the ass.
i tried splicing the indicator light after the flasher relay and it worked great. The bulbs flashed slowly and the indicator lamp went on. The only problem is that the indicator light would flash even when the turn signals were off smfh... And now i have them wired so that the 2 front signals share a common ground and the bulb is between the turn signals and ground...but the bulb still doesnt work -____- So i used the LEDs that come with the indicator lights and it will work but only half of the turn signals light. sooo i just put the damn bulb back in and let them flash fast as hell with no indicator...at least they work i'll go back to it later. Other than that nightmare, i made bracketry for the front fairing. zip tied all the wires and once i mount the ignitor i can put the tank on and try to start it..I've already tested for spark and I'm good money. I had a rebuild kit for the petcock so i figured why not. installed the gas cap. put some fuel in the tank to get all the **** out of it. And i did a bunch of little **** up to and including blowing a bunch of fuses lol. I'll post the pics from my phone. |
|
|
|
|
April 23rd, 2014, 08:25 AM
|
#45 |
|
ninjette.org member
Name: rich
Location: new jersey
Join Date: Nov 2013 Motorcycle(s): 636 250r Posts: 183
|

|
|
|
|
|
April 23rd, 2014, 08:27 AM
|
#46 |
|
ninjette.org member
Name: rich
Location: new jersey
Join Date: Nov 2013 Motorcycle(s): 636 250r Posts: 183
|
Well last night I got the harness and electronic bits out of sight for the most part. A little 2 sided tape held the rectifier and ignitor on.
 
I put the battery on charge while I put the front end together hopefully for good. Here is a look at the brackets I made for the front fairing. They're made of nylon. Got the tank on, all the hoses hooked up. Snapped a pic 
|
|
|
|
|
April 23rd, 2014, 08:28 AM
|
#47 |
|
ninjette.org member
Name: rich
Location: new jersey
Join Date: Nov 2013 Motorcycle(s): 636 250r Posts: 183
|
And now the moment you've all been waiting for.....
....... ......... ................. ......................  
|
|
|
|
|
April 23rd, 2014, 08:29 AM
|
#48 |
|
ninjette.org member
Name: rich
Location: new jersey
Join Date: Nov 2013 Motorcycle(s): 636 250r Posts: 183
|
After charging the battery and putting some stale fuel in the tank. She fired right up and purred like a kitten.
The front fairing looks kinda gay imo in the pics. It will be raked back a little more once I get the headlight adjusted. |
|
|
|
|
April 23rd, 2014, 08:31 AM
|
#49 |
|
ninjette.org member
Name: rich
Location: new jersey
Join Date: Nov 2013 Motorcycle(s): 636 250r Posts: 183
|
Today I welded and cut the side panels and primed them. Im not gonna cry if theyre not ready.
Here are the steps I took to welding the cracked piece |
|
|
|
|
April 23rd, 2014, 08:32 AM
|
#50 |
|
ninjette.org member
Name: rich
Location: new jersey
Join Date: Nov 2013 Motorcycle(s): 636 250r Posts: 183
|
Got some distilled water to flush the coolant system and brake clean to install the grips. I'm happy to report no leaks whatsoever.
After a quick simple green and rinse with the hose I'll call her 85% complete but presentable. I didnt get a chance to ride it but I did take it up and down my driveway a few times.    
|
|
|
|
|
April 23rd, 2014, 08:33 AM
|
#51 |
|
ninjette.org member
Name: rich
Location: new jersey
Join Date: Nov 2013 Motorcycle(s): 636 250r Posts: 183
|
I just realized I could have just used the stock wiring and sockets for those dash lights I fought with for daysss smfh
|
|
|
|
|
April 23rd, 2014, 08:34 AM
|
#52 |
|
ninjette.org member
Name: rich
Location: new jersey
Join Date: Nov 2013 Motorcycle(s): 636 250r Posts: 183
|
Merry Christmas. Okay I guess I'll spill the beans.
  
The countdown begins |
|
|
|
|
April 23rd, 2014, 08:37 AM
|
#53 |
|
ninjette.org member
Name: rich
Location: new jersey
Join Date: Nov 2013 Motorcycle(s): 636 250r Posts: 183
|
It was a great secret until my loud mouth aunt was like "I cant wait for her to open the gift out there"
Anyway. Here is the happy camper. She started bawlin loooool. |
|
|
|
|
April 23rd, 2014, 08:39 AM
|
#54 |
|
ninjette.org member
Name: rich
Location: new jersey
Join Date: Nov 2013 Motorcycle(s): 636 250r Posts: 183
|
Ok here is a to-do/to-buy list for after the holidays:
Buy: Neutral switch Oil switch Tires (pirelli mt75) Resistor lead for trailtech Do: Paint side panels Cut and paint fender Get horn working Get turn signals working properly Sync carbs Find hold down for seat. |
|
|
|
|
April 23rd, 2014, 08:43 AM
|
#55 |
|
ninjette.org member
Name: rich
Location: new jersey
Join Date: Nov 2013 Motorcycle(s): 636 250r Posts: 183
|
I got a relay from cycle gear and made the turn signals blink slower. But still no dash light.
Today I took the bike on its maiden voyage and aside from the brakes kinda sucking, all was well. The front brakes are o k ay, but 2 finger braking is not happening as is. I'll try and bleed them better tomorrow along with the rear. I only put about 3 miles on it because of no tags or insurance and stopped at the gas station to put some fresh fuel in it. I also made a new bracket for the fairing so it wont flop around onto the master cylinder. Heres the new brackets vs the old (shorter) ones Its a lot easier to access the bolts now too. I also blew the dust off of my bike and installed the connector to this new battery maintainer I got. Then I took my bike for a short ride and snapped some pics afterwards In this pic u can see that the angle of the windscreen is more which makes it look a little sportier. |
|
|
|
|
April 23rd, 2014, 08:44 AM
|
#56 |
|
ninjette.org member
Name: rich
Location: new jersey
Join Date: Nov 2013 Motorcycle(s): 636 250r Posts: 183
|
The exhaust for the 250 will be something along these lines once i get around to it

|
|
|
|
|
April 23rd, 2014, 08:46 AM
|
#57 |
|
ninjette.org member
Name: rich
Location: new jersey
Join Date: Nov 2013 Motorcycle(s): 636 250r Posts: 183
|
I tried messing with the brakes today and ended up finding out that the one piston is seized in the rear caliper so I took it apart and its currently soaking in a simple green solution
    And then I picked myself up a birthday gift at a great deal 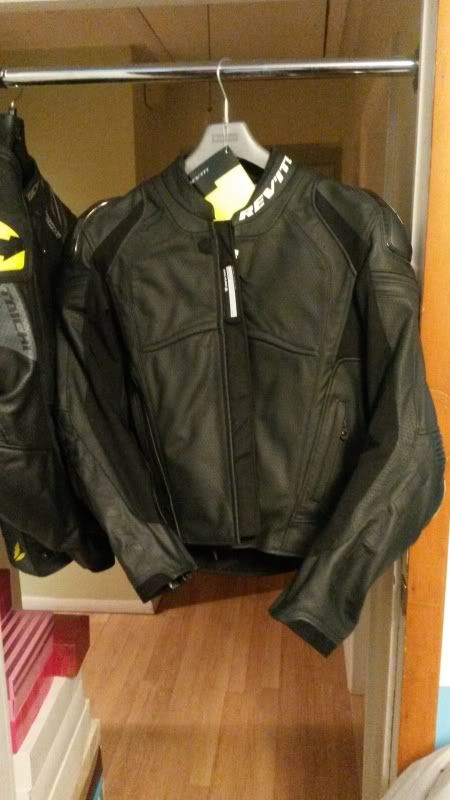 Rev'it tarmac jacket which has been discontinued for over a year. Been searching high and low and ended up searching 3 pages of google for someone who had a for sale ad from july on a rc51 forum. It was my size, 100% brand new in the bag with tags, at a great price of $325 ($650-700 msrp) and the seller was semi local! It was a sign. And is a perfect match for my leather rev'it tarmac pants. |
|
|
|
|
April 23rd, 2014, 08:47 AM
|
#58 |
|
ninjette.org member
Name: rich
Location: new jersey
Join Date: Nov 2013 Motorcycle(s): 636 250r Posts: 183
|
The guy ended up buying 2 and the smaller one fit him. This thing was still in the plastic.
Anyway I had off yesterday so I cleaned the pistons with a toothbrush and soapy water, hit the bores and pistons with some scotchbrite. Cleaned everything once more and reassembled the caliper. The rear brakes now work flawlessly. Sorry no pics. Great fix for $0. |
|
|
|
|
April 23rd, 2014, 08:47 AM
|
#59 |
|
ninjette.org member
Name: rich
Location: new jersey
Join Date: Nov 2013 Motorcycle(s): 636 250r Posts: 183
|
I think if I replace the turn signal indicator bulb with a led it miiiight turn on with this new resistor relay im using. So next weekend I'll try that.
|
|
|
|
|
April 23rd, 2014, 08:48 AM
|
#60 |
|
ninjette.org member
Name: rich
Location: new jersey
Join Date: Nov 2013 Motorcycle(s): 636 250r Posts: 183
|
Just ordered new neutral and oil pressure switches.
|
|
|
|
|
April 23rd, 2014, 08:48 AM
|
#61 |
|
ninjette.org member
Name: rich
Location: new jersey
Join Date: Nov 2013 Motorcycle(s): 636 250r Posts: 183
|
i switched the regular bulb out for the led that came in the trail tech kit for the turn signal indicator.. while the indicator lamp works now, only half of the lights on the front turn signals are lighting up...so i'll leave it for now because its better than nothing atm, but i think i'll have to calculate the resistance in the new lamps compared to the stock ones and add some more resitors to the equation.
not much else done today as I've been cleaning the garage all day, but I'll start to host all the pictures to photobucket and replace them with img codes tonight. |
|
|
|
|
April 23rd, 2014, 08:49 AM
|
#62 |
|
ninjette.org member
Name: rich
Location: new jersey
Join Date: Nov 2013 Motorcycle(s): 636 250r Posts: 183
|
I continued cleaning the garage on sunday but managed to get the horn working properly. I figured out that it was ground controlled and needed a power source -_- I hooked it to the always hot accessory plug for the time being.
|
|
|
|
|
April 23rd, 2014, 08:52 AM
|
#63 |
|
ninjette.org member
Name: rich
Location: new jersey
Join Date: Nov 2013 Motorcycle(s): 636 250r Posts: 183
|
I received the neutral and oil pressure switches in the mail and installed them on Sunday.
You can see below how ****ed up looking the original ops was. I held onto it maybe I can clean it up and have it as a spare. And thankfully all the lights on the dash now work! On monday after a lot of frustration I got the carbs "synchronized". I ran out of fuel twice and got it damn close but probably not perfect. When I was out getting parts for the sync tool, I got a couple of brass 1/4-20 screws and a large plastic wingnut from lowes. I cut the head of the screw off to make it a stud and drilled and tapped the plastic under the seat. I put the nut on there to help keep the stud in place. I may try and reach another nut on the backside as well just to be safe. Here is the finished product. The hole I drilled was a little to the back of center but the seat fits on with no problems. The nut hits the frame but im certain it wont back out. It kinda acts as a locking mechanism. All in all a pretty productive weekend. But if you couldnt tell im really procrastinating on the front fender. |
|
|
|
|
April 23rd, 2014, 08:53 AM
|
#64 |
|
ninjette.org member
Name: rich
Location: new jersey
Join Date: Nov 2013 Motorcycle(s): 636 250r Posts: 183
|
to-do/to-buy list:
Buy: Tires (pirelli mt75) Resistor lead for trailtech Do: Paint side panels Cut and paint fender Get turn signals working properly the list is slowly shrinking |
|
|
|
|
April 23rd, 2014, 08:54 AM
|
#65 |
|
ninjette.org member
Name: rich
Location: new jersey
Join Date: Nov 2013 Motorcycle(s): 636 250r Posts: 183
|
I finally got my ass in gear today on this fender. I originally planned to wrap a piece of paper around it and draw it all out before cutting. But I said **** that and just broke out my dremmel and started cutting.
I at least got it to the rough shape without drawing anything |
|
|
|
|
April 23rd, 2014, 08:55 AM
|
#66 |
|
ninjette.org member
Name: rich
Location: new jersey
Join Date: Nov 2013 Motorcycle(s): 636 250r Posts: 183
|
After cutting and shaping with the belt sander I got everything relatively even and looking decent. Its not perfect but its done and just needs some paint
The pieces I cut off are good for maybe a half pound. Maybe more. And with it being unsprung weight thats definitely a plus |
|
|
|
|
April 23rd, 2014, 08:58 AM
|
#67 |
|
ninjette.org member
Name: rich
Location: new jersey
Join Date: Nov 2013 Motorcycle(s): 636 250r Posts: 183
|
I've been really busy lately working on friend's bikes and I ended up picking up a pitbike for myself. Then I tore my acl on my friend's 65 ktm and switched jobs so I've been MIA for a while.
I managed to get a few things done yesterday that I will continue today. I sanded and primed the fender I cut. There were some dings and deep scratches on it so I put some filler on it.  I also put some filler on the side panel that I had welded a large crack together.  I managed to get that sanded down flat and smooth. It took a lot as im pretty messy with body filler.  Today I will finish sanding the fender and hit both with a few more coats of primer before putting the color on them. Last futzed with by ds650rida; April 24th, 2014 at 07:22 PM. |
|
|
|
|
April 23rd, 2014, 08:59 AM
|
#68 |
|
ninjette.org member
Name: rich
Location: new jersey
Join Date: Nov 2013 Motorcycle(s): 636 250r Posts: 183
|
Here is the left panel and fender ready for primer
    Turns out im not so bad at body work. They came out nice. I will probably wait until next week to lay color on these pieces. Last futzed with by ds650rida; April 24th, 2014 at 07:19 PM. |
|
|
|
|
April 23rd, 2014, 08:59 AM
|
#69 |
|
ninjette.org member
Name: rich
Location: new jersey
Join Date: Nov 2013 Motorcycle(s): 636 250r Posts: 183
|
New mt75's ordered
|
|
|
|
|
April 23rd, 2014, 08:59 AM
|
#70 |
|
ninjette.org member
Name: rich
Location: new jersey
Join Date: Nov 2013 Motorcycle(s): 636 250r Posts: 183
|
Tach lead resistor ordered.
|
|
|
|
|
April 23rd, 2014, 09:00 AM
|
#71 |
|
ninjette.org member
Name: rich
Location: new jersey
Join Date: Nov 2013 Motorcycle(s): 636 250r Posts: 183
|
So I got the tach lead done and was attempting to paint the final pieces but the paint came out super ******. Like it was separating. I may have sanded the primer too smooth or just used ****** primer.
 
Last futzed with by ds650rida; April 24th, 2014 at 07:17 PM. |
|
|
|
|
April 23rd, 2014, 09:01 AM
|
#72 |
|
ninjette.org member
Name: rich
Location: new jersey
Join Date: Nov 2013 Motorcycle(s): 636 250r Posts: 183
|
I made a second attempt to paint the panels this weekend. After a good quality primer and flat sanding you can really see how messed up and uneven they were
  They came out 1000 times better than before  Here is the final product after clear  Final pics with them on the bike next week Last futzed with by ds650rida; April 24th, 2014 at 07:16 PM. |
|
|
|
|
April 23rd, 2014, 09:02 AM
|
#73 |
|
ninjette.org member
Name: rich
Location: new jersey
Join Date: Nov 2013 Motorcycle(s): 636 250r Posts: 183
|
She also got her first ride in over the weekend. She did very well and she likes the way the bike feels

|
|
|
|
|
April 23rd, 2014, 09:03 AM
|
#74 |
|
ninjette.org member
Name: rich
Location: new jersey
Join Date: Nov 2013 Motorcycle(s): 636 250r Posts: 183
|
**That is up to date for now, i will continue to update as time goes on.**
|
|
|
|
|
April 23rd, 2014, 10:15 AM
|
#75 |
|
ninjette.org member
Name: Chris
Location: DFW, TX
Join Date: Aug 2013 Motorcycle(s): 675, 250 Posts: 20
|
Fantastic build! It turned out really good! Love the look - naked, but not busted!

|
|
|
|
|
April 23rd, 2014, 01:57 PM
|
#76 |
|
ninjette.org member
Name: rich
Location: new jersey
Join Date: Nov 2013 Motorcycle(s): 636 250r Posts: 183
|
I put the final pieces on the bike today, and this is the final product as far as looks go until i do the exhaust

 
|
|
|
|
|
April 23rd, 2014, 02:12 PM
|
#77 | |
|
ninjette.org member
Name: rich
Location: new jersey
Join Date: Nov 2013 Motorcycle(s): 636 250r Posts: 183
|
Quote:
|
|
|
|
|
|
April 23rd, 2014, 02:17 PM
|
#78 |
|
ninjette.org member
Name: rich
Location: new jersey
Join Date: Nov 2013 Motorcycle(s): 636 250r Posts: 183
|
I notice that some of the pictures that i've hosted from the other site arent working so I will try to get them uploaded to photobucket and rehosted as soon as i can
|
|
|
|
|
April 23rd, 2014, 05:33 PM
|
#80 |
|
I'm crazy,your excuse is?
Name: Winston
Location: Connecticut
Join Date: May 2013 Motorcycle(s): 250 2007 ninja Posts: A lot.
|
Enjoyed reading the build. Good work!
|
|
|
|
 |
 Similar Threads
|
||||
| Thread | Thread Starter | Forum | Replies | Last Post |
| New Pickup - Eventual Build Thread | ninjakuma | The Ex-Ninjetters Lair | 9 | August 22nd, 2014 11:36 AM |
| Shin's 250r Build Thread | Shintoxica | 1986 - 2007 Ninja 250R Farkles | 3 | August 22nd, 2013 11:10 AM |
| Racer X engine build thread | Racer x | 2008 - 2012 Ninja 250R Tech Talk | 189 | June 12th, 2013 07:34 AM |
| Epic build thread | Alex | Off-Topic | 8 | April 8th, 2013 04:57 PM |
| Not so new '83 Kawi 440 LTD Build thread | 5evenz | The Ex-Ninjetters Lair | 9 | January 28th, 2013 06:48 AM |
|
|


