
|
 February 18th, 2013, 04:14 PM
|
#41 |
|
ninjette.org member
Name: Cody
Location: Wilmington, NC
Join Date: Nov 2012 Motorcycle(s): 2003 Blue Ninja 250, 98 ZX6E, 06 ZX636 Posts: 249
|
OOOOOOhhhh, and also, im assuming that between 2003 and 2006 the parts are all the same yes?
|

|

|
|
February 21st, 2013, 01:45 PM
|
#42 |
|
ninjette.org member
Name: Cody
Location: Wilmington, NC
Join Date: Nov 2012 Motorcycle(s): 2003 Blue Ninja 250, 98 ZX6E, 06 ZX636 Posts: 249
|
You can now say "I told you so"
So i tried getting the clutch basket nut off with a breaker bar and a 1 1/16 socket. the difference between 1 1/16 and a 27 mm seemed negligible. And it may be, but i did round a couple corners on my nut. Hopefully i can find a nearby shop to get it off with air. Obviously i will replace the bolt with a new one for the install. But another problem is i didnt pay attention to the cam chain and it got caught behind the gear there...hopefully i dont screw it up, because thats 60 bucks i dont want to spend.
|
|
|
|
|
February 21st, 2013, 03:21 PM
|
#43 | |
|
ninjette.org certified postwhore
Name: D
Location: Palm Beach, FL
Join Date: Oct 2010 Motorcycle(s): 2006 Ninja 250R, 2007 EFI Ninja 250R Posts: A lot.
Blog Entries: 1
|
Quote:
Not sure about the cam chain. I would replace it with the slightest sign of distress. If it goes, it makes a really big mess. You might want to look at the one from your original short block. The manual shows how to measure it to see if its in spec (they stretch). EDIT: The HF sockets are 6 point which are better for this kind of situation.
__________________________________________________
My Ninja Blog  Proud member of ABATE.My NYC Road Rage documentary - CENSORED! |
|
|
|
|
|
February 21st, 2013, 04:14 PM
|
#44 |
|
Crashing sux
Name: Rick
Location: N. Ga
Join Date: Sep 2012 Motorcycle(s): 07 EX250, 04 ZX6R, 96 Vulcan EN500, 79 XS650-SF, 80 TS185 Posts: 62
|
I never use one of the clutch holders, it's easy to remove the nut with an impact, but with the correct size 6-point socket. electric impacts are pretty cheap at harbor freight.
Also, I have an engine stand, but have built engines on benches, sturdy folding tables, even plastic saw horses with a boards or plywood on top. Use a couple 2x4's or other pieces of wood to hold the bottom end steady. You can get free scraps of wood at home depot or Lowes. |
|
|
|
|
February 22nd, 2013, 05:06 PM
|
#45 | |
|
ninjette.org member
Name: Cody
Location: Wilmington, NC
Join Date: Nov 2012 Motorcycle(s): 2003 Blue Ninja 250, 98 ZX6E, 06 ZX636 Posts: 249
|
Quote:
The chain will be coming from the original hopefully, once it's off I'll measure it and all. Believe me, i don't want to have to reopen this motor for another 50k miles. |
|
|
|
|
|
February 22nd, 2013, 05:18 PM
|
#46 | |
|
ninjette.org certified postwhore
Name: D
Location: Palm Beach, FL
Join Date: Oct 2010 Motorcycle(s): 2006 Ninja 250R, 2007 EFI Ninja 250R Posts: A lot.
Blog Entries: 1
|
Quote:
Just call your local store and ask if they have them in stock. Give them the part number. Go with the right size and not the American size. If they don't have it, try another store that might be nearby. Worst case, order it online. Oh, one other thing, the last I heard, in order to replace the timing chain, you have to split the case. You might want to look into that and see if you can squeeze it through, but when I tried, I couldn't.
__________________________________________________
My Ninja Blog Proud member of ABATE.My NYC Road Rage documentary - CENSORED! |
|
|
|
|
|
February 22nd, 2013, 06:42 PM
|
#47 |
|
Crashing sux
Name: Rick
Location: N. Ga
Join Date: Sep 2012 Motorcycle(s): 07 EX250, 04 ZX6R, 96 Vulcan EN500, 79 XS650-SF, 80 TS185 Posts: 62
|
an auto parts store may have a single socket for sale in 27mm, they may even rent some tool sets with a 27 in it
|
|
|
|
|
March 7th, 2013, 06:18 PM
|
#48 |
|
ninjette.org member
Name: Cody
Location: Wilmington, NC
Join Date: Nov 2012 Motorcycle(s): 2003 Blue Ninja 250, 98 ZX6E, 06 ZX636 Posts: 249
|
Oh boy. So i took my old motor, which from here on out will be motor 1, and split the case. Let me just say too, i just took the motor down to the shop three blocks from me and by 3 Missis- it was off. If you want to get this bolt off, just take it to any garage near by. They will just pop it off for you super fast.
Nothing better to put a grin on your face than pulling something completely apart to the barebones haha. I wasnt planning on doing so for a while since i figured it would be better to do later on at my leisure. But since i wanted that cam chain i had to split the case. Welp, the tranny is good on all accounts. Then i looked past and well, lets just say its obvious i blew the rod bearing. Free cookie to the person who figures out which side went KAPLUT! 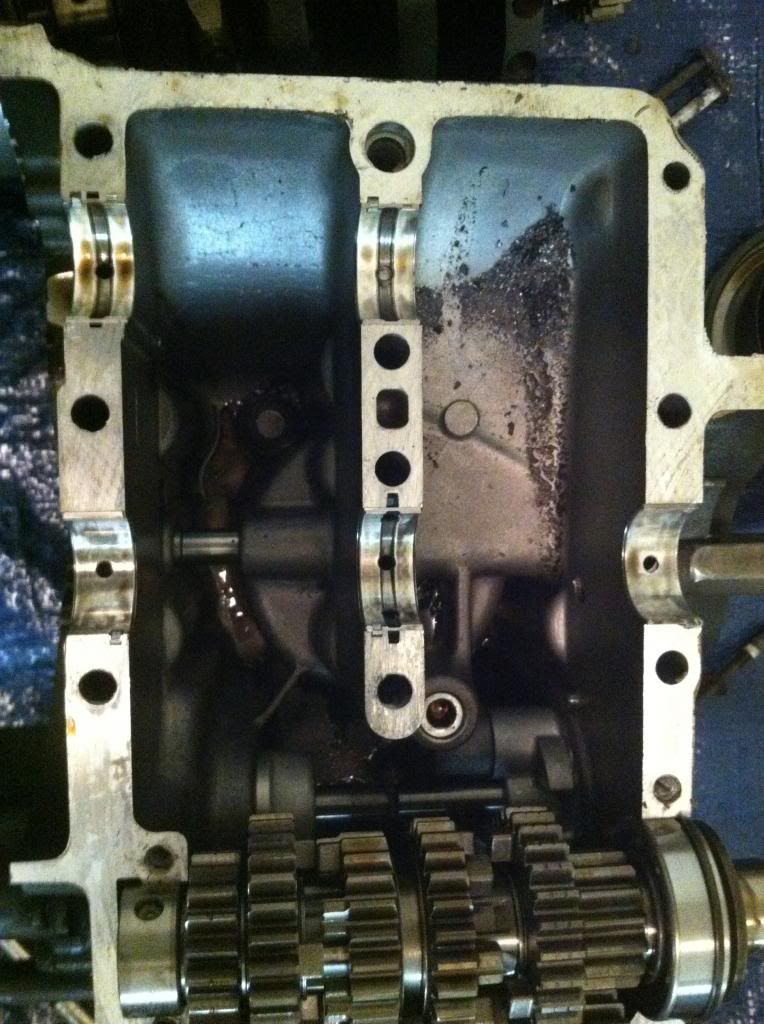 Here you see i found enough scrap metal shaving to pay for another motor 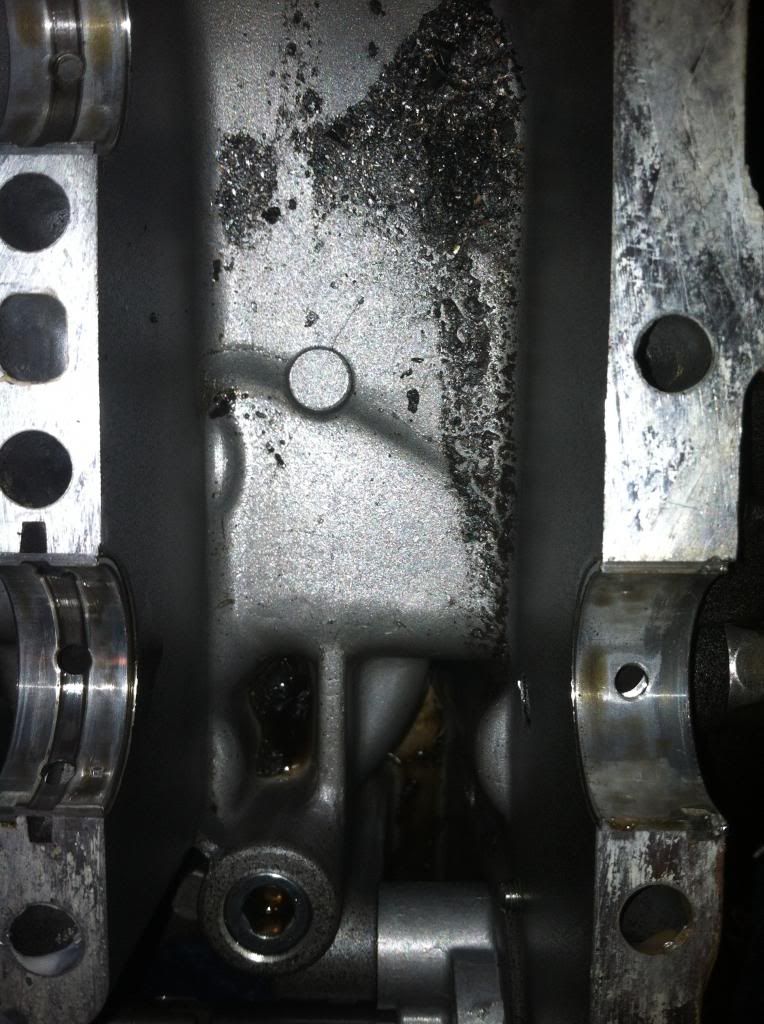 Next is what we've all been waiting for. The rod. TADA!!! 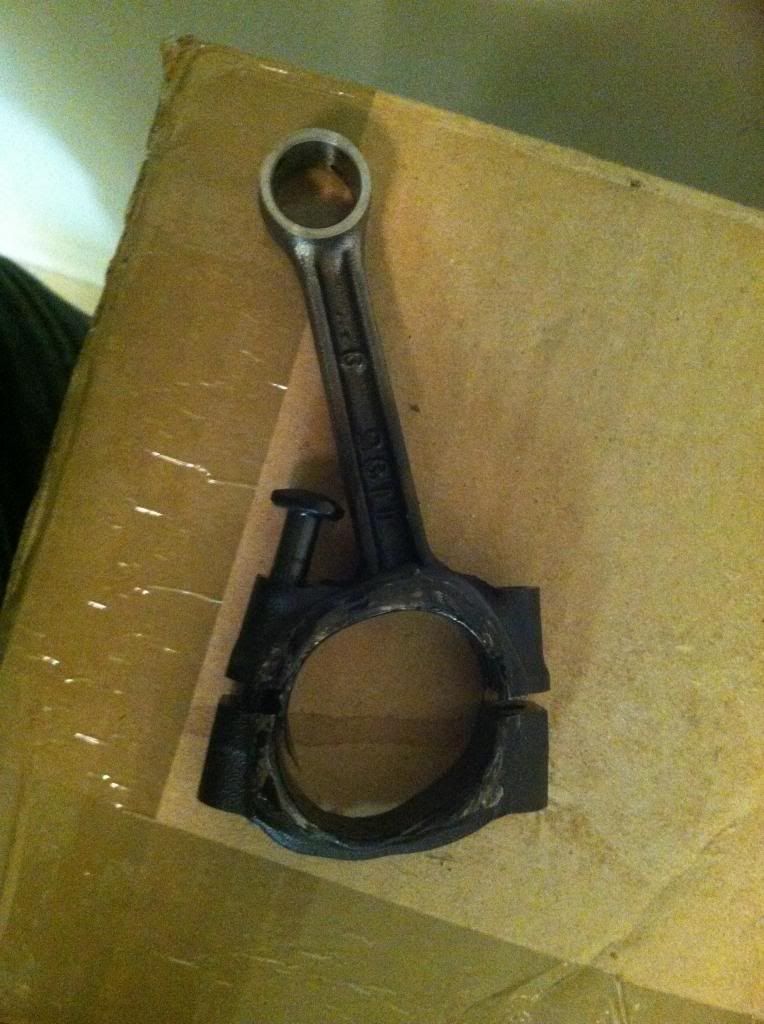 So yes it was very bad. And yes im lucky to have Motor 2 which is all nice and tight and intact. So, now im taking that lovely cam chain, and a couple other things like the clutch basket and will be starting on Motor 2 very soon. I'll be here soon asking about gaskets and sealants and other tibits. Soon so enjoy the photos above and heres a look at the whole group of stuff haha 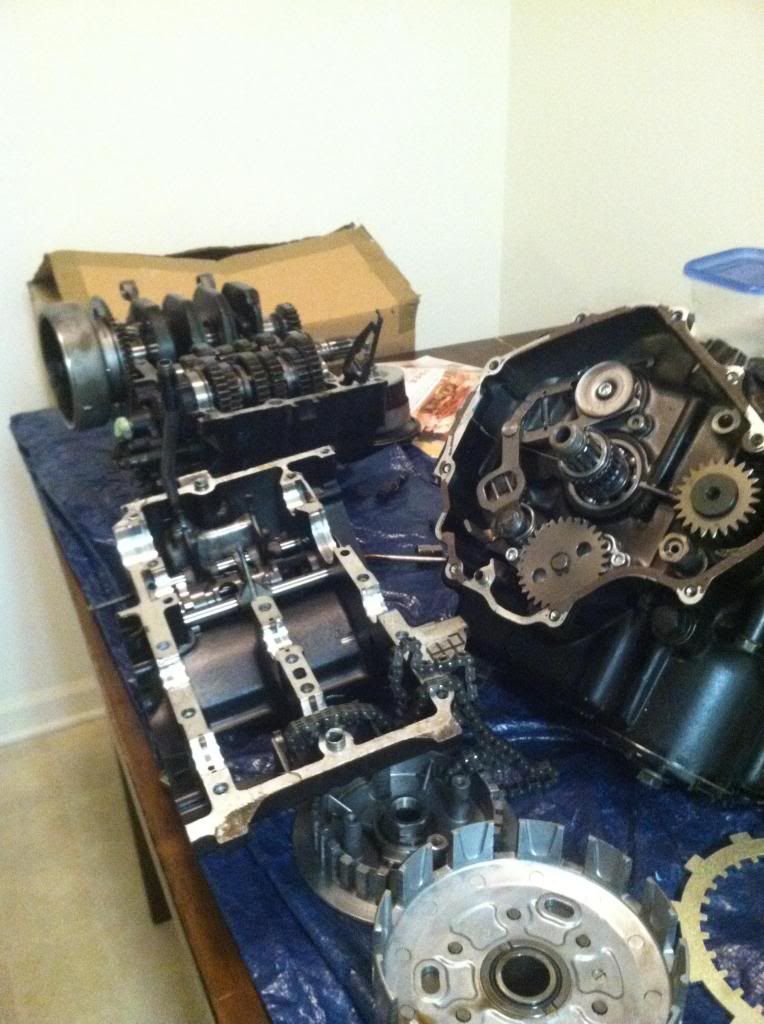 And also a look at the Motor 2. Getting the cam chain on will be nice since this little bugger is already gone. 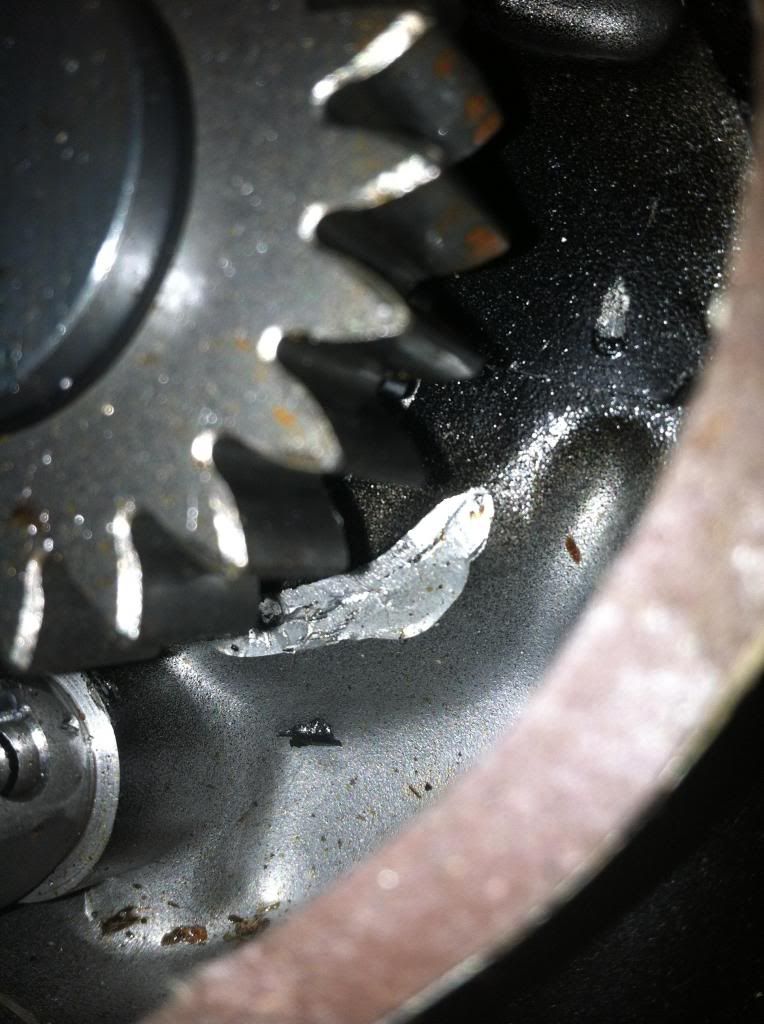 Cheers! |
|
|
|
|
March 7th, 2013, 07:18 PM
|
#49 |
|
ninjette.org certified postwhore
Name: D
Location: Palm Beach, FL
Join Date: Oct 2010 Motorcycle(s): 2006 Ninja 250R, 2007 EFI Ninja 250R Posts: A lot.
Blog Entries: 1
|
Yep, I agree, the rod is bad.
What does the crank and the other rod look like? Also, measure and inspect the cam chain before using it. Engine #2 has a broken cam retainer so its had cam damage before. I would definitely split that case too and use the best parts from both to make a good 3rd. Just don't forget to use the plastigauge. How many miles on engine #1?
__________________________________________________
My Ninja Blog Proud member of ABATE.My NYC Road Rage documentary - CENSORED! |
|
|
|
|
March 7th, 2013, 07:37 PM
|
#50 |
|
ninjette.org member
Name: Cody
Location: Wilmington, NC
Join Date: Nov 2012 Motorcycle(s): 2003 Blue Ninja 250, 98 ZX6E, 06 ZX636 Posts: 249
|
Whats the possible damage with a cam chain malfunction? Everything seems tight in there. It looks more like someone cut it off to me to get the chain off easier.
And im going to defintely measure this cam chain i grabbed off motor 1. Motor 1 had less than 7500 miles on it. Crank and other rod look fine, although i would like to get the crank on a machine to check it for sure before i even considered using it. Pic 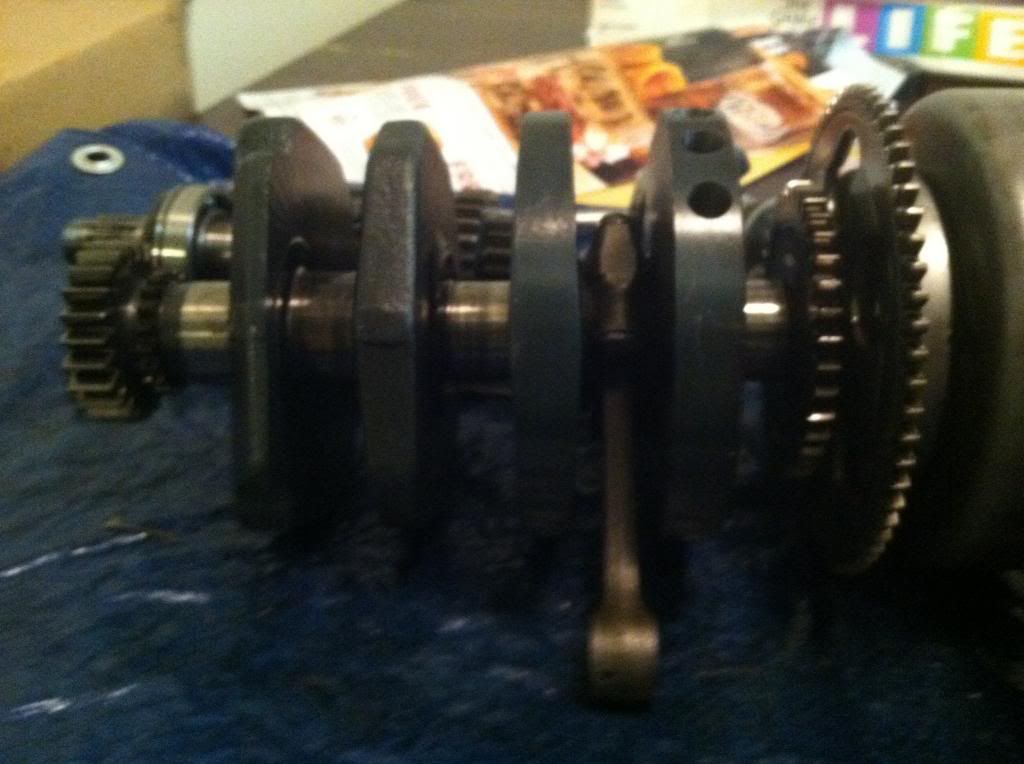
|
|
|
|
|
March 7th, 2013, 08:36 PM
|
#51 |
|
ninjette.org member
Name: Cody
Location: Wilmington, NC
Join Date: Nov 2012 Motorcycle(s): 2003 Blue Ninja 250, 98 ZX6E, 06 ZX636 Posts: 249
|
Seems like the consent on a cam chain failure is that it wouldnt affect the bottom end
http://www.ninjette.org/forums/showthread.php?t=118986 I think im going to risk it. If i have to break this one apart too, then im selling all salvageable parts and moving up a size |
|
|
|
|
March 7th, 2013, 09:02 PM
|
#52 |
|
ninjette.org certified postwhore
Name: D
Location: Palm Beach, FL
Join Date: Oct 2010 Motorcycle(s): 2006 Ninja 250R, 2007 EFI Ninja 250R Posts: A lot.
Blog Entries: 1
|
The journals are measured in microns so the slightest imperfection ruins the crank. Thy don't make oversized bearings for it. I don't see how that rod could have been in there without beating the crap out of the crank.
Other than obvious damage to the chain, it can stretch so you need to measure it. The cam chain retainer tab can break off when the chain is compromised by objects falling down the cam chain tunnel and getting wedged between the chain and the sprocket. This also causes the chain to stretch or break.
__________________________________________________
My Ninja Blog Proud member of ABATE.My NYC Road Rage documentary - CENSORED! |
|
|
|
|
March 7th, 2013, 09:16 PM
|
#53 |
|
ninjette.org member
Name: Cody
Location: Wilmington, NC
Join Date: Nov 2012 Motorcycle(s): 2003 Blue Ninja 250, 98 ZX6E, 06 ZX636 Posts: 249
|
Well, looking at the rod from Motor 1 (M1), the sides that contact the crankshaft are both um...melted? Basically it definitely was melted from the friction caused by the rod bearing destroying itself. So I'm betting that the crank is shot. I'll still see if i can find someone to check the balance and everything.
The cam chain i have is from M1. M2 did not ever have one since I've had it. The cam chain has about 7500 miles on it and after using the calipers, it shows 127.9 mm over 20 links so it is well within spec in multiple sections since i wanted to be sure there wasn't uneven stretching. One section was 128.1mm but that was it. So i think at this point im going to start assmebly, beginning with the cam chain and the clutch basket and then move on from there. I'm wondering if i shouldnt just tighten down the new clutch basket nut tight, but once it is back on the frame, then i tighten to 100ft pounds? I dont have a stand and i imagine that 100# of torque would be quite a bit to fight to keep it still. Also, would it be worth it to pull the valve out and clean them up? They have a layer of black but that seems to be normal and i would rather not mess with them if i dont have to... So, chain, clutch basket, and then on to the pistons i suppose, then head gasket, head, head bolts, chain guides, rockers, cams, cam chain tensioner, valve cover, and then the rest. Im gonna be studying this stuff a lot before i do it, since i didnt do the tear down. Might get interesting haha. Thanks for all your help guys! |
|
|
|
|
March 8th, 2013, 04:15 AM
|
#54 |
|
ninjette.org certified postwhore
Name: D
Location: Palm Beach, FL
Join Date: Oct 2010 Motorcycle(s): 2006 Ninja 250R, 2007 EFI Ninja 250R Posts: A lot.
Blog Entries: 1
|
On mine, I just used the impact wrench to remove the clutch nut. Took less than 3 seconds. Tightening it was a bear. You have to use a torque wrench for that so the impact wrench is out. Without a stand, you're going to need someone to help hold it. I used the clutch basket tool I made and then used a screwdriver jammed in the gears so it couldn't turn.
I forget if you said the valves had an impact or not. If they did, then pull and inspect them for warpage, bent shafts and such. You'll need a good valve tool to get them in and out. If the valves were never impacted, I would just leave them alone. If the cam chain broke, then they were impacted. I have never seen a rod that badly disfigured and not broken. Maybe @Motofool can explain what caused it to get like that.
__________________________________________________
My Ninja Blog Proud member of ABATE.My NYC Road Rage documentary - CENSORED! |
|
|
|
|
March 8th, 2013, 04:19 AM
|
#55 |
|
ninjette.org certified postwhore
Name: D
Location: Palm Beach, FL
Join Date: Oct 2010 Motorcycle(s): 2006 Ninja 250R, 2007 EFI Ninja 250R Posts: A lot.
Blog Entries: 1
|
Oh, and when you put it back together, make sure this thing is in properly and not bent or anything.
 Its the main oil tube. Without it, the engine will not get any lubrication. Its very important and easy to forget.
__________________________________________________
My Ninja Blog Proud member of ABATE.My NYC Road Rage documentary - CENSORED! |
|
|
|
|
March 8th, 2013, 06:06 AM
|
#56 | |
|
Daily Ninjette rider
Name: Hernan
Location: Florida
Join Date: Mar 2011 Motorcycle(s): 2007 Ninja 250 Posts: A lot.
MOTY - 2016, MOTM - Dec '12, Jan '14, Jan '15, May '16
|
Quote:
I would say that a lateral bent in the rod (due to a hit against the valves) may have caused a permanent strong lateral force, for which the sides of the bearing are not designed,...........but that is simple speculation on my part.
__________________________________________________
Motofool  .................................Never ride faster than your guardian angel can fly "Mankind is composed of two sorts of men those who love and create, and those who hate and destroy. Love is the bond between men, the way to teach and the center of the world." - José Martí |
|
|
|
|
|
March 8th, 2013, 06:47 AM
|
#57 |
|
ninjette.org member
Name: Cody
Location: Wilmington, NC
Join Date: Nov 2012 Motorcycle(s): 2003 Blue Ninja 250, 98 ZX6E, 06 ZX636 Posts: 249
|
Guess I'll have to look at the valves haha. Great...
I'll post a pic tonight to see if it looks like i need to tear into them or not. The mechanic that looked at everything said my valves looked good though when he checked them out. I'm hoping so because i dont want to add that to everything. Haha. Guess that'll teach me not to downshift that high...going on one year in april... |
|
|
|
|
March 8th, 2013, 09:05 AM
|
#58 |
|
Daily Ninjette rider
Name: Hernan
Location: Florida
Join Date: Mar 2011 Motorcycle(s): 2007 Ninja 250 Posts: A lot.
MOTY - 2016, MOTM - Dec '12, Jan '14, Jan '15, May '16
|
Is the connecting rod visibly bent?
__________________________________________________
Motofool .................................Never ride faster than your guardian angel can fly "Mankind is composed of two sorts of men those who love and create, and those who hate and destroy. Love is the bond between men, the way to teach and the center of the world." - José Martí |
|
|
|
|
March 8th, 2013, 06:10 PM
|
#59 |
|
ninjette.org member
Name: Cody
Location: Wilmington, NC
Join Date: Nov 2012 Motorcycle(s): 2003 Blue Ninja 250, 98 ZX6E, 06 ZX636 Posts: 249
|
The connecting rod is still straight as can be, with the exception of where it contacts the bearing section. Its just the bearing area that is destroyed, the rod looks fine.
|
|
|
|
|
March 13th, 2013, 11:39 AM
|
#60 |
|
ninjette.org member
Name: Cody
Location: Wilmington, NC
Join Date: Nov 2012 Motorcycle(s): 2003 Blue Ninja 250, 98 ZX6E, 06 ZX636 Posts: 249
|
Alrighty then,
I'm planning to start up the assembly this weekend. Im looking to work from the bottom up, so the first thing will be that oil screen gasket. So my question is, do i need a gasket sealant for that gasket? Or for any of the others gaskets? The head gasket, valve cover, stator cover, clutch cover? Also, im going to slip the cam chain on, i guess after that i should go ahead and get the clutch basket on. Everything still is smooth as far as bearing movements etc. but would i need to grease this stuff at all before reassembly? Will the parts diagrams show bolt sizes and numbers? Mine are all jumbled up and i know there are some that are very specific. Hopefully i can deduce the majority of them between the parts diagrams and the manuals. (I do have the stator and clutch cover bolts nicely labelled so they aren't a problem.) Is there a good thread or reference guide for installing the pistons? I feel comfortable doing this, but the more references, the better. I have found these two so far, but the threads are somewhat incomlete since some pictures were removed. http://forums.ninja250.org/viewtopic...d839fdb9dddc38 http://forums.ninja250.org/viewtopic.php?t=74552 I didnt order a new oil filter since i was thinking that the one i have i had just put in about 500 miles earlier, but then it just occurred to be me, it probably is filled with metal particles haha so I'll get one before running this thing. Before sliding the cylinders back over the pistons, should i lightly oil the walls? Which gasket is it that goes between the bottom end and the cylinders? The metal one? Thanks guys! |
|
|
|
|
March 13th, 2013, 12:30 PM
|
#61 | ||||||||
|
ninjette.org certified postwhore
Name: D
Location: Palm Beach, FL
Join Date: Oct 2010 Motorcycle(s): 2006 Ninja 250R, 2007 EFI Ninja 250R Posts: A lot.
Blog Entries: 1
|
Quote:
Quote:
Quote:
Quote:
Quote:
Quote:
Quote:
Quote:
__________________________________________________
My Ninja Blog Proud member of ABATE.My NYC Road Rage documentary - CENSORED! |
||||||||
|
|
|
|
March 13th, 2013, 03:30 PM
|
#62 |
|
ninjette.org member
Name: Cody
Location: Wilmington, NC
Join Date: Nov 2012 Motorcycle(s): 2003 Blue Ninja 250, 98 ZX6E, 06 ZX636 Posts: 249
|
I guess all thats left is to get the hondabond and jump in. Im getting a piston ring tool from my dad on saturday so saturday will be oil screen cover and gasket, cam chain, clutch basket (although my plan is to leave the discs out for now and just tighten the nut down and tighten to spec once the motor is installed on the frame.), and installing stator cover, plus general clean up, cleaning pistons and prepping for next stage.
Cya guys this weekend then. Thanks for all the help! |
|
|
|
|
March 13th, 2013, 04:26 PM
|
#63 | |
|
ninjette.org certified postwhore
Name: D
Location: Palm Beach, FL
Join Date: Oct 2010 Motorcycle(s): 2006 Ninja 250R, 2007 EFI Ninja 250R Posts: A lot.
Blog Entries: 1
|
Quote:
The only time you need hondabond is when you are trying to reuse old gaskets.  Or when you are reassembling a split case. Or when you are reassembling a split case.Regarding the rings, it would have been best if you had not removed them. just remember that there is a right side up to them. Also, used rings are extremely fragile - like glass. I really suggest that you get your piston rings back on before you start anything else. Maybe just take them to your father and do them there. It shouldn't take long. If they break, then you can start ordering a new set before you go further.
__________________________________________________
My Ninja Blog Proud member of ABATE.My NYC Road Rage documentary - CENSORED! |
|
|
|
|
|
March 13th, 2013, 06:09 PM
|
#64 |
|
ninjette.org member
Name: Cody
Location: Wilmington, NC
Join Date: Nov 2012 Motorcycle(s): 2003 Blue Ninja 250, 98 ZX6E, 06 ZX636 Posts: 249
|
Haha, yeah i got that. I only have a couple new gaskets, i figure that the top end gaskets can all be reused. They are all in good shape from both motors.
|
|
|
|
|
March 16th, 2013, 06:18 AM
|
#65 |
|
ninjette.org member
Name: Cody
Location: Wilmington, NC
Join Date: Nov 2012 Motorcycle(s): 2003 Blue Ninja 250, 98 ZX6E, 06 ZX636 Posts: 249
|
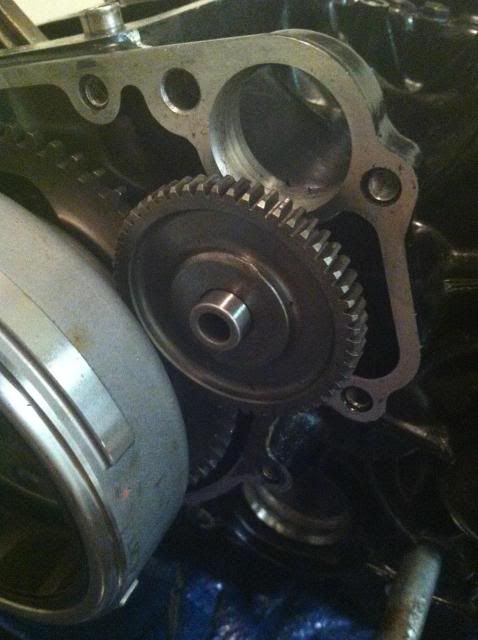
Is this correct placement of this wheel? I don't do the tear down so I'm not sure. But when i looked at this, i was pretty sure that the starter needed contact with something. The manual doesnt say anything about this and none of the pictures show it.
Last futzed with by eulark; March 16th, 2013 at 07:28 AM. |
|
|
|
|
March 16th, 2013, 09:07 AM
|
#66 | ||
|
ninjette.org certified postwhore
Name: D
Location: Palm Beach, FL
Join Date: Oct 2010 Motorcycle(s): 2006 Ninja 250R, 2007 EFI Ninja 250R Posts: A lot.
Blog Entries: 1
|
Quote:
Quote:
EDIT: Yes, that's the right orientation.
__________________________________________________
My Ninja Blog Proud member of ABATE.My NYC Road Rage documentary - CENSORED! |
||
|
|
|
|
March 18th, 2013, 04:00 PM
|
#67 |
|
ninjette.org member
Name: Cody
Location: Wilmington, NC
Join Date: Nov 2012 Motorcycle(s): 2003 Blue Ninja 250, 98 ZX6E, 06 ZX636 Posts: 249
|
Thanks for your help so far!
I've kinda at a road block. Since i didnt do the teardown, im not sure how the cam chain guide works and if i need to install them before the head/cylinders. I didnt realize i left them off at first, but the i saw the empty bolt hole behind the clutch basket at the top right and it kinda clicked. But now after i figured out how the guide and plate and bolt and lever tensioner work together, what i cant figure out is how to do this. The guy who did the tear down, he got it off motor one without removing the clutch basket, but i'd rather do it without the clutch basket and isnt a big deal. I just dont know how the process goes. Looking at another guy's pictures of his teardown to the pistons, i can see the tensioner side chain guide is still attached and he never removes it. So i assume i need to install it now first. So the question i have is when i tighten that bottom bolt and get that lever flush with the case, what angle should it be at? And how does the cam tensioner play into this? I mean, the book calls for 20ft# of torque on that bolt, but after tightening it a little, I cant budge that guide. Is that how its supposed to be? And where should i position the lever arm? Flush with the top of the case? I wish the manual actually showed this part and install, but it mentions it in passing only. By the way, the rings are on perfectly with no breaks or accidents  So i suppose piston install can happen for now while i wait to hear back from ya'll. Of course i may run into complications there too haha. Thanks!!! |
|
|
|
|
March 18th, 2013, 06:03 PM
|
#68 |
|
ninjette.org member
Name: Cody
Location: Wilmington, NC
Join Date: Nov 2012 Motorcycle(s): 2003 Blue Ninja 250, 98 ZX6E, 06 ZX636 Posts: 249
|
@n4mwd
I was looking on youtube and stumbled across a video that helps me understand that the lever should move. Then i copied the address and just out of curiosity looked at the author...lol. Either it was you, or someone with your exact screen name, http://www.youtube.com/watch?v=V5UmHZZTRv0 Still not sure why mine doesnt rotate freely...off to investigate more. |
|
|
|
|
March 18th, 2013, 07:43 PM
|
#69 | |
|
ninjette.org certified postwhore
Name: D
Location: Palm Beach, FL
Join Date: Oct 2010 Motorcycle(s): 2006 Ninja 250R, 2007 EFI Ninja 250R Posts: A lot.
Blog Entries: 1
|
Quote:
The lever shown in the video should pivot freely when the tensioner piston is not engaged. If the tensioner lever does not pivot easily then the tensioner will not work right and bad things will happen. You might have things installed in the wrong order or might need a washer or something. One thing I have noticed about used engines is that just because it was installed like that when you got it, doesn't mean it was right. The main tensioner plastic chain guide is held with a bolt on top. I'm pretty sure that the right guide just lays in there. I forget which way is up, but it shouldn't be too hard to figure out. I think you should be able to install those guides with only the valve cover and cam gears removed. I'm not sure how hard the nut to the tensioner lever is to get to with the clutch basket still in there.
__________________________________________________
My Ninja Blog Proud member of ABATE.My NYC Road Rage documentary - CENSORED! |
|
|
|
|
|
March 19th, 2013, 07:42 AM
|
#70 |
|
ninjette.org member
Name: Cody
Location: Wilmington, NC
Join Date: Nov 2012 Motorcycle(s): 2003 Blue Ninja 250, 98 ZX6E, 06 ZX636 Posts: 249
|
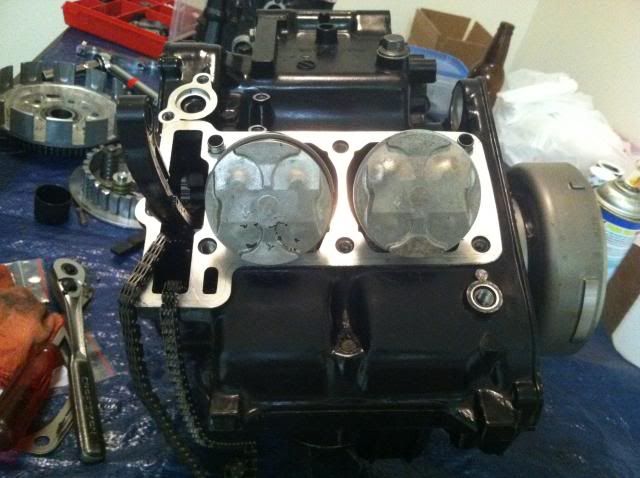
So i went ahead and cleaned the pistons and got them installed. Looking good.
 After playing around with the lever, i realized that the sleeve was in backwards. It was supposed to come in from the other side. Add a little oil and voila! movement. Torqued it down and moved on to the next step. As seen by the following image. 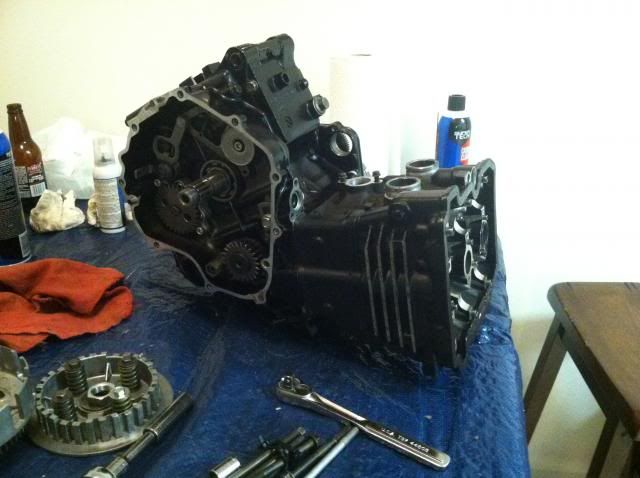 Yep, the thing slid on quite nicely and i cleaned the mating surfaces really well and reused the gasket. All is good in the hood. I did use a little oil (not motorcycle oil, car oil, and just a tiny dab around the cylinders.) to get it to slide in better, but i would think it will mostly burn off right away. Anywho, i torqued the head bolts to the specs and its on there nice and tight now. So a question, the parts shown here, i know what the big bolt thing is and where it goes, but what about the two on the left? 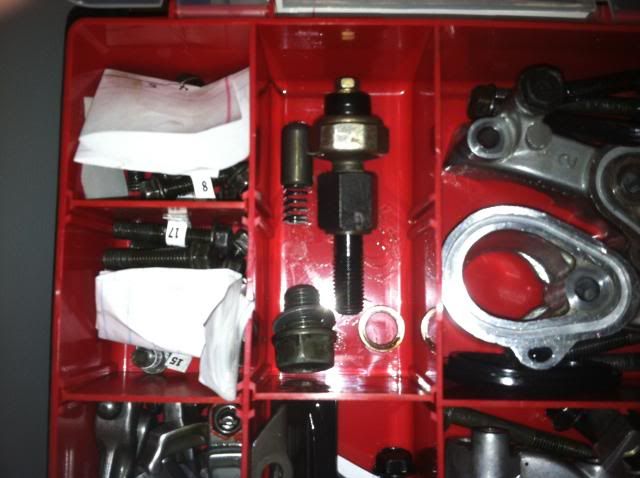 Also here is the cam chain tensioner. I think im missing a part. But maybe not. (As a side note, has anyone found a manual tensioner that worked better for them than the stock one?) Now i need to install the clutch basket, generator cover, cams, rockers, do the valve adjustment and timing. Then buy a filter, oil, clean carbs, install motor on frame, cut air box, install carbs, tighten clutch basket nut to spec (100#), install discs, cover, clutch cover and gaskets, then rest (coolant sys, sprockets, spark plugs, body work etc.) And hopefully i'll be on my way. Muzzy and header, plus rejetting are to follow. Along with a full diagnostic and preventative maintenance of electrical that was left on the bike outside these past 9 months. (It has been under a cover this whole time.) I think i left gas in the tank, just a little since i was on the way to the gas station when it died, but i know the lining was falling to pieces. What should i do about all that? I am going to install an inline filter this time too. Thanks!! |
|
|
|
|
March 19th, 2013, 03:03 PM
|
#71 |
|
ninjette.org certified postwhore
Name: D
Location: Palm Beach, FL
Join Date: Oct 2010 Motorcycle(s): 2006 Ninja 250R, 2007 EFI Ninja 250R Posts: A lot.
Blog Entries: 1
|
Not sure which bolt you are talking about. Maybe a better picture.
The OEM cam chain tensioner is actually a very good mechanism. The only problem is when the lever arm inside gets stuck sometimes and it can't work that good. The spring plunger has a one way system so that the plunger can go down, but never buck up. Its a little hard to understand how it works, but it does work well. There is no need to replace it with anything else unless its broken. Anyhow, it sounds like you are well under way to getting this guy back on the road.
__________________________________________________
My Ninja Blog Proud member of ABATE.My NYC Road Rage documentary - CENSORED! |
|
|
|
|
March 20th, 2013, 03:34 PM
|
#72 | |
|
ninjette.org member
Name: Jaeson
Location: Philadelphia
Join Date: Feb 2012 Motorcycle(s): 2007 ninja ex250 Posts: 56
|
Quote:
You already know Number 1, the oil pressure sensor Number 2 looks like the pin and spring to the shift detent mechanism, it stop your shift drum from turning freely. Number 3 looks more like the oil drain plug than the the top part of the the detent mechanism. From this angle I can't see the holow center where the spring goes so I'll let you be the judge. Anyway it goes right behind the startor motor. (18 ft-lbs) Hope this helps. Last futzed with by jayman87; March 20th, 2013 at 04:52 PM. Reason: Picture upload problem |
|
|
|
|
|
March 20th, 2013, 04:34 PM
|
#73 |
|
ninjette.org dude
Name: 1 guess :-)
Location: SF Bay Area
Join Date: Jun 2008 Motorcycle(s): '13 Ninja 300 (white, the fastest color!), '13 R1200RT, '14 CRF250L, '12 TT-R125LE Posts: Too much.
Blog Entries: 7
|
I can't see any of those pics, but work sometimes blocks them. Can everyone else see them?
__________________________________________________
Montgomery Street Motorcycle Club / cal24.com / crf250l.org / ninjette.org ninjette.org Terms of Service Shopping for motorcycle parts or equipment? Come here first. The friendliest Ninja 250R/300/400 forum on the internet! (especially Unregistered) |
|
|
|
|
March 20th, 2013, 04:48 PM
|
#74 |
|
ninjette.org member
Name: Jaeson
Location: Philadelphia
Join Date: Feb 2012 Motorcycle(s): 2007 ninja ex250 Posts: 56
|
Weird, I can't see them either. I'll upload again and edit the original post.
|
|
|
|
|
March 21st, 2013, 03:10 PM
|
#75 |
|
ninjette.org member
Name: Cody
Location: Wilmington, NC
Join Date: Nov 2012 Motorcycle(s): 2003 Blue Ninja 250, 98 ZX6E, 06 ZX636 Posts: 249
|
Thanks! that is really helpful. I should have numbered them. That would have been the smart thing to do. Turns out the shift detent on motor 2 is still there and in perfect condition as is the oil drain one. So those go in the spare parts bin.
Im starting on the cams now. I think there was a guy who did a good video on the procedure. I'm gonna look for it now to be sure i get it all correct. http://www.youtube.com/watch?v=7-noceisYm4 |
|
|
|
|
March 21st, 2013, 03:23 PM
|
#76 |
|
ninjette.org member
Name: Cody
Location: Wilmington, NC
Join Date: Nov 2012 Motorcycle(s): 2003 Blue Ninja 250, 98 ZX6E, 06 ZX636 Posts: 249
|
This probably goes without saying, but should i just install everything with correct timing and all, and then do the valve clearance job? I suppose thats the only way to do it.
|
|
|
|
|
March 21st, 2013, 05:41 PM
|
#77 | |
|
ninjette.org certified postwhore
Name: D
Location: Palm Beach, FL
Join Date: Oct 2010 Motorcycle(s): 2006 Ninja 250R, 2007 EFI Ninja 250R Posts: A lot.
Blog Entries: 1
|
Quote:
I agree with jayman87 that one of the parts in your bin looks like the bottom part to the detect bolt and the bolt thing looks like the oil plug.
__________________________________________________
My Ninja Blog Proud member of ABATE.My NYC Road Rage documentary - CENSORED! |
|
|
|
|
|
March 22nd, 2013, 05:31 AM
|
#78 |
|
ninjette.org member
Name: Cody
Location: Wilmington, NC
Join Date: Nov 2012 Motorcycle(s): 2003 Blue Ninja 250, 98 ZX6E, 06 ZX636 Posts: 249
|
So bad news, after tightening everything to spec, i began to turn the motor over by hand to make sure everything is good. Of course it isnt. It gets caught up when the lobes on the intake shaft are pushing down on the cylinder that committed suicide. I forced it through the first time thing that it was just compressing, but with no spark plugs, it shouldnt have. The crank turned over fine before the camshafts were installed, so that to me shouts valves. When i forced it, it took quite a bit to do so, and i could hear a snapping, like a valve popping out of place finally, and then it was smooth, until the lobe was off the intake and it popped back into place.
So im guessing im going to have to pull the head of and actually seperate the two. I have another head here with the valves still in place from motor 2. I may just have to use that top half of the head instead of the one from motor 1. From what i can tell, i can seperate the two parts without removing the valves, and then i can get a better look. I just dont understand since from what i can see through the intake holes for the carbs, they dont look bent or anything. Guess the weekend will be spent pulling this apart. I dont want to turn it over again since im afraid of breaking a rocker arm, which i'd really rather not do. I was hoping to be done this weekend but :/ We'll see what happens. In any case, it looks to me like valves is a specialized kind of thing with particular tools and stuff. Would this be something feasible? Or is it best to get it to a mechanic? |
|
|
|
|
March 22nd, 2013, 06:08 AM
|
#79 |
|
ninjette.org certified postwhore
Name: D
Location: Palm Beach, FL
Join Date: Oct 2010 Motorcycle(s): 2006 Ninja 250R, 2007 EFI Ninja 250R Posts: A lot.
Blog Entries: 1
|
Its unlikely you bent a valve turning it by hand. Its more likely the rocker arms. Its also unlikely that you had the cams in there right. Did you make sure that you were TDC for #2 cylinder when you aligned the IN and EX marks with the top edge of the head gasket surface?
You need to remove the cams and rockers and examine each rocker for defects. Make sure that you check the little dog ears on them. The little dog ears don't seem that important, but when they break, the engine gets destroyed. Here's one that, if installed in an engine, would completely destroy the engine. Note the broken dog ear. Here is a good one next to a worn one. Here is one that is broken in half. I suspect this is what you have.
__________________________________________________
My Ninja Blog Proud member of ABATE.My NYC Road Rage documentary - CENSORED! |
|
|
|
|
March 22nd, 2013, 07:02 AM
|
#80 |
|
ninjette.org member
Name: Cody
Location: Wilmington, NC
Join Date: Nov 2012 Motorcycle(s): 2003 Blue Ninja 250, 98 ZX6E, 06 ZX636 Posts: 249
|
I installed the camshafts correctly for sure. They were lined up exactly to spec. The rocker arms were all in one piece when I installed them but perhaps one is now broken. I don't remember the dog ears in particular. Guess the cams are coming off. But like I said, they were for sure installed correctly. Front of motor ex/. \ in. back of motor. Lobes over the cylinder closest to the cam chain were almost level pointing outwards away from each other. Ill check in an hour or so when I go home though.
|
|
|
|
 |
 Similar Threads
|
||||
| Thread | Thread Starter | Forum | Replies | Last Post |
| Rebuilding the petcock and have a question. | 93etgocart | 2008 - 2012 Ninja 250R Tech Talk | 15 | April 3rd, 2015 06:01 PM |
| Rebuilding brakes: tools? | CZroe | 2008 - 2012 Ninja 250R Tech Talk | 2 | July 5th, 2014 08:56 PM |
| Rebuilding top end, where to get parts? | jschatte | 1986 - 2007 Ninja 250R Tech Talk | 1 | August 10th, 2013 12:19 AM |
| New member rebuilding a '10 in Houston | iBang | New Members | 6 | March 30th, 2012 06:15 AM |
| Rebuilding a motor... | saber63 | 1986 - 2007 Ninja 250R Tech Talk | 3 | May 16th, 2011 11:42 AM |
|
|


