
|
 December 14th, 2008, 05:58 PM
|
#1 |
|
Master of the ZZR
Name: Brian
Location: Hamilton
Join Date: Dec 2008 Motorcycle(s): 2005 Kawasaki 250 ZZR Posts: 56
|
DIY: Pregen Fender Chop/Flush mount turn signal mod
I am starting this thread as a dyi for anyone with a pregen 250 who wants to do a fender chop. I know, you are probably saying, but the older 250s don't have big fenders. Granted the engineers did make it look stylish, I think it still leaves a little to be desired.
This mod goes hand in hand with turning the rear fish bulb turn signals into flush mounts. Here is what the back end looks like to start:   First I am going to turn the rear signals into flush mounts.  Then I am going to make a custom fiberglass fender which will serve 3 purposes: 1) Hold the license plate 2) Be large enough storage under the seat to hold the owners manual, registration/insurance, a roll of tape, flashlight, disc lock, and a bottle of water (maybe 2). AND Keep it all dry. 3) Look better.  I am going to update this thread in about three weeks with some more photos, progress, etc. I plan to finish this mod by mid february (I go to school full time, so that is my first priority). If you have any questions, feel free to ask away  If you have any comments/ideas, I'm more than willing to hear them. If you have any comments/ideas, I'm more than willing to hear them.
|

|

|
|
December 14th, 2008, 06:45 PM
|
#2 |
|
That's me!
Name: TJ
Location: Ames, IA
Join Date: Nov 2008 Motorcycle(s): 2008 Ninja 250r (Tis blue), 2008 CBR600RR Posts: 454
|
You're a bamf
 I'm totally digging on your ZZR more and more! Be sure to take muchos pictures! I was going to post how I did MY fiberglass FE, but I think it'd stir up too much, "Where did you get that", "How did you do that?","What is the mixture ratio of the resin?","How did you..." I'm totally digging on your ZZR more and more! Be sure to take muchos pictures! I was going to post how I did MY fiberglass FE, but I think it'd stir up too much, "Where did you get that", "How did you do that?","What is the mixture ratio of the resin?","How did you..."  Anywho here's my 2 cents on it: Anywho here's my 2 cents on it:One thing I could suggest is making a foam mold to form the spandex mold over:  You can buy packs of these foam bricks and they're easy to shape in weird ways.  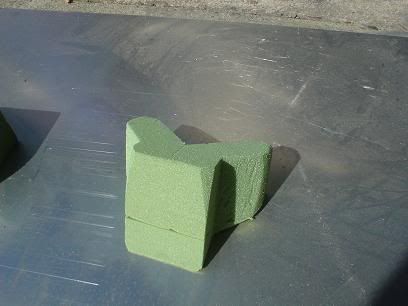 The foam is really easy to work with. I used a hot glue gun to attach a little bit more to the bottom. Like a dunce I neglected to cover the foam with anything (like aluminum foil). This entailed me having to later scrape the foam from the back of the fiberglass  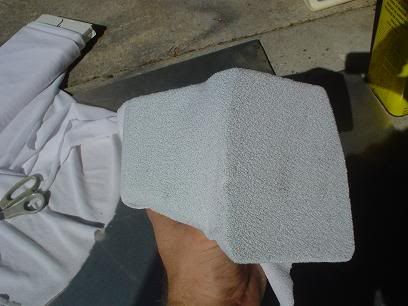 Stretch some cheapy spandex over the whole thing. I planned a hole in the back for access so everything came together there. 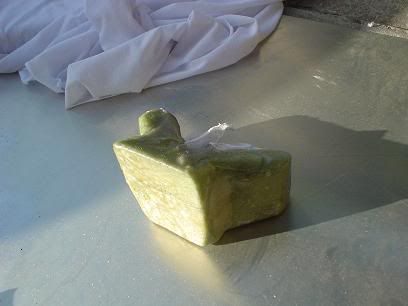 Brush the whole thing bit by bit with resin. It'll look horrid, but later on with much sanding and body filler it'll smooth everything out... 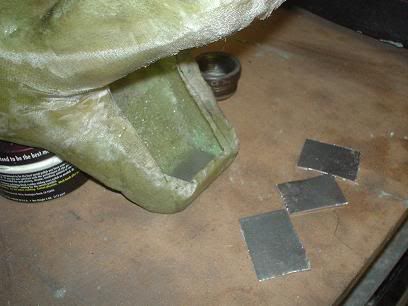 Once you remove the foam from the cured spandex I put piece of aluminum sheeting to reinforce such things as the turn signal holes, license plate mount, and the attaching holes up top. Then simply cut strips of fiberglass CLOTH and cover the backside of the spandex! Go buck wild in there with the fiberglass. It's light weight so if there is overlapping it's not going to kill on weight or anything. When all's said and done THEN you can tackle the sanding of the outside and adding bondo to level things out. 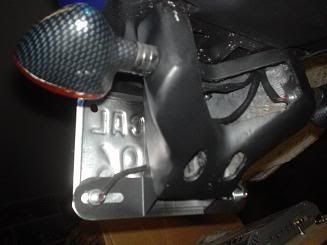  I should probably get better pictures of it as I've since sanded it a little more and re-sprayed it with paint instead of primer  ... In retrospect I would've liked the back to have slopped up more to meet up with the tail, but oh well ... In retrospect I would've liked the back to have slopped up more to meet up with the tail, but oh well
|
|
|
|
|
December 14th, 2008, 06:52 PM
|
#3 |
|
Master of the ZZR
Name: Brian
Location: Hamilton
Join Date: Dec 2008 Motorcycle(s): 2005 Kawasaki 250 ZZR Posts: 56
|
haha :P I like the wikipedia pages quote about it:
This model came to Canada as the Ninja 250R between 2000 and 2001, after which it received a new name: ZZR-250, in line with the -H model's name elsewhere in the world, where it had existed since 1992. This motorcycle has few parts in common with the -F model, though it shares the same engine (with different casings). It sports a lateral aluminum frame, different fairing (designed to make it look sportier), larger (17") wheels, an adjustable rear shock absorber, adjustable brake and clutch levers, a smaller drive sprocket, computer-controlled timing advance, and a revised electrical system.And thanks for the pics of your fiberglass DYI. I was planning on using the foam block method with some felt. It should be interesting. The only fiberglass work I've done before was patching a boat :P This should be pretty rewarding |
|
|
|
|
December 14th, 2008, 08:20 PM
|
#4 | |
|
That's me!
Name: TJ
Location: Ames, IA
Join Date: Nov 2008 Motorcycle(s): 2008 Ninja 250r (Tis blue), 2008 CBR600RR Posts: 454
|
Quote:
Making REAL molds for CF is a PITA though as it has to be prefect  It looks nice in the end, but takes forrrrrever! It looks nice in the end, but takes forrrrrever!Just make sure you get cloth style fiberglass and not the matte style (that you'd use to patch a boat ). I look forward to your pics!
|
|
|
|
|
|
December 14th, 2008, 10:42 PM
|
#5 | |
|
Master of the ZZR
Name: Brian
Location: Hamilton
Join Date: Dec 2008 Motorcycle(s): 2005 Kawasaki 250 ZZR Posts: 56
|
Quote:
|
|
|
|
|
|
December 17th, 2008, 08:50 PM
|
#6 | |
|
Dead-thread Necromancer!
Name: Levon
Location: Central Texas
Join Date: Sep 2008 Motorcycle(s): K5 V-Strom Posts: 144
Blog Entries: 3
|
Quote:
__________________________________________________
Dead-thread Necromancer!  2007 Kawasaki Ninja EX250 ZG250 Quarter-Concours commuter Gone 2005 Suzuki V-Strom DL1000 Big Black Vee future hack? |
|
|
|
|
|
December 17th, 2008, 11:29 PM
|
#7 | |
|
Master of the ZZR
Name: Brian
Location: Hamilton
Join Date: Dec 2008 Motorcycle(s): 2005 Kawasaki 250 ZZR Posts: 56
|
Quote:
but I like the side fairing of the '08 better than my ZZR... just something about being about to see more of the engine is nice |
|
|
|
|
|
March 21st, 2009, 08:05 PM
|
#8 |
|
Master of the ZZR
Name: Brian
Location: Hamilton
Join Date: Dec 2008 Motorcycle(s): 2005 Kawasaki 250 ZZR Posts: 56
|
I just thought I'd resurrect this thread :P
I never did this mod. I tried, but NOTHING could get the paint off, and I've visited a few junk yards and haven't found the same pieces yet. Also, the incredible unavailability of fibreglass made this project die before it started
|
|
|
|
|
March 29th, 2009, 09:37 AM
|
#9 |
|
ninjette.org member
Name: Jon
Location: Long Island, NY
Join Date: Mar 2009 Motorcycle(s): 2007 EX250 Posts: 91
|
Ok take a look at this: http://forums.ninja250.org/viewtopic.php?p=59764#59764
With these instructions you should be able to eliminate that ugly thing off the back of your bike and integrate your turn signals into the empty pods on the left and right of your brake light. Read the thread and you'll see that the empty pod covers are painted and this guy was able to get the paint off. Then all you'll have to do is make a license plate bracket. |
|
|
|
 |
 Similar Threads
|
||||
| Thread | Thread Starter | Forum | Replies | Last Post |
| Flush Mount Turn Signal DIY | n4mwd | 1986 - 2007 Ninja 250R Farkles | 37 | June 23rd, 2014 05:38 PM |
| Flush mount turn signal | Angel | 2008 - 2012 Ninja 250R Farkles | 4 | June 12th, 2014 08:41 AM |
| WANTED: Black AsianCycle flush mount turn signals for pregen Ninja | iplante | Items Wanted | 15 | November 21st, 2013 05:46 PM |
| Flush Mount Turn Signal Options - Need Advice | bbjminardo | 2008 - 2012 Ninja 250R Farkles | 14 | February 19th, 2013 07:27 PM |
| $15 ZX-6R LED Flush mounts/integrated tail mod/mini-mirrors & fender chop =) | speedgsx98 | 1986 - 2007 Ninja 250R Farkles | 9 | March 27th, 2011 10:19 PM |
|
|


