
|
 November 1st, 2010, 05:24 PM
|
#1 |
|
Love Rival
Name: Brian
Location: Western PA
Join Date: Jun 2010 Motorcycle(s): 2008 Ninja 250r Posts: 449
|
Painting Fairings
Hey guys,
Thinking about repainting side fairings this winter - the kid I bought it from busted/scratched the side fairings pretty badly and then tried to touch it up with what looks like black fingernail polish. Have a look: 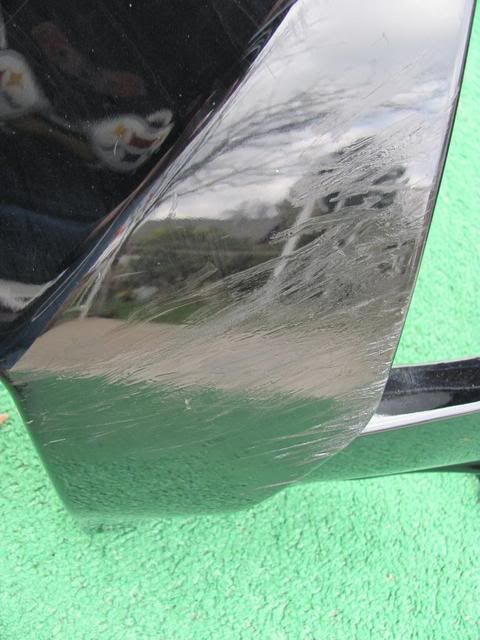 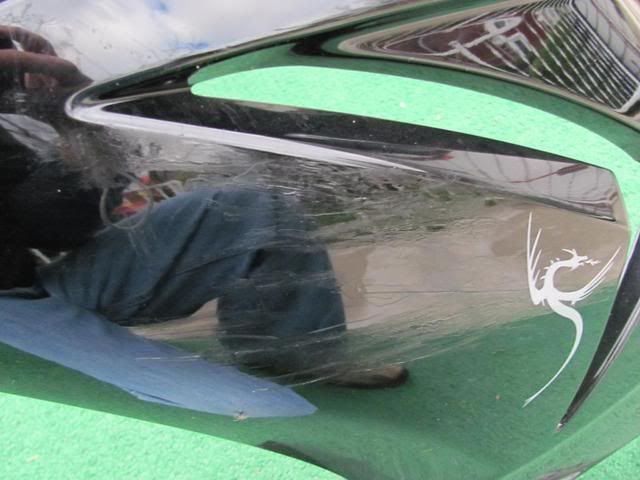 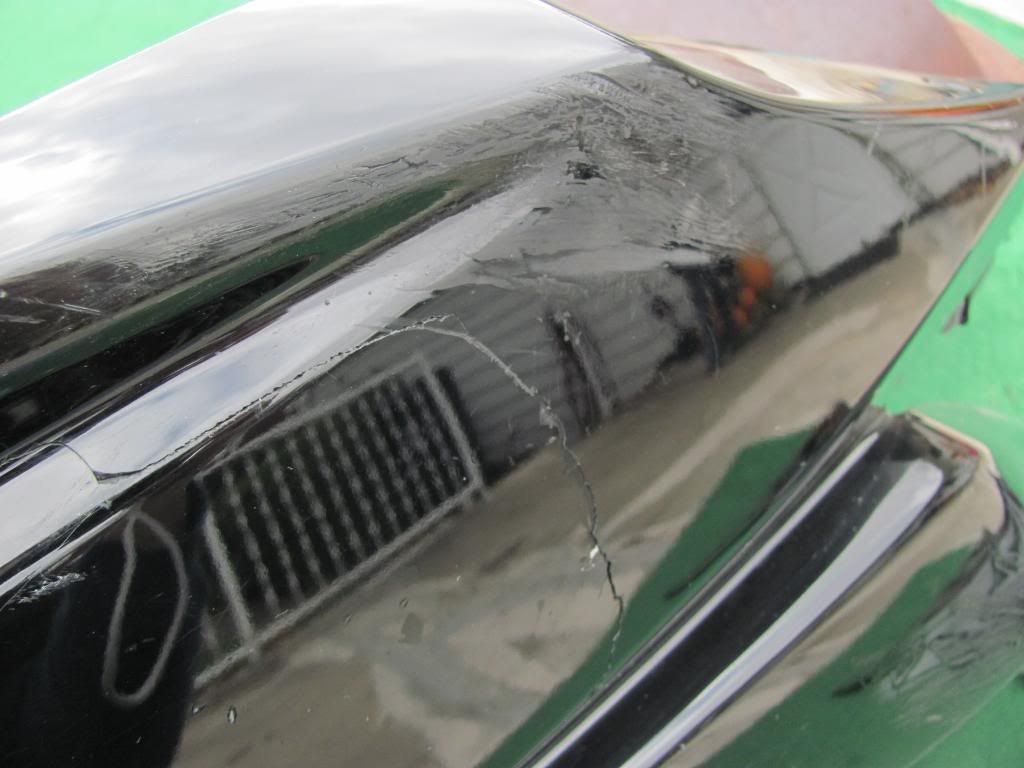 It's not terrible - the lighting in the pix makes it look worse than in person - and I'm not obsessed with having a perfect bike, by any means. Still, I'm seriously thinking about giving the repaint a go. I refinish electric guitars as a hobby and the process I use is the same as you would use on an auto - so I'm good there. I hesitate only because I've never done plastics  My brothers think I'm nutter and should leave it be. What do you think (not about the nutter part...the repaint...saw it coming  )) ))
__________________________________________________
Comparison is the thief of joy. -Dwight Edwards |

|

|
|
November 1st, 2010, 06:39 PM
|
#2 |
|
Internet Slut
Name: Jeff
Location: L.A.
Join Date: Sep 2010 Motorcycle(s): 04 FZ1, 07 FZ6 Posts: A lot.
|
I say give it a shot, everything I have seen seems to be painting them is not that hard. With you doing restore work I am sure you can bust out with a basses fairing.
Also if this post makes you do it and they look totaly bad ass I am sending you mine to paint for me. Lol |
|
|
|
|
November 1st, 2010, 07:39 PM
|
#3 |
|
ninjette.org sage
Name: J
Location: Oklahoma
Join Date: Sep 2010 Motorcycle(s): 2008 250R Posts: 771
|
It shouldn't be that difficult. I've done cars before and I know the smaler surface area and complex angles of it will help prevent and hide any blemishes. If you have done painting yourself, you already have a feel for painting just enough to get a good gloss, but without getting drips.
__________________________________________________
Factory Pro Jet Kit, K&N R-0990 Pod Filter, Sportisi VR Black Exhaust, BRT TIS Ignition, White Paint, and 16/41 Sprockets. Soon: Maybe a 37T Rear Sprocket if I get things running like I'd hoped. |
|
|
|
|
November 1st, 2010, 08:57 PM
|
#4 | |
|
Love Rival
Name: Brian
Location: Western PA
Join Date: Jun 2010 Motorcycle(s): 2008 Ninja 250r Posts: 449
|
Quote:
I'm not worried about runs or orange peal. I do all my guitars with nitro in a rattle can - good prep work, wet sanding and polishing takes care of the rest. I guess I'm a little concerned about which paint to use on plastics, which i understand can flex and crack the paint. I'll need something that can flex with the plastic. Also...I need to know what type clear to use over the paint....incompatible stuff will wrinkle. Thanks guys. If someone can supply some guidance on the rattle can paint, I'll work this into a DIY. B
__________________________________________________
Comparison is the thief of joy. -Dwight Edwards |
|
|
|
|
|
November 2nd, 2010, 12:33 AM
|
#5 |
|
Join Date: Nov 2008 Posts: Too much.
|
with plastics I've worked with, you need to use a primer that contains a flex agent prior to laying down any color coat.
what paint scheme do you have in mind? if redoing the stock color scheme, colorrite.com is the source for OEM paint for our bikes. if you're going to do all the prep work to do a A1 job, do it right and use the correct paint instead of rattle cans. for some guidance on redoing a bike, perhaps frugalninja250 can help? http://www.ninjette.org/forums/showthread.php?t=44144 |
|
|
|
|
November 2nd, 2010, 07:35 AM
|
#6 | |
|
Love Rival
Name: Brian
Location: Western PA
Join Date: Jun 2010 Motorcycle(s): 2008 Ninja 250r Posts: 449
|
Quote:
 Unfortunately, I'm gonna have to learn to live with less than an A1 job I don't have access to a spray rig or spray booth, and I don't have the dough to hire a professional. I'm just hoping to make an improvement from the current state. As for the color - I think i'll stick with black because I like to go fast...  Color Rite Aerosol cans at $33.00USD? Ouch.
__________________________________________________
Comparison is the thief of joy. -Dwight Edwards |
|
|
|
|
|
November 2nd, 2010, 08:34 AM
|
#7 |
|
ninjette.org sage
Name: J
Location: Oklahoma
Join Date: Sep 2010 Motorcycle(s): 2008 250R Posts: 771
|
You can buy decent paint in rattle cans. Hell, ive seen small stuff (like bicycles and such) done with the 97c rattlecans from walmart and come out pretty nice. Most of it is about technique and just being careful. Also, the biggest problem with rattlecans is they just dont put out enough volume to get a solid glossy finish over large areas (and the paint typically dries too fast for that also). And, like everything, it is an exponentially decaying curve as far as the relationship between investment and result. You could spent 5 bucks on rattlecans and an hour of work and have a finish that looks 80% as good as from the factory (say a perfect paint job at 15 or 20 feet). Spend 20 on paint and half a day on prep and buffing and you will get a solid 5 or 10' paintjob. Spend $50 on paint plus a real air system, and invest a weekend into the job, and you will start nearing perfection. But, you have to decide how much you want to invest. Also keep in mind black will show the most blemishes. Im going with white so I dont have as much to worry about.
Btw dont use any clears with the 97c walmart cans! I ruined a surprisingly good paintjob once doing that. Posted via Mobile Device |
|
|
|
|
November 2nd, 2010, 09:49 AM
|
#8 |
|
Love Rival
Name: Brian
Location: Western PA
Join Date: Jun 2010 Motorcycle(s): 2008 Ninja 250r Posts: 449
|
You are dead on JMc. Here are some examples of what can be done with rattle cans filled with good paint combined with good prep work and loads of patience:
  I really hate to go with something like Krylon, after buying Color Rite primer, color, and clear I'm edging up on $200. Considering the time invested, it might be better to just buy a new fairing.
__________________________________________________
Comparison is the thief of joy. -Dwight Edwards |
|
|
|
|
November 2nd, 2010, 02:12 PM
|
#9 |
|
ninjette.org sage
Name: J
Location: Oklahoma
Join Date: Sep 2010 Motorcycle(s): 2008 250R Posts: 771
|
On your current fairing, i would honestly just sand it mildly smooth (stop as you start to lose your mind :P), and rattlecan with whatever is on the shelf. Anything you do will look a millon times better than it does now, and at worst you will have spent a few bucks and a couple of hours getting to a more acceptable half-way point while you save for the fairing anyways. And at best you do find the result satisfactory and call it good.
You might consider getting a single can of the paint, and painting a section on the inside of the fairing. That way you can touch up your technique and also verify that the color and especially glossiness are acceptable. Posted via Mobile Device |
|
|
|
|
November 8th, 2010, 07:42 AM
|
#10 |
|
Love Rival
Name: Brian
Location: Western PA
Join Date: Jun 2010 Motorcycle(s): 2008 Ninja 250r Posts: 449
|
Alright - decided to pull the trigger on the repaint project - that's what the cold winter months are for!
So - I grabbed some 400 grit paper and scuffed up the clear and knocked down the touch-up paint the previous owner had slathered over the scratches. Here's a look: Before: After: 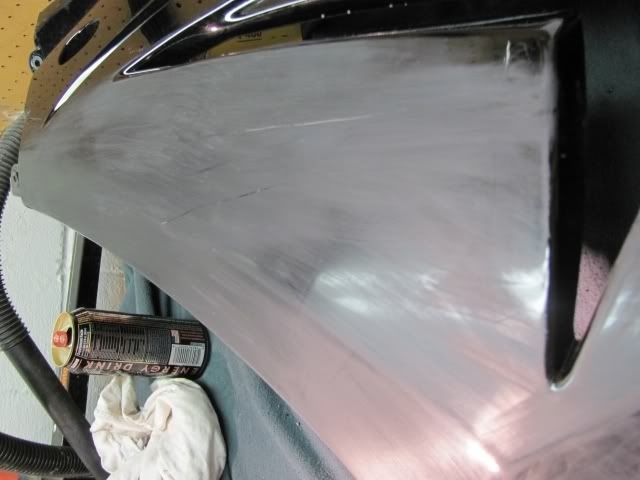 I'll have to say, it was pretty unsettling - scratch up the clear. One of those "point of now return" deals.  It took about two, one hour sessions to get this fairing where I wanted it. Next steps will be to weld the cracks (may use epoxy instead) and feather on some bondo to make sure everything is level in the problem areas.
__________________________________________________
Comparison is the thief of joy. -Dwight Edwards |
|
|
|
|
November 8th, 2010, 08:35 AM
|
#11 |
|
ninjette.org sage
Name: J
Location: Oklahoma
Join Date: Sep 2010 Motorcycle(s): 2008 250R Posts: 771
|
Nice! What paint are you going to use?
__________________________________________________
Factory Pro Jet Kit, K&N R-0990 Pod Filter, Sportisi VR Black Exhaust, BRT TIS Ignition, White Paint, and 16/41 Sprockets. Soon: Maybe a 37T Rear Sprocket if I get things running like I'd hoped. |
|
|
|
|
November 8th, 2010, 09:46 AM
|
#12 |
|
Love Rival
Name: Brian
Location: Western PA
Join Date: Jun 2010 Motorcycle(s): 2008 Ninja 250r Posts: 449
|
Hey J,
Not sure yet. I was planning on finding a cheap primer for plastics - something with a flex agent - and then hit it with some acrylic lacquer - duplicolor or something. However, before I go the uber-cheap route, I'm going to try to pop into my local auto-paint supply shop at lunch today and see what they can do for me. I'll keep you posted.
__________________________________________________
Comparison is the thief of joy. -Dwight Edwards |
|
|
|
|
November 8th, 2010, 11:00 AM
|
#13 |
|
Join Date: Nov 2008 Posts: Too much.
|
make sure the primer and color coat are compatible. mixing incompatible paint types can result in cracks and/or waves in the final product.
|
|
|
|
|
November 8th, 2010, 11:09 AM
|
#14 |
|
self wrencher
Name: john
Location: houston
Join Date: Dec 2008 Motorcycle(s): 08 250r and 07 600r Posts: A lot.
|
Are you doing the whole bike or just a few panels? If just a few, make sure color matches. You don't want the bike to have diff shade here and there
|
|
|
|
|
November 8th, 2010, 11:27 AM
|
#15 |
|
Love Rival
Name: Brian
Location: Western PA
Join Date: Jun 2010 Motorcycle(s): 2008 Ninja 250r Posts: 449
|
I popped into the local auto paint shop during lunch and they were really helpful. I asked about the flex agent and they explained that a flex agent only remains active for about 48-72 hours and only makes sense if plan to manipulate the plastics right after painting.
I normally allow lacquers to gas off for about 30 days before wet sanding and polishing - so I'm not going to worry about flex. They recommended I use an adhesion promoter as a primer coat (I think self-etching is synonymous), which I purchased in aerosol. What I am worried about is incompatibility (as kkim points out) and color match (as random points out). I've seen the wrinkling mess that results from incompatible media... For sure do-over. I'll do some test passes on some scrap to see what's what.Color match is tough, especially when dealing with aerosols....chances any two cans came from the same batch is zip. As for colors: - I think white is easiest - I know black is fastest  - but a two-tone would be a good challenge. I'll gonna look around the forum for some ideas. There are some sweet bikes on ninjette.
__________________________________________________
Comparison is the thief of joy. -Dwight Edwards Last futzed with by onetruevibe; November 8th, 2010 at 12:32 PM. |
|
|
|
|
November 24th, 2010, 08:49 AM
|
#16 |
|
Love Rival
Name: Brian
Location: Western PA
Join Date: Jun 2010 Motorcycle(s): 2008 Ninja 250r Posts: 449
|
Finally got to work on this:
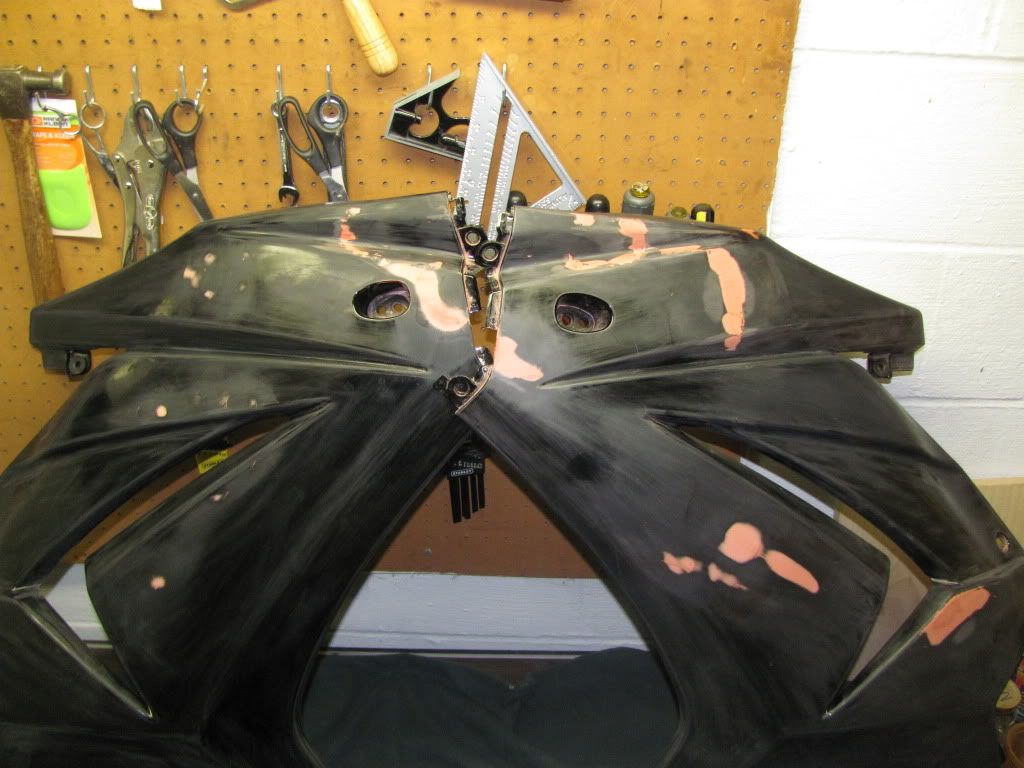
Levelled and roughed up using 800 grit:  Cracks welded and started mudding - looks ugly, don't it?  Stay tuned... Stay tuned...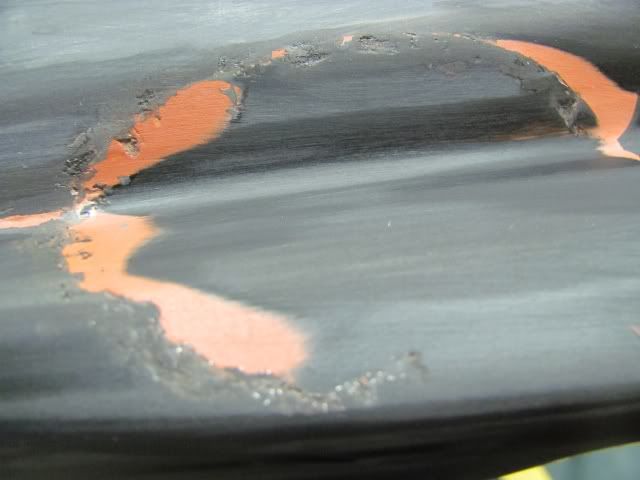 I hope to have this side all prep'd this weekend and get started on the other side. Still unsure about colors. I may just go with black and look for some sick vinyl.
__________________________________________________
Comparison is the thief of joy. -Dwight Edwards |
|
|
|
|
December 29th, 2010, 01:58 AM
|
#17 |
|
ninjette.org member
Name: Craig
Location: Seattle
Join Date: Dec 2009 Motorcycle(s): Blue 2008 Ninja 250R Posts: 86
|
Updates?
|
|
|
|
|
December 30th, 2010, 07:31 AM
|
#18 | |
|
Love Rival
Name: Brian
Location: Western PA
Join Date: Jun 2010 Motorcycle(s): 2008 Ninja 250r Posts: 449
|
Quote:
 Everything is pretty level and ready for paint. After the new year I'll set up a make-shift spray booth in my garage, hit it with adhesion promoter and then paint. I'll be using Krylon Fusion - Black Gloss. I'm waiting to hear back from someone here on vinyl options. I could probably stitch this together as a DIY when I'm done, if there's interest.
__________________________________________________
Comparison is the thief of joy. -Dwight Edwards |
|
|
|
|
|
December 30th, 2010, 01:21 PM
|
#19 |
|
ninjette.org member
Name: Craig
Location: Seattle
Join Date: Dec 2009 Motorcycle(s): Blue 2008 Ninja 250R Posts: 86
|
Sign me up as interested! My fairings were destroyed by a thief this year and I've been contemplating what to do with them once summer rolls around. Could you write more about what's involved I'm building a spraybooth?
BTW, in case you haven't noticed them (I didn't at first), I recommend removing the rubber plugs from the fairings before painting. They work much better when they aren't coated =) Last futzed with by kobachi; December 30th, 2010 at 02:28 PM. |
|
|
|
|
December 30th, 2010, 03:51 PM
|
#20 | ||
|
Love Rival
Name: Brian
Location: Western PA
Join Date: Jun 2010 Motorcycle(s): 2008 Ninja 250r Posts: 449
|
Quote:
Quote:
__________________________________________________
Comparison is the thief of joy. -Dwight Edwards |
||
|
|
|
|
March 26th, 2011, 04:31 PM
|
#21 |
|
Love Rival
Name: Brian
Location: Western PA
Join Date: Jun 2010 Motorcycle(s): 2008 Ninja 250r Posts: 449
|
Ok - the weather finally got nice enough for me to get this job done!
My goals were: 1. learn something new 2. make the bike look better than before I started. While the job is not perfect, I think I accomplished both of those goals, so... Here you go:
__________________________________________________
Comparison is the thief of joy. -Dwight Edwards |
|
|
|
|
March 26th, 2011, 04:34 PM
|
#22 |
|
Join Date: Nov 2008 Posts: Too much.
|
is that krylon fusion paint? looks pretty good. Gloss factor?
have you considered finishing it by sanding with a 2000 grit sandpaper and then compounding and polishing it... or have you done that already? regardless... good work!
|
|
|
|
|
March 26th, 2011, 04:45 PM
|
#23 |
|
Love Rival
Name: Brian
Location: Western PA
Join Date: Jun 2010 Motorcycle(s): 2008 Ninja 250r Posts: 449
|
Thanks for the feedback!
Yes, I used Krylon Fusion Gloss. It's no showroom finish, but that's ok. Showroom was my original plan - to use acrylic lacquer color, clear it, wet sand, buff and polish. But I was afraid of it cracking when the plastic flexed. I also considered spraying clear over the Krylon but feared compatibility issues. I didn't consider sanding and polishing the Krylon directly. Have you had experience with that? I'm curious how it would turn out.
__________________________________________________
Comparison is the thief of joy. -Dwight Edwards |
|
|
|
|
March 26th, 2011, 05:04 PM
|
#24 |
|
Join Date: Nov 2008 Posts: Too much.
|
I've wet cut the top coat on cars using a 2000 grit sandpaper, but they had a clear coat on them. I don't know how this would work with a color coat directly, unless there is a lot of clear mixed in with the color coat.
The basic idea is to sand very lightly to hit down the "orange peel" on the paint surface, which will leave a very fine, sanded surface. the talent comes in not sanding through the color coat and revealing primer.  slow and easy till you get a feel on how much sanding is needed to achieve the desired "cut". compound over the section to smooth out the sanding scratches and work progressively lighter compounds until you achieve a glossy finish. if you're interested, try it on some inconspicuous section on the fairing first to see how the paint responds to the process. if it works, you can end up with a glass like finish. |
|
|
|
|
March 27th, 2011, 05:19 AM
|
#25 |
|
Love Rival
Name: Brian
Location: Western PA
Join Date: Jun 2010 Motorcycle(s): 2008 Ninja 250r Posts: 449
|
Yeah...I've also noticed that the black Krylon scratches very easily without some type of protector clear coat. Just running your fingernail against it can leave a little blemish. It may harden as it continues to gas-off, but still.
") I may do a little more research and repaint later this summer with a more professional approach. Or I may just buy some new fairings
__________________________________________________
Comparison is the thief of joy. -Dwight Edwards |
|
|
|
|
March 27th, 2011, 09:22 AM
|
#26 | |
|
CPT Falcon
Name: J.Emmett Turner
Location: Newnan, GA
Join Date: Apr 2009 Motorcycle(s): '08 CP Blue EX250J, '97 unpainted EX250F, 2nd '97 unpainted EX250F (no engine), '07 black EX250F Posts: A lot.
|
Quote:
|
|
|
|
|
|
March 27th, 2011, 10:34 AM
|
#27 | |
|
Love Rival
Name: Brian
Location: Western PA
Join Date: Jun 2010 Motorcycle(s): 2008 Ninja 250r Posts: 449
|
Quote:
Do you have a link? I popped over there but could only find this, which isn't Krylon specific. Thanks.
__________________________________________________
Comparison is the thief of joy. -Dwight Edwards |
|
|
|
|
|
March 27th, 2011, 11:06 AM
|
#28 | |
|
CPT Falcon
Name: J.Emmett Turner
Location: Newnan, GA
Join Date: Apr 2009 Motorcycle(s): '08 CP Blue EX250J, '97 unpainted EX250F, 2nd '97 unpainted EX250F (no engine), '07 black EX250F Posts: A lot.
|
Quote:
|
|
|
|
|
|
March 27th, 2011, 06:40 PM
|
#29 |
|
ninjette.org sage
Name: Josh
Location: Richmond VA
Join Date: Oct 2009 Motorcycle(s): 2008 Triumph Bonneville Black Posts: 627
|
Did you prime, or just sand and krylon?
__________________________________________________
'08 Bonneville Black sold->'08 Ninja 250R | OES Swingarm Spools | EBC HH brake pads | reflector delete | no-cut brake light modulator | DIY fender eliminator |
|
|
|
|
March 28th, 2011, 05:44 AM
|
#30 |
|
ninjette.org guru
Name: war
Location: north chicago burbs
Join Date: Jan 2011 Motorcycle(s): 2014 Ducati Panigale 899 Posts: 325
|
Looks pretty darn good.
|
|
|
|
|
March 28th, 2011, 06:14 AM
|
#31 | |
|
Love Rival
Name: Brian
Location: Western PA
Join Date: Jun 2010 Motorcycle(s): 2008 Ninja 250r Posts: 449
|
Quote:
Easy-peasy if your not shooting for perfection. I guess you could say that about anything, though.
__________________________________________________
Comparison is the thief of joy. -Dwight Edwards |
|
|
|
|
|
March 28th, 2011, 07:33 AM
|
#32 |
|
Mature motorcyclist
Name: Chris
Location: Sykesville, MD
Join Date: Jan 2009 Motorcycle(s): 2008 Ninja 250R, blue Posts: 126
|
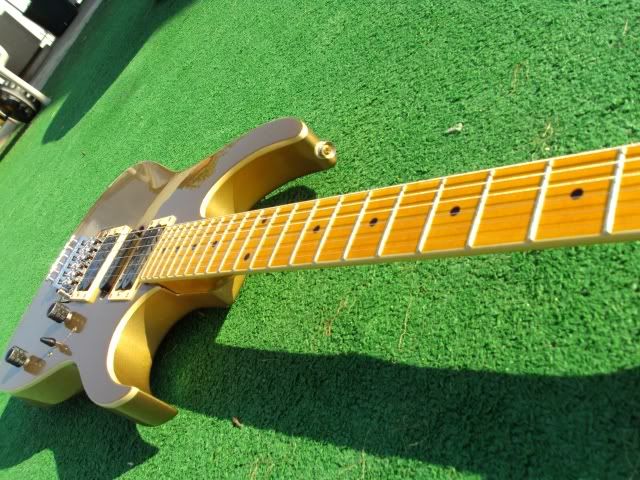
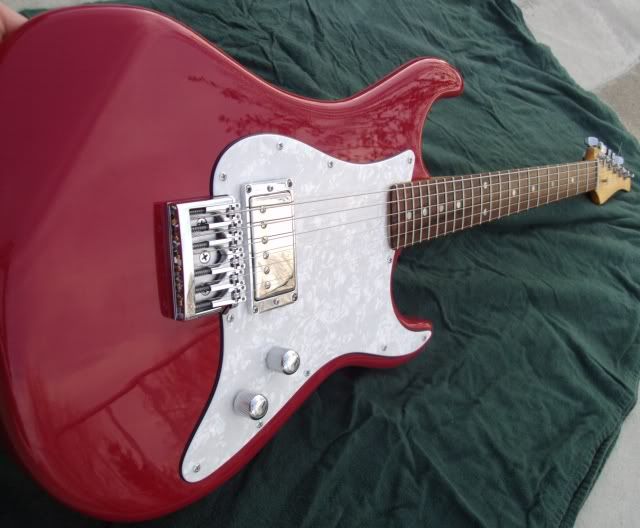
Nice job Brian. I can verify the fact that you can get a good paintjob from a "rattle can" on a motorcycle or a guitar. I've done many touchups and complete refinish jobs with spray cans with complete success. As for guitars, see my gallery for photos of many guitars, all done in this manner. http://www.ninjette.org/forums/album.php?albumid=42
I hope you are using a respirator of some kind when you spray the nitro lacquer- it's very bad for your lungs. My older brother was a yacht yard painter, and he now has a bad case of COPD from all of the paint he inhaled over the years. Chris Last futzed with by cwb48; March 28th, 2011 at 07:38 AM. Reason: added link |
|
|
|
|
March 28th, 2011, 09:32 AM
|
#33 | |||
|
Love Rival
Name: Brian
Location: Western PA
Join Date: Jun 2010 Motorcycle(s): 2008 Ninja 250r Posts: 449
|
Quote:
Quote:
Quote:

__________________________________________________
Comparison is the thief of joy. -Dwight Edwards |
|||
|
|
|
|
March 28th, 2011, 09:37 AM
|
#34 | |
|
Love Rival
Name: Brian
Location: Western PA
Join Date: Jun 2010 Motorcycle(s): 2008 Ninja 250r Posts: 449
|
Quote:
 Here's a pic of the modified coat hanger I rig'd up to hang the panel: 
__________________________________________________
Comparison is the thief of joy. -Dwight Edwards |
|
|
|
|
|
March 28th, 2011, 02:00 PM
|
#35 |
|
Join Date: Nov 2008 Posts: Too much.
|
Brian,
good job on setting up a paint booth. lottsa work to fix plastics, eh? ... which is why I sort of giggle/roll my eyes when someone comes on the forum looking for a cheap, quick and easy way to fix their recently dropped bike from a rider mishap. IMHO, the best way to avoid having to fix screwed up plastics is not to drop the bike in the first place... many do not realize how much work, money and headaches can be expended fixing even the most minor of drop$. work on your riding skills people... and work up to that magic line of crash/no crash in small, incremental steps while obviously working on staying on the no crash side of the line. As for you, sir... great job fixing the fairings!
|
|
|
|
|
July 15th, 2012, 12:54 PM
|
#36 |
|
MSF Coach!
Name: Lupe
Location: Antioch, Tennessee
Join Date: Jun 2012 Motorcycle(s): 2003 ninja 250 Posts: 886
|
looks good, im going to be repainting my pre gen from yellow to gray soon. but i will be using automotive paint.
__________________________________________________
Hey Unregistered wanna ride the dragon? Ninjette group ride! May 16th-20th Join the Ride!!http://www.ninjette.org/forums/group.php?groupid=35 |
|
|
|
 |
 Similar Threads
|
||||
| Thread | Thread Starter | Forum | Replies | Last Post |
| Painting? | Nathanptak | 1986 - 2007 Ninja 250R Tech Talk | 2 | May 26th, 2013 07:56 PM |
| What grit to use to sand fairings for painting? | LoneRonin | 2008 - 2012 Ninja 250R Farkles | 5 | May 7th, 2012 04:10 AM |
| Painting rims...?! | blink | General Motorcycling Discussion | 6 | June 9th, 2011 04:12 PM |
| Replacement Fairings and Painting | kevlarorc | 2008 - 2012 Ninja 250R Tech Talk | 17 | January 21st, 2010 11:44 PM |
| Anyone Good with Painting? | Rafalski | Off-Topic | 2 | July 27th, 2009 05:12 AM |
|
|


