
|
 May 7th, 2015, 05:06 AM
|
#1 |
|
ninjette.org member
Name: Jason
Location: Bay City, MI
Join Date: Apr 2014 Motorcycle(s): 1980 Yamaha XS850G Midnight Special, 32k Miles; 2000 EX250F, <5000 Orig Miles Posts: 98
|
Any improved rear wheel adjusters?
So I installed a 15T front sprocket.. then realized my previous alignment markings would be useless since the chain will be shortened by the additional diameter of the front sprocket. OK, realign and adjust chain tension (which kinda sucks to do).
Man those pregen rear adjusters are sloppy, stupid and inaccurate! Are there any better ones that can be fitted to the 88-07 models? I must not have it right as well, I have a rotational scuffing noise when moving (just went down and back up the driveway). I also installed a newgen rear shock, which raised the rear, not lowered it, so I doubt my rub is from that. Any suggestions? |

|

|
|
May 7th, 2015, 07:48 AM
|
#2 |
|
ninjette.org member
Name: Brandon
Location: Cleveland, OH
Join Date: May 2014 Motorcycle(s): 99 Ninja 250 Posts: 217
|
Did you measure the adjusters with a tape measure? Count the threads? Check your chain slack and then make sure it was aligned?
__________________________________________________
Everything youve ever wanted is on the other side of fear. George Addair |
|
|
|
|
May 7th, 2015, 07:57 AM
|
#3 | |
|
ninjette.org sage
Name: bob
Location: Earf
Join Date: Apr 2013 Motorcycle(s): 2005 Ninja 250, 2006 SV650N Posts: 642
|
Quote:
|
|
|
|
|
|
May 7th, 2015, 08:10 AM
|
#4 |
|
ninjette.org member
Name: Jason
Location: Bay City, MI
Join Date: Apr 2014 Motorcycle(s): 1980 Yamaha XS850G Midnight Special, 32k Miles; 2000 EX250F, <5000 Orig Miles Posts: 98
|
I made the tool like is described in the ninja250.org wiki. An aluminum rod with a 90 degree bend and a zip tie attached. It works quite well. I did not use it this last time. I can never seem to hold it steady enough.
I thought one was to adjust alignment FIRST, then chain slack? |
|
|
|
|
May 7th, 2015, 08:23 AM
|
#5 |
|
ninjette.org member
Name: Brandon
Location: Cleveland, OH
Join Date: May 2014 Motorcycle(s): 99 Ninja 250 Posts: 217
|
It is a combination of both from what I did. Work on setting the slack and then see if the adjusters are of equal length. Go back and check slack, then check adjusters. I mean I have only done it once so some of the veterans may know better but the adjusters are not that difficult to align.
__________________________________________________
Everything youve ever wanted is on the other side of fear. George Addair |
|
|
|
|
May 7th, 2015, 10:58 AM
|
#6 | |
|
Daily Ninjette rider
Name: Hernan
Location: Florida
Join Date: Mar 2011 Motorcycle(s): 2007 Ninja 250 Posts: A lot.
MOTY - 2016, MOTM - Dec '12, Jan '14, Jan '15, May '16
|
Quote:
Consider that adjusters are locators for the rear shaft and that they only work under tension. For that reason, you should do the adjustment with the shaft just loose enough to be able to slide aft while pulled by the adjusters and pushed forward by your foot or hand. Keep pushing forward while the nut is torqued down to the specified value (high). It is that torque and only that what keeps the shaft and wheel from moving under the forces of chain and brake.
__________________________________________________
Motofool  .................................Never ride faster than your guardian angel can fly "Mankind is composed of two sorts of men those who love and create, and those who hate and destroy. Love is the bond between men, the way to teach and the center of the world." - José Martí |
|
|
|
|
|
May 7th, 2015, 03:08 PM
|
#7 |
|
in your machine
Name: Scott
Location: Summer Shade, Ky.
Join Date: Oct 2014 Motorcycle(s): 98 Ninja 250/F12 aka ZX-2R "SERENITY", 91 Ninja 500/A5 aka ZX-5R "Phoenix", 84 Honda GL1200A "SIREN" Posts: A lot.
Blog Entries: 25
MOTM - Jun '17, May '16, Mar '15
|
How-to properly do an alignment
The String Thing Motorcycle rear wheel alignment (Pictures at the bottom) This applies to chain driven bikes the have two sided swing arms The most common cause of a lot of the shakes and wobbles that afflict single track vehicles is, they are not on a single track. This set of instruction will fix it. Mount the bike upright on the center stand or a race stand or lacking those, a pair of cinder blocks and 2X4s. Wrap a long string around the back tire as high up as it will go without fouling some other part of the bike. A piece of tape will hold it. Run the string forward on both sides and tie them to a set of moveable objects. Check to be sure the string is just touching the same part of the rear tire on all four points and not touching any other part of the motorcycle. Move the front stands so that the string just lightly touches the front edge of the rear tire and is not bent over it. Now the strings show the path the rear tire is taking on its way to the point where the front tire was. I said that strange sentence to illustrate the point of what were doing here. Now turn the handle bars to make the front tire parallel to the strings. Now measure the space from the string to the front wheel rim on both sides. Both measurements should be the same w/in 1/16 If they are youre done. If they are not: adjust the rear wheel chain adjusters to correct the error. Re- set the strings and measure again. Repeat till OK. Rocking the Forks While the bike is still rigged for the horizontal work, do this. Before we go into the vertical plane its important to be sure your front forks are parallel to each other. Forks are often not. This can be easily corrected. Obtain a flat piece of metal or glass about 3 wide and long enough to span the forks. Rock this piece across the bare part of the fork tubes just below the bottom triple clamp. By rock I mean the plate should touch both tubes evenly from top to bottom. If it rocks like a chair with a short leg, that means your tubes are twisted. To fix this loosen all the pinch bolts on the triple clamps the top center triple clamp nut and the front axel. Now with you a knee holding the front wheel twist the bars till the plate doesnt rock. Then gradually tighten all the bolts while constantly checking the rocker till all is tight and the plate doesnt rock. Re check the center alignment of the front tire. Vertical alignment Not a necessity but if you want to be really really good about this alignment thing. Your wheels are really big Gyroscopes and as such the angle or Tilt they are on will determine which direction they want to roll in. Example: Roll a bike (pedal) wheel first straight up and down the with a slight tilt to the right, then left. See what I mean? Now back to those two Gyros: The back one is much larger, Guess who rules? While the bike is still rigged for Horizontal alignment. Rig a plumb line near the rear tire as close to the wheel center as possible. Measure from that line to the top and bottom of the rear wheel rim, and shim the stands till the rear wheel is square to the earth. That is parallel to the plumb line. Now rig another plumb line near the front wheel. Measure from the line to the top and bottom of the front wheel rim. Both of those measurements must be the same. If so youre done. If not: Depending on how bad, you may be able to adjust this condition. If worse than ¼ you have a bent frame If less than ¼ try this: If the wheel tilts away from the line at the top extent that fork tube in the triple clamps 1/8 conversely shorten the opposite side the same amount. Re check. Go another 1/8 if necessary. Re check the horizontal alignment, because you just moved the wheel to the side. Suplemental instructions: Adjusting the alignment and chain slack Loosen the big castelated nut, Release the 2 12 mm lock nuts from each other. With the big nut snug but not tight use the 1st 12mm nut against the end cap to adjust the wheel position, mind the chain slack. when a satiafactory alignment is achieved tighten the big nut to 80 lbs. FT. Be sure you have not affecxted the alignment. the back off the 12 mm 1st nut and retighten it to the frame Only finger tight. While holding the 1st nut with a wrench tighten the 2nd nut against it to preserve the settings and secure the end plates. There shoul be no tension on the end plates except the finger tight. Thats it. No alterations or changes to these instructions will work. Some pictures of my setup 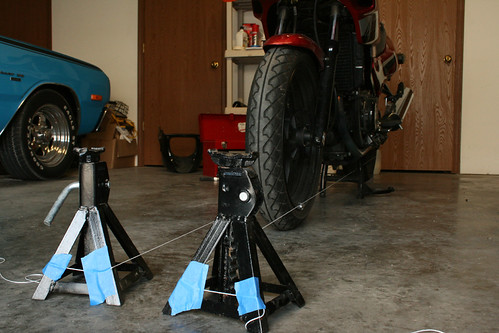 Not a whole lot of clearance here... 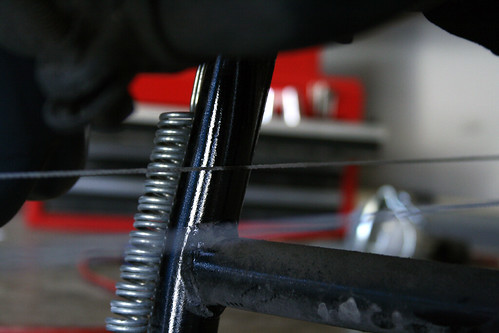 This was about as high as I could get the string without hitting the center stand on the right side. 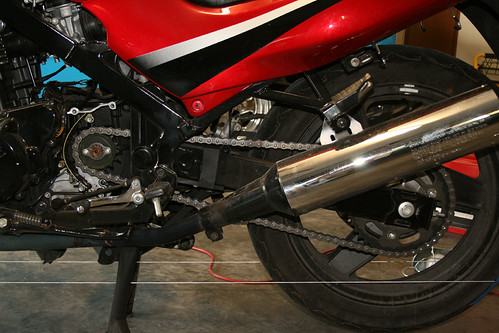
__________________________________________________
violente et ignorantia ZX-2R BLOG Twitter and Instagram = Ghostt_Scott I'm not here to change your mind, just to inform. 
|
|
|
1 out of 1 members found this post helpful. |
 |
 Similar Threads
|
||||
| Thread | Thread Starter | Forum | Replies | Last Post |
| cheap rear set adjusters? | massacremasses | General Motorcycling Discussion | 90 | December 19th, 2014 12:44 PM |
| 08+ rear wheel, right rear set, rear brake system, seat | cuong-nutz | Items Wanted | 2 | October 6th, 2013 05:37 PM |
| Adjusting Throttle Cable - Barrel adjusters and Throttle body adjusters are maxed out | theob | 2008 - 2012 Ninja 250R Tech Talk | 10 | July 19th, 2012 05:01 PM |
| Rear set adjusters...cheap! | Tubesock | 2008 - 2012 Ninja 250R Tech Talk | 4 | May 31st, 2009 08:34 PM |
|
|


