
|
 November 25th, 2008, 11:46 PM
|
#1 | |
|
That's me!
Name: TJ
Location: Ames, IA
Join Date: Nov 2008 Motorcycle(s): 2008 Ninja 250r (Tis blue), 2008 CBR600RR Posts: 454
|
Ok, so I've checked my valve clearances and the exhaust valves are all too tight. To adjust this it's not as simple as with OHV engines and you have to remove the cams. To accomplish THIS:
mod edit from below post: Quote:
Step 1 - Remove the CCT 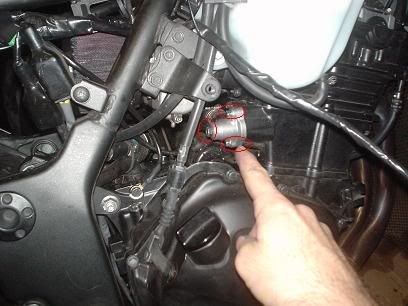 Remove the 10mm center bolt in the Camshaft Chain Tensioner. Then remove the (2) outer 8mm bolts. The CCT should pull out easily. Step 2 - Time the engine 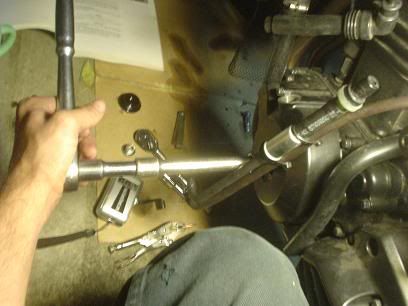 Turn the engine over (again use a 14mm socket and turn clock-wise). You're going to look in the alternator cover inspection hole (the little hole about 6 inches above THIS hole) until you see "2|T" in the middle. 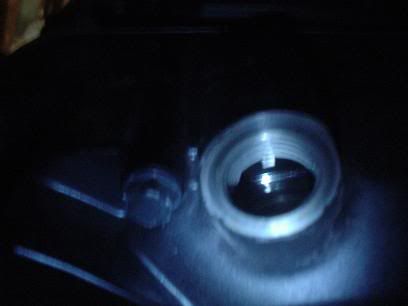 I couldn't for the life of me get a good picture of this. Either there was too much light and it would create a glare, or like this not enough light to see the markings. Oh well. 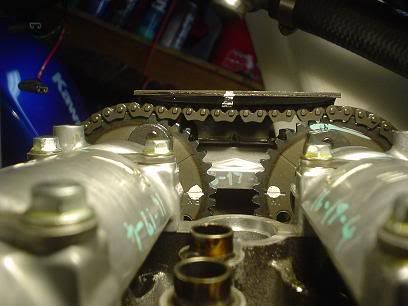 With any 4-stroke engine you'll hit "2|T" TWICE per complete engine cycle. I made sure that I had the engine on "2|T" (which is cylinder #2 at TDC) at the end of i's compression stroke. The camshafts should line up as you can see in the picture above. Notice the two white dots face eachother? Timed! Step 3 - Loosen camshaft cap bolts. 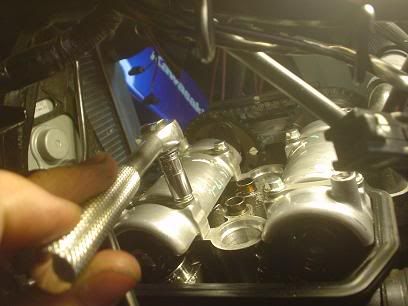 These little 8mm bastards are pretty tight, but still exercise care when removing them. I always suggest when removing and installing camshaft caps to use a 'crossing' pattern instead of simply removing one cap at a time. Step 4 - Loosen camshaft top-chain guide/caps 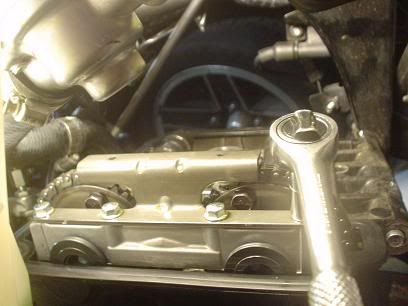 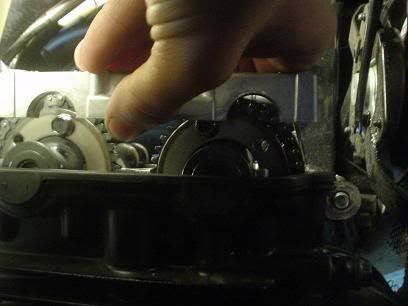 Then you can remove the camshaft caps: 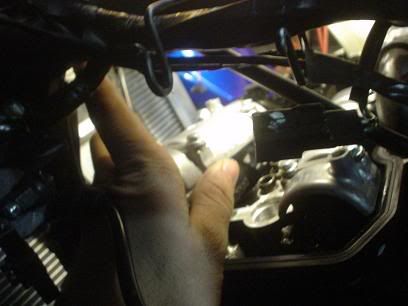 WATCH OUT here: 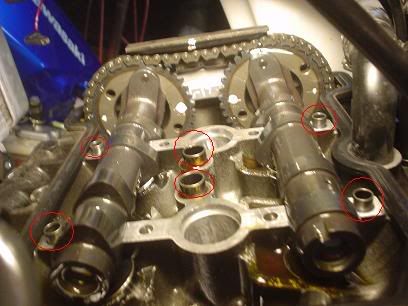 Notice the (4) outter and (2) inner dowel pins? They're not pressed in, but they are 'floating'. Meaning you need to be careful when pulling the camshaft caps that these don't come out (and then fall into the engine). They're there to keep the camshaft caps (and the two center ones for aligning the valve cover). They WILL pull up especially if you don't lift the camshaft caps up evenly. Anywho... Step 5 - Remove camshafts 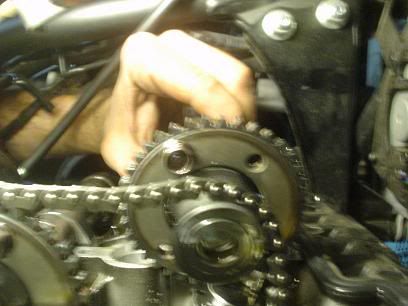 Oh joy of joys! If you push on the chain a little it should push the camshaft tensioner outward and put some slack into the chain. Lift the chain away from one sprocket at a time and remove the camshaft. Afterwards drape the chain over the side of the head so you don't have to fish it out of the engine later . Step 6 - Remove tappets 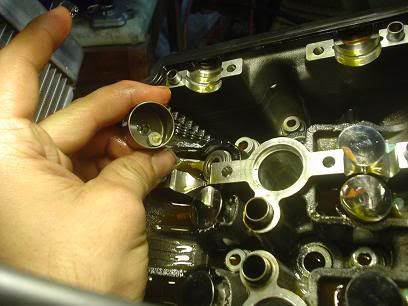 They'll wiggle out (some of them might need some needle nose plier assistance). You can see I've removed one of the exhaust valve tappets here. I've popped the shim loose and you can see it laying inside the cover. They'll all stick to the tappet which is handy as you don't have to worry much about them falling into the engine while you remove them. Important - Put them caps in ORDER 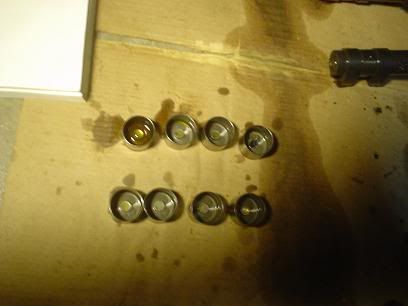 I've just tossed them all on a piece of carboard in order. This comes in handy as I can write the shim thicknesses directly above each tappet. Step 7 - Measure the shims. Most people have dial calipers which work fine or... I prefer micrometers though as they often have higher degrees of accuracy. Now... DON'T get confused with the conversions. I measured the lash with SAE standard feeler gauges. I then measured the shims ALSO in inches. You can convert in the last step (The less conversion you do the less the room for error). While each shim should have a number on each side of it which translates to a thickness on a chart these numbers are hard to read. That's why it's still wise to physically measure them. When you have the new shims though you can rely on the printed numbers on the shims... |
|

|

|
|
November 25th, 2008, 11:49 PM
|
#2 | |
|
That's me!
Name: TJ
Location: Ames, IA
Join Date: Nov 2008 Motorcycle(s): 2008 Ninja 250r (Tis blue), 2008 CBR600RR Posts: 454
|
Note: This is an example with the measurement (It just happens to be MY example). Your results probably WILL vary, so unlike jetting, you can't use 'basline' numbers. It has to be exact
 So to find the 'new shim' heights here's my math (ALL in inches): Exhaust valve - Number 1 - Number 2 - Number 3 - Number 4 Lash = ________.0065_____.0080_______.0070_____.0060 Shim = ________.1112_____.1102_______.1112_____.1083 Total =________.1177______.1182______.1182_____.1143 Intake valve - Number 5 - Number 6 - Number 7 - Number 8 Lash = _________.0095_____.0070_____.0080_____.0080 Shim = _________.1112_____.1112_____.1112_____.1112 Total =_________.1207_____.1182_____.1192_____.1192 Then you subtract what you WANT the total lash to be (in this case I'm looking for .010" on the exhaust and .0085" on the intake). This gives you your 'ideal' shim thickness. Exhaust valve - Number 1 - Number 2 - Number 3 - Number 4 _____________.1077_____.1082_____.1082______.1043 Intake valve - Number 5 - Number 6 - Number 7 - Number 8 _____________.1122_____.1097_____.1107______.1107 NOW I convert to metric and round to match shims on Kawaski charts: Exhaust valve - Number 1 - Number 2 - Number 3 - Number 4 ______________2.80______2.75_______2.75______2.65 Intake valve - Number 5 - Number 6 - Number 7 - Number 8 ______________2.85______2.80______2.825_____2.825 Quote:
Whammy! Got things back together and here are some notable things upon re-installation: 1.) Remove the two seals that seal the spark plug holes from the underside of the valve cover: 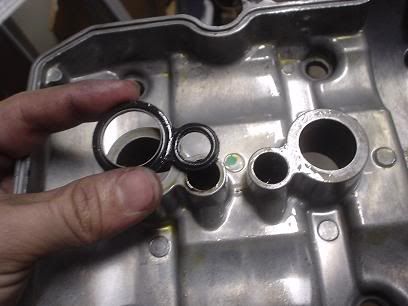 and set them over the holes on the head. I didn't do this at first and one moved and got crushed. This caused an oil leak which I discovered quick enough... RE-installing the CCT: 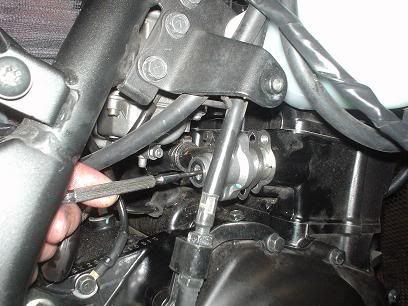 You need to 'reset' the CCT before reinstalling it!! This entails removing the 10mm bolt and inserting a little flat blade screwdriver. You're supposed to turn this clockwise (which in turn causes the shaft to pull backwards into the CCT housing... This is tricky to accomplish in this tight area so I.... 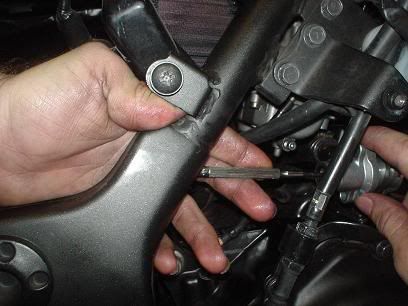 Held the little screwdriver with one hand and turned the housing COUNTER-clockwise (thus doing the same thing as simply turning the screwdriver clockwise). Once you can't turn this any more fully press the housing into the block and put one of the 8mm bolts in to hold things. THEN you can let go of the flat-blade screwdriver, install the other 8mm housing bolt and then lastly the 10mm cap. _ |
|
|
|
|
|
November 25th, 2008, 11:56 PM
|
#3 |
|
Join Date: Nov 2008 Posts: Too much.
|
Thanks for posting this w/ pics. I know how much of a PITA it is to work and take pics at the same time with dirty hands.
so, what difference did the valve adjustment make to the power of the bike? |
|
|
|
|
November 26th, 2008, 12:16 AM
|
#4 | |
|
That's me!
Name: TJ
Location: Ames, IA
Join Date: Nov 2008 Motorcycle(s): 2008 Ninja 250r (Tis blue), 2008 CBR600RR Posts: 454
|
Quote:
... I was going to say it's running like new, but as we all know from the factory they didn't run nearly this well 
|
|
|
|
|
|
November 26th, 2008, 12:21 AM
|
#5 | |
|
Join Date: Nov 2008 Posts: Too much.
|
Quote:

|
|
|
|
|
|
January 23rd, 2009, 08:47 PM
|
#6 |
|
ninjette.org guru
Name: Tom
Location: Dayton, OH
Join Date: Jan 2009 Motorcycle(s): '13 Ninja 300 '09 Boulevard C50. '08 250r(TOTALED BY DEER) Posts: 467
|
How hard was it getting new shims. I don't look forward to waiting months, if mine are out.
__________________________________________________
 CHEERS!!! CHEERS!!!
|
|
|
|
|
January 23rd, 2009, 09:19 PM
|
#7 |
|
Join Date: Nov 2008 Posts: Too much.
|
That depends on how well stocked your local Kawasaki dealer is and which ones you need.
I think Vex had his in a matter of days, but I'll let him answer to confirm. |
|
|
|
|
January 23rd, 2009, 10:39 PM
|
#8 |
|
That's me!
Name: TJ
Location: Ames, IA
Join Date: Nov 2008 Motorcycle(s): 2008 Ninja 250r (Tis blue), 2008 CBR600RR Posts: 454
|
I ordered mine through one of the online OEM vendors (I just happen to use CheapCycleParts.com). I always suggest if you're going to order through them to order other things like screws and bolts which might have disappeared (as their shipping costs are like $10 if you order 1 bolt or 100 of them).
I had them in like 2-3 business days. They're $7 a pop so make sure you measure and re-measure your lash and shim thicknesses so you can ensure you don't have to order more than necessary. I was able to re-use most of the shims and only had to order about 3 of them (not bad considering there's 8 valves and they were almost all way off). Record in your service manual the shim thicknesses that you wind up using so the next adjustment goes easier (If you KNOW what shims are in there then you don't need to pull the cams on the next check). |
|
|
|
|
January 24th, 2009, 06:06 AM
|
#9 |
|
ninjette.org guru
Name: Tom
Location: Dayton, OH
Join Date: Jan 2009 Motorcycle(s): '13 Ninja 300 '09 Boulevard C50. '08 250r(TOTALED BY DEER) Posts: 467
|
Thanks, I wasn't sure if these exact shims were used in other models
__________________________________________________
CHEERS!!!
|
|
|
|
|
January 25th, 2009, 04:07 PM
|
#10 |
|
Don't Be Evil!
Name: Miles
Location: Excelsior, MN
Join Date: Jan 2009 Motorcycle(s): 08 250R Posts: 92
|
How did you go about keeping the engine timed during re installation?
|
|
|
|
|
January 26th, 2009, 12:10 AM
|
#11 |
|
That's me!
Name: TJ
Location: Ames, IA
Join Date: Nov 2008 Motorcycle(s): 2008 Ninja 250r (Tis blue), 2008 CBR600RR Posts: 454
|
You don't You don't time it PER SE until after you get the cams back in:
You line the dots up on the cams and in the inspection hole you turn then engine over to 2|T (Or 1|T depending on which way you have the cam dots lined up). Once these three things are all lined up then you can put the CCT in and buckle everything down. |
|
|
|
|
January 26th, 2009, 12:23 AM
|
#12 |
|
Don't Be Evil!
Name: Miles
Location: Excelsior, MN
Join Date: Jan 2009 Motorcycle(s): 08 250R Posts: 92
|
Thanks. I figured that was how it was done. Is that how the service manual does it?
|
|
|
|
|
January 26th, 2009, 03:31 AM
|
#13 |
|
That's me!
Name: TJ
Location: Ames, IA
Join Date: Nov 2008 Motorcycle(s): 2008 Ninja 250r (Tis blue), 2008 CBR600RR Posts: 454
|
If I remember correctly the manual pulls one of those, "Installation is the same as dissassembly, but in reverse
 Hell the only thing that I almost overlooked was the procedure for re-installing the CCT. If you do that wrong I'm sure bad things would happen Hell the only thing that I almost overlooked was the procedure for re-installing the CCT. If you do that wrong I'm sure bad things would happen  . .If/when you do your shims the cam timing only makes sense. If when the engine is on 2T (which happens TWICE per complete engine cycle) the cam dots line up (which is coincedently the last step you do before yanking the cams) then when reassembling it is logical to match those conditions. |
|
|
|
|
January 26th, 2009, 11:04 AM
|
#14 |
|
Track Junkie
Name: Jon
Location: Dallas
Join Date: Dec 2008 Motorcycle(s): '08 Ninja 250r Track Bike, DR350 commuter, KDX220 woods bike Posts: 602
|
wow... i've only done valves on thumper dirtbike motors. much easier and can be done in 10 minutes.
this looks more like a real project!
__________________________________________________
Las Escobas -- Track Bikes Save Lives JonBroom.com |
|
|
|
|
May 13th, 2009, 04:23 PM
|
#15 |
|
motorcycle rider
Name: Bruce
Location: Victoria, BC
Join Date: Apr 2009 Motorcycle(s): '14 Yamaha V-Star 650 Custom (silver) Posts: A lot.
|
Yes, my thinking exactly. I used to own an Enfield single with pushrod valves. It was _very_ easy to adjust. You just needed one wrench and a coin to open the valve cover to peek inside. It took about 5 minutes to check the valves.
The new-gens look like an all-day job even if you have a clue what you're doing....
__________________________________________________
'14 Yamaha V-Star 650 Custom (silver) |
|
|
|
|
July 27th, 2009, 09:21 AM
|
#16 |
|
3 for street, 2 for dirt
Name: Katlyn
Location: San Francisco Bay Area (California)
Join Date: Mar 2009 Motorcycle(s): 2008 Can Am Spyder PE #1344 / 2009 Kawi KLX140L Monster Energy / 2009 Kawi Ninja 250R (RIP 8.23.09) Posts: 586
|
At what intervals do they suggest the valve clearance be checked at in the new gen 250R?
BRP (for my Spyder) recommends checking them every 6K miles which seems excessive to me. I had them checked (on the Spyder) at 6,200 and won't have them checked again until about 21K (skipping the 12K and doing the 18K late because of our trip in September). I only know of a few people that had to have them adjusted but they all had well over 35K miles before this happened.... one was as late as 42K. The Spyder has a Rotax 998 V-twin.
__________________________________________________
Feel free to look me up on facebook. |
|
|
|
|
July 27th, 2009, 11:14 AM
|
#17 |
|
ninjette.org dude
Name: 1 guess :-)
Location: SF Bay Area
Join Date: Jun 2008 Motorcycle(s): '13 Ninja 300 (white, the fastest color!), '13 R1200RT, '14 CRF250L, '12 TT-R125LE Posts: Too much.
Blog Entries: 7
|
The recommended intervals on the new-gen ninjette are 7.5k. Mine had zero out of spec at the first interval, and I'll have 'em checked again at 15k. Some people have had some out of spec at 7.5k. I wish Yamaha would sprinkle their pixie valve dust magic on other manufacturer's bikes; the valve check interval on even their sportiest bikes is 26k miles. Even on an R6 that revs past 16k rpm!
__________________________________________________
Montgomery Street Motorcycle Club / cal24.com / crf250l.org / ninjette.org ninjette.org Terms of Service Shopping for motorcycle parts or equipment? Come here first. The friendliest Ninja 250R/300/400 forum on the internet! (especially Unregistered) |
|
|
|
|
July 27th, 2009, 11:24 AM
|
#18 |
|
3 for street, 2 for dirt
Name: Katlyn
Location: San Francisco Bay Area (California)
Join Date: Mar 2009 Motorcycle(s): 2008 Can Am Spyder PE #1344 / 2009 Kawi KLX140L Monster Energy / 2009 Kawi Ninja 250R (RIP 8.23.09) Posts: 586
|
I see.... then that definitely makes the every 6K on the Rotax 998 V-twin that powers the Spyder seem really excessive. The motor is 4 times larger and is typically runs below 6k RPM at all times. Even at 80 MPH in 5th gear I'm at about 6K.... and that's well above the speed limit. I typically run her at about 5,200 - 5,500 RPM when cruising on the freeway at about 70.
Thanks for the info.... you're right about Yamaha, they need to share... 26K intervals for valve check is a godsend. That means most owners probably won't ever have more than 1 or 2 valve checks in the amount of time they own the bike... if that. Makes me wonder what those valves are made out of.
__________________________________________________
Feel free to look me up on facebook. |
|
|
|
|
January 1st, 2010, 02:06 PM
|
#19 |
|
ninjette.org guru
Name: Mikel
Location: Valley of the Sun
Join Date: Mar 2009 Motorcycle(s): '09 Blue Kawasaki KLE650 Versys, '95 Ducati 900SS/CR (undergoing track conversion) Posts: 287
|
Two things to add:
From experience, if you TIE the cam chain up so it stays in tension with the crank gear, it can prevent the chain from "falsely" seating with a link bound out of place. That way, when you get everything back together and crank the motor over, that bound link doesn't shift onto the gear properly and make the cam chain "jump" over a tooth on one of the cams. You can guess the rest. In my case, it ate a valve and piston. 2nd: Even knowing what the shim is when you do you next check, if there is slack, you need to remeasure that shim to make sure it didn't deform during use. If you base your measurement off your notes, get the new shim based on the old shim, and its been deformed, then you may be replacing the shim with an over sized shim which will make everything really tight. Yup, been there did that one too... A suggestion is also see if you can get a slim digital cam over the valve ends on MACRO and see if you can get some good pics of the ends. It can let you know if the valve is mushrooming oddly which could be an indication that the valve is binding as it moves. Thanks for the DIY! Very well done! |
|
|
|
|
January 5th, 2010, 06:39 PM
|
#20 |
|
ninjette.org member
Name: Trip
Location: Deland FL
Join Date: Jan 2010 Motorcycle(s): 2009 Ninja 250 Posts: 17
|
Great suggestion on the zip ties, I have been doing that that ever since checking valves on the ole 450r. I do have a question about this and have come across this in the shop manual too. When checking the clearance on each cylinder respectively do you rotate the motor to 1T for CY1 and 2T for CYL2? I don't see this in the manual or here but have always been taught to check valve clearance at TDC. Sounds logically to me but wanted to clarify.
-Trip |
|
|
|
|
January 29th, 2010, 12:42 AM
|
#21 |
|
That's me!
Name: TJ
Location: Ames, IA
Join Date: Nov 2008 Motorcycle(s): 2008 Ninja 250r (Tis blue), 2008 CBR600RR Posts: 454
|
It depends on how anal you are. Like anything, yes the textbook way to check valve lash on an engine is to put a cylinder at TDC on the compression stroke and check it, but when you start wrenching on 6+ cylinder engines there's a "short cut" that actually delivers better results.
They suggest checking each cylinder at TDC on the COMPRESSION stroke as both valves are shut. To ensure absolute accuracy I kind of cheat and crank the engine until I can phycially see a pair of cam lobes pointing 180 degrees away from the cap. Usually on an engine one cylinder might have a valve(s) completely shut and on the base circle (so there's no chance that you might be a tad past TDC and just starting on the ramp on the exhaust valve on a long duration camshaft) another valve(s) will also be completely shut on a different cylinder. In that respect you can still check multiple valves at a time. With OHC engines it's easy to see, with OHV engines often times people have charts to common engine families to this so you can do the same thing (even though you can't physically see the camshaft's position). With solid cammed race engines I'd always have the chart for that engine family and I could pop the valve covers, watch the distributor with the cap off, and go through the sequence quickly and accurately. I only use the timing marks on this engine for making sure you get the cams timed correctly upon reassembly. |
|
|
|
|
January 29th, 2010, 05:58 AM
|
#22 |
|
ninjette.org member
Name: Trip
Location: Deland FL
Join Date: Jan 2010 Motorcycle(s): 2009 Ninja 250 Posts: 17
|
Thanks Vex, I actually check my Aprilia (V-Twin) the second way you suggested-much easier then trying to line up the marks.
|
|
|
|
|
January 29th, 2010, 04:22 PM
|
#23 |
|
ninjette.org member
Name: Peter
Location: Deep South, USA
Join Date: Dec 2009 Motorcycle(s): 2009 Special Edition Ninja 250 a good memory, 2011 Suzuki DL 650 the new ride Posts: 131
|
This guy has a different approach to shims that are too thick.
http://www.ducatisuite.com/valves.html I have read about this approach to adjusting shim type valves someplace else too, but I'm not sure where. Has anyone done this with ninja shims? |
|
|
|
|
January 30th, 2010, 10:29 PM
|
#24 |
|
ninjette.org certified postwhore
Name: Paul
Location: Roanoke, VA
Join Date: Jun 2009 Motorcycle(s): 2008 Candy Plasma Blue 250R Posts: A lot.
|
Vex, when re-installing the cams after re-shimming, should it matter which 2|T we're at so long as the crankshaft is at one of them?
I might've done a bad thing and not double-checked which 2|T I was at before pulling the cams, trying to decide how far up the creek I am...  Edit: FSM just says to turn the crankshaft over til 2|T before reinstalling camshafts, so I *think* I'm ok. Guess I'll find out when I put it all back together, unless someone pipes up with a way to check. 
__________________________________________________
Proud member of the Blue Army Last futzed with by Momaru; January 31st, 2010 at 11:26 AM. Reason: Looked a little deeper @ FSM |
|
|
|
|
February 5th, 2010, 06:52 PM
|
#25 |
|
ninjette.org certified postwhore
Name: Paul
Location: Roanoke, VA
Join Date: Jun 2009 Motorcycle(s): 2008 Candy Plasma Blue 250R Posts: A lot.
|
Seems to run OK, so either it doesn't matter which 2|T you reassemble at (which agrees with the way the manual's worded) or I won the 50/50 chance of getting the right one @ random.
__________________________________________________
Proud member of the Blue Army |
|
|
|
|
February 5th, 2010, 07:29 PM
|
#26 |
|
ninjette.org member
Name: Scott
Location: KS
Join Date: Jan 2010 Motorcycle(s): '09 EX250J, '01 CBR600F4i Posts: 53
|
if you put it back together at the other 2|T i would assume that just means the opposite cylinder was at TDC. assuming that the 250R has a wasted spark ignition system (both plugs fire all the time) and that it has carbs then the bike will start right up. if it had fuel injection and was not wasted spark then the cylinders would be out of sync and it wouldn't work out so well.
someone tell me if i'm wrong here please. |
|
|
|
|
February 5th, 2010, 08:34 PM
|
#27 |
|
ninjette.org certified postwhore
Name: Paul
Location: Roanoke, VA
Join Date: Jun 2009 Motorcycle(s): 2008 Candy Plasma Blue 250R Posts: A lot.
|
I may be wrong, but I'm fairly sure 2|T refers to Cylinder #2 at TDC (FSM mentions the relationship between Cyl#2 and 2|T marking). There's also a 1|T marking, I assume for Cylinder #1 at TDC. From what I recall reading, the engine just hits TDC for each cylinder twice per revolution of the crankshaft. Those with more knowledge, please
 me if I've spoken incorrectly. me if I've spoken incorrectly. As for the ignition system, I'm not sure, but given the simplicity of design on this bike I wouldn't be surprised if it is a wasted spark system but don't know one way or the other. Littledog, I tried that method (sanding shim to spec) with the round of valve shimming I just did and like it. While you still need to buy bigger shims periodically and it takes a little time, it still allows re-use and tailoring the shim for a better clearance. And I've got a lot of glass tables, so it was easy to make sure the shim was reasonably flat
__________________________________________________
Proud member of the Blue Army |
|
|
|
|
February 5th, 2010, 10:01 PM
|
#28 |
|
ninjette.org member
Name: Scott
Location: KS
Join Date: Jan 2010 Motorcycle(s): '09 EX250J, '01 CBR600F4i Posts: 53
|
on second thought, i should have thought about it more. the engine hits TDC for each cylinder twice per complete revolution of the crankshaft once for the ignition of its air/fuel mixture, and once before it lets the spent gases out (while the other cylinder is igniting). whichever of the 2|T's it is on doesn't matter. just don't take out the sensor at 2|T and put it back in at 1|T!
|
|
|
|
|
February 5th, 2010, 10:49 PM
|
#29 |
|
ninjette.org certified postwhore
Name: Paul
Location: Roanoke, VA
Join Date: Jun 2009 Motorcycle(s): 2008 Candy Plasma Blue 250R Posts: A lot.
|
Yeah, definitely don't want to put the cams back in on 1|T, that'd be bad. Thanks for explaining it a bit to me, makes a bunch more sense now: one intake/combustion cycle, one exhaust cycle per crankshaft revolution per cylinder. Hence 4-cycle, 2 cylinder motor.
__________________________________________________
Proud member of the Blue Army |
|
|
|
|
February 6th, 2010, 07:11 AM
|
#30 |
|
self wrencher
Name: john
Location: houston
Join Date: Dec 2008 Motorcycle(s): 08 250r and 07 600r Posts: A lot.
|
Momaru, how hard is it to adjust/shim the bike on diff level of 1 to 10?
Posted via Mobile Device |
|
|
|
|
February 6th, 2010, 02:08 PM
|
#31 |
|
ninjette.org certified postwhore
Name: Paul
Location: Roanoke, VA
Join Date: Jun 2009 Motorcycle(s): 2008 Candy Plasma Blue 250R Posts: A lot.
|
Provided you've got the right tools, lubricants, etc on hand and a shop that stocks our shim size (7.48mm diameter).
I'd give it a solid 6. It's a bit of a hassle draining/removing the coolant system (not 100% necessary but gives you a lot more room to work) and pulling an engine mount bracket just to get into the engine head. The cooling pipe that goes into the top aft end of the engine is a little annoying to get the cover around. But once you've got things disassembled, it's not too bad so long as you trust yourself with feeler gauges and a micrometer. This was my first time with real feeler gauges, so I must've measured each valve lash 6 times. The biggest patience-stretcher is getting shims of the right size; most places seem to only have increments of .05mm, but they vary a little from one shim to the next. I wound up breaking out some 300 and 600-grit sandpaper on my glass-topped coffee table to wet-sand the shims down closer to spec. That said, I'm now dead center of clearance ranges. I'm also confident there's no gravel floating around the top end of my engine and the gaskets aren't fouled/folded. Both of those were true when I opened it up, having taken it to a local shop for my 7500mi checkup. I won't be returning to them for maintenance. Ever. All in all, I'm 95% sure I did it right (bike cranked up and ran fine long enough to warm up in 14" of snow) and think it was time well spent.
__________________________________________________
Proud member of the Blue Army |
|
|
|
|
April 25th, 2010, 06:28 PM
|
#32 |
|
ninjette.org member
Name: Peter
Location: Deep South, USA
Join Date: Dec 2009 Motorcycle(s): 2009 Special Edition Ninja 250 a good memory, 2011 Suzuki DL 650 the new ride Posts: 131
|
First of all, Vex - TJ thank you for this EXCELLENT guide to valve adjustment.
I took on this project this past weekend, and ran from my shop to the house about 43 times to look at your pictures. I am exaggerating only a little bit. I also have the FSM (flying spaggetti monster? no. well actually yes, or at least I'd like to think so, but I meant the factory service manual) to consult. there is a picture guide on ninja.org that is also nice. I did a couple of things differently than Vex. First I removed everything that was removable and even sort of in the way. In particular, I followed the FSM advice to remove the radiator. I also removed the coolant overflow tank. This involves undoing the clutch cable as well, which follows a very (imho) not obvious path from the engine side to the lever. The FSM has a nice diagram of this cable route as well as EVERY other cable -hose-wire route. These extra dis-assembly steps made removing the valve cover very easy, but made very little difference otherwise. I had to drain the coolant (as per FSM) I re installed the old coolant. Here is a table of my valve measurements: Front of bike E clearance old .009 .010 .008 .009 E clearance new .010 .010 .011 .011 E shim size old .116 .115 .115 .114 E shim size new .114 .114 .112 .112 I clearance old .007 .007 .007 .005 I clearance new .007 .008 .007 .007 I shim size old .115 .116 .116 .116 I shim size new .114 .115 .115 .113 My gauges are inch gauges in the 1/1000 of an inch. I probed every clearance several (~5) times with different gauges. ( I have go-no go gauges with markings go .009 no go .011 for example). The first clearance of .009 means that an .009 gauge fit and an .010 did not. I measure shims with an empire brand (made in china, bought at sears, it has markings down to .0005, 1/2 of 1/1000) micrometer. Interpreting these numbers, the .008 old on #3 exhaust and the .005 on # 4 intake are tighter than specified in the FSM. I wet sanded the shims, using 400 grit carborundum with water. My target was .011 on the exhaust side and .008 on the intake side. the carborundum paper was taped to the cast iron table of a large woodworking band saw. (it is pretty flat). Using this method (little circles around a big circle motion) it took about 10 minutes to reduce a shim by .001. I made a lot of measurements; I am pretty sure I did not made the flat shims into wedges, at least down to my measurement capacity. I sanded the side that was NOT against the valve stem. There was a very obvious wear pattern from the valve stem touching the shim. I put all of the shims back in with the same side against the valve stem. They all got a blob of moly grease. By swapping shims around, the second column E and I are both un sanded shims. At the end of the summer or when I have 15k mi on my ninja I will tear down again and measure. I will post here again what I find, and describe what I do. I am not claiming that sanding shims is a good idea, or that this approach works as well as buying new shims , I make no claim at all. I am just describing the work I did on my bike. Oh the results. The ninja runs exactly like it did before I opened it up. Nicely. Smooth power well past 10k rpm, no alarming noises. |
|
|
|
|
August 23rd, 2010, 01:38 PM
|
#33 |
|
ninjette.org member
Name: X
Location: Toronto
Join Date: Apr 2010 Motorcycle(s): 09 Ninja 250 SE Lime Green/Diablo Black Posts: 126
|
So I'm at my 12K service (more like 12.8K
), and I finished measuring my valve lash. Just pulled off the tappets and have the shims ready to measure, but need to grab a different measurement tool, since mine only does 0.1mm increments.EX (mm) 1 0.23 2 0.20 3 0.22 4 0.28 IN (mm) 5 0.21 6 0.20 7 0.18 8 0.20 So 3 of my exhaust valves are tight, with only 1 out of spec. My intake valves are pretty close to the midrange of the spec. I'll need to adjust the exhaust valves for sure, while the intakes could technically be left alone. However, I am debating adjusting them anyway to 0.195 mm, just because I have everything open now, and it'd be nice to balance them. |
|
|
|
|
August 23rd, 2010, 07:34 PM
|
#34 |
|
ninjette.org member
Name: X
Location: Toronto
Join Date: Apr 2010 Motorcycle(s): 09 Ninja 250 SE Lime Green/Diablo Black Posts: 126
|
Exhaust valve - Number 1 - Number 2 - Number 3 - Number 4
Lash = _________0.23_______0.20_______0.22_______0.28 Shim = _________2.75_______2.72_______2.76_______2.66 Total = _________2.98______2.92_______2.98_______2.94 Intake valve - Number 5 - Number 6 - Number 7 - Number 8 Lash = _________0.21_______0.20_______0.18_______0.20 Shim = _________2.75_______2.74_______2.70_______2.80 Total = _________2.96______2.94_______2.88_______3.00 Exhaust valve - Number 1 - Number 2 - Number 3 - Number 4 _____________2.725_____2.665_____2.725______2.685 Intake valve - Number 5 - Number 6 - Number 7 - Number 8 _____________2.765_____2.745_____2.685______2.805 With rounding, I need: Exhaust valve - Number 1 - Number 2 - Number 3 - Number 4 _____________2.725_____2.675_____2.725______2.675 Intake valve - Number 5 - Number 6 - Number 7 - Number 8 _____________2.775_____2.75_____2.675______2.80 Thus, the shim from valve 2 will go to valve 1, the shim from valve 4 will go to valve 2, valves 5, 6, and 8 will remain untouched. I need to order the shims for valves 3, 4, and 7. Here is one small issue I have though. I'm about 90% confident in these measurements. However, I was able to read/infer some of the markings, and my shim measurements don't jive with the marks on some of the shims. Is it possible for shims to suffer wear and become slightly thinner? The differences I saw were on the order of 0.1mm. I'm not entirely sure if this is due to some systemic error in my digital thickness gauge or due to wear. That said, I did verify its correct functionality against my feeler gauges. It is dependent on positioning/movement, but with the gauges, I was close to spot-on. I would hate the order the shims, wait 2 days, install them, only to find my valve clearances are not what I intended to put. |
|
|
|
|
August 24th, 2010, 03:00 PM
|
#35 |
|
ninjette.org member
Name: X
Location: Toronto
Join Date: Apr 2010 Motorcycle(s): 09 Ninja 250 SE Lime Green/Diablo Black Posts: 126
|
So found out a LOT of things today that I'll share.
The FSM has a huge range of possible shims, with part numbers for them. They basically move in 0.025 increments. Oddly though, the x.5 and x.0 have sequential part numbers, while the x.(2/7)5 shims have their own sequential part numbers. Turns out, there's a reason for this. You can't order shims that are in between the x.5 and x.0 increments. Neither Kahuna nor CheapCycleParts have them. So basically, you can only get shims that change in 0.5mm increments. So this had implications for what valves I would actually adjust. As a result, I am definitely NOT touching the intake valves. Intake 7 was a possible candidate for a new shim, but only with a 0.025mm drop. Since that's not possible, I'm leaving it as is. Also, exhaust 4 will remain untouched. So I needed to adjust exhaust valves 1-3. I took all of my tappets and shims (in individually labeled plastic bags) to Kahuna. When I called, they suggested I bring in the shims to have them swapped. I also brought my digital thickness gauge I bought from Princess Auto. Boy am I glad I brought everything. Turns out, my gauge is a piece of ****. It was off by 0.1-0.15mm. Had we not remeasured the shims using the mechanic's gauge, I would've ordered the wrong shims. I had a feeling when I first measured them yesterday, thank goodness I went with my gut! So we remeasured the exhaust shims, and swapped them accordingly. Here are the new values. Exhaust valve - Number 1 - Number 2 - Number 3 - Number 4 Lash = _________0.23_______0.20_______0.22_______0.28 Shim = _________2.83_______2.85_______2.88_______2.77 Total = _________3.06______3.05_______3.10_______3.05 So the shims I needed: Exhaust valve - Number 1 - Number 2 - Number 3 - Number 4 _____________2.805_____2.795_____2.845______2.795 So we swapped for two 2.80mm shims, and one 2.85mm shim. I suppose I could have swapped the number 4 shim too, but my understanding is that it's preferable to keep valves looser, especially for exhaust. Props to Kahuna for taking the time to help me out, and swap the shims for me. I bought a couple of spark plugs too, even though I didn't really need to (I was on the fence about changing my existing ones). Figured they helped me enough, so why not? Anyway, now that I have all my shims here at work with me, I'm going to measure them with our tools here and get the proper values. Such an ordeal, but glad its finally almost over! |
|
|
|
|
November 14th, 2010, 04:18 PM
|
#36 |
|
CVMA #74 WSMC #750
Name: Nemesis
Location: On the track
Join Date: Oct 2009 Motorcycle(s): All of them Posts: A lot.
|
Okay, I'm going to tackle this job for the winter and I have a stupid question to ask: Do I have to drain the oil to perform this job?
Man, pre-gen's were so much easier to work on. LOL! |
|
|
|
|
November 14th, 2010, 04:39 PM
|
#37 | |
|
ninjette.org guru
Name: .
Location: .
Join Date: Nov 2010 Motorcycle(s): . Posts: 331
|
Quote:
|
|
|
|
|
|
November 14th, 2010, 09:46 PM
|
#38 |
|
ninjette.org certified postwhore
Name: Paul
Location: Roanoke, VA
Join Date: Jun 2009 Motorcycle(s): 2008 Candy Plasma Blue 250R Posts: A lot.
|
Having done the valve check/adjust at least three times, I can honestly say it's certainly not necessary to drain the oil. If you're the right combination of tricksy and lazy, you can even get by without draining the coolant, but if you bump a hose the wrong way things will be getting very very green & slippery.
And for what it's worth, I STRONGLY advise taking all measurements a least twice, including the valve lash before you pull the cams and measuring the shims with a micrometer. The shim set I bought from Hot Cams varied about .015mm plus or minus the rated measurement and I've seen similar variances with other brands. The bright side of that is if you're patient, you can get considerably more precise with hitting the 'sweet spot' of the valve clearances.
__________________________________________________
Proud member of the Blue Army |
|
|
|
|
November 14th, 2010, 10:08 PM
|
#39 | |
|
ninjette.org guru
Name: .
Location: .
Join Date: Nov 2010 Motorcycle(s): . Posts: 331
|
Quote:
|
|
|
|
|
|
November 14th, 2010, 10:15 PM
|
#40 |
|
ninjette.org certified postwhore
Name: Paul
Location: Roanoke, VA
Join Date: Jun 2009 Motorcycle(s): 2008 Candy Plasma Blue 250R Posts: A lot.
|
Correct, our shiims are 7.48mm diameter. For clarity, the variance I was talking about was the thickness.
__________________________________________________
Proud member of the Blue Army |
|
|
|
 |
 Similar Threads
|
||||
| Thread | Thread Starter | Forum | Replies | Last Post |
| DIY - Accessing and adjusting idle mixture screws | VeX | 2008 - 2012 Ninja 250R Tech Talk | 71 | December 15th, 2017 03:38 AM |
| DIY - Checking valve lash on '08+ 250r (WITH pictures) | VeX | 2008 - 2012 Ninja 250R Tech Talk | 45 | September 16th, 2017 04:13 PM |
| issue adjusting the valves | extremez31 | 1986 - 2007 Ninja 250R Tech Talk | 5 | June 16th, 2014 10:16 AM |
| DIY - Adjusting the rear shock preload | noche_caliente | 2008 - 2012 Ninja 250R Tech Talk | 139 | April 6th, 2014 10:20 PM |
| !HELP! Adjusting Valves issues | 00v_Lucky | 2008 - 2012 Ninja 250R Tech Talk | 9 | June 14th, 2010 04:39 PM |
| Thread Tools | |
|
|


