
|
 February 24th, 2009, 05:01 PM
|
#1 |
|
Not on the rug... man
Name: Greg
Location: London
Join Date: Jan 2009 Motorcycle(s): 2009 Diablo Black Ninja 250r, 2009 Triumph Daytona 675 Special Edition Posts: 86
|
DIY - ebay universal fit / Bike It Trojan Style Indicator Mirrors
Ok 3rd DIY under way
 Thought an answer to a question on another thread would be better placed in it's own thread. I'll update with more pictures and complete it as a DIY soon as I get a chance So it says they are universal and that normally means that they don't fit anything in the universe lol (well at least not without a bit of tweaking) As is, out of the box, you can mount through the existing fairing holes BUT you cannot use the bracket on the reverse side. This bracket has 2 mount points for the mirrors and a 3rd mount point which connects to the top bolt in your console area (as your sitting on your bike, you should see 4 bolts in the cluster surround - the top 2 bolts - 1 at each side attach to this bracket) so it's kinda important to use this bracket. The bracket doesn't fit with the base of the new mirrors because the slots in the base are not wide enough to accommodate the tubed mounts of the bracket that poke through the fairing. These slots need lengthening towards the centre (so the gap between them decreases) as well as widening. I won't say how I modded the unit, I did it my way to save time. I have 14yrs experience under my belt of using power tools and even so if I'm honest, although nothing bad happened I was stupid for doing it this way. What you need to is........... Place the bracket though the fairing and hold the base unit up to it. Mark out (with a scribe or something) on the base unit where you need to elongate and widen the holes. (the entry point of the bracket cylinders into the base of the new mirrors) And then......... spend alot of time with some circular files or place the base unit in a vice and drill lots of small holes within that marked area taking care not to drill into end of the swingarm part of the mirror or put the mirrors in a jig and use a mill. The bracket also has a rubber compression mat between it and the underside of the fairing - you should really use this. BUT to do so, you will have to replace the bolts that come with the new mirror (they just pull out) with longer ones. They are M6 bolts. I used M6x50mm and something I highly recommend you do - go for something like slotted pan head screws or allen key bolts. Go for anything other than standard bolts that require a socket/spanner because there's no way you are gonna be able to grip the head of the bolt once it's been drawn into the housing of the base unit. You'll notice that the original mirror has a rubber cushion mat between it and the fairing too, you can use this, but then you'll need an even longer bolt and the base just sticks too far away from the fairing. It looks fugly!! I didn't use it (I just placed a thin layer of insulation tape on the side of the mirror base to at least provide some protection to the fairing and stop scratches) and you can see how far mine still sticks out from the fairing in the pictures below. The base of the new mirrors is longer than the original and it's also flat. The fairing at the mount point does curve away so there will be a gap and it's gets slightly bigger the more you move towards the front of the bike. You will also need to drill a hole in the fairing for the power lead to the indicators - 3.5mm drill bit will do the trick. Then because I had to drill an extra hole for that cable and it was a non-standard fit to the fairing (the gaps and I wasn't using 1 of the rubber mats) I used black silicon to plug up the inside of the base unit and to go around the outside and make it nice and watertight. The silicon is easy to apply, just squidge it with a gun into the gap, then wrap a rag around your index finger and gently run it along the gap between the base and fairing. A tiny tiny bit will spill on to the fairing after this. Use a rag to wipe that off. Then wet your index finger and gently run it along the same gap again for the finishing touch. I read on KF forums a post by beeline2000 and he had the ebay ones and he mentioned that his rattled above 60 or 70mph - so I wanted to be sure that when I mounted mine I wouldn't face this problem. I can't say for sure yet, but I'm fairly confident that these steps would prevent any rattling and prevent any leaks on to any of the cables/connections that are below that fairing. And I gotta say it feels rock solid and I haven't even tightened the main bolt that hinges the swingarm (4th picture - well it's in all of the first 4, but 4th looks directly down on it) Here's the pics of the left mirror and a front view at the end (but it's kinda wonky as the bike on a stand and I have not set the mirrors in their normal positions)
__________________________________________________
Ohlins Shock,Sato Rearset,Woodcraft Clipons,Pazzo Levers.Skidmarx-Hugger/DB Screen,RG Racing-Crash Protector/Tail Tidy,Camera,HIDs,LEDs Full Yoshi,Dynojet PC3,Urbane Intake,Bergman Spin On Oil Filter |

|

|
|
February 24th, 2009, 05:20 PM
|
#2 |
|
ninjette.org member
Name: Joe
Location: wisconsin
Join Date: Jan 2009 Motorcycle(s): 08 250 ninja Posts: 16
|
Looks good. I've been contemplating this mod and i think i'm going to go for it. Could you take some pics with a little more light involved please?
|
|
|
|
|
February 24th, 2009, 07:11 PM
|
#3 |
|
self wrencher
Name: john
Location: houston
Join Date: Dec 2008 Motorcycle(s): 08 250r and 07 600r Posts: A lot.
|
how is the visibility of this mirror compared to OEM? Any vibration?
|
|
|
|
|
February 25th, 2009, 12:40 AM
|
#4 |
|
ninjette.org member
Name: Jhaqui
Location: Earth
Join Date: Jan 2009 Motorcycle(s): 2009 Kawasaki Ninja 250R Posts: 83
|
Excellent work Greg!
 Thanks for the DIY, I have emailed them about delivery to Canada just waiting for a reply, just in case I screw up the ebay universal mirrors I'd like to get the same as yours. The ones on ebay has a bend where it mounts to the base, I want to straighten it out a bit or as much as I can to try to get a similar angle like yours. question have you finished wiring them? Thanks for the DIY, I have emailed them about delivery to Canada just waiting for a reply, just in case I screw up the ebay universal mirrors I'd like to get the same as yours. The ones on ebay has a bend where it mounts to the base, I want to straighten it out a bit or as much as I can to try to get a similar angle like yours. question have you finished wiring them? pics of what mine look like.   Stock mount I plan on drilling a hole through this 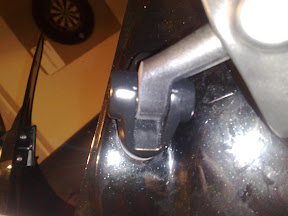 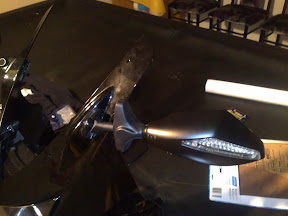 Stock 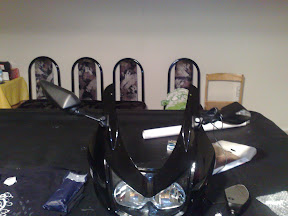 Ebay ones. Ebay ones.
|
|
|
|
|
February 25th, 2009, 12:04 PM
|
#5 | |||
|
Not on the rug... man
Name: Greg
Location: London
Join Date: Jan 2009 Motorcycle(s): 2009 Diablo Black Ninja 250r, 2009 Triumph Daytona 675 Special Edition Posts: 86
|
Quote:
DIY's add alot of time and effort to installs And at the minute I'm trying to install the woodcraft clipons, heated grips, ohlins shock, sato rear set, install and setup the rear view camera, wire in the flush mount indicators and indicator mirrors and I'm starting to play with the placement of my my reflective black lightning plus doing DIYs for the crash protectors, the camera and these mirrors. Better pictures and writeups with assessments of performance on the road will be added soon as I get a chance Quote:
Trust me when I say I'm desperate to get my bike off the stands and on the road, Soon as I know I'll edit the 1st post so it contains all the best and up to date info. Quote:
Is it me or is the one you have fitted to your bike up-side down. The orientation of the LED flasher is deffo reversed to the way mine is. Or maybe mine is the wrong way round lol 
__________________________________________________
Ohlins Shock,Sato Rearset,Woodcraft Clipons,Pazzo Levers.Skidmarx-Hugger/DB Screen,RG Racing-Crash Protector/Tail Tidy,Camera,HIDs,LEDs Full Yoshi,Dynojet PC3,Urbane Intake,Bergman Spin On Oil Filter |
|||
|
|
|
|
February 25th, 2009, 08:55 PM
|
#6 |
|
ninjette.org member
Name: Jhaqui
Location: Earth
Join Date: Jan 2009 Motorcycle(s): 2009 Kawasaki Ninja 250R Posts: 83
|
I don't know either lol. but I tried the other one on the same side and it still has that angle, I don' think it matters between the left and the right?
Just got back from my friends house it took him about 20 mins to get it straighter lol.. I mounted them like yours Greg and I'm happy with it for now but I'm still thinking of getting the same as yours. pics of how it looks now.  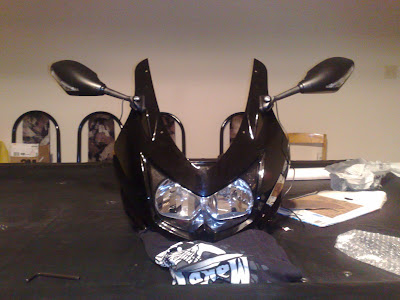
Last futzed with by watcanido; February 26th, 2009 at 12:40 AM. Reason: added pics |
|
|
|
|
February 25th, 2009, 09:36 PM
|
#7 |
|
ninjette.org certified postwhore
Name: Bob
Location: CA
Join Date: Dec 2008 Motorcycle(s): '08 Ninja 250r, '14 CBR500r Posts: A lot.
|
*tag*
(We should get a 'subscribe' button) |
|
|
|
|
February 25th, 2009, 09:37 PM
|
#8 |
|
ninjette.org member
Name: Joe
Location: wisconsin
Join Date: Jan 2009 Motorcycle(s): 08 250 ninja Posts: 16
|
Completely understand about the pics! That's alot of stuff to be adding to the bike and the temps getting warming for the most part. I actually ordered a pair and they're on their way. I'm pretty excited. Now i'll feel better about replacing the side markers with flush mount ones.
|
|
|
|
|
February 25th, 2009, 11:21 PM
|
#9 | |
|
ninjette.org dude
Name: 1 guess :-)
Location: SF Bay Area
Join Date: Jun 2008 Motorcycle(s): '13 Ninja 300 (white, the fastest color!), '13 R1200RT, '14 CRF250L, '12 TT-R125LE Posts: Too much.
Blog Entries: 7
|
Quote:
__________________________________________________
Montgomery Street Motorcycle Club / cal24.com / crf250l.org / ninjette.org ninjette.org Terms of Service Shopping for motorcycle parts or equipment? Come here first. The friendliest Ninja 250R/300/400 forum on the internet! (especially Unregistered) |
|
|
|
|
|
February 26th, 2009, 12:08 PM
|
#10 |
|
ninjette.org member
Name: Joe
Location: wisconsin
Join Date: Jan 2009 Motorcycle(s): 08 250 ninja Posts: 16
|
Got my mirrors today so i'll be working on those .YAY!!!!!
|
|
|
|
|
February 26th, 2009, 03:48 PM
|
#11 |
|
ninjette.org member
Name: Joe
Location: wisconsin
Join Date: Jan 2009 Motorcycle(s): 08 250 ninja Posts: 16
|
I installed the mirrors i got today. I was able to use the factory mount, so it went real smooth. Just a little grinding to get the new mirror to slide into the factory mount. I'll be wiring it tomorrow and will post pics!
|
|
|
|
|
February 26th, 2009, 09:02 PM
|
#12 | |
|
ninjette.org member
Name: Jhaqui
Location: Earth
Join Date: Jan 2009 Motorcycle(s): 2009 Kawasaki Ninja 250R Posts: 83
|
Quote:
|
|
|
|
|
|
February 27th, 2009, 12:27 AM
|
#13 |
|
ninjette.org member
Name: Joe
Location: wisconsin
Join Date: Jan 2009 Motorcycle(s): 08 250 ninja Posts: 16
|
I bought the same Trojan ones he did, but i got mine off ebay. I believe you used the stock mounting bracket on yours if i'm reading correctly. I did the same thing but mine aren't bent like yours, otherwise they look the same. I hope to have pics tomorrow or this weekend of them all hooked up. Yours don't look bad after you straightened them a bit.
|
|
|
|
|
March 11th, 2009, 01:45 AM
|
#14 | |
|
ninjette.org member
Name: Jhaqui
Location: Earth
Join Date: Jan 2009 Motorcycle(s): 2009 Kawasaki Ninja 250R Posts: 83
|
Quote:
|
|
|
|
|
|
March 23rd, 2009, 12:08 PM
|
#15 |
|
ninjette.org member
Name: Joe
Location: wisconsin
Join Date: Jan 2009 Motorcycle(s): 08 250 ninja Posts: 16
|
Here's a pic with the factory mounts on. You can see the wire a little bit. I really like it. I'm going to get flush ones for the fairings soon.
|
|
|
|
|
March 23rd, 2009, 01:29 PM
|
#16 |
|
ninjette.org certified postwhore
Name: Bob
Location: CA
Join Date: Dec 2008 Motorcycle(s): '08 Ninja 250r, '14 CBR500r Posts: A lot.
|
These would look great if they functioned as running/driving lights too....
|
|
|
|
|
March 23rd, 2009, 08:20 PM
|
#17 | |
|
ninjette.org member
Name: Jhaqui
Location: Earth
Join Date: Jan 2009 Motorcycle(s): 2009 Kawasaki Ninja 250R Posts: 83
|
Quote:
|
|
|
|
|
|
March 23rd, 2009, 09:10 PM
|
#18 |
|
ninjette.org member
Name: Joe
Location: wisconsin
Join Date: Jan 2009 Motorcycle(s): 08 250 ninja Posts: 16
|
They vibrate a little, but not to bad. It's not annoying or anything. I can see out of them as good as the stock ones, so no diff there. I like the look and they're very visible. It took a little bit to fit them, but not hard work and nothing that most can't do. I'm very happy with the result. I'll try to get a video made of them in action.
|
|
|
|
|
March 29th, 2009, 01:58 AM
|
#19 | |
|
ninjette.org member
Name: Darryl
Location: Brisbane, Australia
Join Date: Dec 2008 Motorcycle(s): 2010 Ninja ZX-6R Posts: 211
|
Quote:
|
|
|
|
|
|
March 29th, 2009, 09:34 AM
|
#20 |
|
ninjette.org member
Name: Joe
Location: wisconsin
Join Date: Jan 2009 Motorcycle(s): 08 250 ninja Posts: 16
|
The vibration is in the mirror part.I'm not sure how to fix that because i used the stock mounting brackets. It might just be the mirror design. The rod that connects the mirror to the bracket is plastic, not metal like the factory ones, so that might be a factor.
|
|
|
|
|
April 1st, 2009, 09:48 AM
|
#21 |
|
ninjette.org member
Name: Mike
Location: Barrie, Ontario, Canada
Join Date: Mar 2009 Motorcycle(s): 2009 Ninja 250R SE Green Posts: 217
|
hey guys, mirrors look great. i did an ebay search and nothing came up for me. could you provide a link to where you got them from? I only found one site but it looks like the light covers are yellow not clear...woudn't look that great on my green bike.
|
|
|
|
|
April 1st, 2009, 01:03 PM
|
#22 |
|
3 for street, 2 for dirt
Name: Katlyn
Location: San Francisco Bay Area (California)
Join Date: Mar 2009 Motorcycle(s): 2008 Can Am Spyder PE #1344 / 2009 Kawi KLX140L Monster Energy / 2009 Kawi Ninja 250R (RIP 8.23.09) Posts: 586
|
Has anyone figured out how to make these running lights? I like lights and I like being visible, however I have not been able to come up with much on where to add additional lighting on my Ninja. I saw a kit that will make your signal lights become running lights and hazard lights but then you may need to change the bulbs out to LEDs to keep from melting the housings. I've not been able to figure this all out yet. Any input?
__________________________________________________
Feel free to look me up on facebook. |
|
|
|
|
April 1st, 2009, 01:24 PM
|
#23 | |
|
Some weird Canuck!
Name: Greg
Location: Ontario - Canada
Join Date: Dec 2008 Motorcycle(s): '92 CBR250RR "Babyblade", 2008 Ninja 250R, 2001 CBR600F4i Posts: 209
|
Quote:
In order to get signal bulbs that are ALSO running bulbs you would need a dual filament bulb. The one set would be used for running lights in the same manner I mention above and the second filament running off the normal turn indicator signal. People probably have made an LED kit, but either way, It would not melt your housing. The LED kit will probably have a little circuit board and will modulate the voltage to the LED's making them brighter and dimmer for a turn indication. I'm sorry if that is confusing. I tried to make it sound simple.
__________________________________________________
I still like CBR's more  Just kidding. Just kidding.
|
|
|
|
|
|
April 1st, 2009, 01:28 PM
|
#24 | |
|
Not on the rug... man
Name: Greg
Location: London
Join Date: Jan 2009 Motorcycle(s): 2009 Diablo Black Ninja 250r, 2009 Triumph Daytona 675 Special Edition Posts: 86
|
Quote:
Of course this would mean that with these indicator mirrors that you have ambers on all the time and personally I would not recommend that. Ambers are for indicators, some car drivers have enough problems as it is with motorcyclists, best not to add to the confusion with having ambers on all the time. car driver pulls up to a junction and want to turn crossing your lane, he/she has a quick look, sees ambers on the bike, starts to pull out thinking your turning and hey presto you slam into the side of the car as for hazard lights, I can tell you about this. Had it installed yesterday and at last I can take the bike on the road and finish the DIYs http://www.acumen-electronics.co.uk/...and_Fit_19004# its a CAT 1.1 (not sure if that's a uk only standard) immobilzer/alarm and one of its extra functions is hazard lights, just have to hold 2 of the buttons on the remote and voila! I'll post a vid of everything soon It also has a configurable turn signal reminder on it, so say after 30 flashes it will start to bleep to remind you that the indicators are still on. Scared the **** out of me when the install guy tested it. Never heard an alarm so loud and piercing. Guys actually got tinnitus is his ears due to too many years installing these things.
__________________________________________________
Ohlins Shock,Sato Rearset,Woodcraft Clipons,Pazzo Levers.Skidmarx-Hugger/DB Screen,RG Racing-Crash Protector/Tail Tidy,Camera,HIDs,LEDs Full Yoshi,Dynojet PC3,Urbane Intake,Bergman Spin On Oil Filter |
|
|
|
|
|
April 1st, 2009, 01:32 PM
|
#25 |
|
3 for street, 2 for dirt
Name: Katlyn
Location: San Francisco Bay Area (California)
Join Date: Mar 2009 Motorcycle(s): 2008 Can Am Spyder PE #1344 / 2009 Kawi KLX140L Monster Energy / 2009 Kawi Ninja 250R (RIP 8.23.09) Posts: 586
|
I get what your saying about having the ambers on all the time, make sense. I'm just trying to find ways to be more visible, I figured some running lights would help with that. The Spyder has lights on it's front two fenders that are running lights and I really like that people can see those as well as my bright-ass headlights/foglights (not sure how they could miss me).
Maybe I can swap the amber LEDs out for white?? Thanks for the input on this. I'll have to give it some more thought.
__________________________________________________
Feel free to look me up on facebook. |
|
|
|
|
April 1st, 2009, 01:41 PM
|
#26 |
|
Join Date: Nov 2008 Posts: Too much.
|
|
|
|
|
|
April 1st, 2009, 01:46 PM
|
#27 |
|
3 for street, 2 for dirt
Name: Katlyn
Location: San Francisco Bay Area (California)
Join Date: Mar 2009 Motorcycle(s): 2008 Can Am Spyder PE #1344 / 2009 Kawi KLX140L Monster Energy / 2009 Kawi Ninja 250R (RIP 8.23.09) Posts: 586
|
Ah, yes... this was one of the ideas I was going to do to mine as well - just need to purchase the goods. I was going to use those flexible flat LED strips for under the tail. Thanks for sharing. I like it.
__________________________________________________
Feel free to look me up on facebook. |
|
|
|
|
April 1st, 2009, 01:51 PM
|
#28 | |
|
Not on the rug... man
Name: Greg
Location: London
Join Date: Jan 2009 Motorcycle(s): 2009 Diablo Black Ninja 250r, 2009 Triumph Daytona 675 Special Edition Posts: 86
|
Quote:
But there a lot of other options HID headlights - a much easier mod http://www.ninjette.org/forums/showthread.php?t=11413 relective stickers - again much easier, maybe time consuming if its alot of stickers and you want to get the symmetry just right addition lights like a guy already on the forums (i had a quick look but couldn't find the pic for you, but i think it might have been a user - oldguy or maybe g21-30 that installed extra fog lights at the front) additional LEDs - like kkim just beat me too lol bright helmets, there's alot of options
__________________________________________________
Ohlins Shock,Sato Rearset,Woodcraft Clipons,Pazzo Levers.Skidmarx-Hugger/DB Screen,RG Racing-Crash Protector/Tail Tidy,Camera,HIDs,LEDs Full Yoshi,Dynojet PC3,Urbane Intake,Bergman Spin On Oil Filter |
|
|
|
|
|
April 1st, 2009, 02:09 PM
|
#29 | |
|
3 for street, 2 for dirt
Name: Katlyn
Location: San Francisco Bay Area (California)
Join Date: Mar 2009 Motorcycle(s): 2008 Can Am Spyder PE #1344 / 2009 Kawi KLX140L Monster Energy / 2009 Kawi Ninja 250R (RIP 8.23.09) Posts: 586
|
Quote:
I like the thought of reflective stickers. I have reflective blue wheel strips that are HIGHLY visible. I am thinking of going the route of LEDs, possibly a LED chassis light kit or something to light up the bike at night. Now foglights... THAT'S a great idea!! Show me pics. I'd love to see if I could figure out how to do this on my Ninja.Thanks!
__________________________________________________
Feel free to look me up on facebook. |
|
|
|
|
|
April 1st, 2009, 04:00 PM
|
#30 |
|
Join Date: Nov 2008 Posts: Too much.
|
HID kits are running about $60 for our bikes... both hi and low lights included.
http://www.ninjette.org/forums/showthread.php?t=11413 |
|
|
|
|
April 1st, 2009, 05:17 PM
|
#31 | |
|
3 for street, 2 for dirt
Name: Katlyn
Location: San Francisco Bay Area (California)
Join Date: Mar 2009 Motorcycle(s): 2008 Can Am Spyder PE #1344 / 2009 Kawi KLX140L Monster Energy / 2009 Kawi Ninja 250R (RIP 8.23.09) Posts: 586
|
Quote:
__________________________________________________
Feel free to look me up on facebook. |
|
|
|
|
|
June 12th, 2009, 12:52 PM
|
#32 |
|
3 for street, 2 for dirt
Name: Katlyn
Location: San Francisco Bay Area (California)
Join Date: Mar 2009 Motorcycle(s): 2008 Can Am Spyder PE #1344 / 2009 Kawi KLX140L Monster Energy / 2009 Kawi Ninja 250R (RIP 8.23.09) Posts: 586
|
I purchased these mirrors and am waiting for them to arrive and for my bike to get back from the repair shop after my little accident.... was curious on if any resistors had to be added for the signals to operate properly?
I also plan on putting on standard flush mounts to replace the broken signal on my bike.
__________________________________________________
Feel free to look me up on facebook. |
|
|
|
|
June 14th, 2009, 03:51 PM
|
#33 | |
|
Not on the rug... man
Name: Greg
Location: London
Join Date: Jan 2009 Motorcycle(s): 2009 Diablo Black Ninja 250r, 2009 Triumph Daytona 675 Special Edition Posts: 86
|
Quote:
I can only speak for my setup, LED rear, LED flush and LED mirrors and the resistors (a pair for left and right at the rear and a pair for left and right at the front) - by removing an indicator and/or resistor I'd get varying results. for example removing both indicators from one side at the front would increase the flash rate on both sides and the side which still had a full compliment of indicators would ghost flash at the rear if the opposite side was indicating another example was during my initial setup - stock bulbs at the front (no LED mirrors yet) and after installing the LED rears, I noticed that even with resistors nothing would flash as I'd stripped the bike down and had the front's disconnected. Connected the stock front indicators back up and all worked well. As a little tip for the flush indicators, I highly recommend getting some that can still be seen from the front. My flush sit inside the hole left after removing the stock front so can only be seen from the side and I was relying on the the LED mirrors to provide frontal indication. BAD move! During daytime the mirrors aren't bright enough and aren't front facing enough either. At least with the position I have them set in (which I'm guessing wouldn't be that different from most people) they kinda point down a bit. and I've had a number of instances now when someone pulls across the junction from a minor road blocking me from turning right even though I have right of way and my indicators on in plenty of time. I've also noticed that if I'm indicating to turn and stuck behind a car I can't see the LED mirror indicator reflecting off the rear of the car. See the pic below These should only be considered as suplementary front indicators and I have bought another pair of flush to stick on the front as a result of too many people not seeing me indicate right (I drive on the left) during the day. hope this helps
__________________________________________________
Ohlins Shock,Sato Rearset,Woodcraft Clipons,Pazzo Levers.Skidmarx-Hugger/DB Screen,RG Racing-Crash Protector/Tail Tidy,Camera,HIDs,LEDs Full Yoshi,Dynojet PC3,Urbane Intake,Bergman Spin On Oil Filter Last futzed with by Gregular; June 28th, 2009 at 10:36 AM. |
|
|
|
|
|
June 16th, 2009, 02:47 PM
|
#34 |
|
3 for street, 2 for dirt
Name: Katlyn
Location: San Francisco Bay Area (California)
Join Date: Mar 2009 Motorcycle(s): 2008 Can Am Spyder PE #1344 / 2009 Kawi KLX140L Monster Energy / 2009 Kawi Ninja 250R (RIP 8.23.09) Posts: 586
|
Thank you, I will keep that in mind.
__________________________________________________
Feel free to look me up on facebook. |
|
|
|
|
June 28th, 2009, 10:50 AM
|
#35 |
|
Not on the rug... man
Name: Greg
Location: London
Join Date: Jan 2009 Motorcycle(s): 2009 Diablo Black Ninja 250r, 2009 Triumph Daytona 675 Special Edition Posts: 86
|
Wanted to add these pics to the first post but I'm not able to edit it anymore so I'm gonna have to post them here.
view of underside of fairing with the mirror fitted, note the rubber compression thingymebobby and the 2nd just to show the hole hat you need to make for the wiring to the LEDs once mirrors are secured to the fairing, the bracket will then need to be reattached to these mounting points view of both mirrors fitted to the frame Fully installed, note that LED's aren't completely forward facing. I would not recommend relying on these as your only front indicators
__________________________________________________
Ohlins Shock,Sato Rearset,Woodcraft Clipons,Pazzo Levers.Skidmarx-Hugger/DB Screen,RG Racing-Crash Protector/Tail Tidy,Camera,HIDs,LEDs Full Yoshi,Dynojet PC3,Urbane Intake,Bergman Spin On Oil Filter |
|
|
|
 |
 Similar Threads
|
||||
| Thread | Thread Starter | Forum | Replies | Last Post |
| DIY: Ebay universal gear indicator | jdoucet93 | 2008 - 2012 Ninja 250R Tech Talk | 83 | January 10th, 2018 12:08 PM |
|
|


