
|
 April 30th, 2010, 06:38 AM
|
#1 |
|
ninjette.org newbie
Name: Dale
Location: Whitby, ON Canada
Join Date: Sep 2009 Motorcycle(s): 2005 suzuki M50, 2008 ninja 250r Posts: 5
|
Shogun No Cut Crash Kit Installation
Hi all, I just wanted to share my thoughts on the shogun frame sliders installation. This is the frame slider install part of the no cut crash kit. The swingarm spool installation and bar end installation will follow.
The no cut crash kit contains... 2 brackets which the sliders are mounted 2 pucks, one bigger than the other 2 mounting bolts 1 set of bar ends with mounting hardware 1 set of spools and mounting hardware -1 or 2 shogun stickers - no instruction sheet, just down load online http://fatbikez.com/shogun-frame-sli...tructions.html Installation is somewhat complicated unless you get the instructions, i have attached the instructions that was never provided in the box that was sent. NOTE: The brackets are mounted to the frame at the same location as the engine. A jack must be used FIRST to support the engine BEFORE the removal of the stock engine bolts and replaced with the longer shogun bolts. Not a big issue but I had to cut the sprocket cover to fit the lower mounting point of the left bracket. That negates the no cut aspect of the sliders. First: Place the bike on stands, this has been covered in great detail on the forum NEXT: Remove both the left and right fairings, this has been covered in great detail on this forum NEXT: Lay out the brackets on a soft material so that they are not scratched. 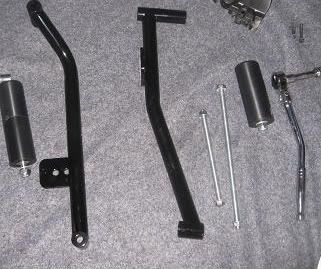 Next: MARK the shift linkage spline with a marker before removing the shift linkage. Notice to the right of the red circle i have marked the spline with a black marker so that the line matches the gap. The will save you time later when connecting the linkage back up. 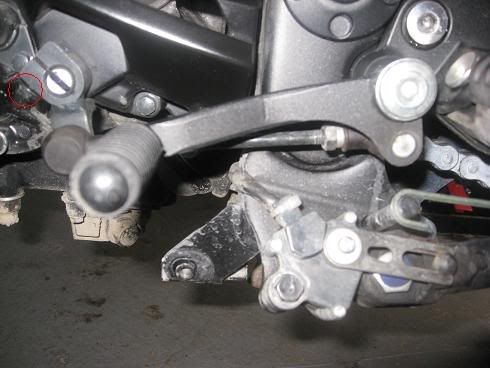 Next: Remove the bolt from the linkage and gently pull the linkage away fromt the spline. 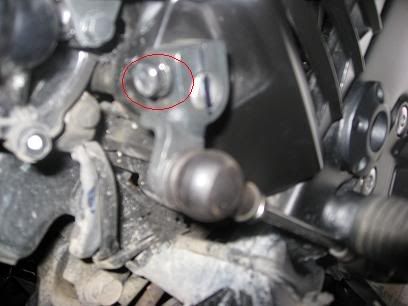 Next: Remove the bolts from the sprocket cover. I believe the whole in the left circle is just an indentation in the cover and it has no bolt. Do not ask me how i know this. 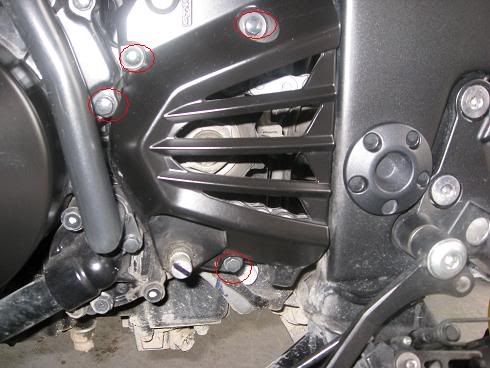 Next: Gently pull the shaft cover out to expose the lower engine mounting bolt 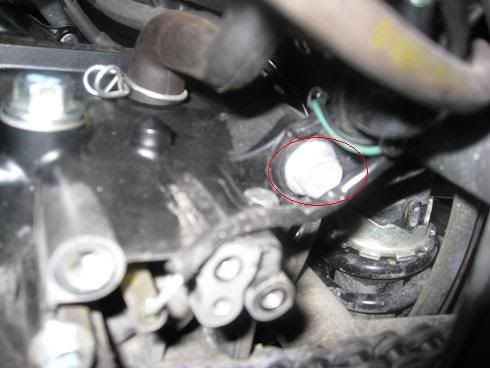 Next: USe a jack or something to support the engine. I used my jack and placed a hockey puck on it so that the engine would not get scratched. 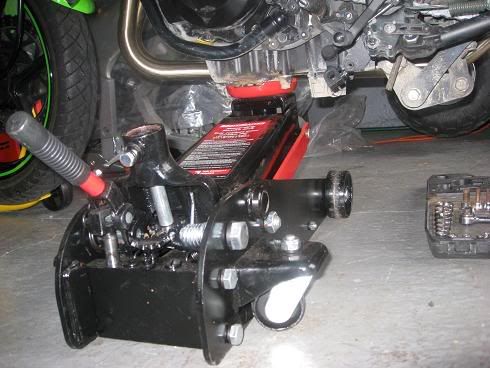 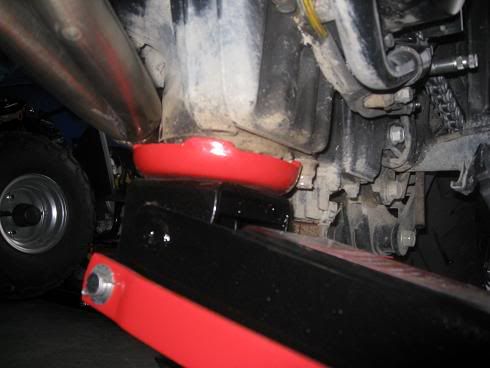 Next: Locate the engine bolts and loosen them. It helps if you have 2 people so that the bolts can be loosened. upper left 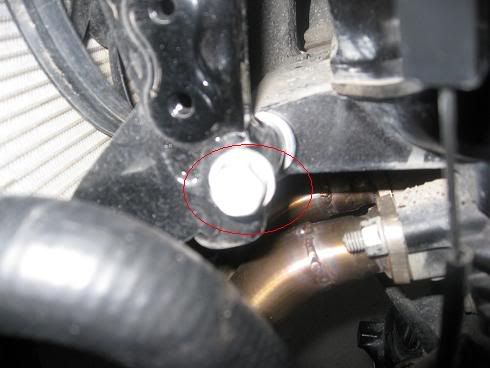 lowerleft upper right 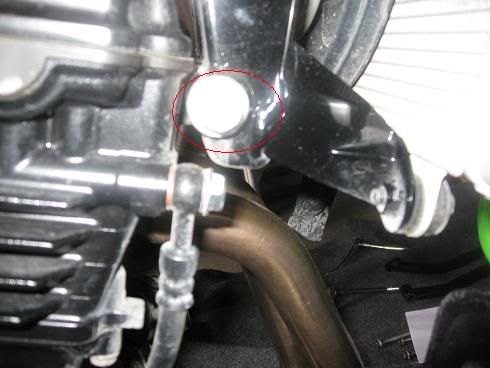 lower right  Next: Remove the upper mounting bolt 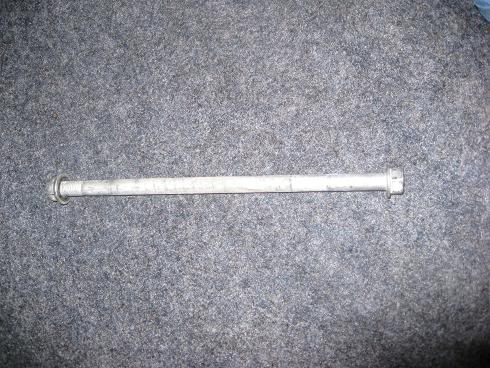 Next: Locate the shogun long mounting bolt, nut and the left bracket. To locate the left bracket, see the marked ls or rs on each bracket, pick the ls bracket 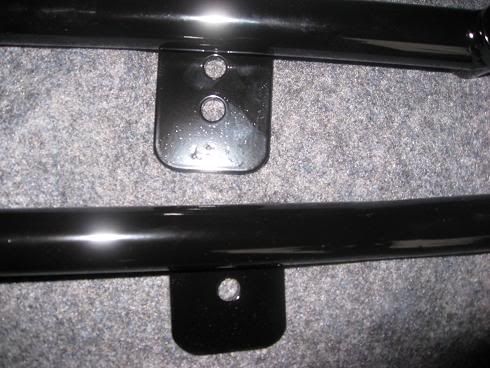 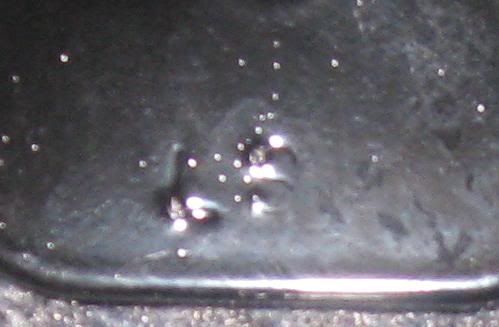 Sorry for the bad pic but the flash obscurred the markings. 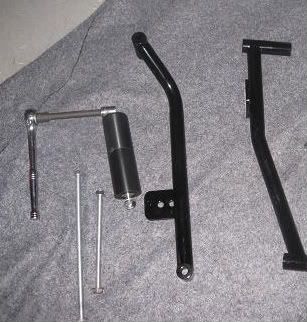 Next: Loosely mount the left bracket as per the shogun instructions... Pres down on the radiator hose so that the bolt can pass though the bracket. 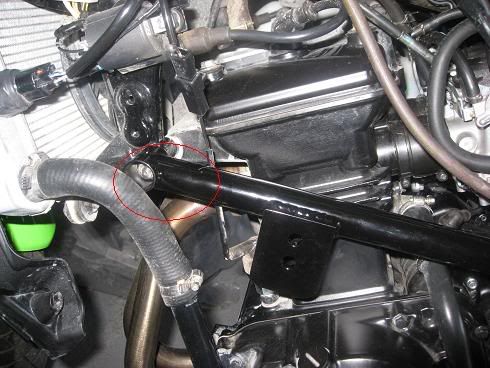 Next Remove the lower engine bolt and nut. Next: Still on the left side, raise the lower end of the shogun bracket and loosely mount it using the smaller shogun bolt. 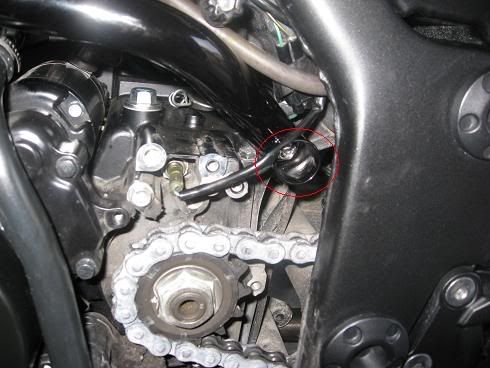 Next: Mount the right bracket 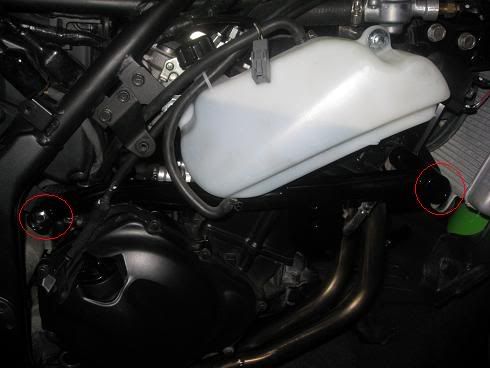  Next: Torque the shogun hex nuts to 40ft lbs. It helps to have 2 people here so that pictures can be taken. See step 7 in attached documents. If you want, you can now lower and remove the jack at this point. Next: The shogun "no cut" cut section... You will need a hacksaw, painters tape or some other type of tape and a marker. I also used a round and a flat foil  I forgot to take a picture of the pre taping but see section 8 and 9 in attached documents. This sounds difficult in the instructions but it actually very easy step. I cut the sprocket cover a bit smaller than the spec with two cuts. As the cuts got closer, i angled the blade to meet the second cut. I then used the round foil to complete the cut and to smooth out the edges. The end result is below.  Next: Prefit to ensure that there is clearance. IF okay then remove the tape, foil the edges. I had some black paint from my old bike and painted the edges of the cut. Waited for that to dry. Next: Mount the sprocket cover and torque to service manual specs, 87 INCH pounds or 7.25 foot pounds which ever you prefer, just be careful not to over torque the bolts! 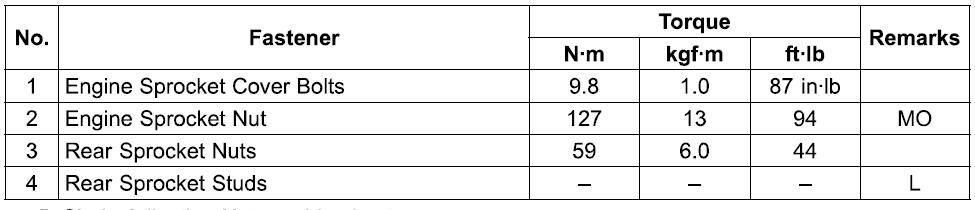 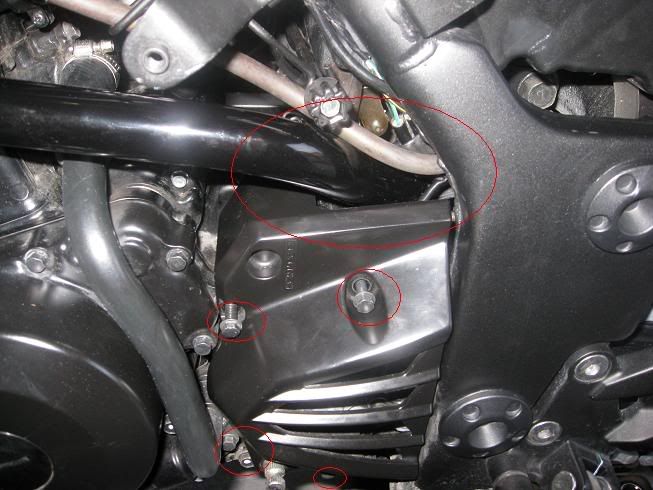 The large circle shows how close the fit actually is. 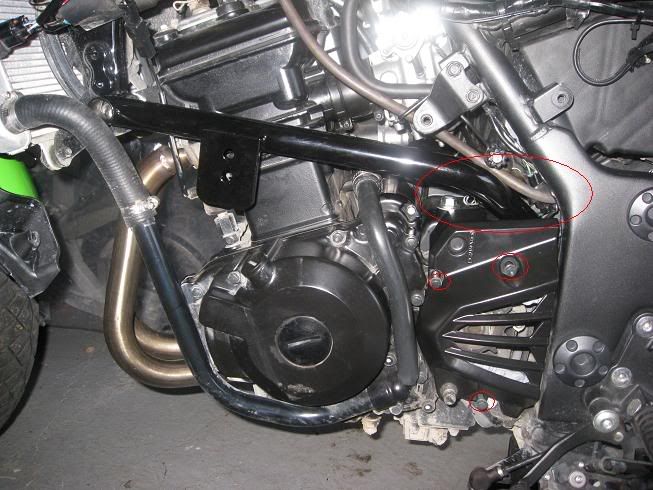 Looking at the pictures, i think i need to clean the bike... Next: Mount the linkage to back onto the shaft and re-align the mark on the spline with the opening on the linkage. Torque the linkage bolt to 104 INCH pounds or 8.67 foot pounds whichever you prefer, just be carefull not to over torgue the bolt. 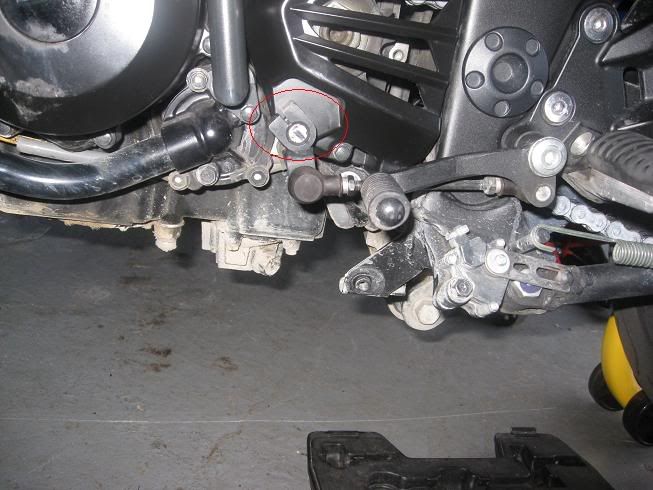 Next: mount the pucks, DO NOT FORGET that the left puck is longer than the right. One washer goes under the head of the bolt and another washer goes under the hex nut. Torque down to 40 lbs. 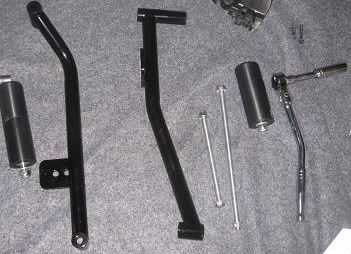 Sorry i cannot find my images of this, next time i take the fairing off i will update the thread. It was late at night. Next: Mount the left and right fairings as covered on this forum. Do not forget to plug the turn signals in. Be carefull as now you have to fit the pucks through the fairing openings. Be sure that the pucks are not touching the fairings. If a puck is touching the fairing, you may have to adjust the engine bolts or fairing brackets. See image below, just above the large red circle. Next: Lower the bike off the stands as covered in this forum. 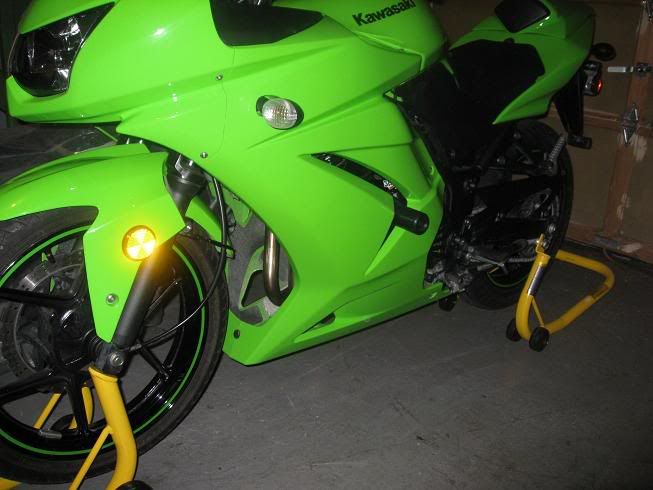 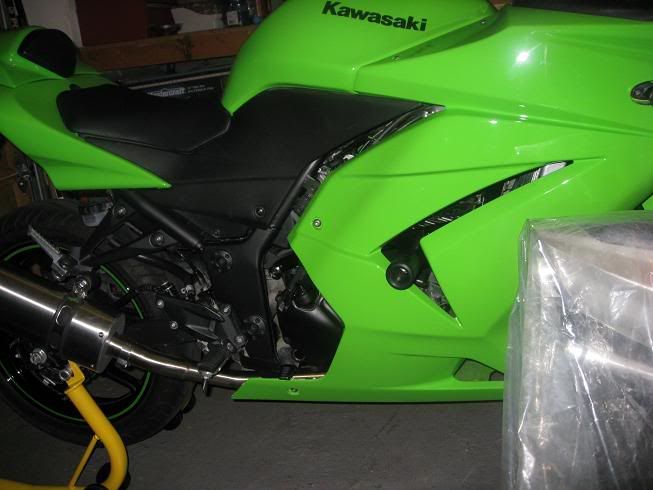 Overall, i am pleased with the sliders, i just hope that we never have to use them. Notes... - The upper and lower engine bolts just slid right in as the jack used took all pressure off the stocks bolts. If the engine is jacked to high or not high enough, there will be binding issues. - The bolts are of lower quality. I was a little uneasy about that. I may even try to find an equivalent but stronger bolt in the future. -Paint the bolts before installation as part of the bolt is exposed. - check the radiator hose that there is still clearance between the the radiator hose and the left shogun upper mounting bar. |

|

|
|
April 30th, 2010, 11:39 AM
|
#2 |
|
ninjette.org newbie
Name: Dale
Location: Whitby, ON Canada
Join Date: Sep 2009 Motorcycle(s): 2005 suzuki M50, 2008 ninja 250r Posts: 5
|
Shogun No Cut Crash Kit Installation
Swing Arm Spool Installation...
The shogun swingarm spools installation is straight forward, the following items are included in the spool kit. -2 10mm bolts -2 spacers -2 spools 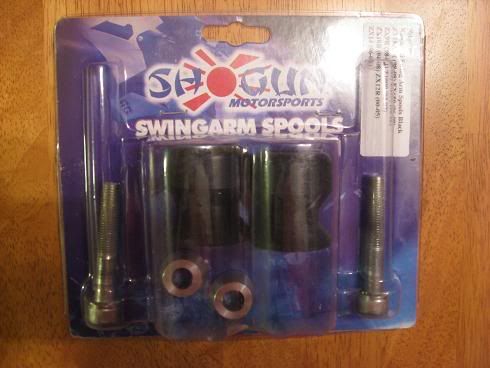 However you will need the list of tools below... -torque wrench -5/16 allen bit or allen key - I tried to capture the type of head on the bolt but the flash kept skewing the image. I will do this during the day so that the image will be clear. -ratchet and extension is optional -blue or red loctite You will also need the torque specs from the service manual, see below 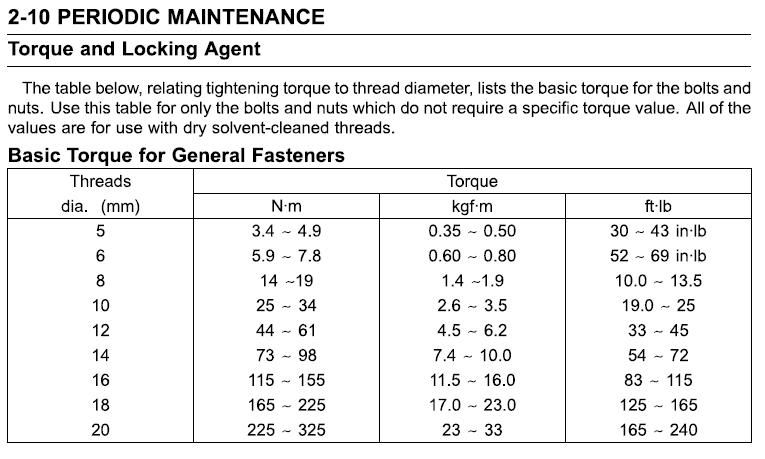 If you are interested in the types of loctite available... 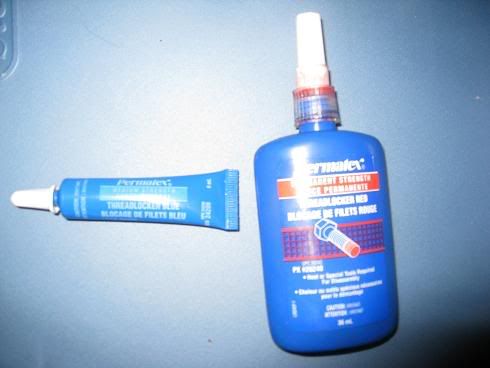 Step1: Place tools, spool kit and loctite on soft cloth, plastic or other material. Remove spool kit from package to assemble 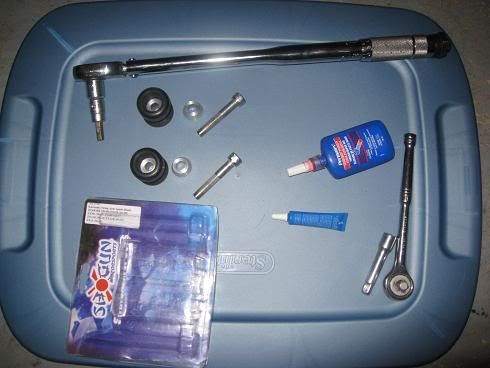 Step2: Assemble the spools as follows... Place a 10mm bolt through the top end of the spool, place a spacer through the bolt at the bottom of the spool. NOTE: the spacer is shaped so that the large end of the spacer MUST go on the bolt first so the the small end of the spacer makes contact to the swingarm. Next get out of the loctite, I used blue loctite and place a small amount over the threads of the bolt. 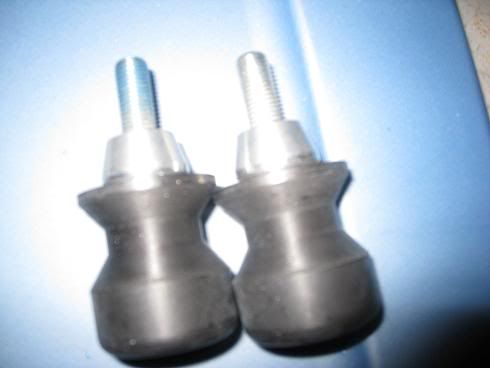 Step3: Locate the threaded hole in the swingarm to mount the spools 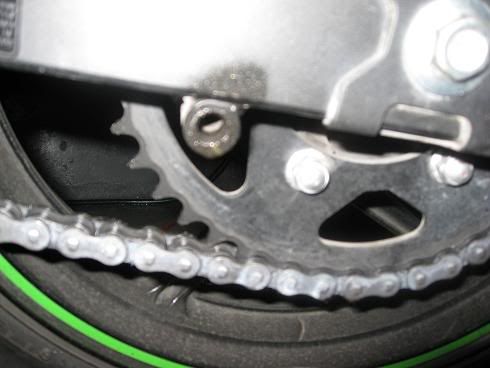 Step4: Screw in the bolt into the swingarm hole, due this by hand so the you donot cross thread the bolt and swingarm threads. 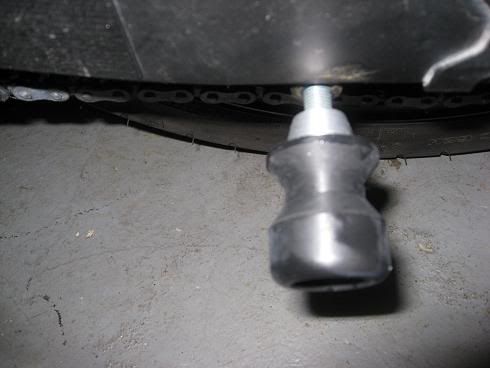 Step5: Use a ratchet or torque wrench to tighten the spools to the swingarm. Then use a torque wrench to tighten to 19-25 foots pounds of torque. 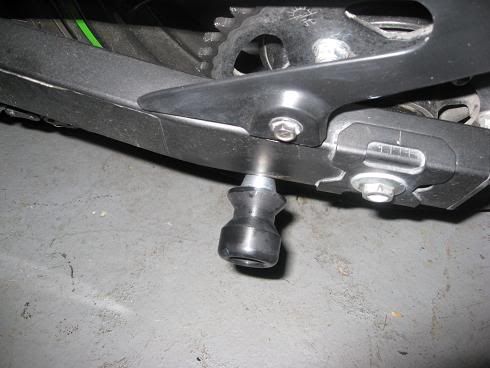 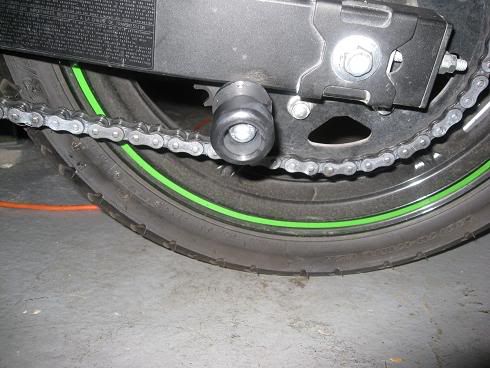 Step6: Perform the same steps for the other side of the swingarm... 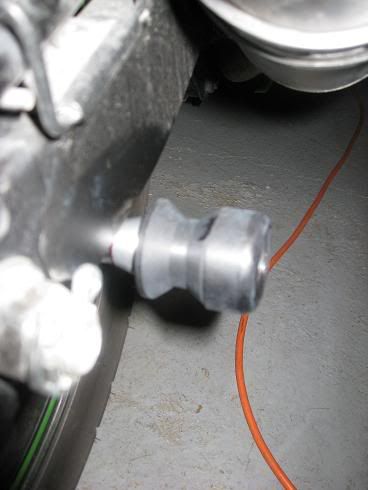 Step7: Now the bike is ready for mounting on a stand... This has been covered on another thread. 
Last futzed with by 08ninja250r; May 3rd, 2010 at 05:05 AM. |
|
|
|
|
May 3rd, 2010, 05:06 AM
|
#3 |
|
ninjette.org newbie
Name: Dale
Location: Whitby, ON Canada
Join Date: Sep 2009 Motorcycle(s): 2005 suzuki M50, 2008 ninja 250r Posts: 5
|
BAR END Installation...
The shogun barend installation is straight forward IF you have the tools, the following items are included in the barend kit. -2 8mm bolts -2 bar ends 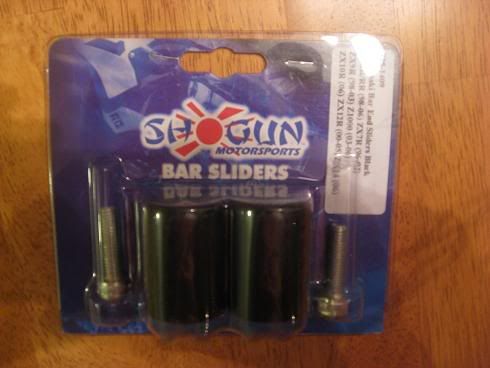 However you will need the list of tools below... -torque wrench -allen bit or allen key - -ratchet and extension is optional -blue or red loctite -heat gun, propane torch or soldering iron 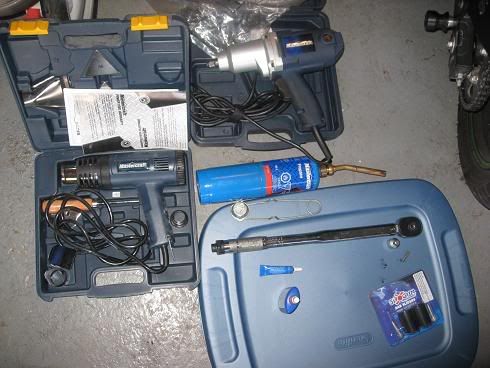 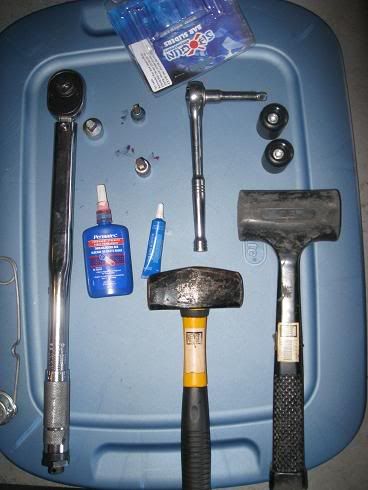 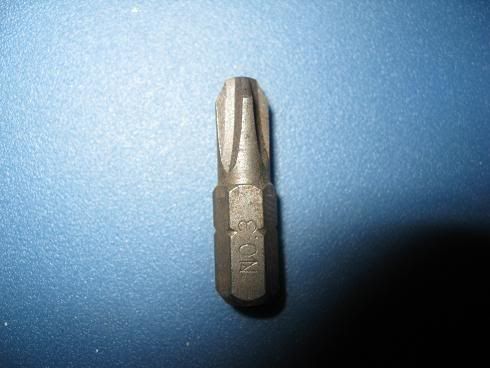 You will also need the torque specs from the service manual, see below If you are interested in the types of loctite available... Step1: Place tools, barend kit and loctite on soft cloth, plastic or other material. Remove barend kit from package to assemble  Step2: Assemble the barends as follows... Place a 8mm bolt through the top end of the barend. 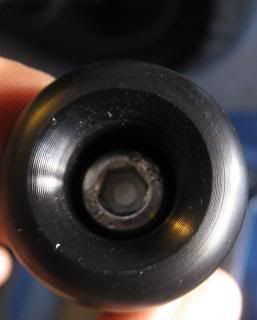 Step3:A little heat WILL be required to remove the bar ends as they are installed with red locktite from the factory. Heat will help break down the compound, otherwise you will damage the screw in the bar end. -IF you have a small propane torch adjust the flame as small as you can, then apply to the bar end. If you donot have a torch, use a heat gun or soldering iron to heatup the screw within the oem barend. -after the bar end heats up, use an impact hammer\drill and a #3 Phillips bit. I also have an air gun and compressor, so this part was easy. -if you have any issues, just try to smack it a few times. But please ensure you have some rubber or thin piece of wood to place over the barend before you smack it to loosen the oem loctite. If it doesn't move, heat it again and try again. -Eventually it will start to give and the screw in the bar end will come out. Next get out of the loctite, I used red loctite and place a small amount over the threads of the bolt. 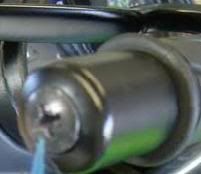 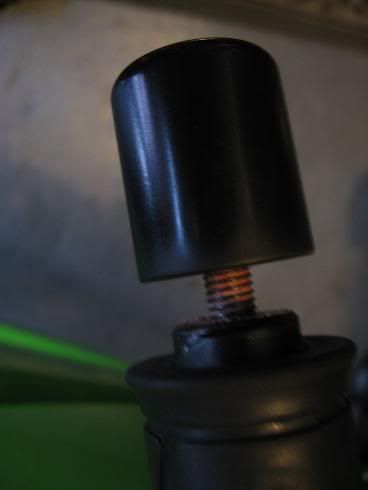 Step3: Locate the threaded hole in the handle to mount the shogun bar end 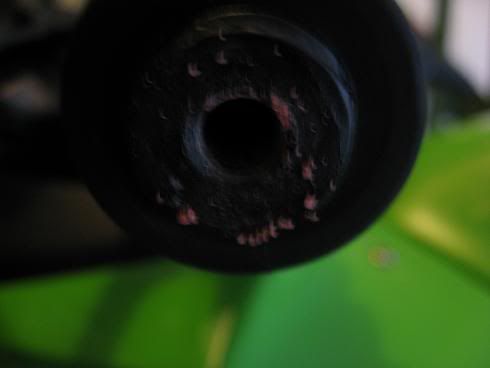 Step4: Screw in the bolt into the handlebar hole, due this by hand so the you donot cross thread the bolt and handlebar threads. 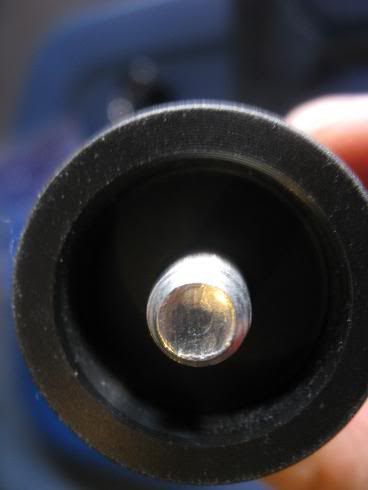 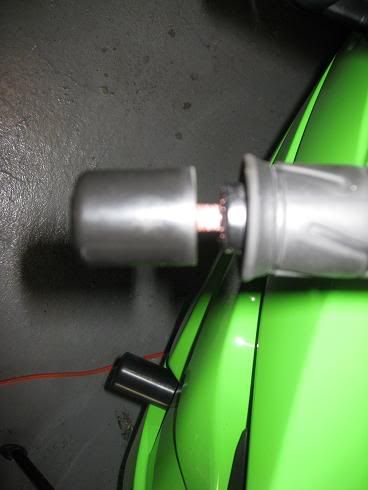 Step5: Use a ratchet or torque wrench to tighten the barends to the handlebar. Then use a torque wrench to tighten to 10 - 13.5 foots pounds of torque. This is a sample of the new barend mounted to the handlebar and the oem barend 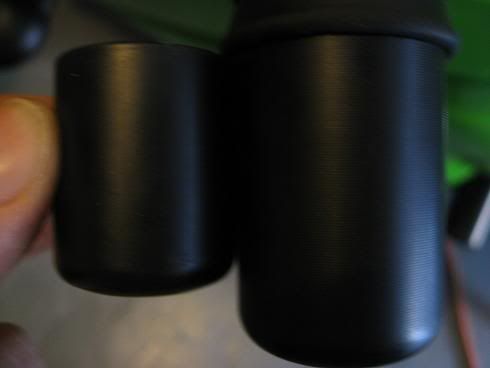 Step6: Perform the same steps for the other side of the handlebar... Overall i am please with the shogun kit but i do find that the barends are not heavy as the oem. I hope that this does not increase any vibration from the bike as i have no vibration currently in this bike. I will keep you posted after a few days of testing these out. Update: After changing the oem bar ends to the shogun bar ends I have decided to keep the shogun bar ends on for now. The shogun bar ends are a type of plastic which means they weigh less than the oem bar ends. I was suprised that the weight difference in the bar ends did not cause any vibration. Overall i am very pleased with the shogun crash kit. I just hope that i never have to test these things out. |
|
|
|
|
May 3rd, 2010, 11:51 PM
|
#4 |
|
ninjette.org dude
Name: 1 guess :-)
Location: SF Bay Area
Join Date: Jun 2008 Motorcycle(s): '13 Ninja 300 (white, the fastest color!), '13 R1200RT, '14 CRF250L, '12 TT-R125LE Posts: Too much.
Blog Entries: 7
|
Linked!

__________________________________________________
Montgomery Street Motorcycle Club / cal24.com / crf250l.org / ninjette.org ninjette.org Terms of Service Shopping for motorcycle parts or equipment? Come here first. The friendliest Ninja 250R/300/400 forum on the internet! (especially Unregistered) |
|
|
|
|
July 9th, 2010, 07:38 PM
|
#5 |
|
ninjette.org member
Name: b
Location: midwest
Join Date: Jun 2010 Motorcycle(s): 2008 ninja 250r Posts: 119
|
this tutorial was awesome. i did the bar ends and spools today. waiting to do the sliders when my roaring toyz links and blocks come in!
|
|
|
|
|
July 29th, 2010, 11:55 PM
|
#6 |
|
ninjette.org newbie
Name: Jiro
Location: Sopranos State
Join Date: Jul 2010 Motorcycle(s): 2003 BMW F650GS Posts: 1
|
before you do this - if you have a date with your gf, cancel it. the instruction makes it sound like an hour job. I do not own Ninja bike but I just worked on my friend's bike (2008 250R) couple days ago to install Shogun crash kit (just 2 spools). It took over over 6 hours. 08ninja250r's tutorial was a great help for me but I will add some details to it. I will explain what to expect and what to do. I'm borrowing 08ninja250r's pictures where I will edit the pictures to illustrate my point.
If you look very carefully at your shift linkage - it has 2 indented circles aligning together.  removing this sprocket cover took me a little more than an hour to remove!  It wouldn't budge at all. I tried everything - rope thru grills to pull it out. Mallet it. WD-40 it. My bare hands. Nothing. even pry bar. So I took a moment.... had my ginger tea because I had food poisoning a few days ago. I probed around closely with flashlight to see what was preventing it from budging. I figured it was some really strong silicone/glue so I used a thick screwdriver as leverage to move it loose. To my surprise - it worked. Be very careful to where you position your screwdriver. Make sure the wires are cleared from leverage. There is a small metal plate underneath that can serve as leverage for your screwdriver. make sure your screwdriver is thick and strong (mine's about 1/4" thick) because you'll have to use some muscle to budge it but it works. It wouldn't budge at all. I tried everything - rope thru grills to pull it out. Mallet it. WD-40 it. My bare hands. Nothing. even pry bar. So I took a moment.... had my ginger tea because I had food poisoning a few days ago. I probed around closely with flashlight to see what was preventing it from budging. I figured it was some really strong silicone/glue so I used a thick screwdriver as leverage to move it loose. To my surprise - it worked. Be very careful to where you position your screwdriver. Make sure the wires are cleared from leverage. There is a small metal plate underneath that can serve as leverage for your screwdriver. make sure your screwdriver is thick and strong (mine's about 1/4" thick) because you'll have to use some muscle to budge it but it works.  I pity ya'all if you don't have a Dremel to cut a piece of metal off the sprocket cover. BUY ONE! It's invaluable investment! Mine's older than your good ole' Yeller and it can do the damn good job anytime. Took me a couple min to cut it. The end result looks like a professional job. Wear your gloves and safety glasses when you do this!!! It's highly suggested that you grind the edge because it is sharp. Trust me - you'll want to take a moment to smoothen the edge with Dremel because chance is - at later date, you or your friend will probe around with your finger and you'll have a really nasty cut. For convenience purpose - you might want to install the spools first before you mount it because it is difficult to tighten the spool in this position (see pix below). And I highly recommended that you remove one engine mounting bolt and insert new bolt - one at a time. Don't remove both or you'll have trouble inserting new bolts. If you have difficulty in unbolting it - don't force yourself or you'll strip it. It has red loctite so use the heat gun/torch for about 20 seconds. It is good idea to put the aluminum foil around the area with a hole in center as you heat the hex nut. The wires could melt. One thing to note - I wasted probably 30 min trying to tighten it and the screw kept getting loosed. It confirmed 08ninja250r's suspicion - these bolts especially hex nuts that come with Shogun are low-quality CRAP CRAP CRAP! Use the hex nuts from engine mounting bolt. IMO - you can get rid of washer for hex nut because that hex nut from engine mounting bolt has "built-in" washer. Use loctite while you're at it.  before you put the sprocket cover back on - clean the dirt and grease on shift shaft and sprocket cover. Then apply some grease on shift shaft  when you're done with everything, tighten with caution on engine sprocket cover and shift linkage. These black bolts are somewhat soft. I hope this helps especially for first-timer like me! I certainly hope this would save you a couple hours.
|
|
|
|
|
November 9th, 2010, 11:58 AM
|
#7 |
|
ninjette.org guru
Name: Natalie
Location: La Puente, CA
Join Date: May 2010 Motorcycle(s): 2010 Kawasaki Ninja EX250 Special Edition Red/Black Posts: 455
|
Got a question about the frame sliders... you can remove the fairings without having to remove the puck, right? Answer seems obvious, but i just want confirmation.
Thanks
__________________________________________________
'10 Ninja 250R SE Red/Blk  Mods: Projekt D FE, Protons, HB Blk Windscreen, HIDs, TBR Blk Series Slip-On, Shogun Sliders, Solo Cowl, Integrated Tail Light, Gls Blk Rear Fender, Red Accents |
|
|
|
|
November 9th, 2010, 03:24 PM
|
#8 | |
|
self wrencher
Name: john
Location: houston
Join Date: Dec 2008 Motorcycle(s): 08 250r and 07 600r Posts: A lot.
|
Quote:
|
|
|
|
|
|
November 20th, 2010, 08:42 AM
|
#9 |
|
ninjette.org member
Name: Andy
Location: 11501
Join Date: Jul 2010 Motorcycle(s): VFR/250r/Gsxr 750 Posts: 74
|
Great job on the tutorial! It took me less than 30 minutes to install the sliders! Thanks so much!
|
|
|
|
|
August 2nd, 2011, 10:40 AM
|
#10 |
|
ninjette.org newbie
Name: Olav
Location: Toronto
Join Date: Jan 2011 Motorcycle(s): 2006 Ninja 250, 2010 Ninja 250, Honda ST1300 Posts: 2
|
Engine Bolts
Has anyone found a replacement for the engine bolts that come with the Shogun kit?
|
|
|
|
|
August 2nd, 2011, 01:49 PM
|
#11 |
|
ModMy250.com
Name: Tri
Location: St, Louis
Join Date: Sep 2010 Motorcycle(s): 2009 Ninja 250R, 2005 R6 Posts: A lot.
|
Why do you need replacements? If you need something that large, you can go to Fastenal or Grainger. If you have the dimensions, I can try to help you find them. You can also try McMaster-Carr.com. I bet Shogun will also sell replacements, but perhaps more expensive than the hardware stores I listed.
|
|
|
|
|
August 3rd, 2011, 07:58 AM
|
#12 |
|
ninjette.org newbie
Name: Olav
Location: Toronto
Join Date: Jan 2011 Motorcycle(s): 2006 Ninja 250, 2010 Ninja 250, Honda ST1300 Posts: 2
|
Just about to install the sliders and there seems to be much discussion on the lower/pooor quality of the engine bolts provided. If i were to describe threaded rod with nut welded on one end. Idea (could be wrong here and maybe don't need to) was to get better quality bolts for the install. I will need to exactly measure but they look to be about M8x245, could be M10x245
Last futzed with by inference; August 3rd, 2011 at 11:41 AM. |
|
|
|
|
August 3rd, 2011, 08:47 AM
|
#13 |
|
ModMy250.com
Name: Tri
Location: St, Louis
Join Date: Sep 2010 Motorcycle(s): 2009 Ninja 250R, 2005 R6 Posts: A lot.
|
I installed the kit w/o any problems so far. It's been at least 3-4 months with them on. I'm sure you can find a decent bolt at one of the places I mentioned above. Be aware that hardened steel will snap instead of bend like normal steel. The hardening process usually causes the steel to become brittle, but not so much that it will break apart on it's own. I'm just referring to an impact.
|
|
|
|
|
May 4th, 2012, 06:34 PM
|
#14 |
|
ninjette.org guru
Name: Richie
Location: Arkansas
Join Date: Apr 2011 Motorcycle(s): 2022 Honda CRF300L Rally, 2015 Ninja ZX6R 636, 2014 Ninja 1000, 2013 Ninja 300 (sold), 2011 Ninja 250R (sold) Posts: 479
|
Has anyone noticed the tight clearance from the left crash bar in relation to the radiator hose? I plan to keep an eye on mine over the next tank of gas in case it rubs during operation. I didn't see anything in the search about it. This thread helped a lot during the install. It took about an hour or so. The iPad makes a perfect workshop manual. No dog-eared, greasy pages. Nothing a little glass cleaner can't fix.
|
|
|
|
|
May 5th, 2012, 02:11 PM
|
#15 |
|
ninjette.org member
Name: JJ
Location: Cali
Join Date: Mar 2012 Motorcycle(s): 2009 Ninja 250 Posts: 127
|
For those that used a dremel, what bit piece did you use?
|
|
|
|
|
May 5th, 2012, 04:13 PM
|
#16 | |
|
ninjette.org guru
Name: Richie
Location: Arkansas
Join Date: Apr 2011 Motorcycle(s): 2022 Honda CRF300L Rally, 2015 Ninja ZX6R 636, 2014 Ninja 1000, 2013 Ninja 300 (sold), 2011 Ninja 250R (sold) Posts: 479
|
Quote:
|
|
|
|
|
|
June 24th, 2012, 09:28 PM
|
#17 |
|
Ninja Noob
Name: Craig
Location: Norwalk, CT
Join Date: Jul 2011 Motorcycle(s): 2008 Ninja 250R Candy Plasma Blue Posts: 128
|
why would the longer puck go on the left side? I was thinking that if it was on the right side it could offer some protection for the muffler.
|
|
|
|
|
June 25th, 2012, 04:40 AM
|
#18 | |
|
ninjette.org member
Name: Andy
Location: 11501
Join Date: Jul 2010 Motorcycle(s): VFR/250r/Gsxr 750 Posts: 74
|
Quote:
|
|
|
|
|
|
June 25th, 2012, 05:28 AM
|
#19 | |
|
ninjette.org guru
Name: Richie
Location: Arkansas
Join Date: Apr 2011 Motorcycle(s): 2022 Honda CRF300L Rally, 2015 Ninja ZX6R 636, 2014 Ninja 1000, 2013 Ninja 300 (sold), 2011 Ninja 250R (sold) Posts: 479
|
Quote:
|
|
|
|
|
|
June 25th, 2012, 06:35 AM
|
#20 |
|
ninjette.org certified postwhore
Name: Jason
Location: Jacksonville, Florida
Join Date: May 2010 Motorcycle(s): 09 Ninja 250R SE, 07 Honda CRF230F, 06 Honda CRF150F Posts: A lot.
|
Anyone having issues with the swing-arm spools contacting the exhaust muffler?
__________________________________________________
09 250R SE: Paying it forward one post at a time!   Don't forget to add yourself to our Member Map Don't forget to add yourself to our Member Map
|
|
|
|
|
June 25th, 2012, 06:41 AM
|
#21 | |
|
ninjette.org guru
Name: Richie
Location: Arkansas
Join Date: Apr 2011 Motorcycle(s): 2022 Honda CRF300L Rally, 2015 Ninja ZX6R 636, 2014 Ninja 1000, 2013 Ninja 300 (sold), 2011 Ninja 250R (sold) Posts: 479
|
Quote:
|
|
|
|
|
|
June 25th, 2012, 06:45 AM
|
#22 |
|
ninjette.org certified postwhore
Name: Jason
Location: Jacksonville, Florida
Join Date: May 2010 Motorcycle(s): 09 Ninja 250R SE, 07 Honda CRF230F, 06 Honda CRF150F Posts: A lot.
|
Actually I was using the HF version spools (which are shorter and thinner) with an Area P exhaust and the spools did rub on the swing-arm side of the exhaust can. I have since removed mine and only use them during maintenance.
__________________________________________________
09 250R SE: Paying it forward one post at a time! Don't forget to add yourself to our Member Map
|
|
|
|
|
November 28th, 2012, 09:10 AM
|
#23 |
|
ninjette.org newbie
Name: Alex
Location: Ontario, Canada
Join Date: Nov 2012 Motorcycle(s): None Yet Posts: 1
|
Just wanted to say thank you very much to everyone that posted their great tutorials and pictures! Very helpful, as well as great feedback and reviews on installation. Keep up the great work everyone.
I am looking at getting the Shogun no-cut 3 piece kit and was wondering where the best site is to pick up this kit if I am shipping to Canada? I have found many sites that stock the unit but am unsure of which is best to buy parts from. A lot of the sites seems to range from 67$ to over 200$; so I've been finding myself questioning the quality of the cheaper end parts. Any Help would be greatly appreciated. |
|
|
|
|
November 28th, 2012, 08:47 PM
|
#24 |
|
Razor's Edge
Name: Richard
Location: El Paso, San Antonio, Ennis...Texas
Join Date: Nov 2012 Motorcycle(s): 2007 Sportster XL1200C Posts: 196
|
This is a great installation guide.
My biggest fear is the sliders catching on an imperfection on the ground and tossing the bike around, or the frame bending if I were to go down hard. I would rather it just slide away. Any thoughts? I was actually looking at getting some until I heard some of these stories.
__________________________________________________

|
|
|
|
|
February 28th, 2013, 08:21 AM
|
#25 |
|
ninjette.org member
Name: Steve
Location: Toronto, Canada
Join Date: Feb 2013 Motorcycle(s): '13 GSX-R600, '09 Ninja 250, 04 SV 650 (track) Posts: 157
|
this is a great thread...I installed my frame slider kit on the weekend. The only difficult part was the left side. First, I had to take off the clutch cable mount to fit the right side bracket. Then, torquing the upper right nut was an issue, I could only get a 3/8" drive 9/16" socket to fit inside the tube and my 3/8" torque wrench settings don't go that high. I ended up torquing the upper bolt from the left side.
Last futzed with by Slick_Stevo; February 28th, 2013 at 12:08 PM. Reason: i'm a dumbass |
|
|
|
|
March 25th, 2013, 07:44 PM
|
#26 |
|
ninjette.org member
Name: Jon
Location: Missouri
Join Date: Feb 2013 Motorcycle(s): 09 250R Posts: 123
|
Just installed mine. Wasnt hard at all, although, my motor and the bracket (slide the upper bolt through) did not want to line up so it was a pain in the ass to get the bolt out but no biggie.
What is everyones thoughts on the crappy quality bolts? I didnt even think about seeing if the stock bolts fit or not. It seems like they work fine, although I havent ridden the bike yet. Will these actually protect the muffler? I have a yoshimura exhaust and it seems like if I were to lay the bike down on the right side, the spool slider and the lower corner of the muffler will hit before the frame slider makes contact with the ground 
|
|
|
|
|
March 26th, 2013, 06:06 AM
|
#27 |
|
ninjette.org guru
Name: Richie
Location: Arkansas
Join Date: Apr 2011 Motorcycle(s): 2022 Honda CRF300L Rally, 2015 Ninja ZX6R 636, 2014 Ninja 1000, 2013 Ninja 300 (sold), 2011 Ninja 250R (sold) Posts: 479
|
I don't think the stock bolts are long enough. If they were to spec higher quality bolts, they could shatter. I wouldn't count on frame sliders protecting your exhaust either. That's why they are called frame sliders.

|
|
|
|
|
September 15th, 2013, 07:05 PM
|
#28 |
|
ninjette.org newbie
Name: Israel
Location: Irvine, CA
Join Date: Jul 2013 Motorcycle(s): 2013 Kawasaki Ninja 300 ABS Posts: 2
|
Thanks just installed my shogun no cuts on my '13 Ninja 300 SE/ABS this afternoon! Here the pics.
|
|
|
|
 |
 Similar Threads
|
||||
| Thread | Thread Starter | Forum | Replies | Last Post |
| Shogun no-cut sliders for 08-12 NEVER INSTALLED | adouglas | Motorcycle-related | 2 | April 2nd, 2013 04:22 AM |
| WTB shogun crash kit/lowering kit | mz_twee | Items Wanted | 0 | April 16th, 2012 12:45 AM |
| Shogun Crash Kit or Just Sliders | subiegy2010 | 2008 - 2012 Ninja 250R Tech Talk | 26 | October 29th, 2009 05:25 AM |
| Shogun Crash Kit | Wade | 2008 - 2012 Ninja 250R Tech Talk | 6 | August 3rd, 2009 11:35 PM |
|
|


