
|
 November 11th, 2010, 12:32 AM
|
#1 |
|
Eddie
Name: Eduardo
Location: Colton, CA
Join Date: Jul 2010 Motorcycle(s): None. Posts: 53
|
DIY - Hotbodies Fender Eliminator
So I was in search of a fender eliminator kit. I know doing a self-chop of the stock fender is a cheap and easy way to get rid of the long thing, but I wanted a clean look.
I decided to purchase the Hotbodies Fender Eliminator Kit. I finally received the product only to find no set of instructions! =O I give them a call, and since its a rather new item, they were still in the making of one. I decided this is a perfect chance to do my first DIY for all you fellow Ninjette owners who were interested in this same kit, well here it goes.  1. First off, here are all the tools needed for this DIY. a. Philips Screwdriver b. 10mm Socket and Wrench c. Needle Nose Pliers d. 4mm and 5mm Allen Wrenches (Also included in your Kawasaki toolkit) (Not included in the pic: electrical tape, a dremel, and a pair of male connectors) 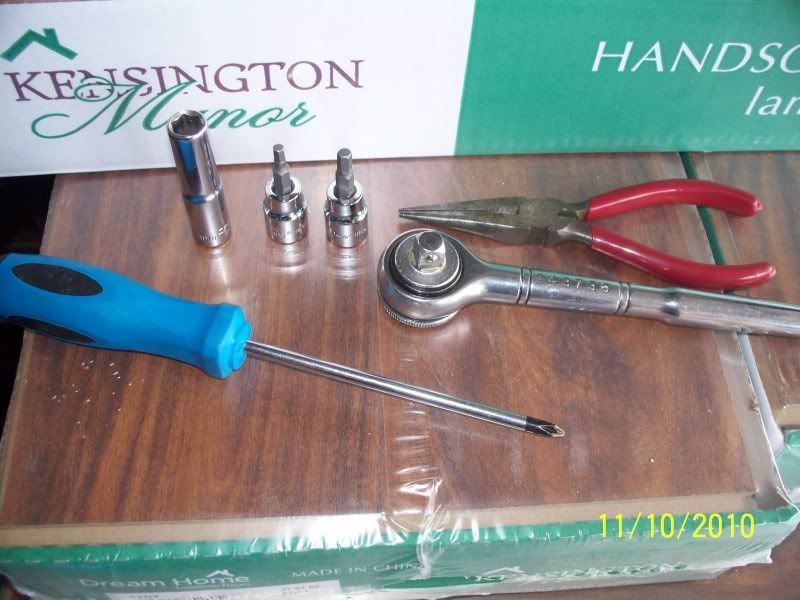 2. First things first, remove the black side panels, driver seat, passenger seat, and rear body fairings. (Will end up looking like this) 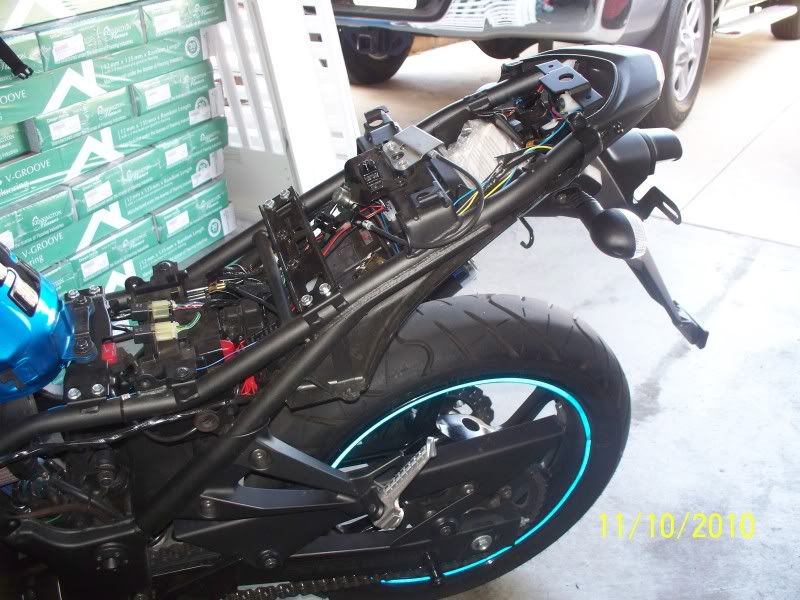 3. Next you want to remove all screws that hold your rear fender, and taillight. (6 in total) 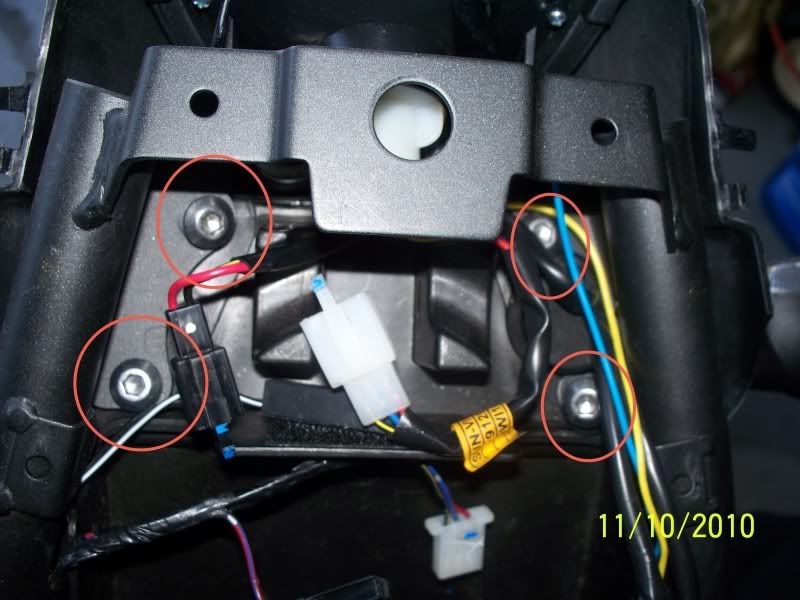 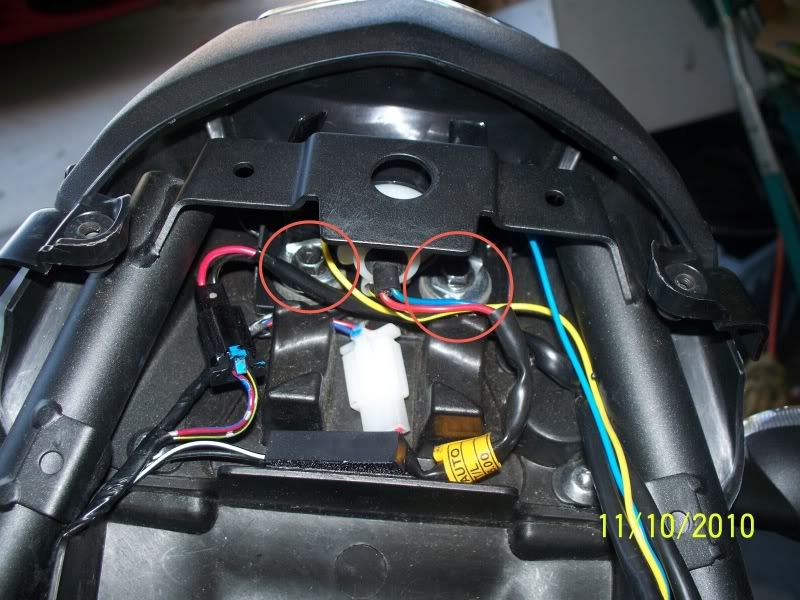 4. The only thing keeping your rear fender connected to your ninjette now is the wiring from the turn signals. Personally, I didnt want to keep those long rear turn signals, so I cut them right off and by doing so makes it easier for me to install my aftermarket turn signals when they come in. 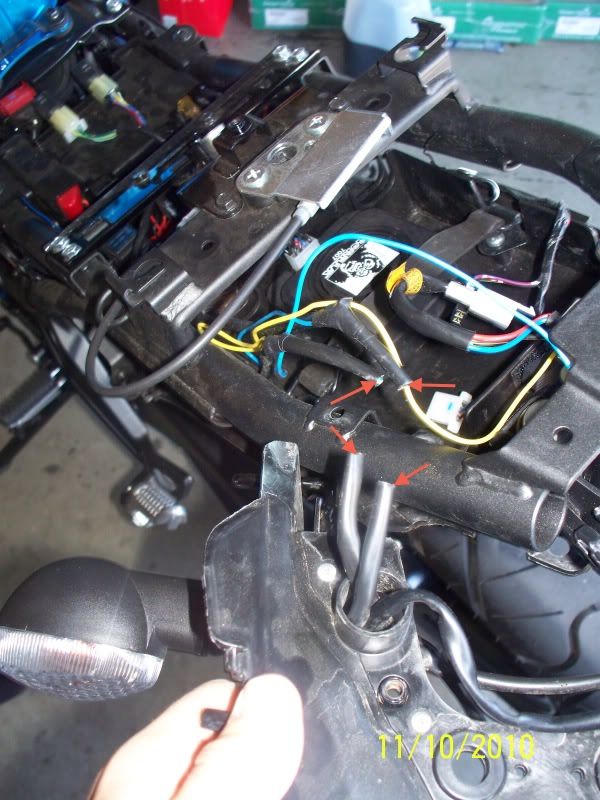 5. Of all pieces included with this kit, these 5 things were the only ones I used for the install. (Need I remind you I didnt have a set of instructions to work off of, so I did what I could and it ended up working very well) For the next step you only need the bracket that came with your kit (circled) 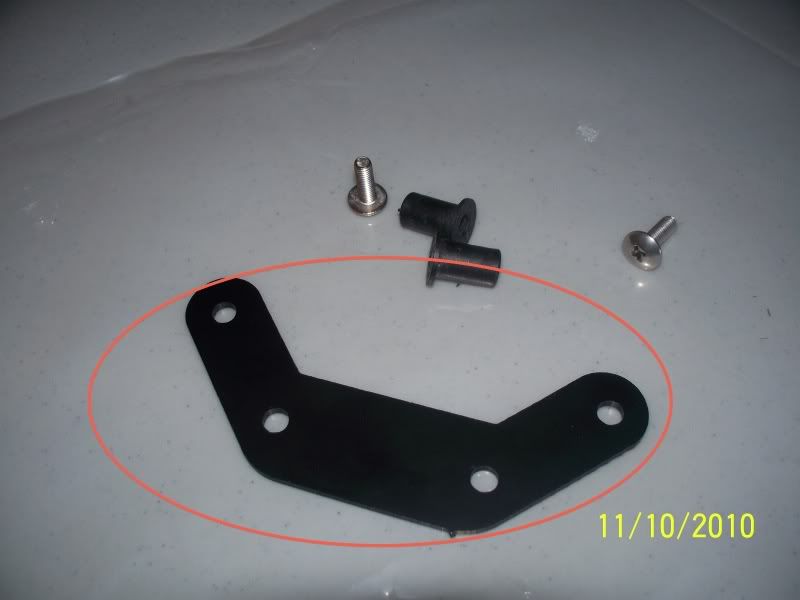 6. For this next part its a little difficult to explain so I hope you guys understand. I used the stock screws and that single black piece found on the under side of the fender (used for the screws to screw into) so all in all it looks like this. 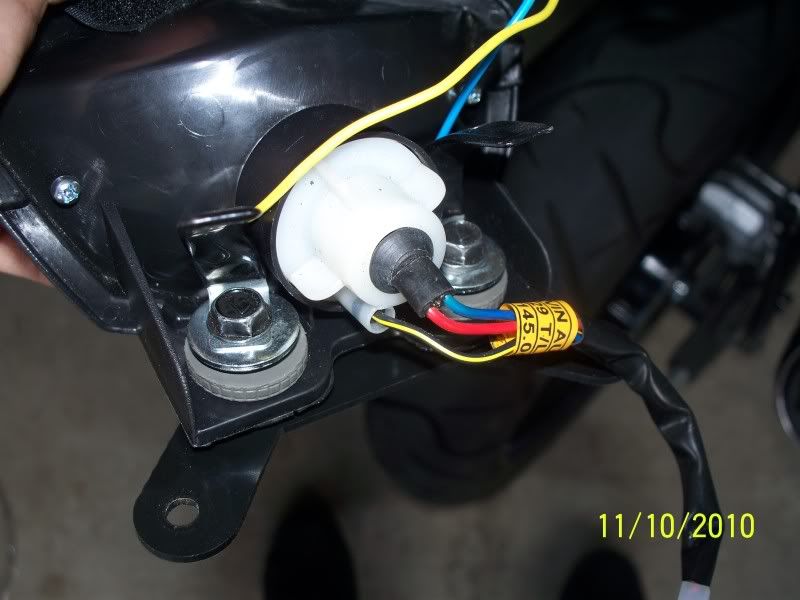 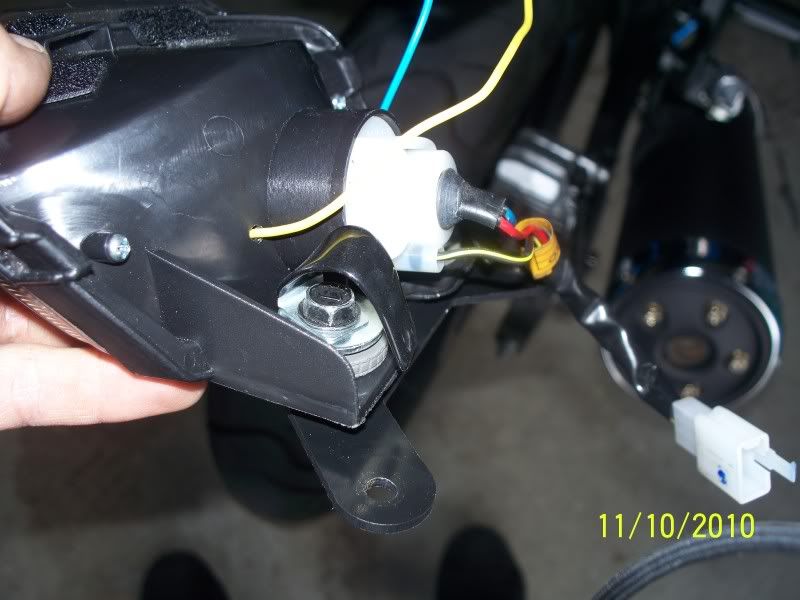 7. After installing the plastic bracket included with the kit, you want to screw your license plate to the included big black plastic piece. After that you want to screw everything together, your taillight, stock under tail, and the actual piece that came with the kit that contains the integrated led bulb and its what your license plate is no attached to. (I dont have a picture of it, but it is the biggest piece that comes with the kit) Here are pictures of how I did it (youll be left with 2 holes that arent needed, 1 on each side) 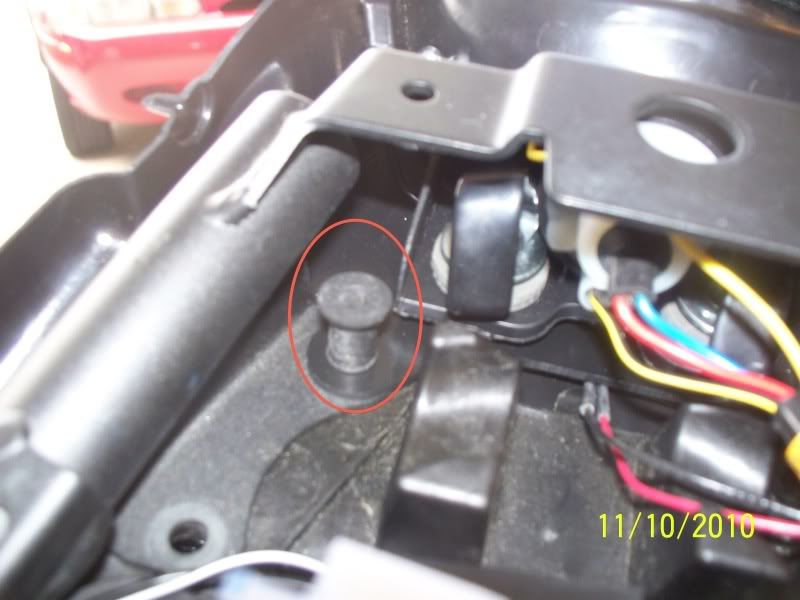 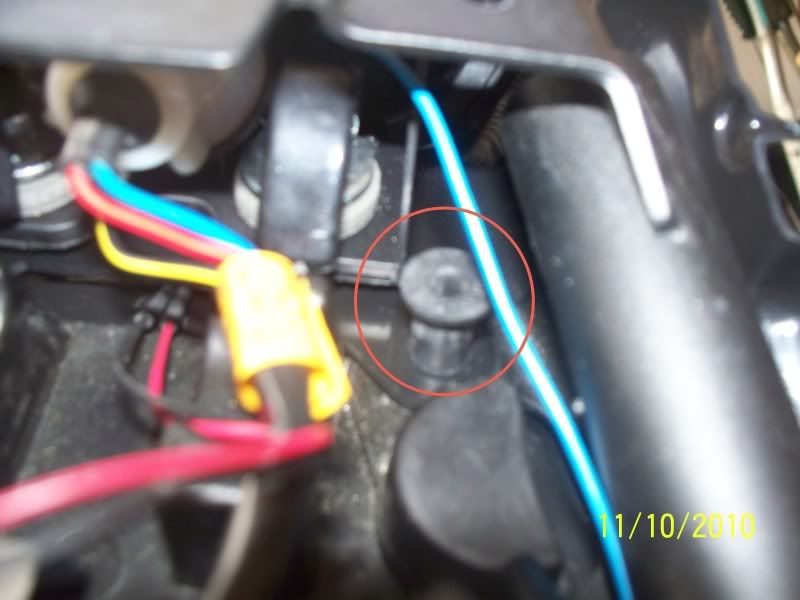 8. Now in order to connect the integrated led bulb, I used 2 male connectors (can be purchased from any local auto/hardware store) and stripped them down (using a dremel) to connect into the stock plug where the original license plate light connected. Here are some pictures of that. 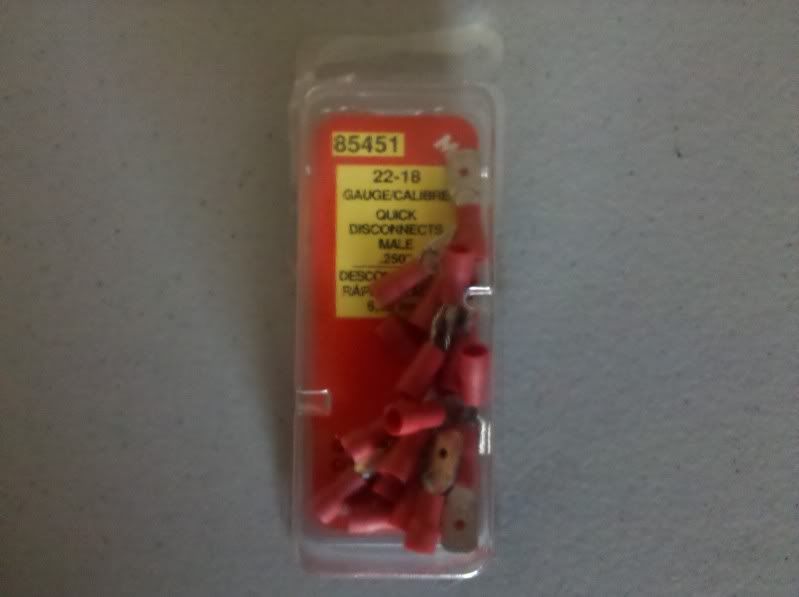 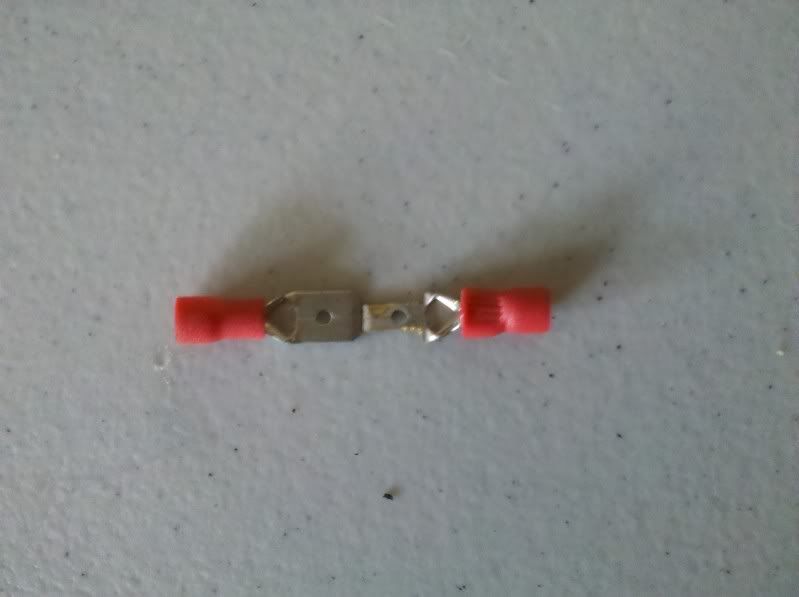 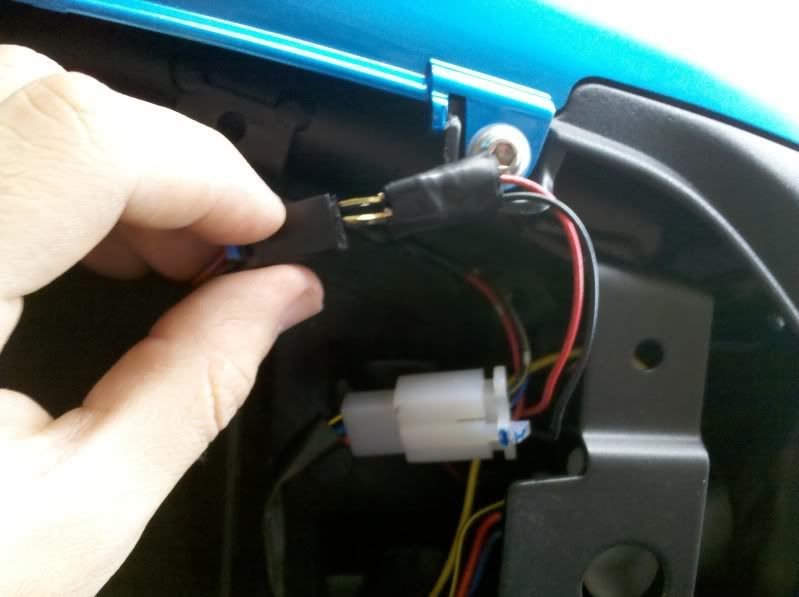 9. After that youre pretty much done! Put the rear fairings back on, driver and passenger seat, and the side panels, and voila! Here are some pics of the finished project!  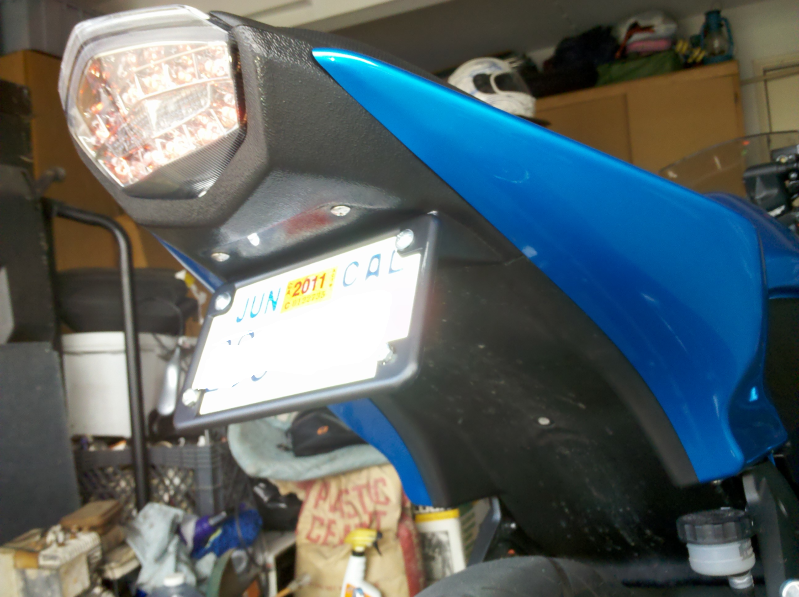 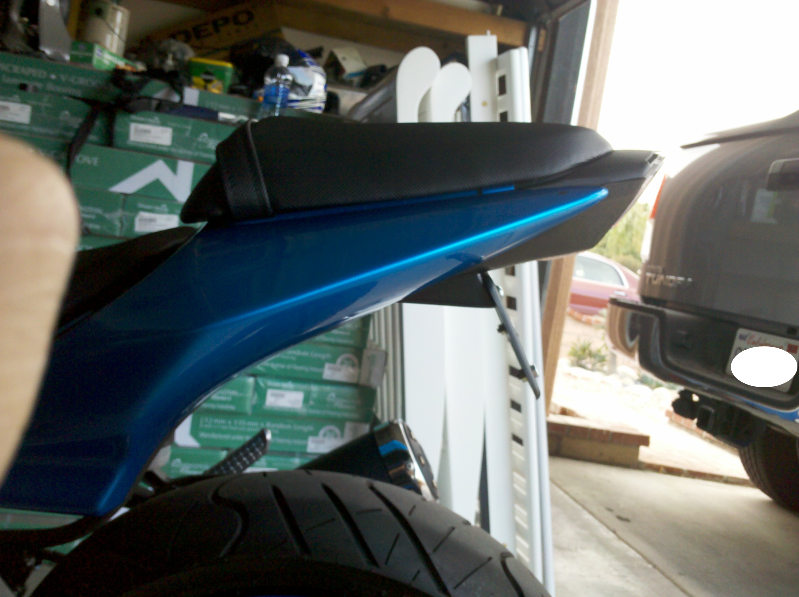 All in all a fairly easy install here are the parts the kit came with that I didnt need/use. 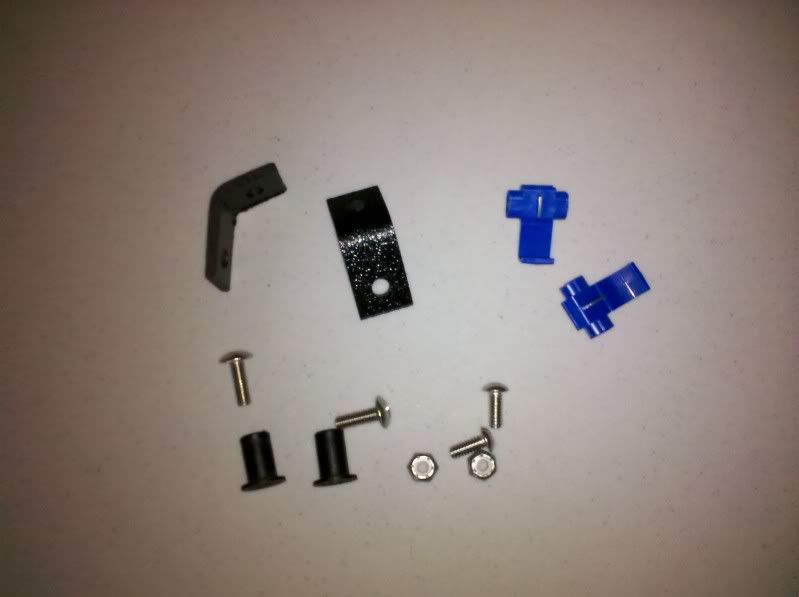
|

|

|
|
November 11th, 2010, 12:44 AM
|
#2 |
|
ninjette.org dude
Name: 1 guess :-)
Location: SF Bay Area
Join Date: Jun 2008 Motorcycle(s): '13 Ninja 300 (white, the fastest color!), '13 R1200RT, '14 CRF250L, '12 TT-R125LE Posts: Too much.
Blog Entries: 7
|
/linked to DIY sticky.
__________________________________________________
Montgomery Street Motorcycle Club / cal24.com / crf250l.org / ninjette.org ninjette.org Terms of Service Shopping for motorcycle parts or equipment? Come here first. The friendliest Ninja 250R/300/400 forum on the internet! (especially Unregistered) |
|
|
|
|
November 12th, 2010, 07:16 AM
|
#3 |
|
ninjette.org member
Name: Eric
Location: Cloquet, MN
Join Date: Jul 2010 Motorcycle(s): '09 Ninja 250 BLACK Posts: 20
|
Is that the new tag fender eliminator. I've been thinking about getting that one but wanted to see some better pictures of it. I also read some reviews that are out there saying it's cheap plastic.
What's your opinion of the overall quality of it? |
|
|
|
|
November 12th, 2010, 09:39 AM
|
#4 | |
|
Eddie
Name: Eduardo
Location: Colton, CA
Join Date: Jul 2010 Motorcycle(s): None. Posts: 53
|
Quote:
as far as quality, to be honest, it could be better. plastic isnt that great, and as for mine, I didn't take time into cutting bits and peices of anything to make it a PERFECT fit..only because it is good enough for me. Plus I paid 49.99 with shipping. I was on a budget, and just wanted to try something out to get rid of the fender. I'd give the kit itself a 7/10 Here are some pictures of the clearance and stuff, best I can do I guess..if you want any other shot tell me and I'll see what I can do..haha 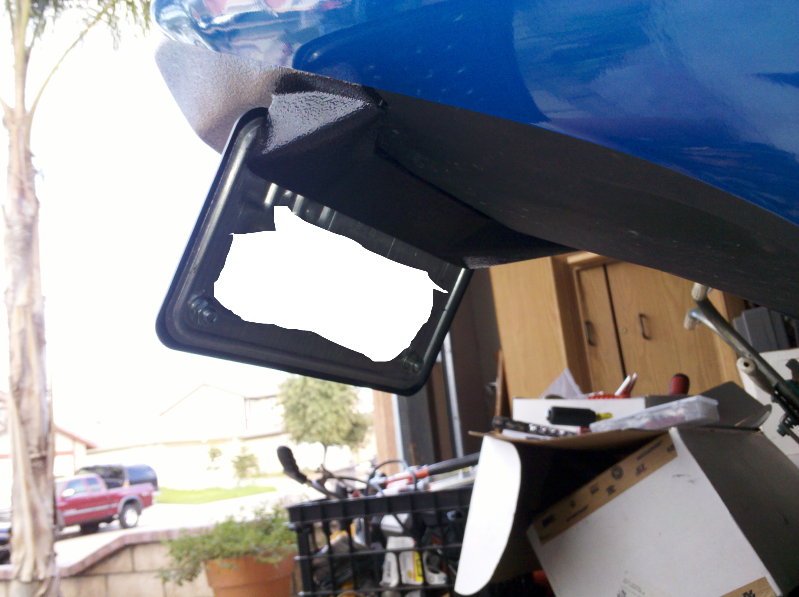 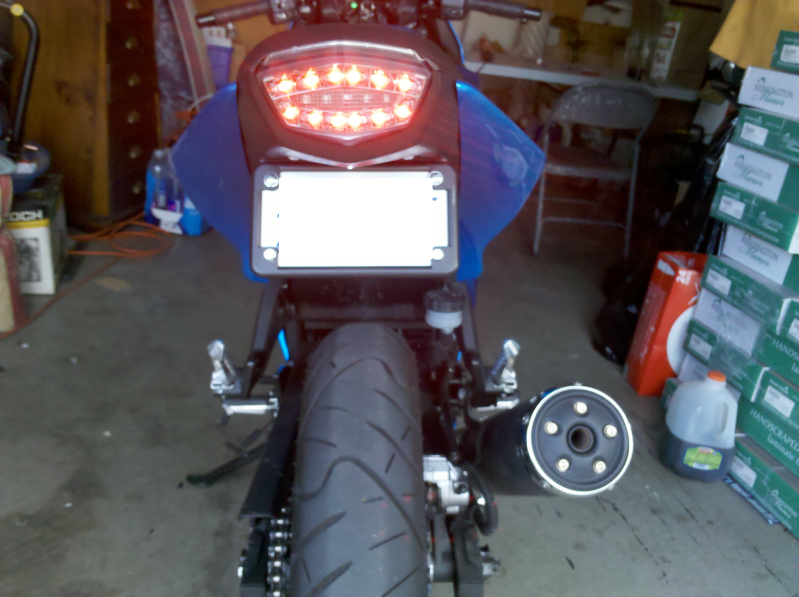
|
|
|
|
|
|
April 6th, 2011, 04:23 PM
|
#5 |
|
ninjette.org newbie
Name: Ryan
Location: Alabama
Join Date: Apr 2011 Motorcycle(s): 2010 Ninja250r Posts: 3
|
Out of curiosity if you buy this kit you don't necessarily have to replace the turn signals or anything else do you? I wanted to pick this up myself but just wasn't sure if there was anything else i would have to buy as well.
http://www.supercyclestore.com/Hotbo...50802-1000.htm Last futzed with by Keyoa; April 6th, 2011 at 04:26 PM. Reason: And this is what you got right? |
|
|
|
|
April 13th, 2011, 05:58 AM
|
#6 |
|
ninjette.org member
Name: Eric
Location: Cloquet, MN
Join Date: Jul 2010 Motorcycle(s): '09 Ninja 250 BLACK Posts: 20
|
It depends on the look you want and if you get or have an integrated tail light. I just have the stock tail light so I bought mini blinkers to put on mine. I thought about using the stock signals but when I did a mock setup I thought they just looked to big without the big fender there and there wasn't much room to cut the holes needed for the stock signals. The kit is made to be installed without blinkers but there is a flat surface on each side to drill holes if you want to mount some.
|
|
|
|
|
March 7th, 2012, 07:16 PM
|
#7 |
|
ninjette.org member
Name: Andrei
Location: Austin, TX
Join Date: Aug 2011 Motorcycle(s): 2012 Ninja 250, 2008 Daytona 675 Posts: 212
|
Sorry to revive the dead thread.
When installing this, please remember to install the damn license plate BEFORE putting everything back together. No, the instructions do NOT tell you to do that. I'm kind of pissed about that, going to have to do some cutting tomorrow (no way am I taking everything apart again) to actually bolt the license to it. The kit quality is ...meh. The plastic ears which are supposed to join with the upper body ears and snap into the fairing grommet did not mold properly at all. In fact the entire top edge where it's supposed to join with the top bracket is very poorly made and needs grinding to be flush. |
|
|
|
|
March 13th, 2012, 10:18 AM
|
#8 |
|
ninjette.org newbie
Name: Kerrie
Location: Chattanooga, TN
Join Date: Feb 2012 Motorcycle(s): 2008 ninja 250r Posts: 2
|
I just got my kit in the mail and i'm having a hard time making the brake light sit securely as well as the rear fairings. The way I have it currently is with the rear light only screwed in to the base bracket combo with two screws, and tehrefore the top is quite wobbley, so much that i'm afraid to put my rear seat on for fear i'll crack it if it's not flush. As for the side fairings, any suggestions on how to secure them? I feel like the wind would catch them and turn them into wings! Thanks
Kerrie |
|
|
|
|
May 17th, 2012, 10:02 AM
|
#9 |
|
ninjette.org member
Name: David
Location: Pittsburgh, PA
Join Date: Mar 2012 Motorcycle(s): 09 Blue 250 Posts: 16
|
So, I probably will be doing this mod this weekend. Those to "L" brackets were puzzling me. So, I called Hotbodies. From what I gather those are for the under tail (They must use the same hardware kit for both). They would be the license plate mounting brackets. Even their instructions are a little vague. I wish they would have taken a few more detailed pictures.
|
|
|
|
|
May 21st, 2012, 07:45 AM
|
#10 |
|
ninjette.org member
Name: David
Location: Pittsburgh, PA
Join Date: Mar 2012 Motorcycle(s): 09 Blue 250 Posts: 16
|
Did the mod this weekend. All went o.k. There were two issues that I have. The hardware they provide to mount the under piece was two short. I had to take a trip to the hardware store to get a longer stainless bolt. The other issue was that I had to file the plastic for better fit. Also, added my customLED integrated light (via modmy250.com). Overall it wasn't a difficult install.
|
|
|
|
|
January 31st, 2013, 07:58 PM
|
#11 |
|
ninjette.org guru
Name: Danny
Location: San Francisco, CA
Join Date: Dec 2012 Motorcycle(s): 2008 Ninja 250R Posts: 263
|
Just so were clear, this doesnt replace the part thats around the tail light right? Just wondering why the kit is so cheap.
Edit: Nvm it does replace it Last futzed with by sLick415; February 1st, 2013 at 04:15 PM. |
|
|
|
|
January 17th, 2014, 04:46 AM
|
#12 |
|
ninjette.org newbie
Name: Jack
Location: LA
Join Date: Jan 2014 Motorcycle(s): kawi ninja Posts: 3
|
Cheap to free fender eliminator is always nice. I actually sucked it up and spend the money on a 007 license plate hide kit
Its cool because it acts as a fender eliminator, plate bracket, and a plate flipper too. I did have to do some moding to the undertail of the bike but it wasn't too hard to install. Can I post a link even tho I'm now here? http://hideplate.org.... I guess I can :-) PS. If I was installing it all over, I would do it differently. I shouldn't have cut off most of the oem fender. If you leave some of it there its easier to mount the kit there later... |
|
|
|
 |
 Similar Threads
|
||||
| Thread | Thread Starter | Forum | Replies | Last Post |
| hotbodies tag fender eliminator | contact148 | 2008 - 2012 Ninja 250R Farkles | 6 | June 13th, 2013 07:39 PM |
| The $0 DIY fender eliminator! | jezebel | 2008 - 2012 Ninja 250R Farkles | 11 | March 14th, 2012 04:53 AM |
| Looking for DIY fender eliminator? | OfftheWaffle | 2008 - 2012 Ninja 250R Tech Talk | 1 | June 8th, 2011 01:51 AM |
| Hotbodies fender eliminator | Keyoa | 2008 - 2012 Ninja 250R Tech Talk | 2 | April 8th, 2011 06:07 PM |
| [2fiddy.com] - How-to: DIY Fender Eliminator | Ninjette Newsbot | General Motorcycling Discussion | 1 | July 14th, 2010 07:55 AM |
|
|


