
|
 March 16th, 2009, 10:42 AM
|
#41 |
|
ninjette.org certified postwhore
Name: Sam
Location: Northern Virginia
Join Date: Nov 2008 Motorcycle(s): Ninja 250R 2009 and ZX-12R 2000 Posts: A lot.
|
Cheng, Thanks for taking the additional pics. From your original pics, it looks like I could still move everything another inch or so to the rear.
|

|

|
|
March 27th, 2009, 01:03 PM
|
#42 |
|
ninjette.org member
Name: Michael
Location: Texas
Join Date: Feb 2009 Motorcycle(s): 08 Ninja 250R Posts: 112
|
Just finished installing mine. Thanks Kelly for the write up. I really like the position they give you and it feels like a totally different bike to me (along with WC clips). If you already have woodcrafts clipons and want an affordable way to finish the position then I would recommend these. The only trouble im having is deciding what to do with the brake hose. Since I have mine in the highest position it really gets bent and zip ties would only move it but im afraid the bends will block the flow. Dont really want to cut it but im not sure right now. Heres mine with button screws
 And Dennis is a real nice guy to work with he was always updating me with order status and stuff. (Thanks) |
|
|
|
|
March 28th, 2009, 11:50 AM
|
#43 |
|
ninjette.org member
Name: Michael
Location: Texas
Join Date: Feb 2009 Motorcycle(s): 08 Ninja 250R Posts: 112
|
Heres how I temporarily adjusted the brake hose. Dosnt look so great but this is just until I decide if I want to cut the hose or move down a few positions and zip tie. It clears and theres no piching of the hose......is this a bad idea?

|
|
|
|
|
March 28th, 2009, 12:06 PM
|
#44 |
|
Join Date: Nov 2008 Posts: Too much.
|
Got a shortened version of the link yesterday from Dennis and went to install it this morning.
First off, thanks Dennis for making good on what I believe is the only shortcoming with this kit. (other than shipping costs  ) )This is the new rod in comparison with the old. As you can see, it is shorter, but not by 1/2" as I suggested.  the actual length difference...  So I move the footpeg bracket up to the forward most and lowest position available, then install the rod. I find the rod is still too long with the shifter end in it's present position on the shift shaft. I move it up a notch and find it does work... however, shifting is sort of "iffy" with the shift linkage end mounted on the shift shaft at such a radical angle. I move the shift linkage end back down by a notch and by shortening the rod as much as possible, I am able to make the rod work in a setting on the shift shaft end that will shift a little better, but still, the arm is at a radical angle to the shift shaft.    I really do feel that if the shaft had been shortened a full 1/2", the shifter linkage arm would be a lot closer to ideal. Ideal being that the arm should be coming off the shift shaft at a 90* angle. I've not ridden the bike yet, but just sitting on it, I can tell the small move of the footpegs forward has made a difference in the seating comfort for me. Will report back after I have some riding time on it and perhaps adjust things around a bit, if needed. |
|
|
|
|
March 28th, 2009, 12:14 PM
|
#45 |
|
"Is that the Ninjer 1000?
Name: Ken
Location: SoCal SGV
Join Date: Nov 2008 Motorcycle(s): 2008 Quarter Liter Kawi Posts: 275
|
Dennis sent me the "shortened" version like your new one, however I think before I proceed with the install I'm going to take it to a machine shop to shorten the rod and increase the threads accordingly. Thanks for the input Kelly
__________________________________________________
My Mods |
|
|
|
|
March 28th, 2009, 12:22 PM
|
#46 |
|
Join Date: Nov 2008 Posts: Too much.
|
Ken,
Before you do that, try the extenders on the bike first. The rod length is only an issue on the forward most, lowest position due to that being the closest of all the positions to the shift shaft. If you go back and up, you may not have an issue at all. The only reason I'm being this picky is that I want to use that front, lower position and the rod length is keeping me from doing so. This is a great kit and the concept is  I urge you, try it first before reworking the rod. if you don't like the rod at that point, it's a snap to remove w/o having to remove anything else. I was going to shorten it myself, but I don't have a means to reverse thread one end of it... I may still shorten the end that I do have the die to thread the rod. |
|
|
|
|
March 28th, 2009, 01:50 PM
|
#47 |
|
ninjette.org member
Name: Michael
Location: Texas
Join Date: Feb 2009 Motorcycle(s): 08 Ninja 250R Posts: 112
|
What Kelly says is true. The rod works perfectly for the higher and farther back positions and I am able to adjust the pedal to shift comfortably. I would check which position you would use first and see how it fits.
|
|
|
|
|
March 28th, 2009, 02:35 PM
|
#48 |
|
ninjette.org certified postwhore
Name: Joe
Location: Buffalo NY
Join Date: Jan 2009 Motorcycle(s): 08 Ninja 250 "Wasabi", 82 Yamaha xj650j Posts: A lot.
|
In another thread I suggested making the threads longer to cheng. Im sure he'll figure something out. from the pics you have there kkim it seems you have the clutch lever at its highest position. Usually when you move foot position back theres a change in ergonomics(obviously). You did say your sitting higher on the seat. Try sitting closer to where you were comfortable before the extenders but adjust the lever down some more so you toes point down alittle more. I think it would be abit more comfortable, though alittle more slightly more aggressive feeling.
__________________________________________________
|
|
|
|
|
March 28th, 2009, 03:42 PM
|
#49 |
|
Join Date: Nov 2008 Posts: Too much.
|
I definitely need to ride it and adjust the shift lever to a comfortable position. Whatever I decide on, that rod should be able to accommodate me, but it is already "off" as it is.
the rod length makes that shift linkage arm a very radical angle to the shift shaft. What you are talking about, to me, is fine tuning. |
|
|
|
|
March 28th, 2009, 04:51 PM
|
#50 |
|
ninjette.org guru
Name: Mikel
Location: Valley of the Sun
Join Date: Mar 2009 Motorcycle(s): '09 Blue Kawasaki KLE650 Versys, '95 Ducati 900SS/CR (undergoing track conversion) Posts: 287
|
I would suggest using a 3-4 inch coupling nut in the center of the rod, then you could adjust the length of the rod from 2-3 inches longer. If you bought the coupling nut Kelly, I am sure a machine shop there would be able to cut your stock shift rod, then thread the two ends to work with the coupling nut for a Kalua Pork plate with Poke. Run a jam nuts against the coupling nut and Bingo, added length so you can use the stock rod with the closest holes on the adjustment plate and still have room for adjustment. This would actually give you 4 points of adjustment.
|
|
|
|
|
March 28th, 2009, 04:57 PM
|
#51 |
|
Join Date: Nov 2008 Posts: Too much.
|
thanks for the idea. I'll have to check to see what's available here at the hardware store.
I can easily cut and thread the rod myself. No sense wasting the kalua pork and poke on the machine shop.
|
|
|
|
|
March 29th, 2009, 08:36 AM
|
#52 |
|
ninjette.org member
Name: Cheng
Location: Malaysia KL
Join Date: Feb 2009 Motorcycle(s): Kawasaki ninja250r Posts: 70
|
kkim,
Did you try to adjust the "thing" i not sure what it call circle in red to upper abit so your shift pedal will be lower down. I cant cut the rod too short as it might not fit well, that why i try to shorten it close to 1/2 inch. 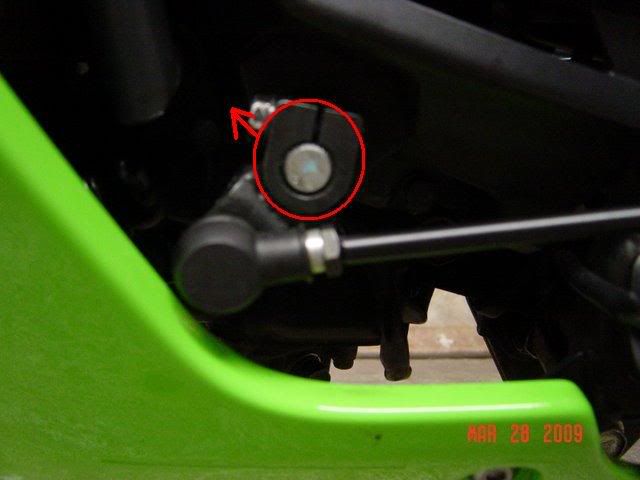
|
|
|
|
|
March 29th, 2009, 08:51 AM
|
#53 |
|
ninjette.org guru
Name: Mikel
Location: Valley of the Sun
Join Date: Mar 2009 Motorcycle(s): '09 Blue Kawasaki KLE650 Versys, '95 Ducati 900SS/CR (undergoing track conversion) Posts: 287
|
Agreed R2M, if he rotated the the shift linkage 2-3 teeth backwards it would move the tip of the gear lever downward more. I do think he needs it to rotate downward more then that, to let the linkage move the shift pawl through the full motion. Where the shift rod attaches needs to be closer to 90 degrees to the attachment.
|
|
|
|
|
March 29th, 2009, 11:07 AM
|
#54 |
|
Join Date: Nov 2008 Posts: Too much.
|
I can't move the shift linkage arm down by a spline or two... the rod is at it's shortest length now. I like the pedal placement as is, I need more adjustment on the rod to lower the arm a few splines.
If I lower the arm by a few splines, the shift lever for the foot ends up way lower than the footpeg. |
|
|
|
|
March 29th, 2009, 11:28 AM
|
#55 |
|
ninjette.org member
Name: Cheng
Location: Malaysia KL
Join Date: Feb 2009 Motorcycle(s): Kawasaki ninja250r Posts: 70
|
kkim,
Mean you perfer the setting as is it now? |
|
|
|
|
March 29th, 2009, 11:45 AM
|
#56 |
|
Join Date: Nov 2008 Posts: Too much.
|
I like the placement of the shifter, but don't like the angle that the shift linkage arm comes off the shift shaft and also that have no room for adjustment in one direction as the rod is at it's shortest right now.
I have not ridden the bike to see if this is a workable situation for me, yet, but if I find it is not, I'll just cut and rethread one end of the rod to get it to my liking. |
|
|
|
|
March 30th, 2009, 05:29 PM
|
#57 | |
|
ninjette.org certified postwhore
Name: Joe
Location: Buffalo NY
Join Date: Jan 2009 Motorcycle(s): 08 Ninja 250 "Wasabi", 82 Yamaha xj650j Posts: A lot.
|
Quote:
__________________________________________________
|
|
|
|
|
|
April 1st, 2009, 11:49 AM
|
#58 |
|
ninjette.org member
Name: BAD
Location: Malaysia
Join Date: Jan 2009 Motorcycle(s): Ninja 250R 2008 Model Posts: 50
|
for the rear brake hose. Just add some metal plate or just a normal bracket. to make your hose longger .PUT a set of washer at the back of your rear brake oil rev,so it will go out a bit,so went u hit a speed bum,u will not touch your fender or other place.
learn and ajust your gear liver to other angle(up/down) then only u get what u wan. 
|
|
|
|
|
April 1st, 2009, 01:36 PM
|
#59 | |
|
ninjette.org member
Name: Michael
Location: Texas
Join Date: Feb 2009 Motorcycle(s): 08 Ninja 250R Posts: 112
|
Quote:
nice.
|
|
|
|
|
|
April 13th, 2009, 06:43 PM
|
#60 |
|
ninjette.org member
Name: Nico
Location: Anchorage, Alaska
Join Date: Dec 2008 Motorcycle(s): 08 Ninja 250R Posts: 52
|
This doesn't seem to work with the Yoshimura Exhaust, as the brake actuator arm will hit the heat shield of the exhaust.
I'm also having trouble with the shift linkage, it seems to be too long.
__________________________________________________
'08 Ninja 250R: Yoshi Full System, HID's, FP Jet Kit, Snorkel removed, LED Brakelight, LED Footpeg Turnsignals, Zero Gravity SR Windscreen, Fender Eliminator, Solo Seat Cowl, Woodcraft Clip-Ons |
|
|
|
|
April 15th, 2009, 10:12 AM
|
#61 | |
|
ninjette.org member
Name: Cheng
Location: Malaysia KL
Join Date: Feb 2009 Motorcycle(s): Kawasaki ninja250r Posts: 70
|
Quote:
|
|
|
|
|
|
April 15th, 2009, 05:38 PM
|
#62 |
|
ninjette.org member
Name: Nico
Location: Anchorage, Alaska
Join Date: Dec 2008 Motorcycle(s): 08 Ninja 250R Posts: 52
|
i saw the picture of your yoshi exhaust, and yours doesnt seem to have a heatshield.
I tried adjusting the linkage as far as it goes, but the arm is still too long
__________________________________________________
'08 Ninja 250R: Yoshi Full System, HID's, FP Jet Kit, Snorkel removed, LED Brakelight, LED Footpeg Turnsignals, Zero Gravity SR Windscreen, Fender Eliminator, Solo Seat Cowl, Woodcraft Clip-Ons |
|
|
|
|
April 15th, 2009, 10:32 PM
|
#63 |
|
Join Date: Nov 2008 Posts: Too much.
|
I finally got to ride the bike with the pegs in the bottom forward position and with the shortened rod that R2M sent a few weeks ago.
I really like the repositioned peg position and in the twisties, the bike feels easier to maneuver coupled with the WC clipons I also have installed. From an ergonomic standpoint, for me, it is an improvement. The shortened rod works, but the shifting is a bit notchier than it was before. I will cut the rod shorter and see if that improves the shifting action. The shift linkage end should be at a 90* angle to the rod for optimum shift action. I know with the adjustable peg position this is impossible to achieve, but it's nowhere close right now. I need to fix that. Also, another tidbit raised it's ugly head. Now, with the pegs in the back and up position from the original stock peg location, the next hard point that will touch in severe cornering angles will be the kickstand. If you do this mod, be very aware that you can hang the stand up in a corner if you're leaned over enough and crash if it does so. I am nowhere close to doing so, but it has happened to another forum member, so be forewarned. |
|
|
|
|
April 16th, 2009, 05:37 PM
|
#64 |
|
ninjette.org certified postwhore
Name: Joe
Location: Buffalo NY
Join Date: Jan 2009 Motorcycle(s): 08 Ninja 250 "Wasabi", 82 Yamaha xj650j Posts: A lot.
|
Getting hung up on the stand is fear of mine. Imagine your having a great ride and that happens outta no where.
__________________________________________________
|
|
|
|
|
April 17th, 2009, 06:46 AM
|
#65 |
|
ninjette.org sage
Name: Wayne
Location: Brookfield, MA
Join Date: Nov 2008 Motorcycle(s): 2011 Honda CBR250R Posts: 585
|
What the heck, you have a set of track stands....lose the kickstand and some dead weight at the same time!
I know I wouldn't ride a bike that had even a chance of the kickstand catching in a turn. It's dangerous enough out there without adding the possibility of a crash that can be easily & completely eliminated. |
|
|
|
|
April 21st, 2009, 10:12 PM
|
#66 |
|
"Is that the Ninjer 1000?
Name: Ken
Location: SoCal SGV
Join Date: Nov 2008 Motorcycle(s): 2008 Quarter Liter Kawi Posts: 275
|
Finally installed mine this afternoon.
A few things about my parts: The supplied allen bolts for the extender brackets were a little too long. When I tightened the bolts until they fully seated, the extenders was loose. I looked at all the installed pics in this thread and you guys didn't have this issue. Just to be sure I threaded the bolts until they fully seated, then I slid the extender behind it to see if there's any clearance. On both sides I can slide it behind the bolt heads, so I know for sure the bolts were too long (or the extender brackets I have are thinner gauge). The solution was to use the supplied washers that are intended for the supplied nuts. I'm going to buy some button screws and replace the supplied screws for a cleaner look. At any rate, here's what it looks like: Left side:  Right side:  As for the shifter placement I decided to make it feel more like the Kawasaki Super Sports. The shifter is usually much lower than than the footpeg on those bikes so I lowered it accordingly.  Riding impressions: I rode for about 1 hr, and the first 15 minutes or so I noticed a little more pressure on my "boys". It went away and I enjoyed the remainder of the ride. It's totally comfortable for me and I was riding around town so there's a lot of stopping. I had no problems reaching further back and higher for the pegs. The shift action feels more solid. It's still smooth but it feels like there's less play. (Maybe my stock shift rod wasn't tightened correctly this whole time??) The only negative thing I noticed is an increase in vibration felt at the feet. If the extenders were thicker I think it may quell some of the vibrations. Now I'm trying to decide if I should put a magnet behind it to dampen the vibrations. Otherwise I think this is one of the best bang-for-the-buck mods Thanks again Kelly for your write-ups. Thanks Dennis for making these available.
__________________________________________________
My Mods Last futzed with by Ken; April 22nd, 2009 at 12:38 PM. |
|
|
|
|
April 21st, 2009, 11:52 PM
|
#67 |
|
Join Date: Nov 2008 Posts: Too much.
|
I agree... while the kit is not perfect, it is still one of the best bangs for your buck if you are looking for a more rearward placement for the pegs.
Glad you like them, Ken. Great additional feedback as usual!
|
|
|
|
|
April 22nd, 2009, 06:21 AM
|
#68 |
|
ninjette.org certified postwhore
Name: Joe
Location: Buffalo NY
Join Date: Jan 2009 Motorcycle(s): 08 Ninja 250 "Wasabi", 82 Yamaha xj650j Posts: A lot.
|
Will a magnet do that?
Heres a video you might be interested in Ken. http://www.onthethrottle.com/content/view/68/40/
__________________________________________________
|
|
|
|
|
April 22nd, 2009, 12:54 PM
|
#69 | |
|
"Is that the Ninjer 1000?
Name: Ken
Location: SoCal SGV
Join Date: Nov 2008 Motorcycle(s): 2008 Quarter Liter Kawi Posts: 275
|
Quote:
To my surprise, this is what I found:  On my right side, my first set of holes (right row, from top to bottom) are essentially useless. If you can see the background I've already installed the left side. See the top-left side of the extender itself? The contact is preventing the alignment of the top hole. However it looks like if the extender or stay itself is grinded, the holes won't line up anyway because the extender hole is spaced a little too wide. Since the measurements are off for the first set of holes, I wonder if my pegs are symmentrical in its current position. I guess I'll have to take some measurements later tonight.
__________________________________________________
My Mods |
|
|
|
|
|
April 23rd, 2009, 08:46 AM
|
#70 |
|
ninjette.org certified postwhore
Name: Joe
Location: Buffalo NY
Join Date: Jan 2009 Motorcycle(s): 08 Ninja 250 "Wasabi", 82 Yamaha xj650j Posts: A lot.
|
Cheng will probably take this info back to the drawing board and notch the top accordingly.
after you file/grind it down check to see if the holes align.keep us updated plz.
__________________________________________________
|
|
|
|
|
April 23rd, 2009, 10:30 AM
|
#71 |
|
"Is that the Ninjer 1000?
Name: Ken
Location: SoCal SGV
Join Date: Nov 2008 Motorcycle(s): 2008 Quarter Liter Kawi Posts: 275
|
I'm a form-follows-function kind of guy, however the thought of grinding it down and attempting to refinish it (I'm no expert at metal work) will probably result in myself just taking a dive and buy some woodcraft rearsets.
The stays are angled differently on the extenders than from the factory position (I'm assuming it's intentional to have the feet slope down on the footpegs) so I'll try to measure the angles/holes during the weekend to see if my current position is symmetrical. If it's okay then I'm just going to leave it alone. I'll take off the extenders and trace it on paper and scan it so at least Cheng/Dennis will have something to work with. I wasn't expecting to become a guinea pig. 
__________________________________________________
My Mods |
|
|
|
|
April 23rd, 2009, 10:38 AM
|
#72 | |
|
ninjette.org certified postwhore
Name: Joe
Location: Buffalo NY
Join Date: Jan 2009 Motorcycle(s): 08 Ninja 250 "Wasabi", 82 Yamaha xj650j Posts: A lot.
|
Quote:
 I'm pretty good with metal. I planned on buying these anyhoo.
__________________________________________________
|
|
|
|
|
|
April 25th, 2009, 08:26 PM
|
#73 |
|
"Is that the Ninjer 1000?
Name: Ken
Location: SoCal SGV
Join Date: Nov 2008 Motorcycle(s): 2008 Quarter Liter Kawi Posts: 275
|
Well,
I decided to do start with the measuring. Preface: My garage floor is flat. I laid down a 4 foot long level and check the sight glasses to ensure that the bubbles are centered at all all times in multiple positions. I left the level underneath the bike so when I use the tape measure I can rest it on the level itself. I lifted the bike up and I placed another level on top of the gas cap area and it confirms the bike is level. Finding: I found out that the left side footpeg is 3/8" higher than the right side. There wasn't enough play in the bolts to close the gap difference. As I was tinkering the extenders I thought to myself, I spend $130.00 on these things and I am essentially doing the R&D work. These should be checked before they were sent out. I decided to stop at that point. I reinstalled my stays and measured them. They were dead-on. If you already have these extenders installed, please take some measurements and see if they're symmetrical on both sides.
__________________________________________________
My Mods Last futzed with by Ken; April 28th, 2009 at 07:28 PM. |
|
|
|
|
April 28th, 2009, 06:03 PM
|
#74 |
|
ninjette.org certified postwhore
Name: Joe
Location: Buffalo NY
Join Date: Jan 2009 Motorcycle(s): 08 Ninja 250 "Wasabi", 82 Yamaha xj650j Posts: A lot.
|
$50

__________________________________________________
|
|
|
|
|
May 9th, 2009, 05:52 AM
|
#75 |
|
self wrencher
Name: john
Location: houston
Join Date: Dec 2008 Motorcycle(s): 08 250r and 07 600r Posts: A lot.
|
|
|
|
|
|
May 9th, 2009, 01:53 PM
|
#76 |
|
ninjette.org certified postwhore
Name: Bob
Location: CA
Join Date: Dec 2008 Motorcycle(s): '08 Ninja 250r, '14 CBR500r Posts: A lot.
|
310Ken: Not doubting your methods, because it sounds like you where very intentional, but was wondering if you also double checked the levelness of the bike in other ways? I see you leveled over the gas tank, but (not having tried it myself) did you measure to the stock pegs, or the stand itself? One of the reason I am asking is because I know my rear stand is not level.... I got a cheapy so it is visually off, but don't know how exact the nicer ones are.
|
|
|
|
|
May 10th, 2009, 06:47 AM
|
#77 |
|
ninjette.org certified postwhore
Name: Joe
Location: Buffalo NY
Join Date: Jan 2009 Motorcycle(s): 08 Ninja 250 "Wasabi", 82 Yamaha xj650j Posts: A lot.
|
Its clearly off by design. you can tell by the pictures, the right side is up against the heal guard, brake cylinder. It looks like one could just get a metal file,mark some lines, put the extender in a vise, and go to work notching out the upper left corner of the extender. ?
__________________________________________________
|
|
|
|
|
November 1st, 2010, 09:19 AM
|
#78 |
|
ninjette.org newbie
Name: Junae
Location: Florianopolis Brazil
Join Date: Oct 2010 Motorcycle(s): Kawasaki Ninja 250R Posts: 1
|
Hi friends, do you know if Ride2Max is still selling those footpeg extenders?
I'm REALLY interested on them.. Also if any one know where else I can find a good extender would help a lot. Thanks for any info
|
|
|
|
|
November 20th, 2010, 09:58 PM
|
#79 |
|
ninjette.org member
Name: Armando
Location: So Cal
Join Date: Sep 2010 Motorcycle(s): 2009 ct blue 250r,2011 black/red zx6r Posts: 64
|
Hey guys I have the yoshimura bracket adjusters similar to this one I was wondering if I cut the rear brake reservoir hose do I have to bleed the brakes ?
|
|
|
|
 |
 Similar Threads
|
||||
| Thread | Thread Starter | Forum | Replies | Last Post |
| DIY for installing race fairing? | psych0hans | Ninjettes At Speed | 5 | April 16th, 2013 07:40 AM |
| DIY - $10 Newgen Mirror Extenders | NathanF | 2008 - 2012 Ninja 250R Farkles | 18 | June 28th, 2011 09:49 AM |
| DIY: SW-Motech mirror extenders | Sound Wave | 2008 - 2012 Ninja 250R Farkles | 57 | April 22nd, 2011 01:27 PM |
| DIY: Mirror extenders made easy | Live2ride | 2008 - 2012 Ninja 250R Farkles | 6 | April 20th, 2011 08:47 PM |
| DIY: Installing Halos | tlhamon | 2008 - 2012 Ninja 250R Tech Talk | 26 | October 27th, 2010 08:40 PM |
|
|


