
|
 October 6th, 2014, 07:28 AM
|
#1 |
|
World Class Ninja
Name: Rusty
Location: West Chester PA
Join Date: Sep 2014 Motorcycle(s): 2002 Ninja 250, 96 VFR750, 79 Yamaha XS1100 Special Posts: 224
|
Fairing Repairs with PlastiFix
Ok so some of you know I bought a non running ninja 250 for super cheap and I'm tearing it apart and rebuilding it. This is kind of my post graduation project now that I'm a motorcycle technician. My own bike my own money my own tools my own project.
That being said other then the internal compression issues the bike is fairly solid. new tires, it was just dirty except it looks like it was dropped on the left hand side and there are some cracks. So I'm going to try and clean it all up and then plastidip it or something like that. So let us take a look at the damage. Missing two nipples 
Nevermind Found Them 
The other side is perfect it is just missing one of the grommets so I should be able to find that at the hardware store. now the other damage near the windscreen and the corner from the top to the side of this piece is also cracked didn't really take a picture of that. 
and the part that goes there the mirror was holding it all in place 
ok so damaged assessed 3 parts are broken off and a few surface cracks. I'm not a body shop and didn't really take any classes on fairing repair but I think I can get this to look acceptable. More posts and info coming
__________________________________________________
Life is not a journey to the grave with the to arrive safely in one pretty and well preserved piece, but to skid across the line, thoroughly used up, worn out, leaking oil, shouting, GERONIMO! |

|

|
|
October 6th, 2014, 07:31 AM
|
#2 |
|
ninjette.org sage
Name: Lane
Location: Medford, OR
Join Date: May 2014 Motorcycle(s): Ninja 250 (trackbike), CBR600RR, GS500F Posts: 588
|
I've had really good luck with Plastex for fairing repair. I've even managed to rebuild a tab that was broken on one side, by mirroring the tab from the other side and building it up with the Plastex. Works great, and I'm not very technically inclined.
|
|
|
|
|
October 6th, 2014, 07:32 AM
|
#3 |
|
World Class Ninja
Name: Rusty
Location: West Chester PA
Join Date: Sep 2014 Motorcycle(s): 2002 Ninja 250, 96 VFR750, 79 Yamaha XS1100 Special Posts: 224
|
Ok so there are plenty of guides and materials out there. Melting lego bricks in ethonal, plastic Welding, plastic cement, bondo, etc. I'm writing this up because I haven't seen anyone talk about this material here. and I've used it before on my VFR, I didn't actually sand it and fill it to actually finish the VFR but I didn't really care that bike is my work horse. This bike is my project.
Ok so what is Plastifix PlastiFix is a two-part methacrylate adhesive system which consists of a powder and a liquid. When the powder and liquid are mixed together, they form a solid in about 10 - 15 minutes. The adhesive cures rock hard in about an hour and a half. The most unique thing about the PlastiFix kit is that it allows you to replace pieces that are completely missing! Each kit comes with a FlexMold molding bar. When heated in boiling water for about two minutes, the FlexMold bar softens and can be formed around a pattern to create a mold. Once it cools, you peel it away from the pattern and you've got a perfect impression of the piece you want to replace. Affix the mold in the repair area and fill with the PlastiFix adhesive mixture. When the adhesive cures, peel away the mold and you're finished! Best of all, the FlexMold bar can be reused again and again. From HERE
__________________________________________________
Life is not a journey to the grave with the to arrive safely in one pretty and well preserved piece, but to skid across the line, thoroughly used up, worn out, leaking oil, shouting, GERONIMO! |
|
|
|
|
October 6th, 2014, 07:33 AM
|
#4 | |
|
World Class Ninja
Name: Rusty
Location: West Chester PA
Join Date: Sep 2014 Motorcycle(s): 2002 Ninja 250, 96 VFR750, 79 Yamaha XS1100 Special Posts: 224
|
Quote:
__________________________________________________
Life is not a journey to the grave with the to arrive safely in one pretty and well preserved piece, but to skid across the line, thoroughly used up, worn out, leaking oil, shouting, GERONIMO! |
|
|
|
|
|
October 6th, 2014, 07:35 AM
|
#5 | |
|
ninjette.org sage
Name: Lane
Location: Medford, OR
Join Date: May 2014 Motorcycle(s): Ninja 250 (trackbike), CBR600RR, GS500F Posts: 588
|
Quote:
I also have a plastic welder for the bigger jobs. |
|
|
|
|
|
October 6th, 2014, 08:46 AM
|
#6 |
|
World Class Ninja
Name: Rusty
Location: West Chester PA
Join Date: Sep 2014 Motorcycle(s): 2002 Ninja 250, 96 VFR750, 79 Yamaha XS1100 Special Posts: 224
|
Ok so lets get started
you need a few things the powder and the liquid 
and the special needle the interesting part is the opening is actually on the side of the needle so when you squeeze it will run down the needle and wash of the material see further down. 
So to use it you put the powder which is really fine in a small container, I like to use my trusty Dave and busters Shot Glass (being that this is a chemical I would not actually use this shot glass anymore) look how fine this powder is. 
To use the product you squeeze a few drops (2-3) from the needle into the powder then you stick it with the needle to pick it up. 
then place it where you need the product and squeeze a little more liquid out till the ball start to run and place it where you need it. Then repeat as needed. 
More to come boss actually wants me to make sales today and not post things on forums ... 
__________________________________________________
Life is not a journey to the grave with the to arrive safely in one pretty and well preserved piece, but to skid across the line, thoroughly used up, worn out, leaking oil, shouting, GERONIMO! |
|
|
|
|
October 6th, 2014, 11:19 AM
|
#7 |
|
World Class Ninja
Name: Rusty
Location: West Chester PA
Join Date: Sep 2014 Motorcycle(s): 2002 Ninja 250, 96 VFR750, 79 Yamaha XS1100 Special Posts: 224
|
Ok so I am on a lunch break now so I can post.
Ok so I fixed both of the nipples and we can see that here. As stated already this stuff takes some getting used too and even when you get really good there is a lot more to do. 
So from here i took the rubber off of the mirror ports and i took some sand paper to create an edge the guide that youj get when you get the material talks more about cracks and using a tear dropped shape dremel attachment to create a groove for the plastifix. with this part I used my hand and some 100 and 220 grit sand paper. 
Now this part in particular was hard due to the shape of the upper. I had to tig it first using the material to get it to start to support it self, then you just go crazy and fill in the entire crack and any missing pieces like the one chunk that was missing up at the top. 
Now that the one side was done do the other. Now in theory the plastifix turns the entire piece into one solid piece of plastic. 
Now that that piece is on nice and tight I can work on the crack and this is a very three dimensional crack so I need to take my time. What I'm doing here Is trying to smooth any quick changes in elevation from the cracks. 
and that was it for the plastifix. I still have a crack on the windscreen but I'm thinking i'm just going to get a new one because well I won't be able to hide the crack unless I paint the entire windscreen and I don't know if i want to do that. So my next step is to start sanding areas smooth to prep it for paint. Now as for paint I'm going plastidip because I have the materials and I like the low cost change it whenever I want mentality. I haven't decided on any color scheme yet. But I'm thinking black and Blaze Yellow Accents like this. 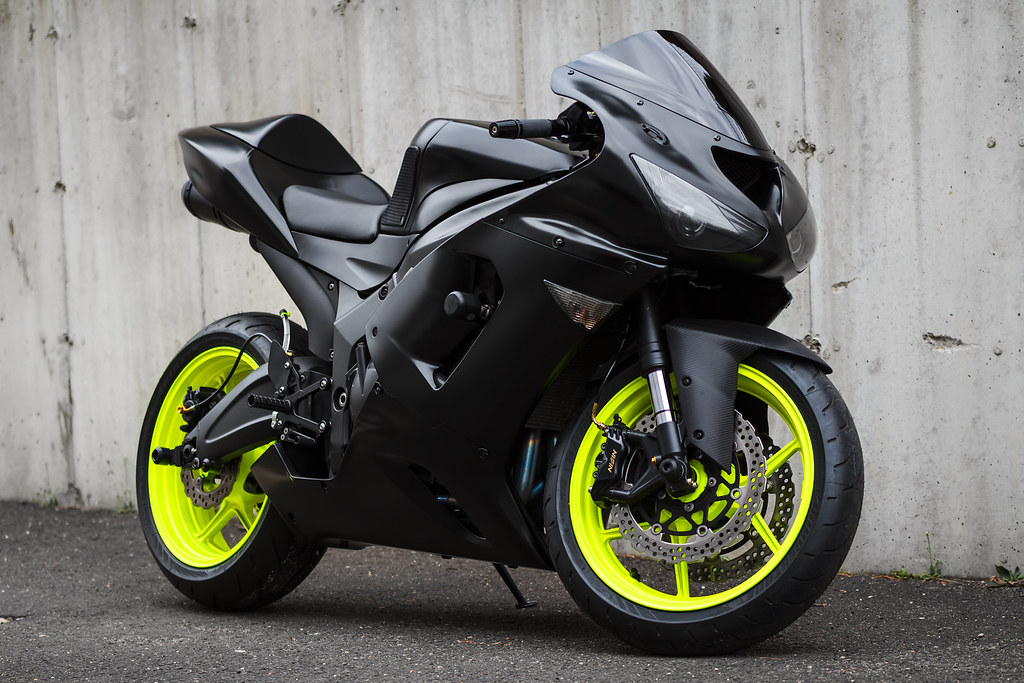
__________________________________________________
Life is not a journey to the grave with the to arrive safely in one pretty and well preserved piece, but to skid across the line, thoroughly used up, worn out, leaking oil, shouting, GERONIMO! |
|
|
|
|
October 6th, 2014, 11:40 AM
|
#8 |
|
ninjette.org certified postwhore
Name: Jason
Location: Monroe, MI
Join Date: May 2013 Motorcycle(s): '75 CB550:.'82 XV920:.'00 KLR650:.'00 EX250:.'08 Ninja 250 Posts: A lot.
MOTM - June '15
|
Looks a lot like my repairs with ABS cement.
__________________________________________________
'82 XV920: Soon to be tracker--'00 KLR685:adv --'04 DRZ400E--'12 Super Tenere --'13 Versys Ride more, worry less. |
|
|
|
|
October 6th, 2014, 12:13 PM
|
#9 | |
|
World Class Ninja
Name: Rusty
Location: West Chester PA
Join Date: Sep 2014 Motorcycle(s): 2002 Ninja 250, 96 VFR750, 79 Yamaha XS1100 Special Posts: 224
|
Quote:
__________________________________________________
Life is not a journey to the grave with the to arrive safely in one pretty and well preserved piece, but to skid across the line, thoroughly used up, worn out, leaking oil, shouting, GERONIMO! |
|
|
|
|
|
October 6th, 2014, 01:49 PM
|
#10 |
|
ninjette.org guru
Name: xorbe
Location: Bay Area, CA
Join Date: Jun 2013 Motorcycle(s): N650 (and others) Posts: 408
|
Talk about reconstructive surgery!
|
|
|
|
|
October 6th, 2014, 08:57 PM
|
#11 |
|
ninjette.org sage
Name: bob
Location: Earf
Join Date: Apr 2013 Motorcycle(s): 2005 Ninja 250, 2006 SV650N Posts: 642
|
Any suggestions on easy tab repair? My 2 tabs on the right side of the upper fairing broke during a low side a while back and after replacing the lower cowling I haven't really figured out a good way to repair it other then maybe resorting to something like jb weld.
|
|
|
|
|
October 7th, 2014, 07:16 AM
|
#12 | |
|
World Class Ninja
Name: Rusty
Location: West Chester PA
Join Date: Sep 2014 Motorcycle(s): 2002 Ninja 250, 96 VFR750, 79 Yamaha XS1100 Special Posts: 224
|
Quote:
__________________________________________________
Life is not a journey to the grave with the to arrive safely in one pretty and well preserved piece, but to skid across the line, thoroughly used up, worn out, leaking oil, shouting, GERONIMO! |
|
|
|
|
|
October 7th, 2014, 08:03 AM
|
#13 | |
|
ninjette.org sage
Name: Lane
Location: Medford, OR
Join Date: May 2014 Motorcycle(s): Ninja 250 (trackbike), CBR600RR, GS500F Posts: 588
|
Quote:
|
|
|
|
|
|
October 7th, 2014, 08:46 AM
|
#14 |
|
World Class Ninja
Name: Rusty
Location: West Chester PA
Join Date: Sep 2014 Motorcycle(s): 2002 Ninja 250, 96 VFR750, 79 Yamaha XS1100 Special Posts: 224
|
__________________________________________________
Life is not a journey to the grave with the to arrive safely in one pretty and well preserved piece, but to skid across the line, thoroughly used up, worn out, leaking oil, shouting, GERONIMO! |
|
|
|
|
October 7th, 2014, 08:47 AM
|
#15 |
|
ninjette.org member
Name: Brett
Location: Everett, WA
Join Date: Jun 2012 Motorcycle(s): 1998 Ninja 250 2007 Yamaha R6 2003 Honda RC51... sold :( Posts: 205
|
Good write up. The only thing that I would mention is that you should probably clean around the cracks more. Take it down to the plastic about 1/4" to 1/2" around the crack. Otherwise any of the plastifix you add that isn't down in the crack, will just be on top of paint and won't make a good bond.
|
|
|
|
|
October 7th, 2014, 08:57 AM
|
#16 |
|
World Class Ninja
Name: Rusty
Location: West Chester PA
Join Date: Sep 2014 Motorcycle(s): 2002 Ninja 250, 96 VFR750, 79 Yamaha XS1100 Special Posts: 224
|
Thats a good point and something that should be done, I didn't feel like busting out the sander or looking for my good dremal, so I didn't everything seems to be holding really well should have some more progress this weekend
__________________________________________________
Life is not a journey to the grave with the to arrive safely in one pretty and well preserved piece, but to skid across the line, thoroughly used up, worn out, leaking oil, shouting, GERONIMO! |
|
|
|
 |
 Similar Threads
|
||||
| Thread | Thread Starter | Forum | Replies | Last Post |
| Time to start the huge task of repairs | Quick1 | 1986 - 2007 Ninja 250R Tech Talk | 10 | July 28th, 2013 11:59 AM |
| Tank slapper; I dislike road repairs | SabreValkyrn | Riding Skills | 14 | November 7th, 2012 02:25 PM |
| Need Lots of Help With Bike Repairs | bkh2 | 2008 - 2012 Ninja 250R Tech Talk | 2 | July 9th, 2012 12:41 PM |
| Repairs (Scratches + Bodywork) | AeroXtasy | 2008 - 2012 Ninja 250R Tech Talk | 12 | August 30th, 2011 04:23 PM |
| Spare pre-08 Ninja Parts for repairs | herrorara | Items Wanted | 0 | November 30th, 2010 01:34 AM |
|
|


