
|
 November 15th, 2010, 12:16 AM
|
#41 |
|
CVMA #74 WSMC #750
Name: Nemesis
Location: On the track
Join Date: Oct 2009 Motorcycle(s): All of them Posts: A lot.
|
Thx guys. I'm a bit nervous about tackling this job but it probably just sounds harder than it is.
Don't you guys order the shims from a Kawi dealer (not fuss about the wrong shims and what not)? |

|

|
|
November 15th, 2010, 01:55 AM
|
#42 |
|
ninjette.org guru
Name: .
Location: .
Join Date: Nov 2010 Motorcycle(s): . Posts: 331
|
Each single shim is ~5$ at the dealer. while you can get something like this:
http://cgi.ebay.com/ebaymotors/HOTCA...ht_1854wt_1167 or http://www.amazon.com/CAMS-VALVE-SHI...9798133&sr=8-1 3x of a whole bunch of widths |
|
|
|
|
December 3rd, 2010, 12:52 PM
|
#43 |
|
CVMA #74 WSMC #750
Name: Nemesis
Location: On the track
Join Date: Oct 2009 Motorcycle(s): All of them Posts: A lot.
|
Omgosh...I took off the CCT last night then went back to this thread and re-read the whole thread and I'm freakin' confused.
Do I buy the shims first or take them all out and measure them? WTHeck is with the conversions? LOL! Where do you buy the tool to measure shims? Harborfreight? I understand the shims but what's this "lash" talk? |
|
|
|
|
December 3rd, 2010, 01:47 PM
|
#44 |
|
ninjette.org certified postwhore
Name: Paul
Location: Roanoke, VA
Join Date: Jun 2009 Motorcycle(s): 2008 Candy Plasma Blue 250R Posts: A lot.
|
I'd suggest buying a shim set before even starting. Otherwise you may be waiting a while to get shims (and either have your bike open, or have to reassemble it,then disassemble it again) if you don't have a local shop that keeps them stocked.
There's a few levels to the conversions. First there's the metric-SAE conversion, but that's just between fractions of an inch and millimeters. Then there's the math that relates the valve clearance (the 'lash') and the shim thickness. There's an excel file posted on the Yeager's ninjette page that will do most of the math for ya. I think it's linked on this thread or a related one. The tool to measure the shims is known as a micrometer. I bought mine at Sears, but you should be able to find one at most hardware stores. The lash is just the other half of the important measurement in valve clearances. It's the greatest gap between the top of the cap that sits on top of the shim and the cam with its lobe facing away from the valve
__________________________________________________
Proud member of the Blue Army |
|
|
|
|
December 3rd, 2010, 05:29 PM
|
#45 |
|
ninjette.org guru
Name: .
Location: .
Join Date: Nov 2010 Motorcycle(s): . Posts: 331
|
THis is the kit I bought from Powersport Superstore: http://www.amazon.com/gp/product/B000WJWTM6/
You can use a micrometer or a caliper. Get one that is digital (easier to read) and does metric. Then get feeler gauges that are labeled in metric. That way, you own't have to convert. http://www.theyeagergroup.com/2008_n..._clearance.htm |
|
|
|
|
December 3rd, 2010, 06:33 PM
|
#46 |
|
ninjette.org guru
Name: .
Location: .
Join Date: Nov 2010 Motorcycle(s): . Posts: 331
|
Also, I did the valves a week back and it's still fresh in my head so post up any questions.
|
|
|
|
|
December 3rd, 2010, 07:59 PM
|
#48 | |
|
ninjette.org certified postwhore
Name: Paul
Location: Roanoke, VA
Join Date: Jun 2009 Motorcycle(s): 2008 Candy Plasma Blue 250R Posts: A lot.
|
Quote:
Thanks for posting the Yeager link; was @ work when I replied earlier so didn't have time to hunt it down. I also did my valves recently for the third time, so +1 to the 'available for questions' list, if the DIYs don't get it and Indrish doesn't beat me to it 
__________________________________________________
Proud member of the Blue Army |
|
|
|
|
|
December 9th, 2010, 09:10 AM
|
#49 |
|
CVMA #74 WSMC #750
Name: Nemesis
Location: On the track
Join Date: Oct 2009 Motorcycle(s): All of them Posts: A lot.
|
Okay, next question: How in the world do you take off the top valve cover? I've taken out the four bolts and the cover loose but it's such a tight area there the cover won't come off.
It looks like the radiator hose is preventing me from completely taking it off. Do I have to remove the hose? I rather not...is there another way? |
|
|
|
|
December 9th, 2010, 11:04 AM
|
#50 | |
|
ninjette.org member
Name: Peter
Location: Deep South, USA
Join Date: Dec 2009 Motorcycle(s): 2009 Special Edition Ninja 250 a good memory, 2011 Suzuki DL 650 the new ride Posts: 131
|
Quote:
|
|
|
|
|
|
December 9th, 2010, 11:11 AM
|
#51 |
|
CVMA #74 WSMC #750
Name: Nemesis
Location: On the track
Join Date: Oct 2009 Motorcycle(s): All of them Posts: A lot.
|
Thx.
I already have the coolant (water wetter actually..not coolant) drained out. I just can't wiggle the cover off. I mean, it's off but I can't completely remove cover out of the frame section. Just wondering if there was a trick to getting the cover out...like removing hoses, radiator, etc. which I'm really reluctant to do. I'll give it another shot tonight. Thx. |
|
|
|
|
December 9th, 2010, 11:16 AM
|
#52 | |
|
ninjette.org member
Name: Peter
Location: Deep South, USA
Join Date: Dec 2009 Motorcycle(s): 2009 Special Edition Ninja 250 a good memory, 2011 Suzuki DL 650 the new ride Posts: 131
|
Quote:
GL, it can be done. |
|
|
|
|
|
December 9th, 2010, 12:14 PM
|
#53 |
|
ninjette.org guru
Name: .
Location: .
Join Date: Nov 2010 Motorcycle(s): . Posts: 331
|
Make sure the right side engine mounting bolts are out.
Take off the hoses. Take off the coolant tank, the radiator, the fan, the horn. It'll make it easier to take it out and put back in. But even after that, it takes a bit of manuevering. PS: take off the cover from the right side. |
|
|
|
|
December 9th, 2010, 05:00 PM
|
#54 | |
|
ninjette.org certified postwhore
Name: Paul
Location: Roanoke, VA
Join Date: Jun 2009 Motorcycle(s): 2008 Candy Plasma Blue 250R Posts: A lot.
|
Quote:
Removing the coolant tank, radiator, fan & horn are all optional, but it makes the job a ton easier and minimizes the risk of poking a hole in your radiator. Removing some of the mounting bolts for that stuff is absolutely necessary though, so you can move it 'round.
__________________________________________________
Proud member of the Blue Army |
|
|
|
|
|
December 9th, 2010, 06:21 PM
|
#55 |
|
self wrencher
Name: john
Location: houston
Join Date: Dec 2008 Motorcycle(s): 08 250r and 07 600r Posts: A lot.
|
Take a video of the process.
|
|
|
|
|
December 20th, 2010, 10:16 AM
|
#56 |
|
CVMA #74 WSMC #750
Name: Nemesis
Location: On the track
Join Date: Oct 2009 Motorcycle(s): All of them Posts: A lot.
|
I finally got the valve cover off last night and what a freakin' PITA it was! The only way I was able to do this was to take off the cap (11065-0208) off the valve cover, disconnect the coolant hose leading into the valve and then twist/turn the upside down "J" shaped pipe forward. No way that thing was going to come out/off unless I did the above.
Man what a PITA it was. |
|
|
|
|
December 25th, 2010, 10:45 PM
|
#57 |
|
CVMA #74 WSMC #750
Name: Nemesis
Location: On the track
Join Date: Oct 2009 Motorcycle(s): All of them Posts: A lot.
|
Hey guys, I need your help.
When I line up the 2lT mark to the little metal marker in the alternator hole, the cams do not line up perfectly line in Vex's pic. 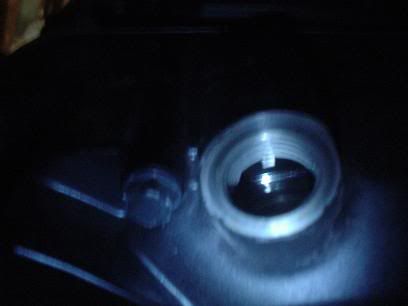 But when I line the cams up perfectly like the pic below the 2lT mark is passed the marker. Even after several revolutions. 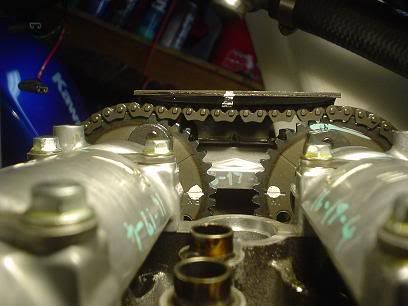 Any idea why this is? Am I doing it right? |
|
|
|
|
December 25th, 2010, 11:25 PM
|
#58 | |
|
CVMA #74 WSMC #750
Name: Nemesis
Location: On the track
Join Date: Oct 2009 Motorcycle(s): All of them Posts: A lot.
|
Quote:
|
|
|
|
|
|
December 27th, 2010, 11:07 AM
|
#59 |
|
ninjette.org guru
Name: .
Location: .
Join Date: Nov 2010 Motorcycle(s): . Posts: 331
|
1T is when the cams for the first cylinder are facing away from one another
2T is when you see this picture. go to the left leg side of the bike. line it up so the cams that you can see are facing away from the shim bucket as much as possible. then measure the two intake clearances and the two exhaust clearances for the left cylinder. then, turn the engine so you end up with this. this is when you measure the two intake and the two exhaust for the right cylinder. i was confused as **** too when i did it. hope it helps. post any more questions you might have or if it didn't make sense. |
|
|
|
|
December 27th, 2010, 12:59 PM
|
#60 | |
|
CVMA #74 WSMC #750
Name: Nemesis
Location: On the track
Join Date: Oct 2009 Motorcycle(s): All of them Posts: A lot.
|
Quote:
That's the part I'm confused. I thought if I turn it from the left side to hit 2T that the cams would line up. Is this not the case? |
|
|
|
|
|
December 27th, 2010, 01:20 PM
|
#61 |
|
ninjette.org guru
Name: .
Location: .
Join Date: Nov 2010 Motorcycle(s): . Posts: 331
|
Yes. To get 2T, the two white marks should point to each other. Don't worry about the little marking on the sight hole. Mine wasn't accurate. Once you have 2T, you'd measure the clearance for the 2nd (right side cylinder). You don't measure the left cylinder clearance once you have 2T.
|
|
|
|
|
December 27th, 2010, 06:03 PM
|
#62 | |
|
CVMA #74 WSMC #750
Name: Nemesis
Location: On the track
Join Date: Oct 2009 Motorcycle(s): All of them Posts: A lot.
|
Quote:
Okay..phew...I thought my engine was screwed when the ex. & in. mark didn't line up when I hit 2T in the sight hole. Why don't our marks line up when we hit 2T in the sight hole like Vex's? |
|
|
|
|
|
December 27th, 2010, 06:34 PM
|
#63 |
|
ninjette.org guru
Name: .
Location: .
Join Date: Nov 2010 Motorcycle(s): . Posts: 331
|
don't know. when I line up the two marks on the sprockets, I could SEE the 2T mark through the sigh hole (tho not aligned). When I went back to put the cams back on, I couldn't even find the mark. but everything worked fine when I put it back together.
|
|
|
|
|
May 7th, 2011, 07:52 PM
|
#64 |
|
CPT Falcon
Name: J.Emmett Turner
Location: Newnan, GA
Join Date: Apr 2009 Motorcycle(s): '08 CP Blue EX250J, '97 unpainted EX250F, 2nd '97 unpainted EX250F (no engine), '07 black EX250F Posts: A lot.
|
Question: Do you have to do an oil change to do a valve job?
Here's why I ask: I spoke to a dealer and they quoted me a much lower price for just the valve change than the full 22,500 mile service. Even so, I can't afford it yet, but I do have the oil and filters ready to go. I don't want to change my oil with expensive Shell Rotella T6 just before they do this if they are just going to flush it out and do an oil change anyway as part of the valve service. Thanks! Edit: When I got my first valve service done they said that I had to leave my bike the entire day and pick it up the next day because the engine needed to be completely cool before they could do the service. If that is so, that's a pretty major thing to leave out of the OP. Were they full of it? Last futzed with by CZroe; May 11th, 2011 at 07:33 AM. |
|
|
|
|
May 8th, 2011, 12:12 PM
|
#65 |
|
ninjette.org guru
Name: .
Location: .
Join Date: Nov 2010 Motorcycle(s): . Posts: 331
|
Oil doesn't have to be changed when adjusting valves.
The bike needs to be cooled down for several hours. |
|
|
|
|
May 11th, 2011, 07:32 AM
|
#66 | |
|
CPT Falcon
Name: J.Emmett Turner
Location: Newnan, GA
Join Date: Apr 2009 Motorcycle(s): '08 CP Blue EX250J, '97 unpainted EX250F, 2nd '97 unpainted EX250F (no engine), '07 black EX250F Posts: A lot.
|
Quote:
 Thanks! |
|
|
|
|
|
July 17th, 2011, 11:46 PM
|
#67 |
|
ninjette.org guru
Name: Domagoj
Location: Rijeka, Croatia
Join Date: Aug 2010 Motorcycle(s): Ninja 250r 2009 Posts: 396
|
Big thanks to VeX for writing these DIYs, and all who contributed! It's great to have a guide like this.
 So I checked valve lash yesterday. My ninja is on ~14000 miles. Decided to do it somewhat early as I have some free time now, and it's the first time I'm doing it myself. The results are very consistent, surprisingly so. All the exhaust valves are ~0.25 mm, and all inlet valves are on ~0.18 mm. This is within spec, but not exactly in the middle, especially inlet valves. Do you think I should adjust them now, or leave it be and check again within 5k miles, and adjust then? I have a separate concern, though. Stick coils are rusty. It's the gaskets which are rusty, actually, and they look quite bad. (pictures) I will replace the gaskets with the new ones, and clean the stick coils, but I wonder if I should apply some silicone on the coils before putting them back on? Service manual says to just put them back in place, without any additional sealing. But some water has obviously escaped down there. Or is there some other reason for this rust? I am also unsure about cylinder head gasket. I see no damage to it, and according to the manual it is not a replacement part, so there is no need to buy a new one, right? I should apply some silicone there, but I do not know if it should be all around, or just on the 2 spots marked in the manual? Does anyone have any ideas? |
|
|
|
|
July 19th, 2011, 12:07 AM
|
#68 |
|
ninjette.org certified postwhore
Name: Paul
Location: Roanoke, VA
Join Date: Jun 2009 Motorcycle(s): 2008 Candy Plasma Blue 250R Posts: A lot.
|
Your valves are so close to middle-of-spec I'd leave 'em alone. Lucky bastid
Regarding the coil seals, I agree it looks like the spark plug boots haven't been sealing well, lettin' in some rain/wash water down the shaft. I'd consider replacing those seals, but in the meantime (or if you'd rather not) take a wire brush to the metal bits so it'll mate better, and hit it with just a little high-temp silicone. Make sure you don't use too much though. Also make sure they don't shift while you're putting the head cover back on... one did that to me and got crimped in a bad way, blocking the plug shaft. Regarding some silicone on the actual stick coil boots, I don't see why that would be a problem, aside from requiring some additional work (cleaning out, etc) when you need to pull them to check/replace plugs, etc. I mean, those seals should be water-tight to begin with. I'd potentially leave a little bit of each boot seal un-siliconed (perhaps @ the aft end, since it's most uphill and least likely to collect water), to allow air pressure to vent as the engine heats up. Re: the head gasket, if you didn't fubar it removing it, I'd reuse it. Factory manual suggests just putting silicone in the designated areas (at the dips in the head next to the cam sprockets IIRC) but I always put a small bead all the way 'round. Provided you don't use too much, I don't see the harm other than a little more cleanup next time you're in there and it should (theoretically) help prevent leaks/blowout.
__________________________________________________
Proud member of the Blue Army |
|
|
|
|
July 19th, 2011, 01:09 AM
|
#69 |
|
ninjette.org guru
Name: Domagoj
Location: Rijeka, Croatia
Join Date: Aug 2010 Motorcycle(s): Ninja 250r 2009 Posts: 396
|
Thanks Paul!
What you say is what I was planning to do. Feels better to have a second opinion though.
|
|
|
|
|
August 17th, 2011, 08:58 AM
|
#70 |
|
ninjette.org member
Name: Nick
Location: Perth, Australia
Join Date: Dec 2010 Motorcycle(s): 2010 Blue Ninja 250R Posts: 37
|
What happened to the pictures. I'm thinking about doing this myself and pictures will give me better orientation.
|
|
|
|
|
November 11th, 2012, 04:54 PM
|
#71 |
|
ninjette.org member
Name: Harold
Location: Alaska
Join Date: Oct 2010 Motorcycle(s): 08 ninja 250r Posts: 10
|
Hey guys. I just recently did a valve adjustment to my girlfriend's 08 250r and when I went to start it, it fired up just fine then within a few seconds it started bogging down and the idle started dropping and it finally died. I started it again and this time it had a really hard time starting and once it does it idles fine then it starts dropping and dies. I want to see if you guys had any insight on what this might be? I am guessing I didn't time the engine right, but i wanted to see if anyone else knew anything about this before I start taking the bike apart again. Much thanks in advance for any help!
|
|
|
|
|
March 23rd, 2013, 01:50 PM
|
#72 |
|
ninjette.org newbie
Name: Adam
Location: Cedar Rapids, Iowa
Join Date: Feb 2011 Motorcycle(s): 2009 Kawasaki Ninja 250r SE Posts: 8
|
I just did a valve check/adjustment and when I got to the part to turn the engine over to make sure everything is working the camshafts won't move. The chain turned the sprockets but the lobes are not rotating. What could cause this?
__________________________________________________
My Ninja 250 Blog |
|
|
|
|
March 23rd, 2013, 02:16 PM
|
#73 |
|
ninjette.org newbie
Name: Adam
Location: Cedar Rapids, Iowa
Join Date: Feb 2011 Motorcycle(s): 2009 Kawasaki Ninja 250r SE Posts: 8
|
I found out why the lobes weren't moving. apparently the camshafts broke right after the first lobe closest to the cam chain when i went to turn over the engine. I don't think I used enough force to do that but apparently I did. Does anyone know why this might happen?
__________________________________________________
My Ninja 250 Blog |
|
|
|
|
April 16th, 2013, 07:48 AM
|
#74 |
|
CPT Falcon
Name: J.Emmett Turner
Location: Newnan, GA
Join Date: Apr 2009 Motorcycle(s): '08 CP Blue EX250J, '97 unpainted EX250F, 2nd '97 unpainted EX250F (no engine), '07 black EX250F Posts: A lot.
|
Well, I've seen a few people lose a chunk of some kind of collar on the chain side but it always still worked.
|
|
|
|
|
April 30th, 2013, 10:23 AM
|
#75 | |
|
ninjette.org newbie
Name: Michael
Location: riverside ca
Join Date: Mar 2012 Motorcycle(s): 2009 250R SE Posts: 2
|
Quote:
I had this happen to me last night. Ordered a used cam set off feabay. Im almost certain it broke removing the cam as it was lodged in the journal even with the chain off. Also have you guys ever seen one set off valves completely off from the rest? I was a little tight on all the valves except 2 exhaust valves were WAY tight on one cylinder. |
|
|
|
|
|
November 16th, 2013, 05:44 PM
|
#76 |
|
ninjette.org member
Name: Raymond
Location: San Francisco
Join Date: May 2011 Motorcycle(s): Kawasaki Ninja 250R 2008 White Posts: 11
|
How would I calculate the correct shim needed for my ninja 250?
For example. I measured the clearance and it has .18mm and when I measured it it was .111 which is 2.8194 If it's an inlet, do I do 2.82 + .18 - .195 If it's an exhaust, do I do 2.82. + .18 - .255 I did it this way and when I put everything back on, it seems like the clearance is still the same. Did I do something wrong? I did valve adjustment before but I forgot how to do the calculation. I think I saw a video or read a forum that said if you want more clearance subtract .205 from inlet and .265 from exhaust? |
|
|
|
|
November 16th, 2013, 05:49 PM
|
#77 |
|
ninjette.org member
Name: Joe
Location: Florida
Join Date: Jan 2013 Motorcycle(s): 2009 Ninja 250R Posts: 206
|
Use this Excel spreadsheet to do the calculations for you: http://www.theyeagergroup.com/2008%2...50J_Valves.xls
Valve clearance: Exhaust 0.22 ∼ 0.29 mm (0.0087 ∼ 0.0114 in.) Inlet 0.15 ∼ 0.24 mm (0.0059 ∼ 0.0094 in.) •Measure the thickness of the removed shim [A]. •Select a new shim thickness calculation as follows. a + b – c = d [a] Present Shim Thickness [b] Measured Valve Clearance [c] Specified Valve Clearance (Mean Value = 0.255 mm (Exhaust), 0.195 mm (Inlet)) [d] Replace Shim Thickness Example (Inlet): 2.90 + 0.45 – 0.195 = 3.155 mm ○Exchange the shim for the 3.175 size shim. |
|
|
|
|
November 17th, 2013, 01:31 AM
|
#78 | |
|
ninjette.org member
Name: Raymond
Location: San Francisco
Join Date: May 2011 Motorcycle(s): Kawasaki Ninja 250R 2008 White Posts: 11
|
Quote:
This is what I was talking about. Couldn't find it. |
|
|
|
|
|
January 19th, 2014, 08:44 PM
|
#79 |
|
ninjette.org newbie
Name: Allan
Location: Denton, TX
Join Date: Mar 2012 Motorcycle(s): 2009 Ninja 250, 2007 GSXR 600, 2009 KLX 110, 1995 RS125 Posts: 2
|
getting the valves adjusted on my 250 as we speak. This is a great write up and was a huge help.
FYI for anyone doing this, I found the necessary shims for $1.99 at rocky mountain ATV. (7.48mm outside diameter) |
|
|
|
|
February 20th, 2014, 04:35 PM
|
#80 |
|
Daily Jap rider
Name: Lance
Location: La Porte
Join Date: Dec 2012 Motorcycle(s): 2012 Ninja 250r Posts: A lot.
|
I really don't want to pay the $300-400 its going to cost to have my valves adjusted, coming up on 11,000 miles (Kawasaki dealer said that the 7500 miles recommended adjustment is a littler early for these bikes brand new). After seeing what it takes to do this, I am confident in saying that it is a little above my expertise.
 Will need the carbs synced as well probably. Guess I know what part of my tax return is going to. Will need the carbs synced as well probably. Guess I know what part of my tax return is going to.
|
|
|
|
 |
 Similar Threads
|
||||
| Thread | Thread Starter | Forum | Replies | Last Post |
| DIY - Accessing and adjusting idle mixture screws | VeX | 2008 - 2012 Ninja 250R Tech Talk | 71 | December 15th, 2017 03:38 AM |
| DIY - Checking valve lash on '08+ 250r (WITH pictures) | VeX | 2008 - 2012 Ninja 250R Tech Talk | 45 | September 16th, 2017 04:13 PM |
| issue adjusting the valves | extremez31 | 1986 - 2007 Ninja 250R Tech Talk | 5 | June 16th, 2014 10:16 AM |
| DIY - Adjusting the rear shock preload | noche_caliente | 2008 - 2012 Ninja 250R Tech Talk | 139 | April 6th, 2014 10:20 PM |
| !HELP! Adjusting Valves issues | 00v_Lucky | 2008 - 2012 Ninja 250R Tech Talk | 9 | June 14th, 2010 04:39 PM |
|
|


