
|
 April 19th, 2010, 09:38 AM
|
#1 |
|
ninjette.org member
Name: Dave
Location: DFW, US
Join Date: Mar 2010 Motorcycle(s): 2008 Ninja TwoFiddy Posts: 164
|
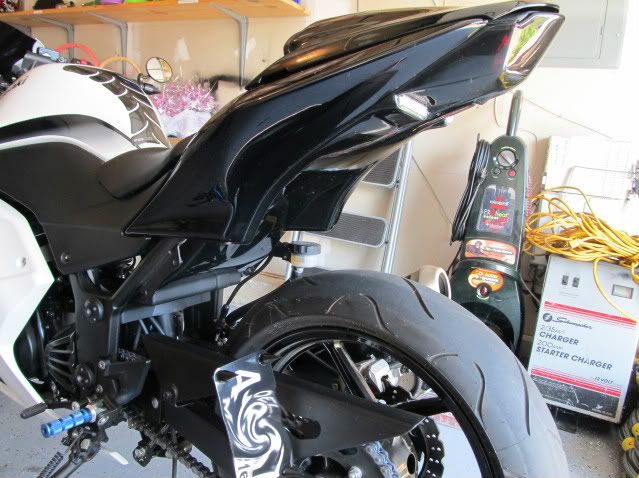
DIY: Hotbodies Racing Undertail Install (Ninja 250R)
Installation guide for Hotbodies Racing (HBR) Ninja 250R Undertail. Note this is how I installed the undertail and should be as an aid with the instructions provided by HBR. You may opt to proceed a different route. I am not responsible for any damage to your motorcycle or yourself. It's your own your responsibility to use the appropriate tools and safety gear.
Whats included in the kit: • Undertail w/ all LED Lights (2 amber turn signals & 1 license plate LED) • License plate mounting kit (2 "L" brackets & bolts) never received this. • All mounting hardware (blue wire connectors & plastic rivets) • Installation instructions with photos (black & white. Website has a color PDF version) CLICK ON PHOTOS FOR LARGER VIEW. moto002.jpg OEM rear fender and undertail.  moto001.jpg 1.- REMOVE/UNPLUG: >Tail section panels >Seats >Foot pegs >Disconnect Turn signals, License plate light and Tail light >Mud flap >Remove the rear Brake Reservoir (keep reservoir upright to avoid leaks). moto003.jpg 2.- RESERVOIR BRACKET >Place a cloth or several layers of masking tape over reservoir bracket to prevent scratching of undertail during installation. >Also covered the foot peg nuts with several layers of masking tape to avoid scratch the undertail. >OPTIONAL: I had a hard time with the reservoir bracket in the way so I bended slightly outwards. Not something normally done. moto004.jpg 3.-CUTTING > Mask the battery box area with 1" blue painters masking tape as a guide for cutting. moto005.jpg >Secure the battery box area with garbage ties to avoid movement when cutting and double check that all wires out of the way. >Use a dremel, saw, scissors. I used a dremel. Use gloves and goggles due to the hot melted plastic as a result of the cutting. After cutting wait a few minutes for the melted plastic to cool off and remove the excess by hand. moto008.jpg moto010.jpg 4.-SECURE >Secure the battery box using two bolts or four tie wraps. I used tie wraps. moto011.jpg 5.-MOUNT >Mount the HBR undertail. Make sure the bottom tail panel bolts line up on each side. moto012.jpg moto013.jpg moto014.jpg 6.- OLD TAIL SECTION >Carefully separate the highlighted green and remove the tail light. moto015.jpg >Insert the tail light. Noticed this does not use any bolts to keep it in place. Sandwiched between the Kawi battery box and the HBR undertail. >Mount the top taillight cover. moto016.jpg moto017.jpg >Re-install all tail pieces properly aligned, seats and bolts. 7.- SAGGING > WTF!... A gap between my passenger seat! I did read about this issue on another thread. I did contact HBR customer service and stated "As long as you trimmed the glove box (battery box) it shouldn't sag." IMO seem like lack of support bolts/screws. moto018.jpg moto019.jpg >For a solution you can use foam pipe insulation between the frame and the tail panels to push it up. I'd look for the thickest one you can find. I used from two to three layers half since I could not wrap it around. I did locate an area on the HBR undertail that can be screwed to the frame (will need to drill a hole) and covered up by the tail panels without interfering. moto020.jpg moto21.jpg EDIT: I just realized why the sag. HBR supplies two metal "L" brackets and bolts to secure the license plate (which I never received). These mount approximate under the area marked in the photo below. Once these bolts are secured (if possible to the frame) I bet it solves the sagging/passenger seat gap issue. moto21.jpg 8.- ALMOST COMPLETE >moto24.jpg 9.- ELECTRICAL > For the LED turn signals to work properly (they just stays ON) you need to add a 8 ohm resistor to each LED turn signal according to HBR. It is easier to replace the stock flasher (Mitsuba FR22-091) with a Tridon LL552 Long Life Electronic Flasher for aprox USD $6.50 from a local auto parts store. It now blinks and at a normal speed. Read more about flasher upgrade here. Tridon_LL552.jpg >I spliced the old Kawi OEM turn signals wire harness connector and soldered the wires to the HBR LED turn signals ones. I'm also wiring the SHINTO LED tail light turn signals. >Secured the HBR LED turn signals with clear silicone on the inner part of the undertail. More DIY info to come.... NOTE: You may need a wheel hugger to protect the undertail's paint job. This undertail is not painted. I left it white for this write up. Manufactures product link, reviews and install guide: http://www.hotbodiesracing.com/en/pr...-10_ninja_250r Last futzed with by FerociousNINJA; April 23rd, 2010 at 04:32 PM. |

|

|
|
April 19th, 2010, 10:46 AM
|
#2 |
|
ninjette.org sage
Name: Matt
Location: South East Florida/Rutgers University
Join Date: Dec 2008 Motorcycle(s): 2008 250r (Fastest Color) Posts: 914
|
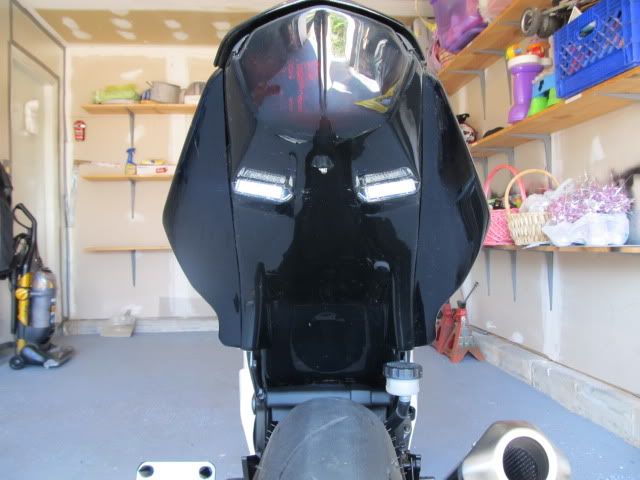
I must say I really like that design detail on the bottom of the tail light, the little part that comes up. Reflects the styling of the headlight
__________________________________________________
Pictures of my ninjette plus... |
|
|
|
|
April 19th, 2010, 12:33 PM
|
#3 |
|
ninjette.org member
Name: Henry
Location: Harahan, Louisiana
Join Date: Apr 2010 Motorcycle(s): Blue 09 Ninja 250 Posts: 55
|
nice write up Dave and good idea for the gap......any particular size foam insulation piping u used? did u cut it in half or wrapped it around the frame?
__________________________________________________
 Im So Cereal Im So Cereal 
|
|
|
|
|
April 19th, 2010, 02:23 PM
|
#4 |
|
ninjette.org certified postwhore
Name: Bob
Location: CA
Join Date: Dec 2008 Motorcycle(s): '08 Ninja 250r, '14 CBR500r Posts: A lot.
|
Very nice. You will have to tell us how visible the turn signals are. I don't know if there is technically enough separation between them to be legal, but I'm not real sure about the ins and outs of all that.
|
|
|
|
|
April 19th, 2010, 02:27 PM
|
#5 |
|
ninjette.org member
Name: Henry
Location: Harahan, Louisiana
Join Date: Apr 2010 Motorcycle(s): Blue 09 Ninja 250 Posts: 55
|
the blinkers are visible and bright enough.....cop was behind me and didnt pull me over so i guess they are legal
__________________________________________________
Im So Cereal
|
|
|
|
|
April 19th, 2010, 02:41 PM
|
#6 | |
|
ninjette.org certified postwhore
Name: Bob
Location: CA
Join Date: Dec 2008 Motorcycle(s): '08 Ninja 250r, '14 CBR500r Posts: A lot.
|
Quote:
I vaguely remember from a thread from a year or two ago about the differences between DOT approved equipment and what is/isn't "legal." So it isn't always super straight forward. |
|
|
|
|
|
April 19th, 2010, 04:17 PM
|
#7 |
|
ninjette.org guru
Name: dawn
Location: portland, or
Join Date: Sep 2009 Motorcycle(s): 08 ninja 250r modded, 73 honda cl200, 74 kawasaki 400 triple Posts: 255
|
i never had issues with sagging...i wonder if it's because i have a bike monkey tail light?
|
|
|
|
|
April 19th, 2010, 04:31 PM
|
#8 |
|
ninjette.org member
Name: Henry
Location: Harahan, Louisiana
Join Date: Apr 2010 Motorcycle(s): Blue 09 Ninja 250 Posts: 55
|
i have a bike bitez tail light so idk
__________________________________________________
Im So Cereal
|
|
|
|
|
April 19th, 2010, 04:35 PM
|
#9 |
|
ninjette.org member
Name: Dave
Location: DFW, US
Join Date: Mar 2010 Motorcycle(s): 2008 Ninja TwoFiddy Posts: 164
|
7.- SAGGING
........ EDIT: I just realized why the sag. HBR supplies two metal "L" brackets and bolts to secure the license plate (which I never received). These mount approximate under the area marked in the photo below. Once these bolts are secured (if possible to the frame) I bet it solves the sagging/passenger seat gap issue. Attachment 6723 |
|
|
|
|
April 19th, 2010, 05:01 PM
|
#10 |
|
ninjette.org member
Name: Henry
Location: Harahan, Louisiana
Join Date: Apr 2010 Motorcycle(s): Blue 09 Ninja 250 Posts: 55
|
is that is true why dont they mention that in the install?
__________________________________________________
Im So Cereal
|
|
|
|
|
April 19th, 2010, 11:01 PM
|
#11 |
|
ninjette.org newbie
Name: Walid
Location: Toronto
Join Date: Nov 2009 Motorcycle(s): 2009 Ninja 250R Posts: 5
|
Awesome DIY! I was looking all over for a DIY of the undertail to see the work involved before buying one, didn't expect something this good though. Great work!
|
|
|
|
|
April 20th, 2010, 08:52 AM
|
#12 |
|
ninjette.org member
Name: John
Location: Boston
Join Date: Mar 2010 Motorcycle(s): 2007 Zx10R 2009 250R Posts: 134
Blog Entries: 14
|
Nice! You beat me to to DIY. I was in progress and the sagging tail light just made me quit. I figured out the light was pressing up against the black plastic too much forcing the tail to sag. I have since, decided to replace the original under tray and use a R&G tail. Great work! Anyone looking for the exact same undertail as above PM me!
__________________________________________________
2007 Kawasaki ZX10R Red 2009 Kawasaki EX250R Special Edition |
|
|
|
|
April 22nd, 2010, 08:38 AM
|
#13 |
|
ninjette.org newbie
Name: Glen
Location: Laval
Join Date: Apr 2010 Motorcycle(s): Ninja 250 Posts: 4
|
I just got this undertail and am almost finished installing it. I did all the wiring to test out the lights but the turn signals don't blink. Left side (front and back) stays lit when I signal left and right side (front and back) stays lit when I signal right.
I'm surprised the Hotbodies instructions didn't mention anything about this or any other trouble shooters for that matter... The whole thing is a real pain in the a@#. Any ideas as to what he problem might be be? |
|
|
|
|
April 22nd, 2010, 08:52 AM
|
#14 |
|
ninjette.org member
Name: John
Location: Boston
Join Date: Mar 2010 Motorcycle(s): 2007 Zx10R 2009 250R Posts: 134
Blog Entries: 14
|
The problem is the the signals are LED so the OEM flasher doesn't see enough "resistance" to make the lights blink. What happens with the stock bulbs - Filament ones is as the light turn on, the filament heats up and creates a resistance on the circuit. Once it reaches a certain point, it trips the flasher relay and then the whole cycle starts over again. LEDs since, they draw little current do not create enough resistance.
I have the Hotbodies kit as well and I am 100% sure that somewhere in the documentation is states that you will need to add resisters to solve this issue. Two ways to solve this issue. 1. Replace the flasher relay with an electronic flasher that can handle variable loads. This happened to me when I changed my ZX10 bulbs front and rear to LEDS. The light would turn on and stay on. I bought the flasher from Autozone for $8. 2. Add resisters in parallel to each light so when you do signal, it create enough resistance to trip the flasher. Search the forum for "led and resister" you will find a ton of threads relating to it. IMO - I just bought the electronic flasher because it was less work. I don't like spaghetti wiring and splicing unless I have to. Replacing the flasher is backwards compatible if you want to switch back to none LED lights without further modification.
__________________________________________________
2007 Kawasaki ZX10R Red 2009 Kawasaki EX250R Special Edition |
|
|
|
|
April 22nd, 2010, 09:16 AM
|
#15 |
|
ninjette.org newbie
Name: Glen
Location: Laval
Join Date: Apr 2010 Motorcycle(s): Ninja 250 Posts: 4
|
Thanks deezyellownutz! I'm no electrician but I figured it was something due to the current for the new LED's as oppose to the stock bulbs.
There were some blue clips that came with the kit that are for splicing wires together. I assumed that's all they were for. HBR only calls them "blue clips". Could these possibly be the resistors? |
|
|
|
|
April 22nd, 2010, 09:51 AM
|
#16 |
|
ninjette.org member
Name: Dave
Location: DFW, US
Join Date: Mar 2010 Motorcycle(s): 2008 Ninja TwoFiddy Posts: 164
|
I haven't installed the electrical yet but this is what I read:
"You’ll need to get a new 2 pole electronic flasher relay from any auto parts store. They’re about $4 or so at Autozone. You need the new relay because the undertail comes with LED turn signals. The LEDs don’t draw enough power to operate the stock mechanical relay so they won’t work without the electronic relay." HBR FAQ -Do Hotbodies Racing's LED flush mount blinkers work with my stock running lights? No, our turn signals only have two wires. One for the ground and one for the turn signals, the extra wires from your wiring harness are for the running lights and this should be tied off to the side because it is not used. -Do I need resistors or load equalizers? We actually designed the LED's to blink faster, since they are smaller than stock, so they will draw more attention from drivers behind you. If you wish to slow them down, we recommend a 20-25 watt 8 ohm non-inductive resistor wired inline with the RED wires on our kits. You can check with Radio Shack or www.customled.com for pricing and availability. http://www.hotbodiesracing.com/en/fa...kers_questions |
|
|
|
|
April 22nd, 2010, 06:47 PM
|
#17 |
|
ninjette.org member
Name: Dave
Location: DFW, US
Join Date: Mar 2010 Motorcycle(s): 2008 Ninja TwoFiddy Posts: 164
|
9.- ELECTRICAL
> For the LED turn signals to work properly (they just stays ON) you need to add a 8 ohm resistor to each LED turn signal according to HBR. It is easier to replace the stock flasher (Mitsuba FR22-091) with a Tridon LL552 Long Life Electronic Flasher for aprox USD $6.50 from a local auto parts store. It now blinks and at a normal speed. Read more about flasher upgrade here. Attachment 6782 |
|
|
|
|
April 27th, 2010, 10:19 AM
|
#18 |
|
ninjette.org member
Name: Dave
Location: DFW, US
Join Date: Mar 2010 Motorcycle(s): 2008 Ninja TwoFiddy Posts: 164
|
Received missing license plate plastic "L" brackets and bolts from HBR... Great customer service from Kevin
 NOTE: Realized you will need to drill holes in the frame and support the undertail with screws. Attachment 6723 |
|
|
|
|
April 29th, 2010, 10:06 AM
|
#19 |
|
ninjette.org member
Name: N/A
Location: N/A
Join Date: Jul 2009 Motorcycle(s): N/A Posts: 66
|
So whats the general concensus on the sag? is there a way to tweak the install or be extra careful to have it fit properly?
|
|
|
|
|
July 2nd, 2010, 09:48 AM
|
#20 |
|
ninjette.org dude
Name: 1 guess :-)
Location: SF Bay Area
Join Date: Jun 2008 Motorcycle(s): '13 Ninja 300 (white, the fastest color!), '13 R1200RT, '14 CRF250L, '12 TT-R125LE Posts: Too much.
Blog Entries: 7
|
Another member has written up their install experiences here:
http://www.ninjette.org/forums/showthread.php?t=49212
__________________________________________________
Montgomery Street Motorcycle Club / cal24.com / crf250l.org / ninjette.org ninjette.org Terms of Service Shopping for motorcycle parts or equipment? Come here first. The friendliest Ninja 250R/300/400 forum on the internet! (especially Unregistered) |
|
|
|
|
May 2nd, 2011, 07:13 PM
|
#21 |
|
ninjette.org newbie
Name: Fred
Location: Pittsburgh
Join Date: May 2011 Motorcycle(s): '10 250 Posts: 1
|
thanks
|
|
|
|
|
July 13th, 2011, 07:23 PM
|
#22 |
|
ninjette.org member
Name: Owen
Location: Canada
Join Date: Mar 2011 Motorcycle(s): 2009 Kawasaki Ninja 250R Posts: 121
|
Hi Guys,
I just wanted to comment on the indicator (flasher) relay mentioned in the original post in this thread. For anyone out there looking to fix the non functioning LED indicator problem, DO NOT buy the LL552 flasher mentioned in the first post. I'm not sure why that part in particular is suggested, but it's the exact same type of relay that was originally on the bike, and does NOT work with LED indicators. For that you need an EP34 or similar flasher, and you'll notice that it says "LED" right on the part. That type uses a relay and an electronic circuit to switch, so it doesn't require the resistance of the bulb to turn on and off. It also requires a ground termination that you'll have to connect yourself. I wasted the better part of a day getting the LL552 installed only to find out it didn't do anything! I've attached some pictures to help clarify the difference between these parts since it's otherwise pretty vague. Cheers, Owen |
|
|
|
|
August 22nd, 2011, 02:53 PM
|
#23 |
|
ninjette.org member
Name: Omar
Location: Dallas Texas
Join Date: Aug 2011 Motorcycle(s): 2011 ninja 250 special edition Posts: 54
|
Just got done with mine. Tips : no need to cut oem undertai. Used EL12 relay flasher. You should notch the tail light and add the bolts threw the under tail.
|
|
|
|
|
October 8th, 2011, 12:52 PM
|
#24 | |
|
ninjette.org member
Name: Mahesh
Location: Silver spring,md
Join Date: Oct 2011 Motorcycle(s): 11 ninja 250r Posts: 14
|
Quote:
|
|
|
|
|
|
October 8th, 2011, 07:18 PM
|
#25 |
|
Ridin Dirty
Name: Ed
Location: Delaware
Join Date: Jun 2011 Motorcycle(s): 2011 white se 250r , 2008 zx6R Posts: 921
|
i just did mine the other day.. i cut mine just because it said too, but i think without cutting it would be a really tight fit snapping into the side tail fairings. might even possibly buldge out some .
__________________________________________________
#1 |
|
|
|
|
October 8th, 2011, 07:32 PM
|
#26 |
|
ninjette.org certified postwhore
Name: Bob
Location: CA
Join Date: Dec 2008 Motorcycle(s): '08 Ninja 250r, '14 CBR500r Posts: A lot.
|
greatwhiteninja: I'm interested in hearing about the picture in your avatar....
__________________________________________________
Honda Interceptor VFR800 DLX (2014, 8th gen) Honda CBR500r (2014) - FOR SALE Kawi Ninja 250r (2008) - Restored and passed-down within family, only to be abandoned |
|
|
|
|
October 8th, 2011, 07:46 PM
|
#27 |
|
Ridin Dirty
Name: Ed
Location: Delaware
Join Date: Jun 2011 Motorcycle(s): 2011 white se 250r , 2008 zx6R Posts: 921
|
that is a pic of the front end of my bike with my led running lights

__________________________________________________
#1 |
|
|
|
|
October 8th, 2011, 09:16 PM
|
#28 | |
|
ninjette.org certified postwhore
Name: Bob
Location: CA
Join Date: Dec 2008 Motorcycle(s): '08 Ninja 250r, '14 CBR500r Posts: A lot.
|
Quote:
 Which lights did you use?
__________________________________________________
Honda Interceptor VFR800 DLX (2014, 8th gen) Honda CBR500r (2014) - FOR SALE Kawi Ninja 250r (2008) - Restored and passed-down within family, only to be abandoned |
|
|
|
|
|
October 8th, 2011, 11:15 PM
|
#29 |
|
Avid Kitteh Poster
Name: Justin
Location: Norcal
Join Date: Sep 2011 Motorcycle(s): 2006 Yamaha TTR 50 SUCK IT Posts: A lot.
|
these look great does anyone in CA have one and where did you put your plate?
__________________________________________________
I powdercoat stuff Help me pay for my addiction  I say funny stuff. http://twitter.com/JustinPWNSyou sometimes... I write like a 12 year old too, http://justinpwnsyou.wordpress.com/ |
|
|
|
|
October 9th, 2011, 06:33 AM
|
#30 | ||
|
Ridin Dirty
Name: Ed
Location: Delaware
Join Date: Jun 2011 Motorcycle(s): 2011 white se 250r , 2008 zx6R Posts: 921
|
Quote:
Quote:
__________________________________________________
#1 |
||
|
|
|
|
October 9th, 2011, 09:46 PM
|
#31 |
|
Avid Kitteh Poster
Name: Justin
Location: Norcal
Join Date: Sep 2011 Motorcycle(s): 2006 Yamaha TTR 50 SUCK IT Posts: A lot.
|
I dont think thats legal in California.
__________________________________________________
I powdercoat stuff Help me pay for my addiction I say funny stuff. http://twitter.com/JustinPWNSyou sometimes... I write like a 12 year old too, http://justinpwnsyou.wordpress.com/ |
|
|
|
|
October 9th, 2011, 11:59 PM
|
#32 | |
|
ninjette.org certified postwhore
Name: Bob
Location: CA
Join Date: Dec 2008 Motorcycle(s): '08 Ninja 250r, '14 CBR500r Posts: A lot.
|
Quote:
__________________________________________________
Honda Interceptor VFR800 DLX (2014, 8th gen) Honda CBR500r (2014) - FOR SALE Kawi Ninja 250r (2008) - Restored and passed-down within family, only to be abandoned |
|
|
|
|
|
October 10th, 2011, 06:17 AM
|
#33 |
|
Ridin Dirty
Name: Ed
Location: Delaware
Join Date: Jun 2011 Motorcycle(s): 2011 white se 250r , 2008 zx6R Posts: 921
|
it probably is the same here also.. but 1 out of 3 bikes on the road around here have a sidemount tag and ive been running one for a while now even before the hotbodies undertail with no issues. plus the bike is tagged for 5yrs so i got a long time before worrying about inspection again..loL!
__________________________________________________
#1 |
|
|
|
|
October 10th, 2011, 07:41 AM
|
#34 |
|
Avid Kitteh Poster
Name: Justin
Location: Norcal
Join Date: Sep 2011 Motorcycle(s): 2006 Yamaha TTR 50 SUCK IT Posts: A lot.
|
CHP is pulling over anyone they can... idk about chancing it.. lol
__________________________________________________
I powdercoat stuff Help me pay for my addiction I say funny stuff. http://twitter.com/JustinPWNSyou sometimes... I write like a 12 year old too, http://justinpwnsyou.wordpress.com/ |
|
|
|
|
October 10th, 2011, 07:50 AM
|
#35 |
|
Ridin Dirty
Name: Ed
Location: Delaware
Join Date: Jun 2011 Motorcycle(s): 2011 white se 250r , 2008 zx6R Posts: 921
|
whats CHP? im not worried about, like i said ive went the whole summer like it is and never had a problem so probably in my area its either allowed or they dont stress it.
__________________________________________________
#1 |
|
|
|
|
October 10th, 2011, 08:00 AM
|
#36 |
|
Avid Kitteh Poster
Name: Justin
Location: Norcal
Join Date: Sep 2011 Motorcycle(s): 2006 Yamaha TTR 50 SUCK IT Posts: A lot.
|
California Highway Patrol.
__________________________________________________
I powdercoat stuff Help me pay for my addiction I say funny stuff. http://twitter.com/JustinPWNSyou sometimes... I write like a 12 year old too, http://justinpwnsyou.wordpress.com/ |
|
|
|
|
October 10th, 2011, 09:26 AM
|
#37 |
|
Ridin Dirty
Name: Ed
Location: Delaware
Join Date: Jun 2011 Motorcycle(s): 2011 white se 250r , 2008 zx6R Posts: 921
|
oh..ok. the normal way to mount it is underneath , right in the middle of the 2 turn signals but down some. even has a small led there to light up the tag.
__________________________________________________
#1 |
|
|
|
|
October 10th, 2011, 09:37 AM
|
#38 |
|
Ridin Dirty
Name: Ed
Location: Delaware
Join Date: Jun 2011 Motorcycle(s): 2011 white se 250r , 2008 zx6R Posts: 921
|
also just a FYI , when running front led turns then adding this undertail.. the EL12 wouldnt work for me, the lights were very dim and just stayed lit solid.. swapped to a EP34 relay and now they are all fully lit up and all blink like hazards.. now diode kit is needed, and all should be working like normal.
__________________________________________________
#1 |
|
|
|
|
May 18th, 2012, 12:54 PM
|
#39 |
|
ninjette.org newbie
Name: Conor
Location: Toronto
Join Date: May 2012 Motorcycle(s): Ninja 250r Posts: 1
|
One comment
I'd just like to add some things to save someone else some heartache.
When you are running the cables up MAKE SURE that you run them back through the holes in the bike frame. I forgot about this and had to snip and reconnect them again. If you dont run them through the holes the undertail will not fit properly. You dont need to do any cutting i.m.o. I have a 2011 ninja 250 and the undertail just slots on over the battery box plastic part. Pain in the ass getting the lower bolts back in. I only managed to get one in. Definitely screw out the reservoir cap screw as mentioned above, this will get in the way and scratch your undertail if you dont. Make sure that you buy connectors aswell, you'll need about 10 or so. Its handy to have someone to help you with installing for certain parts. Getting the bolts removed from the tail light stock is a challenge without the right spanner, I would recommend getting one Im not sure of the size though, I used a vice grip but it wasnt straight forward. Tools needed: Pliers (very handy for electrical work as you can snip and also clamp down on the connectors to close them) Set of allenkeys Small flathead screwdriver and medium sized head flathead. Drill with a size 8 steel bit. Patience
|
|
|
|
|
May 25th, 2012, 06:13 PM
|
#40 |
|
ninjette.org newbie
Name: C
Location: Ft Lauderdale
Join Date: May 2012 Motorcycle(s): Kawasaki Ninja 250r Posts: 1
|
Does anyone know where exactly you're supposed to mount the license plate or is it just personal preferance?
|
|
|
|


