
|
 October 28th, 2014, 10:03 PM
|
#1 |
|
ninjette.org certified postwhore
Name: TC
Location: Hawaii
Join Date: Sep 2013 Motorcycle(s): A lot. Posts: A lot.
|
Safety wire!
For those of you who take it to the track -- or are just as paranoid about safety as I am -- what did you find the best way to drill holes in bolts for the purpose of safety wiring them to be?
Just installed a new brembo front caliper, and had to use an aftermarket SSR bracket to get the job done -- but now that I've got non-OEM parts on the bike, I'm paranoid about bolts coming loose. I used plenty of red loctite but would much rather safety-wire things properly to finish the job correctly. How do you guys drill a tiny hole in hardened steel bolts? This is what I'm trying to accomplish... 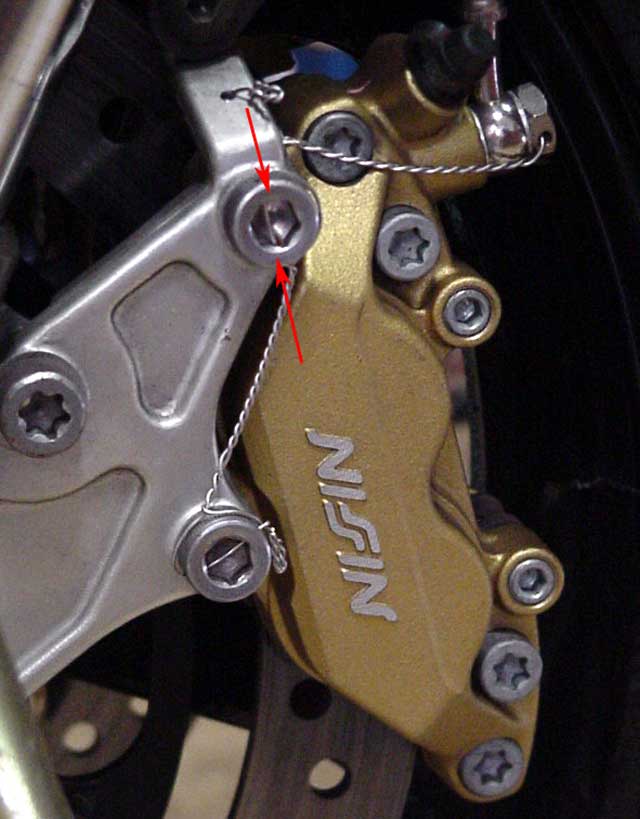  
__________________________________________________
Just batshit crazy. All his posts are endless diatribes. Some are actually entertaining but mostly batshit crazy. |

|

|
|
October 28th, 2014, 10:04 PM
|
#2 |
|
ninjette.org certified postwhore
Name: TC
Location: Hawaii
Join Date: Sep 2013 Motorcycle(s): A lot. Posts: A lot.
|
And to follow up --- what's the best gauge/size/diameter safety wire to use for this sort of thing? I've been using some rather thick stuff so far, but the smaller of a hole I'll need to drill in a bolt, the less I will weaken the bolt.
__________________________________________________
Just batshit crazy. All his posts are endless diatribes. Some are actually entertaining but mostly batshit crazy. |
|
|
|
|
October 28th, 2014, 10:08 PM
|
#3 |
|
Certifiable nontundrum
Name: Harper
Location: NC Milkshake stand
Join Date: Mar 2013 Motorcycle(s): 2013 SE NINJA 300 Posts: Too much.
MOTM - Sep '13, Sep '16
|
They sell a lil gauge to do it, you could probly make one yourself if your to cheap to buy one. No I don't have one, my neighbor does, no you can't borrow it... Sorry

__________________________________________________

|
|
|
|
|
October 28th, 2014, 10:25 PM
|
#4 |
|
Certifiable nontundrum
Name: Harper
Location: NC Milkshake stand
Join Date: Mar 2013 Motorcycle(s): 2013 SE NINJA 300 Posts: Too much.
MOTM - Sep '13, Sep '16
|
__________________________________________________
|
|
|
|
|
October 29th, 2014, 07:06 AM
|
#5 |
|
The Corner Whisperer
Name: Chris (aka Reactor)
Location: Northern KY
Join Date: May 2011 Motorcycle(s): 2010 250 (track), 1992 250, 2006 R6 (street/track), 2008 R6 (track) Posts: Too much.
MOTY 2015, MOTM - Nov '12, Nov '13
|
I buy my rolls of safety wire from HF (http://www.harborfreight.com/0041-in...coil-8895.html). It's cheap and easy to work with.
When drilling for safety wire, I drill the smallest hole that the wire will go through. And buy good bits to make the job easier. Also, your gunna break a couple so buy a few before you start the job.
__________________________________________________
Goal: Shake A Million Hands | Look through the corners | Track Day Prep | Closest track? | The Mid-Ohio School |
|
|
1 out of 1 members found this post helpful. |
|
October 29th, 2014, 07:19 AM
|
#6 |
|
ninjette.org member
Name: Tim
Location: NJ
Join Date: Sep 2013 Motorcycle(s): 2006 Ninja 250 Posts: 47
|
Ebay sells packs of 1/16th cobalt bits. I bought a pack of 10 for drilling through ARP flywheel bolts for less than $15 and only used up maybe 4 and drilled 7.
|
|
|
|
|
October 29th, 2014, 07:57 AM
|
#7 |
|
Cat herder
Name: Gort
Location: A secret lair which, being secret, has an undisclosed location
Join Date: May 2009 Motorcycle(s): Aprilia RS660 Posts: A lot.
Blog Entries: 6
MOTM - Jul '18, Nov '16, Aug '14, May '13
|
I used a "Nutholer." No kidding, that's what it's called. Great product, and I'd say well worth it.
http://www.motodracing.com/safety-wire-drill-guide It comes with one or two 1/16 cobalt drill bits. Cobalt is important, you can get them online or in any decent hardware store. You WILL break them so buy a bunch. Given how fragile the bits are, it's probably a good idea to use a small drill press if you can. I happen to have one. If you don't have access to one, be REALLY careful about keeping things square and straight. With hardened steel use high RPM, lube (e.g. WD40), and "peck" at it rather than applying steady pressure. It'll be messy because of the lube. Standard safety wire is a bit smaller than 1/16 inch (.0625). That's what you need. Also, buy the special twister pliers. Neatness counts. I just wanted to do the basic wiring for my track day, but found that it's kind of fun and a good way to pass long winter nights. So I wired up a bunch of stuff that wasn't required, just because I could. Tip: The jig will drill a hole at a tangent, between two faces of the bolt head. It will not drill through the center. This is fine, but you'd do well to mark the faces you want to use before you remove the bolt, so the wire wraps properly around the head. When you reinstall the bolt, it will be oriented in the same way assuming you torque it correctly.
__________________________________________________
I am NOT an adrenaline junkie, I'm a skill junkie. - csmith12 Nam et ipsa scientia potestas est. Heri historia. Cras mysterium. Hodie donum est. Carpe diem. |
|
|
|
|
October 29th, 2014, 08:13 AM
|
#8 | |
|
ninjette.org certified postwhore
Name: Jay
Location: CT
Join Date: Apr 2011 Motorcycle(s): 2015 636 ABS - 69 Honda 305 Posts: A lot.
|
Quote:
Cobalt drills are good, getting coated will help a ton. TiN or something along those lines. If your using a drill press, if your using a regular hand drill you may snap them just by pressing at wierd angles, so the coating wouldnt help you. It only helps to keep the drill sharper for longer. |
|
|
|
|
|
October 29th, 2014, 08:20 AM
|
#9 |
|
Old and slow
Name: Lohman
Location: Aiken, S.C.
Join Date: May 2014 Motorcycle(s): Suzuki TL1000R, Honda CBR600F3, Ninja 250 Posts: 889
|
I took a block of aluminum and drilled and tapped the 3 basic sizes of bolt holes along one edge. Thread the bolt with a lock nut on it so that you can set the side to be drilled horizontal. I put the block in a vice and used a pretty sharp center punch to mark the point I wanted to start drilling.
I have a small vice that fits on my drill press and so i clamped the block/bolt assembly in the vice on the drill press for minimal movement. Finally, Cobalt bits... no not the company Kobalt... the element Cobalt. There are bits that have 3 - 5 % cobalt in the steel... that makes for some really hard bits... they will cut stainless if you are gentle. be sure the use some kind of cutting fluid and make sure the drill bit is vertical during the drilling process. I would make a little divot, back off, realign and then start drilling again. it also helps to mark them when they are on the bike so you know what flat to drill through. these are what I would call perfect. The safety wire is pulling the bolt int the "tight" direction. That is what you want, not just to keep the bolt from falling out but to keep it from backing off if at all possible. I used the heavy wire, but it was a PITA to get through the drilled holes. I'm running the 0.032 soft stainless now... works and looks great. 
|
|
|
1 out of 1 members found this post helpful. |
|
October 29th, 2014, 09:42 AM
|
#10 |
|
Daily Ninjette Rider
Name: Steve
Location: Hollywood, FL
Join Date: Jul 2014 Motorcycle(s): 2012 Ninja 250R, 2015 Vespa GTS 300 IE Super, 1989 Honda Elite 80 (SOLD) Posts: 402
|
I would just buy wire-lockable (drilled head) bolts.
__________________________________________________
  Check out my music at http://www.proteusmusic.com |
|
|
|
|
October 29th, 2014, 10:01 AM
|
#11 | |
|
Old and slow
Name: Lohman
Location: Aiken, S.C.
Join Date: May 2014 Motorcycle(s): Suzuki TL1000R, Honda CBR600F3, Ninja 250 Posts: 889
|
Quote:
frequently it is hard to find the proper length and strength requirements with predrilled fasteners when dealing with brakes or other high stress locations I replaced most of the engine case bolts with anodized aluminum, easy to drill. |
|
|
|
|
|
October 29th, 2014, 10:13 AM
|
#12 | |
|
wat
Name: wat
Location: tustin/long beach
Join Date: Sep 2009 Motorcycle(s): wat Posts: Too much.
Blog Entries: 5
MOTM - Oct '12, Feb '14
|
Quote:
all of these photos show poor safetywiring. the wire should be tight and pulling on the bolt. see how there is a curve to all those. that means its not tight enough. the wire should be pulling the bolt clockwise always. i use the HF safetywire and safetywire pliers also.
__________________________________________________
  
|
|
|
|
|
|
October 29th, 2014, 10:35 AM
|
#13 |
|
ninjette.org certified postwhore
Name: Eric
Location: Iowa City
Join Date: May 2009 Motorcycle(s): 2008 Kawmeracchi 350 2010 Project X Posts: A lot.
Blog Entries: 54
MOTM - Sep '18, Feb '16
|
I would pass that at tech
__________________________________________________
Top speed 123.369mph. Ohio mile Worlds fastest 250 ninja |
|
|
1 out of 1 members found this post helpful. |
|
October 29th, 2014, 10:59 AM
|
#14 |
|
ninjette.org member
Name: Alan
Location: Gwinnett County, GA
Join Date: Jul 2014 Motorcycle(s): 04 Ninja 250 Posts: 42
|
Your mileage may vary, but the AF taught me not to have runs that were too straight between the objects being tied off. Some of those pics would be just fine and some of them wouldn't hold tightening pressure or were too straight.
Safety wire pliers are nice, but the thin stuff will snap easily if you aren't careful with it. |
|
|
|
|
October 29th, 2014, 02:47 PM
|
#15 | |
|
Daily Ninjette rider
Name: Hernan
Location: Florida
Join Date: Mar 2011 Motorcycle(s): 2007 Ninja 250 Posts: A lot.
MOTY - 2016, MOTM - Dec '12, Jan '14, Jan '15, May '16
|
Quote:
The steel of the drill is harder than the bolt, but if it overheats it becomes dull. Plenty of lubrication keeps friction down and carries heat away. Use the smallest diameter bit first: the point (chisel edge) of the bigger bit does not cut the metal; hence, the bigger the initial diameter the worst. Experiment with the best speed: too much leads to overheating and dulling. The bigger the diameter, the slower the optimal speed. Copied from: http://boingboing.net/2014/08/25/a-b...to-drills.html "Mind the speed of the drill on hard materials with large bits which can heat to the point where it will stop cutting and can burn, melt, or otherwise damage what you're drilling. It's impossible to go too slow to be safe, but most drills don't provide much power at low speeds. A 1/2" bit cutting hard steel should turn around 500 RPM while a 1/8" bit in wood can go up to 10,000 RPM without problems. A good rule of thumb is: If it starts spitting out smoke or discolored chips, slow down. Use cutting oil when drilling metal, which will not only lubricates and cool the bit, but help remove chips. You won't typically need more than a few drops per hole and it will dramatically improve the life of the bit. ........ Bits often have coatings to improve their performance. Black oxide mostly lubricates and prevents rust, while titanium coatings improve the hardness and heat resistance. However the coatings are thin and once they've worn off you're left with an ordinary bit. Sharpening them just removes this coating, and they'll never get return to their original performance. The points of the bit come in two styles. Spade points are the most common and require the bit to be pressed into the material before it starts to cut. On hard surfaces like metal this can mean it will skate around before making a hole, which will often put the hole in the wrong place. This can be minimized by using a center punch or drilling a pilot hole to mark the hole, but split tip (aka: pilot point) bits reduce wandering and eliminate the need to punch or drill a pilot hole. When drilling deep holes in soft materials be sure to occasionally pull the bit out and clear the flutes. Otherwise the flutes will get packed with chaff, and it will stop cutting. " 
__________________________________________________
Motofool  .................................Never ride faster than your guardian angel can fly "Mankind is composed of two sorts of men those who love and create, and those who hate and destroy. Love is the bond between men, the way to teach and the center of the world." - José Martí |
|
|
|
1 out of 1 members found this post helpful. |
|
October 29th, 2014, 03:13 PM
|
#16 |
|
wat
Name: wat
Location: tustin/long beach
Join Date: Sep 2009 Motorcycle(s): wat Posts: Too much.
Blog Entries: 5
MOTM - Oct '12, Feb '14
|
hey @Motofool
is there an "ideal" angle for the cutting face? i've been hand-sharpening my bits but it seems like i'm getting too steep of an angle and it pulls too hard? it likes to drive in too deep and get stuck on a too-big chunk of metal? maybe not enough lube and too much pressure?
__________________________________________________
|
|
|
|
|
October 29th, 2014, 03:53 PM
|
#17 | |
|
Daily Ninjette rider
Name: Hernan
Location: Florida
Join Date: Mar 2011 Motorcycle(s): 2007 Ninja 250 Posts: A lot.
MOTY - 2016, MOTM - Dec '12, Jan '14, Jan '15, May '16
|
Quote:
This is a very good article: http://www.autospeed.com/cms/article.html?&A=112910 When drilling steel by hand, if the bit is properly sharpened, you will always use excessive pressure. Big holes in big chunks of metal are drilled in machines that control the feed or progress of the tool, so the cutting edge cannot grab too much material at once. http://www.americanmachinetools.com/...rill_press.htm Sheet metal or thickness smaller than the diameter of the hole are the worst for grabbing the bit at the end; hence, punching is a better technique, as well as using stepping bits. Hand-sharpening is a very difficult skill, the smallest the bit, the harder to get it right. The main difficulty for me was always getting both edges symmetrical. When the several angles, symmetry, speed and pressure are correct, the cutting edges stay relatively cool, creating reasonably long, even chips when drilling.
__________________________________________________
Motofool .................................Never ride faster than your guardian angel can fly "Mankind is composed of two sorts of men those who love and create, and those who hate and destroy. Love is the bond between men, the way to teach and the center of the world." - José Martí |
|
|
|
|
|
October 29th, 2014, 04:02 PM
|
#18 |
|
wat
Name: wat
Location: tustin/long beach
Join Date: Sep 2009 Motorcycle(s): wat Posts: Too much.
Blog Entries: 5
MOTM - Oct '12, Feb '14
|
thanks for the info hernan. do you think a sharpening holder tool is worth the cost?
__________________________________________________
|
|
|
|
|
October 29th, 2014, 04:04 PM
|
#19 |
|
ninjette.org certified postwhore
Name: Eric
Location: Iowa City
Join Date: May 2009 Motorcycle(s): 2008 Kawmeracchi 350 2010 Project X Posts: A lot.
Blog Entries: 54
MOTM - Sep '18, Feb '16
|
Think of the bolt or nut you are drilling as a coconut. The outside is very hard but the inside is soft. You start drilling and drill through the hard outer shell. Then drill the soft center. This is when trouble starts. As you go into the soft center the bit dulls some. Then suddenly the drill hits the outer shell. The bit grabs and snaps. So keep it in mind after you get through to the other side to ease up on the pressure and be ready for the bit to grab.
Also if you are made of money. Snap-on sells a set of safety wire plyers that twist in bothe clockwise and counter clockwise direction.
__________________________________________________
Top speed 123.369mph. Ohio mile Worlds fastest 250 ninja |
|
|
1 out of 1 members found this post helpful. |
|
October 29th, 2014, 04:52 PM
|
#20 | |
|
Daily Ninjette rider
Name: Hernan
Location: Florida
Join Date: Mar 2011 Motorcycle(s): 2007 Ninja 250 Posts: A lot.
MOTY - 2016, MOTM - Dec '12, Jan '14, Jan '15, May '16
|
Quote:
 Not all sharpening machines are good, but all are expensive, especially for the person that only drills eventually. The key for those is the flatness of the grinding wheel, which tends to disappear with use. A diamond cutting tool to rectify that surface is the only way, ....... other than replacing the abrasive surface. Personally, I cannot recommend any, as I just don't have experience with those. Most hardened drill bits that are sold today have a relatively soft core (tool grade steel), which will be exposed once the tool is sharpened. For that reason, ........ 1) Keep the hardened type cool and lubricated during drilling, so the original sharpness lasts as much as possible. 2) Buy regular bits (cheaper) and sharpen them regularly (by a skillful hand or in a machine).
__________________________________________________
Motofool .................................Never ride faster than your guardian angel can fly "Mankind is composed of two sorts of men those who love and create, and those who hate and destroy. Love is the bond between men, the way to teach and the center of the world." - José Martí |
|
|
|
|
|
October 29th, 2014, 10:33 PM
|
#21 |
|
ninjette.org certified postwhore
Name: TC
Location: Hawaii
Join Date: Sep 2013 Motorcycle(s): A lot. Posts: A lot.
|
Wow this thread exploded with helpful info! I don't have time to read all of it now and take proper notes for this project -- but I most certainly will read every post and take notes before I tackle this.
Speaking of tackle.. My jackpot in terms of wire at low cost was stainless steel wire designed for fishing leaders. Toothy fish bite through fishing line apparently and it's common practice to use a length of stainless steel wire (of appropriate diameter for the fish to be caught) between the lure and the line. Tackle shop had the best prices on all the stuff I needed. Waaaay cheaper than the stuff from the bike shop. I'll just post my notes from this morning before I set out hunting for appropriate wire. In case anyone else is following my work with the purpose of wiring up their own stuff. I'll try to keep the thread condensed in my [long] posts. The article someone linked way up in the thread called for 0.032" wire and a 5/64" drill bit. That would be 0.8125mm wire, and a 1.984mm drill bit. Seems like too loose of a hole to me.. I like the tight holes. Not the lose ones. Back on topic. For reference, 1/16" is 1.587mm. Adouglas recommended 0.0625" wire (1.5875mm hole required) Csmith recommended 0.0415" wire (1.0414mm hole required) Rifleman recommended 0.0325" wire (0.8255mm hole required) Again, typical hardware store drill bits usually jump from 1/16" (1.587mm) to 5/64" (1.984mm) -- I measured all this stuff with my caliper and most of the quality control tolerances were shoddy at best, but the bits and wire were typically accurate to the nearest 0.003" (three hundred thousandth of an inch.) I recommend anyone doing this get a very accurate caliper and measure things for themselves before buying anything -- as stated -- none of this stuff measured exactly as it was advertised to be in size. (For what it's worth, the "made in china" stuff was usually the furthest from "spec" -- and the stuff with "made in america" packaging always seemed much closer in terms of tolerances.) Here are the drill bits I'm going to be working with. Of course things get more complicated once we introduce "gauge" in terms of nomenclature --- but for reference -- #60 drill bit is 1.016mm. Seeing as this is a japanese machine, it seems only right to use millimeters. As for wire, I've come up with two kinds of wire I mic'd to 1.0mm and 0.80mm. For reference that is a #60 drill bit (1.016mm technically) and a #67 drill bit (0.8128mm technically.) [The "#" sizing system was developed by dentists, who apparently like hole drilled in teeth to be on the "loose" side of things.] I'll re-read the helpful drilling advice posted further up in this thread before I sit down and start breaking drill bits. Thanks to everyone who contributed. Here are some pics of the drill bits I'm working with and wire. Harbor fart, ace hardware wire, and fishing leader line wire. If anyone has made it this far and still seems lacking in intelligence -- let me say one final thing. DO NOT BUY GALVANIZED STEEL WIRE. IT HAS NO-WHERE NEAR THE APPROPRIATE TENSILE STRENGTH (STRETCH-UNTIL-BREAK-STRENGTH) REQUIRED FOR THIS TYPE OF APPLICATION. Thanks guys hopefully everyone is having a lovely evening.
__________________________________________________
Just batshit crazy. All his posts are endless diatribes. Some are actually entertaining but mostly batshit crazy. |
|
|
|
|
October 29th, 2014, 10:42 PM
|
#22 |
|
ninjette.org certified postwhore
Name: TC
Location: Hawaii
Join Date: Sep 2013 Motorcycle(s): A lot. Posts: A lot.
|
https://drive.google.com/file/d/0B82...ew?usp=sharing
https://drive.google.com/file/d/0B82...ew?usp=sharing https://drive.google.com/file/d/0B82...ew?usp=sharing https://drive.google.com/file/d/0B82...ew?usp=sharing https://drive.google.com/file/d/0B82...ew?usp=sharing Specializing in advanced motherufckery. That's me!
__________________________________________________
Just batshit crazy. All his posts are endless diatribes. Some are actually entertaining but mostly batshit crazy. |
|
|
|
|
October 30th, 2014, 05:14 AM
|
#23 | ||
|
Cat herder
Name: Gort
Location: A secret lair which, being secret, has an undisclosed location
Join Date: May 2009 Motorcycle(s): Aprilia RS660 Posts: A lot.
Blog Entries: 6
MOTM - Jul '18, Nov '16, Aug '14, May '13
|
Quote:
Not quite. Quote:
You don't need to overthink this. Put the caliper down and back slowly away. Buy a pack of 1/16" cobalt bits. Buy a can of ordinary safety wire (most people use the gauge that fits into a 1/16" hole, so that's what you'll find most easily). It will be clearly identified as safety wire, right on the label, so don't worry about the wrong material. Buy a pair of safety wire pliers (which might just come with wire anyway... mine did). Done.
__________________________________________________
I am NOT an adrenaline junkie, I'm a skill junkie. - csmith12 Nam et ipsa scientia potestas est. Heri historia. Cras mysterium. Hodie donum est. Carpe diem. |
||
|
|
|
|
October 30th, 2014, 06:35 AM
|
#24 | |
|
ninjette.org certified postwhore
Name: Jay
Location: CT
Join Date: Apr 2011 Motorcycle(s): 2015 636 ABS - 69 Honda 305 Posts: A lot.
|
Quote:
|
|
|
|
|
|
October 30th, 2014, 07:48 AM
|
#25 |
|
Old and slow
Name: Lohman
Location: Aiken, S.C.
Join Date: May 2014 Motorcycle(s): Suzuki TL1000R, Honda CBR600F3, Ninja 250 Posts: 889
|
Yeah, I'm going to agree with Adoug... don't over think this.
Get a pack of 1/16th Cobalt bits mark your bolts where you want the holes to go so that when tight, the lock wire will be pulling them in the "tight" direction. the smaller wire bends and twists up nicer and will be just fine in all normal circumstances. the reason for lock wire on track bike is to keep from losing parts that will endanger other people. You have 6 case bolts come lose, you will pour oil on the track and hurt someone else. track bikes are worked on more often... you will have your brakes on and off more times in one season then the normal street bike has them on and off in its life time. the purpose of lock wire is to add one more step between it's on and tight... and it's bouncing down the track and hitting the guy behind me. Wire your case bolts, wire you oil plug and oil fill, wire your oil filter if you can (most guys put a hose clamp around the filter and run lock wire under the hose clamp. Lock wire the parts of the brake caliper you take apart (normally the mount bolts) rule of thumb is if it's something you take apart frequently, it's something you want to think about wiring. the ONLY time you need to go to the level you are talking about is Aero-space. Airplanes and Space ships... and well submarines (got to keep the ocean out of the people tank) for those applications they have exact standards for the type and size of wire, the number to twist per inch (TPI) the minimum length of the 'tail' All part of quality assurance where zero error is acceptable. the only reason I'm so what ever about it, is because i had to do it on sea water systems... if I know how to do it right, might as well do that on the bike as well. |
|
|
|
 |
 Similar Threads
|
||||
| Thread | Thread Starter | Forum | Replies | Last Post |
| WERA safety wire list | RacerX113 | Ninjettes At Speed | 22 | February 21st, 2013 06:42 AM |
| Where to buy safety wire? | Motofool | Ninjettes At Speed | 9 | July 8th, 2012 12:45 PM |
| Does anyone safety wire this bolt? | abhijitz | Ninjettes At Speed | 2 | March 15th, 2012 08:18 AM |
| Why Safety Wire? | Francis | Ninjettes At Speed | 6 | October 8th, 2011 09:34 AM |
| Safety wire snafu | ithaca00 | Ninjettes At Speed | 6 | April 23rd, 2010 04:21 PM |
|
|


