
|
 September 22nd, 2013, 10:34 AM
|
#1 |
|
Braaap
Name: Ryan
Location: St. Louis, MO
Join Date: Sep 2013 Motorcycle(s): 2012 ninja 250r SE. 2002 Suzuki DRZ400e Supermoto Posts: 90
|
stlcbr's '12 ninja 250 Race Bike Build
Hey guys, new here from St. Louis.
A quick background: I ride and have my race license through our local organization MCRA. Been riding the track for a couple years and really looking forward to something completely different! Coming from my previous track bikes an '05 cbr 600rr, an '09 zx6r, and my latest bike, a '02 drz400e Supermoto... the 250 should be a blast and a completely different track experience. This year MCRA introduced a 250 class and since day one it has been growing rapidly. After watching the races and crazy battles, I finally gave in and picked up a Ninja 250! Anyways, after searching around I was able to find a Brand New leftover stock 2012 Ninja 250r SE. Buying a track ready 250 would have definitely been cheaper and easier, but I enjoy the builds and like the thought of a nice fresh motor ") 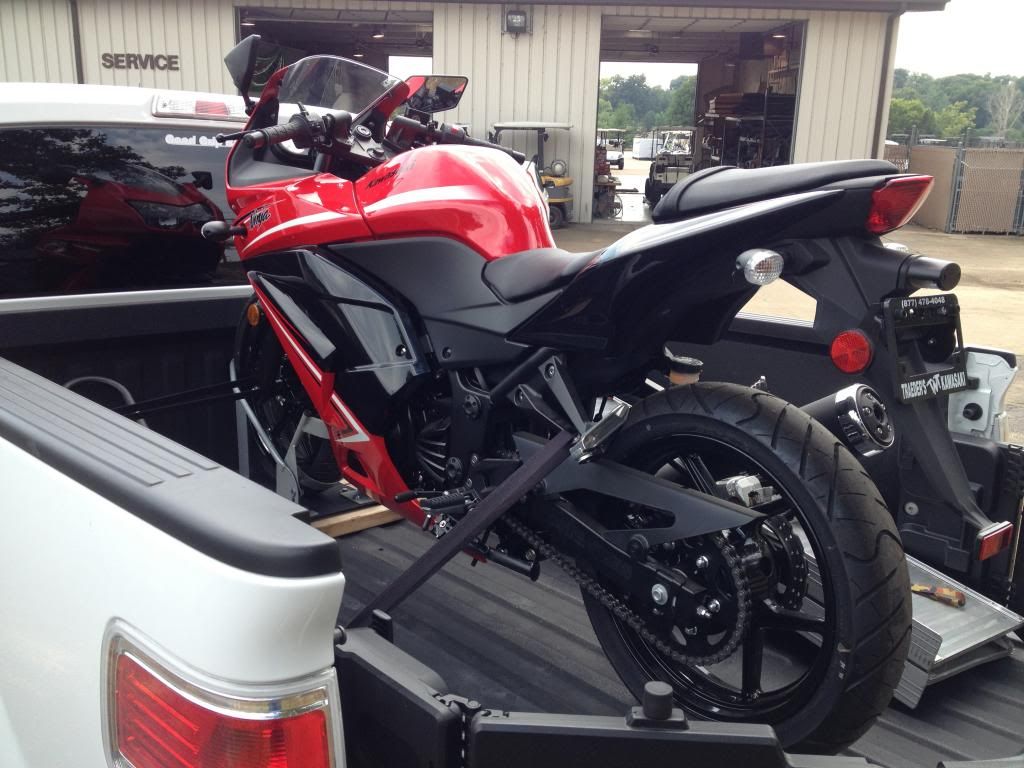 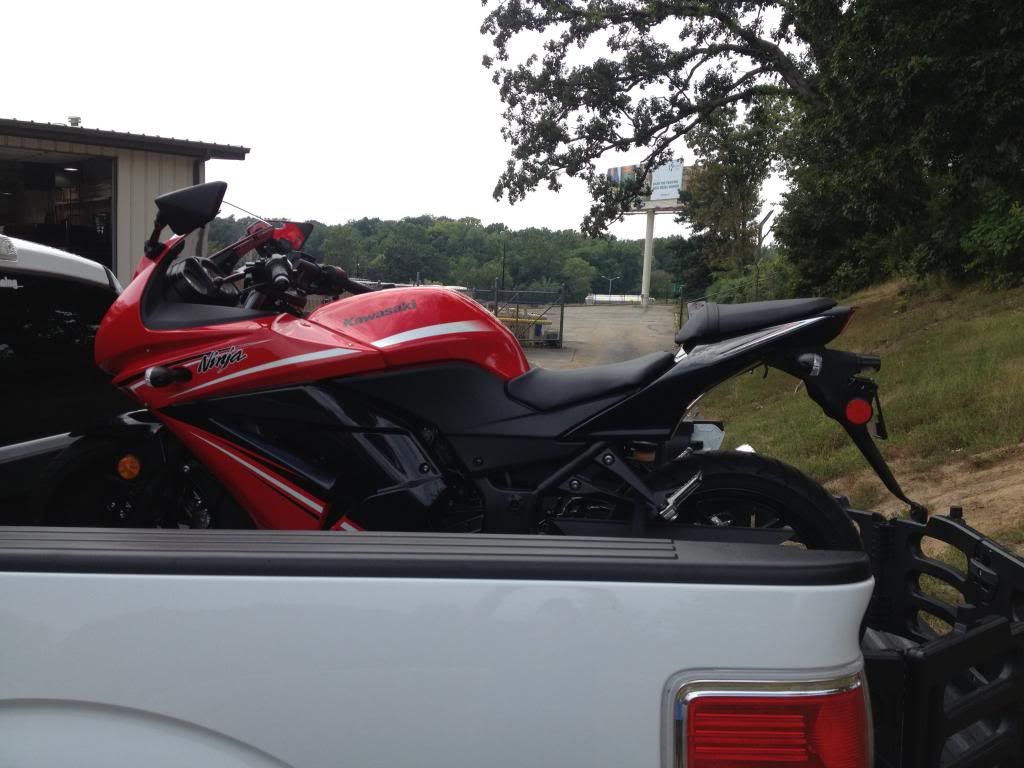 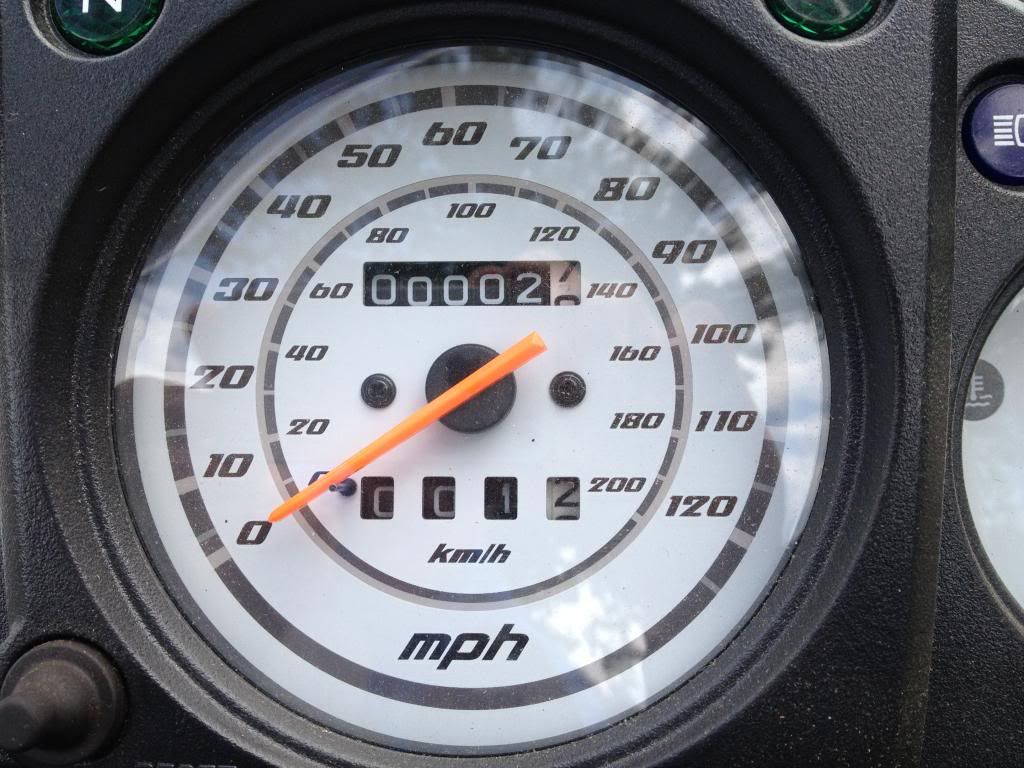 We only have one more weekend before the end of the season, and it being less than two weeks away; I am starting pretty basic, leaving the majority of upgrades ( full suspension, full exhaust, filter, jets, bodywork, etc.) for this winter. For now I'm starting with clip-ons, rearsets, different brake pads and fluid. Along with the required safety wiring, and coolant changes. Once in the garage it was time to say goodbye to the fancy new bodywork  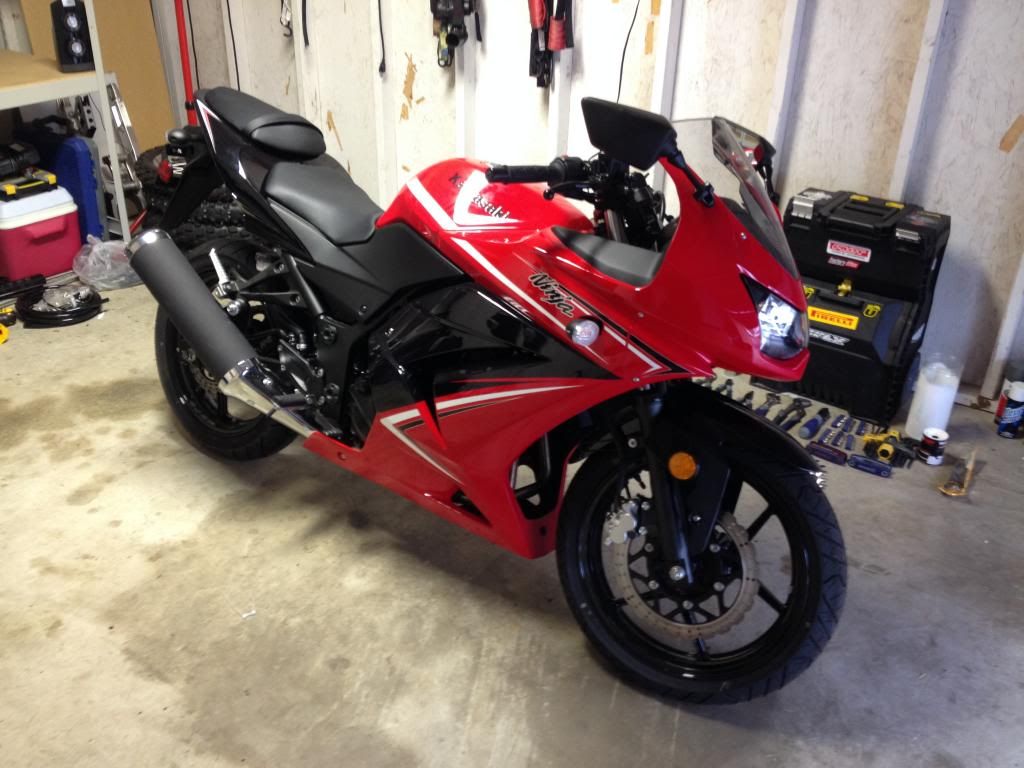 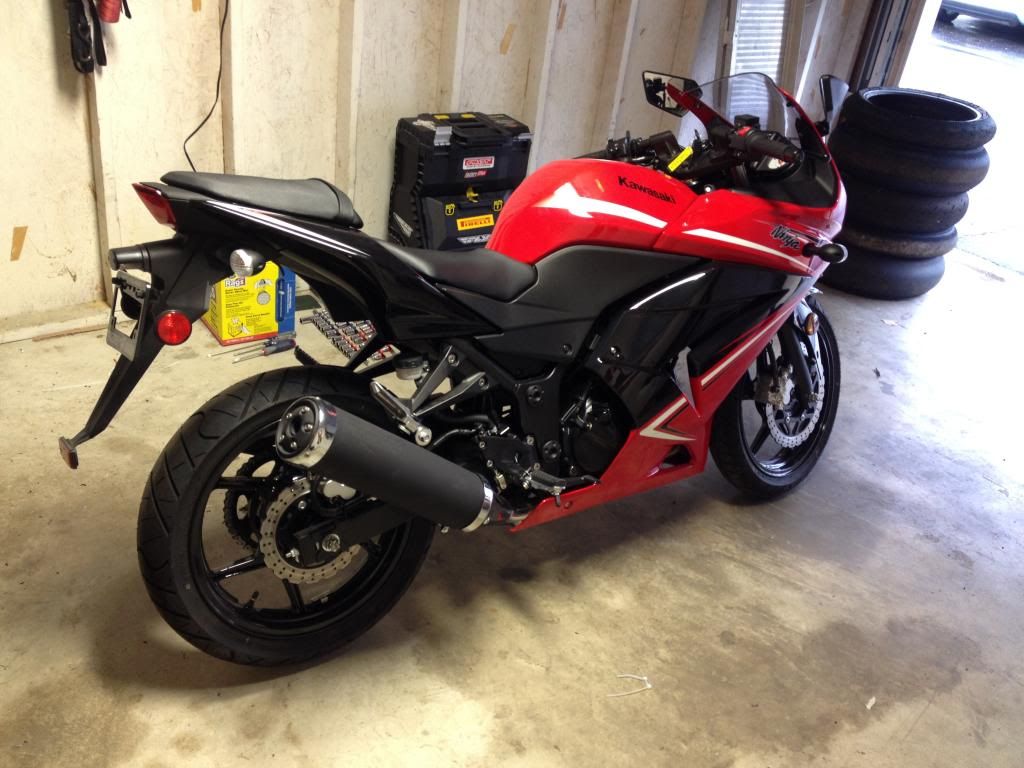 It was pretty straight forward, and nothing too crazy... but I still HATE oem bodywork and tabs, and pop pins, and ugh  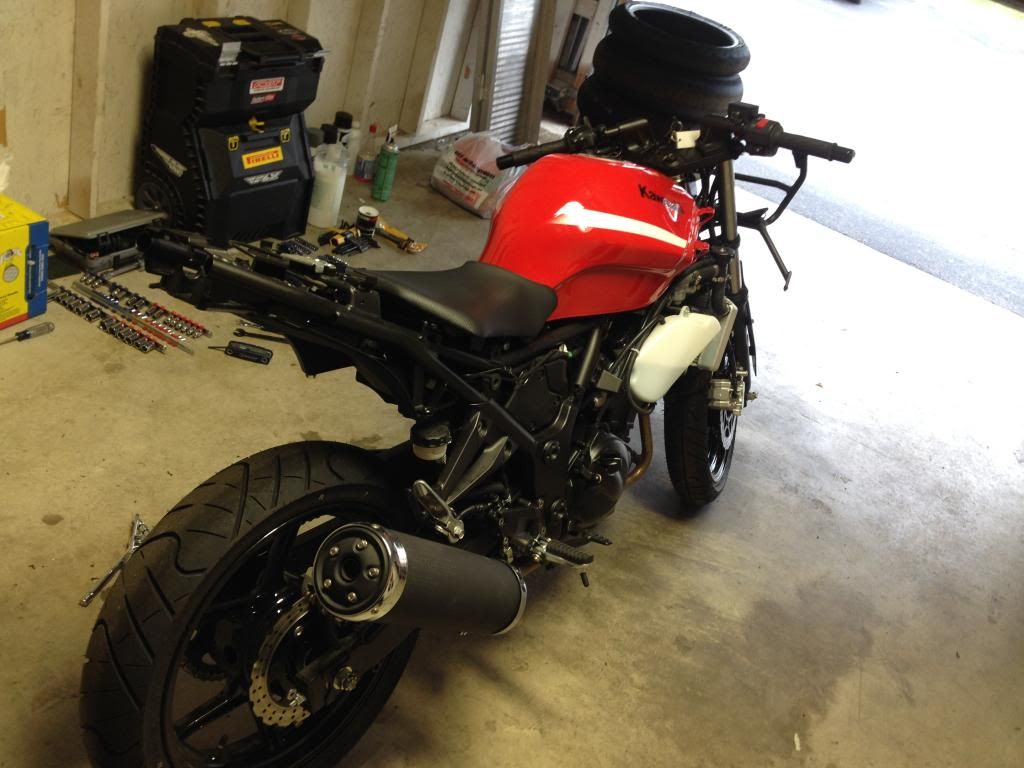 One one issue i did run into was the stock fairing stay 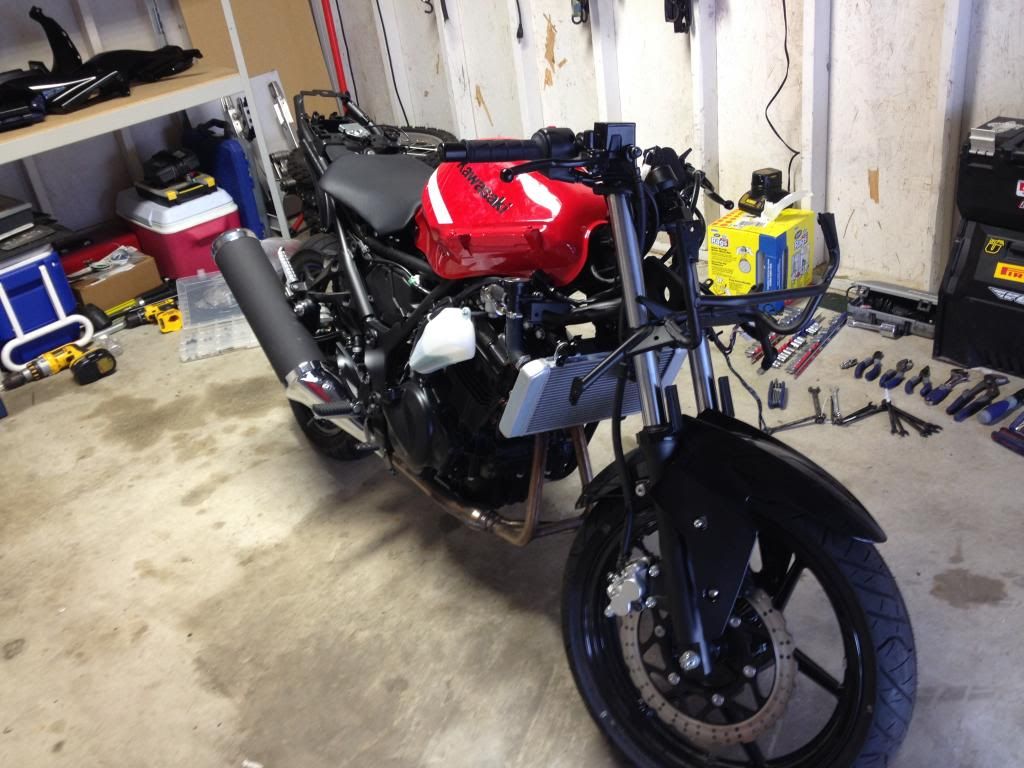 It has two loops to hold everything in place, and without removing throttle and clutch cables, along with wiring, I didn't see an easy way to remove it... so I cut it: 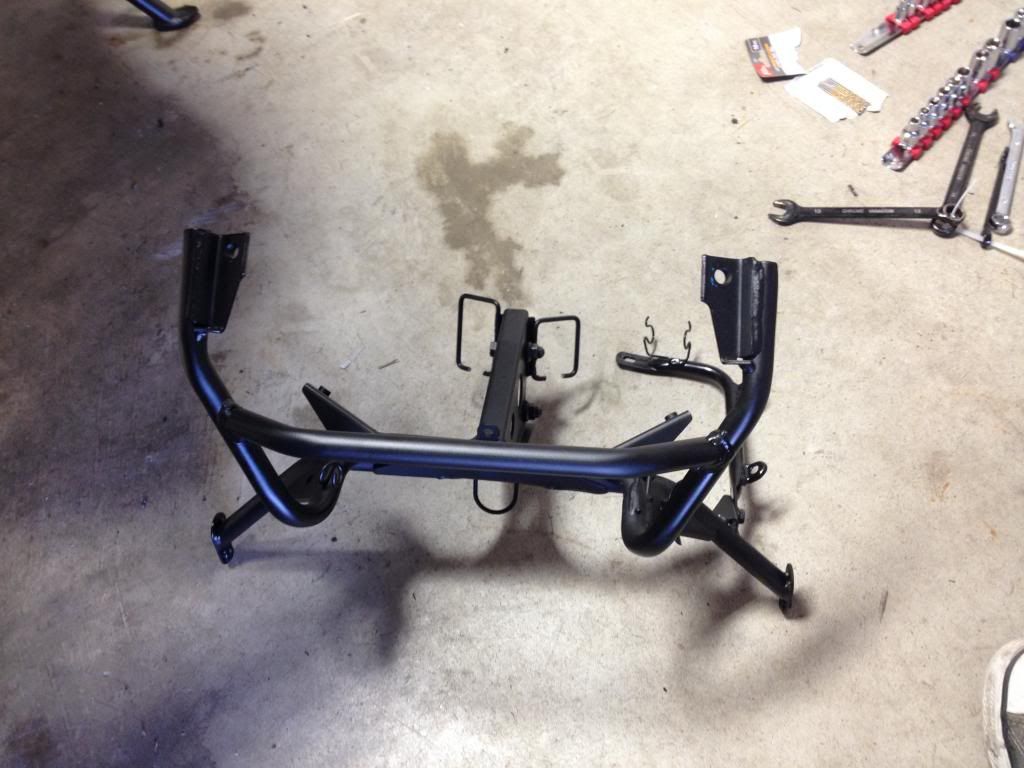 2 small cuts with some snips and I was able to pull the fairing stay right off without having to mess with any cables or wiring: 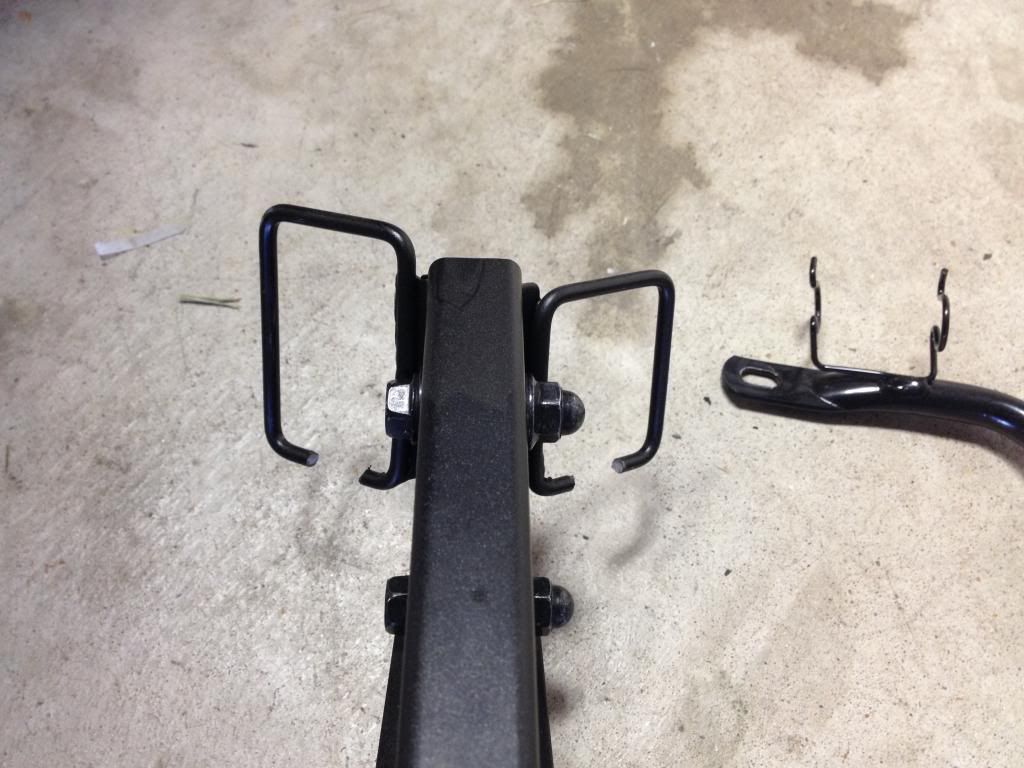 From there it was time to safety wire. I usually directly saftey wire everything, but wanted to try a clip/ and tubing (for cleanliness) method for easy removal and quick fluid/tire changes. 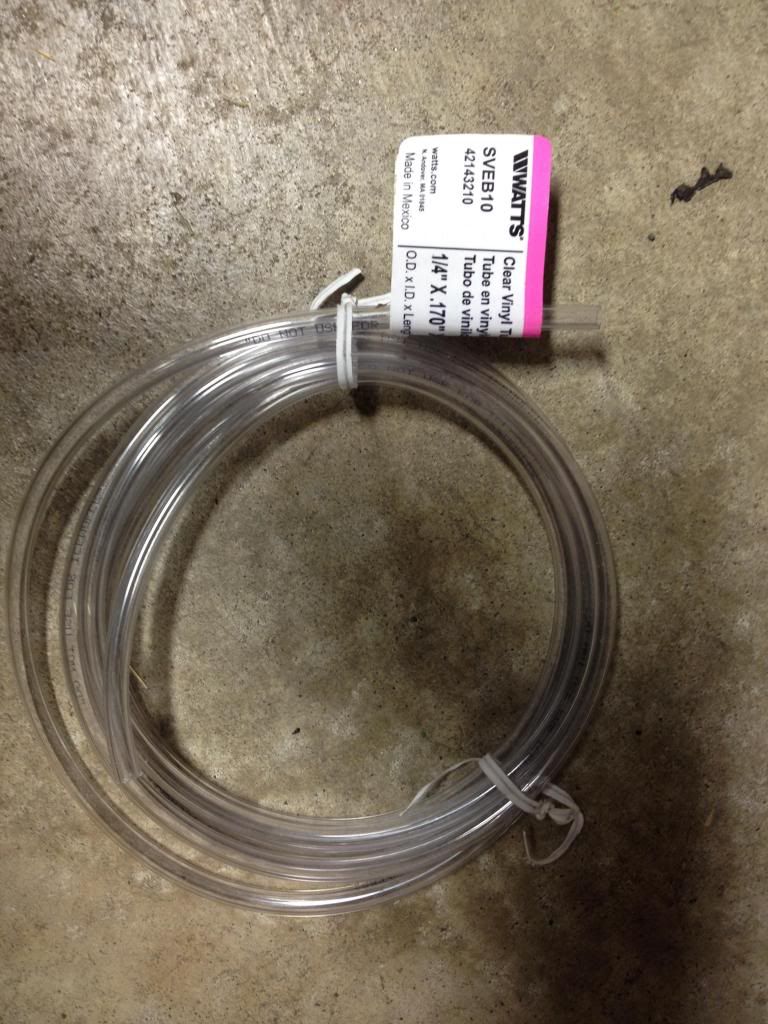 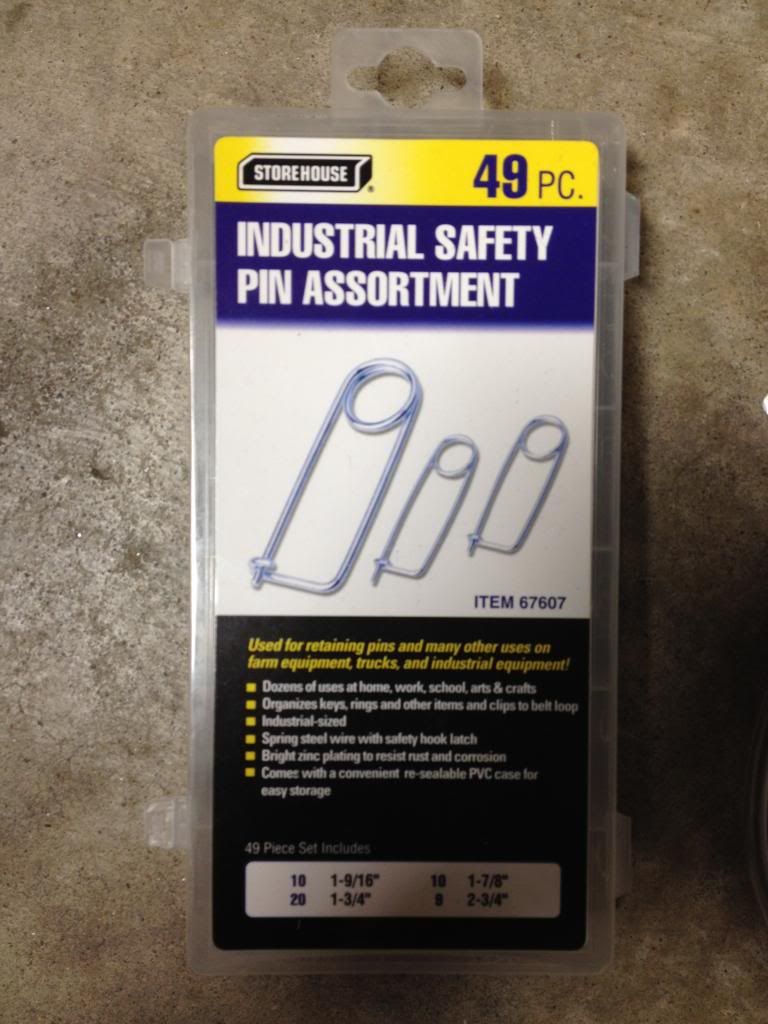 Here's the route I went with: Drill a small hole for mounting: 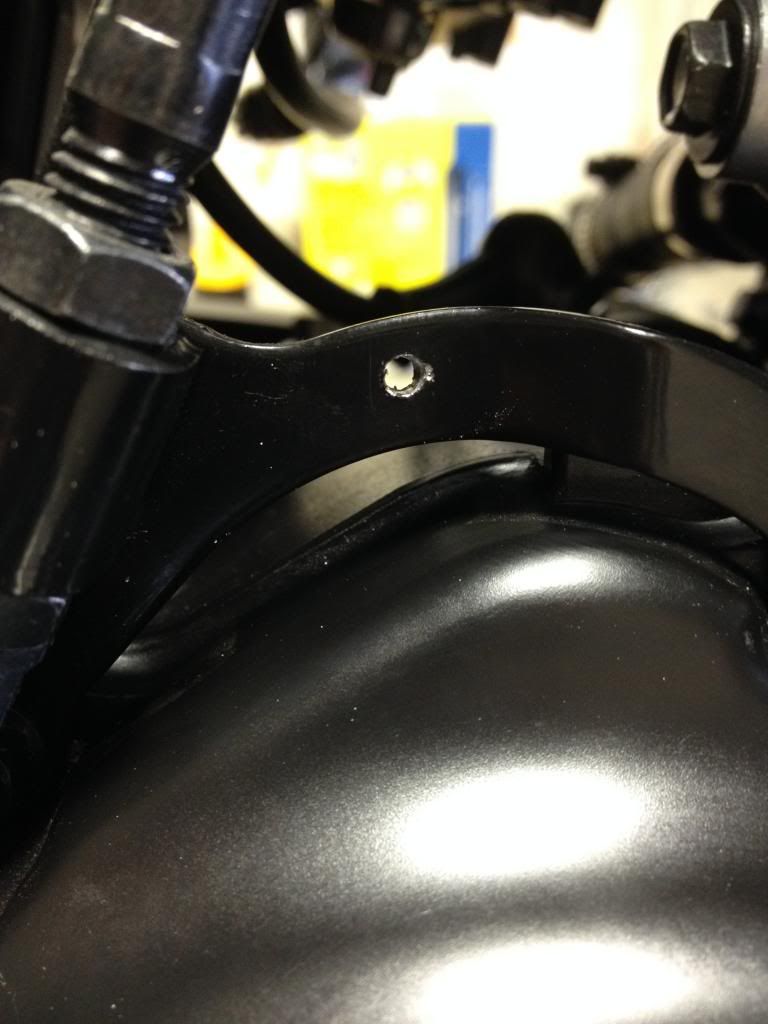 Thread the wire through: 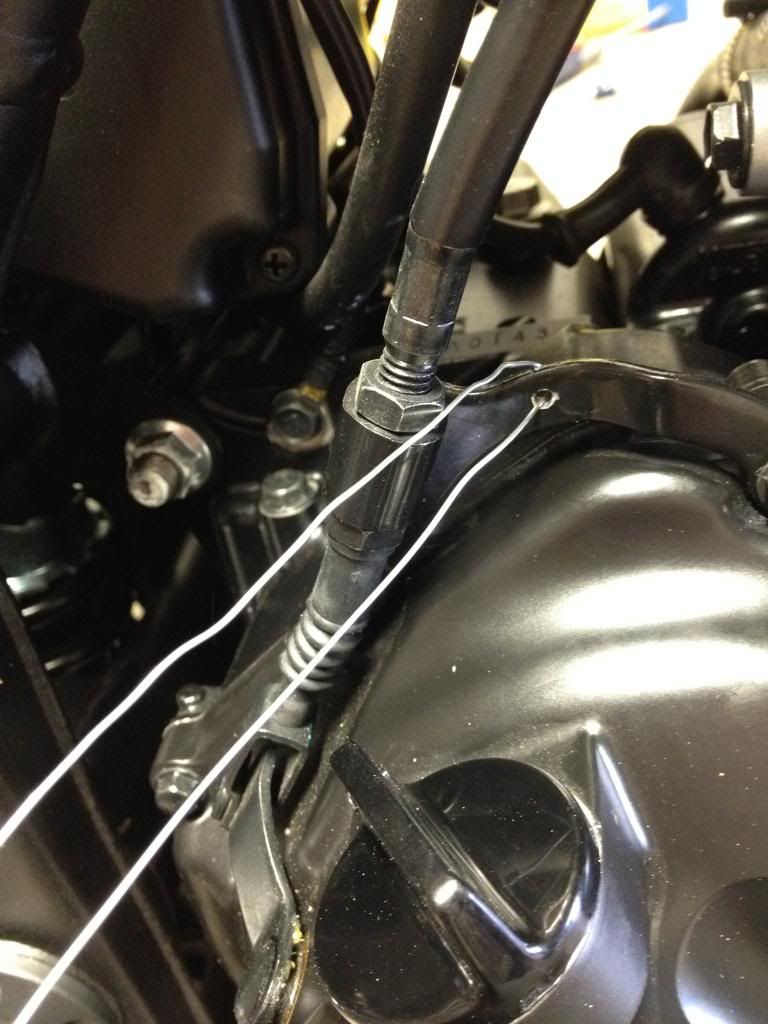 Measure out the lenth and twist: 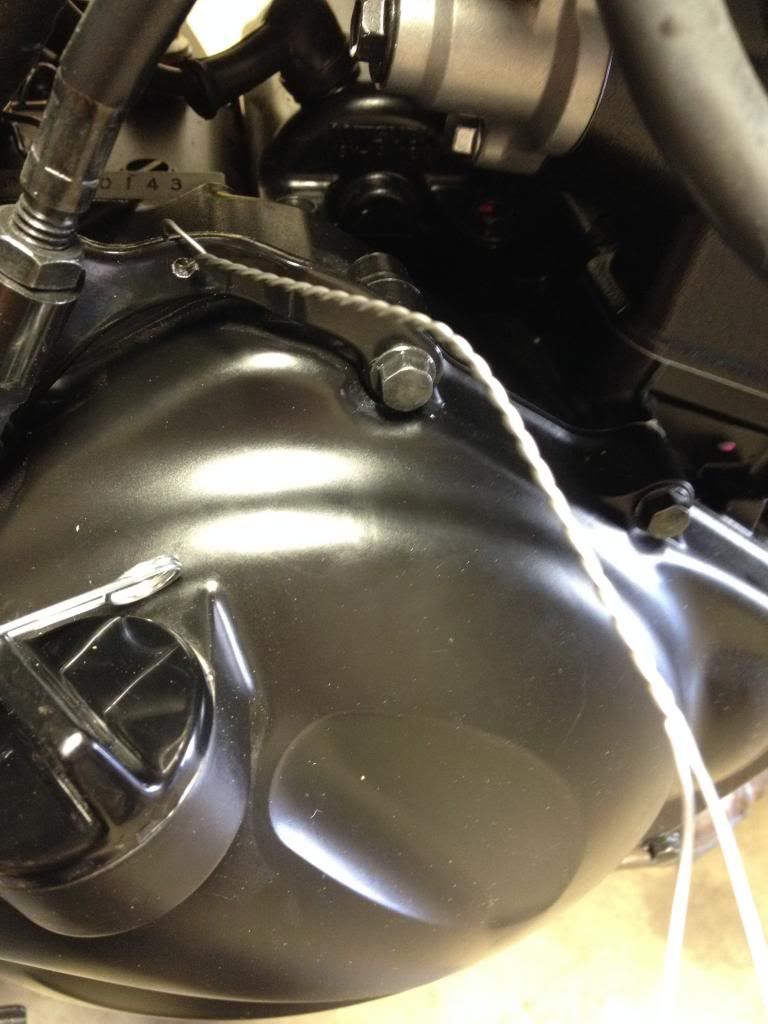 Measure out tubing length: 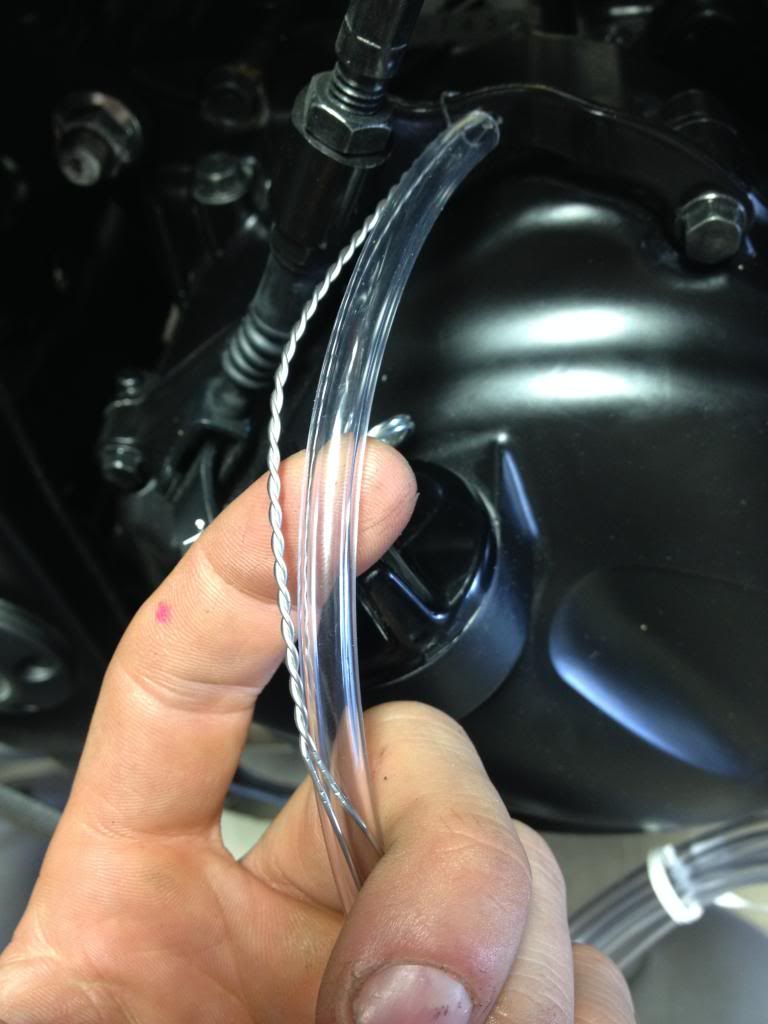 Slide tubing over the twisted wire: 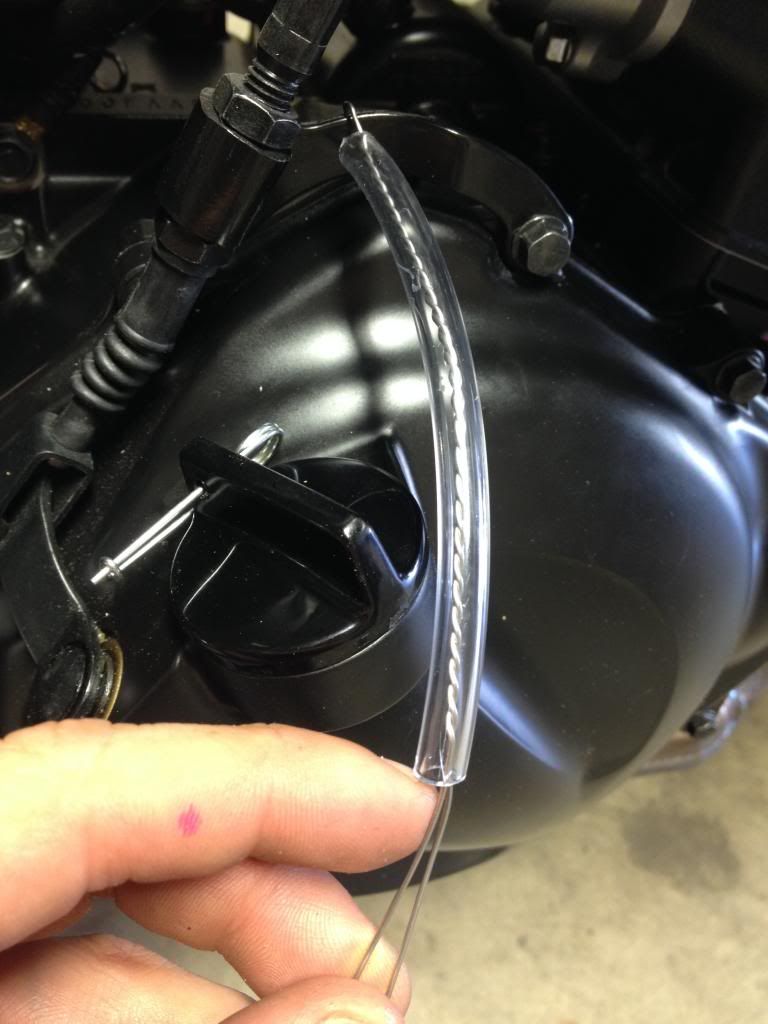 Slide the clip into the open wire: 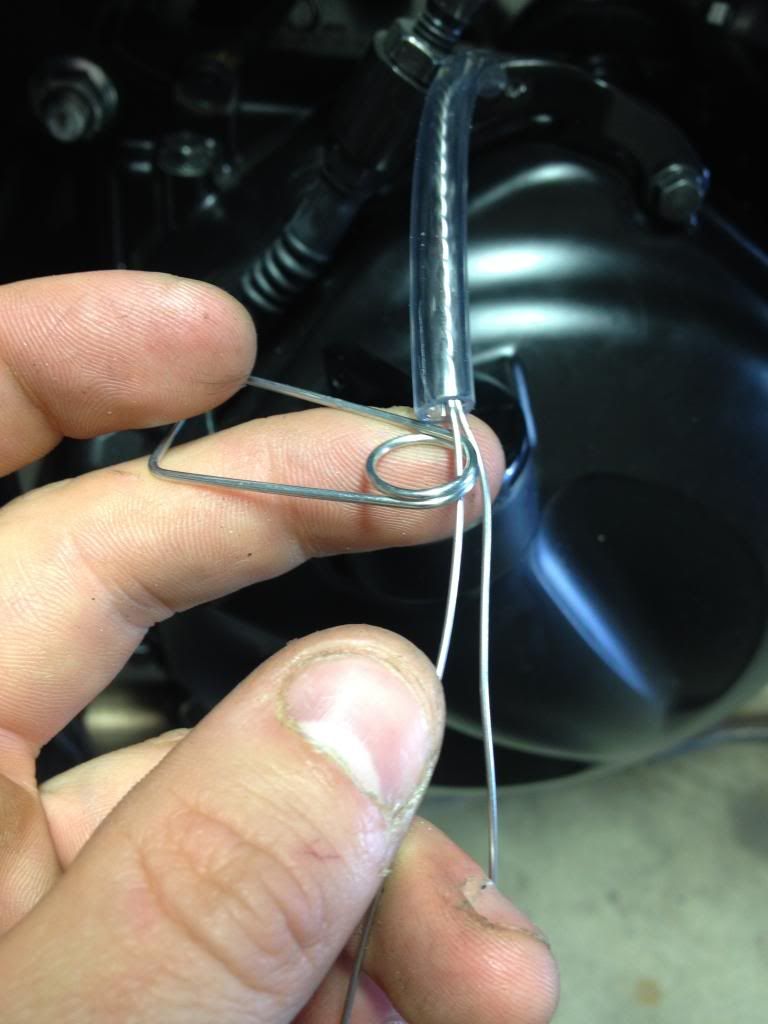 Twist the remaining safety wire: 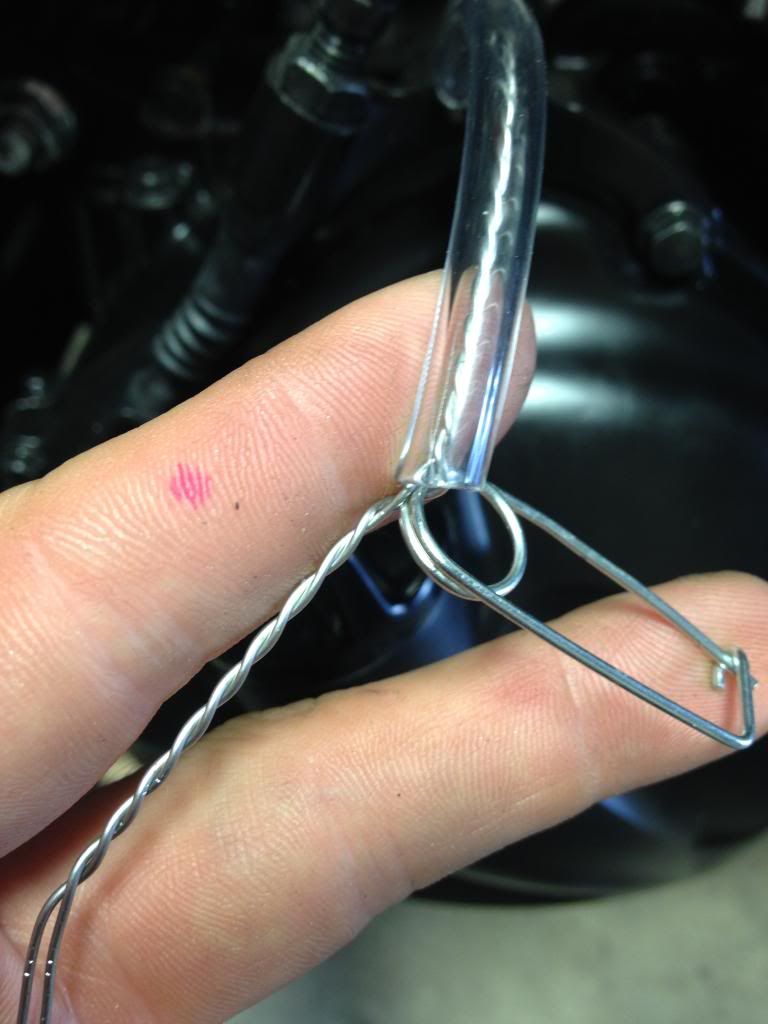 Cut the excess:  This method I can simply slide the clip through what I need wired, and can easily remove and reattach when changing fluids or tires. Here's a look at the finished product: 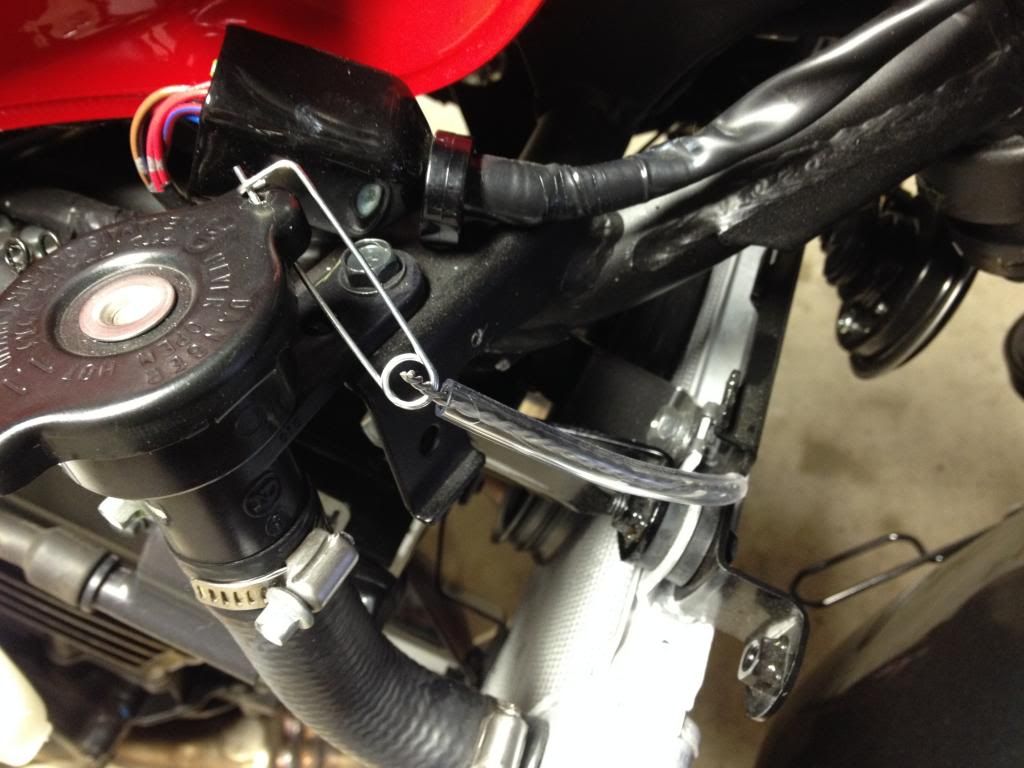 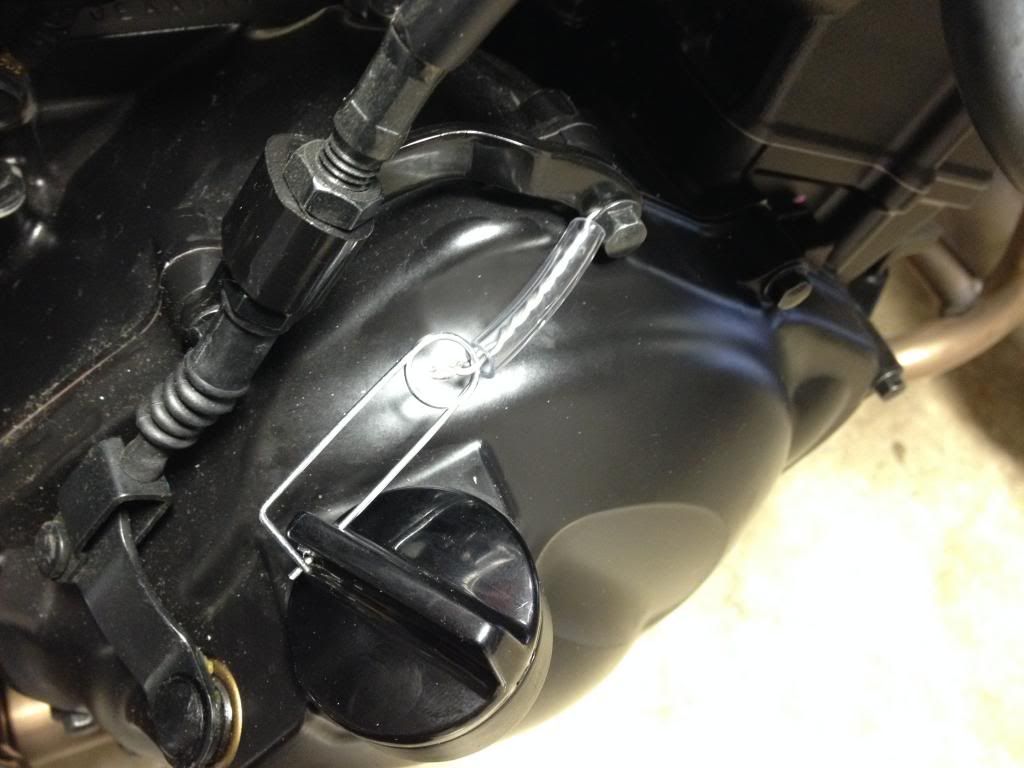 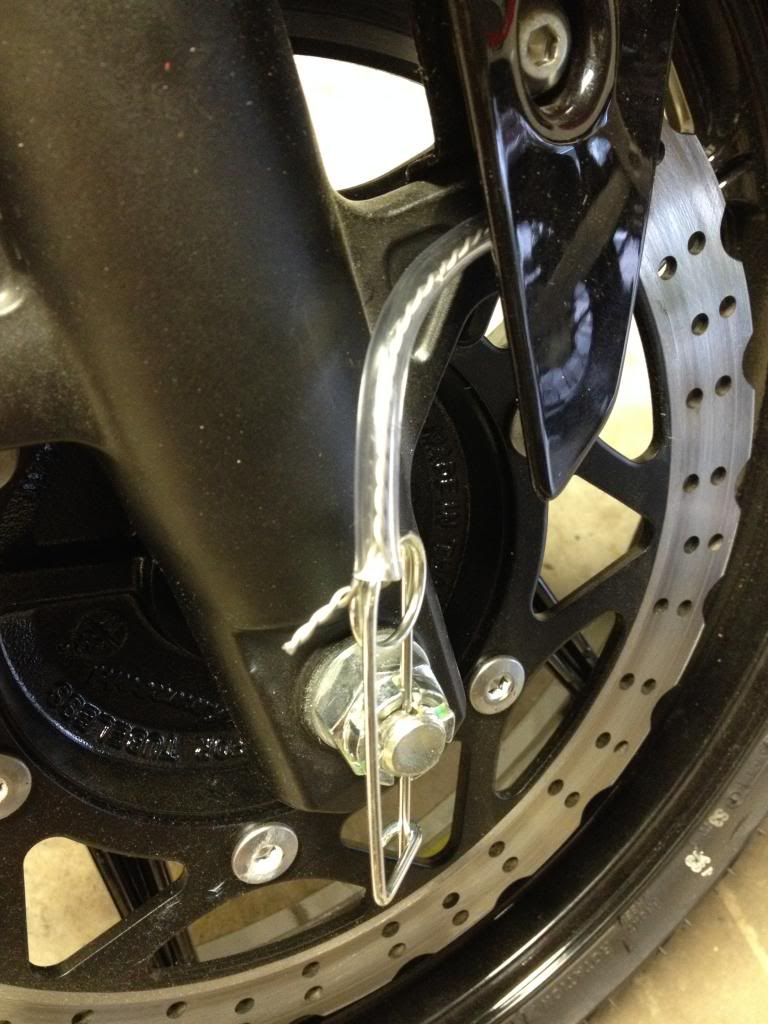 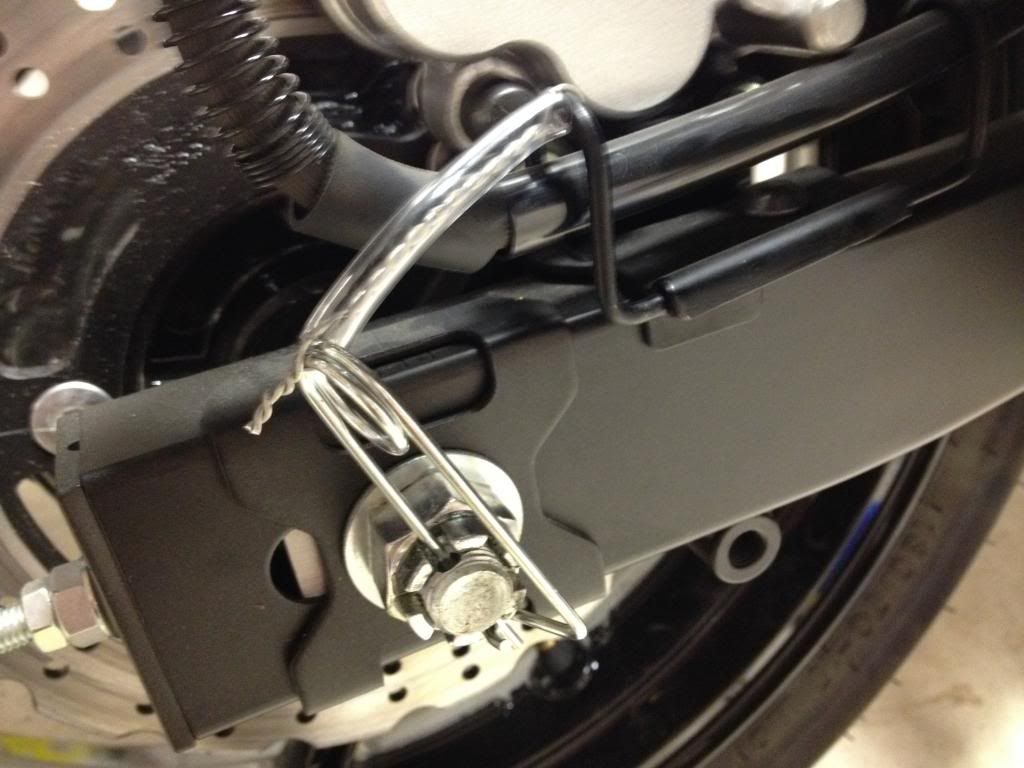 Like I said I won't be running any bodywork yet as there's just not enough time to get them, drill and mount before the next weekend. So onto a front number plate... I used some universal rubber fork mounts I had from my supermoto, and simply a piece of cardboard to mock up a plate and get the size/shape right: 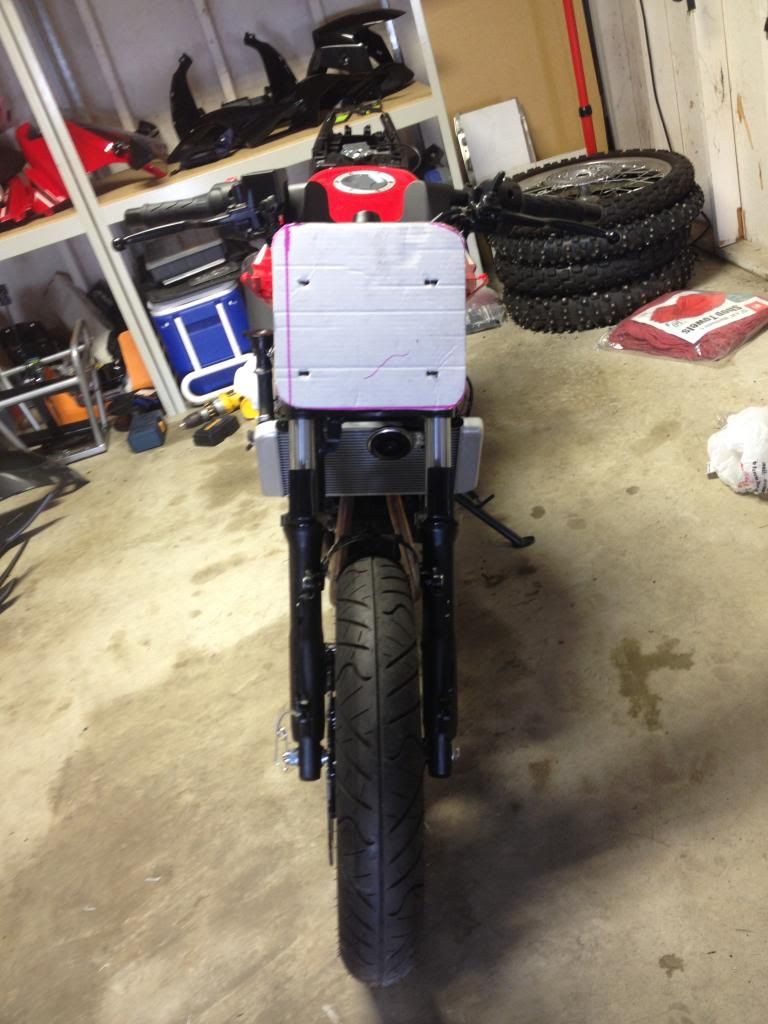 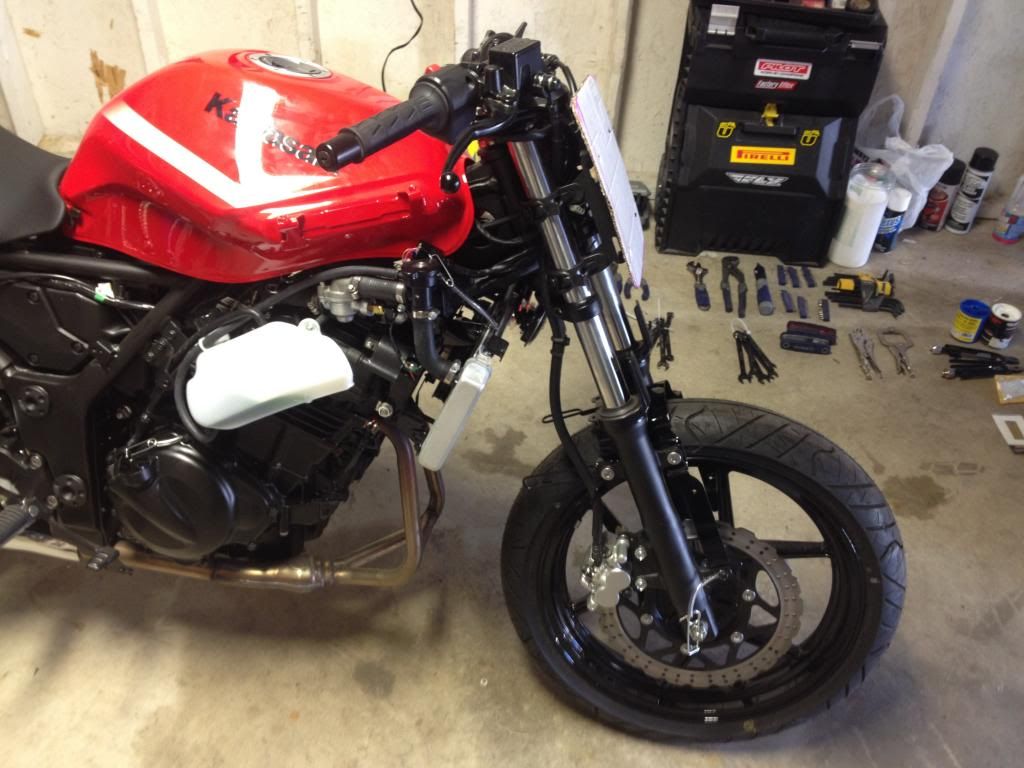 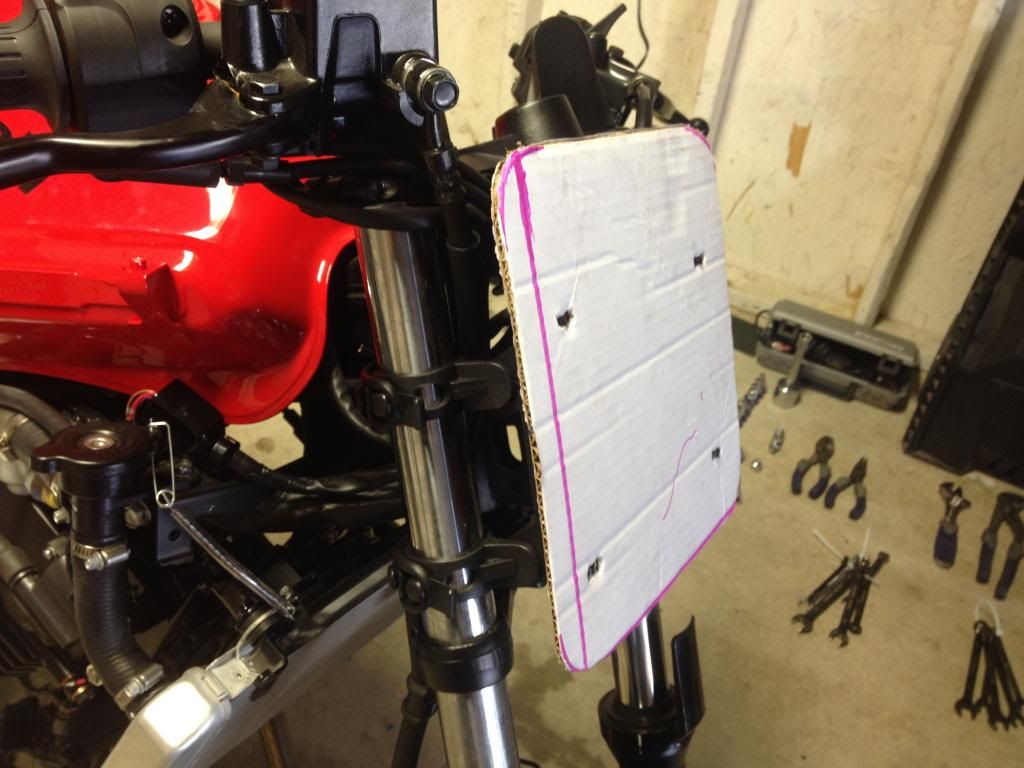 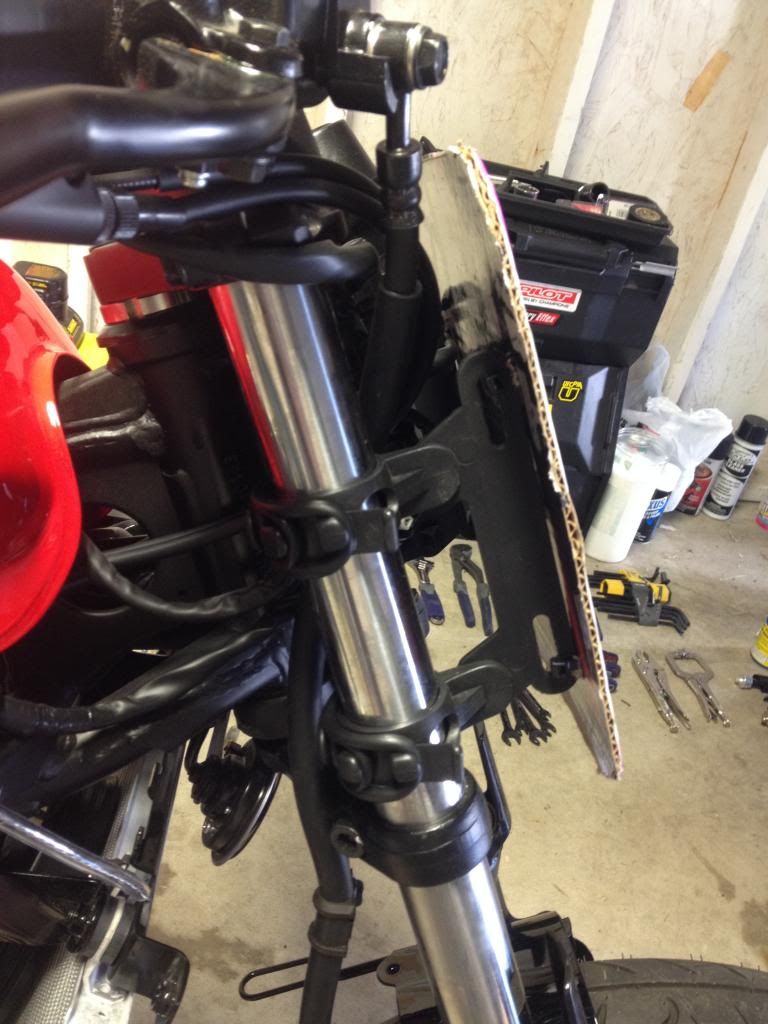 Like I said the cardboard is just a template, I will use that to cut one from plastic to mount. That's it for day 1, here's how she sits now: 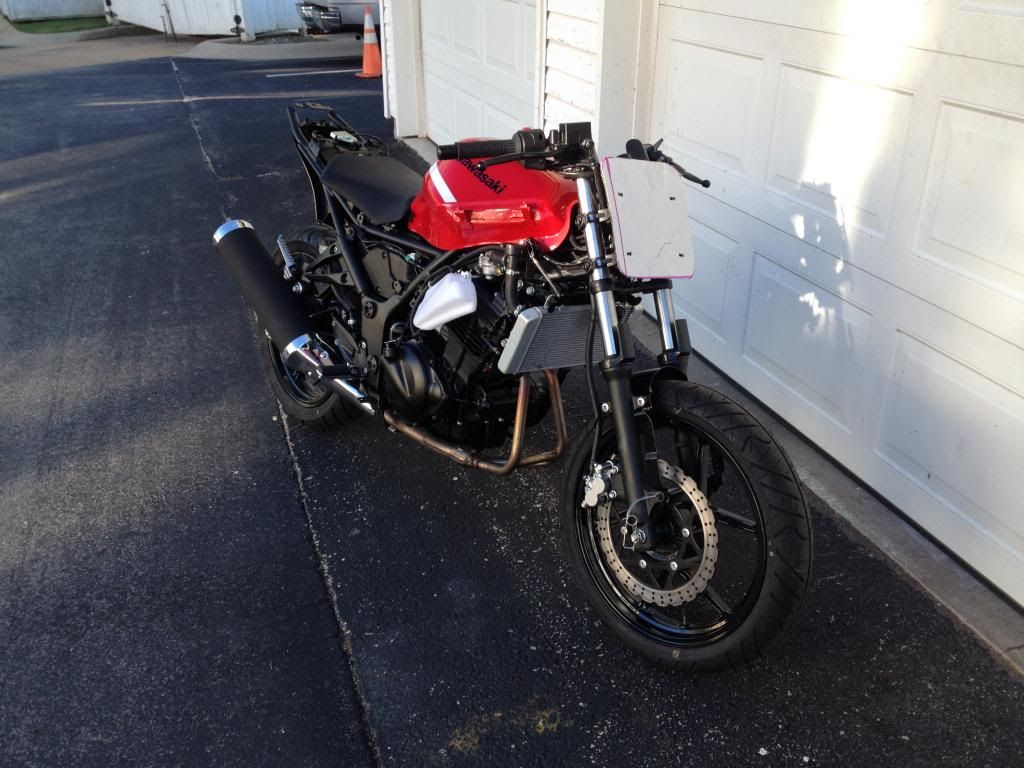 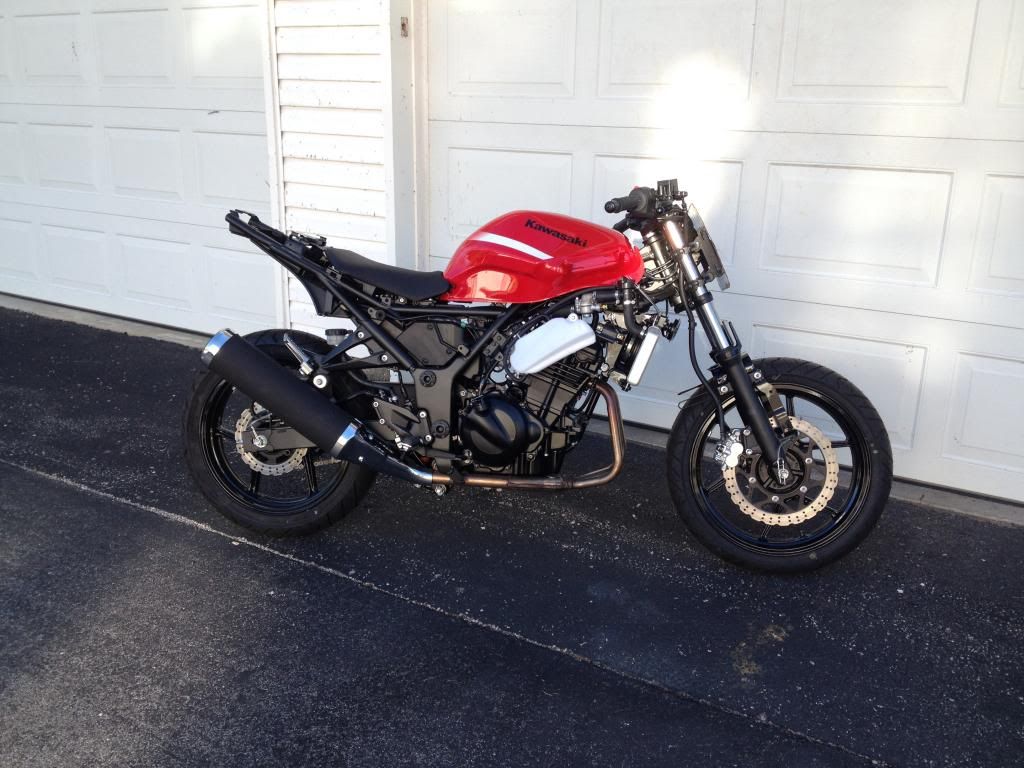 My first round of parts should be here on Tues: Woodcraft Clip-ons Woodcraft Rearsets Rental Grips Water Wetter and a few more bits later this week. I'll be updating as things come in and have plenty of pics of the progress 
__________________________________________________

Last futzed with by stlcbr; September 25th, 2013 at 09:28 AM. |

|

|
|
September 22nd, 2013, 12:22 PM
|
#2 |
|
ninjette.org member
Name: Brandon
Location: Orlando, FL
Join Date: Apr 2013 Motorcycle(s): 2010 250r SE (without stupid tribal decals) Posts: 110
|
Excited to see more!
__________________________________________________
"It sounds like a lawnmower." "Shut up no it doesn't." 
|
|
|
|
|
September 22nd, 2013, 12:59 PM
|
#3 |
|
ninjette.org sage
Name: -
Location: -
Join Date: May 2010 Motorcycle(s): - Posts: 591
|
This will be a fun thread to watch!
 
|
|
|
|
|
September 22nd, 2013, 06:18 PM
|
#4 |
|
Certifiable nontundrum
Name: Harper
Location: NC Milkshake stand
Join Date: Mar 2013 Motorcycle(s): 2013 SE NINJA 300 Posts: Too much.
MOTM - Sep '13, Sep '16
|
Nekkid
 
__________________________________________________

|
|
|
|
|
September 22nd, 2013, 07:17 PM
|
#5 |
|
ninjette.org member
Name: Chris
Location: Pittsburgh PA
Join Date: Sep 2013 Motorcycle(s): Ninja 250R Posts: 96
|
Quick progress!
|
|
|
|
|
September 22nd, 2013, 07:42 PM
|
#6 |
|
ninjette.org guru
Name: Andrew
Location: St Louis
Join Date: Sep 2013 Motorcycle(s): Ducati 1198s, Triumph D675, Suzuki SV1000s, `08 Ninja 250, `11 Ninja 250, Suzuki GS750 Posts: 368
|
You running the Pirelli combo for tires, SC1 front, Rossa II rear?
__________________________________________________
MCRA.com |
|
|
|
|
September 23rd, 2013, 06:27 AM
|
#7 | |
|
Braaap
Name: Ryan
Location: St. Louis, MO
Join Date: Sep 2013 Motorcycle(s): 2012 ninja 250r SE. 2002 Suzuki DRZ400e Supermoto Posts: 90
|
Quote:
__________________________________________________
|
|
|
|
|
|
September 23rd, 2013, 08:48 AM
|
#8 |
|
Hello Moto
Name: Alex
Location: Ft. Myers
Join Date: Mar 2013 Motorcycle(s): 1975 RD350; 2001 KX125; 2003 Z1000; 2003 KDX50; 2009 ZX6R; 2011 Ninja 250R; 2014 KX250F Posts: 352
|
They will let you run without a lower?
|
|
|
|
|
September 23rd, 2013, 09:30 AM
|
#9 | |
|
Braaap
Name: Ryan
Location: St. Louis, MO
Join Date: Sep 2013 Motorcycle(s): 2012 ninja 250r SE. 2002 Suzuki DRZ400e Supermoto Posts: 90
|
Quote:
I work two jobs and am in school on my nights so just not enough time to get the things i want done.
__________________________________________________
|
|
|
|
|
|
September 23rd, 2013, 09:39 AM
|
#10 |
|
Braaap
Name: Ryan
Location: St. Louis, MO
Join Date: Sep 2013 Motorcycle(s): 2012 ninja 250r SE. 2002 Suzuki DRZ400e Supermoto Posts: 90
|
And without the protection of race bodywork or sliders of any sort, don't want to be pushing too hard battling for a position and do any major damage.
Not that I've ever crashed before or anything.... 
__________________________________________________
|
|
|
|
|
September 23rd, 2013, 12:14 PM
|
#11 |
|
ninjette.org member
Name: Chad
Location: Stationed in Turkey
Join Date: Sep 2013 Motorcycle(s): 08 CBR600RR Posts: 12
|
Subscribed. Keep it detailed!
|
|
|
|
|
September 24th, 2013, 08:41 AM
|
#12 |
|
Braaap
Name: Ryan
Location: St. Louis, MO
Join Date: Sep 2013 Motorcycle(s): 2012 ninja 250r SE. 2002 Suzuki DRZ400e Supermoto Posts: 90
|
UPS Tracking shows on time! So after school tonight it will be time for rearsets and clip-ons...
__________________________________________________
|
|
|
|
|
September 24th, 2013, 08:49 AM
|
#13 |
|
ninjette.org dude
Name: 1 guess :-)
Location: SF Bay Area
Join Date: Jun 2008 Motorcycle(s): '13 Ninja 300 (white, the fastest color!), '13 R1200RT, '14 CRF250L, '12 TT-R125LE Posts: Too much.
Blog Entries: 7
|

__________________________________________________
Montgomery Street Motorcycle Club / cal24.com / crf250l.org / ninjette.org ninjette.org Terms of Service Shopping for motorcycle parts or equipment? Come here first. The friendliest Ninja 250R/300/400 forum on the internet! (especially Unregistered) |
|
|
1 out of 1 members found this post helpful. |
|
September 24th, 2013, 08:50 AM
|
#14 |
|
ninjette.org certified postwhore
Name: Rebecca
Location: SF Bay Area
Join Date: Sep 2009 Motorcycle(s): 2013 Ninja 300 w/ ABS, 2014 NC700X, 2008 Ninja 250 (sold), 2002 Ninja 250 (sold) Posts: A lot.
MOTM - Jan '18, Sep '13
|
Excited to see how this turns out

|
|
|
|
|
September 25th, 2013, 09:41 AM
|
#15 |
|
Braaap
Name: Ryan
Location: St. Louis, MO
Join Date: Sep 2013 Motorcycle(s): 2012 ninja 250r SE. 2002 Suzuki DRZ400e Supermoto Posts: 90
|
Came home to some new bits
Black Woodcraft Rearsets Black Woodcraft Clip-ons spare Woodcraft bar Renthal Grips, SOFT compound spare Spark plug Water Wetter 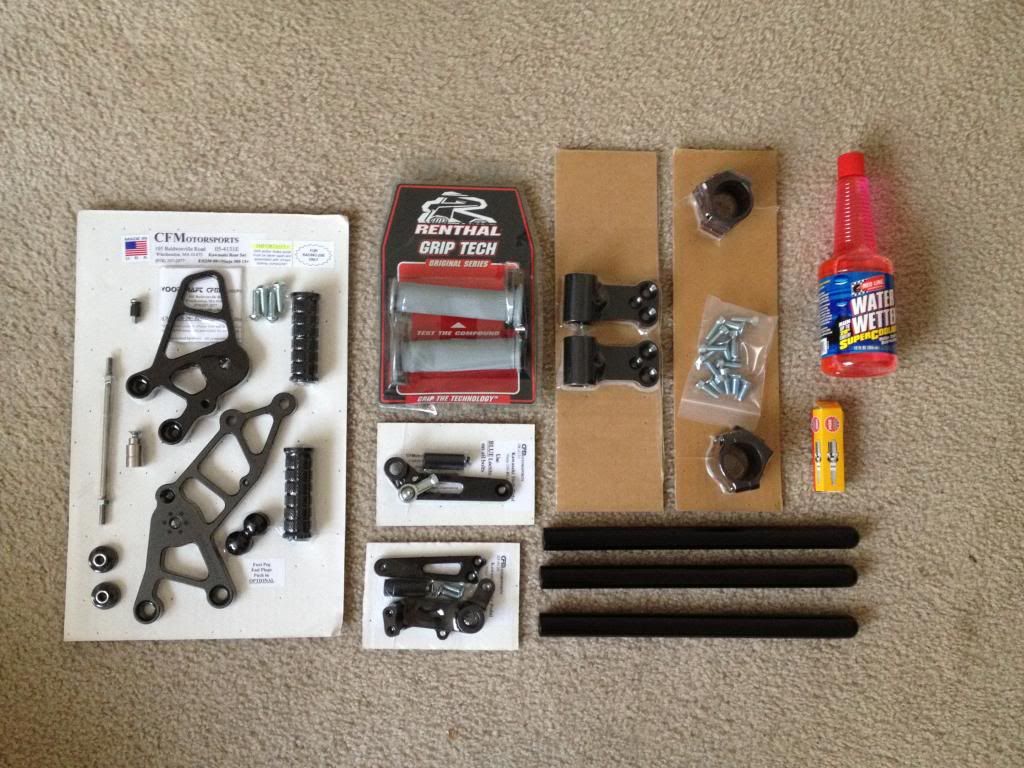 It was time replace my old Bell Star as it has seen the pavement twice, both in pretty rough crashes... so picked up a new shiny one 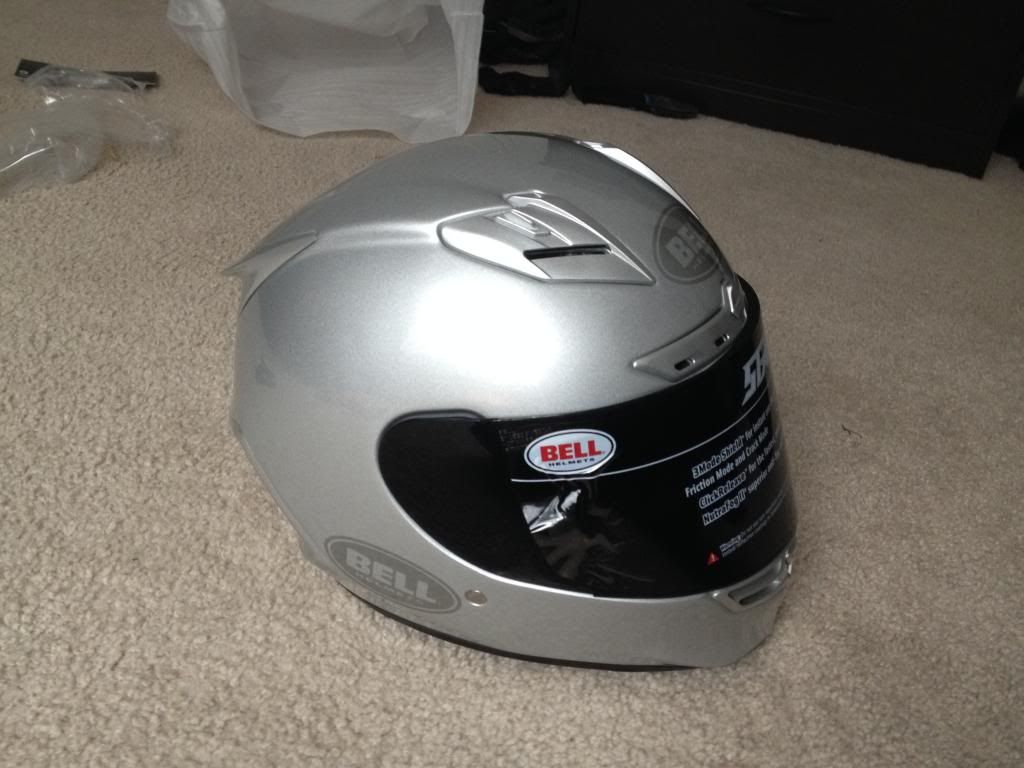
__________________________________________________
|
|
|
|
|
September 25th, 2013, 09:59 AM
|
#16 | |
|
Rev Limiter
Name: Jay
Location: WI
Join Date: Jul 2013 Motorcycle(s): '06 SV650n, '00 Derbi GPR, '64 CA77 Dream 305, '70 CL450 Scrambler, numerous dirt bikes Posts: A lot.
MOTM - Jun '18, Oct '16
|
Quote:
Nice! |
|
|
|
|
|
September 25th, 2013, 10:03 AM
|
#17 |
|
Braaap
Name: Ryan
Location: St. Louis, MO
Join Date: Sep 2013 Motorcycle(s): 2012 ninja 250r SE. 2002 Suzuki DRZ400e Supermoto Posts: 90
|
got home from school last night and decided to tackle the Rearsets.
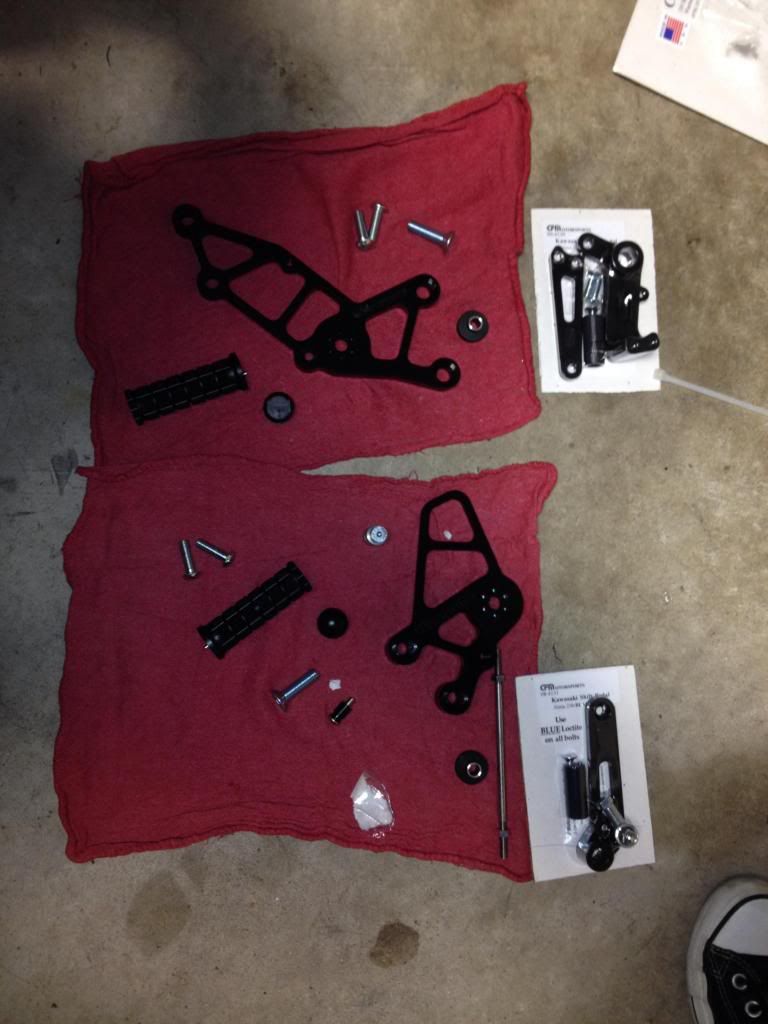 stock rearset 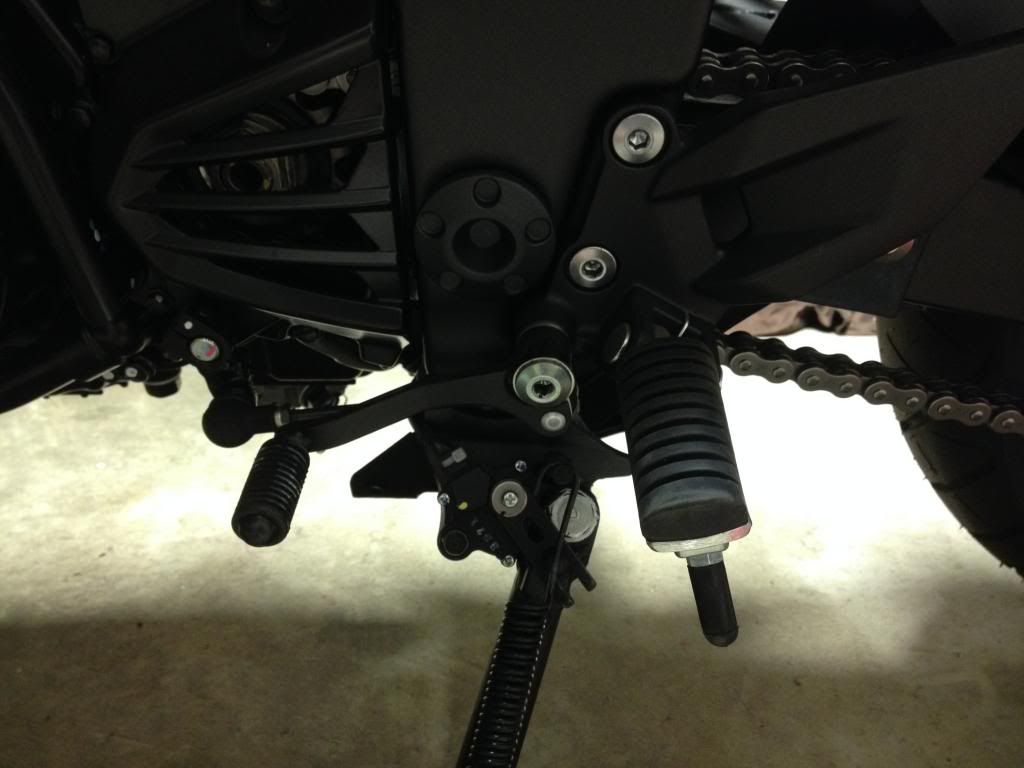 first thing was to get that hunk-o-junk out of the way 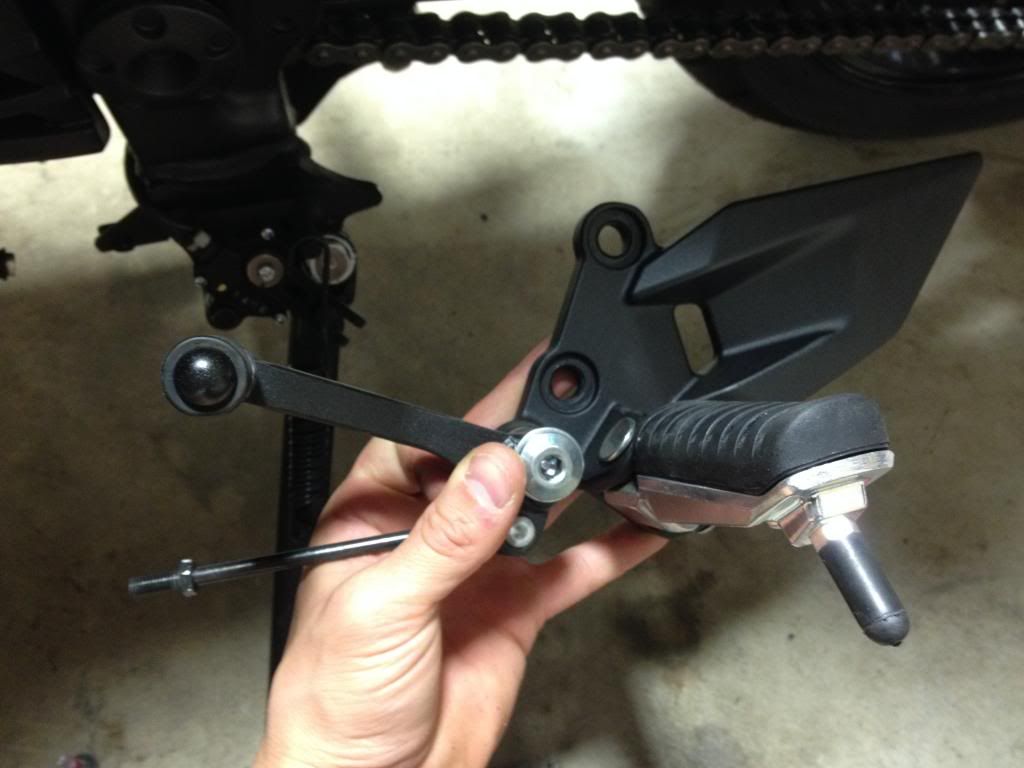 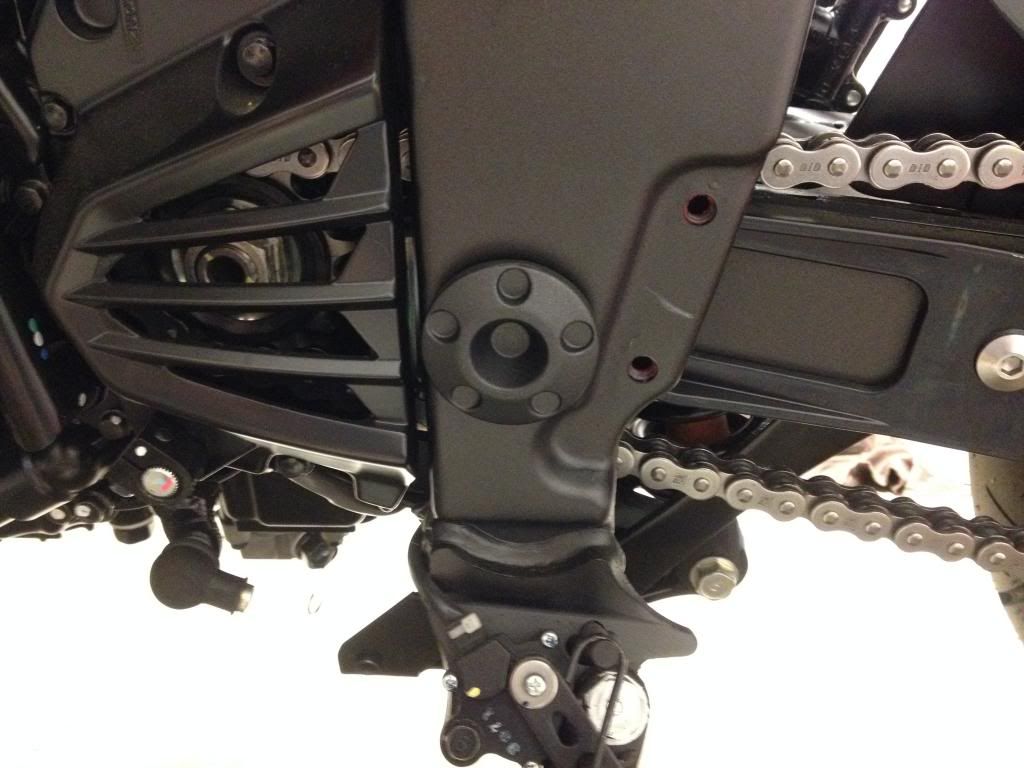 I actually had to read the directions as I seemed to be a few bolts short  ... turns out the Woodcraft set requires you to use some of your stock hardware: ... turns out the Woodcraft set requires you to use some of your stock hardware: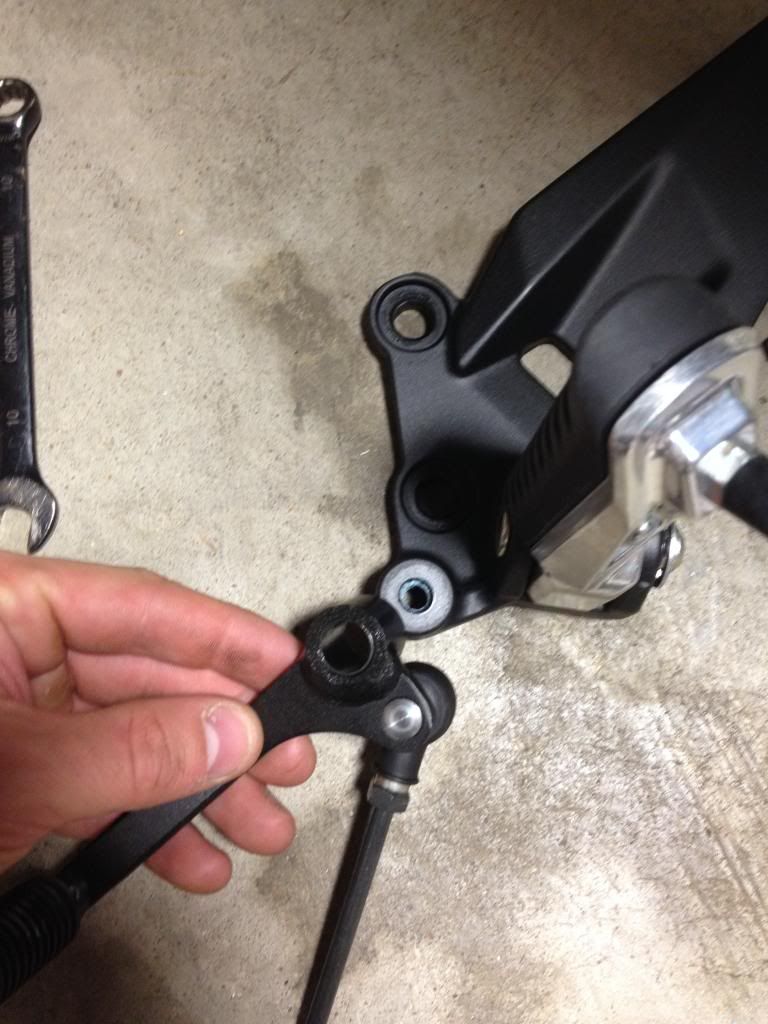 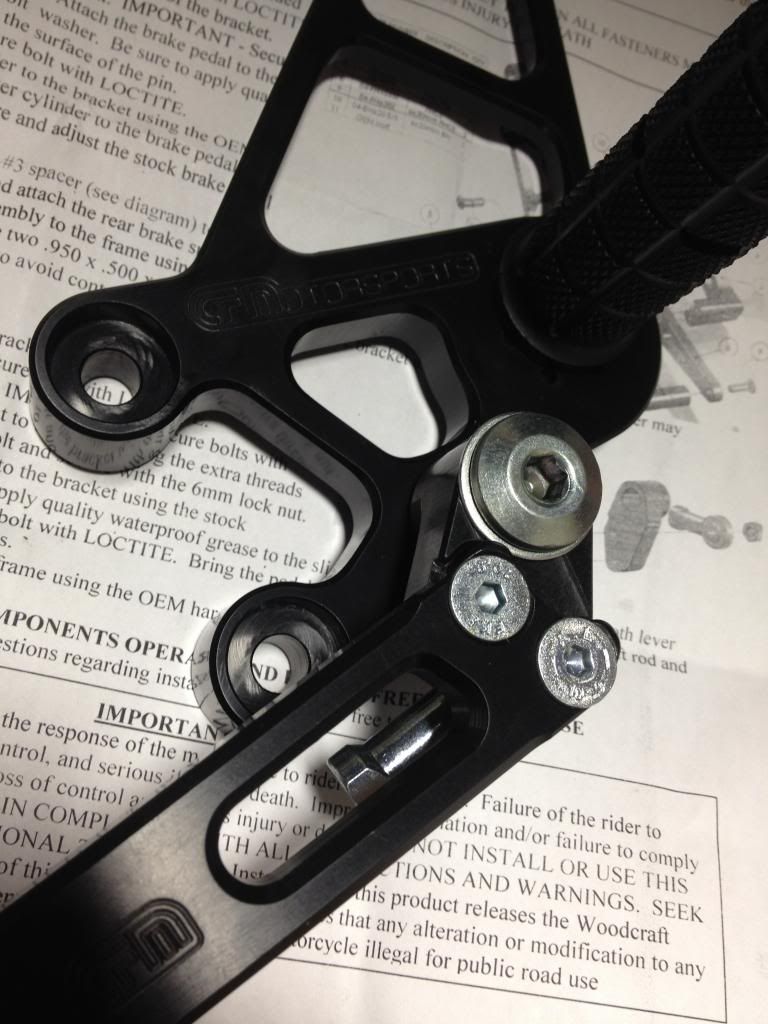 Woodcrafts put on 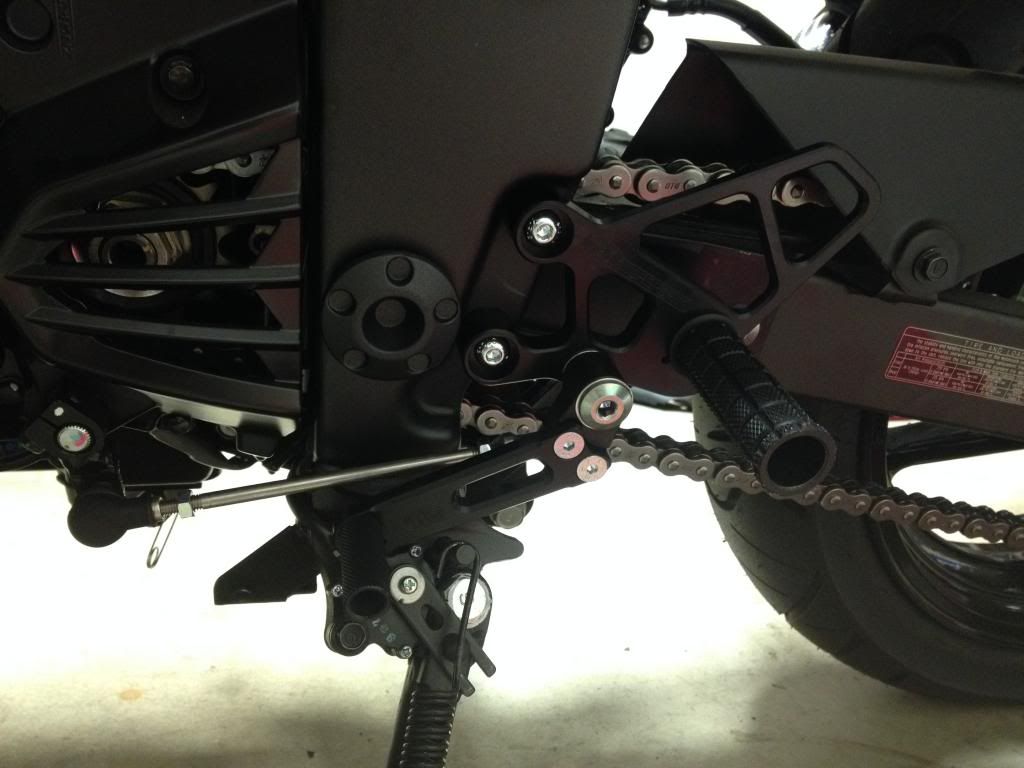 I like to run a GP or Reverse shift pattern, so had to flip the knuckle, but realized it hit the front sprocket cover... 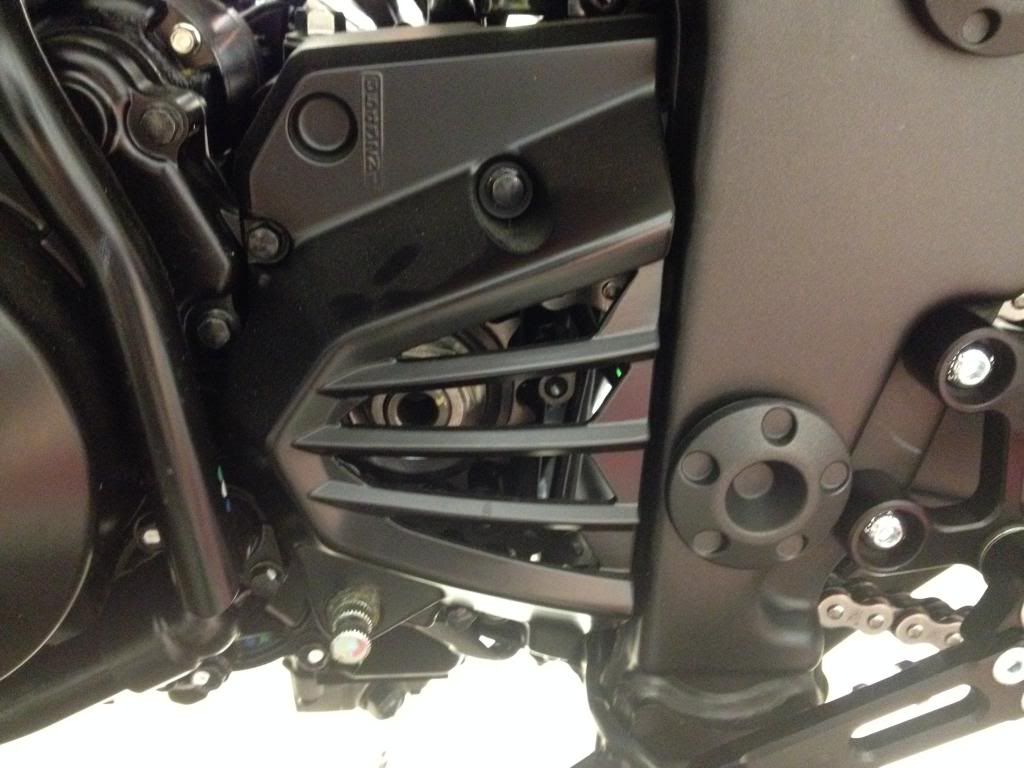 so pulled that off 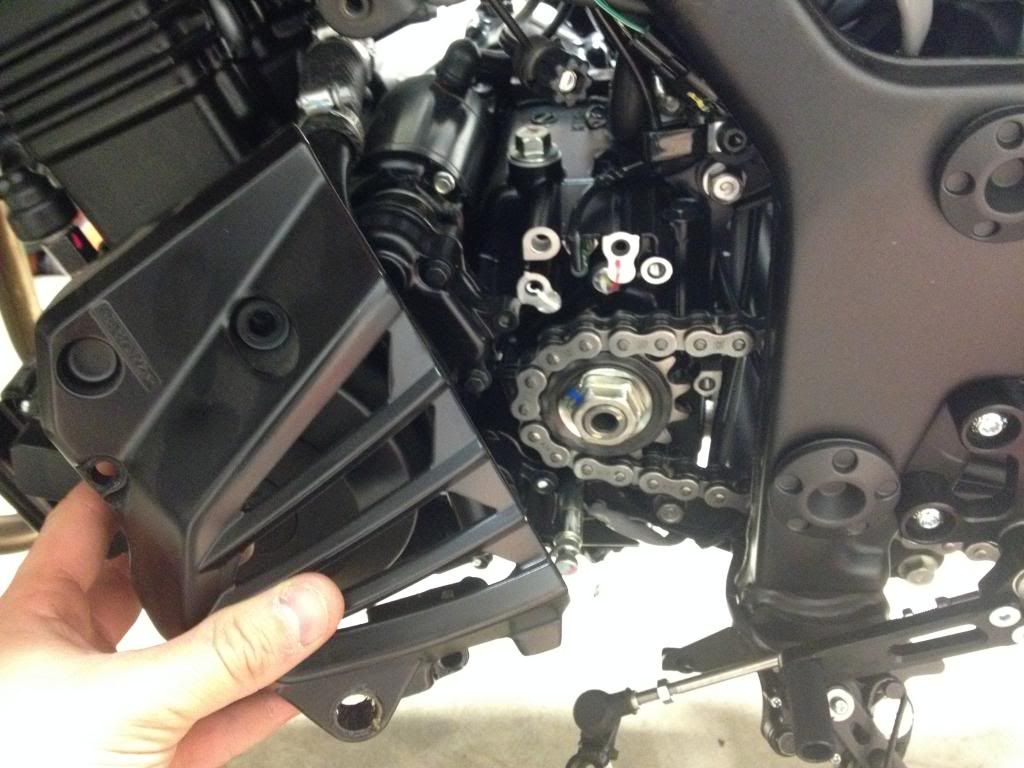 which cleared up plenty of room 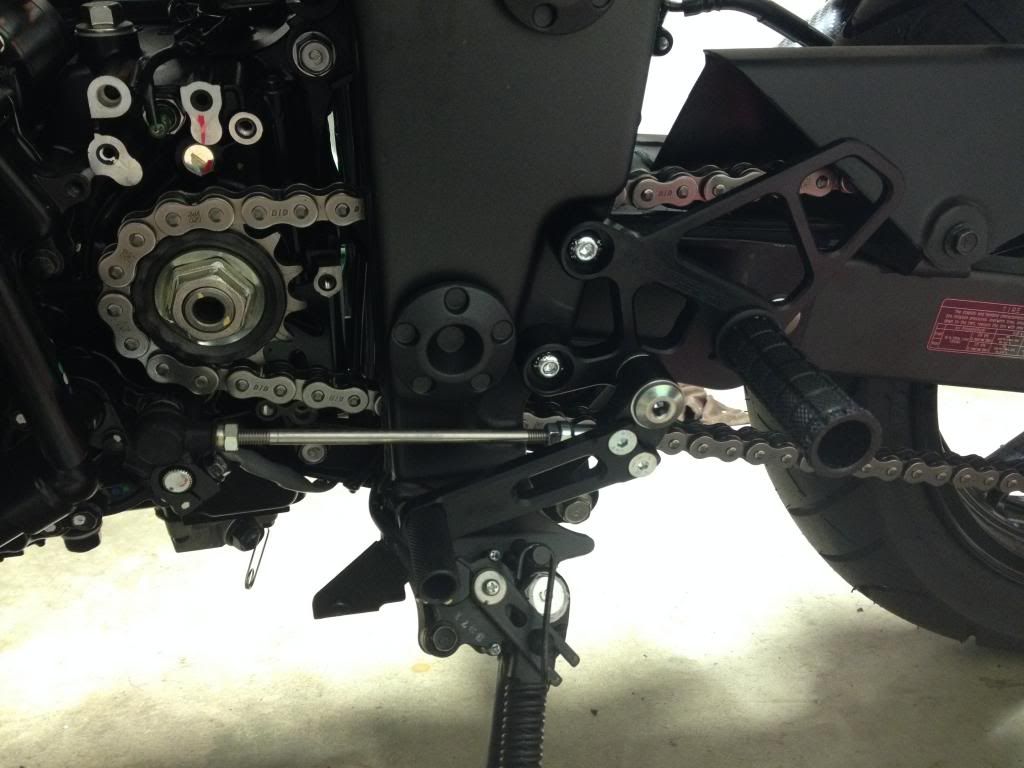 A quick look at the difference from stock (on the right)  and the difference in pegs  not a huge fan of the way they have the peg set up to break off, My Attack rearsets on my zx6r had a much better design IMHO. but I guess we'll see 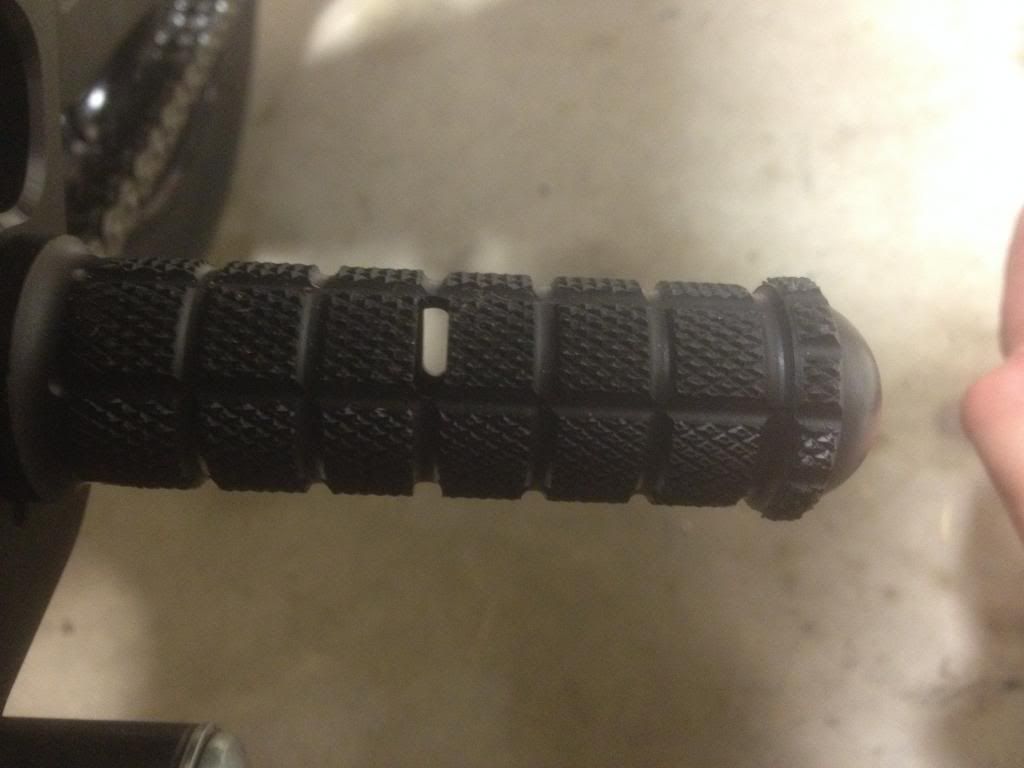 And the brake side  same process just making sure to get all the hooks, springs, and pivots right. And yes I kept the brake switch and everything there seeing as I'll probably ride this on the street in the off season 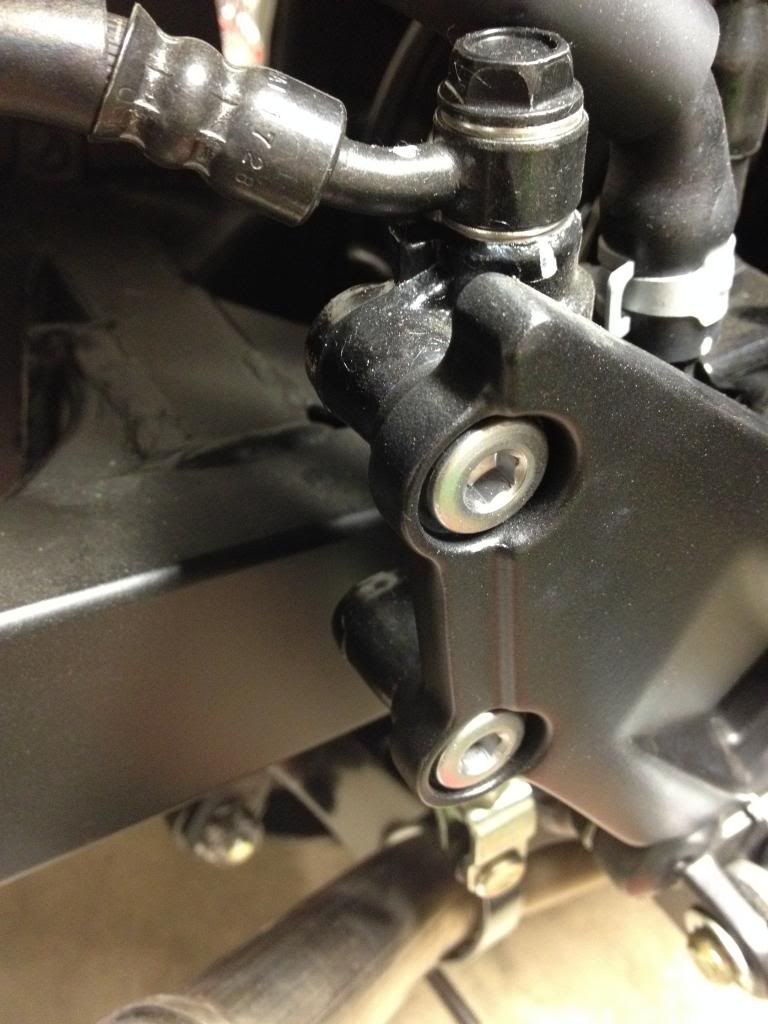 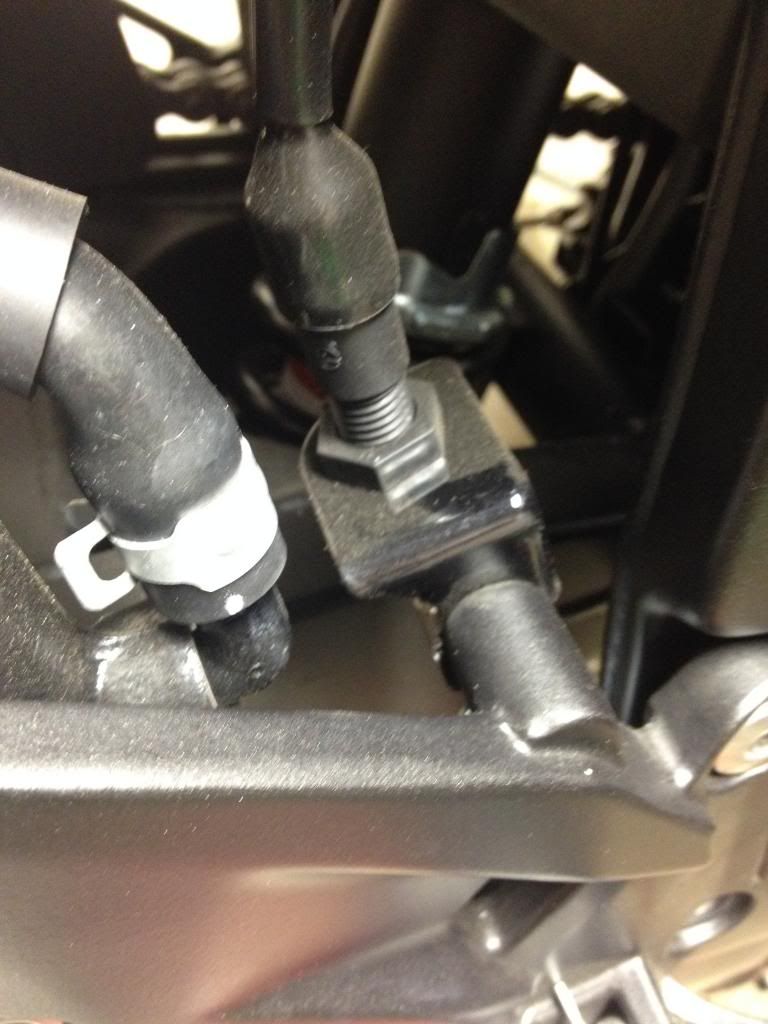   BOOM  Another thing about these I don't like is the adjustability of the peg, not very much compared to others I've used.... So I had my friend Zach machine some risers for me! Up 1" back 1", using his OEM rearset for reference  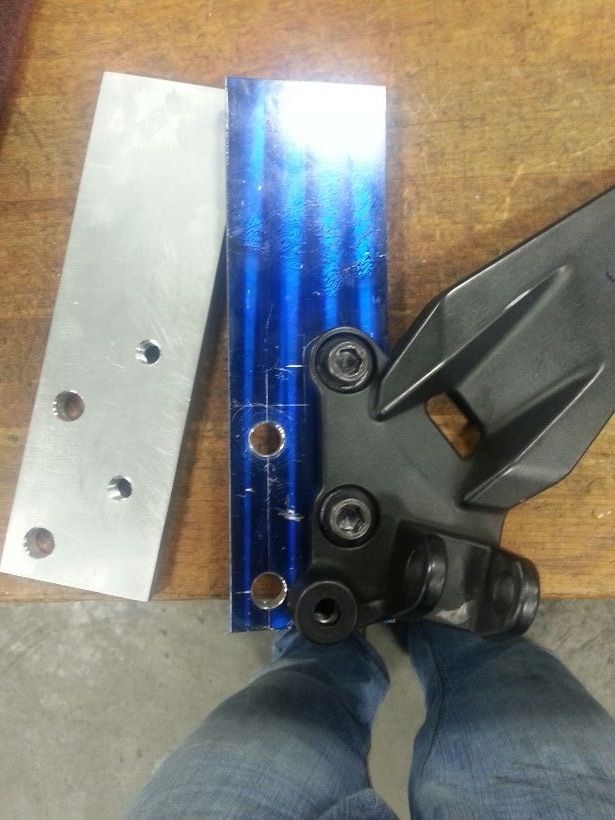 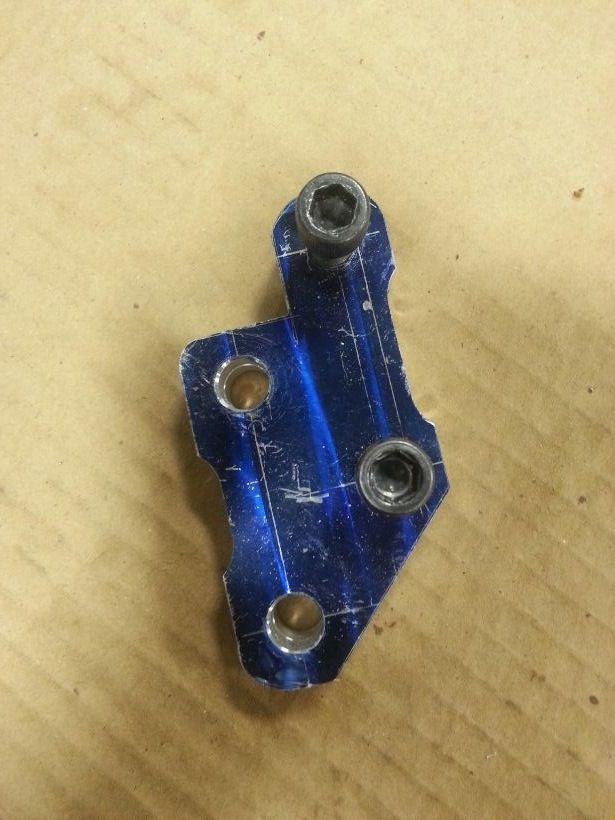 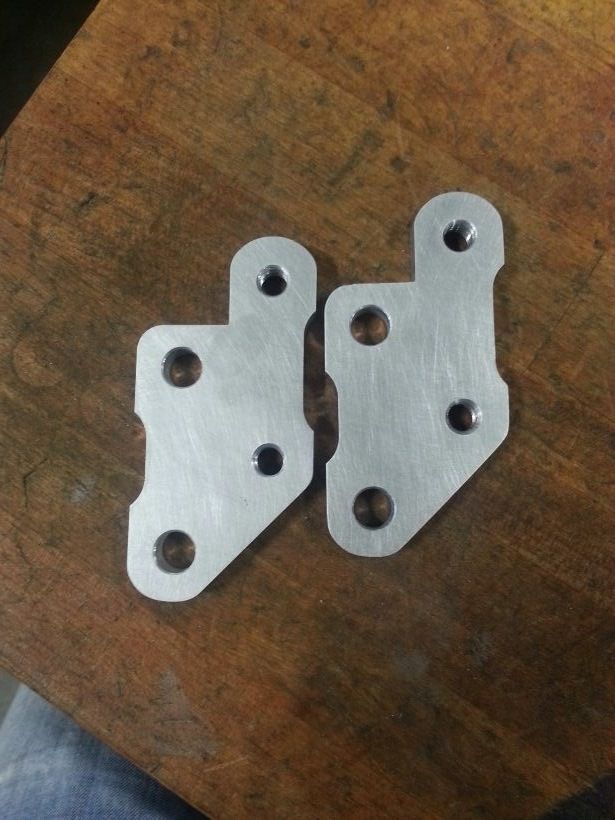 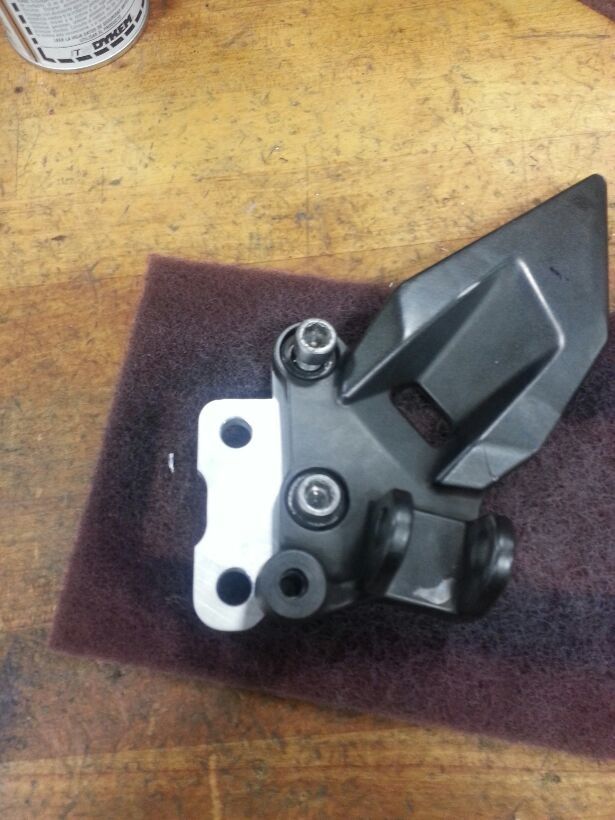 I think they turned out great especially considering he milled it all by hand from scratch, no cnc. I'll see how they fit and go from there!
__________________________________________________
|
|
|
|
|
September 25th, 2013, 02:16 PM
|
#18 | |
|
ninjette.org member
Name: Steve
Location: Gallatin TN
Join Date: Aug 2013 Motorcycle(s): 1 2005 Ninja EX250, 1 2008 Ninja 250, 1 2009 Ninja 250 Posts: 37
|
Nice progress and thanks for the updates!
If you want to sell your stock pegs, particularly the right (brake) side, PM me since my son "modified" one by crashing... Quote:
|
|
|
|
|
|
September 25th, 2013, 02:29 PM
|
#19 | |
|
Braaap
Name: Ryan
Location: St. Louis, MO
Join Date: Sep 2013 Motorcycle(s): 2012 ninja 250r SE. 2002 Suzuki DRZ400e Supermoto Posts: 90
|
Quote:
__________________________________________________
|
|
|
|
|
|
September 25th, 2013, 10:37 PM
|
#20 |
|
Kawi Girl
Name: Heather
Location: Washington
Join Date: Dec 2012 Motorcycle(s): '10 Ninja 250R Green SE, '13 Ninja 636 Pearl White Posts: 245
|
Sooooooooo jealous..... Looks great! I'm dying to do the race bike thing but having to wait a couple years. Another thread marked for stalking *ahem* I mean subscription.
__________________________________________________
Perspective: Everything looks better from the inside of a motorcycle helmet |
|
|
|
|
September 30th, 2013, 04:38 AM
|
#21 | |
|
Braaap
Name: Ryan
Location: St. Louis, MO
Join Date: Sep 2013 Motorcycle(s): 2012 ninja 250r SE. 2002 Suzuki DRZ400e Supermoto Posts: 90
|
Quote:
__________________________________________________
|
|
|
|
|
|
September 30th, 2013, 05:18 AM
|
#22 |
|
Braaap
Name: Ryan
Location: St. Louis, MO
Join Date: Sep 2013 Motorcycle(s): 2012 ninja 250r SE. 2002 Suzuki DRZ400e Supermoto Posts: 90
|
Sorry for the time gap, work and school have made it hard to get down to the garage...
But Gateway is a week away so the show must go on Next up is the Woodcraft Clip-ons, I really like the 2-piece design of the clamps, avoiding ever having to drop the forks simply to change out clip-ons or replace clamps. 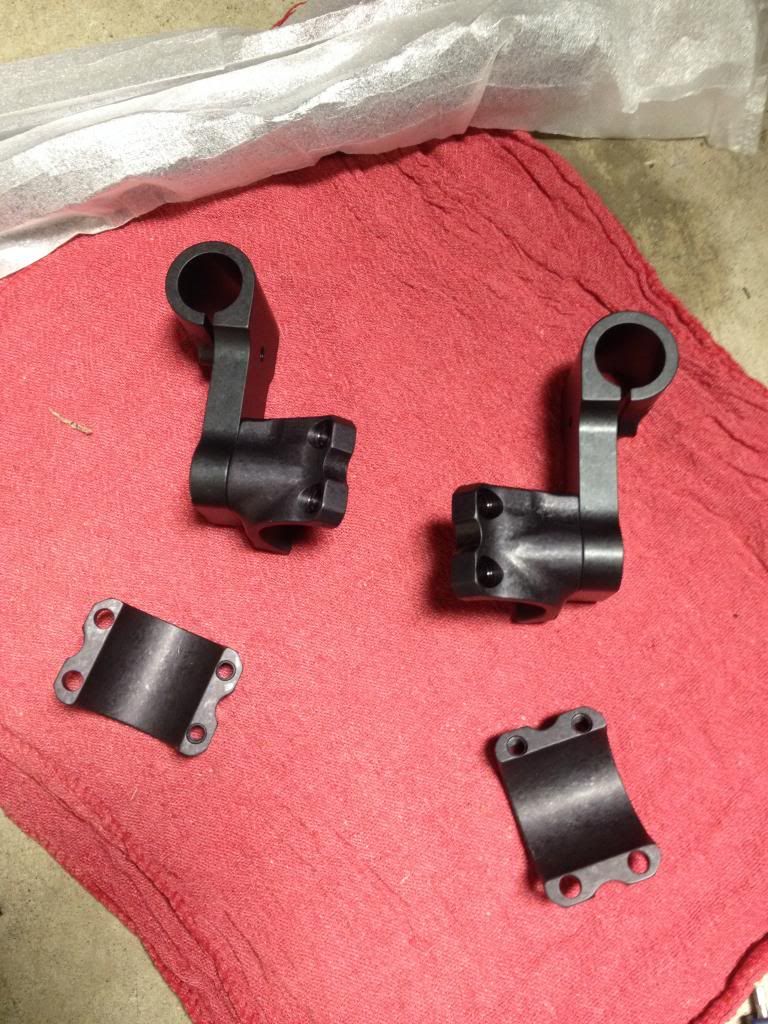 and put together to make sure all the bits were accounted for 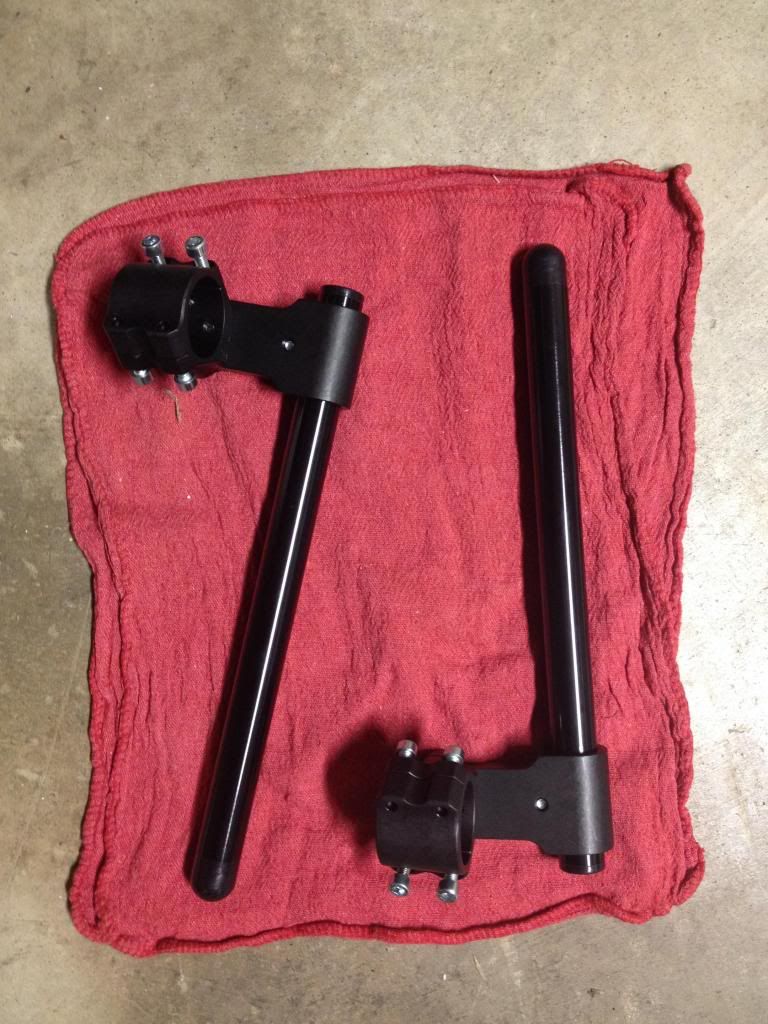 So out with the old... Taking the time to read up before I started, it let me know Kawasaki uses RED LOCTITE and how stubborn the bar ends would be, and a torch and impact drill would make things much easier. 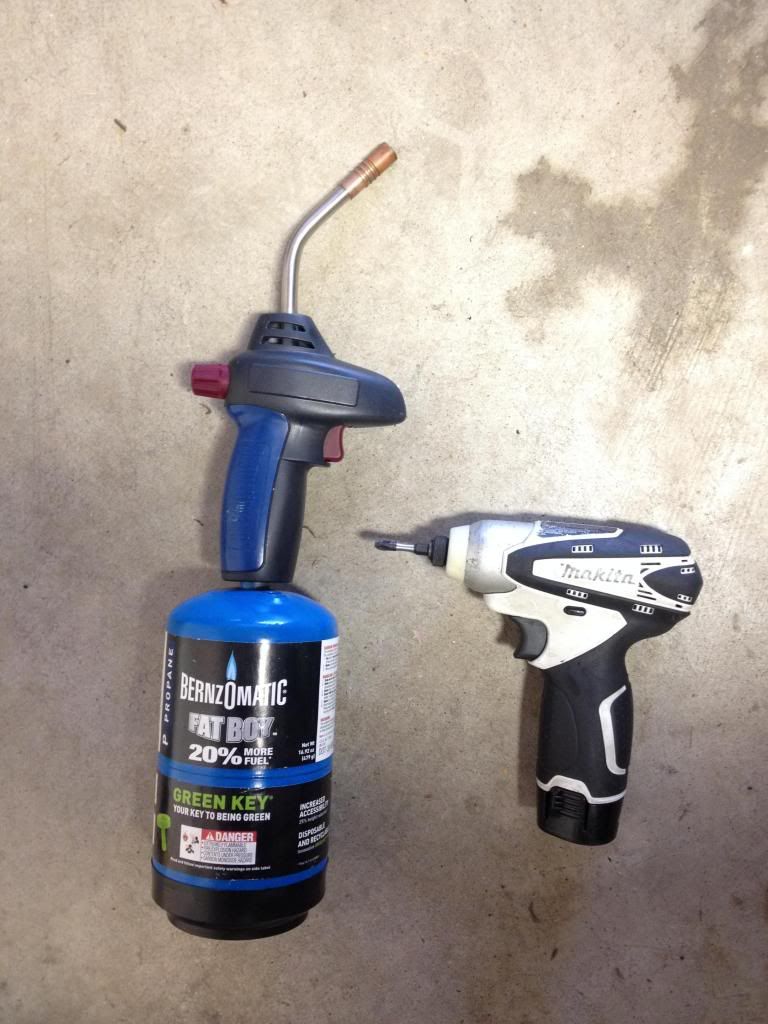 Simply heat up the bar end for about a min, 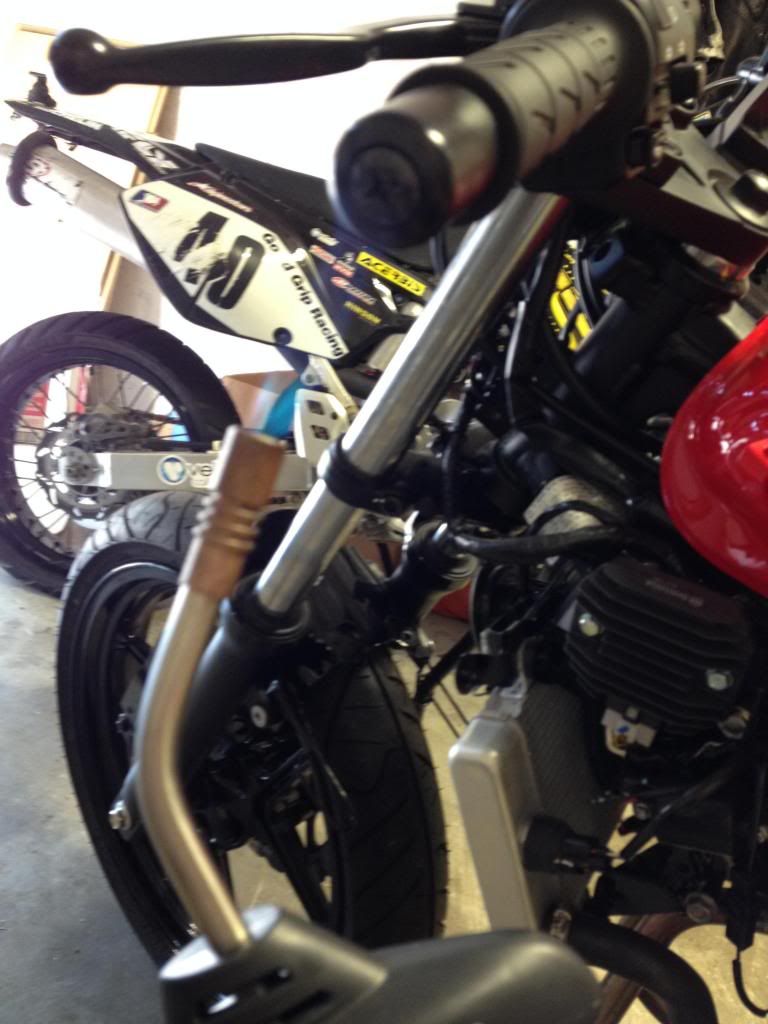 And using a #3 Phillips bit; take the impact drill to it,  and Boom, they come right out notice the Red Loctite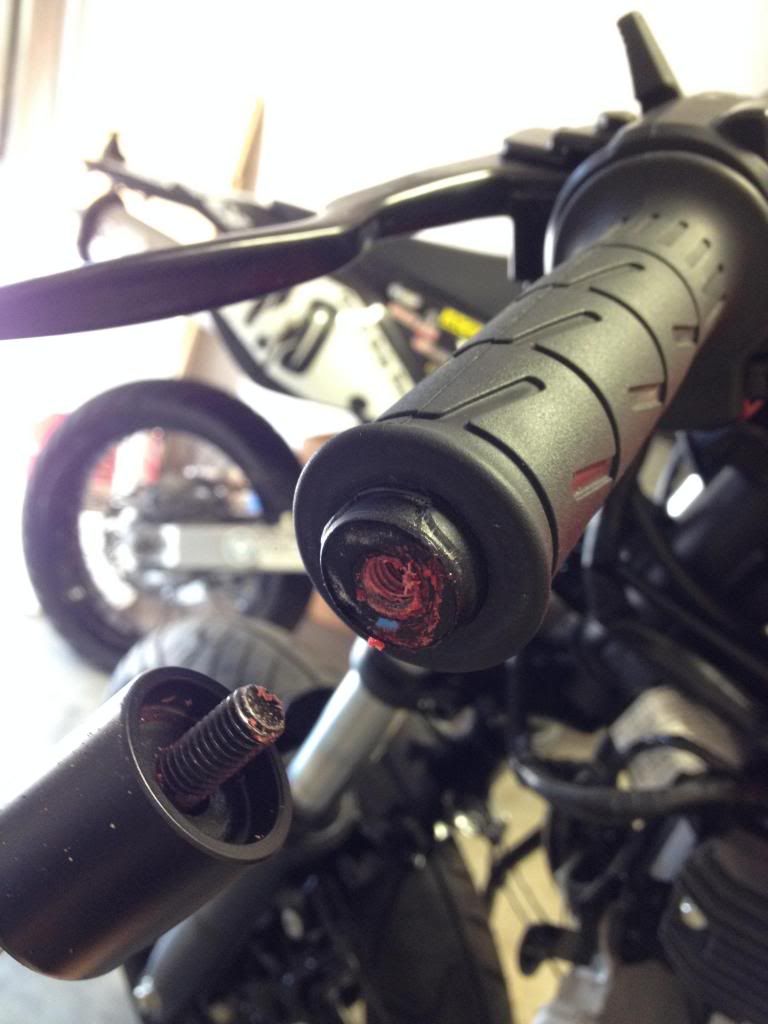 And yes just for fun I tried simply using a #3 Phillips screwdriver with no heat to see if it was even possible... didn't take long to start to strip the screw  So save yourself the frustration and go right for the torch and impact So save yourself the frustration and go right for the torch and impactWith the bar ends off, next was to do away with the old grips. I hate the OEM ones and will never use them, so rather than fight the glue to take them off... it's much easier to just cut them off. Seeing as she'll be riding it too, the girlfriend gave me a hand. Using a utility knife balde to cut the old grips off 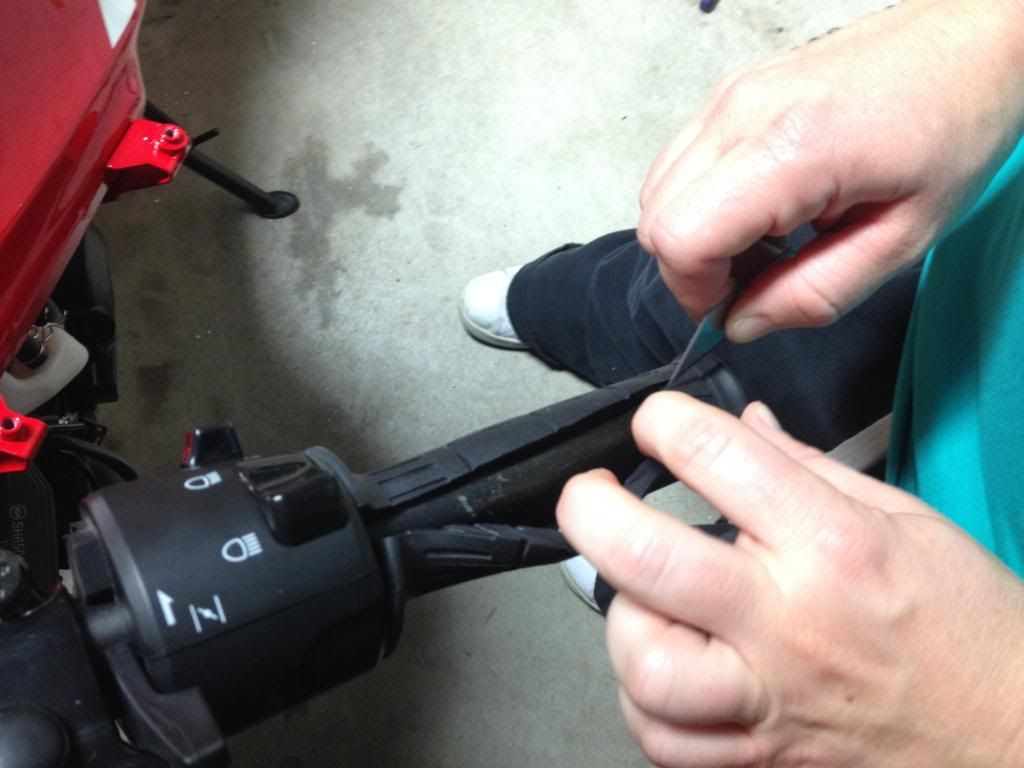 With the grips off you can slide the controls off. The controls have a little set pin to keep them from moving on the bars... 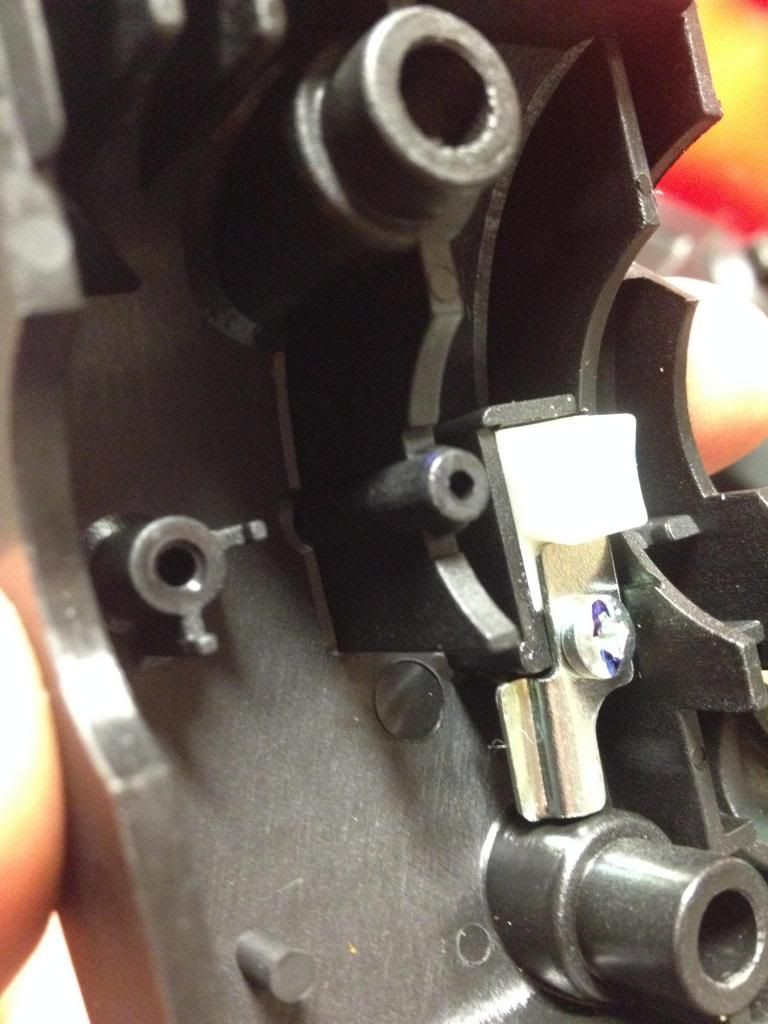 You can either drill out the clip-on bar so the pin will have a place to sit... OR my favorite route, remove the little set pin  So Brittany used a dremel tool to take off the set pin 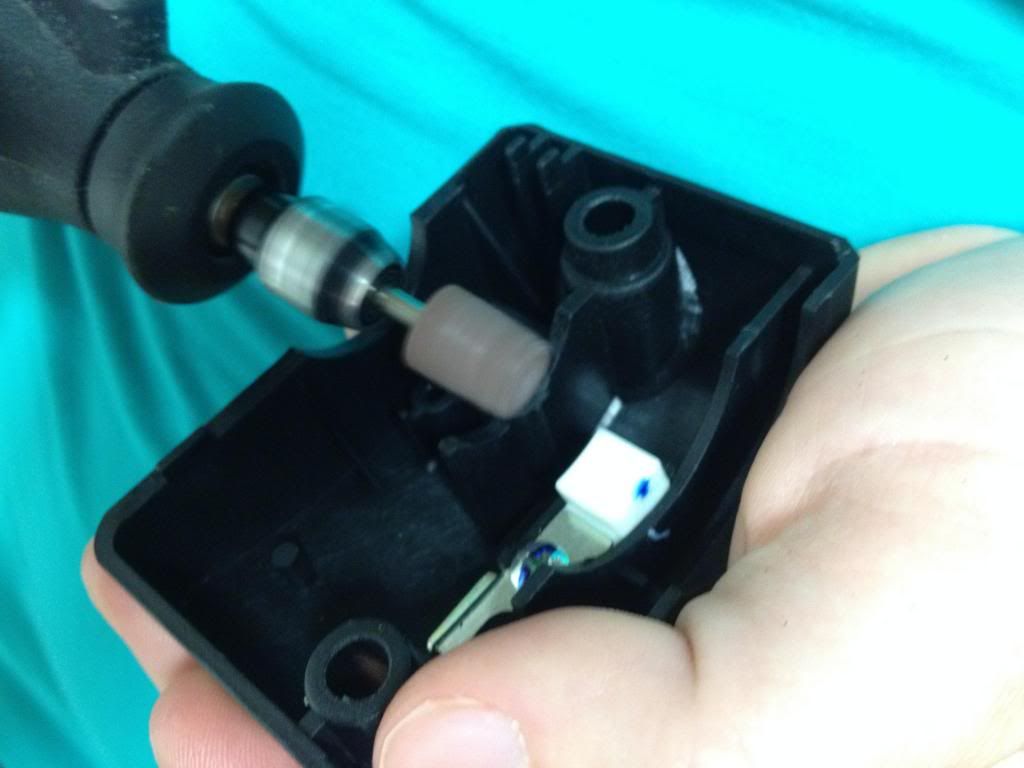 All sanded down 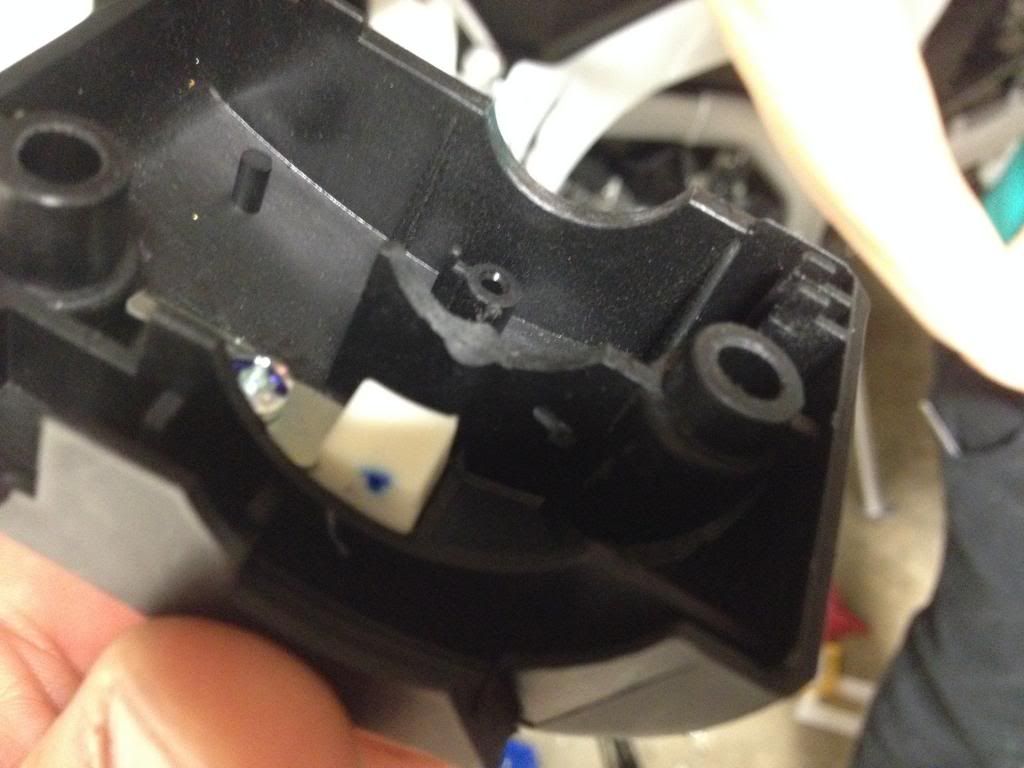 Now they will slide right onto the Woodcraft bar with no issues, and simply tighten the phillips head screws enough on the controls to keep them from rotating. (Again this will be riden on the street so I'm keeping all the controls) With the old clip-ons striped down, time to take them off. 2 6mm allen screws and they are off, 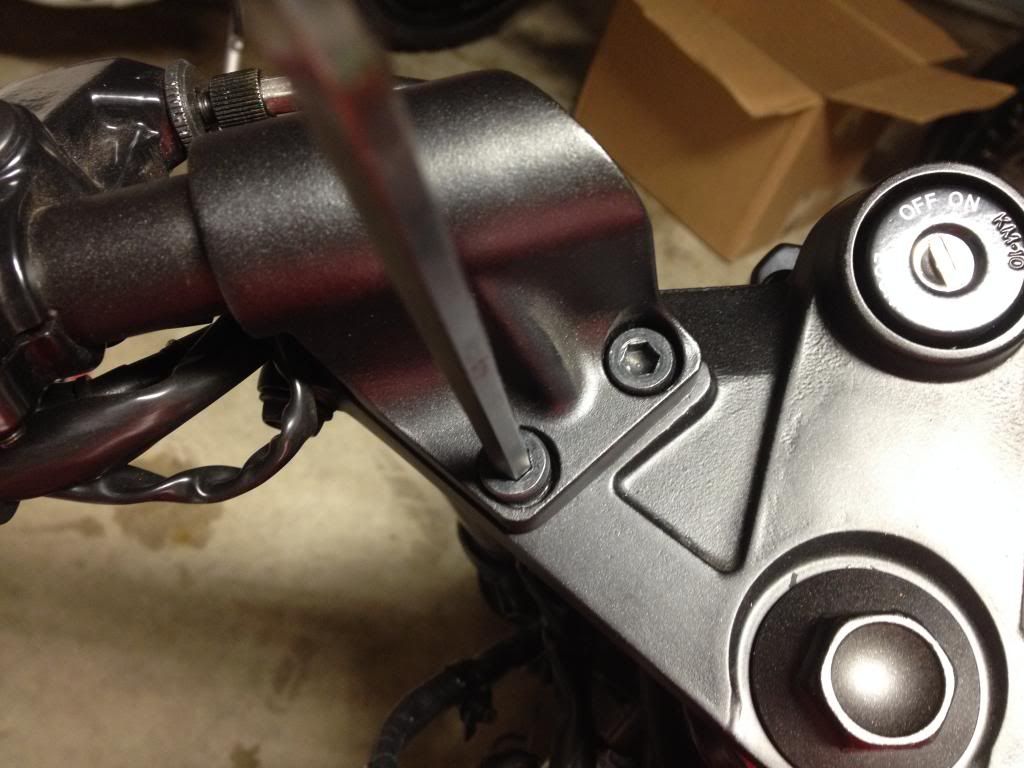 The bottom of the Woodcraft clamps are engraved with little L's and R's so you can't mix up which side is which 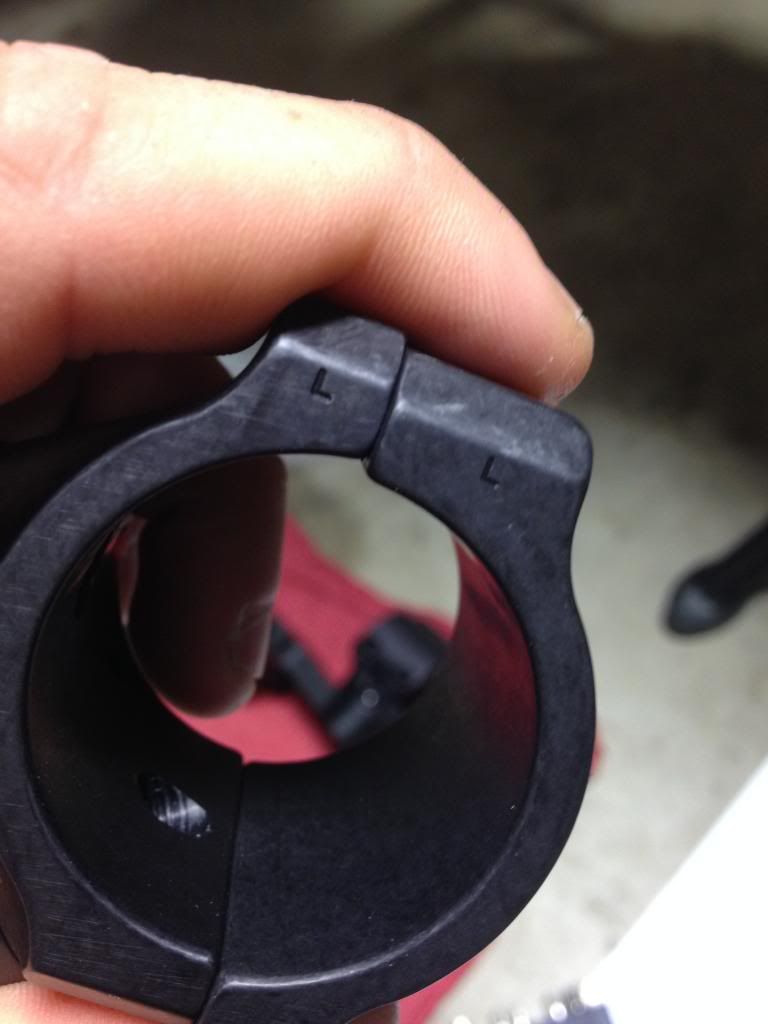 Then bolt the clamps onto the forks, just below the triple 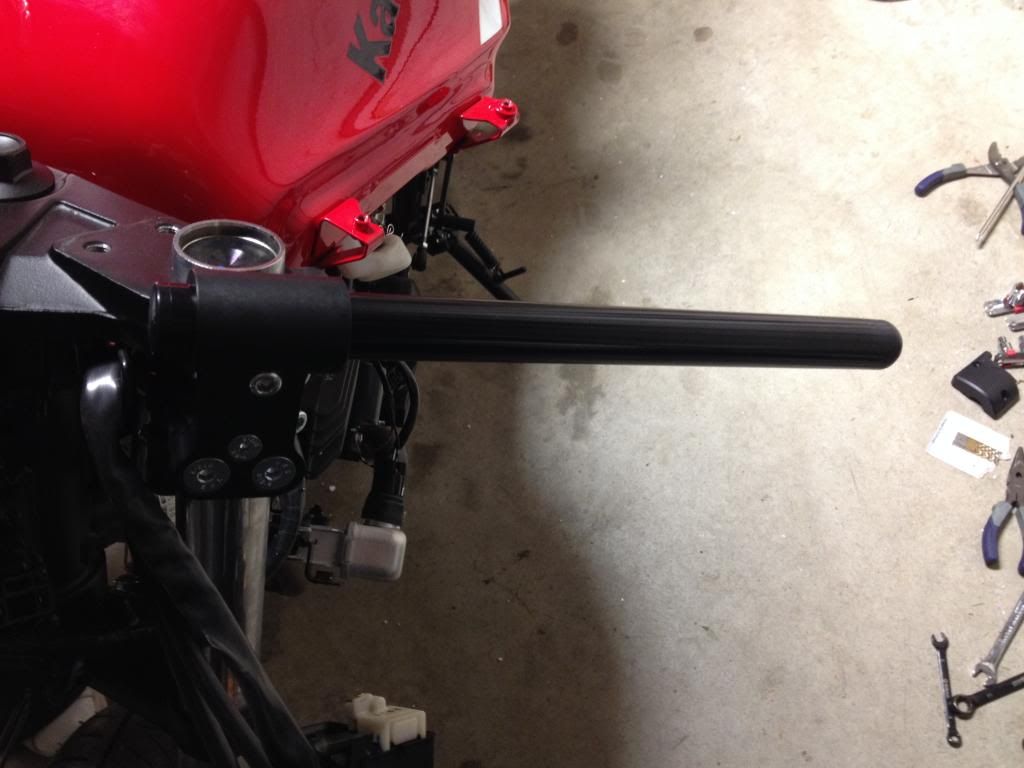 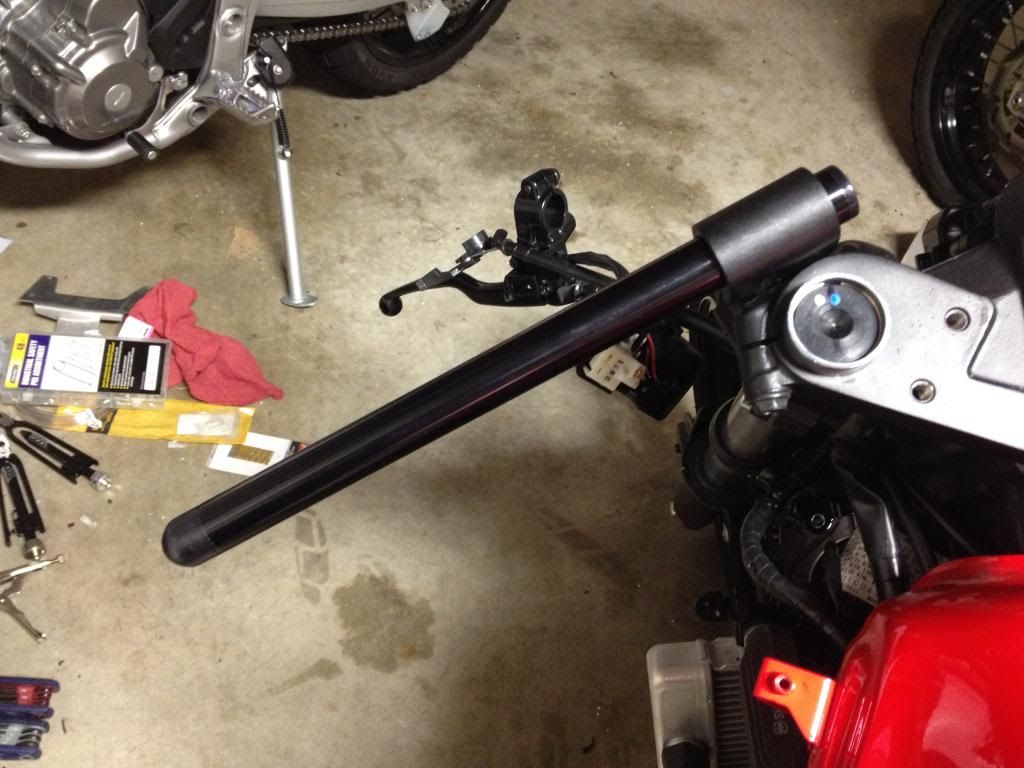 And repeat the same process for the right side: Remove the bar end, cut off the grip, dremel out the set pin on the controls, remove the old clip-on and bolt up the new Woodcraft. I just snug everything up at this point and don't torque anything down yet as I still need to get the height and angle I want from the bars. Then sit on the bike and play around with the angle/height until I get something I like, then tighten them up 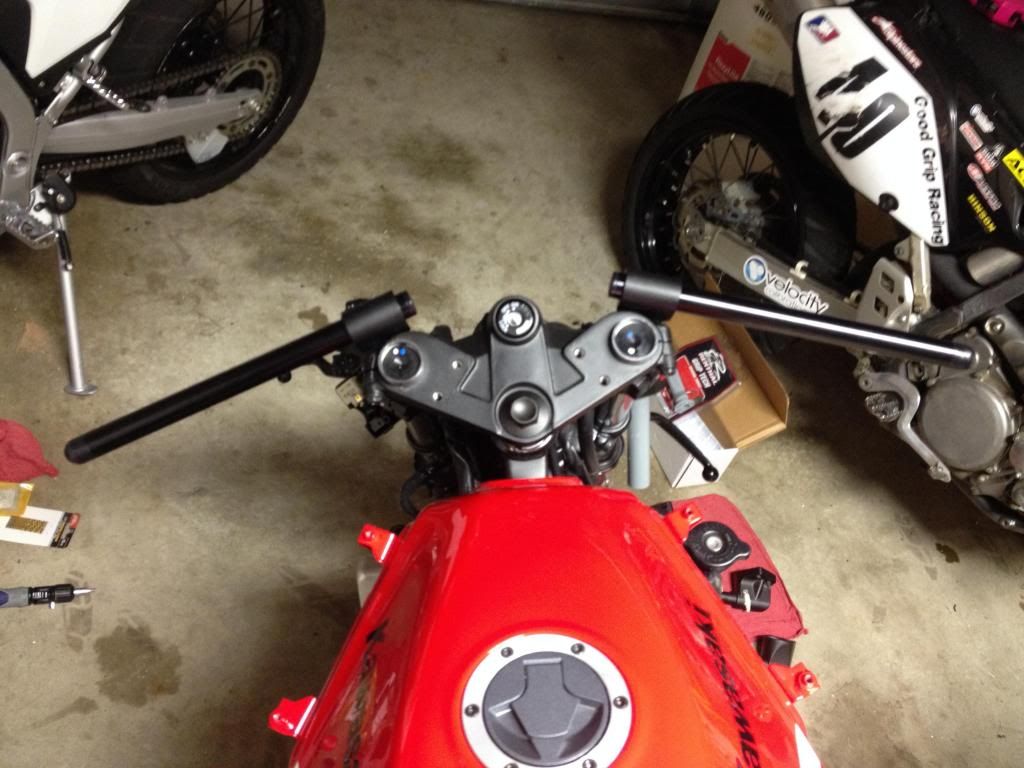 next step is to put all the controls back on, and install the new Renthal grips. Left side, 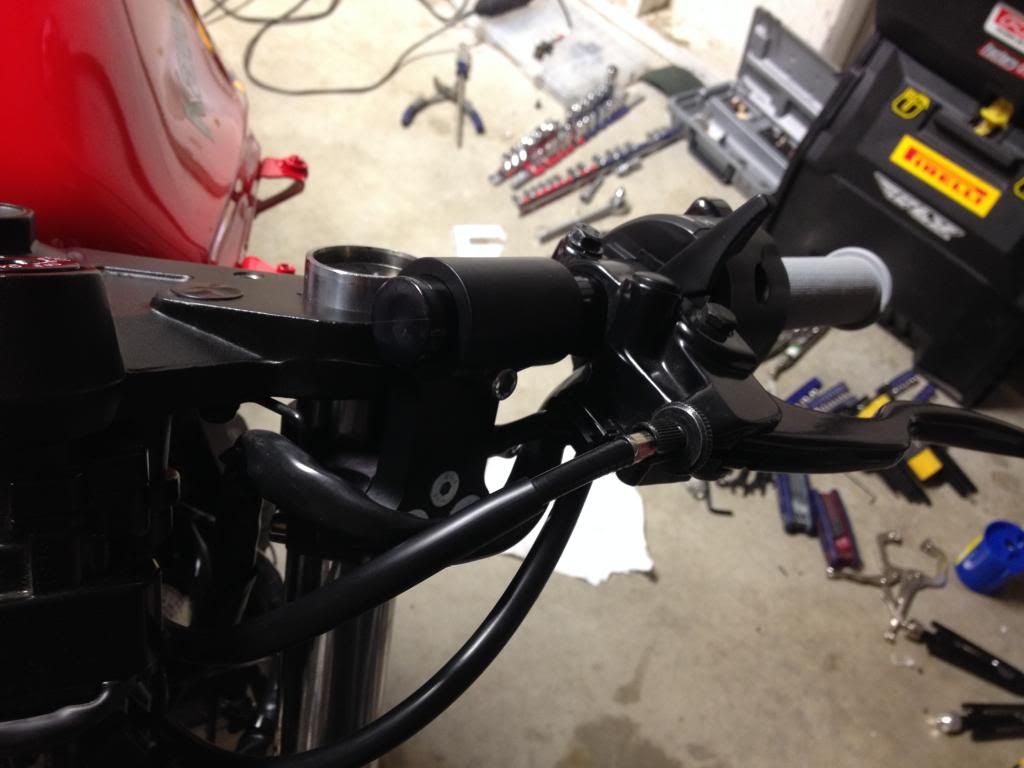 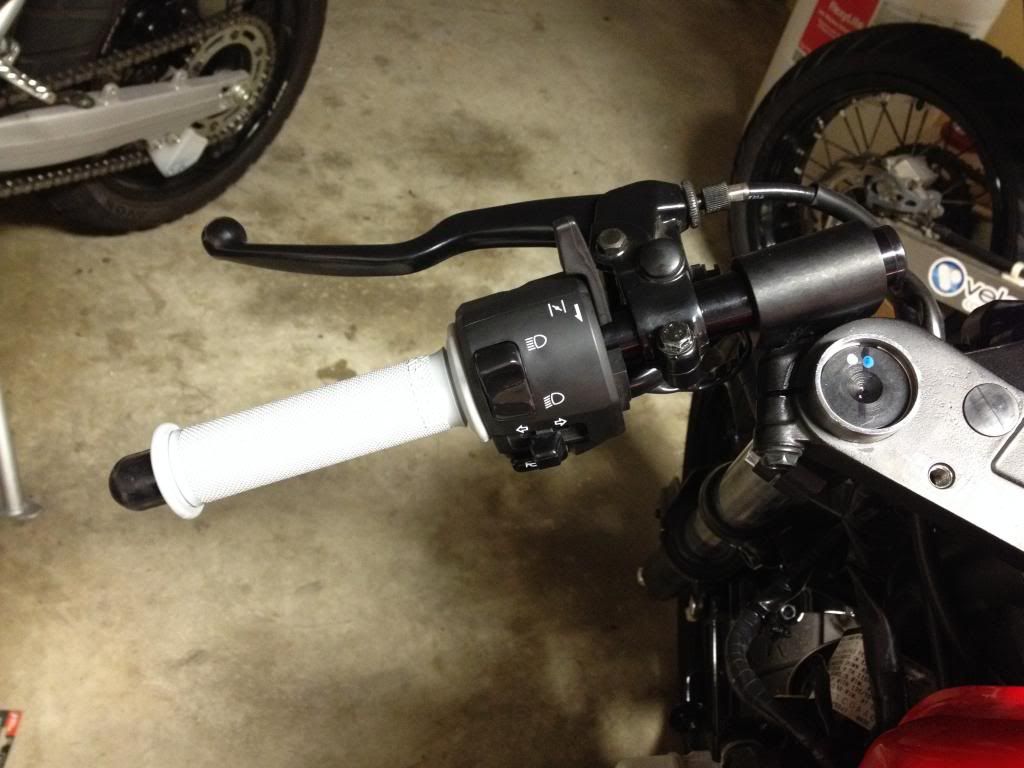 And right, 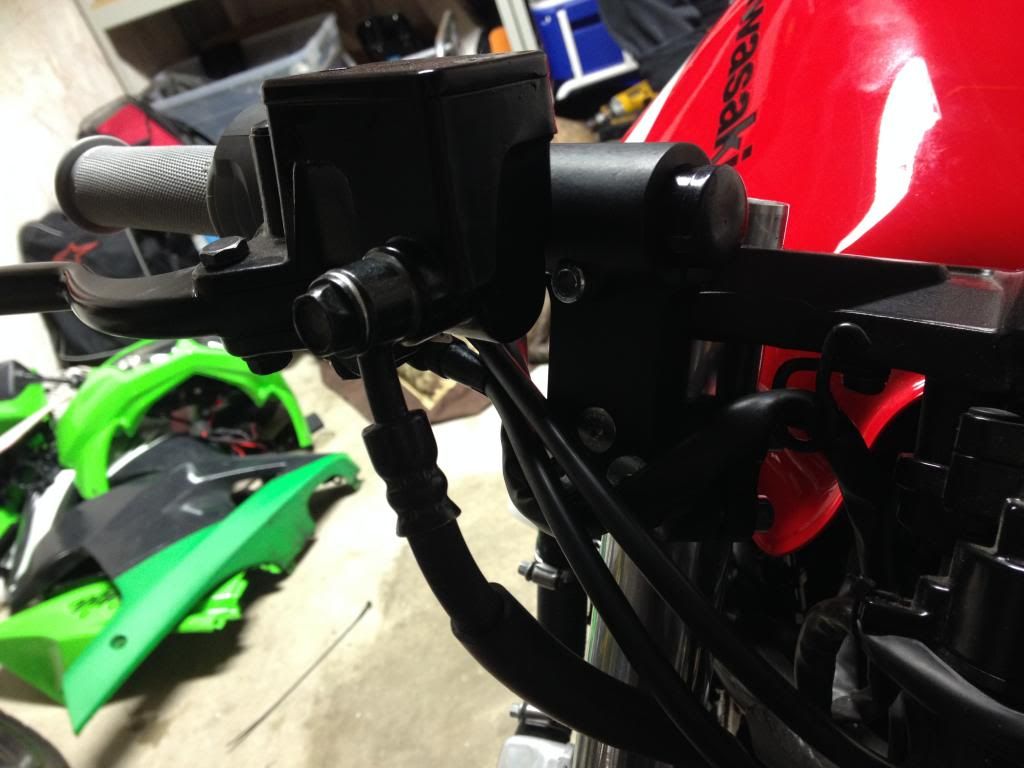 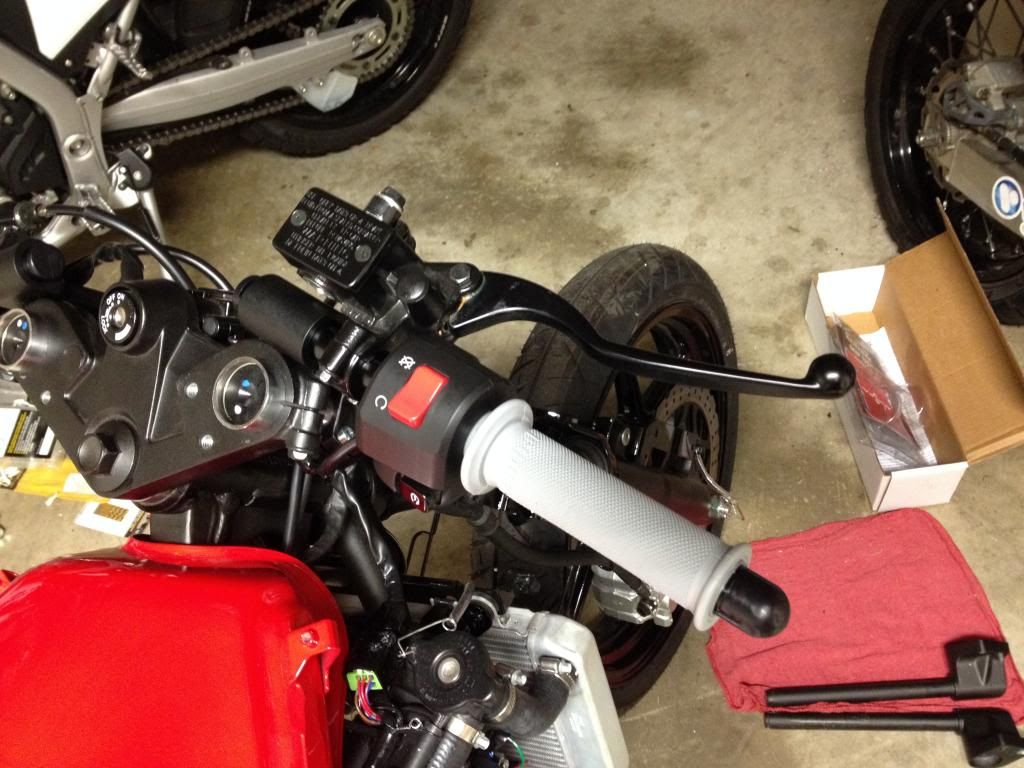 Once everything was back, it's just a matter of sitting on the bike again, and making sure the angle of your controls and levers are where you like them, then tighten all your bolts
__________________________________________________
|
|
|
|
|
September 30th, 2013, 06:46 AM
|
#23 |
|
ninjette.org guru
Name: Danger
Location: Canada
Join Date: Jan 2011 Motorcycle(s): 15 CBR300R, 14 BWS50, 09 FZ1, 09 Ninja 250, 06 CRF450R Motard, 03 ZX-6R Posts: 422
|
You can save the old grips by easily removing them with an air compressor instead of cutting them. I replaced mine with Progrip grips but have the old ones on the stock bars. I used soft compound Renthal grips on my 636, and liked them, but they only lasted one month.
I drilled my Woodcraft bar instead of taking a dremel to the plastic pin. It is there to prevent your controls from spinning on the bar so is the best route to take. My Woodcraft bars are silver. I've read about people with black ones having trouble with fading.
__________________________________________________
15 CBR300R, 14 BWS50, 09 FZ1, 09 Ninja 250, 06 CRF450R Motard, 03 ZX-6R 636 
|
|
|
1 out of 1 members found this post helpful. |
|
September 30th, 2013, 06:51 AM
|
#24 | |
|
ninjette.org guru
Name: Andrew
Location: St Louis
Join Date: Sep 2013 Motorcycle(s): Ducati 1198s, Triumph D675, Suzuki SV1000s, `08 Ninja 250, `11 Ninja 250, Suzuki GS750 Posts: 368
|
Quote:
__________________________________________________
MCRA.com |
|
|
|
|
|
September 30th, 2013, 06:57 AM
|
#25 |
|
ninjette.org guru
Name: Danger
Location: Canada
Join Date: Jan 2011 Motorcycle(s): 15 CBR300R, 14 BWS50, 09 FZ1, 09 Ninja 250, 06 CRF450R Motard, 03 ZX-6R Posts: 422
|
I wouldn't risk possible loose controls by the choke lever on a street or race bike.
I ditched the horn, signal, and high beam switches on my 04 ZX-6RR race bike, as well as the ignition (no key to forget for the big race ).
__________________________________________________
15 CBR300R, 14 BWS50, 09 FZ1, 09 Ninja 250, 06 CRF450R Motard, 03 ZX-6R 636
|
|
|
|
|
September 30th, 2013, 07:28 AM
|
#26 | |
|
dirty boy
Name: Joe
Location: Johnstown, PA
Join Date: Sep 2012 Motorcycle(s): I don't even know anymore?? Posts: A lot.
MOTM - Apr '14
|
Quote:
Doesn't your shift lever make contact with the side stand mount? I understand this is a race bike so you just plan on removing it in the end so it is non issue in the end?
__________________________________________________
I love the smell of burning pre-mix in the morning I don't think I'm a lot dumber than you thought that I think that I thought I was once. 
|
|
|
|
|
|
September 30th, 2013, 07:36 AM
|
#27 | ||
|
Braaap
Name: Ryan
Location: St. Louis, MO
Join Date: Sep 2013 Motorcycle(s): 2012 ninja 250r SE. 2002 Suzuki DRZ400e Supermoto Posts: 90
|
Quote:
Quote:
I won't ever use the OEM grips as I don't like them, so no point in fussing with a compressor just to toss them in the trash. I use the Renthals, Medium compound which hold up great for me. As for the controls, like I said you simply tighten the phillips screws until the controls don't rotate, which doesn't take too much. I have gone this route on all my builds and never had an issue with controls spinning on me. So it's not worth the time drilling out the clip-ons, and also makes for quick replacement at the track. Worse case on a race weekend if I crash and have already gone through a spare bar, I can grab one from a buddy and not have to worry if it's drilled out for a pin (most are not seeing as they remove the controls all together)
__________________________________________________
|
||
|
|
|
|
September 30th, 2013, 07:38 AM
|
#28 | |
|
Braaap
Name: Ryan
Location: St. Louis, MO
Join Date: Sep 2013 Motorcycle(s): 2012 ninja 250r SE. 2002 Suzuki DRZ400e Supermoto Posts: 90
|
Quote:
I have it adjusted so i stops just short of the mount. But yes, I will be removing it before this weekend so I don't have issues dragging it.
__________________________________________________
|
|
|
|
|
|
September 30th, 2013, 07:50 AM
|
#29 |
|
ninjette.org guru
Name: Danger
Location: Canada
Join Date: Jan 2011 Motorcycle(s): 15 CBR300R, 14 BWS50, 09 FZ1, 09 Ninja 250, 06 CRF450R Motard, 03 ZX-6R Posts: 422
|
Good point about being able to swap out a clip-on quicker without having to drill the bar. Clip-ons, levers, and rearsets are definitely needed as spares for anyone who races. Thankfully I kept all my extra race parts from my 04 ZX-6RR for my 636.
__________________________________________________
15 CBR300R, 14 BWS50, 09 FZ1, 09 Ninja 250, 06 CRF450R Motard, 03 ZX-6R 636
|
|
|
|
|
September 30th, 2013, 11:40 AM
|
#30 | |
|
ninjette.org certified postwhore
Name: .
Location: .
Join Date: Feb 2011 Motorcycle(s): . Posts: Too much.
MOTM - Feb '13, Feb '14
|
Quote:
I already have rearset adjusters with my OE rearsets, but I want them back further. So I'm just going to make my own rearset adjusters and sell my current ones. |
|
|
|
|
|
September 30th, 2013, 11:45 AM
|
#31 | |
|
Braaap
Name: Ryan
Location: St. Louis, MO
Join Date: Sep 2013 Motorcycle(s): 2012 ninja 250r SE. 2002 Suzuki DRZ400e Supermoto Posts: 90
|
Quote:
I'll find out for you, he has to remake the right side as he made both just using the left side for reference, and apparently the space between the bolts is a little wider on the brake side.
__________________________________________________
|
|
|
|
|
|
September 30th, 2013, 11:47 AM
|
#32 |
|
ninjette.org certified postwhore
Name: .
Location: .
Join Date: Feb 2011 Motorcycle(s): . Posts: Too much.
MOTM - Feb '13, Feb '14
|
Thanks Ryan, I appreciate that!
|
|
|
|
|
September 30th, 2013, 09:51 PM
|
#33 |
|
ninjette.org member
Name: Rick
Location: St Peters
Join Date: Feb 2013 Motorcycle(s): '09 ZX6 (street), '04 RC51 (street/track), '08 Ninja 250 (race) Posts: 104
|
It's not like you need to do this because you are a skinny ass. You can get rid of the left side controls, it saves about 1/2 pound. I use a coat hanger for the choke if I need it.
|
|
|
|
|
October 1st, 2013, 06:31 AM
|
#34 | |
|
Braaap
Name: Ryan
Location: St. Louis, MO
Join Date: Sep 2013 Motorcycle(s): 2012 ninja 250r SE. 2002 Suzuki DRZ400e Supermoto Posts: 90
|
Quote:
Once this track season is over, the bike will go back into street trim for the winter and me and Brittany will both ride it on occasion. Once we get close to next season I'll start really tearing into it, loosing any extra weight I can
__________________________________________________
|
|
|
|
|
|
October 1st, 2013, 07:08 AM
|
#35 |
|
Braaap
Name: Ryan
Location: St. Louis, MO
Join Date: Sep 2013 Motorcycle(s): 2012 ninja 250r SE. 2002 Suzuki DRZ400e Supermoto Posts: 90
|
So I hit a small snag on the rearset risers...
The left side lines up perfect and won't be an issue 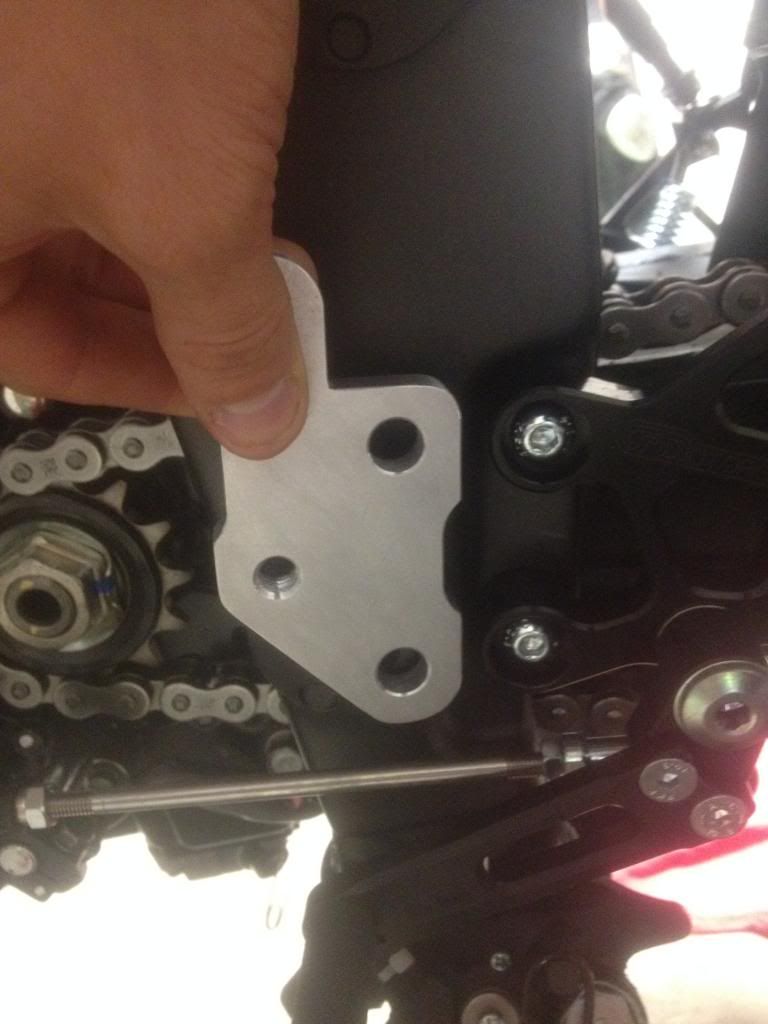 The problem is on the right side 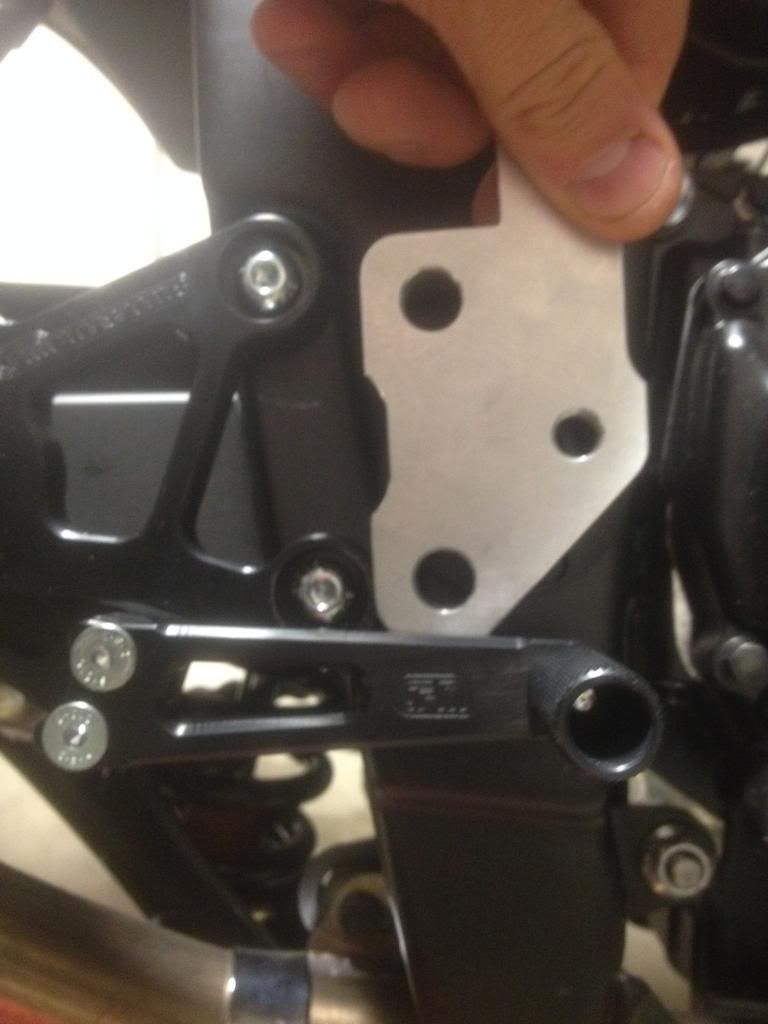 Apparently the two sides are not spaced the same for the bolts. When Zach made these up he only had the left OEM rearset to use for reference so made both sides from that. It wasn't until I went to put them on we realized the spacing is different from the two sides. you can see the small about the right side is off: 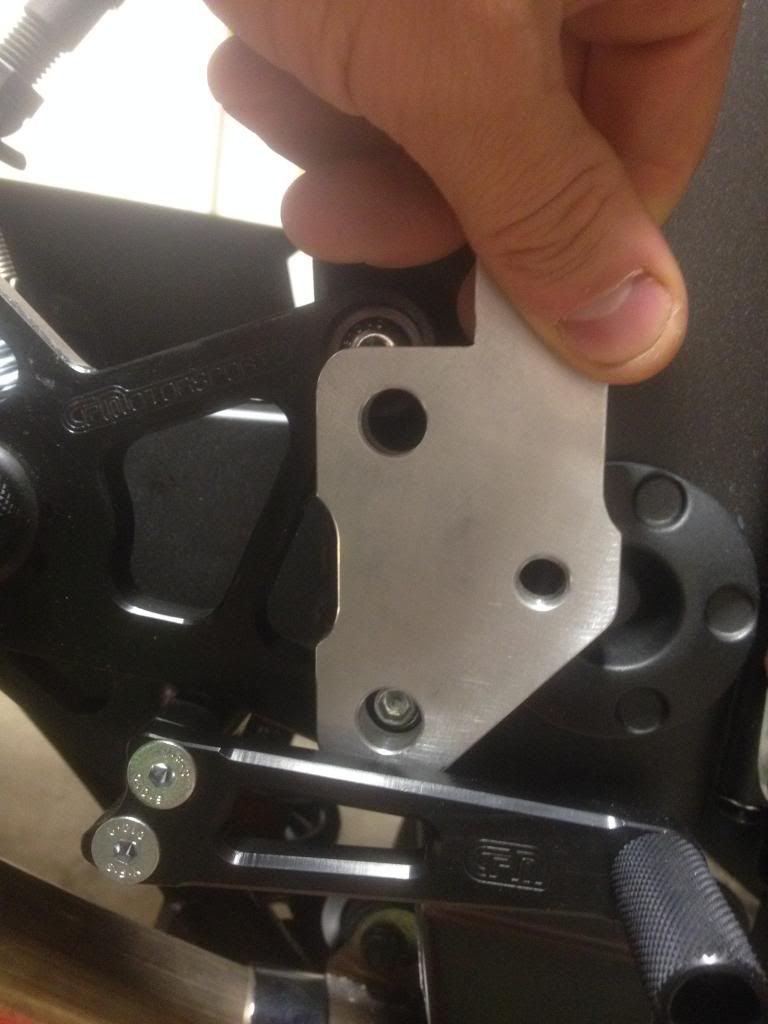 Now that we know, he's going to use the right OEM rearset and make two from that, so there will be two sets of risers ....so one for RcRickAll part of the learning process when making your own custom bits
__________________________________________________
|
|
|
|
|
October 1st, 2013, 07:16 AM
|
#36 |
|
Braaap
Name: Ryan
Location: St. Louis, MO
Join Date: Sep 2013 Motorcycle(s): 2012 ninja 250r SE. 2002 Suzuki DRZ400e Supermoto Posts: 90
|
Also got thrown a set of torn up OEM fairings, so the bike will have a little protection until the Race bodywork gets ordered this winter.
They are bashed up but will at least protect more than nothing. And nothing a quick spray job can't clean up... I had to move the stable out into the lot to make some room for the "paint booth" 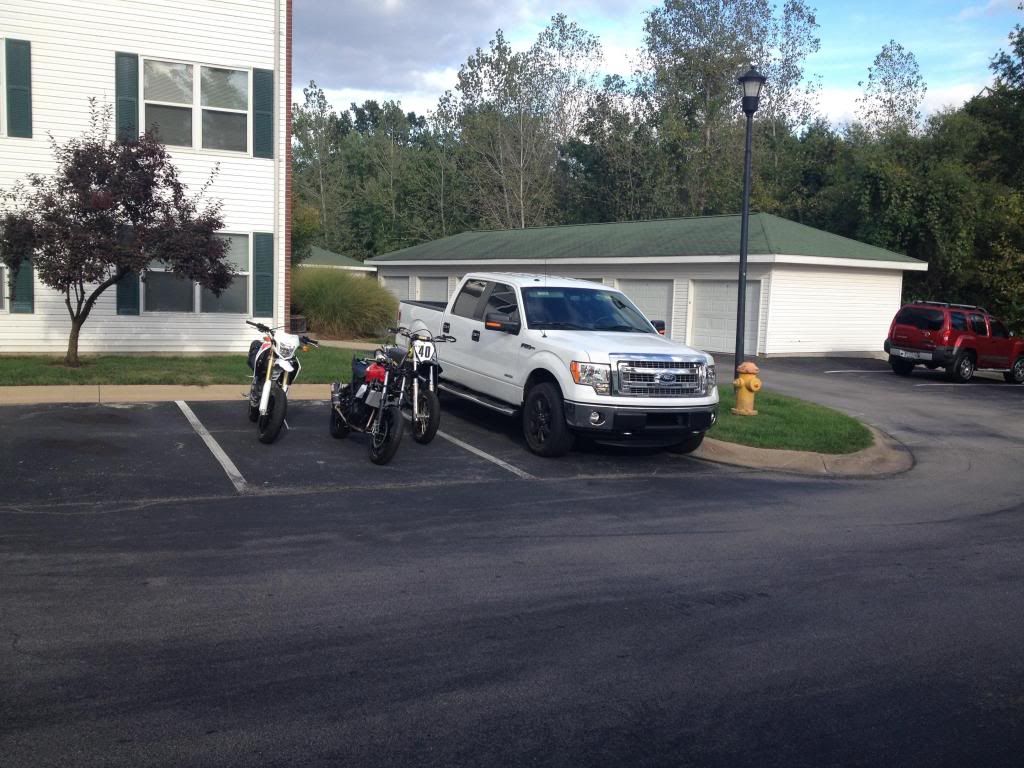 Time for SPRAY BOMB quick sand 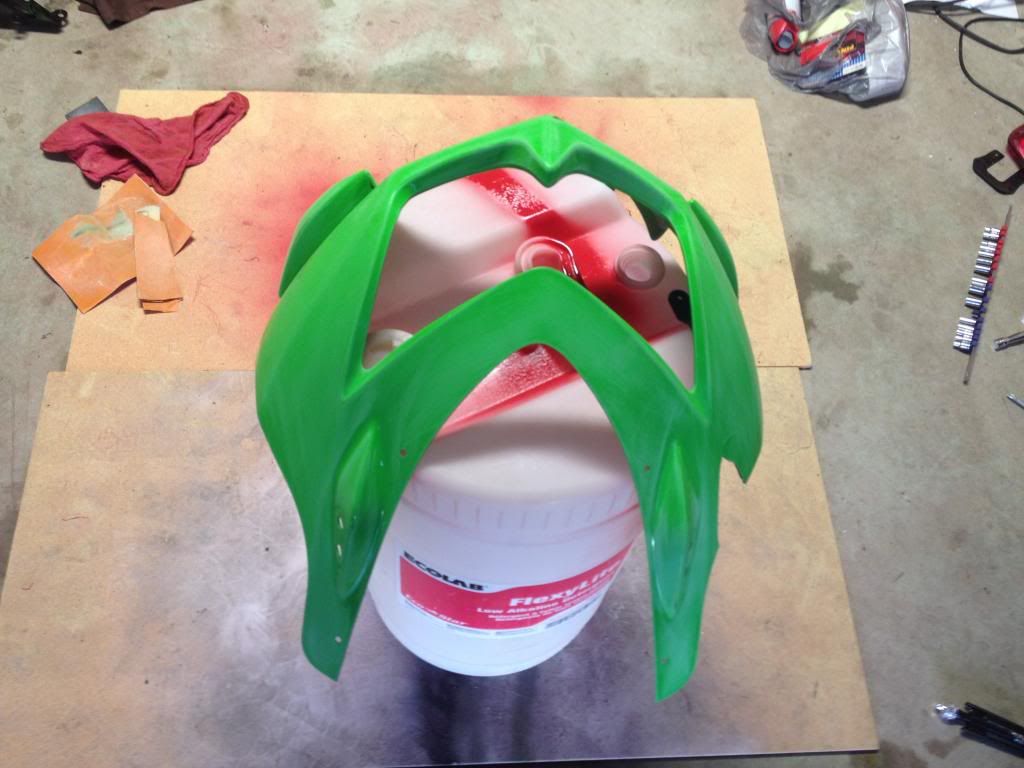 prime 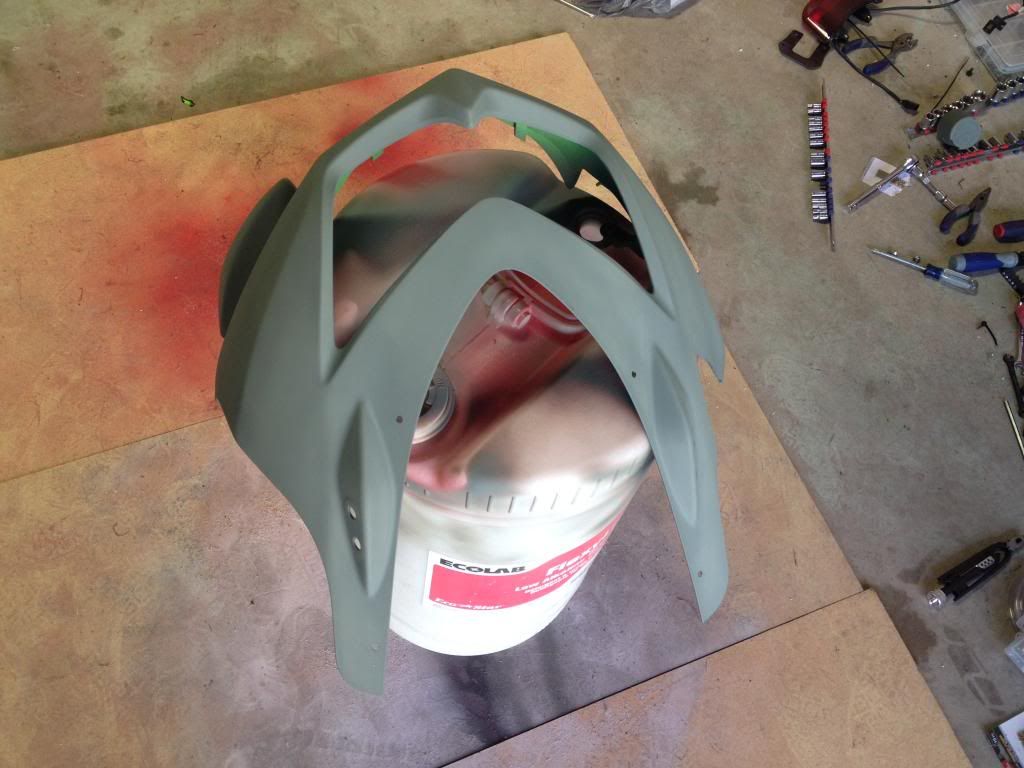 and the color  same for the side    The belly will get sprayed black tomorrow. I'm not worried about fixing cracks or making it perfect, just something temporary to protect the bike and look half way decent
__________________________________________________
|
|
|
|
|
October 1st, 2013, 10:56 PM
|
#37 |
|
ninjette.org member
Name: Rick
Location: St Peters
Join Date: Feb 2013 Motorcycle(s): '09 ZX6 (street), '04 RC51 (street/track), '08 Ninja 250 (race) Posts: 104
|
Throw a turkey pan on the bottom and race! That's what Drew is doing.
|
|
|
|
|
October 2nd, 2013, 05:14 AM
|
#38 | |
|
ninjette.org guru
Name: Andrew
Location: St Louis
Join Date: Sep 2013 Motorcycle(s): Ducati 1198s, Triumph D675, Suzuki SV1000s, `08 Ninja 250, `11 Ninja 250, Suzuki GS750 Posts: 368
|
Quote:
__________________________________________________
MCRA.com |
|
|
|
|
|
October 2nd, 2013, 05:55 AM
|
#39 |
|
The Corner Whisperer
Name: Chris (aka Reactor)
Location: Northern KY
Join Date: May 2011 Motorcycle(s): 2010 250 (track), 1992 250, 2006 R6 (street/track), 2008 R6 (track) Posts: Too much.
MOTY 2015, MOTM - Nov '12, Nov '13
|
The turkey pan will get you out there but it's ugly as sin lol.
Also, those woodcraft rearsets should hold up really well in the crash. I left about an inch of my right one in turn 1 at Putnam. It ground down instead of breaking. Another racer had his rip the threads out of frame instead of breaking in turn 8.
__________________________________________________
Goal: Shake A Million Hands | Look through the corners | Track Day Prep | Closest track? | The Mid-Ohio School |
|
|
|
|
October 2nd, 2013, 06:48 AM
|
#40 | |||
|
Braaap
Name: Ryan
Location: St. Louis, MO
Join Date: Sep 2013 Motorcycle(s): 2012 ninja 250r SE. 2002 Suzuki DRZ400e Supermoto Posts: 90
|
Quote:
Quote:
 just track days for now. I can't risk getting hurt right now with school, in the middle of the Fire Academy right now and if I miss one practicle day because of injury i'm out. Money lost and have to start back over again. just track days for now. I can't risk getting hurt right now with school, in the middle of the Fire Academy right now and if I miss one practicle day because of injury i'm out. Money lost and have to start back over again. So just Track days right now, no pushing too hard or battling for position with you guys Quote:
__________________________________________________
|
|||
|
|
|
 |
 Similar Threads
|
||||
| Thread | Thread Starter | Forum | Replies | Last Post |
| CVMA Race bike build - buncha questions | cookiebug79 | 2008 - 2012 Ninja 250R Tech Talk | 4 | July 22nd, 2014 01:30 PM |
| Race Bike Build | Mark Cook | 2008 - 2012 Ninja 250R Tech Talk | 48 | May 7th, 2014 07:47 PM |
| My 250R Race Bike Build | icbm | Pictures | 5 | August 16th, 2012 11:06 AM |
| Plum Crazy Purple Race Bike Build | kogary | Pictures | 12 | May 18th, 2011 02:59 PM |
| My track/race 250 'build' | switch | Ninjettes At Speed | 14 | April 22nd, 2010 04:45 PM |
|
|


