
|
 October 22nd, 2015, 07:24 PM
|
#1 |
|
ninjette.org certified postwhore
Name: Spooph
Location: Golden, CO
Join Date: Jul 2010 Motorcycle(s): '08 Ninja 250R Posts: A lot.
MOTM - Oct '15
|
DIY: New Gen Automatic Cam Chain Tensioner Rebuild
First off, either I'm stupid or ignorant. Not sure if this is supposed to go in the wiki but I couldn't figure out how to post there.
Second, I'm sorry this took so long as I said in this thread.Life has been crazy but I finally got it done!  Third - follow this DIY at your own risk. Reassembling the tensioner is an absolute bitch as you will see down below... PRIMER: The new-gen tensioner is heavily over engineered, and I think designed to be maintenance free. Yours very well might be in great condition and there is no reason to think it has failed. If however your bike's valves have been properly adjusted by a professional and you still get a click, the cam chain tensioner might be the culprit. This is NOT the kawi click, as that's just a noisy valve train. This click could be intermittent and after some time it could become regular. If left untreated it can eventually wear out the cam chain and guides. The guides are easy to replace during a valve adjust, but to replace the cam chain will require a full engine tear down and the crank to be lifted out of the cases to replace (ask me how I know  ). This will require a minimum of $200 if you buy all the stock gaskets/stretch bolts to put it back together yourself. ). This will require a minimum of $200 if you buy all the stock gaskets/stretch bolts to put it back together yourself.If a tensioner isn't working as it should it's because water has entered it and it has started to rust. There is no way for oil to enter the tensioner, which is why the bolt with o-ring caps it off when installed on the bike. Mine started failing around 30K. Since I've rebuild it, it's performed like a champ for over an additional 30K. I'm excited to see how much further it will go! If you're reading this you probably know how to get it out and are familiar with the valve adjustment procedure, so I'm not going to discuss that. HOW-TO: This is what the tensioner looks like when removed from the motorcycle: 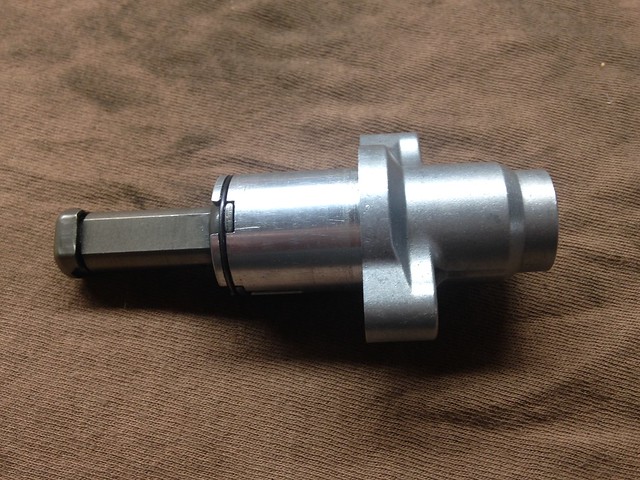 Remove the retainer ring and the whole thing will pop apart. NOTE the orientation of the springs, and the order in which things come apart, so you can put it back together correctly. 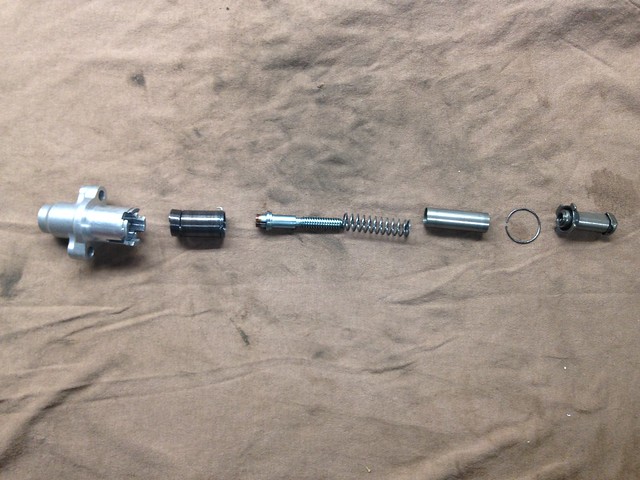 The reason I believe the tensioner is meant to be maintenance free is because it has 2 springs, resulting in a locking design - the plunger will "unscrew", or move out, but it will not push back in when the unit is reassembled. If you try to compress it you will break something beyond repair. These units are sold as unit. Separate replacement parts are not available. SO DON'T BREAK ANYTHING!  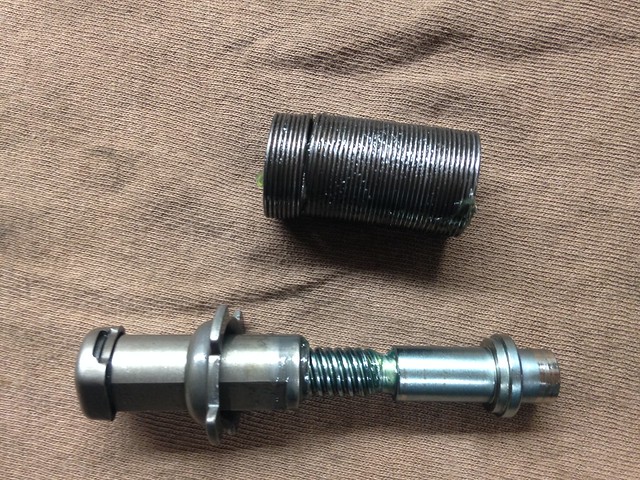 IMG_6192 IMG_6192 The second spring/spiral assembly which keeps the plunger from being pushed in. I place high temp grease inside of the plunger assembly (the part with the spiral, which screws into plunger). 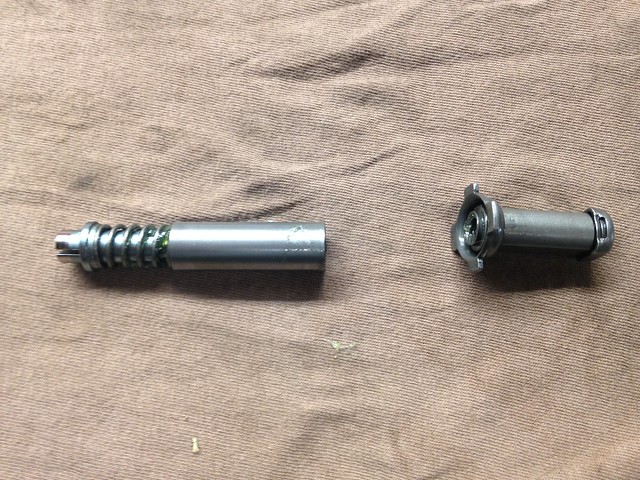 IMG_6193 IMG_6193 The primary spring around the plunger assembly. Make sure to grease this spring very well. Get as much grease in between the windings as possible. 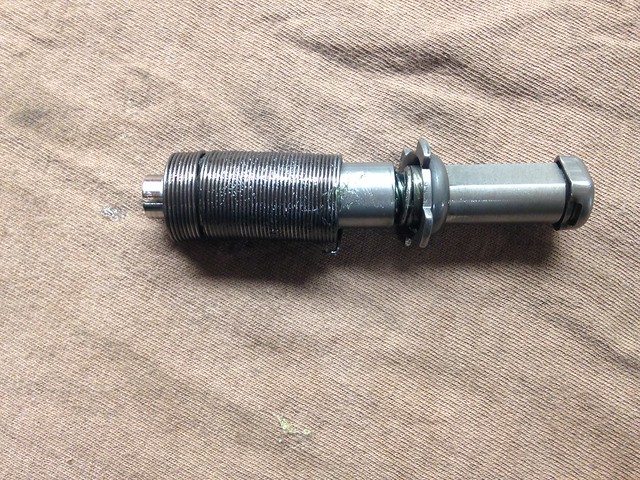 IMG_6194 IMG_6194 The plunger screwed all the way in with primary spring around the assembly. This is how it goes into the tensioner body, and the state that the plunger assembly is held in when it's preloaded for install (say after a valve adjustment). Refer to the last picture to see what it looks like re-assembled and primed for installation. 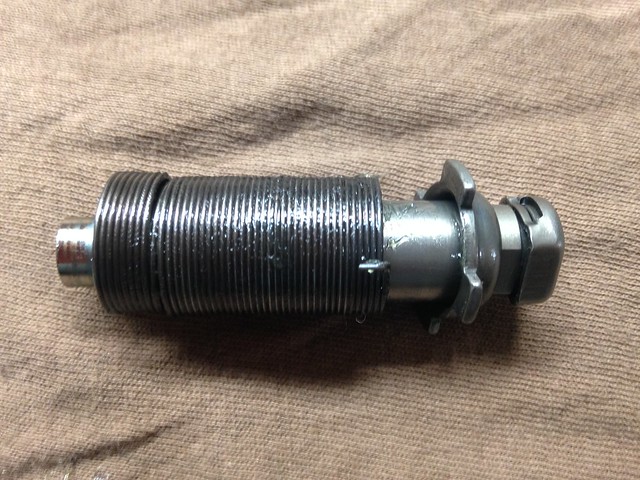 IMG_6196 IMG_6196 Make sure to engage the primary spring in the winding notch: 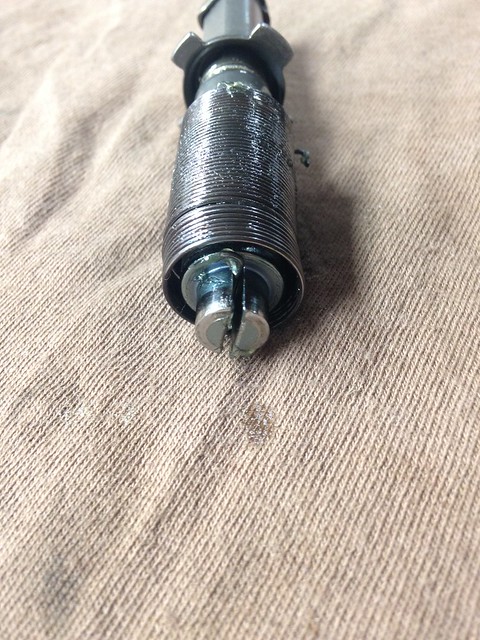 IMG_6195 IMG_6195 Slide the assembly into the tensioner body. Make sure the little hook on the primary spring engages with the CORRECT slot in the tensioner body - it is the longest, thinnest slot: 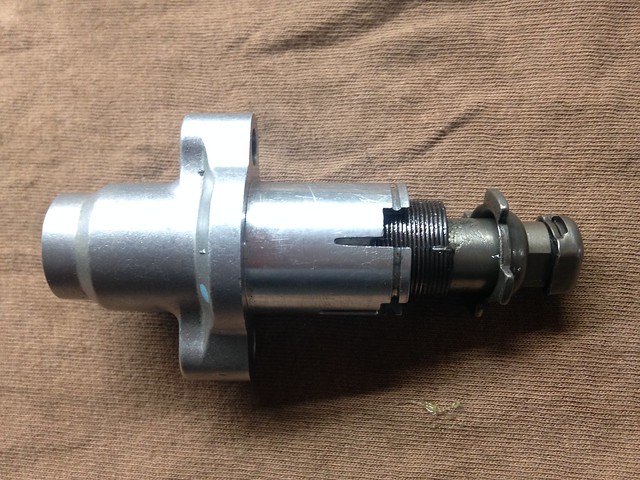 IMG_6197 IMG_6197 Now it gets fun. Put the retainer clip over the plunger, but not over the keyed catch which slots into the tensioner body. Keep intense positive pressure on the plunger as you wind it. If at any time the pressure is released, the plunger will unwind/push out and you will have to rewind it. Wind it until the primary spring is properly tight. If it's over-wound, it will jump out of the catch in the tensioner body and you'll have to start over. If it's not wound tight enough it won't provide enough tension on the cam chain and your effort will be for naught. When the primary spring is wound just right, the plunger retainer will slot into the tensioner body. The short stubby "spokes" are different sizes. This is another way to know if the primary spring is correctly wound, as these will line up correctly. With this thing under extreme tension, slide the plunger retainer into the tensioner body and hold in place. I do this by holding it in my hand: 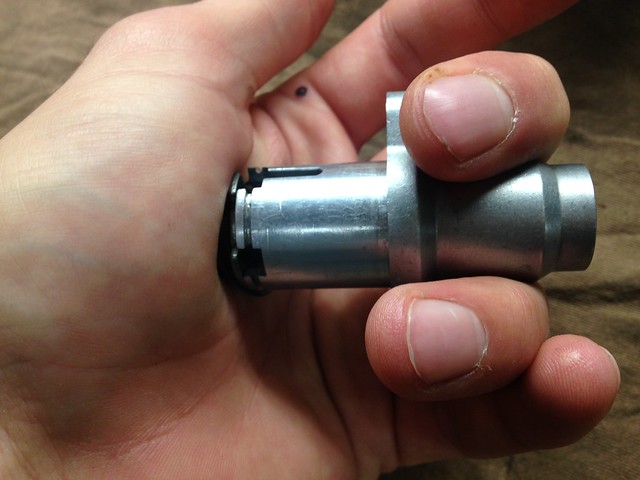 IMG_6198 IMG_6198 At this point, you can hold the plunger retainer in place with your other hand and push the retainer spring over the tensioner body to secure it. If pressure is let off, the plunger will unwind/push out and the plunger retainer won't be able to seat into the tensioner body. This can be incredibly frustrating, and if somebody else comes up with a better way to this I would love to see it! At this point a stop can be placed on the plunger since it's already compressed and it's ready for installation: 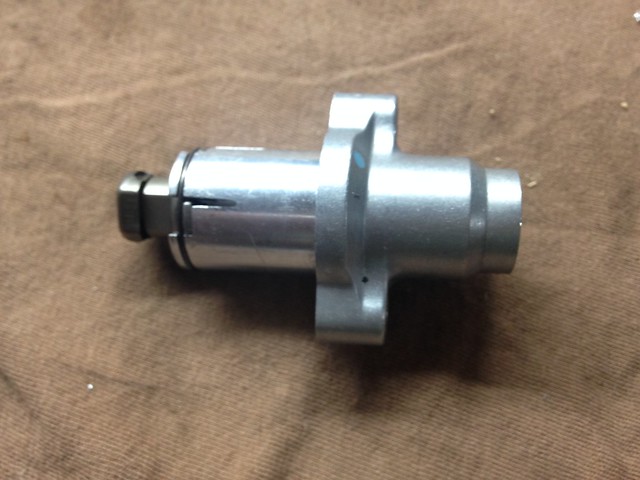 IMG_6199 IMG_6199 Notice the "T" shaped pin in the very top: 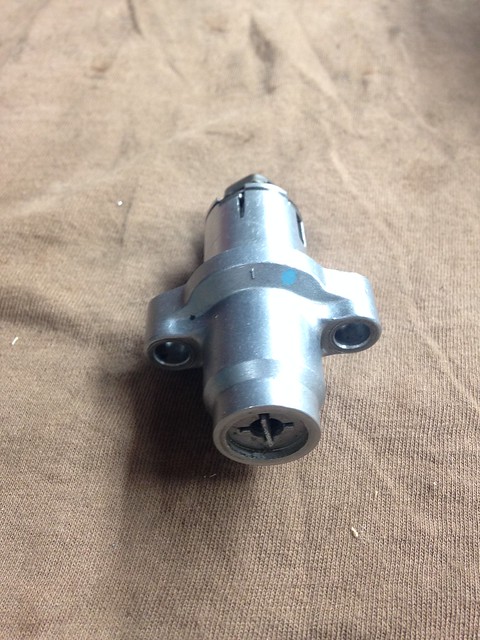 IMG_6200 IMG_6200 Compare to the pic at the top, it's much shorter: 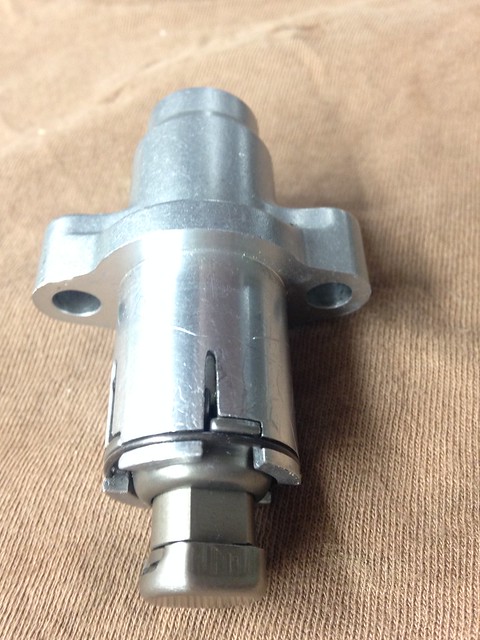 IMG_6201 IMG_6201 Anybody who's done valve adjust following the factory maintenance manual has seen this before. A new tensioner is: 12048  Another option is the APE manual tensioner which I found here. I'm sure they're available other places as well: http://store.schnitzracing.com/ape-m...nja-250-08-13/ If it gets too frustrating, PM me. You can send me yours and I'll do it for a competitive fee. So, why keep the auto-tensioner? If it works correctly, it's an absolute dream! Adjusting a manual tensioner isn't hard, but the risk of doing that which you're trying to avoid (stretching the cam chain), is much greater than with an auto-tensioner. Another up side of the manual tensioner is you can precisely adjust it, and it CAN be set to put slightly less pressure on the cam chain while keeping it from kocking around in side the case, and this could yield a MINIMAL performance increase (0.01hp). Anyway, I hope this helps. Sorry for the book, but I'm trying to be as clear as possible. 
__________________________________________________
 My therapist has 2 wheels and a seat. If you are ever in doubt to my tone, please refer to my avatar. Last futzed with by spooph; October 23rd, 2015 at 07:52 AM. Reason: Fixed pictures |

|

2 out of 2 members found this post helpful. |
|
October 22nd, 2015, 07:29 PM
|
#2 |
|
The Corner Whisperer
Name: Chris (aka Reactor)
Location: Northern KY
Join Date: May 2011 Motorcycle(s): 2010 250 (track), 1992 250, 2006 R6 (street/track), 2008 R6 (track) Posts: Too much.
MOTY 2015, MOTM - Nov '12, Nov '13
|
nice!
__________________________________________________
Goal: Shake A Million Hands | Look through the corners | Track Day Prep | Closest track? | The Mid-Ohio School |
|
|
|
|
October 23rd, 2015, 07:10 AM
|
#3 |
|
EX500 full of EX250 parts
Name: Bill
Location: Grand Rapids-ish, MI
Join Date: Jul 2012 Motorcycle(s): '18 Ninja 400 '09 Ninja 500R (selling) '98 VFR800 (project) '85 Vulcan VN700 (sold) Posts: A lot.
Blog Entries: 1
MOTM - Aug '15
|
Hmmm, this looks like an improved design of the CCT used on the Gen1 EX500 and the VN750. http://www.tocmanufacturing.com/ACCT...structions.htm
In those, the spring tension was the only thing holding the plunger out. If (when) the spring failed, your cam chain was no longer under tension. They also sell a kit that includes a special key to make it much easier to preload the spring. That might not work with the NewGen's design though. The Gen2 EX500 CCT is a simpler design, with some spring tension on a ratcheting lever. The spring only pushes the lever out to the next tooth as needed, and any pressure from the cam chain is handled by the ratcheting mechanism. Even if the spring completely falls out, it'll still hold it as tight as it currently is.
__________________________________________________
 *** Unregistered, I'm not your mom and I'm not paying for your parts, so do whatever you want with your own bike. *** |
|
|
|
|
October 23rd, 2015, 07:32 AM
|
#4 |
|
ninjette.org certified postwhore
Name: Spooph
Location: Golden, CO
Join Date: Jul 2010 Motorcycle(s): '08 Ninja 250R Posts: A lot.
MOTM - Oct '15
|
Wow, it is remarkably similar to the Gen1 EX500 CCT! That write-up reads almost exactly like mine, lol!
The Gen2 EX500 CCT seems to be quite similar to the ones used in the ZX series. I like the ratcheting design for it's fail-safe, however, it's not as "infinitely" adjustable as the new gen's helix design...
__________________________________________________
My therapist has 2 wheels and a seat. If you are ever in doubt to my tone, please refer to my avatar. |
|
|
|
|
November 1st, 2015, 07:30 PM
|
#5 |
|
ninjette.org dude
Name: 1 guess :-)
Location: SF Bay Area
Join Date: Jun 2008 Motorcycle(s): '13 Ninja 300 (white, the fastest color!), '13 R1200RT, '14 CRF250L, '12 TT-R125LE Posts: Too much.
Blog Entries: 7
|

__________________________________________________
Montgomery Street Motorcycle Club / cal24.com / crf250l.org / ninjette.org ninjette.org Terms of Service Shopping for motorcycle parts or equipment? Come here first. The friendliest Ninja 250R/300/400 forum on the internet! (especially Unregistered) |
|
|
|
 |
 Similar Threads
|
||||
| Thread | Thread Starter | Forum | Replies | Last Post |
| cam chain tensioner question | bob706 | 2008 - 2012 Ninja 250R Tech Talk | 16 | June 21st, 2016 12:09 PM |
| Manual cam chain tensioner. | Monkeytofu | 1986 - 2007 Ninja 250R Tech Talk | 10 | December 23rd, 2013 05:58 PM |
| cam chain tensioner | kittyslasher | 2008 - 2012 Ninja 250R Tech Talk | 2 | June 16th, 2013 09:17 AM |
| Cam Chain Tensioner Replacement | pongoo4u | 2008 - 2012 Ninja 250R Tech Talk | 4 | July 23rd, 2010 05:11 AM |
| New Cam Chain Tensioner before valves? | headshrink | 2008 - 2012 Ninja 250R Tech Talk | 21 | March 24th, 2010 10:30 PM |
|
|


