
|
 December 12th, 2008, 05:57 PM
|
#1 |
|
That's me!
Name: TJ
Location: Ames, IA
Join Date: Nov 2008 Motorcycle(s): 2008 Ninja 250r (Tis blue), 2008 CBR600RR Posts: 454
|
I know this is going to stem a good 10+ posts of people asking if they should do this to their bike, but I digress:
Anywho, I don't like the slop in the stock master-cylinder and wanted to convert to Pazzo levers on the clutch AND brake side... That was the initial mindset. I also wanted to convert to Galfer SS brake lines. I figured I might as well just switch out the whole master cylinder/lever with a ZX-6R's (Which stock is an adjustable lever). So to begin: Step 1 - Get the parts! Here are the master cylinders next to one another: 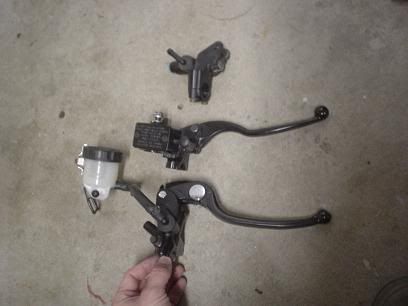 Fun story time: I got the 2007 ZX-6R master cylinder and lever (bottom) but it lacked a reservoir. I then got a reservoir from a ZX-7R (which CAME with it's master cylinder) (top)  . It was only $20 which is a steal considering a NOS M/C for the ZX-6r is around $60 . Lastly in the middle is the factory 250r mastercylinder and lever. . It was only $20 which is a steal considering a NOS M/C for the ZX-6r is around $60 . Lastly in the middle is the factory 250r mastercylinder and lever.Top and bottom view of the ZX-6r M/C: 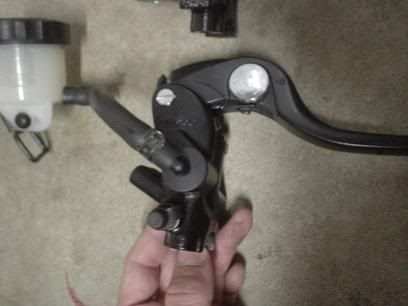 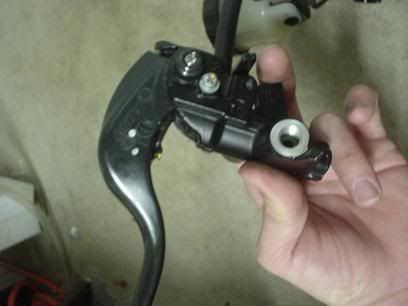 Notice the brake hose mounts underneath the M/C whereas the 250r's mounts on the front? This leads to... The tale of the two hoses: 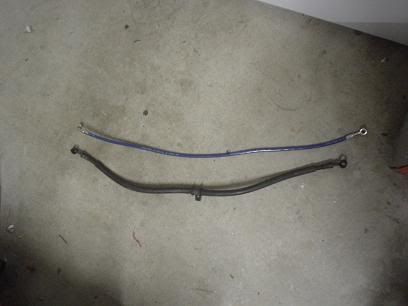 The shiny Galfer line makes the factory line look like a chump. Here's the important part:  The caliper side maintains the same angle (although look how much more compact and nifty the Galfer one appears). 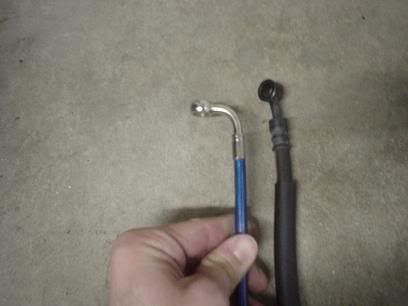 b bFor the M/C side I ordered the hose with a 90 degree bend. This allows it to mount without incident except for one little hiccup which I'll go over shortly... Step 2 - Loosen the reservoir cap. 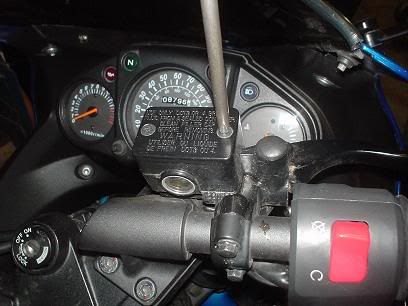 This allows for the draining of the brake fluid. Step 3 - Hook up a vacuum pump to the bleeder valve, open the bleeder valve and pump the lines clear. 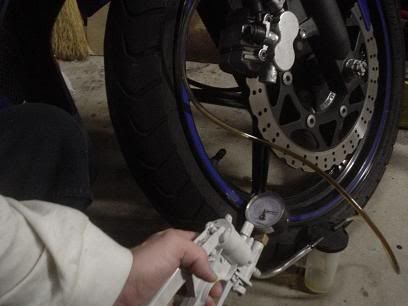 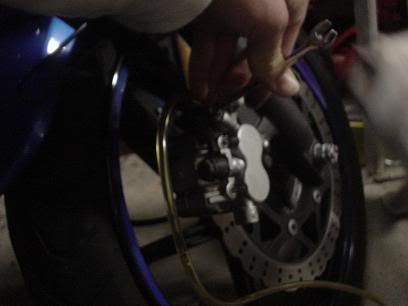 Step 4 - Remove the banjo bolt 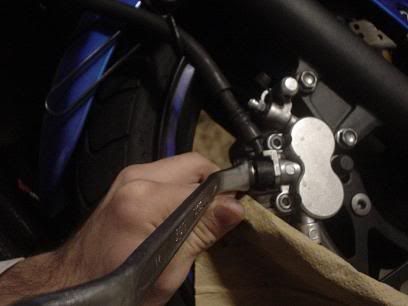 Make sure to have a rag when you do this. The traces of brake fluid might form a drop or two and you don't want that stuff on paint! Step 5 - Remove brake hose clamp 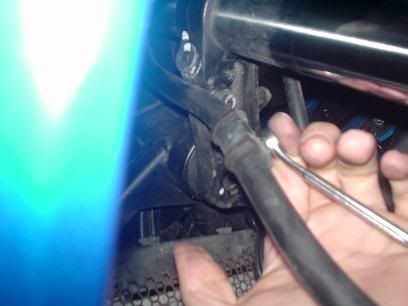 Follow the line up and on the triple tree clamp is a brake line clamp. One 10mm bolt holds it in place. Step 6 - Remove the M/C brake line banjo bolt  Same as the lower, make sure you have a rag handy... The hose should come out with ease. Step 7 -Remove the old M/C  Remove the cap (Should be two-8mm bolts), and swing the M/C up so that you can: Step 8 -Remove the brake sensor 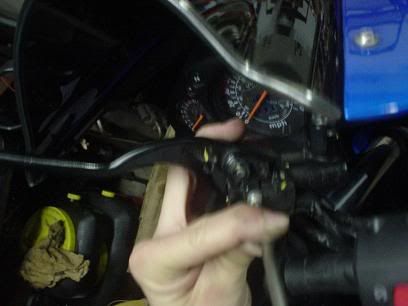 One phillips screw holds it on... Step 9 - Put the new M/C on 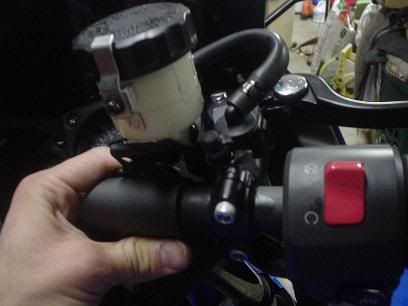 Same as the 250r M/C except (2) allen head bolts attach the M/C to the handlebar. Here's one snag to the installation of this M/C. The way the brake hose mounts to the M/C on the bottom you can't swivel the assembly down like the old one. So it sits higher than the original. It's not THAT noticeable IMO, but I haven't really figured a way around it. The picture of this problem is in step 15. Also the brake sensor fits perfectly on the new M/C! It's clocked a little differently, but mounts the same way. Step 10 - Making a reservoir mount. In the last picture I was simply holding the reservoir up. To mount it I: 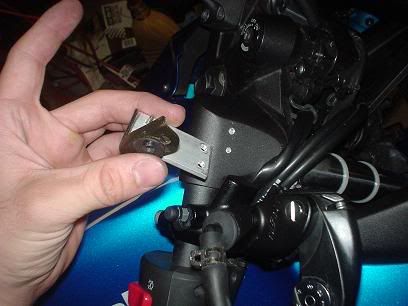 Cut a piece of 3/4" flat aluminum stock (about 2" long). The top of the bracket is notched so the aluminum slides up and 'seats'. I put one #10 sheet metal screw through the original bracket and the aluminum. I then attached the aluminum piece to the handle bar mounts (see the holes?). Step 11 - The reservoir attached:  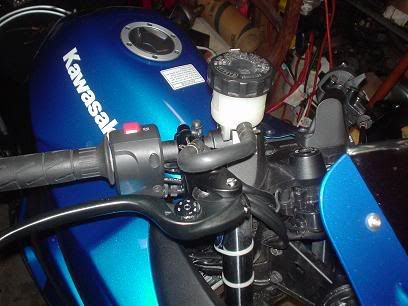 I'll paint the aluminum flat-black one of these days, but no matter. From the front you can see the original reservoir bracket attached to the aluminum with the sheet metal screw. You can't see the bracket much from the other side. I'll eventually get a new hose, but this one works surprisingly well (no kinks). I spun the M/C inlet forward and the reservoir inlet faces forward. So the hose makes a 'U'. I mounted the reservoir just high enough that there are no high spots on the hose (no place for air bubbles to form) and a dumb stroke of luck it is pretty level! Step 12 - Preparing the new hose. I reused the clamp from the original brake hose (to attach it to the lower triple tree clamp) and the grommet. 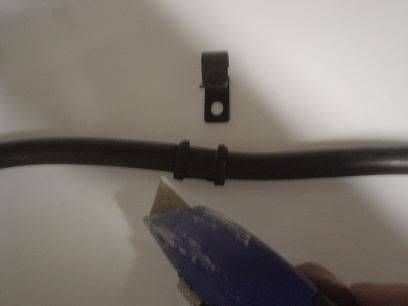 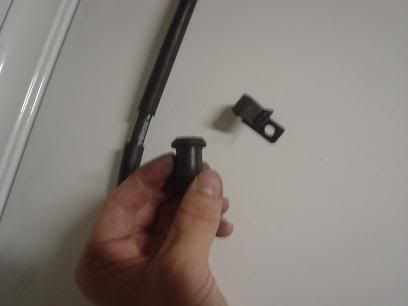 I cut a line along the grommet (there are seam lines on the grommet, so cut one of them). The grommet can then be peeled from the original hose. Step 13 - Install the grommet. 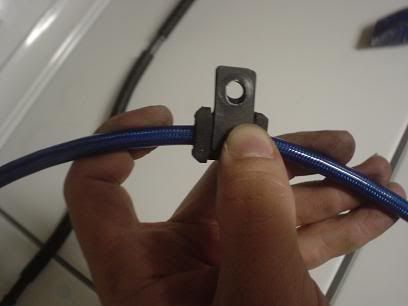 Nothing complicated here. The grommet slips over the new hose and you can bend the clamp back over it. Since the OD of the Galfer hose is thinner (SS lines are stronger AND thinner) the grommet doesn't 'clamp' the hose. You can plausibly wrap the hose with electrical tape to make up the gap, or you can just not sweat it (I'm not too worried). Step 14 - Install the hose. 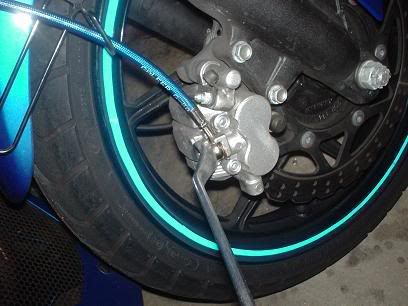 First connect the banjo fitting back on the caliper. Make sure you route the hose back through the brake hose guard (look about 3" up the picture). The new Galfer line includes new crush washers AND a new banjo bolt (sweet!) Step 15 - Finish hooking up the line. 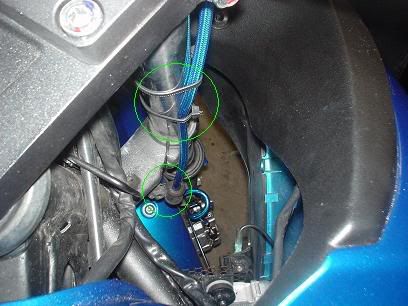 You can see here the hose clamp back installed. A few other 'points of interest'... See the 'slack' portion of the hose (between the lower triple tree clamp and the caliper)? The major 'unexpected' part of this was the clocking of the 90 degree banjo fitting atop the hose! The way it's clocked I had to spin the line around about 180 degrees and that's why there's a 'corkscrew' at the bottom  . I'm not entirely happy about that, but then again it shouldn't cause any problems. It just looks stupider than it should. . I'm not entirely happy about that, but then again it shouldn't cause any problems. It just looks stupider than it should.Also you'll see the zip-ties holding the brake line to the fork tube. The brake line will contact the plastic cowling around the fork tube otherwise. Since the area of the forks between the two triple tree clamps doesn't 'move' it's a safe spot to clamp to. 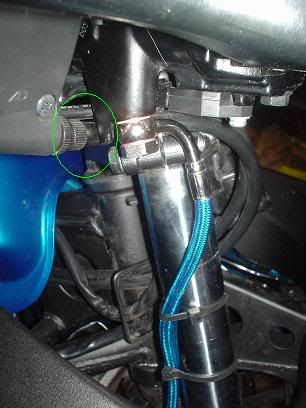 At the top of the hose you can see the 90 degree banjo fitting attached. Again it includes a new banjo bolt and crush washers (yeah!). Circled in green is the spot where the M/C contacts the throttle cable. As previously mentioned this is what causes the whole assembly to have to sit a little higher than previous. I actually clocked the clutch lever assembly up a little as well to ensure things don't looks 'dumb'  Whenever I lube my throttle cable I'll see about clocking the throttle assembly down a little and then I can move the M/C down Whenever I lube my throttle cable I'll see about clocking the throttle assembly down a little and then I can move the M/C down ") Step 16 - Bleed the lines. Fill the reservoir with brake fluid. Just like flushing the line, do the same thing from step 2. This time pump until brake fluid comes out. 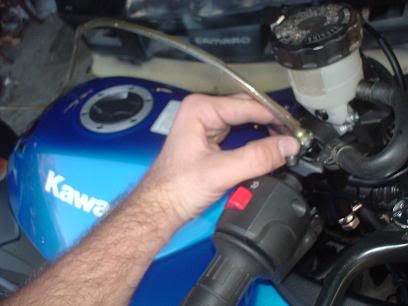 With this style M/C there's a bleeder ON the M/C (neato!). I hooked the pump up and pulled the air out of that one as well. Little micro-bubbles always find their way into the system and it takes some time for everything to settle into normal bubbles. So I usually wait an hour or so and then re-bleed. Pumping the brakes a lot helps with this! 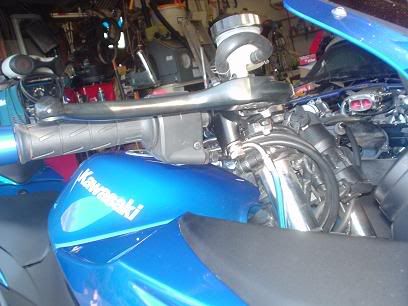 Huzzah! You can see it pretty well in the last picture as well. All in all I think it looks pretty flipping sweet. It looks nifty and the tolerances are real tight (no more slop!). I can't wait to go and... Stop! Huzzah! You can see it pretty well in the last picture as well. All in all I think it looks pretty flipping sweet. It looks nifty and the tolerances are real tight (no more slop!). I can't wait to go and... Stop! 
|

|

|
|
December 12th, 2008, 07:56 PM
|
#2 |
|
Join Date: Nov 2008 Posts: Too much.
|
Great job!
So, the only way to avoid the twist in the line is to specify how the top fitting should be attached to the line when they make it? Is there even a provision for that when you order the custom line? Curious to hear the road test results once you get to test. Kudos to you for even hatching up the idea to mount up parts from another bike and to have success the first time around. Pictures of stoppies would be appreciated.
|
|
|
|
|
December 12th, 2008, 08:12 PM
|
#3 | |
|
That's me!
Name: TJ
Location: Ames, IA
Join Date: Nov 2008 Motorcycle(s): 2008 Ninja 250r (Tis blue), 2008 CBR600RR Posts: 454
|
Quote:
 Actually that's a good bit of logic! To get a wheel off the ground, rather than re-sprocket or get more power, I'll just upgrade the front braking and get that rear wheel off the ground! Actually that's a good bit of logic! To get a wheel off the ground, rather than re-sprocket or get more power, I'll just upgrade the front braking and get that rear wheel off the ground! They have a whole form you can fill out and they accept faxes where you literally DRAW what you want! I didn't really consider this though ahead of time... With all the stainless braided systems I've done I've used removeable AN fittings. So this is the first time I've run into this problem hah. |
|
|
|
|
|
December 12th, 2008, 08:19 PM
|
#4 |
|
Join Date: Nov 2008 Posts: Too much.
|
what was the cost of the custom line? hindsight is always 20/20, eh?
 thanks for being the guinea bunny on this! 
|
|
|
|
|
December 12th, 2008, 08:22 PM
|
#5 | |
|
That's me!
Name: TJ
Location: Ames, IA
Join Date: Nov 2008 Motorcycle(s): 2008 Ninja 250r (Tis blue), 2008 CBR600RR Posts: 454
|
Quote:
. If I had money I would've also sprung for the rear line (along with the EX500 perch and pazzo clutch lever), but I digress
|
|
|
|
|
|
December 12th, 2008, 08:24 PM
|
#6 | |
|
Join Date: Nov 2008 Posts: Too much.
|
Quote:
http://www.ninjette.org/forums/showthread.php?t=10610 |
|
|
|
|
|
December 14th, 2008, 11:32 AM
|
#7 |
|
That's me!
Name: TJ
Location: Ames, IA
Join Date: Nov 2008 Motorcycle(s): 2008 Ninja 250r (Tis blue), 2008 CBR600RR Posts: 454
|
 I haven't really been able to try out the new M/C. Just a quick jaunt to the gym yesterday, but it was raining so I didn't want to 'test' it . That and I never got around to re-bleeding everything after everything's had time to fully settle... Anywho I re-clocked the throttle assembly and was able to set everything better: I haven't really been able to try out the new M/C. Just a quick jaunt to the gym yesterday, but it was raining so I didn't want to 'test' it . That and I never got around to re-bleeding everything after everything's had time to fully settle... Anywho I re-clocked the throttle assembly and was able to set everything better: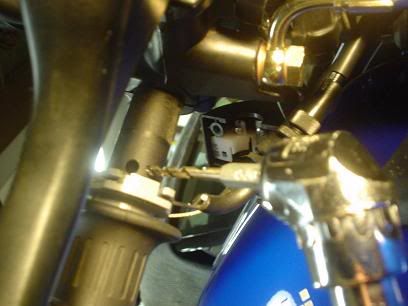 After opening up the throttle assembly I drilled a hole slightly lower than the original 'alignment' hole. This allowed me to set the throttle housing clocked forward a bit... One additional perk to doing this was: 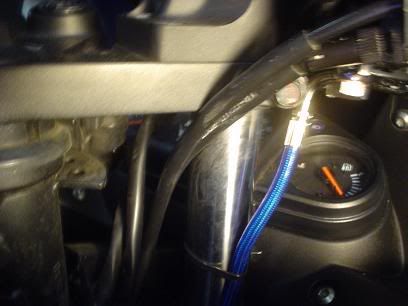 The throttle cables are routed in front of the shock tube. It's a sharp bend, and now I was able to route the cables behind the shock tube. The bend is a lot less sharp now as evident in the adjustment knob on the throttle housing. It's not being 'pulled' forward anymore. Yeah! But wait! There's more: 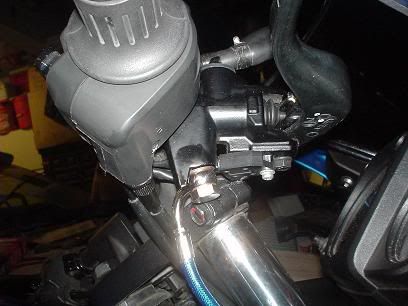 This also allowed me to turn the banjo fitting on the bottom of the M/C so now it not only completely clears the black cowling around the dash area, but it lessens the corkscrew effect on the brake line! 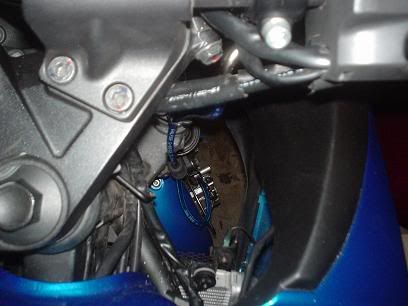 It's damn near straight and from the outside it no longer looks 'odd'. 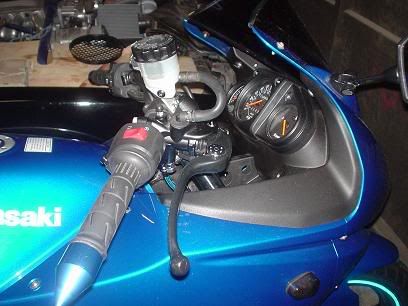 So I rotated it down and spun the clutch lever back down as well so it's all as it should be. 
|
|
|
|
|
December 14th, 2008, 12:23 PM
|
#8 |
|
WORKDADDY
Name: Dave
Location: slc utah
Join Date: Nov 2008 Motorcycle(s): 2008 ninja 2fitty Posts: 112
|
Great Write Up Vex... Kelly... He's catching up to ya on stuff like this
|
|
|
|
|
December 14th, 2008, 12:51 PM
|
#9 | |
|
That's me!
Name: TJ
Location: Ames, IA
Join Date: Nov 2008 Motorcycle(s): 2008 Ninja 250r (Tis blue), 2008 CBR600RR Posts: 454
|
Quote:
My upcoming DIY's should be: Changing to an EX500 clutch perch and Pazzo clutch lever Installing a new chain and pressing on the master link Changing the brake pads Installing clip-ons and eventually the "Adding extended intake runners" Then again I don't have any money so it's going to be a while possibly until I start doing anything I'd LIKE to also tackle putting an aftermarket gauge cluster and making a fiberglass enclosure for it, but that's really expensive compared to most anything else. Perhaps that's an idea for things people can do write-ups on as well?
|
|
|
|
|
|
December 14th, 2008, 01:08 PM
|
#10 | |
|
Join Date: Nov 2008 Posts: Too much.
|
Quote:
 ho-ho-ho... so much for a merry christmas. ho-ho-ho... so much for a merry christmas.good to see you've got a host of things lined up... and good to see your list has nothing on it that I'm lined up to do in the near future, so that means there will not be overlapping of DIYs. I really don't care who "wins" the DIYs "race". As long as the result is that we all end up winners by the knowledge shared, I'm good with that. 
|
|
|
|
|
|
December 14th, 2008, 01:13 PM
|
#11 |
|
WORKDADDY
Name: Dave
Location: slc utah
Join Date: Nov 2008 Motorcycle(s): 2008 ninja 2fitty Posts: 112
|
I feel ya... See I keep seeing all these nice DIY's and think I would love to do that... Ahh Crap. I have no money
so I will just wait and then come back to you guys when I do ever get it Lookin forward to the upcoming thread on DIY's Vex
|
|
|
|
|
December 17th, 2008, 11:29 PM
|
#12 |
|
Join Date: Nov 2008 Posts: Too much.
|
Okay... feedback, Vex!!! How is the front brake?

|
|
|
|
|
December 18th, 2008, 01:13 AM
|
#13 |
|
That's me!
Name: TJ
Location: Ames, IA
Join Date: Nov 2008 Motorcycle(s): 2008 Ninja 250r (Tis blue), 2008 CBR600RR Posts: 454
|
Low and behold it doesn't rain for like 6 months (I'm not exaggerating) and it's been raining non-stop for about 3 days now
The weather forecast has been this:  Finally tomorrow it should be letting up. I rode to the gym last night as it was a light sprinkle (and got rained on like the dickens on the way back), but I haven't really been able to get a good feel for the brakes. It is definitely a LOT more responsive now! It's not like you grab the lever and you endo . The total distance you have to move the lever isn't much and (likely because the SS line) there is no sponginess!
|
|
|
|
|
December 18th, 2008, 01:25 AM
|
#14 |
|
Join Date: Nov 2008 Posts: Too much.
|
yeah, I saw where you guys in socal were getting some cold, rainy weather.
geeez, snow in las vegas, even.  it's somehow connected with the weather we're having here, too... rain for the past week. grrrr... pic of the GF and me >   keep us updated once you're doing stoppies! |
|
|
|
|
December 19th, 2008, 03:22 PM
|
#15 |
|
IC2(SW)
Name: Kerry
Location: Pensacola
Join Date: Nov 2008 Motorcycle(s): . Posts: A lot.
|
Dude over on the other forum(redelk) did this with a 04 ZX-10r MC.
Maybe will do this one also.......... Pazzo lever rocks for the clutch For the clutch lever perch. If I was doing it over, I would look for a newer style perch...... something smaller/newer than the old style ex500
|
|
|
|
|
December 24th, 2008, 04:35 PM
|
#16 | |
|
That's me!
Name: TJ
Location: Ames, IA
Join Date: Nov 2008 Motorcycle(s): 2008 Ninja 250r (Tis blue), 2008 CBR600RR Posts: 454
|
Quote:
What forum is that on?ALSO: I'd been under the impression that Galfer lines do not swivel. I was looking something up on their site and the fittings DO swivel! They're really tight so they can't swivel freely, but I was able to pad some channel locks and swivel the fitting. So now the line is str8! |
|
|
|
|
|
December 24th, 2008, 05:56 PM
|
#17 |
|
ninjette.org dude
Name: 1 guess :-)
Location: SF Bay Area
Join Date: Jun 2008 Motorcycle(s): '13 Ninja 300 (white, the fastest color!), '13 R1200RT, '14 CRF250L, '12 TT-R125LE Posts: Too much.
Blog Entries: 7
|
Hmmm... I've got a ZX-10R master cylinder ('06) sitting in the garage because I swapped it for a Brembo on mine. Might as well take a look-see to figure out if a swap with the ninjette's is worth it. Though to be honest, the 10R m/c is a pretty low-quality piece, which is why the Brembo is necessary anyway. Believe it or not, Kawi put a better m/c on the 6R's than the 10R's the past few generations. Can't speak for the new '08 10R m/c, but it's supposed to be improved.
__________________________________________________
Montgomery Street Motorcycle Club / cal24.com / crf250l.org / ninjette.org ninjette.org Terms of Service Shopping for motorcycle parts or equipment? Come here first. The friendliest Ninja 250R/300/400 forum on the internet! (especially Unregistered) |
|
|
|
|
December 24th, 2008, 08:22 PM
|
#18 | |
|
That's me!
Name: TJ
Location: Ames, IA
Join Date: Nov 2008 Motorcycle(s): 2008 Ninja 250r (Tis blue), 2008 CBR600RR Posts: 454
|
Quote:
Actually I DO believe it! That's one reason why I got the 6r master cylinder. A really common upgrade on the '06+ 10R's is to put 6R or 14R calipers on (They use the SAME Nissin caliper!). I don't know why, but Kawi dropped the ball on the brakes on the later 10R's!
|
|
|
|
|
|
December 24th, 2008, 10:09 PM
|
#19 |
|
ninjette.org dude
Name: 1 guess :-)
Location: SF Bay Area
Join Date: Jun 2008 Motorcycle(s): '13 Ninja 300 (white, the fastest color!), '13 R1200RT, '14 CRF250L, '12 TT-R125LE Posts: Too much.
Blog Entries: 7
|
http://www.ninjette.org/forums/showthread.php?t=11176 Yup, I've seen folks put on the ZX-14 calipers, had not seen them swap out for the 6R calipers and wasn't aware they were the same. The 14 calipers are much heavier than the 10's; the 14 uses steel pistons and the 10's are aluminum. But the 14 calipers do provide better braking power and feel. On my 10 I put on more aggressive pads, steel lines, and the Brembo m/c, and kept the stock calipers; those changes were enough for decent performance at my current skill level. At some point if I can find some 14 calipers (or now it sounds like 6R calipers) cheap, maybe I'd add them on as well...
__________________________________________________
Montgomery Street Motorcycle Club / cal24.com / crf250l.org / ninjette.org ninjette.org Terms of Service Shopping for motorcycle parts or equipment? Come here first. The friendliest Ninja 250R/300/400 forum on the internet! (especially Unregistered) |
|
|
|
|
January 16th, 2009, 01:55 PM
|
#20 |
|
ninjette.org member
Name: ken
Location: USA
Join Date: Dec 2008 Motorcycle(s): none yet Posts: 18
|
I hope its Ok top add a side note to this thread of a steel braided line install that might help others out here
thought it had some good pictures. IF not... mods delete please. |
|
|
|
|
January 16th, 2009, 06:20 PM
|
#21 |
|
That's me!
Name: TJ
Location: Ames, IA
Join Date: Nov 2008 Motorcycle(s): 2008 Ninja 250r (Tis blue), 2008 CBR600RR Posts: 454
|
ehh I don't like some of the things they did in that article. I would suggest opening the reservoir and draining the brake fluid out of the bleeder screw on the caliper. In that article they just loosened the banjo-bolt on the caliper? That'll pour brake fluid all over the place! That and it'll force the rubber diaphram inside the reservoir to expand un-nessesarilly.
|
|
|
|
|
October 25th, 2012, 11:57 AM
|
#22 |
|
time is running out....
Name: jesse
Location: the land of corn
Join Date: Sep 2012 Motorcycle(s): pregen ninjari Posts: 412
Blog Entries: 3
|
bumping from the grave. so does the 08+ ninja 250 "lever" work with this bmc?
__________________________________________________
The King |
|
|
|
|
October 26th, 2012, 10:15 AM
|
#24 | |
|
ninjette.org certified postwhore
Name: Sam
Location: Northern Virginia
Join Date: Nov 2008 Motorcycle(s): Ninja 250R 2009 and ZX-12R 2000 Posts: A lot.
|
Quote:
|
|
|
|
|
|
October 27th, 2012, 09:13 AM
|
#25 | |
|
KThanksBye
Name: Kevin
Location: Orange County
Join Date: Mar 2011 Motorcycle(s): 2006 zx636r Posts: A lot.
|
Quote:
I have a 2006 Master cylinder if anyone is interested
__________________________________________________
----> My Youtube! <---- Unregistered, watch my youtube page! 
|
|
|
|
|
|
November 19th, 2012, 05:38 PM
|
#26 |
|
FDA
Name: Fer
Location: Argentina
Join Date: Nov 2012 Motorcycle(s): Kawasaki Ninja 250R 2009 and Yamaha YZF R1 2009 Posts: 37
|
Zx6 pump
Hi! I'm fernando from Argentina. I recently installed a Zx6 07/08 pump on my ninja 250 2009 but when tested the lever is very strong and brake a half of the axial original pump.. Do you have some suggestion??
|
|
|
|
|
November 19th, 2012, 06:22 PM
|
#27 | |
|
ninjette.org member
Name: Jim
Location: Schofield Barracks, HI
Join Date: Jun 2012 Motorcycle(s): 2008 Ninja 250, 2009 Concours 14 Posts: 130
|
Quote:
As another aside, I swapped the stock MC from my '02 Superhawk (I had upgraded that to a 954 MC) and the same result: Hugely improved feel at the lever, much less pull, and much more immediate brake response. I still need to do an upgraded SS line and get some better pads put on, but just swapping the MC moved the front brake up to 'satisfactory' from deep in 'full-on sketchitude' territory.
__________________________________________________
Igitur qui desiderat pacem, praeparat bellum... 
|
|
|
|
|
|
November 19th, 2012, 06:27 PM
|
#28 |
|
FDA
Name: Fer
Location: Argentina
Join Date: Nov 2012 Motorcycle(s): Kawasaki Ninja 250R 2009 and Yamaha YZF R1 2009 Posts: 37
|
Zx6 pump
Hi! I'm Fernando from Argentina. I recently installed a Zx6 07/08 pump with GALFER lines and Ipon dot4 brake fluid in my ninja 250 2009 but when tested the lever is very strong and brake a half of the axial original pump.. Do you have some suggestion??
|
|
|
|
|
November 19th, 2012, 06:37 PM
|
#29 | |
|
FDA
Name: Fer
Location: Argentina
Join Date: Nov 2012 Motorcycle(s): Kawasaki Ninja 250R 2009 and Yamaha YZF R1 2009 Posts: 37
|
Quote:
|
|
|
|
|
|
November 19th, 2012, 06:42 PM
|
#30 | |
|
FDA
Name: Fer
Location: Argentina
Join Date: Nov 2012 Motorcycle(s): Kawasaki Ninja 250R 2009 and Yamaha YZF R1 2009 Posts: 37
|
Quote:
|
|
|
|
|
|
January 11th, 2013, 11:24 PM
|
#31 | |
|
Nerd
Name: Chris
Location: Tujunga
Join Date: Mar 2012 Motorcycle(s): Ducati Hyperstrada Posts: 672
|
Quote:
Its Unbelievably hard to pull that lever!
__________________________________________________
It doesn't LOOK that steep. But you can go first... |
|
|
|
|
|
January 11th, 2013, 11:43 PM
|
#32 | |
|
Fast-Guy wannabe
Name: Jason
Location: Brentwood, Ca
Join Date: Oct 2011 Motorcycle(s): 2009 Ninja250, 2011 RM-Z250, 2004 NSR50, Posts: A lot.
MOTM - Jan '13
|
Quote:
Take a look here at what I've tried. The thread has fallen behind of where I'm at but I'm planning on updating it this weekend. http://www.ninjette.org/forums/showthread.php?p=617484 |
|
|
|
|
|
August 26th, 2018, 02:59 PM
|
#33 |
|
ninjette.org guru
Name: Chris
Location: Bristol, UK
Join Date: Feb 2016 Motorcycle(s): ZZR250, VFR800 Posts: 491
|
The most important thing is the M/C to pistons ratio. For a twin 4pot brake system the best power ratio is around 33/1. When you reduce this to a single 2 piston calliper, then the sweet spot ratio is around 8.5/1. A lower first number will make the lever feel stiffer & require MORE pull by your fingers for any given brake effect. A bigger first number will make the lever feel softer, but will result in an increased brake effect for less pull by your fingers, but a longer lever travel.
To work it out do the following. Piston diameter divided by 2, times the answer, times 3.14 will give you the area of ONE piston be it brake or master cylinder. So the stock Ninja front calliper has 2x27mm pistons & IIRC a 14mm M/C. So calliper = 27/2=13.5, so 13.5x13.5x3.14 = 572.3mm2, as there are two pistons, we double this number (x2) to 1144.6mm2. This is the total piston area. The M/C is 14/2 = 7, 7x7x3.14 = 154mm2. So if we devide the piston area by the M/C area we get a brake ratio of 7.43/1 which is on the stiff side of optimal. Say we changed to a 12.7mm M/C then 1144.6 / 126= 9.04, which is on the soft side of optimal, but will produce a nicer feel & a more easily modulated brake. So optimal woul be a 13mm M/C if you can find one. YMMV Last futzed with by Mohawk; August 26th, 2018 at 11:40 PM. |
|
|
|
|
August 27th, 2018, 11:30 AM
|
#34 | |
|
ninjette.org certified postwhore
Name: AKA JacRyann
Location: Mesa, AZ
Join Date: Dec 2011 Motorcycle(s): CB125T CBR250R-MC19 CBR250RR-MC22 NSR350R-MC21 VF500F CBR600RR SFV650 VFR750F R1M ST1300PA Valkyrie-F6C Posts: A lot.
MOTY - 2018, MOTM - Nov '17
|
Quote:
Yup, surface-area = (r^2)*Pi Last futzed with by DannoXYZ; August 27th, 2018 at 02:25 PM. |
|
|
|
|
 |
 Similar Threads
|
||||
| Thread | Thread Starter | Forum | Replies | Last Post |
| DIY: Installing Spy 5000m Alarm | jeanca223 | 2008 - 2012 Ninja 250R Tech Talk | 8 | May 17th, 2017 03:33 PM |
| DIY for installing race fairing? | psych0hans | Ninjettes At Speed | 5 | April 16th, 2013 07:40 AM |
| DIY- Installing Zartan's Exhaust Hanger | kkim | 2008 - 2012 Ninja 250R Farkles | 45 | April 26th, 2011 06:43 PM |
| DIY- Installing Footpeg Extenders | kkim | 2008 - 2012 Ninja 250R Tech Talk | 78 | November 20th, 2010 09:58 PM |
| DIY: Installing Halos | tlhamon | 2008 - 2012 Ninja 250R Tech Talk | 26 | October 27th, 2010 08:40 PM |
|
|


